1
User’s guide
Issue 1
9356130
Issue 1
9356130
DECLARATION OF CONFORMITY
We, NOKIA CORPORATION declare under our sole responsibility that the product PT-2 is in conformity with the
provisions of the following Council Directive: 1999/5/EC. A copy of the Declaration of Conformity can be found
from http://www.nokia.com/phones/declaration_of_conformity/.
Copyright © 2003 Nokia. All rights reserved.
Reproduction, transfer, distribution or storage of part or all of the contents in this document in any form without
the prior written permission of Nokia is prohibited.
Nokia and Nokia Connecting People are registered trademarks of Nokia Corporation. Other product and company
names mentioned herein may be trademarks or tradenames of their respective owners.
Nokia operates a policy of continuous development. Nokia reserves the right to make changes and improvements
to any of the products described in this document without prior notice.
Under no circumstances shall Nokia be responsible for any loss of data or income or any special, incidental,
consequential or indirect damages howsoever caused.
The contents of this document are provided “as is”. Except as required by applicable law, no warranties of any kind,
either expressed or implied, including, but not limited to, the implied warranties of merchantability and fitness for
a particular purpose, are made in relation to the accuracy, reliability or contents of this document. Nokia reserves
the right to revise this document or withdraw it at any time without prior notice.
The availability of particular products may vary by region. Please check with the Nokia dealer nearest to you.
Do not switch the camera on when wireless phone use is prohibited or when it may cause
interference or danger.
ROAD SAFETY COMES FIRST Don't install the camera in a vehicle. Do not use the camera or your
mobile phone to control or configure the camera while driving; park the vehicle first.
INTERFERENCE All wireless devices may get interference, which could affect performance.
SWITCH OFF IN HOSPITALS Follow any regulations and rules. Switch the camera off near medical
equipment.
SWITCH OFF IN AIRCRAFT Wireless devices can cause interference in aircraft.
SWITCH OFF WHEN REFUELLING Don't use the camera at a refuelling point. Don't use near fuel or
chemicals.
SWITCH OFF NEAR BLASTING Don't use the camera where blasting is in progress. Observe
restrictions, and follow any regulations or rules.
USE SENSIBLY Use only in the normal operating positions. Don't touch the antenna unnecessarily.
QUALIFIED SERVICE Only qualified personnel may install or repair equipment.
ENHANCEMENTS AND BATTERIES Use only approved enhancements and batteries. Do not connect
incompatible products.
Copyright©2003 Nokia. All rights reserved.
For your safety
Read these simple guidelines. Breaking the rules may be dangerous or illegal. Further detailed information
is given in this user’s guide.
For your safety
For your safety
For your safety
BACKUP COPIES Remember to make backup copies of all important data.
CONNECTING TO OTHER DEVICES When connecting to any other device, read its user's guide for
detailed safety instructions. Do not connect incompatible products.
WATER-RESISTANCE Your camera is not water-resistant. Keep it dry.
Copyright©2003 Nokia. All rights reserved.
Getting started .............................................................................3
Installing the camera ............................................................................................................... 5
Installing the PC Suite software ........................................................................................... 8
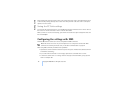
Configuring the settings with PC Suite .............................................................................. 9
Main page ...........................................................................................................................10
Settings page......................................................................................................................11
Users page...........................................................................................................................15
Monitor page......................................................................................................................17
Security settings................................................................................................................17
Saving the PC Suite settings..........................................................................................18
Configuring the settings with SMS ...................................................................................18
Taking the camera in use with SMS commands ......................................................19
Light indicators ........................................................................................................................26
Using the camera ...................................................................... 29
Capturing an image ................................................................................................................29
Using motion detection ........................................................................................................30
Using timed imaging ..............................................................................................................31
Using the thermometer .........................................................................................................32
Using the audio connection .................................................................................................32
Copyright©2003 Nokia. All rights reserved.
Contents
Introduction..................................................................................1
Contents
Contents
Contents
Care and maintenance.............................................................. 33
Important safety information.................................................. 35
Technical specifications............................................................ 38
Copyright©2003 Nokia. All rights reserved.
Note: National laws and regulations may place restrictions on recording images and regarding
further processing and use of such data. Do not use this feature illegally. Honour the privacy
and other legitimate rights of others and obey all laws governing, for example, data protection,
privacy, and publicity.
Note: The images and messages sent from the camera will be charged to the subscription of the
SIM card in the camera.
The Nokia Observation Camera is approved for use on the GSM 900/1800 network.
To use the Nokia Observation Camera, you need:
• a GPRS enabled mobile subscription with a SIM card and MMS service.
• an MMS and SMS enabled mobile phone with a colour display
• GSM network coverage in the camera premises
• an available e-mail address if you want to receive images to your e-mail.
Note: Check how large MMS messages your mobile phone is capable of receiving. Your network
operator may also restrict the size of MMS messages. Ask your network operator for details.
Copyright©2003 Nokia. All rights reserved.
1
Introduction
The Nokia Observation Camera is a remote imaging device with a motion detector, thermometer, and
microphone. With the camera you can capture images remotely and send them to your multimedia
messaging (MMS) enabled mobile phone with a colour display, or to an e-mail address. You can control
and configure the camera with short messages (SMS), and the PC Suite for Nokia Observation Camera
software is provided for more advanced functions.
Introduction
Introduction
Introduction
Before you can use any of these network services, you must subscribe to them through your service
provider and obtain instructions for their use from your service provider.
Note: Some networks may not support all language-dependent characters and/or services.
Note: For availability, rates, and information on using SIM services, contact your SIM card
vendor, e.g. network operator, service provider, or other vendor.
Note: The MMS function can be used only if it is supported by your network operator or service
provider. Only devices that offer compatible multimedia message or e-mail features can receive
and display multimedia messages.
Important: Multimedia message objects may contain viruses or otherwise be harmful to your
phone or PC. Do not open any attachment if you are not sure of the trustworthiness of the
sender.
The default setting of the multimedia message service is on ("Allow multimedia reception" is set
"Yes"), and your operator or service provider may charge you for every message you receive.
Warning: Use only power source ACW-6 and enhancements approved by the camera
manufacturer for use with this particular camera model. The use of any other types may
invalidate any approval or warranty applying to the camera, and may be dangerous.
For availability of approved enhancements, please check with your dealer.
When you disconnect the power cord of any enhancement, grasp and pull the plug, not the cord.
Warning: Do not switch the camera on when wireless phone use is prohibited or when it may
cause interference or danger.
Warning: In order to comply with RF exposure requirements for mobile transmitting devices, a
minimum distance of 20 cm must be maintained between the camera and all persons.
2
Copyright©2003 Nokia. All rights reserved.
The Nokia Observation Camera sales package contains the following items:
• Nokia Observation Camera
• desktop/wall stand
• mounting screws and a tool for tightening them
• serial data cable
• power source and wall mount cradle
• CD-ROM with PC Suite software
• user’s guide
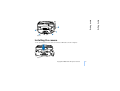
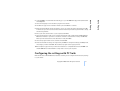
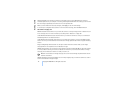
The front panel of the Nokia Observation Camera features:
• Infrared light source for capturing images in low light (1)
• Start button for motion detection (2)
• Motion detector (3)
Copyright©2003 Nokia. All rights reserved.
3
Getting started
Getting started
Getting started
Getting started
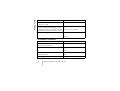
Figure 1
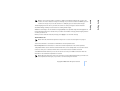
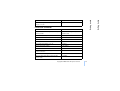
The back panel of the Nokia Observation Camera features:
• SIM card slot (4)
• Data connector (5)
• External antenna connector (6)
• Power connector (7)
• Thermometer (8)
4
Copyright©2003 Nokia. All rights reserved.
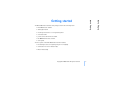
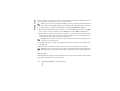
Installing the camera
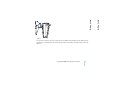
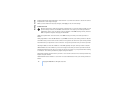
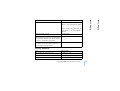
1. Lift up the back lid of the camera and insert a SIM card as shown in Figure 3.
Figure 3
Copyright©2003 Nokia. All rights reserved.
5
Getting started
Getting started
Figure 2
Getting started
Note: Keep all miniature SIM cards out of the reach of small children.
Note: If you want to configure the Nokia Observation Camera settings with SMS messages,
disable the PIN code request on your SIM card before inserting it into the camera. If the PIN
code request is active, you can only configure the camera settings with PC Suite.
2. If you configure the camera settings with PC Suite, connect the serial data cable to the data
connector at the back of the camera and to the COM port of a compatible PC.
3. Attach the power source to the power connector of the camera and plug it into a mains outlet. If
the LEDs on the camera light up, the camera receives power from the mains outlet.
4. Configure the camera settings either with PC Suite or with SMS commands, see Configuring the
settings with PC Suite on page 9 and Configuring the settings with SMS on page 18.
5. After completing the configuration, disconnect the serial data cable, and power off the camera by
unplugging it from the mains outlet.
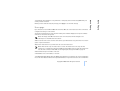
6. Attach the camera to the desktop stand with the screw, turn the stand to the usage position and
tighten the screw with the tool included in the sales package. To tighten the ball joint, remove the
rubber shield and tighten the screw. See Figure 4.
6
Copyright©2003 Nokia. All rights reserved.
Copyright©2003 Nokia. All rights reserved.
7
Getting started
Getting started
Figure 4
You can also mount the stand on a wall: remove the rubber screw shields from the desktop stand
and attach it to the wall with two screws. Use the wall mount cradle to hold the power source. See
Figure 5.
Getting started
Figure 5
7. Power on the camera.
Note: When you disconnect the power cord, grasp and pull the plug, not the cord.
Tip: You can also place the camera on a standard camera tripod.
Installing the PC Suite software
Note: PC Suite for Nokia Observation Camera supports the Windows 98/2000/NT/XP operating
systems and requires 5 MB of free disk space.
1. Exit all Windows programs. Insert the CD-ROM into the CD-ROM drive of your computer.
8
Copyright©2003 Nokia. All rights reserved.
4. The Welcome page of the installation wizard opens. Click Next to continue.
5. Read through the Nokia license agreement. If you do not accept the license agreement, click No,
in which case you cannot use the software and the installation procedure stops. Click Yes to accept
the license agreement.
6. Enter your name and the name of your company. Click Next.
7. Select the destination folder for the software. The default folder is C:\Program Files\Nokia\Nokia
Observation Camera. If you want to install the software in another drive or folder, click Browse.
When you have selected the correct destination folder, click Next.
8. Select the program folder for the software and click Next.
9. Check the installation settings. To accept them, click Next. To change the settings, click Back, make
the changes, and then click Next. The installation program starts copying the files.
10.The Completion page informs you when the installation is completed. Remove the CD-ROM from
the CD-ROM drive and click Finish. You may need to restart your computer.
Configuring the settings with PC Suite
With the PC Suite for Nokia Observation Camera software you can configure all the necessary settings
for your camera.
Copyright©2003 Nokia. All rights reserved.
9
Getting started
3. Select the language for the installation program and software.
Getting started
2. If the CD-ROM is not launched automatically, go to your CD-ROM drive (e.g. drive D) and doubleclick Setup.exe.
Getting started
The user interface of the software consists of four pages: Main, Settings, Users, and Monitor. You can
open the pages by clicking the icons on the icon bar on the left.
Note: If you do not have a compatible PC available, you can configure the camera settings with
your mobile phone using SMS messages. See Configuring the settings with SMS on page 18.
1. To access PC Suite, go to Start, select Programs, and select Nokia Observation Camera.
2. Plug the serial data cable into the data connector of the Nokia Observation Camera and the COM
port of your PC. You can configure the correct COM port in the File, COM Port Settings menu.
3. When the PC is connected to the camera, you are asked for your security code. The preset code is
1234. Change the preset code in the Security settings, Change access codes menu. Keep the new
code secret and in a safe place separate from the camera.
Note: Only those who know the security code can change the camera settings and give new
users access to camera functions.
4. If the PIN code request is active on your SIM card, you will be prompted to enter the PIN code of
your SIM card.
5. When PC Suite asks whether you want to import the camera settings to PC Suite, click Yes.
Note: Before you can use the camera, you need to configure the name and the language of the
camera (see page 11), the master user (see page 15), and the connection used (see page 14).
Main page
The Main page shows general information about the camera. You can also check the current settings
of the camera and save them to a file on your PC.
10
Copyright©2003 Nokia. All rights reserved.
Write: save the current settings to the camera.
Open: open a settings file from your PC.
Save as: save the current settings to your PC.
Settings page
The Settings page consists of four tabs, each of which contains a group of settings.
General settings tab
Camera name: give a name for the camera. The name can be up to 20 characters long and it must not
contain spaces or special characters.
Language: select the language for the SMS commands and notifications.
Send SMS after power out: check this box if you want the camera to send you an SMS message when
a power shortage has occurred and the power is back on.
Note: This feature can only be used when motion detection is on.
Note: The messages sent from the camera will be charged to the subscription of the SIM card
in the camera.
Resolution: select whether you want to receive the images in high (640 x 480 pixels), normal (320 x
240 pixels), or compact (160 x 120 pixels) resolution.
Image quality: select whether you want the images to be of high, normal, or basic quality.
Copyright©2003 Nokia. All rights reserved.
11
Getting started
Getting started
Import: click this button to import the current settings from the camera to PC Suite.
Getting started
Camera position: If the camera is placed in an upright position, select Normal. If the camera is
mounted upside down, for example on a ceiling, select Upside down. With this setting you can ensure
that the images captured by the camera are not sent upside down.
When you have made the necessary changes, click Apply to use the new settings.
To use the pre-configured factory values for all the camera settings, click the Restore button.
Automatic imaging tab
Motion detection: check this box if you want the camera to send you images when it detects motion
in its coverage area. For more information, see Using motion detection on page 30.
Send SMS when motion detected: check this box if you want the camera to send you a notification
immediately when it has detected motion.
Send SMS after last detection: check this box if you want the camera to send you an SMS message
after it has sent you all the defined motion detection images (see below) and has stopped detecting
motion.
Image sending delay after detection: set the period after which the camera sends you an image
message when it has captured a motion detection image.
Number of detections: set how many motion detection image messages (0-10) you want the camera
to send you before turning off the motion detection function. If you set 0 as the number of image
messages, motion detection remains on until you turn it off.
Note: A motion detection image message can contain several images captured at 0.5 second
intervals. See below.
Number of images per detected motion: set how many images (1-3) you want the camera to send in
each motion detection image message.
12
Copyright©2003 Nokia. All rights reserved.
Interval for image sending: set the interval for sending timed images.
Number of sent images: set the number of images (0-10) to be captured using timed imaging before
the timed imaging function is turned off. If you set 0 as the number of images, timed imaging remains
on until you turn it off.
When you have made the necessary changes, click Apply to use the new settings.
Thermometer tab
Note: Turn the thermometer up before using it. Do not use force. See Figure 2 on page 5.
Scale: select whether to use Celsius or Fahrenheit as the temperature scale.
Read temperature: click this button to check the current temperature in the camera premises.
Temperature limits: set the minimum and maximum limits for the temperature. You can then set the
camera to send you a notification when either of the limits has been reached. See below.
Send SMS when limit reached: you can set the camera to send you an SMS notification when the
minimum or the maximum temperature is reached.
Note: After the camera has sent you a notification on the reached temperature, you need to set
the temperature limits again, if you want to continue using this function.
Copyright©2003 Nokia. All rights reserved.
13
Getting started
Timed imaging: check this box if you want the camera to send you images at certain intervals.
Getting started
Note: If you set the resolution of images to High on the General settings tab, you can only
receive one motion detection image in a message. If you set the resolution to Normal, you can
receive two images. If you set the resolution to Compact, you can receive three images.
Getting started
Include temperature value with images: check this box if you want the camera to attach the current
temperature to each image message.
When you have made the necessary changes, click Apply to use the new settings.
Connection tab
Tip: The easiest way to make the necessary configurations is to ask your service provider to send
you the settings over the air. Click Get at the bottom of the tab, if your service provider has
enabled this service. You only need to give the number of the MMS settings service, write the
SMS configuration request message, and click Send.
GPRS access point name: enter the name of the GPRS access point. Ask your service provider for
details.
Home page address: enter the URL address of your MMS centre. Ask your service provider for details.
User name: enter your user name for the connection. You get the user name from your service provider.
Password: enter your password for the connection. You get the password from your service provider.
Gateway IP address: enter the IP address of the WAP gateway. Ask your service provider for details.
SMSC number: enter the number of your short message centre. Ask your service provider for details.
Prompt password: check this box if you want the camera to prompt for your password when making
a connection. Your service provider may require using this feature.
Connection security: check this box if you want to use a secure connection. Your service provider may
require using this feature.
Authentication: select whether to use normal or secure authentication. Ask your service provider for
details.
14
Copyright©2003 Nokia. All rights reserved.
Users page
Up to 20 users can use the Nokia Observation Camera. One user is the master user who is allowed to
configure the settings for the camera.
The camera authenticates the users by their mobile phone numbers. Requests from phone numbers
unknown to the camera are ignored.
Note: The images and SMS notifications sent from the camera will be charged to the
subscription of the SIM card in the camera.
Name: enter the name of the user. The name can be up to 20 characters long and it must not contain
spaces or special characters.
Master user: check this box if you want this user to be the master user.
Note: There can be only one master user at a time. The master user is the only one with
permission to configure the camera with SMS messages. Other users can only take images and
use the audio connection with SMS. See Configuring the settings with SMS on page 18.
Phone number: the phone number of the user.
E-mail address: the e-mail address of the user.
Send SMS notification about: check the Motion detection box if you want the user to be notified when
motion has been detected. Check the Temperature limits box if you want the user to be notified when
Copyright©2003 Nokia. All rights reserved.
15
Getting started
When you have made the necessary changes, click Apply to use the new settings.
Getting started
Session mode: select whether to use permanent or temporary sessions when using GPRS. Ask your
service provider for details.
Getting started
the temperature limits are reached. Check the Power failure box if you want the user to be notified
when a power shortage has occurred and the power is back on.
Note: The Power failure option can only be used when motion detection is on.
Default image address: select whether to send the images to the user’s mobile phone or e-mail address.
Allow image request: check this box if you let the user capture images.
Allow audio connection: check this box if you let the user listen to the premises of the camera.
Allow timed imaging: check this box if you let the user receive images captured using timed imaging.
Allow motion detection: check this box if you let the user to receive images captured with motion
detection.
Click Add to include the created user to the user list. To remove a user, select the user from the user
list and click Remove. To update a user’s settings, select the user and click Update.
Disable image request authentication: check this box if you want to let everyone capture images
without authentication.
Warning: If you check the Disable image request authentication box, everyone who knows the
camera’s phone number can capture images with the camera.
When you have added all the desired users to the user list, click Apply to import the user list to the
camera.
Note: When you click Apply, the current user list of the camera is overwritten. If you want to
add a user to the current user list, go to the Main page and click Import to open the current
user list. Then edit the list on the Users page and click Apply.
16
Copyright©2003 Nokia. All rights reserved.
On the Monitor page you can view and capture images.
Open: click this button to open a previously saved image.
Save: click this button to save the still image on the monitor.
Send: click this button to send an image as an MMS message to a recipient.
Capture image: click this button to capture an image and show it on the monitor.
Automatic update: select this option to see a continuously updated image from the camera.
Snapshot: select this option to see still images from the camera.
Operator: shows the name of your network operator.
Signal strength: shows the signal strength of the network connection.
Security settings
To set the security settings for the Nokia Observation Camera, open the Security settings menu from
the menu bar.
PIN code settings: if you set the PIN mode On, the camera asks you to enter your PIN code in PC Suite
the first time you turn the camera on. The camera then saves the PIN code in its memory and later
enters the PIN code automatically every time it is turned on. If you set the PIN mode Off, the camera
does not ask for the PIN code.
Change access codes: select whether to change the PIN, PIN2, or the Security code. Enter the old code,
then the new code, and confirm the new code.
Copyright©2003 Nokia. All rights reserved.
17
Getting started
Getting started
Monitor page
Getting started
Enter security code: type the security code for the camera. The preset code is 1234. Change the preset
code in Security settings, Change access codes menu. Keep the new code secret and in a safe place
separate from the camera.
Saving the PC Suite settings
You can save the camera settings in a *.noc file. Open the File menu and select Save or Save as. Choose
the location for the file and enter a name for the file. Click Save.
When you want to use the saved settings, open the File menu and select Open settings file. Select the
file and click Open.
Configuring the settings with SMS
The Nokia Observation Camera can also be configured with SMS commands.
Note: The master user is the only one with permission to configure the camera with SMS
commands. For defining the master user, see the User commands table on page 24.
When using SMS commands, remember these guidelines:
• Separate the command and the value with a space. The space is marked in the tables below with
an underline character (_).
• If you send several commands in one message, separate the commands with a comma.
• To check the current value of a setting, send the message: command number, space, question
mark. For example: 46 ?
18
Copyright©2003 Nokia. All rights reserved.
• The default values of the settings are marked in the tables in bold.
When you send a command to the camera, the camera replies with a confirmation message.
Taking the camera in use with SMS commands
1. Set the language for the camera by sending the SMS command 21_security code_number of
language to the camera. The preset security code is 1234. The number of your language can be
found in the General commands table below.
2. Set yourself as the master user of the camera by sending the SMS command 8_security code_user
name_phone number to the camera. Replace user name with your name. The name can be up to 20
characters long and it must not contain spaces or special characters. Replace phone number with
the number of your mobile phone.
3. Set the name for the camera by sending the SMS command 25_camera name to the camera.
Replace camera name with the name you want to give to the camera.
4. If your service provider supports over-the-air MMS configuration, send the message 91_service
number_service provider dependent text to the camera. Ask your service provider for the service
number and text. If your service provider does not support this feature, send the commands listed
in the Connection commands table to the camera. Ask your service provider for details.
Copyright©2003 Nokia. All rights reserved.
19
Getting started
• When removing the selection for a setting, you can use the following parameters: off, 0, or -.
Getting started
• When selecting a setting, you can use the following parameters: on, 1, or +.
Getting started
General commands
Task
SMS command
21_security code _number of language
Set the language of the SMS commands and
notifications. The language numbers are:
Danish 1, Dutch 2, English 3, Finnish 4, French
5, German 6, Italian 7, Norwegian 8, Polish 9,
Portuguese 10, Spanish 11, Swedish 12,
Simplified Chinese 13, Traditional Chinese
(Hong Kong) 14, Traditional Chinese (Taiwan)
15, Czech 16, Canadian French 17, Greek 18,
Hungarian 19, Brazilian Portuguese 20, Russian
21, Latin Spanish 22, Thai 23
Set a name for the camera
25_camera name
Define the position of the camera: normal (1), 19_number
upside down (2)
Set the image resolution to high (1), normal (2), 11_number
or compact (3)
Capture an image and send it to your mobile
phone
1
or
image
Capture an image and send it to another phone 1_phone number/e-mail address
number or e-mail address
or
image_phone number/e-mail address
20
Copyright©2003 Nokia. All rights reserved.
Ask for the IMEI code, and software and
hardware versions of the camera
92
Set the SMS notification of power cuts on or off 18_on/off
Set confirmation messages from the camera on 26_on/off
or off
Check the current settings
77
Restore factory settings
99_security code
Automatic imaging commands
Task
SMS command
2_on_number of messages
Set motion detection on and set how many
image messages (0-10) you want the camera to or
send after it has detected motion. If you set 0 as detection_on_number of messages
the number of image messages, motion
detection remains on until you turn it off
Set motion detection off
2_off
or
detection_off
Set the number (1-3) of images in one motion 12_number
detection image message
Set motion detection notification on or off
16_on/off
Copyright©2003 Nokia. All rights reserved.
21
Getting started
SMS command
Getting started
Task
Getting started
Task
SMS command
Set the SMS notification on completed motion 17_on/off
detection on or off
Set timed imaging on, and define the interval 4_on_hh:mm_number
and the maximum number (0-10) of timed
or
images. If you set 0 as the number of images, timed_on_hh:mm_number
timed imaging remains on until you turn it off
Set timed imaging off
4_off
or
timed_off
Thermometer commands
Task
SMS command
Select whether to use Celsius (1) or Fahrenheit 14_number
(2) as the temperature scale
Request the current temperature
3
or
temp
Set the temperature alarm on and set the
temperature limits
15_on_minimum value_maximum
value
Set the temperature alarm off
15_off
22
Copyright©2003 Nokia. All rights reserved.
Set the sending of current temperature with
images on or off
13_on/off
Connection commands
Task
SMS command
Request over-the-air configurations from your 91_service number_service provider
service provider
dependent text
Set the GPRS access point name
31_access point name
Set the address of the MMS centre home page 32_URL address
Set the user name for the connection
41_user name
Set the password for the connection
42_password
Set password prompting on or off
43_on/off
Set the gateway IP address
33_IP address
Set the SMS centre number
27_number
Select normal (1) or secure (2) authentication
for the connection
44_number
Set connection security on or off
45_on/off
Select the permanent (1) or temporary (2)
session mode
46_number
Copyright©2003 Nokia. All rights reserved.
23
Getting started
SMS command
Getting started
Task
Getting started
User commands
Task
SMS command
Define the master user. The e-mail address is
not mandatory
8_security code_user name_phone
number_e-mail address
or
master_security code_user
name_phone number_e-mail address
Set the default image address for the master
user: mobile phone (1) or e-mail (2)
9_security code_number
or
address_security code_number
Add a new user, and give the right to capture
images and/or use the audio connection
5_security code_user name_user’s
phone number_on_on
or
add_security code_user name_user’s
phone number_on_on
Remove a user. The user can be removed based 6_security code_user name/phone
on either the user name or the phone number number
or
remove_security code_user name/
phone number
24
Copyright©2003 Nokia. All rights reserved.
Remove several users
6_security code_user name 1/phone
number 1_user name 2/phone number
2
or
remove_security code__user name 1/
phone number 1_user name 2/phone
number 2
Check the current user list
7_security code
Set image request authentication on. The
88_security code_on
camera authenticates the users by their mobile
phone numbers. Requests from phone numbers
unknown to the camera are ignored
Set image request authentication off. Everyone 88_security code_off
who knows the camera’s phone number can
capture images with the camera
Security commands
Task
SMS command
Set the PIN code request on or off
22_PIN code_on/off
Change the PIN code
23_old PIN code_new code_new code
Change the security code
24_old code_new code_new code
Copyright©2003 Nokia. All rights reserved.
25
Getting started
SMS command
Getting started
Task
Getting started
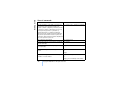
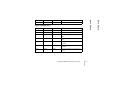
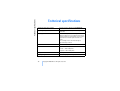
Light indicators
The Nokia Observation Camera has three light indicators (LEDs), which indicate, for example, the
network status. See Figure 6.
Figure 6
Start-up LEDs
LED 1
LED 2
LED 3
Description
Red and green Red and green Red and green There is no SIM card in the camera or
blink
blink
blink
the SIM card is incorrectly inserted
Green scan
Green scan
Green scan
The camera is connecting to a GSM
network
-
Red blink
-
Enter the PIN code in PC Suite
-
Red blink
Red blink
Enter the PUK code in PC Suite
26
Copyright©2003 Nokia. All rights reserved.
LED 3
Description
Red blink
Red blink
Red blink
Failure, contact service
Signal strength LEDs
LED 1
LED 2
LED 3
Signal strength
Red blink
-
-
No connection
Green blink
-
-
No connection
Green
-
-
The signal strength of the network is
weak
Green
Green blink
-
The signal strength of the network is
weak
Green
Green
-
The signal strength of the network is
moderate
Green
Green
Green blink
The signal strength of the network is
moderate
Green
Green
Green
The signal strength of the network is
strong
Copyright©2003 Nokia. All rights reserved.
27
Getting started
LED 2
Getting started
LED 1
Getting started
Operating LEDs
LED 1
LED 2
LED 3
Description
-
-
Green
The camera is connected to a GSM
network
Green/Red
-
Green blink
The microphone is active
Green
-
Green
The camera is in normal operating
mode
Red
-
Green
Motion detection is on
Green
Red
Green
Image sending is in progress
28
Copyright©2003 Nokia. All rights reserved.
Capturing an image
To capture an image and have it sent to your mobile phone, send the SMS command 1 to the Nokia
Observation Camera.
To capture an image and have it sent to another mobile phone, send the SMS command 1 phone
number to the Nokia Observation Camera (replace phone number with the desired mobile phone
number).
To capture an image and have it sent to an e-mail address, send the SMS command 1 e-mail address
to the Nokia Observation Camera (replace e-mail address with the desired e-mail address).
Tip: If you want to add a message to the image, write the message to the end of the SMS
command in quotation marks. For example: 1 [email protected] “This is my new car!”.
Note: National laws and regulations may place restrictions on recording images and regarding
further processing and use of such data. Do not use this feature illegally. Honour the privacy
and other legitimate rights of others and obey all laws governing, for example, data protection,
privacy, and publicity.
Copyright©2003 Nokia. All rights reserved.
29
Using the camera
When you have made all the necessary settings to the Nokia Observation Camera, take it to the place
of usage, and power up the camera by plugging the power cord to a mains outlet.
Using the camera
Using the camera
Using the camera
Using motion detection
To start motion detection, press the motion detection button on the camera (see Figure 1 on page 4).
Note: You have 60 seconds to leave the premises before motion detection starts.
You can also start motion detection by sending the SMS command 2 on [number of image messages
(0-10)] to the Nokia Observation Camera (replace [number of image messages (0-10)] with the number
of motion detection image messages you want the camera to send you), or you can configure the
camera with PC Suite.
Note: If you set 0 as the number of image messages, motion detection remains on until you turn
it off.
When motion detection is on, LED 1 of the camera is red. See Light indicators on page 26. When the
camera detects motion in the coverage area, it captures images and sends the number of image
messages specified in the settings to your mobile phone or e-mail address. Motion detection is then
turned off. If you want to use motion detection again, send the SMS message 2 on [number of image
messages (0-10)] to the Nokia Observation Camera.
Note: Motion detection does not work if there are obstacles, such as windows or walls between
the camera and the target.
Note: The size of the image messages and possible network-related issues may affect the time
in which the image messages are received.
If the camera has detected motion, and you do not want it to send motion detection messages to
anyone, you have 15 seconds to turn off motion detection by pressing the motion detection button on
30
Copyright©2003 Nokia. All rights reserved.
Using timed imaging
To set the camera to capture images at defined intervals, send the SMS command 4 on hh:mm number
to the Nokia Observation Camera. Replace hh:mm with the desired interval, for example 00:01, if you
want the interval to be one minute, or 01:00, if you want the interval to be one hour. Replace number
with the maximum number (0-10) of timed images you want to receive.
Note:If you set 0 as the number of images, timed imaging remains on until you turn it off.
Note: If you turn timed imaging on with SMS, the images are sent to the master user only.
You can also set timed imaging on with PC Suite. With PC Suite you can also define how many timed
images you want to receive before the timed imaging feature is turned off, see Automatic imaging
tab on page 12.
When you have set timed imaging on, the camera sends you the first image message after the first
interval has passed.
Note: The size of the image messages and possible network-related issues may affect the time
in which the image messages are received.
Copyright©2003 Nokia. All rights reserved.
31
Using the camera
To turn off motion detection, send the SMS command 2 off to the Nokia Observation Camera.
Using the camera
the camera. You can configure the 15 second delay on the Automatic imaging tab, see page 12. If you
press the motion detection button while the camera is sending an image, the camera sends the image
first and then turns off motion detection.
Using the camera
Using the thermometer
Note: Turn the thermometer up before using it. Do not use force. See Figure 2 on page 5.
To check the current temperature in the camera premises, send the SMS command 3 to the Nokia
Observation Camera.
If you want the camera to send you a notification via SMS when the maximum or the minimum
temperature is reached in the premises, send the SMS command 15 on minimum value maximum value
to the Nokia Observation Camera (replace minimum value and maximum value with the desired
values)
Note: After the camera has sent you a notification on the reached temperature, you need to set
the temperature limits again, if you want to continue using this function.
If you want the camera to include temperature in the image messages, see Thermometer tab on page
13.
Using the audio connection
Make a phone call to the Nokia Observation Camera and you can hear the voices in the premises of
the camera. During the call, motion detection is disabled, and SMS commands are put on hold and
executed after the call.
Note: When the camera is sending images, it cannot answer phone calls.
Note: Obey all local laws governing listening. Do not use this feature illegally.
32
Copyright©2003 Nokia. All rights reserved.
• Keep the camera and all its parts and accessories out of the reach of small children.
• Keep the camera dry. Precipitation, humidity and all types of liquids or moisture can contain
minerals that will corrode electronic circuits.
• Do not use or store the camera in dusty, dirty areas. Its moving parts can be damaged.
• Do not store the camera in hot areas. High temperatures can shorten the life of electronic devices,
damage batteries, and warp or melt certain plastics.
• Do not store the camera in cold areas. When it warms up (to its normal temperature), moisture can
form inside, which may damage electronic circuit boards.
• Do not attempt to open the camera. Non-expert handling may damage it.
• Do not drop, knock or shake the camera. Rough handling can break internal circuit boards.
• Do not use harsh chemicals, cleaning solvents, or strong detergents to clean the camera.
• Do not paint the camera. Paint can clog the moving parts and prevent proper operation.
• Use only the supplied or an approved replacement antenna. Unauthorised antennas, modifications
or attachments could damage the camera and may violate regulations governing radio devices.
Copyright©2003 Nokia. All rights reserved.
33
Care and maintenance
The Nokia Observation Camera is a product of superior design and craftsmanship and should be treated
with care. The suggestions below will help you to fulfil any warranty obligations and to enjoy this
product for many years.
Care and maintenance
Care and maintenance
Care and maintenance
All of the above suggestions apply equally to your camera or any enhancement. If any of them is not
working properly, take it to your nearest qualified service facility. The personnel there will assist you
and, if necessary, arrange for service.
34
Copyright©2003 Nokia. All rights reserved.
Don't install the camera in a vehicle. Do not use the camera or your mobile phone to control or configure
the camera while driving; park the vehicle first. Do not place the camera on the passenger seat or where
it can break loose in a collision or sudden stop.
Remember road safety always comes first!
Operating environment
Remember to follow any special regulations in force in any area and always switch off your camera
whenever it is forbidden to use it, or when it may cause interference or danger.
Use the camera only in its normal operating positions.
Electronic devices
Most modern electronic equipment is shielded from radio frequency (RF) signals. However, certain
electronic equipment may not be shielded against the RF signals from your camera.
Vehicles
RF signals may affect improperly installed or inadequately shielded electronic systems in motor
vehicles (e.g. electronic fuel injection systems, electronic antiskid (anti-lock) braking systems,
electronic speed control systems, air bag systems). Check with the manufacturer or its representative
Copyright©2003 Nokia. All rights reserved.
35
Important safety information
Traffic safety
Important safety information
Important safety information
Important safety information
regarding your vehicle. You should also consult the manufacturer of any equipment that has been
added to your vehicle.
Pacemakers
Pacemaker manufacturers recommend that a minimum separation of 20 cm (6 inches) be maintained
between a camera and a pacemaker to avoid potential interference with the pacemaker. These
recommendations are consistent with the independent research by and recommendations of Wireless
Technology Research. Persons with pacemakers:
• Should always keep the camera more than 20 cm (6 inches) from their pacemaker when the camera
is switched on;
• If you have any reason to suspect that interference is taking place, switch off your camera immediately.
Hearing aids
Some observation cameras may interfere with some hearing aids. In the event of such interference,
you may want to consult your service provider.
Other medical devices
Operation of any radio transmitting equipment, including cameras, may interfere with the
functionality of inadequately protected medical devices. Consult a physician or the manufacturer of
the medical device to determine if they are adequately shielded from external RF energy or if you have
any questions. Switch off your camera in health care facilities when any regulations posted in these
areas instruct you to do so. Hospitals or health care facilities may be using equipment that could be
sensitive to external RF energy.
36
Copyright©2003 Nokia. All rights reserved.
Potentially explosive atmospheres
Switch off your camera when in any area with a potentially explosive atmosphere and obey all signs
and instructions. Sparks in such areas could cause an explosion or fire resulting in bodily injury or even
death.
Users are advised to switch off the camera when at a refuelling point (service station). Users are
reminded of the need to observe restrictions on the use of radio equipment in fuel depots (fuel storage
and distribution areas), chemical plants, or where blasting operations are in progress.
Areas with a potentially explosive atmosphere are often but not always clearly marked. They include
below deck on boats; chemical transfer or storage facilities; vehicles using liquified petroleum gas
(such as propane or butane); areas where the air contains chemicals or particles, such as grain, dust
or metal powders; and any other area where you would normally be advised to turn off your vehicle
engine.
Failure to observe these instructions may lead to suspension or denial of telephone services to the
offender, or legal action or both.
The Nokia Observation Camera, like any wireless device, operates using radio signals, wireless and
landline networks, and user-programmed functions. Because of this, connections in all conditions
cannot be guaranteed. Therefore you should never rely solely upon any wireless phone for essential
communications (e.g. medical emergencies).
Copyright©2003 Nokia. All rights reserved.
37
Important safety information
Switch your camera off in any facility where posted notices so require.
Important safety information
Posted facilities
Technical specifications
Technical specifications
Supported operating systems
PC Suite supports Windows 98/2000/NT/XP.
Operating temperature
-10...+50 degrees Celsius, 14...122 degrees
Fahrenheit
Lighting
The camera captures colour images in normal
lighting conditions. For low light conditions the
camera includes an infared light source. Images
captured with infrared light are black and
white.
The coverage area of the infrared light is
approximately 3 metres.
Focus area
Minimum focus distance is 0.5 metres.
Resolution
High = 640 x 480 pixels
Normal = 320 x 240 pixels
Compact = 160 x 120 pixels
Image format
The image format is JPEG.
Viewing angle
The viewing angle is 58 degrees.
38
Copyright©2003 Nokia. All rights reserved.
Audio connection
You can hear a normal human conversation
from approximately 4 metres in indoor
conditions.
Humidity
5...95% non condensing.
Copyright©2003 Nokia. All rights reserved.
39
Technical specifications
The camera reacts to moving thermal radiation,
and it detects an adult of average height
approximately within 5 metres. Motion
detection works also in the dark.
Technical specifications
Motion detection coverage area