1
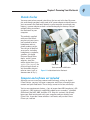
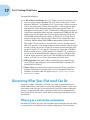
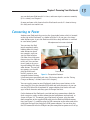
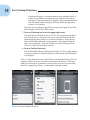
1
AL
Powering Your iPod touch
In This Chapter
RI
▶ Looking inside the box
TE
▶ Finding what your iPod touch is good for
▶ Setting up your iPod touch wirelessly
MA
▶ Connecting to your computer and iTunes
▶ Using and recharging your battery
D
Y
GH
TE
ou hold in your hands the greatest pocket-sized music player in the
world, which also happens to be a fantastic portable video and game
player and video camera. But that’s not all: With built-in wireless Internet
connectivity, the iPod touch defines an entire new class of . . . things.
CO
PY
RI
I want to call it a device, but it’s so much more — the iPod
touch puts the entire world in your pocket. It’s your passport to millions of songs as well as movies, TV shows,
and other content on the iTunes Store. It lets you communicate with your friends and family with FaceTime
video calls and instant messaging and participate
in social and gaming networks like Facebook and
the Game Center. It records stunning HD video as
well as photos and lets you edit them before sharing them. And, of course, it offers a library of hundreds of thousands of applications (known as apps)
that offer everything from soup to nuts, including
thousands of games — but I get into that later in this
chapter.
Less than one-third–inch thick and weighing less than
four ounces, the iPod touch is really a pocket computer — it
uses a flash memory drive and the iOS operating system. It shares
design characteristics and many of the features of its more famous cousin,
the iPhone, with built-in speaker and volume controls, an accelerometer for
8
Part I: Touching All the Basics
motion detection (such as rotation and shaking), and Internet connectivity
for surfing the Web and checking e-mail. Like the newest model iPhone, the
newest model (4th generation) iPod touch sports a three-axis gyro for measuring or maintaining orientation (used extensively by games), and a 3.5-inch,
widescreen, multi-touch Retina display that offers a stunning 960-x-640 pixel
resolution at 326 pixels per inch — so many pixels that the human eye can’t
distinguish individual ones.
The newest iPod touch also offers a main camera on the back for recording
HD (720p) video at up to 30 frames per second (with audio), and shooting
photos at 960-x-720 pixel resolution. And you can use a front-facing video
camera for taking VGA-quality (640-x-480 pixel) photos and making FaceTime
video calls over the Internet.
The newest model iPod touch can do nearly everything an iPhone can do,
except make cellular-service phone calls or pinpoint its exact location with
the Global Positioning System (GPS). Even so, the iPod touch can find its
approximate location with Internet-based location services, and you can
make the equivalent of a “phone call” using FaceTime, the Skype app, and an
Internet connection. It also offers stereo Bluetooth for using wireless headphones and microphones.
So what’s in the box, and what can it do?
Thinking Inside the Box
Apple excels at packaging. Don’t destroy the elegant box while opening it,
and check to make sure that all the correct parts came with it, as shown in
Figure 1-1. Keep the box in case, heaven forbid, you need to return the iPod
touch to Apple — the box ensures that you can safely return it for a new battery or replacement.
The iPod touch is supplied with the following:
✓ Stereo earphones (often called earbuds) with remote control buttons
and a microphone
✓ A quick-start guide
✓ A cable with a dock connector on one end and a USB connector on the
other
The cable connects your iPod touch (or a dock for the iPod touch) to your
computer or to the AC power adapter using a USB (Universal Serial Bus)
connection — a way of attaching things to computers and bussing data
around while providing power. The cable has a USB connector on one end
and a flat dock connector on the other end to connect either to a dock or
directly to an iPod touch.
Chapter 1: Powering Your iPod touch
Outside the box
You may want to have around a few things that are not in the box. For example, even though you don’t really need an AC power adapter or dock (because
you can connect the iPod touch directly to your computer to recharge your
battery), a power adapter or dock is useful for keeping the battery charged
without having to connect
the iPod touch to your
computer.
The earbuds supplied
with your iPod touch
may not suit your tastes,
but hundreds of other
headphone and earphone products might.
You can get all kinds of
accessories, including
headphones, earphones,
speakers, the Apple
Universal Dock, other
docks, and AC power
adapters, from the
online Apple Store (www.
apple.com/store), the
physical Apple Store, or
any electronics department or store (such as
Amazon.com or Fry’s).
iPod touch
Earbuds
Dock connector to USB cable
Figure 1-1: Inside the box for the iPod touch.
Computer and software not included
Although you can store your content and iPod touch settings in Apple’s
iCloud service, you may still want a computer and iTunes to manage your
content and your iPod touch. These things are not in the box, obviously.
You’ve seen requirements before — lots of jargon about MB (megabytes), GB
(gigabytes), GHz (gigahertz), and RAM (random access memory), sprinkled
with names like Intel, AMD, and Mac OS X. Skip this section if you already
know your iPod touch works with your computer and you already have
iTunes. But, if you don’t know whether it will work, and you don’t have
iTunes yet, read on.
9
10
Part I: Touching All the Basics
You need the following:
✓ A PC or Mac to run iTunes: On a PC, iTunes version 10 (version 10.5 as
of this writing) requires Windows XP (with Service Pack 2) or a 32-bit
edition of Windows 7 or Windows Vista. (You can use a 64-bit version of
Vista if you also run the iTunes 64-bit installer — which you can download from the iTunes download page.) While you can run iTunes 10
and newer versions on a PC with a 1 GHz Intel or AMD processor with a
QuickTime-compatible audio card and a minimum of 512MB of RAM, you
need at least a 2 GHz Intel Core 2 Duo or faster processor and at least
1GB of RAM to play HD-quality videos, an iTunes LP, or iTunes Extras
from the iTunes Store. You also need a DirectX 9.0–compatible video
card with 32MB of video RAM (64MB recommended) to watch video.
With a Mac, iTunes version 10 (version 10.5 as of this writing) requires
Mac OS X version 10.5 or newer (Leopard, Snow Leopard, Lion, or newer
version). While you can run iTunes 10 or newer versions on a Mac with
an Intel, PowerPC G5, or PowerPC G4 processor, and at least 512MB of
RAM, you need at least a 1 GHz PowerPC G4, PowerPC G5, or Intel processor to play Standard Definition video, or at least a 2 GHz Intel Core
2 Duo or faster processor and at least 1GB of RAM to play HD-quality
videos, an iTunes LP, or iTunes Extras from the iTunes Store.
✓ USB connection: You need a USB 2.0 connection (also called a highspeed USB) on your computer. All current-model Macs and many PCs
provide built-in USB 2.0.
✓ iTunes: Make sure you have the current version of iTunes, which also
includes QuickTime for playing video. You can download iTunes for
Windows or the Mac from the Apple site (www.apple.com/itunes/
download); it’s free.
Discovering What Your iPod touch Can Do
Play music, videos, and games; get some “face time” communication with
friends and relatives; participate in social and gaming networks; make travel
reservations and see maps of the entire world; check the weather and your
finances; record and edit videos; and keep track of all your appointments.
You can do all this and much, much more by using apps and connecting to
the Internet.
Whipping up a multimedia extravaganza
Portable DVD players are cute, but they don’t come anywhere close to being
as convenient as an iPod touch for a pocket video player. The iPod touch
Chapter 1: Powering Your iPod touch
is the Swiss Army Knife of media: It plays music, music videos, TV shows,
movies, audio books, photo slideshows, and podcasts (audio and video episodes designed to be downloaded to your iPod touch). With Apple’s iBooks
app or other book-reading apps, you can even read books.
The convenience of carrying content on an iPod touch is phenomenal. For
example, the 32GB iPod touch can hold around 7,000 songs. That’s more than
a week of nonstop rock around the clock.
Apple offers the following sizes of iPod touch models as of this writing:
✓ The 8GB model holds about 1,750 songs, 10,000 photos, or about 10
hours of video.
✓ The 32GB model holds about 7,000 songs, 40,000 photos, or about 40
hours of video.
✓ The 64GB model holds about 14,000 songs, 90,000 photos, or about 80
hours of video.
All three models use the same battery that offers up to 40 hours of audio
playback, or 7 hours of video playback.
How do you get 14,000 songs (or for that matter, any number of songs)
onto your iPod touch quickly? If you have an iTunes library of songs, you
can fill your iPod touch by connecting it to your computer (which I describe
later in this chapter) and synchronizing it with iTunes (which I describe in
Chapter 5). You can also sync your iPod touch wirelessly with your iTunes
library stored on Apple’s iCloud service (which I describe in Chapter 6). And
you can download songs from the iTunes Store; see Chapter 4.
Audio books and videos — some of your favorite TV shows, plus music
videos and full-length movies — are just a touch away on your iPod touch, or
a click away in iTunes, as I show in Chapter 4. You can even rent movies and
TV shows directly on your iPod touch. And you can organize your photos on
your computer and then transfer them to your iPod touch using iTunes, as I
describe in Chapter 9.
You use iTunes to organize your content, make copies, burn CDs, and play
disc jockey without discs. To find out more, see the latest edition of my book
iPod & iTunes For Dummies.
Communicating with the world
Your iPod touch can sense Wi-Fi networks. (Wi-Fi, short for wireless fidelity,
is a popular connection method for local area networks and the Internet; you
11
12
Part I: Touching All the Basics
can set up your home or office with Wi-Fi using a Wi-Fi hub such as Apple’s
AirPort Extreme.) After it finds one or more networks, the iPod touch lets you
choose one to connect to the Internet, and it can remember the settings for
that network so that it can automatically choose the same network again.
With a Wi-Fi connection, you can make FaceTime calls to other FaceTime
users, browse the Web and interact with web services, and send and receive
e-mail. Stocks, Maps, and Weather are apps that show information from the
Internet. You can also use the YouTube app to play YouTube videos on the
Web. All these apps are supplied with your iPod touch.
You can download more apps to your iPod touch by connecting to Wi-Fi and
the Internet, and tapping the App Store icon. You can also download music,
videos, and podcasts by tapping the iTunes icon, as I describe in Chapter 4.
You also use apps to connect to the Internet in ways other than browsing.
For example, popular social networks such as Facebook and Twitter offer
apps to connect you with your friends on those services. Google offers an
array of services through the Google Mobile app, including the ability to edit
documents and spreadsheets, use the Gmail service, and share calendars and
photos.
Rolling the dice
Many of the apps you’ll find listed at the App store are especially designed
to take advantage of four distinct features of the iPod touch: the multi-touch
display; the accelerometer (which detects acceleration, rotation, motion gestures, and tilt); the three-axis gyro (for detecting and measuring orientation);
and Location Services for detecting its physical location.
For example, Motion X Poker — actually a dice game — uses the accelerometer to let you roll the dice by shaking the iPod touch. The Flick Fishing app
senses motion so you can cast a fishing line with a flick of the wrist. And for
really precise motion, try rolling a steel ball over a wooden labyrinth of holes
in the free Labyrinth Lite app.
Sensing the location of your iPod touch location is a very useful feature. The
Showtimes app uses your location to show the movie theaters closest to
you. The Foursquare app provides a social city-guide of nearby places, offers
rewards for checking into certain places regularly, and lets you see where
your friends are. The Eventful app uses your location to display local events
and venues, and the Lethal app can tell you the dangers that could surround
you — the hostile animals, the likelihood of crimes, the prevalence of disease, and the potential accidents and disasters. And with the iCloud service,
Chapter 1: Powering Your iPod touch
you can find your iPod touch if it is lost, and even wipe its contents remotely
(if it’s stolen); see Chapter 6.
So now you know a bit about what the iPod touch can do. It’s time to fire up
this baby and start rockin’ out.
Connecting to Power
Awaken your iPod touch by pressing the sleep/wake button, which is located
on the top of the iPod touch, as shown in Figure 1-2. If you press the sleep/
wake button again, it puts the iPod touch back to sleep and locks its controls
to save battery power.
Microphone and main camera (on back)
You can turn the iPod
Sleep/wake button
touch completely off by
holding down the sleep/
wake button for about
two seconds, until you
see the Slide to Power
Off slider; then slide your
finger across the slider to
turn it off. You can then
turn it back on by pressing and holding the sleep/
wake button. To save battery power, you should
Front camera
plug the iPod touch
into AC power or your
Figure 1-2: The top of the iPod touch.
computer before turning
it back on from a completely off state. (For battery details, see the “Facing
Charges of Battery” section, later in this chapter.)
You can supply power to your iPod touch (and charge your battery at the
same time) by using the provided USB cable and your computer, or you can
use the USB cable with an optional AC power adapter that works with voltages in North America and many parts of Europe and Asia.
On the bottom of the iPod touch, you find one large connection called the
dock connection, and a smaller connection for headphones and earbuds, as
shown in Figure 1-3. To connect your iPod touch to power, plug the wide
dock connector of the supplied USB cable into the iPod touch dock connection (see Figure 1-3), and then plug the USB connector on the other end of the
cable into the Apple (or third-party USB) power adapter. You can also plug
the USB connector into the USB port on your computer for power or to set up
13
14
Part I: Touching All the Basics
your iPod touch and sync
it with iTunes, as I show
in “Connecting to iTunes,”
later in this chapter.
(Some older computers
may not provide enough
power through their USB
connections.)
A dock can be convenient
because you can remove
Dock connection
Speaker
any travel case and slip
Headphones/earbuds connection
your iPod touch into the
dock without connecting Figure 1-3: The bottom of the iPod touch showing the dock
cables. The dock connec- connection.
tion on the back end of a
dock mirrors the dock connection on the iPod touch. You can plug the supplied USB cable into the dock connection on the back end of the dock, and
leave it that way on your desk. When you slip the iPod touch into the dock’s
cradle connector, the dock connects the iPod touch to the USB cable. You can
pick up a dock at an Apple Store, order one online, or take advantage of thirdparty dock offerings. Some docks, such as the Apple Universal Dock, keep your
iPod touch in an upright position while connected and also provide connections for a home stereo or headphones. Some docks offer built-in speakers.
Setting Up Your iPod touch
After you add power, a new iPod touch comes alive and displays words in different languages and a pop-up scrollable menu of language choices, as shown
in Figure 1-4, left side. Follow these steps to set up your iPod touch to meet
your needs:
1. Select your language by scrolling the list and tapping the language.
English is at the top for models sold in the United States. After you tap
a language choice, the iPod touch offers the Wi-Fi Networks screen for
choosing a Wi-Fi network, as shown in Figure 1-4, center.
2. Tap the network name if it is not already selected, and then tap Next
in the upper-right corner of the screen.
The closest network with the strongest signal should already be
selected (with a check mark next to it); if not, tap the network name
(see Chapter 4 for details on connecting to Wi-Fi networks).
If you don’t have a Wi-Fi network at your location, and no networks are
within range (or networks that you can log in to), you need to connect
your iPod touch to iTunes to continue with setup and syncing. Skip
these steps and jump to “Connecting to iTunes,” later in this chapter.
Chapter 1: Powering Your iPod touch
3. Tap a password for the Wi-Fi network if needed, or log in to the network with your ID and password, and then tap Next in the upper-right
corner of the screen.
Public networks typically require a user name or ID and a password.
Private networks are usually set up with a password — type the password for access.
After you choose a Wi-Fi network, the iPod touch displays the Country
or Region screen for choosing your country.
4. Choose your country by scrolling the list of countries and tapping
your country and then tap Next in the upper-right corner of the
screen.
Apple offers country-specific iTunes Stores, which you use to set up
your iPod touch wirelessly and sync it with Apple’s iCloud service.
United States is at the top of the list for models sold in the U.S. After you
select a country, the iPod touch displays the Set Up iPod touch screen,
as shown in Figure 1-4, right side.
5. Select one of the following choices:
• Set Up as New iPod touch: Select this option if you want to set up
the iPod touch as new and then tap Next. iTunes displays a screen
that lets you sign in with an Apple ID, or create a free Apple ID.
• Restore from iCloud Backup: Select this option if you previously
backed up your settings for an iPod touch, iPad, or iPhone to the
Apple iCloud service as I describe in Chapter 14. You can then
pick an iPod touch, iPad, or iPhone name from the pop-up menu to
restore the previous device’s name and settings. Your automatic
sync settings are restored from the previous backup, and you can
change your sync settings as I show you in Chapter 6.
• Restore from iTunes: Select this option to use iTunes on your
computer to restore the previous iPod touch name and settings
(you can also restore from the backup of an iPhone or iPad in
order to use those settings). You can then skip to the next section,
“Connecting to iTunes.”
6. Sign in with your Apple ID or create a free Apple ID.
Your Apple ID automatically sets up the iPod touch with your account in
the iCloud service, the App Store, and the iTunes Store. Here’s what you do:
• If you purchased your iPod touch directly from Apple and you
have an iTunes Store, App Store, Apple Store, MobileMe, iCloud,
or Apple developer ID, tap the Sign In with an Apple ID option, and
enter the ID and password to swiftly move through the registration
process. Apple automatically recognizes your purchase so that
you don’t need to enter the serial number.
• If you bought your iPod touch elsewhere or you don’t have an
Apple ID of any kind, tap the Create a Free Apple ID option. Your
15
16
Part I: Touching All the Basics
iPod touch displays a screen for entering your birthday (which is
used as a question for retrieving your password if you forget it),
and then a screen for entering an Apple ID and password combination. For details about setting up an iTunes Store and App Store
account, see Chapter 4.
After you sign in with your Apple ID, or create a free Apple ID, the iPod
touch displays the Set Up iCloud screen.
7. Turn on iCloud and tap Next in the upper-right corner.
Tap the iCloud Off button to turn it On. This sets up the free portion of
your iCloud service, which you can use to sync your iPod touch with
content and personal settings (as I show in Chapter 6). After you tap
Next, the Find My iPod touch screen appears if you turned iCloud on;
if not, you’re finished — and you need to sync your iPod touch with
iTunes, as I describe in the next section.
8. Turn on Find My iPod touch.
Tap the Find My iPod touch Off button to turn it On. This option appears
if you also turned on iCloud. For details on how to find your iPod touch,
see Chapter 6.
That’s it. Your iPod touch syncs with iCloud if you turned iCloud on. This all
happens wirelessly, so you can do it in any location that offers a Wi-Fi network you can log in to. If you don’t turn on iCloud, you can sync your iPod
touch by connecting to iTunes, as I describe in the next section.
Figure 1-4: Set up an iPod touch wirelessly.
Chapter 1: Powering Your iPod touch
Connecting to iTunes
iTunes manages your library of content and apps on your computer, and
enables you to sync apps, content, and personal information on your computer with your iPod touch. While you can sync content and apps using the
iCloud service, as well as update the iPod touch software, iTunes lets you do
all that without an Internet connection — and also lets you restore it to original factory settings if you need to.
To connect to iTunes, you connect your iPod touch to your computer using
the supplied USB cable. Plug the wide dock connector of the supplied USB
cable into the iPod touch dock connection (refer to Figure 1-3), and then plug
the USB connector on the other end of the cable into the USB port on your
computer.
Most PCs and all current Macs already have USB 2.0 (high-speed USB), which
is all you need to provide power and to sync an iPod touch with your computer. Although you can use a low-powered USB 1.0 or 1.1 connection to sync
your iPod touch, it may not supply enough power to charge the iPod touch
battery, and it’s slower than molasses on a subzero morning for syncing.
Don’t use another USB device in a chain and don’t use a USB 2.0 hub to connect your iPod touch unless the hub is a powered hub — a hub with a separate power source, in other words. Note that a USB keyboard typically acts
like a USB 1.1 hub, but older ones can’t provide power to the iPod touch.
Macs already have iTunes, and setting up iTunes on a Windows PC is a quick
and easy process. The most up-to-date version of iTunes as of this writing
is version 10.5. However, software updates occur very rapidly. If you really
want the latest version, go directly to the Apple website (www.apple.com/
itunes) to get it. You can download iTunes for free.
For details on how to install iTunes, see the instructions on Apple’s web site
or see my book iPod & iTunes For Dummies.
Be aware that, for your new iPod touch and iTunes to play nice with each
other, you first have to set up the iPod touch. You can do that wirelessly by
following the steps in “Setting Up Your iPod touch,” earlier in this chapter, or
by using iTunes as spelled out in the following steps:
17
18
Part I: Touching All the Basics
1. Launch iTunes and connect your iPod touch to the computer with a
USB cable.
iTunes recognizes the iPod touch and, if the iPod touch has not been
set up wirelessly (as I describe in the section, “Setting Up Your iPod
touch”), opens the Register and Set Up screen to get you started. (If you
have already set up your iPod touch wirelessly, you can skip to Step 7.)
If the iPod touch isn’t recognized in a few minutes, make sure it’s
charged. A lightning bolt battery icon appears when it’s asleep and connected to power — if you don’t see this icon, iPod touch isn’t charging
properly, and you may need to try a different cable or try a different
USB 2.0 connection. (For more battery details, see the section, “Facing
Charges of Battery,” later in this chapter.) If the iPod touch is charged
and still not recognized, try putting it to sleep and waking it again (refer
to the preceding section). If that doesn’t make your iPod touch recognizable by iTunes, try resetting your iPod touch as described in Chapter 14.
If all else fails, try restarting your computer, and if that doesn’t help, try
reinstalling iTunes. Finally, contact Apple Support to return your iPod
touch for repair (www.apple.com/support).
2. Click Continue (or click Register Later to skip the registration
process).
iTunes displays the License Agreement. You can scroll down to read it
if you want. You must choose to accept the agreement, or the installer
goes no further. (If you click Register Later, you skip a few screens in the
set-up process, but you don’t get to skip the License Agreement.)
I don’t recommend skipping the registration screens unless you intend
to register the device later; registration helps you get better service
from Apple in case you need it.
3. Click the option to accept the terms at the end of the License
Agreement and then click Continue.
After you click Continue, iTunes lets you register your iPod touch with
Apple online so you can take advantage of Apple support. You see a
screen for entering your Apple ID.
4. Select the option (Use My Apple ID to Register My iPod or I Do Not
Have an Apple ID) that applies to you and fill in the info beneath that
option.
How you handle this step depends on how you purchased your iPod
touch. Here’s the scoop:
Chapter 1: Powering Your iPod touch
• If you purchased your iPod touch directly from Apple and you
have an iTunes Store, App Store, Apple Store, MobileMe, iCloud, or
Apple developer ID, select the Use My Apple ID to Register My iPod
option and enter the ID and password to swiftly move through the
registration process. Apple automatically recognizes your purchase so that you don’t need to enter the serial number.
• If you bought your iPod touch elsewhere or you don’t have an
Apple ID, iCloud, or MobileMe ID, select the I Do Not Have an Apple
ID option. If needed, select your country from the pop-up menu
below that. When you click Continue, iTunes displays a screen for
entering your iPod touch serial number and your personal information. Fields marked with an asterisk (*) are required, such as your
name and e-mail address.
Got a magnifying glass? You can find the iPod touch serial number on
the back of the device or on the side of its packaging.
5. Click Continue to advance through each screen in the registration process and click Submit at the end to submit your information.
iTunes checks to see whether you’ve ever backed up an iPod touch,
iPhone, or iPad before using iTunes. If you’ve synced one of these
devices previously using iTunes, as I describe in Chapter 5 (and you
haven’t deleted its backup, see Chapter 14), iTunes displays the Set
Up as New iPod or Restore from the Backup Of choices. If you haven’t
backed up an iPod touch before, skip to Step 7.
6. If you see the following choices, select one:
• Set Up as New iPod: Select this option if you want to set the iPod
touch up as new, and then click Continue. iTunes displays a
screen that lets you enter a name for your iPod touch, as shown
in Figure 1-5.
• Restore from the Backup Of: Select this option, and pick an iPod
touch from the pop-up menu to restore the previous iPod’s name
and settings (you can also restore from the backup of an iPhone
or iPad in order to use those settings). Then click Continue to
finish setting up your iPod touch, and skip Step 7. Your automatic
sync settings are restored from the previous backup, and you can
change them the way I show you in Chapter 5.
19
20
Part I: Touching All the Basics
7. Give your iPod touch a name, set the automatic sync options, and then
click Done (on a Mac) or Finish (on Windows).
Giving your iPod touch a name is nice to give it more of a personality.
And when it comes to setting automatic options (refer to Figure 1-5),
here’s the deal:
• Automatically Sync Songs and Videos to My iPod: If you want
to copy your entire iTunes music and video library onto your iPod
touch, leave this option selected. If you want to control which
portion of your library is copied to the iPod touch, deselect this
option and turn to Chapter 5 for synchronization details.
• Automatically Sync Photos to My iPod: Select this option to copy
all the photos in your Pictures folder or photo library to your iPod
touch, and select the photo library or folder in the Sync Photos
From pop-up menu. (See Chapter 9 for information about synchronizing photo libraries.) Leave this option deselected if you want to
transfer photos later.
• Automatically Sync Applications: Select this option to copy all
iPod touch-compatible apps in your iTunes library to your iPod
touch.
Don’t want to add songs or videos now? If you deselect the option to automatically synchronize (refer to Figure 1-5), you can still add songs and videos
later, along with podcasts and audio books — either manually or automatically with iTunes, as I describe in Chapter 5, or with the iCloud service, as I
describe in Chapter 6.
After you finish setup, your iPod touch name appears in the iTunes source
pane (the left column) under the Devices heading (refer to Figure 1-5). Click
this name to display information about your iPod touch in the main iTunes
window. The information you see also includes a message to update your
iPod touch if Apple has an update for it. If you see this message, click the
Update button to update your iPod touch (see Chapter 14 for details).
If you chose the option to automatically synchronize your songs and videos,
or restored your iPod touch from a backup set to automatically sync your
songs and videos, your iPod touch fills up with music and videos from your
iTunes library.
Chapter 1: Powering Your iPod touch
Figure 1-5: Name your iPod touch and automatically synchronize content in one step.
You can leave your iPod touch connected to the computer, using the computer as a source of power — the iPod touch appears in iTunes whenever
you start iTunes.
To disconnect it from iTunes and your computer, click the eject button next
to the iPod touch name (refer to Figure 1-5) in the source pane. (The eject
button shows a triangle with a line beneath it.)
After you eject the iPod touch, wait for its display to show the Home screen
or the slider to unlock it (which happens almost immediately after you eject
the iPod touch). You can then disconnect the iPod touch from the computer.
Don’t ever disconnect an iPod touch before ejecting it because such bad
behavior might cause it to freeze up and require a reset. (If that happens,
see Chapter 14 for instructions.)
21
22
Part I: Touching All the Basics
Facing Charges of Battery
You can take a six-hour flight from New York City to California and watch
videos on your iPod touch the entire time without recharging. The iPod
touch uses a built-in, rechargeable lithium-ion (Li-Ion) battery that offers 40
hours of music playing time or seven hours of video, browsing the Internet,
or displaying photo slideshows with music.
Recharging your battery
The iPod touch battery recharges automatically when you connect it to a
power source. For example, it starts charging immediately when you insert it
into a dock that’s connected to a power source (or to a computer with a powered USB connection). It takes only four hours to recharge the battery fully
from a drained state (less if partially charged).
Need power when you’re on the run? Look for a power outlet in the airport
terminal or hotel lobby and plug in your iPod touch with your AC power
adapter — the battery fast-charges to 80 percent capacity in two hours. After
that, the battery receives a trickle charge for the next two hours until it’s
fully charged.
Don’t fry your iPod touch with some generic power adapter. Use only the
power adapter from Apple or a certified iPod adapter, such as the power
accessories from Belkin, Griffin, Monster, XtremeMac, and other reputable
vendors.
When you awaken an iPod touch that’s plugged in to power, you see a large
battery icon indicating how much juice you have. When you charge the battery, the large battery icon includes a lightning bolt.
You can also use your iPod touch while the battery is charging, or you can
disconnect it and use it before the battery is fully charged. The small battery
icon in the top-right corner of the iPod touch display indicates how much
power is left. It’s completely filled in when the battery is fully charged, and it
slowly empties out into just an outline as the battery is used up. A lightning
bolt appears inside it when recharging, and a plug appears inside when the
iPod touch is connected to power.
The iPod touch built-in rechargeable battery is, essentially, a life-or-death
proposition. After it’s dead, it can be replaced, but Apple charges a replacement fee plus shipping. If your warranty is still active, you should have Apple
replace it under the warranty program (which may cost nothing except perhaps shipping — and with AppleCare service, even the shipping may be free).
Chapter 1: Powering Your iPod touch
Don’t try to replace it yourself because opening your iPod touch invalidates
the warranty.
Keeping an iPod touch in a snug carrying case when charging is tempting but
also potentially disastrous. You could damage the unit by overheating it and
frying its circuits, rendering it as useful as a paperweight. To get around this
problem, you can purchase one of the heat-dissipating carrying cases available in the Apple Store.
If you don’t use your iPod touch for a month, even while it’s connected
to power and retaining a charge, it can become catatonic. Perhaps it gets
depressed from being left alone too long. At that point, it may not start — you
have to completely drain and recharge the battery. To drain the battery, use it
to play videos and surf the Web for about seven hours, or leave it unconnected
to power for 24 hours. Then, to fully recharge the battery, connect it to power
for at least four hours without using it (or longer if you are using it).
Maintaining battery mojo
There are ways to keep your battery healthy. I
recommend a lean diet of topping off your battery whenever it is convenient.
Using and recharging 100 percent of battery
capacity is called a charge cycle. You can
charge the battery many times, but there is a
limit to how many full charge cycles you can do
before needing to replace the battery.
Each time you complete a charge cycle (100
percent recharge), it diminishes battery capacity slightly. Apple estimates that the battery
loses 20 percent of its capacity (meaning it
holds 80 percent of the charge) after 400 full
charge cycles. Recharging your battery when
it’s only half empty does not count as a full
charge cycle, but as half a charge cycle. That
means you can use half its power one day and
then recharge it fully, and then use half the next
day and recharge it fully again, and this would
count as one charge cycle, not two.
It’s a good idea to calibrate the battery once
soon after you get your iPod touch; that is,
run it all the way down (a full discharge) and
then charge it all the way up (which takes at
least four hours). Although this doesn’t actually change battery performance, it does
improve the battery gauge so that the gauge
displays a more accurate reading. This calibration occurs anyway if you fully recharge
the battery, but if you’ve never done that, you
can calibrate by disconnecting the iPod touch
from any power for 24 hours to make sure the
battery is empty and then fully recharging the
battery.
Lithium-ion batteries typically last three years or
more, but are vulnerable to high temperatures,
which decrease their life spans considerably.
Don’t leave your iPod touch in a hot place,
such as on a sunny car dashboard, for very
long (don’t leave it with the cake out in the rain,
either — water can easily damage it).
For a complete description of how Apple’s batteries work, see the Apple Lithium-Ion Batteries
page at www.apple.com/batteries.
23
24
Part I: Touching All the Basics
Saving power
The iPod touch uses power doing things like accessing the Internet, using
Bluetooth devices, keeping up with notifications, and running apps. Keeping
these activities to a minimum can help you save power.
The following are tips on saving power while using your iPod touch:
✓ Pause. Pause playback when you’re not listening. Pausing (stopping)
playback is the easiest way to conserve power.
✓ Lock it. Press the sleep/wake button on top of the iPod touch to immediately put it to sleep and lock its controls to save battery power.
You can set your iPod touch to automatically go to sleep by choosing
Settings➪General➪Auto-Lock from the Home screen, and choosing 1
Minute, 2 Minutes, 3 Minutes, 4 Minutes, or 5 Minutes (or Never, to prevent automatic sleep).
✓ Back away from the light. Turn down the brightness on an iPod touch
by choosing Settings➪Brightness and dragging the brightness slider to
the left.
✓ Don’t ask and don’t tell where you are. Turn off Location Services if
you aren’t using apps that need it. Choose Settings➪Location Services
from the Home screen, and tap On for the Location Services option
at the top to turn it off (tap Off to turn it back on). See Chapter 3 for
details.
✓ Let the postman ring twice. Check e-mail less frequently. You may want
to turn off Push and change your Fetch settings, as I describe in Chapter
11. Turn off instant notifications from Facebook and other sources —
see Chapter 3 for details.
✓ Put a cap on Bluetooth. Turn off Bluetooth (choose Settings➪General➪
Bluetooth and tap the On button to turn it off) if you’re not using a
Bluetooth device.
✓ Drop back in from the Internet. Turn off Wi-Fi when not browsing the
Internet or using Maps: Choose Settings➪Wi-Fi and tap the On button to
turn it off.
✓ Fasten your seat belt. Turn on Airplane Mode to automatically turn off
Wi-Fi and Bluetooth at once, before the flight attendant reminds you to
do it: Choose Settings and tap Off to turn Airplane Mode on.
Chapter 1: Powering Your iPod touch
✓ Turn it off completely. You can turn the iPod touch completely off by
holding down the sleep/wake button for about two seconds, until you
see the Slide to Power Off slider; then slide your finger across the slider
to turn it off. You can then turn it back on by pressing and holding the
sleep/wake button.
Starting an iPod touch that was completely turned off takes quite a bit of
power — more than if it woke from sleep. If you do turn it off, plug it in
to AC power or your computer before turning it back on.
✓ You may continue. Play songs continuously without using the iPod
touch controls. Selecting songs and using the previous/rewind and next/
fast-forward buttons require more energy. Also, turn off your iPod touch
equalizer (EQ) if you turned it on (see Chapter 7).
Always use the latest iPod touch software and update your software when
updates come out. Apple constantly tries to improve how your iPod touch
works, and many of these advancements relate to power usage.
25
26
Part I: Touching All the Basics