1
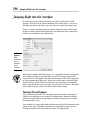
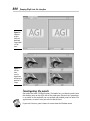
Chapter 1: Introducing
Fireworks CS4
AL
In This Chapter
✓ Understanding when you should use Fireworks
✓ Finding out about the tools
✓ Looking into the views
MA
✓ Using the basic selection tools
TE
RI
✓ Discovering the workspace
A
TE
D
dobe Fireworks is an incredible application with specific solutions to
meet online designers’ needs. With Fireworks, you have the freedom
to create test Web sites, experiment with advanced scripting features, and
come up with compelling graphics that look good and work well on Web
pages.
RI
GH
In this chapter, you encounter the software and its workspace. You also discover how to use selection tools so that you can start to manipulate graphics
in Fireworks right away.
PY
Why Use Fireworks?
CO
With all the applications included in the Creative Suite, why do you need
one more? The reason is mostly because after CS2 (and the removal of
ImageReady), the Creative Suite provided no easy way to create interesting Web graphics. Sure, you can save images for online use in Photoshop
and Illustrator using the Save for Web & Devices feature, but what about
rollovers, easy image maps, and interactive wireframes? (A wireframe is a
low-fidelity mock-up, page-schematic rough draft. In Web design, wireframes
are basic visual guides used to suggest the layout and placement of fundamental design elements.)
With Fireworks, you can work intuitively by taking advantage of the logical interface. This interface provides panels and features that relate to the
Web and that offer you the easiest way to optimize (make Web-ready) your
graphics.
796
Jumping Right into the Interface
Jumping Right into the Interface
So what’s the big deal about Fireworks being built specifically for Web
graphics? Well, first of all, you are working strictly with pixels — no messy
dpi (dots per inch) or lpi (lines per inch), which are typical printing terms.
Figure 1-1 shows the dialog box that appears when you choose File➪Open
to open a vector graphic from Illustrator. The dialog box offers conversion
choices but emphasizes pixel dimensions.
Figure 1-1:
Pixel
dimensions
play an
important
role in
Fireworks.
When you’re working with Web images, it’s a good idea to know the approximate width, in pixels, of your final page. Typical Web pages range all the
way from 650 to 1,000 pixels wide, but most designers stick with a page built
to span approximately 800 pixels. When you create images, you must think
about how they will fit within the context of your total page. An image 600
pixels wide would take up most of your page, whereas one that’s 1,200 pixels
wide would force the viewer to scroll to see the entire image.
Touring the workspace
Upon launching Fireworks CS4, you notice right away that its workspace is
similar to the workspaces in the other CS4 applications. Adobe has done a
good job of organizing each application so that the learning curve is quick
and integration is easy.
You shouldn’t be surprised to find a toolbox to the left of the workspace and
panels to the right. The tools even look very much like the tools you may
already be familiar with from working in other CS4 applications.
Jumping Right into the Interface
797
Using the tools
The Tools panel is broken into six categories: Select, Bitmap, Vector, Web,
Colors, and View. Table 1-1 lists the tools by category and the keys you can
press to access them easily.
Table 1-1
Icon
Fireworks Tools
Tool
Purpose
Keyboard
Shortcut
Pointer
Selects paths and
objects
V+0
Subselection
Adjusts paths, much
like the Direct Select
tool in Illustrator and
Photoshop.
A+1
Scale
Scales objects or
selections
Q
Crop
Crops images
C
Marquee
Makes rectangular
selections
M
Lasso
Makes freeform
selections
L
Magic Wand
Selects similar
colors
W
Brush
Paints on image
B (toggles
with Pencil)
Pencil
Draws bitmap paths
B (toggles
with Brush)
Eraser
Erases bitmap data
E
Selection tools
Bitmap tools
Introducing
Fireworks CS4
(continued)
Book VIII
Chapter 1
798
Jumping Right into the Interface
Table 1-1 (continued)
Icon
Tool
Purpose
Keyboard
Shortcut
Blur
Blurs image
R
Rubber
Stamp
Clones image data
S
Line
Creates vector lines
N
Pen
Creates Bezier paths
P
Rectangle
Creates vector
shapes
U
Type
Creates text
T
Freeform
Creates freeform
paths
O
Knife
Cuts paths
Y
Rectangle
Hotspot
Creates image map
hotspots
J
Slice
Creates slices for
tables or CSS
K
Hide Slices
and Hotspots
Hides slices and
image map hotspots
2
Show Slices
and Hotspots
Displays slices and
image map hotspots
2
Bitmap tools
Vector tools
Web tools
Jumping Right into the Interface
Icon
799
Tool
Purpose
Keyboard
Shortcut
Eyedropper
Samples color
I
Paint Bucket
Fills color
G
Hand
Pans the artboard
Zoom
Zooms in and out of
artboard
Color tools
View tools
x
As you select each tool, notice that the Properties panel displays additional
options. (If your Properties panel isn’t visible, choose Window➪Properties.)
Understanding the views
The tabs at the top of an image give you the opportunity to view it in four ways:
✦ Original displays your image as it appears before being optimized for
the Web.
✦ Preview displays the image as it will appear when it’s saved for the Web,
based on your current settings. (You find out more about those settings
in Chapter 5 of this minibook.)
✦ 2-Up offers the opportunity to see your image in two windows, with different settings applied in each window. Most users tend to compare the
original and optimized images in this view (see Figure 1-2).
Book VIII
Chapter 1
Introducing
Fireworks CS4
✦ 4-Up is for those who are never quite sure which is the best way to optimize an image. You don’t necessarily need to compare different formats
when you use this view; you can experiment with different options for
one format, such as pushing the limit with the amount of colors you
want to keep in a GIF, as shown in Figure 1-3.
800
Jumping Right into the Interface
Figure 1-2:
Compare
original
(left) and
optimized
image (right)
in 2-Up
view.
Figure 1-3:
In 4-Up
view,
you can
experiment
with ways to
optimize an
image.
Investigating the panels
Not unlike the other CS4 applications, Fireworks lets you detach panels from
the docking area on the right side of the workspace. Because this procedure
is so similar to the methods you use to dock and undock panels in other CS4
applications, we won’t bore you with the details here.
If you can’t locate a panel, choose its name from the Window menu.
Jumping Right into the Interface
801
Working with basic selection tools
You can work in Fireworks using the same selection tools for both vector
and bitmap images.
Making a selection with the Marquee
and Lasso tools
If you are familiar with Photoshop selection techniques, you will have no
problem using the same tools in Fireworks.
To make a selection with the Marquee tool, simply select the tool from the
Tools panel, and then click and drag to surround the area that you want to
select.
You can add to the selection by holding down the Shift key and dragging
another marquee region, or deselect some of the active selection by holding down the Alt (Windows) or Option (Mac) key while dragging with the
Marquee tool.
To use the Lasso tool, select the Lasso tool from the Tools panel and click
and drag to create a path that will then become your selection. As mentioned in the Marquee tool, you can add to the selection by holding down
the Shift key and creating another selection region, or subtract from the
selection by holding down the Alt (Windows) or Option (Mac) key while
dragging a selection region with the Lasso tool.
You can use both the Marquee and Lasso tools interchangeably when
making a selection.
By making a selection with the Marquee or Lasso tool and then clicking
and dragging with the Pointer tool, you can move one part of an image to
another, as shown in Figure 1-4. If you make no selection before you drag,
everything on the existing layer is moved.
Book VIII
Chapter 1
Introducing
Fireworks CS4
Figure 1-4:
Drag a
selection
to move it.
Switch to the Subselection tool, and notice that if you have an existing selection, the pointer changes to a double arrow. This double arrow indicates
that you will clone (copy) the selection when you click and drag it.
802
Jumping Right into the Interface
Making a selection in a vector image
With the same tools you use to select bitmap images, you can adjust vector
paths. Use the Pointer tool to move an entire vector shape, as shown in
Figure 1-5.
Figure 1-5:
The Pointer
tool lets
you move
a vector
shape.
Use the Subselection tool to move the individual points on the path.