1
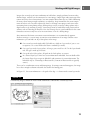
TE
RI
AL
Working with Digital Images
C
TE
D
MA
amera film and photographic prints are not yet things of the past,
and hopefully, there will always be a place for these beloved mediums. But humans continue to be endowed with certain irresistible
compulsions, not the least of which is the pursuit of convenience. The
instant gratification of digital imaging, along with the improvement of its
quality, has contributed to making it the standard of today.
RI
GH
On the downside, the convenience of this new technology comes with the
inconvenience of having to learn new things. Thankfully, the eye-candy of
imagery — and, of course, the anticipation of knowing how to nefariously
alter friends’ photos — dulls the unpleasantness. Some might even say it
makes it fun.
PY
About Digital Images
CO
You can save digital images in many different file formats — for example,
JPEG and TIFF — but there are formats and types within the file formats.
The characteristics and types of digital images are discussed in this chapter
so you can learn how to create the kind of images you need for specific
purposes.
First, it is important to know that all digital images contain pixels, usually
square in shape, that describe their colors and brightness levels. You can see
an image’s individual pixels on-screen if you zoom in and look at a magnified version, as shown in Figure 1.1.
3
IN THIS CHAPTER
About digital images
Getting images into Photoshop
Storing digital images
Part I
Welcome to Adobe Photoshop CS4
FIGURE 1.1
Some of the individual pixels in an image are magnified and shown here.
Color and lightness qualities of digital images
The following terminology is helpful to know when learning about the types of digital images:
n Tonal range (or dynamic range). This term refers to the range of dark to light values in
an image, usually referred to as shadows, midtones, and highlights. An image that contains all or most of the possible tones, rather than a smaller portion of the possible tones,
usually appears more detailed and is said to have a large tonal range, or dynamic range.
Tones also may be referred to as levels or intensities.
n Brightness, lightness, luminosity, luminance. These terms refer to dark to light tonal
characteristics, as opposed to color characteristics. They can be thought of as describing
the image as if the colors had been converted to blacks, grays, and whites.
n Hue. Hue is identified by the name of the color, such as red, orange, or green. The lightness or darkness of a color is thought of as separate from the hue. Hue can be measured
on a location on the standard color wheel and expressed as a degree between 0° and 360°.
n Color. In many instances in Photoshop, color refers to the hue, as a separate quality from
dark to light tonal qualities. For example, it is common to say, “The color in this image is
good and needs to stay the same, but I need to make changes to the luminosity.”
But sometimes color refers to the overall qualities of a color — the hue component
together with the lighter or darker components of the color. For example, it is just as correct to say, “I will use a darker blue color fo the type,” as it is to say, “I will use the same
blue color but one that has a darker luminosity for the type.”
n Saturation. The strength or purity of the color, or chroma, saturation represents the
amount of hue in the color compared to the amount of black, gray, or white in the color. If
a color contains some black or gray, it may look darker, and/or muted; if iti contains some
white, it may look lighter, muted, and/or pastel. The maximum amount of hue, with no
black, gray, or white mixed in, would be fully saturated and look like pure vivid color.
NOTE
4
In Photoshop, color is sometimes, and hue is always, thought of as a separate characteristic from the dark to light characteristics of an image.
Working with Digital Images
Hue, Saturation, and Brightness
The Hue, Saturation, and Brightness (HSB) color model is not a color mode that can be assigned to
an image in Photoshop, but it is a useful way of organizing color components. The HSB model is
helpful in understanding the meaning of the terms Hue, Saturation, and Brightness. In the HSB
model, the hue is specified as an angle from 0° to 360° that corresponds to a location on the color
wheel. Saturation is expressed from 0 percent (no hue) to 100 percent (maximum amount of hue).
Brightness is expressed from 0 percent (as dark as possible) to 100 percent (as light as possible).
Colors and their degrees are shown in the color wheel: R for Red, Y
for Yellow, G for Green, C for Cyan, B for Blue, and M for Magenta.
Cyan corresponds to 180 degrees, Yellow-Green corresponds to 90
degrees, and Red can be expressed as either 0 degrees or 360
degrees.
The Color Picker is a common tool used to define colors in Photoshop
and is shown in the following figure. You can access it by clicking
the foreground color box in the Toolbox. In the HSB section of the
Color Picker shown, H is set to 180 degrees, which specifies the
color Cyan, as shown on the color wheel; S is set to 100 percent,
which specifies the maximum amount of hue; and B is set to 100
percent, which specifies the maximum amount of brightness. These
values result in a picked color that is a vivid pure version of Cyan. The picked color is shown
selected in the top-right corner of the color field box (the large square box on the left side of the
Color Picker dialog box).
Hue, Saturation, and Brightness (HSB) values are set in the Color Picker.
5
1
Part I
Welcome to Adobe Photoshop CS4
Overview of the main types and characteristics
of digital images
Following are basic descriptions of digital image types and characteristics:
n Bit depth. The higher an image’s bit depth, the more colors each of its pixels can be;
therefore, the more colors and degrees of brightness the image can contain.
n Bitmap (raster) and vector. A bitmap, or raster, image gets its detail from the number
of pixels it contains. The more pixels a bitmap image has, the more detail the image can
contain. A vector image gets its detail from shapes and lines that are mathematically calculated, so its detail does not depend on the number of pixels in the image.
n Color mode. The color mode of an image specifies which basic set of colors is used to
make up an image. Some common basic sets of colors used to make up full-color images
are Red, Green, and Blue (RGB mode) and Cyan, Magenta, Yellow, and Black (CMYK
mode; Black is represented by the letter K). Colors within color modes are stored in their
own color channels. You can view the channels in the Channels palette.
CROSS-REF
See Chapter 10 for more information about the Channels palette.
n Color space, color profile, gamut. Within the basic sets of colors used to make up each
color mode, such as RGB or CMYK, there are different sets of combinations of these colors. These subordinate sets can be thought of as color palettes chosen for images so they
will look better when they reach their final destinations.
n File format. Various destinations for an image, such as other software or a computer
screen display, require certain file formats because of the software language or properties
of the device. Some common file formats are JPEG and GIF, usually used for Web page
display, and TIFF, often used for page layout programs and printing.
The color-mode term Bitmap mode (images that are limited to black and/or white;
no gray; no color) is different from the image-type term bitmap, or raster (images
that get their detail from the number of pixels they contain). Not all bitmap images are Bitmap
mode.
NOTE
Bit depth
You can see or convert bit depth by choosing Image ➪ Mode ➪ Bits/Channel. At a basic level, all
digital images contain components called pixels. Pixels can contain varying amounts of information
that describe their color. In this case, color refers to the qualities of hue combined with lightness.
The greater an image’s bit depth, the more information each of its pixels can contain, and the more
colors each of those pixels can potentially be. Therefore, the higher an image’s bit depth, the more
colors and degrees of brightness the image can contain (see Table 1.1).
6
Working with Digital Images
Bit depth is measured in bits per channel (bpc):
n 1 bit/channel. An image with a bit depth of 1 has pixels with only two possible values,
black or white. A Bitmap mode image has one channel with pixels that can be either
black or white. There is no 1 Bit/Channel option that can be selected in Photoshop, but
Bitmap mode images are 1-bpc images.
n 8 bits/channel. An image with a bit depth of 8 has 28, or 256, possible values per channel. An 8-bpc Grayscale mode image’s pixels can only be black, white, or shades of gray.
Since a Grayscale mode image has only one channel, each 8-bpc Grayscale mode image
can have only 256 possible values. An 8-bpc RGB mode image has 256 possible values in
each of its three color channels (red, green, and blue). It is possible for each pixel in an
RGB image to be any mixture of those three colors. Therefore, each 8-bpc RGB image has
16,777,216 possible values (256 × 256 × 256).
n 16 bits/channel. An image with a bit depth of 16 has 216, or 65,536, possible values per
channel.
n 32 bits/channel. Also known as a high dynamic range (HDR) image, an image with a bit
depth of 32 has 232, or 4,294,967,296, possible values per channel.
TABLE 1.1
Limits of Photoshop’s Support for Bit Depths Above 8
16-bpc Images
32-bpc Images
Cannot use Bitmap, Duotone, or Indexed
Color mode
Can use only RGB and Grayscale modes
Cannot use Art History Brush tool
Cannot use some blending modes
Cannot use Variations image adjustment
Cannot use some commands from the Image ➪ Adjustments
menu
Cannot use some filters
Cannot use some filters
Can save these formats only:
Photoshop (PSD, PSB)
Radiance (HDR)
Portable Bit Map (PBM)
OpenEXR
TIFF
Cannot fully use a few commands from the Image menu
Cannot use a few commands from the Layer menu
Cannot use a few commands from the Select menu
Cannot use some of the tools in the Toolbox
7
1
Part I
Welcome to Adobe Photoshop CS4
Eight-bpc RGB images are sometimes called 24-bit images (8 bits x 3 channels = 24
bits of data for each pixel). This can be confusing. For example, sometimes 8-bpc
RGB images are called 8-bit images and sometimes they are called 24-bit images.
CAUTION
Thirty-two-bpc HDR images can represent the entire dynamic range of the visible world, unlike the
lower bit depths, which can represent only a portion of it. Among the advantages of HDR is that
adjusting its exposure is like adjusting the exposure when photographing a scene in the real world.
Blurs and other real-world lighting effects look realistic in HDR images. Motion pictures, 3-D
work, and some high-end photography are mediums that sometimes use HDR images.
HDR images contain brightness levels that a standard monitor cannot display, so Photoshop lets
you make choices about the appearance of the on-screen preview of HDR images by choosing
View ➪ 32-bit Preview Options.
The Merge to HDR command lets you create HDR images from multiple photographs with different exposures, thereby gaining the larger dynamic range that 32-bpc images can support.
Following are the steps to merge multiple images to HDR format:
1. Choose File ➪ Automate ➪ Merge to HDR.
2. In the Merge to HDR dialog box, click Browse, select the images, and click Open.
3. If you held your camera in your hands when you photographed your multiple
images, select the Attempt To Automatically Align Source Images option.
4. Click OK.
5. Set view options by clicking the minus or plus button for zoom in or out, or choose
a view percentage or mode from the pop-up menu below the preview image.
6. (Optional) Select or deselect check boxes under the filmstrip thumbnails to specify
which images to use in the merge.
7. Choose a bit depth from the Bit Depth menu. Choose 32 Bits/Channel if you want the
merged image to store the entire dynamic range of the merged images.
8. Move the slider below the histogram to preview the merged image (this does not
remove any image data). This preview adjustment is stored in the HDR image file and
applied when the image is open. It can be changed later by choosing View ➪ 32-bit
Preview Options.
9. Click OK to create the merged image.
You can convert a 32-bpc HDR image to a 16-bpc or 8-bpc image, but some of the image’s information will be lost in the conversion. You will need to make choices about what information to
keep and what to throw away based on what you want the converted image to look like.
8
Working with Digital Images
Following are the steps to convert from 32-bpc HDR to 16- or 8-bpc:
1. Choose Image ➪ Mode ➪ 16 Bits/Channel or 8 Bits/Channel.
2. Make sure the Preview box is checked and choose one of the following four methods
for adjusting the brightness and contrast in the image until the image’s appearance
and tonal range meets your requirements:
n Exposure and Gamma. Move the Exposure slider to adjust the gain, and move the
Gamma (midtone) slider to adjust the contrast. If the result is acceptable, click OK to
complete the conversion.
n Highlight Compression. This is an automatic method that compresses the highlight
values in the HDR image so they fall within the range the lower bit depth can support.
If the result is acceptable, click OK to complete the conversion.
n Equalize Histogram. This is an automatic method that compresses the dynamic range
of the HDR image while trying to preserve some contrast. If the result is acceptable,
click OK to complete the conversion.
n Local Adaptation. Move the radius slider to specify the size of the local brightness
regions. Move the threshold slider to specify how far apart two pixels’ tonal values
must be before they are no longer part of the same brightness region. You can also use
the toning curve to make adjustments. It’s usually best to uncheck the corner option
so the curve will be smooth. (For more about using curves, see Chapter 11.) If the
result is acceptable, click OK to complete the conversion.
NOTE
With the HDR dialog box open, you can use the Save or Load button to save or load
your custom HDR conversion settings.
Tips for Taking Photos for Merging to HDR
n Use a tripod.
n Take at least five to seven photos to capture the dynamic range of the scene.
n Vary the shutter speed to create different exposures. (Caution: Changing the aperture can
produce lower quality, and changing the ISO or aperture may cause noise or vignetting.)
n Keep in mind that auto-bracketing may not provide enough differences in exposures.
n Set exposure differences one or two EV (exposure value) steps apart (equivalent to about
one or two f-stops).
n Don’t vary the lighting in the images.
n Keep each photo identical except for exposure. The scene must be stationary.
9
1
Part I
Welcome to Adobe Photoshop CS4
Bitmap (raster) and vector
A bitmap, or raster, image gets its detail from the number of pixels it contains, which is called resolution. Since they depend on the number of pixels for detail, bitmap images are said to be resolution-dependent. Resolution is commonly expressed in Photoshop as the number of pixels per inch
(ppi). Choose Image ➪ Image Size to see the resolution of an image.
CROSS-REF
Appendix A includes a chart of required resolutions for different kinds of images.
The more pixels a bitmap image has, the more detail the image can contain. Larger bitmap images
need to have more pixels than smaller ones in order to preserve detail. Photos are bitmap images,
and paintings or illustrations that donít have well-defined shapes are usually bitmap images.
Very simple images can also be bitmap format (see Figure 1.2). It is necessary for bitmap images
to have many pixels if they need to show a lot of detail, and in the case of photos or scanned
images, the detail must be captured in the initial creation of the image. It is possible for an image
to look deceptively good on-screen but bad in its printed form. If it doesnít have enough pixels,
the printed version may lack detail and look blurry or pixilated (the undesirable appearance of
individual square pixels or their jagged edges).
Photoshop images can have multiple layers that contain different parts of an image.
Having parts on separate layers can make it easier to manipulate the individual
parts. You can also create layer masks that can be used to hide and show parts of a layer. Layers
are explained in more detail in Chapter 8.
CROSS-REF
FIGURE 1.2
A bitmap image
A vector image gets its detail from shapes and lines that are mathematically calculated. The shapes
and lines in vector images retain their smoothness no matter how much they are resized, regardless
of how many pixels are in the image. Although there are pixels in a vector image that display color,
a vector imageís detail does not depend on the number of pixels in the image. Therefore, vector
images are resolution-independent.
10
Working with Digital Images
Images that are made up of some combination of solid colors, simple gradations between colors,
distinct shapes, and lines can be constructed as vector images. Simple logos and cartoon-type illustrations often have these characteristics, but some complex illustrations do, too. While eliminating
the worry about having enough resolution is an advantage, keep in mind that the vector components often have to be created or adjusted by hand, so creating vector images can be more timeconsuming than creating bitmap images. Bitmap images can be created by taking a photo with a
digital camera or by scanning an image. Vector images must be hand-drawn using vector tools in
software such as Photoshop or Illustrato. Note that an image that is a good candidate for the vector
format does not necessarily have to be in vector format. It can be a bitmap image.
Since numerous file formats can contain vector information, it is not immediately apparent
whether an image is a vector image or contains vector information. If an image contains vector
information, you can find it in any of four places in the image:
n On a vector layer mask (right-click [Ctrl-click on a Mac] on a layer mask; if you see vector options, it is a vector mask rather than a standard layer mask).
n On a type layer in the Layers palette. As long as you can still see the T in the layer thumbnail, the type is made up of vectors.
n On a path in the Paths palette. All paths in the Paths palette are vectors.
n In a Smart Object layer. Some have vector information embedded. You can double-click
the Smart Object layer to open its linked file and examine it for vector information. The
linked file may be a Photoshop or Illustrator file. (Content in Illustrator files is typically
vector.)
There can be a combination vector and bitmap image. If an image contains bitmap parts, the image
has to have enough resolution to describe the detail in the bitmap parts.
In Figure 1.3, the vector information — the path of the dog — is shown on the vector layer mask.
FIGURE 1.3
A vector-only image in which the active vector information is contained in a vector layer mask
11
1
Part I
Welcome to Adobe Photoshop CS4
The type of layer shown is a shape layer, a layer completely filled with a color (in this case, black)
and that has a vector layer mask that hides part of the color on the layer, leaving visible what looks
like a shape. White areas on a vector mask allow the color on the layer to be visible; gray on a vector mask hides the layer’s color. The layer name is “Shape Layer-Black,” and the vector layer mask
is immediately to the left of the layer name.
The dog path on the mask allows the corresponding area of black color on the layer to be visible,
and the leftover gray part of the vector mask hides all the other black on the layer (makes it invisible, or transparent). The vector mask in Figure 1.3 is small, so it’s hard to see that the dog path on
the vector mask is filled with white; if you examine the file on the CD, you can see that it is filled
with white.The dog path has also been saved in the Paths palette, just for safekeeping. All paths in
the Paths palette and on vector layer masks are vector components of the image.
Figure 1.4 shows a vector image in which the vector information is stored in a Smart Object.
FIGURE 1.4
A vector-only image in which the vector information is contained in a Smart Object
Smart Object layers have a special icon at the lower right of the layer thumbnail and can contain
linked Photoshop or Illustrator files. Smart Objects also allow certain Photoshop functions that
regular layers may not allow. To confirm that a Smart Object contains vector information, you can
double-click the Smart Object, and check the linked file that opens for vector information.
CROSS-REF
Smart Objects are discussed in Chapter 8.
Vector-only files can contain color, but in order to take full advantage of the vector format, separate
colors must be on separate layers; however, gradients that include more than one color can be on a
vector layer. Gradients generally don’t contain the kind of detail that requires the bitmap format.
12
Working with Digital Images
Figure 1.5 shows a vector-only image with four colors. The layers are linked so that they resize
together.
Figure 1.6 shows a combination vector and bitmap image. The type layer contains vector information, the Star Shape Layer contains the star shape in the vector layer mask, and the Background
layer contains a bitmap image.
FIGURE 1.5
A vector-only image with four colors. Vector information is contained in the vector layer masks.
FIGURE 1.6
A combination vector and bitmap image
13
1
Part I
Welcome to Adobe Photoshop CS4
While the vector parts of the image are still resolution-independent and can be resized with no
worries, the image must have enough resolution to describe the detail in the bitmap photo.
Printing an enlarged bitmap image that doesn’t have enough resolution to describe the detail in the
enlarged size often results in a pixilated look, shown in Figure 1.7.
CROSS-REF
Part IV explains how to create vector paths, type, and shapes.
FIGURE 1.7
Printing a bitmap image at a size larger than its resolution can result in a pixilated look.
You can print a vector-only image as large as you want without regard to image resolution, and it
will still look smooth and not pixilated, as shown in Figure 1.8. A vector-only image will appear
pixilated on-screen if you zoom in far enough, but it will print smoothly.
FIGURE 1.8
A vector image will print smoothly without regard to resolution, even if it is enlarged.
14
Working with Digital Images
Color mode
The color mode of an image specifies which basic set of colors is used to make up an image. You
can specify the color mode in the Image ➪ Mode menu.
Colors within most color modes are stored in color channels. You can view the channels in the
Channels palette.
The color modes available in Photoshop are:
n RGB color mode. Red, Green, and Blue are used to make up the image’s color. In 8-bpc
images, tonal values range from 0 (black) to 255 (white), for each of the three colors.
When the values for all three colors are equal, the resulting color is a neutral color —
black, white, or a shade of gray with no color hue. RGB mode (see Figure 1.9) is used to
display images on-screen because monitors use Red, Green, and Blue light to display
color. It is also commonly used when color-correcting images.
FIGURE 1.9
RGB mode channels
n CMYK color mode. Cyan, Magenta, Yellow, and Black are used to make up the image’s
color. Tonal values range from 0 percent (no color) to 100 percent (maximum amount of
color) for each of the four colors. In CMYK-colors that are neutral, Magenta and Yellow
have equal values and Cyan has a higher value than either Magenta or Yellow; the amount
of Black determines the lightness of the color.
CMYK mode (see Figure 1.10) is used when printing images with Cyan, Magenta, Yellow,
and Black inks. Typically, RGB mode is used to color-correct images in order to preserve
the maximum amount of colors and to make assigning neutral color values easier (all
three color values are equal in neutral colors in RGB mode), then the image is converted
to CMYK mode. But color correction can also take place in CMYK mode.
n Lab color mode. The Lab color mode (pronounced el, ay, bee, not lab) is based on a standardized way to describe color that corresponds to the way a person with normal vision
sees it. It is used by color management systems as an intermediate color reference to help
accurately convert colors from one color space to another. It is sometimes used in color
correction and image manipulation. Lab color (see Figure 1.11) uses the following components to make colors: an L (lightness) component, an a component that contains green
and red, and a b component that contains blue and yellow. L values range from 0 to 100;
a and b values range from +127 to –128.
15
1
Part I
Welcome to Adobe Photoshop CS4
FIGURE 1.10
CMYK mode channels
FIGURE 1.11
Lab mode channels
n Grayscale mode. Black, white, and shades of gray are used to make up the “colors”
in an image (no hue is present). In 8-bpc images, there can be 256 brightness values.
Grayscale images’ values can be measured in a range from 0 (black) to 255 (white) or
with 0 percent–100 percent of black ink coverage.
Grayscale mode (see Figure 1.12) can be used when preparing images to be printed with
one color of ink. Grayscale images can be assigned a color within most page layout software, such as InDesign or Quark Xpress.
FIGURE 1.12
Grayscale mode channels
n Bitmap mode. Only black and white pixels are used. Bitmap mode images are 1-bpc
images (see Figure 1.13). They are often used for simple artwork that lends itself to
reproduction in only black and white pixels, sometimes called line art. Bitmap mode
images can be assigned a color within most page layout software, such as InDesign or
Quark Xpress.
16
Working with Digital Images
n Duotone mode. In Duotone mode, one to four custom inks can be used to make up the
colors in an image. Figure 1.14 shows Duotone-mode channels, options, and curves. A
dutone can be used to add a color tint to a black-ink photo printed in a brochure that
uses only black ink plus one other color. A quadtone with custom inks can give a rich
and uniquely colored look to a photograph. Pantone offers reference books that show
sample duotones printed in various inks and their ink percentages.
FIGURE 1.13
Bitmap mode channel
FIGURE 1.14
Duotone mode channels, Duotone options, and Duotone curves
17
1
Part I
Welcome to Adobe Photoshop CS4
The Duotone-mode images can be referred to as monotones, duotones, tritones, or quadtones. Their values are typically measured with 0%–100% of ink coverage. Duotone mode
is used when two, three, or four custom ink colors (other than the typical CMYK combination) are used in printing.
Duotone mode separates the overall image into multiple custom colors, and the Duotone
mode curves can be used to adjust the percentage of ink in specific areas of the tonal
range of each color.
n Indexed color mode. Up to 256 colors can be used to make up the colors in an image.
Colors are stored in a color lookup table (CLUT). Indexed color images are typically used
for GIF format images destined for on-screen display (see Figure 1.15). When you save a
GIF by choosing File ➪ Save for Web & Devices, the image is automatically converted to
Index color mode.
You can generally or selectively reduce the number of colors in an indexed color image to
reduce the image’s file size, which decreases download time for Web images. In an effort
to improve an image’s appearance while at the same time using fewer colors, you can also
take advantage of dithering, the simulation of a third color by generating the appearance
of two colors being mixed together.
FIGURE 1.15
Indexed color mode channels and GIF options, including Dither options and Color Table
18
Working with Digital Images
n Multichannel mode. Multichannel mode uses only spot channels (see Figure 1.16), channels that store parts of an image that you want to print in custom-selected inks (sometimes
called spot colors), such as inks from the Pantone color library. In Multichannel mode,
you can put certain parts of an image on each spot channel and assign custom-selected
inks to the spot channel.
For example, you can put a custom-red-ink logo on the spot channel for red ink and a
custom-blue-ink background on the spot channel for blue ink. You can also put image
areas that you want to print in clear varnishes on spot channels.
Spot channels result in inks overprinting each other, so if the logo mentioned previously
is to print in red ink only, then the area corresponding to the logo in the blue spot channel must contain no pixels in order to avoid blue ink printing on the red ink logo.
FIGURE 1.16
Multichannel mode spot color channels in a two-color image
NOTE
Spot channels can be added to CMYK images by using the Channel palette menu.
A common scenario would be adding a spot channel for a clear varnish to a CMYK
image.
Color space
There are many colors that can be formed from combinations of the basic sets of colors that make
up each color mode, such as RGB (Red, Green, Blue) or CMYK (Cyan, Magenta, Yellow, Black).
But not all devices (monitors, presses, desktop printers) can reproduce all the possible color combinations within each color mode. Therefore, there are sets of color-combinations within each
color mode that are customized for different devices and that you can use to make up the colors in
your images. You can think of these sets of color-combinations as color palettes. They also can be
referred to as color spaces, color gamuts, or color profiles.
When you use a set of color-combinations that is specially made for an image’s destination device,
your image should look better when it is reproduced that device. For example, if you erroneously
use a color space that is made for uncoated paper for an image that is going to be printed on glossy
paper on a printing press, you are allowing your image to potentially have many more colors than
can be reproduced satisfactorily on uncoated paper. There can be unpredictable results in this situation. It’s better in this situation to use a color space that is specifically tailored to uncoated paper
printed on a printing press.
19
1
Part I
Welcome to Adobe Photoshop CS4
Before you begin working on an image, you can specify the color spaces (also called color profiles or
gamuts) for various types of images, such as RGB, CMYK, Grayscale, and Spot Color. This enables
Photoshop’s color management functions, which attempt to keep colors accurate across devices,
such as a monitor, a desktop printer, and a printing press.
To specify color spaces, choose Edit ➪ Color Settings (see Figure 1.17). If you are working on
images for the Web, the sRGB color space is a good set of RGB colors to work in because it resembles the set of colors available for display on many monitors.
If you are working on images for printing on a sheetfed press on coated paper, you may want to
choose the CMYK color space U.S. Sheetfed Coated. Custom color profiles (color spaces) may also
be created and loaded.
FIGURE 1.17
The Color Settings dialog box
You can change an image’s color profile by choosing Edit ➪ Assign Profile or Edit ➪ Convert
Profile. Assign Profile uses a conversion method that pays more attention to keeping the color’s
numeric values the same and does not prioritize keeping the color’s appearance consistent from one
color space to another. Convert Profile attempts to keep the color’s appearance the same from one color
space to another and does not prioritize keeping the color’s numeric values the same.
Color management is not a perfect system. With that in mind, you may also choose not to use color
management by clicking the More Options button in the Color Settings dialog box, then selecting
Color Management Off in the Settings menu.
20
Working with Digital Images
CROSS-REF
More about color management is discussed in Chapter 23.
File format
Various destinations for an image, such as other software or a computer screen display, require
certain file formats because of the software language or properties of the device. Some common file
formats are JPEG and GIF, usually used for Web page display, and TIFF, often used for page layout
programs and printing.
The file formats supported by Photoshop CS4 are listed in Table 1.2.
CROSS-REF
For descriptions and purposes of file formats, see Chapter 7 and Appendix A.
TABLE 1.2
File Formats Supported by Photoshop CS4
Format
Extension
3D Studio Max
.3DS
Adobe Illustrator
.ai
Adobe Illustrator Paths
.ai
Alias PIX
.pix
Alias|Wavefront
.obj
Amiga IFF
.iff, .tdi
AVI
.avi
BMP
.bmp, .rle, .dib
Camera Raw
.tif, .crw, .nef, .raf, .orf, .mrw, .dcr, .mos, .raw, .pef, .srf, .dng, .x3f, .cr2, .erf, .
sr2, .kdc, .mfw, .mef, .arw
Cineon
.cin, .spdx, .dpx, .fido
Collada
.dae
CompuServe GIF
.gif
Dicom
.dcm, .dc3, .dic
Digital Negative
.dng
ElectricImage
.img, .ei, .eiz, .eizz
EPS
.eps, .epsf, .epsp
EPS with JPEG Preview
.eps
continued
21
1
Part I
Welcome to Adobe Photoshop CS4
TABLE 1.2
(continued)
Format
Extension
EPS with PICT Preview
.eps
EPS with TIFF Preview
.eps
Filmstrip
.flm
Google Earth 4
.kmz
JPEG
.jpg, .jpeg, .jpe
JPEG 2000
.jpf, .jpx, .jp2, .j2c, .j2k, .jpc
Kodak Photo CD
.pcd
Large Document Format
.psb
MacPaint
.mpt, .mac
OpenEXR
.exr
PCX
.pcx
PDF
.pdf, .pdp
Photoshop
.psd, .pdd
Photoshop DCS 1.0 and 2.0
.eps
Photoshop Raw
.raw
PICT
.pct, .pict
PICT Resource
.rsr
Pixar
.pxr
PixelPaint
.px1
PNG
.png
Portable Bitmap
.pbm, .pgm, .ppm, .pnm, .pfm, .pam
QuickTime Movie
.mov, .avi, .mpg, .mpeg, .mp4, .m4v
Radiance
.hdr, .rgbe, .xyze
Scitex CT
.sct
SGI RGB
.sgi, .rgb, .rgba, .bw
SoftImage
.pic
Targa
.tga, .vda, .icb, .vst
TIFF
.tif
U3D
.u3d
Wavefront RLA
.rla
Wireless Bitmap
.wbm, .wbmp
ZoomView
.mtx
This file format list is taken from Adobe Tech Note: www.adobe.com/go/kb401022
For the most up-to-date comprehensive file format list, search for “Import and export file formats for Photoshop CS4” on the
Adobe Support Web site at www.adobe.com/support/photoshop/.
22
Working with Digital Images
Low versus high resolution
Bitmap images, as opposed to vector-only images, depend on the number of pixels in the image to
describe the image’s detail. In Photoshop, image resolution is measured in pixels per inch (ppi)
and can be seen and changed in the Image Size dialog box (choose Image ➪ Image Size), shown in
Figure 1.18. If an image does not have enough resolution for its purpose, it may look blurry or
pixilated.
Generally, images destined for print will have enough pixels if the resolution is 300 ppi at the final
size in inches. Images destined for on-screen display should be 72 ppi at the final size in pixels.
An adequate number of pixels needed to describe an image’s detail should be captured initially, for
example, at the time a digital photo is taken or a photographic print is scanned. If the resolution is
increased or the size of the image is enlarged after importing it into Photoshop, there may not be
enough pixels in the image to adequately describe the image’s detail at a larger resolution or size.
Even though you can increase the resolution or size in Photoshop, no new pixel information that
describes detail is added.
FIGURE 1.18
The Image Size dialog box
Photoshop may simply guess at what kind of pixels to add, which is called resampling up or interpolation. This may result in an image that looks blurry or pixilated.
To avoid resampling up, uncheck the Resample Image check box in the Image Size dialog box when
you increase size or resolution numbers. You can check the Resample Image check box when you
are decreasing an image’s size; this will just throw away unneeded pixels by resampling down.
To double-check that there is no resampling up happening, enter the desired numbers in the
Image Size dialog box and before you click OK, check the total file size at the top of the dialog box
to the right of Pixel Dimensions and make sure it does not display a new larger size, along with a
smaller previous size. A new larger size would indicate resampling up.
23
1
Part I
Welcome to Adobe Photoshop CS4
CROSS-REF
For more about image resolution and resizing, see Chapter 5.
Getting Images into Photoshop
It’s great to know a lot about Photoshop, and if you’ve read the previous sections in this chapter,
you have already gained knowledge that, believe it or not, many Photoshop users have not taken
the time to learn. But to apply that knowledge, you need to know how to get images from their
sources onto your computer and ready to open in Photoshop. Next are some tips that will help you
get your images from point A to B.
Digital cameras
Digital cameras come with some type of memory card that holds your digital photos, and they usually come with a cable that can connect the camera to your computer, often a USB-type cable.
There are different types of memory cards for digital cameras. Some computers come with memory
card slots that may or may not accept your camera’s type of memory card. Some desktop printers
also come with memory card slots that you can use to transfer photos from the memory card to your
computer, assuming that your printer is connected to the computer. If it’s not obvious that your
type of memory card will fit in your device’s memory card slot, check the device’s documentation
or contact the manufacturer of the device.
If you don’t have the device’s documentation, you may be able to find a downloadable operation
manual on the manufacturer’s Web site that will give you the memory card slot information.
Inexpensive card readers that accept virtually all types of memory cards, such as a 35-in-1 card
reader, can also be purchased and connected to your computer via a USB- or FireWire-type connection. Check to see which type of connection your computer has before you purchase a card reader.
Transferring images from a memory card slot to your computer doesn’t use the camera’s battery
and can be faster than a USB connection.
Figure 1.19 shows what USB-type connectors look like. Figure 1.20 shows what FireWire connectors look like.
If you want to use a cable connection to transfer images from your camera to your computer, the
memory card must be inside the camera. You can purchase a cable that connects your camera to
your computer if you don’t have one.
One end of the cable will need a smaller USB connector for the camera and the other end will need
a larger USB connector for your computer. Look at the ports on your camera and computer to see
what type of connector ends the cable needs.
24
Working with Digital Images
FIGURE 1.19
USB connectors
FIGURE 1.20
FireWire connectors
FireWire
You can also contact the manufacturer to find out what kind of cable you need for your camera
model. The major manufacturers, like Canon and Nikon, have Web sites with lots of information,
including downloadable camera operation manuals. You can also take the camera to an electronics
store, such as Circuit City, for help finding the right cable.
When you either put your camera’s memory card into an appropriate card slot or connect your
camera to your computer with a cable, an additional drive that represents the memory card should
show up on your computer. Figure 1.21 shows a memory card called “NO NAME,” listed with the
other drives on the computer: Macintosh HD, iDisk, and My Book. The path to the images inside
the NO NAME memory card is shown as DCIM ➪ 101CANON ➪ images.
You can use your computer’s operating system to copy the images from their location on the memory card to your hard drive, then use Bridge or choose File ➪ Open from within Photoshop to open
the files on your hard drive (not directly from the memory card drive) into Photoshop.
25
1
Part I
Welcome to Adobe Photoshop CS4
CROSS-REF
Adobe Bridge provides a useful visual interface to find, open, and process files on
your computer. Using Bridge is discussed in Chapter 3.
FIGURE 1.21
An example of a file path from a camera’s memory card to the images: NO NAME ➪ DCIM ➪
101CANON ➪ images
After you connect your camera or memory card to your computer, you can use Adobe Bridge’s
Photo Downloader by following these steps:
1. In Photoshop: Choose File ➪ Browse (opens Bridge).
2. In Bridge: Choose File ➪ Get Photos from Camera.
Bridge’s Photo Downloader (see Figure 1.22) automatically finds the camera’s images and allows
you to choose a location on your computer to copy the images to and create a new subfolder to put
them in. Using Photo Downloader, you can also rename the images with text and a serial number
as they are being copied to your computer, preserve the old filename inside the image’s file information, and automatically display the images in Adobe Bridge.
Film cameras
A quick, convenient, and inexpensive way to get images from a film camera into digital form is to
purchase a photo CD along with your prints when you get your film developed. Simply put the CD
into your computer, copy the folder of images to your hard drive, and use Bridge or choose
File ➪ Open from within Photoshop to open the files on your hard drive (not directly from the CD)
into Photoshop.
If you have already developed the film without getting a photo CD, you can still purchase a photo
CD from many developers if you provide them with your negatives to scan. It is usually more
expensive than getting the CD at the time of developing, but still inexpensive at discount developers such as Wal-Mart.
26
Working with Digital Images
FIGURE 1.22
The Adobe Bridge Photo Downloader
Scanners
You can scan negatives, slides, and other transparencies with a film scanner, or you can scan prints
with a flatbed scanner. Some film scanners will do batch scans, which can save loads of scanning
time. If you have a lot of slides or negatives, you may also find reasonably priced services on the
Web that offer mass film scanning.
Keep in mind that the quality of the scanner, as well as the resolution at which you scan, makes a
difference in the quality of the scanned image. Of course, the larger the print, the better. Also keep
in mind that a print is a step removed from the original. If your prints are 4 x 6 and you have a
good-quality film scanner, you can probably get a better result by scanning the negatives.
Check scanner reviews on the Web to get an idea of scanner quality, or if you have a scanner, do
some scans of your own and compare them with scans from other scanners and/or photo CDs to
get an idea of the scanner’s quality. Pay special attention to shadow and highlight detail. Check the
image quality with prints from a good printer rather than on-screen if your scanned images are
destined for print.
27
1
Part I
Welcome to Adobe Photoshop CS4
You can be confident that images for print will have enough resolution if they are scanned at
300ppi resolution or larger than their final printed size in inches. Images for on-screen display
need to have 72ppi resolution at their final size in pixels. Web pages are often constrained to an
800 wide x 600 tall pixel area, so that should give you some idea of the pixel dimensions your
images for the Web need to be. If in doubt, scan at a larger size. In Photoshop, enlarging image size
comes with a much greater risk of loss of detail than reducing it.
If you scan images from printed publications, an undesirable moiré pattern will likely be included
in the image because images printed in publications are made up of dots rather than continuous
tone. You can attempt to avoid or reduce moiré patterns by using a blur option in your scanner
software or by raising the image off the scanner bed slightly before you scan it (by mounting it on
a firm substrate and placing it on top of coins, for example).
Images that are mostly gray can benefit from being scanned in RGB color mode. You have more
initial information to work with in Photoshop, which can be useful even if you plan to convert the
image to Grayscale mode. Many scanners also let you choose the color profile. Adobe RGB is a
good color profile to use for scanning because it contains a relatively large amount of colors. You
can convert the image to another color mode in Photoshop, if necessary.
Be sure to make a note of where you’ve told your scanner to save the scanned image on your computer. Then use Bridge or choose File ➪ Open from within Photoshop to open the files on your
hard drive into Photoshop.
The Internet
You can save images from Web pages to your computer by right-clicking on the image or image
link and choosing Save Image As or Save Linked File As. If you don’t have a mouse with a rightclick or you are using a Mac, Ctrl+click to get the same context menu.
Images on the Web are low resolution, usually 72 ppi, so keep in mind resolution requirements for
the purpose of your image.
If you are using Stock Art services, such as iStockPhoto, or photo collection sites, such as Flickr,
there may be different sizes and resolutions available.
E-mail
Like images from Web pages, you can save many images or image attachments in e-mails to your
computer by right-clicking on the image or image link and choosing Save Image As or Save Linked
File As. If you don’t have a mouse with a right-click or you are using a Mac, Ctrl+click to get the
same context menu.
28
Working with Digital Images
There may also be a download button in the e-mail program, which may not give you an opportunity to choose a location on your computer. If you can’t choose a location, you will need to know
where your computer auto-saves downloaded files or make a note of the image name and search
your computer for it after it is downloaded.
JPEG is usually a fail-safe format for easy downloading through e-mail, but if a JPEG doesn’t meet
your needs, good formats for retrieval from e-mail are those that can be compressed and saved
with ZipIt or Stuffit software. Common file extensions are ZIP and SIT files. ZipIt and Stuffit are
inexpensive and can create self-extracting files at a reduced size. Once downloaded, either the files
automatically decompress when they are saved to your computer, or you can double-click the
downloaded files to decompress them. A decompressed version of the file will be saved in the same
directory as the compressed version.
Many e-mail servers are set to limit the file size that can be received through e-mail. Often, the
limit is 1MB. If the attached files are too large, the e-mail may not reach the recipient. E-mail providers should be able to tell you the file attachment size limitations.
Video
Common types of digital camcorders record to MiniDV tapes, MiniDVDs, or camcorder hard
drives. Most use FireWire cables to connect to your computer so you can copy video files to your
computer. See Figure 1.20 for FireWire connector types.
If you are shopping for a camcorder and want to edit your video in the video-editing software that
comes with your operating system or in Photoshop, be sure to research which camcorder models
can be used to transfer video files to your computer.
Transferring video files to your computer is generally easiest from camcorders that use MiniDV
tapes. Video-editing software that comes with Windows (Windows Movie Maker) and the Mac OS
(iMovie) can import MiniDV video and, if necessary, save it to a format that Photoshop can import.
Still frames from videos can also be captured and saved to your computer from Windows Movie
Maker and iMovie and opened in Photoshop. Figure 1.23 shows still frames in iMovie on a Mac.
Photoshop can open these Quicktime video file formats: MPEG-1 and -4, MOV, AVI, FLV (if Flash
8 is installed), and MPEG-2 (if an MPEG-2 encoder is installed).
Photoshop can open these image sequence formats: BMP, DICOM, JPEG, OpenEXR, PNG, PSD,
Targa, TIFF, Cineon, and JPEG 2000 if the plug-ins are installed.
29
1
Part I
Welcome to Adobe Photoshop CS4
FIGURE 1.23
iMovie lets you capture and save a still frame by navigating to the frame within the movie clip and choosing Edit ➪ Create Still Frame, then File ➪ Save Frame.
Typical steps to get video from a digital camcorder onto your computer include:
1. Make sure any recording media (MiniDV tape, MiniDVD disk) is in the camcorder.
2. Open Windows Movie Maker or iMovie.
3. Turn on the camcorder and make sure it is set to the video mode rather than the
camera mode. If the camcorder has a camera mode, this means it can also take still
photos and save to a memory card.
4. Connect the camcorder to your computer with an appropriate cable.
5. Import the video with Windows Movie Maker or iMovie, then save to a format that
Photoshop supports. For supported video formats, import directly into Photoshop by
choosing File ➪ Open or File ➪ Import ➪ Video Frames to Layers. Figure 1.24 shows how
you can use iMovie to import video onto a Mac.
30
Working with Digital Images
FIGURE 1.24
iMovie detects a connected video camera and lets you import the video by clicking the
Import button.
If these steps don’t work for your camcorder and media, keep the following tips in mind:
n MiniDVD disks cannot be put into slot-loading DVD drives and require tray-loading DVD
drives (which can be purchased inexpensively).
n More advanced video-editing software or video conversion software can be used if other
video file conversions are needed to convert the video to a format that Photoshop supports. Quicktime Pro is an inexpensive video-editing software program for Windows and
Mac and can be used to convert video formats.
n Some Web sites offer free video conversion for smaller files.
n Video-ripping software, such as MacTheRipper and Alcohol 120%, can extract video from
copy-protected DVDs and save it to your computer. This process is subject to copyright laws.
n You may be able to convert VHS tapes to digital video and transfer those files to your
computer. Typically, you would need the old camcorder (with the VHS tape inside) connected to a digital camcorder that has an AV to DV chip. An RCA cable may be needed to
connect the VHS camcorder to the digital camcorder. The digital camcorder would then
need to be connected to the computer, typically with a FireWire cable.
31
1
Part I
Welcome to Adobe Photoshop CS4
Storing Digital Images
It’s easy for digital images to accumulate to an unmanageable number, and storing and backing up
images is often a concern.
External hard drives are relatively inexpensive and offer large amounts of storage space. They can
be used to regularly back up not only your images but also your entire internal hard drive. These
drives are offered in different configurations and amounts of storage space, including those that
offer 1TB of space or more, such as Seagate, Maxtor, LaCie, My Book, and Iomega external drives.
Archival media include recordable DVD-Rs (which can hold more than 4GB) and CDs (which can
hold about 700MB).
Rewritable storage includes DVD-RWs (more expensive than DVD-Rs) and USB Flash drives (very
handy when you’re on the go).
Summary
This chapter described the characteristics and types of digital images, getting images into Photoshop,
and storing digital images. Following are key concepts:
Digital images contain pixels, usually square in shape, that describe their colors and brightness
levels. It is important to be familiar with the specific terms Photoshop uses to describe brightness levels and color qualities. Brightness, lightness, luminosity, and luminance describe the
dark to light qualities in an image, separate from the color qualities. Tonal range, or dynamic
range, is the range of dark to light values in an image, usually referred to as shadows, midtones,
and highlights. Hue refers to the color in an image, such as red, orange, or green. Saturation is
the strength or purity of a color.
Characteristics of digital images include bit depth, bitmap or vector, color mode, color space, and
file format. The images can originate from numerous sources, including digital cameras, film cameras, scanners, the Internet, e-mail, and camcorders. Digital images can be stored on numerous
types of media, including internal or external computer hard drives, DVDs, CDs, and USB Flash
drives.
32