1
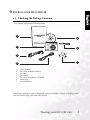
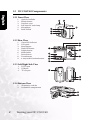
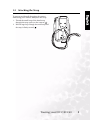
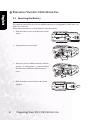
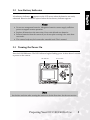
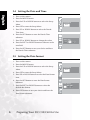
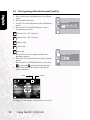
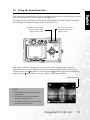
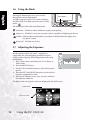
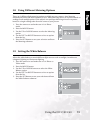
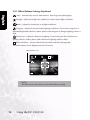
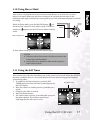
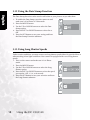
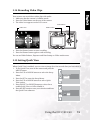
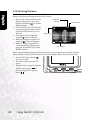
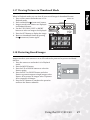
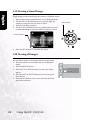
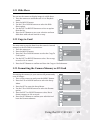
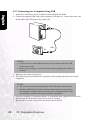
DC C30/C40 Digital Camera User’s Manual Welcome Copyright Copyright 2003 by BENQ Corporation. All rights reserved. No part of this publication may be reproduced, transmitted, transcribed, stored in a retrieval system or translated into any language or computer language, in any form or by any means, electronic, mechanical, magnetic, optical, chemical, manual or otherwise, without the prior written permission of this company. Disclaimer BENQ Corporation makes no representations or warranties, either expressed or implied, with respect to the contents hereof and specifically disclaims any warranties, merchantability or fitness for any particular purpose. Further, BENQ Corporation reserves the right to revise this publication and to make changes from time to time in the contents hereof without obligation of this company to notify any person of such revision or changes. *Windows, Internet Explorer and Outlook Express are trademarks of Microsoft Corporation. Others are copyrights of their respective companies or organizations. Taking care of your camera • Do not use your camera in the following environmental range: temperature below 0°C or above 40°C. • Do not use or store your camera in the environments listed below: – Direct sunlight – High and dusty places – Next to the air conditioner, electric heater or other heat sources – In a closed car that is directly under the sun – Unstable locations • If your camera becomes wet, wipe it with dry cloth as soon as possible. • Salt or seawater may cause severe camera damage. • Do not use organic solvents, such as alcohol, etc., to clean your camera. • If the lens or viewfinder is dirty, use a lens brush or soft cloth to clean the lens. Do not touch the lens with your fingers. • To prevent electrical shock, do not attempt to disassemble or repair your camera by yourself. • Water may cause a fire or electric shock. Therefore, store your camera in a dry place. • Do not use your camera outdoors when it is raining or snowing. • Do not use your camera in or near water. • If a foreign substance or water gets in your camera, please turn the power off immediately and disconnect the batteries and the transformer. Remove the foreign substance or water, and send it to the maintenance center. • Transfer the data to the computer as soon as possible to avoid losing your image data. Table of Contents 1. Touring your DC C30/C40 .................................... 1 Englisch 1.1 Checking the Package Contents....................................... 1 1.2 DC C30/C40 Components ............................................... 2 1.2.1 Front View............................................................... 2 1.2.2 Rear View ................................................................ 2 1.2.3 Left/Right Side View ............................................... 2 1.2.4 Bottom View ........................................................... 2 1.3 Attaching the Strap ........................................................... 3 2. Preparing Your DC C30/C40 for Use.................... 4 2.1 Inserting the Battery ......................................................... 4 2.2 Low Battery Indicator....................................................... 5 2.3 Turning the Power On ..................................................... 5 2.4 Setting the Date and Time................................................ 6 2.5 Setting the Date format .................................................... 6 2.6 Language Settings ............................................................. 7 2.7 TV Out Settings ................................................................ 7 2.8 Setting the Beep Sound..................................................... 8 2.9 Setting the Power Save Function ..................................... 8 2.10 Loading an SD Memory Card ........................................ 9 2.10.1 Inserting the SD Memory card............................. 9 2.10.2 Removing the SD Memory card .......................... 9 2.11 Camera Mode Setting ................................................... 10 2.11.1 Photo Mode ........................................................ 10 2.11.2 Playback Mode ................................................... 10 2.11.3 Video Mode ........................................................ 10 3. Using the DC C30/C40 ........................................ 11 3.1 Previewing a Picture ....................................................... 11 3.2 Taking a Picture .............................................................. 11 3.3 Setting the LCD Display Mode ...................................... 11 3.4 Setting Image Resolution and Quality........................... 12 3.5 Using the Zoom Function .............................................. 13 3.6 Using the Flash................................................................ 14 3.7 Adjusting the Exposure .................................................. 14 Table of Contents I Table of Contents Englisch 3.8 Using Different Metering Options .................................15 3.9 Setting the White Balance ...............................................15 3.9.1 White Balance Settings Explained ........................ 16 3.10 Using Macro Mode .......................................................17 3.11 Using the Self Timer......................................................17 3.12 Using the Date Stamp Function ...................................18 3.13 Using Long Shutter Speeds ...........................................18 3.14 Recording Video Clips ..................................................19 3.15 Setting Quick View........................................................19 3.16 Viewing Pictures............................................................20 3.17 Viewing Pictures in Thumbnail Mode.........................21 3.18 Protecting Stored Images ..............................................21 3.19 Erasing a Stored Image..................................................22 3.20 Erasing all Images..........................................................22 3.21 Slide Show......................................................................23 3.22 Copy to Card .................................................................23 3.23 Formatting the Camera Memory or SD Card .............23 3.24 DPOF Print Settings......................................................24 3.24.1 Print Order Setting.............................................. 24 4. PC Dependent Features ........................................25 4.1 Installing the Digital Camera Software ..........................25 4.2 Bundled Software ............................................................26 4.3 Making Connections.......................................................27 4.3.1 Viewing Images on TV.......................................... 27 4.3.2 Connecting to a Computer Using USB................ 28 5. Troubleshooting....................................................29 6. Specifications.........................................................31 7. Service information...............................................33 II Table of Contents BenQ DC 5530 User’s Manual 1 TOURING YOUR DC C30/C40 Englisch 1.1 Checking the Package Contents The package includes the following items: 1 DC C30/C40 Digital Camera Manual User’s M Us 5 Welcome 2 6 3 7 4 1. 2. 3. 4. 5. 6. 7. User's manual DC C30/C40 digital camera AV cable USB cable DC C30/C40 software CD-ROM Hand strap 2 x AA Batteries If anything is missing or appears damaged, contact your dealer. Save the packaging in the event you need to ship your camera for service. Touring your DC C30/C40 1 BenQ DC 5530 User’s Manual 1.2 DC C30/C40 Components Englisch 1.2.1 Front View 1. 2. 3. 4. 5. 6. Optical viewfinder Shutter button Lens/lens cover Self-timer/AF assist lamp Microphone Built-in flash 2 1 6 3 4 5 1.2.2 Rear View 1. 2. 3. 4. 5. 6. 7. 8. 9. Green LED indicator LCD panel Menu button Flash/SET button Display button Mode switch Power button Zoom buttons 4-ways multi-function buttons 6 7 1 w T 8 2 3 9 4 5 1.2.3 Left/Right Side View DC IN port USB port TV out port 1 DC IN 3.3V 1. 2. 3. 2 TV OUT 3 1.2.4 Bottom View 1. 2. SD memory card slot AA batteries compartment 1 2 2 Touring your DC C30/C40 BenQ DC 5530 User’s Manual 1.3 Attaching the Strap Englisch DC IN 3.3V To prevent accidentally dropping the camera when using your camera, always use the strap. 1. Thread the small loop of the hand strap through the strap eyelet on the camera (A). 2. Pull the large loop through the small loop until the strap is firmly secured (B). A B Touring your DC C30/C40 3 BenQ DC 5530 User’s Manual 2 PREPARING YOUR DC C30/C40 FOR USE Englisch 2.1 Inserting the Battery BATTERY OPEN The cameras powered by two AA-size alkaline batteries or rechargeable Ni-MH (min. 550 mAh/1.2V) batteries. Follow these instructions to insert batteries into the camera. 1. Slide the battery cover in the direction of the arrow. 2. Swing the battery cover open. 4. Slide the battery cover back into the closed position. 4 Preparing Your DC C30/C40 for Use BATTERY OPEN 3. Insert two AA-size alkaline batteries with the positive (+) and negatime (-) poles matching the directions indicated inside the battery cover. BenQ DC 5530 User’s Manual 2.2 Low Battery Indicator Englisch A low battery indicator appears on the LCD screen when the batteries are nearly exhausted. Batteries should be replaced when the low battery indicator appears. Notes • • • • Do not use manganese batteries. Manganese batteries cannot supply sufficient power to support camera operation. Replace all batteries at the same time. Never mix old and new batteries. Remove batteries from the camera if you do not plan on using it for more than two weeks. The camera body may feel warm after extended used. The is normal. 2.3 Turning the Power On Press the POWER button. The LED indicator begins flashing green. It takes about 3 seconds to power on the camera. LED Indicator Power button w T Note Set the date and time after turning the camera on for the first time. See the next section. Preparing Your DC C30/C40 for Use 5 BenQ DC 5530 User’s Manual 2.4 Setting the Date and Time Englisch 1. Turn on the camera. 2. Press the MENU button. 123 3. Press the UP or DOWN buttons to select the Setup Menu. Setup Menu Enter 4. Press SET to enter the Setup Menu. 5. Press UP or DOWN buttons to select the Date & Time item. 6. Press the SET button to enter the Date & Time submenu. Tv Date & Time 7. Press UP or DOWN buttons to change the values. 8. Press the LEFT or RIGHT buttons to advance to the next field. 2003 10 10 YMD 9. Press the SET button to save your choice and leave the Date & Time submenu. 2.5 Setting the Date format 1. Turn on the camera. 2. Press the MENU button. 123 3. Press the UP or DOWN buttons to select the Setup Menu. Setup Menu Enter 4. Press SET to enter the Setup Menu. 5. Press UP or DOWN buttons to select the Date format item. 6. Press the SET button to enter the Date format submenu. 7. Press the LEFT or RIGHT buttons to select the desired date format. 8. Press SET button to save your choice and leave the Date format submenu. 6 Preparing Your DC C30/C40 for Use Date format YMD SD F YMD _ _ _ MDY _ _ _ DMY ___ BenQ DC 5530 User’s Manual 2.6 Language Settings Englisch The camera can display menus and other information in a number of different languages. 1. Turn the camera on. 2. Press the MENU button. 123 Setup Menu Enter 3. Press the UP or DOWN buttons to select the Setup Menu. 4. Press SET to enter the Setup Menu. 5. Press UP or DOWN buttons to select the Language. 6. Press the LEFT or RIGHT buttons to select the desired language. 7. Press the SET button to save your choice and leave the Language submenu. YMD Language English SD F 2.7 TV Out Settings Your camera can be connected to TV as described in Chapter 4. Connecting to a TV allows you to preview photos and video clips on the television screen. TV Out should be set to either NTSC or PAL depending on your region. The default setting varies according to the country of purchase. 1. Turn the camera on. 2. Press the MENU button. 3. Press the UP or DOWN buttons to select the Setup Menu. 4. Press SET to enter the Setup Menu. 5. Press the UP or DOWN buttons to select TV Out. 123 Setup Menu Enter z z Tv TV Out - NTSC NT SC PAL 6. Press the LEFT or RIGHT buttons to select NTSC or PAL. 7. Press the SET button to save your choice and leave the TV Out submenu. Note • • NTSC : America, Japan, Taiwan, Korea PAL : All of Europe Preparing Your DC C30/C40 for Use 7 BenQ DC 5530 User’s Manual 2.8 Setting the Beep Sound Englisch The camera beep sound can be turned on (default) or off as required. 1. Turn the camera on. 2. Press the MENU button. 3. Press the UP or DOWN buttons to select the Setup Menu. 4. Press SET to enter the Setup Menu. SD F Beep ON OFF z z 5. Press the UP or DOWN buttons to select the Beep option. Tv 6. Press the LEFT or RIGHT buttons to choose On or Off. 7. Press the SET button to save your option and leave the Beep submenu. 2.9 Setting the Power Save Function To save battery power, your camera can be set to turn itself off after 1, 3 (default), or 5 minutes of inactivity. The period can be set in the Setup Menu. 1. Turn the camera on. 123 2. Press the MENU button. 3. Press the UP or DOWN buttons to select the Setup Menu. Setup Menu Enter 4. Press SET to enter the Setup Menu. 5. Press the UP or DOWN buttons to select the Power Save submenu. 6. Press the LEFT or RIGHT buttons to select off,1, 3 or 5 mins. The camera will turn itself off automatically if not used for the specified period. You can also turn the function off completely. 7. Press SET button to save your option and leave the Power Save submenu. SD F Power Save - Off z z z 1min 3min 5min z Tv Note The Power Save function will work only when the camera is powered by batteries. If a DC power supply is used, the camera will not turn off automatically. 8 Preparing Your DC C30/C40 for Use BenQ DC 5530 User’s Manual 2.10 Loading an SD Memory Card Englisch BATTERY OPEN The SD memory card slot is located beneath the battery cover, adjacent to the battery comparment. 2.10.1Inserting the SD Memory card 1. Slide the battery cover open. 2. Slide the SD card into the slot as shown. 3. Close the battery compartment. 2.10.2Removing the SD Memory card 1. Slide the battery cover open. 2. Push and release the SD card. It will eject part way from the slot. 3. Pull the SD card from the slot. LOC K ړMB 4. Close the battery cover. When a memory card is inserted, an icon appears in the LCD. BATTERY OPEN Images, videos, and audio files are automatically saved to the flash memory card whenever it is inserted in the camera Notes • To prevent valuable data from being Press the tab in the direction of the arrow accidentally erased from an SD Memory on the card to write Card, slide the write-protect tab (on the protect the SD Memory Card. side of the SD Memory Card) to Write-protect tab "LOCK". To save, edit, or erase data on an SD Memory Card, you must unlock the card. Format your SD Memory Card before use. Refer to 3.23“Formatting the Camera Memory or SD Card” on page 23. LOCK • • Preparing Your DC C30/C40 for Use 9 BenQ DC 5530 User’s Manual 2.11 Camera Mode Setting Englisch Your camera can be set in various modes for different situations. 2.11.1Photo Mode In Photo mode, the camera automatically adjusts exposure and white balance to suit the shooting environment. 2.11.2Playback Mode In playback mode you can review, erase, and protect photos and video clips. 2.11.3Video Mode Your camera can record video clips with audio in video mode. White balance and exposure can be set before recording a video clip. Note • 10 When the camera is connected to a computer with the included USB cable, the camera acts as a mass storage device, regardless of the mode setting. Preparing Your DC C30/C40 for Use BenQ DC 5530 User’s Manual 3 USING THE DC C30/C40 3.1 Previewing a Picture Preview photos on the LCD screen before pressing the shutter button. 1. Turn on the camera and the LED indicator next to the viewfinder flashes green. 2. Select Photo mode. 3. The image automatically appears on the LCD screen together with information about current camera settings. 3.2 Taking a Picture 1. Turn the camera on and make sure it is in Photo mode. 2. Capture the photo by pressing the shutter button down until the camera beeps. 3. The photo is captured and stored on the camera's internal memory, or on the SD card if inserted. The green LED Flashes while the image is being stored. NOTES: • When the shutter button is pressed halfway down, check the exposure value that appears on the LCD screen to make sure that it is appropriate for the lighting conditions. • The beep does not sound if the beep setting is turned off in the Set menu. 3.3 Setting the LCD Display Mode Turn the LCD Screen display on or off by pressing DISP. There are 2 LCD screen displays in Playback and Video modes. There are 3 LCD displays in Photo mode. 3M +0.0 A 1. In Playback mode and Video modes, press DISP once to turn the on-screen information display (OSD) off and press again to restore OSD. 2. In Photo mode, press DISP once to turn the OSD off, once again to turn the LCD off completely and a third time to turn the LCD and OSD back on. Using the DC C30/C40 41 11 Englisch This chapter describes the camera operating modes, and explains how to take, review, and manage pictures or movies. BenQ DC 5530 User’s Manual 3.4 Setting Image Resolution and Quality Englisch 1. Turn on the camera and make sure it is in Photo mode. 2. Press the MENU button. 2048x1536 3. Use the UP or Down buttons to select Resolution option. 4. Press the LEFT or RIGHT buttons to select a resolution from the list. 3M 2M 1M WB 4M 2304 x 1728 ( DC C40 only ) 3M 2048 x 1536 ( DC C30 only ) 2M 1600 x 1200 1M 1024 x 768 680 x 480 640 x 480 5. Press SET to save your setting and leave the Resolution option. 6. Press the UP or DOWN buttons to select Quality option. 7. Press the LEFT or RIGHT buttons to select Fine or Normal quality from the submenu. 8. Press SET to save your selection and leave the Quality submenu. Size Quality 3M +0.0 A 41 The image size and quality are displayed on the LCD. 12 Using the DC C30/C40 Quality - Fine WB YMD x 640 480 BenQ DC 5530 User’s Manual 3.5 Using the Zoom Function Press W to zoom out for a wide angle shot (subject appears further away). Press T to zoom in for a telephoto shot (subject appears closer). w T Digital zoom works by enlarging the center portion of an image through a software interpolation process. The digital zoom is used to achieve magnification levels up to 4X. In Photo mode, press T to zoom in. Continue pressing T until the digital zoom indicator is displayed. Press T to digitally zoom in on a subject in increments of 0.2X. Digital zoom ratio 11/14 x1.6 NOTES: • The digital zoom does not work in video mode. • In Photo mode, you can zoom in and out in steps of 0.2 x. • In Playback mode, you can zoom in and out in steps of 0.1x. 103_0007 2004/01/19 Using the DC C30/C40 13 Englisch Your camera has a combination of optical and digital zoom functions that allow you to zoom in on far away subjects or zoom out for a wide angle shot. The optical zoom is achieved by mechanically adjusting the lens of the camera. The digital zoom enlarges or shrinks the image using a software process. w BenQ DC 5530 User’s Manual 3.6 Using the Flash Englisch Pressing the flash button cycles your camera through the various flash modes. A symbol appears on the LCD screen to indicate the flash mode. The flash cannot be used in Video mode. Flash Button The following list describes each flash mode. Automatic - Flash fires when conditions require extra lighting Always on - Flash fires every time you take a photo, regardless of lighting conditions. RedEye - Flash strobes to let the subject’s eyes adjust to the flash, then fires again when the photo is taken. Always off - The flash never fires. 3.7 Adjusting the Exposure Set the exposure value (EV value) manually to compensate for unusual lighting conditions such as indirect indoor lighting, dark backgrounds, and strong backlighting. 1. Turn on the camera and make sure it is in Photo or Video mode. 2. Press the MENU button. Exposure +/ WB 3. Use the UP or DOWN buttons to select the Exposure option. 4. Press the LEFT and RIGHT buttons to set the desired exposure compensation value. 5. Press the SET button to save your selection and leave the Exposure submenu. The flash mode and exposure value are displayed in the OSD screen. Flash mode 3M +0.0 Exposure value A 41 14 Using the DC C30/C40 0.0 T BenQ DC 5530 User’s Manual 3.8 Using Different Metering Options 3. Use the UP or DOWN buttons to select the Metering option. 4. Use the LEFT or RIGHT buttons to select an option from the list. 5. Press the SET button to save your selection and leave the Metering submenu. Metering - Auto A YMD 123 3.9 Setting the White Balance Adjust the white balance to match different light sources such as sunlight, incandescent (tungsten) lighting or, fluorescent lighting. 1. Turn the camera on and make sure it is in Photo or Video mode. 2. Press the MENU button. +/ 3. Use the UP or DOWN buttons to select the White Balance option. 4. Use the LEFT or RIGHT buttons to select an option from the list. 5. Press the SET button to save your selection and leave the White Balance submenu. WB - Daylight WB A YMD +/ WB - Black & White WB YMD Using the DC C30/C40 15 Englisch There are 3 different light metering options available on your camera. Auto Metering automatically selects the best exposure for you, Multi Metering selects an exposure based on readings from multiple points in the subject area and Spot Metering selects an exposure based on a single reading taken from the center of your picture. 1. Turn the camera on and make sure it is in Photo +/ mode. 2. Press the MENU button. WB BenQ DC 5530 User’s Manual 3.9.1 White Balance Settings Explained Englisch A Auto - Automatically corrects white balance. Ideal for general photography. Daylight - Adjusts for bright sun conditions or other natural light conditions. Shade - Adjusts for cloudy days or twilight conditions. Tungsten - Adjusts for normal indoor lighting conditions. Corrects the orange hue of household light bulbs. Ideal for indoor photos under tungsten or halogen lighting without a flash. Fluorescent - Adjusts for fluorescent lighting. Corrects the green hue of fluorescent lighting. Ideal for indoor photos under fluorescent lighting without a flash. Black and White - Sets the white balance for black and white photography. The white balance icon is displayed on the LCD screen. White balance icon 3M +0.0 A 41 NOTE: The flash can be used with any of the white balance settings 16 Using the DC C30/C40 BenQ DC 5530 User’s Manual 3.10 Using Macro Mode When in Photo mode, press the MACRO button on the back of the camera to enter Macro mode. The Macro mode icon mode. appears on the LCD screen when in Macro Macro Button 3M Macro mode icon A 41 To leave Macro mode, press the MACRO button again. NOTES: • Distances referred to measure the distance between the camera lens and the subject. • Auto and Red-eye Reduction flash modes cannot be used in Macro mode. 3.11 Using the Self Timer Your camera has a self timer that allows you to take pictures of yourself. When the self timer function is enabled, there is a 10 second delay between the shutter being pressed and the picture being taken. 1. To enable the self timer function, press the SELF Self Timer icon TIMER button until the self timer symbol appears on the LCD display. 2. Place the camera in a stable position, preferably on a 3M tripod. 3. Compose your shot as normal. F2.7 4. Press the shutter button. A 1/108 5. The camera takes a picture 10 seconds after you press the shutter button. You will hear some beeps, indicating that the self timer is active. 41 Using the DC C30/C40 17 Englisch Your camera is equipped with a macro function that allows you to focus on very close subjects. In macro mode you can focus on subjects 50 cm from the lens when in the maximum wide angle (zoomed out) setting and 10 cm in the maximum telephoto (zoomed w T in) setting. BenQ DC 5530 User’s Manual 3.12 Using the Date Stamp Function Englisch The Date Stamp function can be used to add a date to your pictures as you take them. 1. To enable the Date Stamp, turn the camera on and WB make sure it is in Photo or Video mode. 2. Press the MENU button. Date Stamp 3. Use the UP or DOWN buttons to select the Date Stamp option. 4. Press the LEFT or RIGHT buttons to select On or Off. 5. Press the SET button to save your setting and leave the Date Stamp Function submenu. YMD ON OFF 123 3.13 Using Long Shutter Speeds Under certain conditions, you may want to use long shutter speeds either for special effects or when working in low light conditions. Your camera is equipped with a set of long shutter speeds. 1. Turn on the camera and make sure it is in Photo mode. YMD 2. Press the MENU button. 123 Long Shutter 3. Use the UP or DOWN buttons to select the Long Shutter option. 4. Press the LEFT or RIGHT buttons to select the speed you require : Off, 1, 2, 4, or 8 seconds. 5. Press the SET button to save your selection and leave the Long Shutter submenu. OFF 1" YMD 123 Long Shutter 8" 18 Using the DC C30/C40 2" 4" BenQ DC 5530 User’s Manual 3.14 Recording Video Clips Englisch Your camera can record short video clips with audio. 1. Make sure that the camera is in Photo mode. 2. Press the Video Button on the rear of the camera. 3. The video icon appears on the LCD screen. Video button Video icon Mode switch w +0.0 T A 41 4. Press the Shutter button to start recording. 5. Press the Shutter button again to end recording. You can set White Balance, Exposure and Date Stamp on Video mode menu. 3.15 Setting Quick View When Quick View is enabled, you can view an image for a few seconds after you have taken it. 1. To set Quick View, turn on the camera and press the MENU button. 123 2. Press the UP or DOWN buttons to select the Setup Setup Menu Menu. Enter 3. Press the SET to enter the Setup Menu. 4. Press the UP or DOWN buttons to select Quick View option. 5. Press the LEFT or RIGHT buttons to select On to enable Quick View, or Off to disable it. 6. Press the SET button to save your selection and leave the Quick View submenu. z z Tv Quick view ON OFF Using the DC C30/C40 19 BenQ DC 5530 User’s Manual 3.16 Viewing Pictures Englisch Pictures can be viewed using the built in LCD screen. 1. Turn on the camera and move the Sequence sliding switch next to the power number Total number button to Playback , to enable Playback mode. 5/7 2. Use the RIGHT and LEFT buttons to step through the images stored in the internal memory or on an 1/108 Image type SD card. 3. Still images can be magnified using the T (zoom in) button. 4. Return the image to original size using the W (zoom out) button. 101_0003 2004/01/19 5. When an image is magnified, it can be moved around the screen File number using the UP, DOWN, LEFT and RIGHT buttons. When cycling through images stored in the camera, some images may be marked with the Video symbol in the top left hand corner of the LCD display. These are stored video clips. 1. Press the SET (play) button to start the video. 2. The video will play on the LCD screen. 3. Playback can be stopped using the MENU (stop) button , or paused using the SET (pause) . button 20 Using the DC C30/C40 w BenQ DC 5530 User’s Manual 3.17 Viewing Pictures in Thumbnail Mode Englisch When in Playback mode, you can view all your stored images in thumbnail format. 1. Turn on the camera and make sure it is in Zoom out Playback mode. 2. Press and hold the W (zoom out) button. 3. Images stored in the camera are displayed in thumbnail format. w T 4. Use the UP, DOWN, LEFT or RIGHT buttons to select an image to be displayed. 5. Press the SET button to display the image. 6. Return to thumbnail format by pressing the W (zoom out) button again. 5/7 101_0003 2004/01/19 3.18 Protecting Stored Images Images stored on your camera or on an SD card can be protected to prevent accidental deletion. 1. Turn the camera on and make it is in Playback SD mode. 2. Press the MENU button. Protect 3. Press the UP or DOWN buttons to select the Protect option. 4. Press the LEFT or RIGHT button and select Protect to protect/unprotect single images; select Protect All to protect all images; select Unprotect All to unprotect all images. 5. Press the SET button to complete the operation and leave the Protect submenu. Using the DC C30/C40 21 BenQ DC 5530 User’s Manual 3.19 Erasing a Stored Image Englisch Single images can be erased from the camera in Playback mode. 1. Turn on the camera and make sure it is in Playback mode. 2. Use the LEFT or RIGHT buttons to cycle through the images to select the one you want to delete. 3. Press the UP (delete) button. 4. Use the UP or DOWN buttons to confirm that you want to delete the image or press the MENU button to cancel. Delete button 15/15 Confirm deletion 103_0010 2004/01/19 5. Press the SET button to complete the action. 3.20 Erasing all Images You can delete single or all images from the Setup Menu. 1. Turn the camera on and make sure it is in Playback mode. 2. Press the MENU button. 3. Press the UP or DOWN buttons to select the Delete option. 4. Press the LEFT or RIGHT buttons to select an option from the list. 5. Press the SET button to save your selection and leave the Delete submenu. 22 Using the DC C30/C40 Delete YES NO ALL BenQ DC 5530 User’s Manual 3.21 Slide Show Englisch You can set the camera to display images in a slide show. 1. Turn the camera on and make sure it is in Playback mode. 2. Press the MENU button. 3. Use the UP or DOWN buttons to select the Slide Show option. 4. Use the LEFT or RIGHT buttons to select an option from the list. 5. Press the SET button to save your selection and start slide show with selected interval or stop. Slide show - Off OFF 5" 10" SD 3.22 Copy to Card You may want to copy the data from the camera's internal memory to the SD card for convenience. 1. Turn the camera on. 2. Press the MENU button. 3. Press the UP or DOWN buttons to select the Copy To Card option. 4. Use the LEFT or RIGHT buttons to select Yes to copy to card or No to cancel. Copy to Card SD YES NO 5. Press the SET button to confirm and leave the Copy to Card submenu. 3.23 Formatting the Camera Memory or SD Card Formatting the memory in your camera will permanently erase all images. 1. Turn on the camera on and press the MENU button. 2. Press the UP or DOWN buttons to select the Setup Menu. 123 Setup Menu Enter 3. Press the SET to enter the Setup Menu. 4. Use the UP or DOWN buttons to select the Format option. 5. Press the LEFT or RIGHT buttons to select Yes to format memory or No to cancel. 6. Press the SET button to confirm your selection and leave the Format submenu. YMD Format SD F YES NO z z Using the DC C30/C40 23 BenQ DC 5530 User’s Manual 3.24 DPOF Print Settings Englisch The Digital Print Order Format (DPOF) settings allow you to select photos stored on an SD card that you want to print. You can also set the number of copies to print. This function is convenient when used with a printer or commercial printing service that supports DPOF printing. LO CK SD Card 3.24.1Print Order Setting 1. Turn the camera on and make sure it is in Playback mode. 2. Press the LEFT or RIGHT buttons to select the file you want to print. 3. Press the MENU button. 4. Press the UP or DOWN buttons to select the DPOF option. 5. Press the SET button to print the file. You are prompted to select the number of prints. 6. Press the UP and DOWN buttons to select the number of prints and then press SET to confirm your selection. Note • 24 In the DPOF submenu, you can also print all files or reset the DPOF setting. Using the DC C30/C40 BenQ DC 5530 User’s Manual 4 PC DEPENDENT FEATURES 4.1 Installing the Digital Camera Software • • • If your operating system is Windows 98SE, set up the DC C30/C40 driver first. If the operating system is Windows ME/2000/XP, then it's not necessary for you to set up the driver in advance. It's recommended that you set up the driver and software before connecting the digital camera to your PC. Normally, a software installation menu appears automatically after this installation CD is inserted into your CD-ROM drive. If the menu did not appear, browse the CD and find a program file named “Autorun.exe” in the root directory and double-click it. The menu will appear. Click each item to install the software program of your choice. To browse the content of this CD and install software manually, refer to the descriptions of the CD content in the next section. PC Dependent Features 25 Englisch To use the PC dependent functions, you need to install your digital camera software and connect the camera to your PC. BenQ DC 5530 User’s Manual Englisch 4.2 Bundled Software Software 26 Description PhotoBase Arcsoft PhotoBase enables you to efficiently find and organize your media-files. Use it to create slide shows, Web albums, or video postcards, and share your media-files with your friends on the Internet. PhotoImpression ArcSoft PhotoImpression is an easy-to-use photo editing and creative design program. Edit and retouch your photos, then add special effects or place them in cards, calendars, frames and fantasy templates. PhotoImpression also includes a wide variety of printing options. VideoImpression Arcsoft Video Impression lets you edit and combine video files. New videos can be created by existing video, animation, and image files. Quickly and easily create desktop video presentations for use at home, business, or on the Internet. PhotoPrinter Pro. Arcsoft Photo Printer is a versatile printing utility that lets you print out several different images on a single sheet of paper. It's as simple as opening your image, selecting from an assortment of templates and clicking Print. Microsoft DirectX Microsoft DirectX is an all-in-one and cross-platform media tool. Acrobat reader Adobe Acrobat Reader is a “must have” utility to read files in the popular cross-platform PDF file format. Q-link BenQ Q-link is a utility for your smart photo downloads, and has printout and edit functions. Share via email with others, for photos folders management and show slide show photos on screen. PC Dependent Features BenQ DC 5530 User’s Manual 4.3 Making Connections 1. Turn on the TV. 2. Switch on the camera. R AV L VIDEO 3. Connect the camera to the TV with the included AV cable as shown. 4. Switch your TV channel to the proper video mode for viewing video in media. Consult your TV users manual. 5. Playback images or movies as described in 3.16“Viewing Pictures” on page 20. PC Dependent Features 27 Englisch 4.3.1 Viewing Images on TV BenQ DC 5530 User’s Manual 4.3.2 Connecting to a Computer Using USB Englisch 1. Install the USB software driver included with the bundled CD-ROM. 2. Connect the supplied USB cable to the computer's USB port (A). Connect the other end of the cable to the USB port on the camera (B). A B USB NOTES: • You don’t have to switch off the camera or the computer when the USB connection is made • Refer to your computer’s manual for information regarding the USB port location 3. Make sure the camera is turned on. 4. The LCD screen turns off when the connection to the computer has been successfully completed. NOTES: • The camera will turn off automatically if the USB cable is disconnected • Windows 98SE:If this is the first time the camera has been connected to the computer, Windows detects the camera as an "Unknown device" and automatically completes the required software installation. 5. Open My Computer or Windows Explorer. A "Removable Disk" appears in the drive list. 6. Double-click the "Removable Disk" icon to view its contents. 7. Files stored on camera are located in the folder named "DCIM". 28 PC Dependent Features BenQ DC 5530 User’s Manual 5 TROUBLESHOOTING Cause Resolution Power does not turn on • The batteries are inserted incorrectly. The batteries are dead. The battery compartment door is open. • • The camera is set to Playback mode. The flash is charging The memory is full. The SD card is not formatted correctly. • The camera is set to Playback mode. The flash is charging Memory is full. • • • The camera does not take pictures. • • • • Image is not recorded when the shutter button is pressed. • • • • • • • • • Englisch Problem Reload the batteries. Replace with new batteries. Make sure the battery compartment door is securely closed. Set the camera to Photo mode. Wait for the flash to charge. Reformat the SD card. The card may be defective, use a new card. Set camera to Photo mode. Wait for flash to charge. Make space in memory by deleting unwanted images or downloading files to a computer. The flash doesn't fire. The Flash mode is set to OFF. Set the flash to any mode except OFF. Images are blurry or out of focus. • • • The camera was moving when the image was captured. The subject was beyond the focal range of the camera. • • Hold the camera steady. Turn the Macro mode on if the subject is very close. Turn Macro mode off when shooting distant subjects. Troubleshooting 29 BenQ DC 5530 User’s Manual Englisch Problem Cause Resolution Images are not displayed on the LCD screen. A memory card with nonEXIF images (recorded with another camera) is loaded. This camera cannot display non-EXIF images. Images are not saved in memory. The camera was turned off before the image was stored in memory. If the battery low indicator appears on the LCD screen, replace the batteries immediately. Cannot transfer images to a computer after connecting the USB cable. The USB driver is not installed. • • Images do not appear on the television. • • 30 Troubleshooting The cable is not connected securely. The TV Out setting is incorrect. • • Install the USB driver before you connect the camera to a computer. Turn the camera on. Use the included video cable to connect the camera to a TV. Set the video system to the correct setting, NTSC or PAL. BenQ DC 5530 User’s Manual 6 SPECIFICATIONS 3.34 megapixel CCD(C30) ; 4 megapixel CCD (C40) 2304 x 1728 pixels (C40), 2048 x 1536 pixels (C30), 1600 x 1200 pixels, 1024 x 768 pixels, 640 x 480 pixels Lens F = 35 ~ 98 mm (35mm film equivalent) F2.66 / F4.92 Zoom Optical: 3X ; Digital: 4X Focusing TTL Auto focus Focus Range Macro: 10~50 cm ; Normal: 50 cm to infinity Shutter Mechanical shutter and Electrical shutter Shutter Speed 8, 4, 2, 1, 1/2 ~ 1/2000 sec. Mechanical shutter White Balance Auto/ Daylight/ Cloudy/ Tungsten/ Fluorescent/ Black & White Exposure Metering: Auto, Spot, Multi Average. Matrix compensation: -2 ~ 2 EV (0.3 EV/ Step) LCD 1.6” TFT-LCD Flash Auto/ Red-eye reduction/ Forced flash/ Flash off Flash Range 0.8 ~ 2.0m (T), 3.0M (W) Viewfinder Optical, real image Self-Timer 10 seconds File format Still image: JPEG (EXIF 2.2), DCF, DPOF, PIM II Movie Clip: ASF format Still Image Mode Single image / Continuous (3 pic) Movie Mode 320 x 240 pixels with sound Recording time: depending on memory Storage Type Built-in memory: 14 MB flash memory External memory: SD card compatible (8~256MB) Image Play Single image/ ASF play/ Thumbnails/ Slide show Interface Digital output connector: USB 1.1 AV output DC Power input connector: 3.3V Power Source 2 x AA Battery Dimensions (W x H x D) 92 x 62.2 x 31.5 mm Weight 147 g (without battery) Camera Driver PC Driver (Windows 98SE/ 2000/ ME/ XP) Specifications Englisch Image Sensor Image Resolution 31 BenQ DC 5530 User’s Manual Software Application Englisch Q-link Photobase PhotoImpression VideoImpression PhotoPrinter Acrobat Reader DirectX System Requirements FOR WINDOWS 32 Specifications Pentium MMX or Higher Compatible CPU 64MB RAM 100MB free hard disk space CD-ROM USB port Windows 98SE/2000/ME/XP BenQ DC 5530 User’s Manual 7 SERVICE INFORMATION If you encountered problems using DC C30/C40 and the camera driver program, please send an Email (containing detailed descriptions of the problem you came upon, the hardware and software environment of your system) to the following addresses: USA: [email protected] Europe: [email protected] Taiwan: [email protected] China: [email protected] Australia and New Zealand: [email protected] Asia and other countries: [email protected] For free driver program updates, product information and news release, please visit the following web address: http://www.BenQ.com.tw/global/ Service information 33 Englisch Technical Support