1
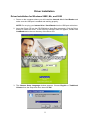
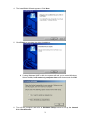
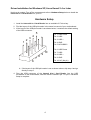
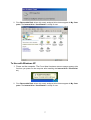
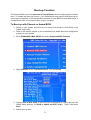
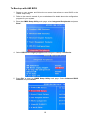
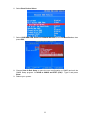
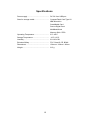
USB 2.0 Internal 6-in-1 Card Reader User’s Manual P/N TS0MFLRD6E Table of Contents Introduction Package Contents................................................................................................................ 1 Features ................................................................................................................................ 1 System Requirements ......................................................................................................... 1 Driver Installation Driver Installation for Windows 98SE, Me, and 2000 ........................................................ 2 Driver Installation for Windows XP, Linux Kernel 2.4 or Later…..................................... 4 Hardware Setup ....................................................................................................... 4 To Use the Internal 6-in-1 Card Reader To Use with Windows 98SE, Me, and 2000........................................................................ 6 To Use with Windows XP .................................................................................................... 7 To Use with Linux Kernel 2.4 or Later................................................................................ 8 To Safely Remove Memory Cards To Remove in Windows....................................................................................................... 8 To Remove in Linux............................................................................................................. 8 Boot-up Function To Boot-up with Pheonix or Award BIOS .......................................................................... 9 To Boot-up with AMI BIOS ................................................................................................ 10 Specifications.......................................................................................................... 12 Card Reader Limited Warranty Introduction Thank you for purchasing Transcend’s Internal 6-in-1 Card Reader, a small device designed for fast, easy data exchange using six types of storage media: CompactFlash, IBM Microdrive™, SmartMedia, Secure Digital, MultiMediaCard™, and Memory Stick® / PRO. Designed to fit in any 3.5” drive, Transcend’s Internal 6-in-1 Card Reader is easy to install in your computer. Package Contents The Internal 6-in-1 Card Reader package includes the following items: • Internal 6-in-1 Card Reader • Driver CD • Quick Installation Guide Features The Internal 6-in-1 Card Reader has the following features: • Compliant with USB specification version 2.0; • Supports six kinds of storage media: - CompactFlash Card Type I/II - IBM Microdrive - SmartMedia Card - Secure Digital Card - MultiMediaCard - Memory Stick / PRO • Hi-Speed with transfer rate up to 480 Mbps; • LEDs indicate card insertion and data traffic; • Boot-Up function; and • Easy installation. System Requirements • Desktop computer with an onboard USB pin-header and 3.5” drive bay • One of the following operating systems: - Windows® 98SE, Windows® 2000, Windows® Me - Windows® XP (No driver needed) - Linux kernel 2.4 or later 1 Driver Installation Driver Installation for Windows 98SE, Me, and 2000 1. Power on the computer where you will install the Internal 6-in-1 Card Reader and make sure the USB port is enabled and working properly. NOTE: Do not plug your Internal 6-in-1 Card Reader into the USB port at this time. 2. Insert the Driver CD into the CD-ROM drive (Auto-Run supported). Click the Driver button to install the driver. If the Auto-Run window does not appear, double-click CardRead.exe in the root directory of the Driver CD. 3. The Choose Setup Language window appears. Choose English or Traditional Chinese from the drop-down box, then click OK. 2 4. The InstallShield Wizard appears. Click Next. 5. Click Finish to complete the driver installation. If using Windows 98SE or Me, the system will ask you to restart Windows. Select the No, I will restart my computer later radio button and click OK. 6. Turn off the computer and refer to Hardware Setup below to set up the Internal 6-in-1 Card Reader. 3 Driver Installation for Windows XP, Linux Kernel 2.4 or Later No driver is needed. Turn off the computer and refer to Hardware Setup below to install the Internal 6-in-1 Card Reader into your PC. Hardware Setup 1. Install the Internal 6-in-1 Card Reader into an available 3.5” drive bay. 2. Find the layout of the USB pin-header in the owner’s manual of your motherboard. 3. If the layout of the USB pin-header is as shown below, it matches the default setting of the USB connector. 1 2 3 4 5 Pin 1: USB Power Pin 2: USB Pin 3: USB + Pin 4: GND Pin 5: NC/USBOC 6 7 8 9 10 Pin 6: USB Power Pin 7: USB Pin 8: USB + Pin 9: GND Pin 10: NC (No pin) If the layout of the USB pin-header is not as shown above, skip step 4 and go directly to step 5. 4. Plug the USB connecter of the Internal 6-in-1 Card Reader into the USB pin-header on the motherboard, with the red wire seated in pin 1 or pin 6. Hardware setup is complete. 4 Red White Green Black Thick Black Plug the USB connecter with the red wire seated in pin 1 or pin 6. 1 2 3 4 6 5 7 8 9 10 5. If the layout of USB pin-header does not match the default setting of USB connector (shown above), rearrange the color wires of the USB cable as follows: a. Use a needle to raise the small plastic tab and pull the color wires out of the connector. Be careful not to break the tab. PU 5 LL b. Refer to the pin assignment of USB connector (as below) and to realign the color wires. WARNING: Wire Pin Assignment Red Vcc / Power / +5V White P-, Data- Green P+, Data+ Black Gnd Thick Black Not Connect / Shield Ground Be careful in realigning the color wires. Any error here will cause serious damage to the Internal 6-in-1 Card Reader. c. Keep the same side of wire pins facing up and insert them back into the connector. Press the tab down to fully seat the wire pins. s In er t 6. Connect the USB connector of the Internal 6-in-1 Card Reader to the USB pin-header on the motherboard. Hardware setup is complete. To Use the Internal 6-in-1 Card Reader After the driver installation and hardware setup are complete, you can power on the computer and start to use Internal 6-in-1 Card Reader. To Use with Windows 98SE, Me and 2000 1. Power on the computer. The New Hardware Found window appears (the first time you power on the computer after installing the Internal 6-in-1 Card Reader.) 6 2. Four Removable Disk drives with newly assigned drive letters appear in My Computer. The Internal 6-in-1 Card Reader is ready for use. To Use with Windows XP 1. Power on the computer. The Found New Hardware status message appears (the first time you power on the computer after installing the Internal 6-in-1 Card Reader.) 2. Four Removable Disk drives with newly assigned drive letters appear in My Computer. The Internal 6-in-1 Card Reader is ready for use. 7 To Use with Linux Kernel 2.4 or Later The Internal 6-in-1 Card Reader is a driver-free device for Linux kernel 2.4 or later. Just follow the procedures below to mount and use it. 1. Power on the computer and insert a memory card into the Internal 6-in-1 Card Reader. 2. Create a directory for the Internal 6-in-1 Card Reader. Example: mkdir /mnt/CardReader 3. Mount the Internal 6-in-1 Card Reader. Example: mount –a –t msdos /dev/sda1 /mnt/CardReader No matter how many memory cards are inserted into the Internal 6-in-1 Card Reader, only the slot with first inserted memory card can be mounted. To Safely Remove Memory Cards To Remove in Windows Make sure that the LED is not blinking (no data are being transmitted). You can then safely remove the memory card. WARNING: Removal of a memory card directly may cause the system to halt. To Remove in Linux Unmount the device from the Linux environment. You can then safely remove the memory card. Example: umount /mnt/CardReader WARNING: Never remove or insert a memory card while data are being transmitted. To avoid improper shutdown, open the transmitted file from its new location to ensure transmission has been completed. 8 Boot-up Function The CompactFlash slot of the Internal 6-in-1 Card Reader can be configured as a bootable drive. To enable the Boot-Up function, your motherboard must support USB boot-up devices. Upon completion of the appropriate procedure for your BIOS as described below, a CompactFlash card can be used to boot up your computer. To Boot-up with Pheonix or Award BIOS 1. Power on your system and follow the on-screen instructions to enter BIOS or the CMOS setup utility. 2. Refer to the owner’s manual of your motherboard for details about the configuration program for your system. 3. Enter STANDARD CMOS SETUP and select Advanced BIOS Features. 4. Select USB-ZIP for the ”First Boot Device”, then press ESC. 5. Choose Save & Exit Setup to save the new configuration to CMOS and exit the CMOS Setup program. At SAVE to CMOS and EXIT (Y/N)? Type Y and press Enter. 6. Reboot your system. 9 To Boot-up with AMI BIOS 1. Power on your system and follow the on-screen instructions to enter BIOS or the CMOS setup utility. 2. Refer to the owner’s manual of your motherboard for details about the configuration program for your system. 3. Enter the CMOS Setup Utility main page, select Integrated Peripherals and press Enter”. 4. Select USB Device Legacy Support and change the setting to All Device. 5. Press Esc to return to CMOS Setup Utility main page. Select Advanced BIOS Features and press Enter. 10 6. Select Boot Device Select. 7. Select USB RMD-FDD Generic STORAGE DEVICE for the 1st Boot Device, then press ESC. 8. Choose Save & Exit Setup to save the new configuration to CMOS and exit the CMOS Setup program. At SAVE to CMOS and EXIT (Y/N)? Type Y and press Enter. 9. Reboot your system. 11 Specifications Power supply............................................... DC 5V from USB port Slots for storage media: .............................. CompactFlash Card Type I/II IBM Microdrive SmartMedia Card Secure Digital Card MultiMediaCard Memory Stick / PRO Operating Temperature ............................... 0°C–40°C Storage Temperature................................... -10°C–60°C Humidity ...................................................... 0%–90% RH Emission/Safety .......................................... FCC Class B, CE, BSMI Dimensions ................................................. 154mm x 102mm x 26mm Weight ......................................................... 315 g 12 Card Reader Limited Warranty “Above and beyond” is the standard we set ourselves for customer service at Transcend. We consistently position ourselves to be significantly above the industry norm. It’s all part of our commitment to Customer Satisfaction. All Transcend Information, Inc. (Transcend) products are warranted and tested to be free from defects in material and workmanship and to conform to the published specifications. Should your Transcend Card Reader malfunction during normal use in its recommended environment due to improper workmanship or materials within the warranty period, Transcend will repair or replace your product with a comparable product. This warranty is subject to the conditions and limitations set forth herein. Duration of Warranty: Transcend Card Readers are covered by this warranty for a period of two (2) years from the date of purchase. Transcend will inspect the product and make the determination as to whether the product is eligible for repair or replacement. The decision by Transcend regarding eligibility of the product for repair or replacement will be final and binding. Transcend reserves the right to provide a functionally equivalent refurbished replacement product. Limitations: This warranty does not apply to products that fail due to accident, abuse, mishandling, improper installation, alteration, acts of nature, improper usage, or problems with electrical power. Transcend Card Reader must be used with devices that conform to the recommended industry standards. Transcend will not be liable for damages resulting from a third party device that causes the Transcend product to fail. Transcend shall in no event be liable for any consequential, indirect, or incidental damages, lost profits, lost business investments, lost goodwill, or interference with business relationships as a result of lost data. Transcend is also not responsible for damage or failure of any third party equipment, even if Transcend has been advised of the possibility. This limitation does not apply to the extent that it is illegal or unenforceable under applicable law. Disclaimer: The foregoing limited warranty is exclusive, with no other warranties implied or statutory, including but not limited to any implied warranty of merchantability or fitness for a particular purpose. This warranty is not affected in any part by Transcend’s providing technical support or advice. Transcend Information, Inc. www.transcendusa.com The Transcend logo is a registered trademark of Transcend Information, Inc. *All logos and marks are trademarks of their respective companies.