1
SGP Technologies SA
Blackphone BP1
USER GUIDE version 1.2
Blackphone BP1
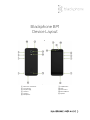
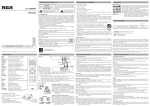
Device Layout ① Back cover removal slot ② Front camera ③ Earphone plug ④ Volume + ⑤ Volume – ⑥ Microphone ⑦ On/Off Button ⑧ Flash ⑨ Rear camera ⑩ Micro-‐USB Port ⑪ Speaker BLACKPHONE USER GUIDE
1 Technical Specifications
SCREEN
Screen Size: 4.7” (1280 * 720)
Technology: IPS HD, Capacitive >4 point multi-touch
CAMERAS
Main camera: 8MP AF (auto-focus) with LED flash
Front camera: 5MP
CONNECTIVITY
Single micro-SIM slot
Bluetooth Class 4.0 LE
WiFi 802.11b/g/n
Micro USB
3.5mm audio jack
DIMENSIONS
Approximately 141 x 69 x 9 mm (rear camera housing is an additional 2 mm)
W EIGHT
Approximately 119 grams or 4.2 ounces
HARDW ARE
Processor: NVIDIA Tegra 4i Quad-core 2GHz System on Chip
RAM: 1GB LPDDR3
STORAGE
16GB on-board storage
Single microSD slot (128GB max)
DATA NETW ORK
Rest Of World (Region1)
GSM: 850 / 900 / 1800 / 1900 MHz
HSPA+/WCDMA: 850 / 900 / 1900 / 2100
MHz (42 Mbps)
LTE FDD bands 3/7/20 * (Cat. 3 100 Mbps)
North America (Region2)
GSM: 850 / 900 / 1800 / 1900 MHz
HSPA+/WCDMA: 850 / 1700 / 1900 / 2100
MHz (42 Mbps)
LTE FDD bands: 4/7/17 * (Cat. 3 100 Mbps)
* LTE Cat. 4 (150 Mbps) under development
SENSORS
Gravity sensor, light sensor, proximity sensor, magnetic sensor, GPS
ENERGY
Lithium Polymer Battery 2000mAh
Basic Operations
Turning your Blackphone On or Off
When your Blackphone is powered off, press and hold the Power button to turn it on.
The phone will vibrate for a moment when it begins to boot.
When your Blackphone is powered on, press and hold the Power button to trigger the
“Power off” menu. Choose “Power Off” to turn off your Blackphone, “Reboot” to
reboot it, or tap anywhere outside of the menu to cancel.
Note: If your display has turned off due to inactivity, briefly press the Power button to
wake it up.
Touchscreen Operation
Use your fingers to manipulate icons, buttons, menus, the on-screen keyboard, and
other items on the touchscreen. To select or activate something, tap it.
To type something, such as a name, password, or search term, just tap where you
want to type. An on-screen keyboard will pop up allowing you to enter text.
Other common gestures include:
Touch & hold to drag: Touch & hold an item on the screen by touching it and not lifting
your finger until an action occurs. For example, touch an icon on the Home screen and
hold it. When the Remove icon is shown on the screen, dragging the selected icon to
the “Remove” area will remove it from the Home screen. You can also use touch and
hold to reposition items on the Home screen.
Swipe or slide: Quickly slide your finger across the surface of the screen without
pausing. For example, you can slide a Home screen left or right to view adjacent Home
screens.
Double-tap: Tap quickly twice on a webpage or other screen to zoom. For example,
double tap a webpage in Browser to zoom in and double-tap again to zoom out.
Pinch: In some apps, you can zoom in and out by placing two fingers on the screen at
once and pinching them together to zoom out or spreading them apart to zoom in.
Rotate the screen: In most applications, the orientation of the screen rotates with your
device as you turn it. (This does not work on the main home screen.) You can disable or
enable this behavior in the Display section of your device’s system settings.
BLACKPHONE USER GUIDE
1 Important Areas of the Touchscreen
Status icons (top of screen) are used to display the current status of your device’s
network connections, battery level, volume, and system time.
Signal Display Legend
R - Roaming
G - GPRS
3G - UMTS
E - Edge
H - HSDPA
H+ - HSDPA+
4G - LTE
All Apps (bottom center home screen): Tap this to see all of your apps and widgets.
To open an application or widget, tap its icon.
Improving Battery Life
The battery icon in the status bar shows the remaining amount of battery power. To
extend the battery life of your Blackphone, go to Settings in the applications area and
click on Display. Set the brightness of your screen and the display sleep time (the
point of time at which the display will turn off due to inactivity) to a reasonable level.
You can also make more advanced changes in the “Power saving” section of the
Settings menu.
Charging your Blackphone
Charge your Blackphone before the battery icon is empty. Your Blackphone should be
charged with a typical 5V USB DC charger. Note that it is normal for the surface of the
device to be warm to the touch while charging.
BLACKPHONE USER GUIDE
2 Settings
From the all apps screen, tap the Settings icon to enter the system settings and
make changes to any of the following.
a) WiFi : Turn the device’s WiFi capabilities on or off by touching the slider. When
you turn WiFi on, your Blackphone will scan for available networks. By choosing
the desired WiFi listing and typing the correct password, you can use the
selected network.
b) Bluetooth : Turn Bluetooth functionality on or off by touching the slider.
Blackphone can automatically scan for available Bluetooth devices. By pairing
your Blackphone with another device, you can transmit data between the
paired devices. Data usage: tap this area to see detailed information about your
device’s data usage.
c) Sound : tap to set Volume levels, Ringtones, your Default notification sound,
Tap sounds, Screen lock sounds and various other audio options.
d) Display : tap to make changes to your settings for Brightness, Wallpaper,
Screen rotation, Sleep time, or font size.
e) Storage : tap to view settings for your on-board storage and your micro-SD
card.
f) Battery : tap to check the status of the battery.
g) Power saving : tap to activate the Dynamic Backlight, Processor performance
and nSaver settings.
h) Apps : tap to see the lists of Downloaded, Running and All apps installed on
your device.
i) Location : tap to view or change your Location settings.
j) Security: tap to set or manage lock screen settings, encryption and other
security-related settings.
k) Language & input : tap to set your default language and keyboard.
l) Backup & reset : tap to access the option to factory reset your device. Note
that this will erase all data!
m) Add account : tap to add an account to your device.
n) Date & time: tap to set the system time and date if needed; these are typically
set by your carrier automatically.
o) Accessibility : tap to access various accessibility settings for your
Blackphone.
p) About phone : tap to view basic information about your Blackphone, including
system status and the current version of PrivatOS.
BLACKPHONE USER GUIDE
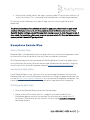
3 Blackphone Bundled Applications
Blackphone Activation Wizard
NOTE: if you make a mistake and want to start over from the very beginning, please
see https://support.blackphone.ch/customer/portal/articles/1610834-how-do-ireset.
Before you do anything else, make sure you are running the latest firmware! Please
see
https://support.blackphone.ch/customer/portal/articles/1668855-how-do-i-updateblackphone-firmware.
The getting started guide at https://my.blackphone.ch/ and the other articles in
https://support.blackphone.ch/customer/portal/topics/660710-activation-wizard are
also great resources to reference.
What is the Activation Wizard
The Activation Wizard is an exclusive Blackphone application that guides the user
step by step through the set up process of the phone. The application will help to
set up security features such as device encryption and PIN/Password. In addition,
Activation Wizard helps to set up the Silent Phone, Silent Text and Disconnect
applications.
How Activation Wizard Works
Activation Wizard will be launched automatically the first time the user switches
on the Blackphone, as well as immediately after entering the SIM card PIN code.
The Activation Wizard includes 7 different steps to help the user configure the
Blackphone.
Setting up Activation Wizard
• Step 1: Language selection. If the user does not insert a SIM card, the default
language will be English. If the user inserts a SIM card before switching the
device on, the language will automatically be set to the language corresponding
BLACKPHONE USER GUIDE
4 to the SIM. [Further support:
https://support.blackphone.ch/customer/portal/articles/1638936-what-shouldi-see-when-i-turn-on-blackphone-the-first-time]
• Step 2: PIN/Password set up. The user must set up a PIN code (different than the
SIM PIN code) or a Password to protect the device when the screen is turned off.
This step is mandatory and cannot be skipped.
• Step 3: Device Encryption. The user is encouraged to encrypt the device. To
complete the encryption, the device must be plugged in and the battery should
have at least an 80% battery charge; if not, encryption cannot be performed. If
the device is not encrypted, the Blackphone will remind the user to consider
encryption every three days. The encryption process will take approximately 25
minutes. This process WILL NOT encrypt the microSD card if one is present.
[Further support:
https://support.blackphone.ch/customer/portal/articles/1612222-how-long-willit-take-to-encrypt-my-blackphone]
BLACKPHONE USER GUIDE
5 • Step 4: Data Connectivity. The user is invited to connect to a data network.
He/she can connect to a WiFi network if one is available (Note: WPS setup is not
available in this step, but can be used later) or to a cellular network (if a SIM with
an active data subscription is in the phone).
Important note: a data connection is needed to activate the Blackphone
application suite licenses in next step. A WiFi connection is preferred.
Important note: If you are using WiFi for the initial setup period, you will need an
open, WEP, or WPA-PSK secured network (preferably WPA-PSK). You can later
configure any network for use. Specifically, you cannot use a WPA-enterprise
(PEAP, TTLS, etc.) network during setup, because there is no way to provision
certificates or run a browser during the first stages the setup process. [Further
support: https://support.blackphone.ch/customer/portal/articles/1612221-can-iactivate-blackphone-from-a-captive-portal-or-enterprise-wi-fi-connection]
BLACKPHONE USER GUIDE
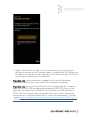
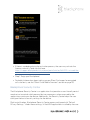
6 • Step 5: Scanning the QR code. If a data connection is available, the user will be
invited to scan the QR code included in Blackphone’s box. Scanning the QR code
will provision Silent Phone, Silent Text and Disconnect licenses.
• If this step is skipped or the data connection is not good enough to
automatically download the licenses, the user may activate the licenses
manually. To do so, click here:
https://support.blackphone.ch/customer/portal/articles/1614222-i-missed-theqr-scan-in-the-activation-wizard-what-now
• The QR code looks similar to this.
BLACKPHONE USER GUIDE
7 • Step 6: If the QR code is correctly scanned, a page will be shown indicating that
the process has been performed successfully and showing the corresponding
licenses that have been activated. The user also has the option to have a copy of
the subscription codes sent in an email for future reference. [Further support:
https://support.blackphone.ch/customer/portal/articles/1662300-why-didn-t-iget-my-license-code-email]
BLACKPHONE USER GUIDE
8 • If there is a problem during the activation process, the user may activate the
licenses manually. To do so, click here:
https://support.blackphone.ch/customer/portal/articles/1614222-i-missed-theqr-scan-in-the-activation-wizard-what-now
• Step 7: Enjoy your Blackphone!
• For helpful information about setting up your Silent Circle apps for encrypted
calls and texts, see the “Silent Circle Mobile Overview” section on page 20.
Blackphone Security Center
The Blackphone Security Center is an application that provides a user-friendly central
mechanism to control which personal data or resources can be accessed by the
applications running on the device. Additionally, the Security Center helps the user
configure the basic security settings for the device.
Right out of the box, Blackphone Security Center comes configured with “Default
Privacy Settings.” Under these settings, all the NEW applications installed by the user
BLACKPHONE USER GUIDE
9 will NOT have access to private sensitive information such as user location, contacts,
messages, or device settings.
To modify this default behavior, or explore new configurations allowing access to your
data by different applications, open the Blackphone Security Center by clicking on the
shield icon on the main desktop, labeled as Security Center.
The security center app is divided in different tabs or screens that help the user to
easily set up the security/privacy configuration of the device.
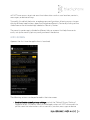
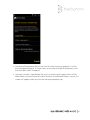
INTRO SCREEN
Appears the first time the application is launched.
The following actions can be performed in the intro screen:
• Enable/disable default privacy settings: switch the “Default Privacy Settings”
toggle on or off. ON means newly installed applications will NOT have access to
private sensitive information such as contacts, location, messages or device
BLACKPHONE USER GUIDE
10 settings. OFF means newly installed applications will have access to private
sensitive information, as on any regular device.
• Encrypt your Blackphone: If you have not yet encrypted the Blackphone, Security
Center will show an option to do so labeled as “Encryption Not Enabled”. To
encrypt your Blackphone, click on this button and follow the procedure. Please
note this process will take approximately 25 minutes and will require you to input
a password any time you power on the phone. Encryption is one of the very basic
privacy and security settings that should be enabled on any phone carrying
sensitive information
• Configure remote wipe: If you haven’t yet configured remote wipe, the Security
Center will show an option to do so, labeled as “Remote Wipe not enabled”. To
configure remote wipe, click on it and follow the steps described in the Remote
Wipe application (later in this document).
• Read basic information on the Security Center Glossary: This area contains
valuable information about basic security under “Glossary.” This includes
information about how the security center works, as well as how to protect
yourself and your data.
BLACKPHONE USER GUIDE
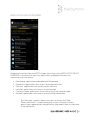
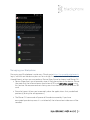
11 APPLICATION GROUP SCREENS
Swiping left and right from the INTRO screen, you will get to the APPLICATION GROUP
SCREENS, in which you will see list of applications grouped by the sensitive
information they can access:
•
•
•
•
•
•
Blackphone: applications preloaded with Blackphone
Phone Info: applications with access to your personal data
Contacts: applications with access to your contacts
Location: applications with access to your location
Camera & Audio: applications accessing or using your audio or video
Network: applications with access to your Internet connection
By clicking on a specific application, you can access the “App
Permission Details” screen where you can view all the data access
permissions requested by the application, and modify them as indicated
in the next bullet.
BLACKPHONE USER GUIDE
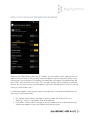
12 APPLICATION DETAILED PERMISSIONS SCREENS
When on the “App Permission Details” screen, you can select which types of data an
application can access. Switch each individual permission setting on or off by using
the toggles. Any change will take effect immediately and impact the application the
next time it tries to access this data. This includes the possibility of denying network
access, privacy data access or other permissions not related to data (such as vibrate
settings, notifications, etc.).
A shield icon appears next to each app as an indicator of the level of protection that
the current settings provide:
•
•
Full yellow shield: means the app is running under the “Default Privacy
Settings” which is the highest level of protection
Half yellow shield: means the app is running under user-customized settings,
where some permissions are allowed and some are not.
BLACKPHONE USER GUIDE
13 •
Empty black shield: means the app is running under NO restrictions and has full
access to all data. This is the lower level of protection available (no protection).
By clicking on the shield next to a specific app, you can also change the level of
protection.
Troubleshooting note: If you choose to install an app store, then install an app which
crashes when you try to run it, the first place to check is the Security Center. If your
Security Center settings prevent the app from having access to data it needs to run, it
may crash. For example, a bar- code scanner app may crash if it does not have camera
access, which it does NOT get by default.
Blackphone Remote Wipe
What is Remote Wipe
Remote Wipe is Blackphone’s exclusive application that gives the user peace of mind
by allowing him/her to control his/her data from anywhere in the world.
With Remote Wipe, the user can power off the Blackphone, kill sensitive applications
(using the Brace for Impact feature) or even wipe the device data remotely simply by
way of a few clicks on the Blackphone website (https://manage.blackphone.ch).
How Remote Wipe Works
Using Remote Wipe is easy. You must first set up the application by clicking on the
Remote Wipe icon in your Blackphone. Once the initial setup has been performed, you
can go to https://manage.blackphone.ch to manage your Blackphone and power it off,
close some applications (selected during setup) or wipe the data on the device.
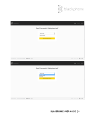
Setting up Remote Wipe
• Click on the Remote Wipe icon on your Homescreen
• Create a Device Password, which is a specific password to identify the
Blackphone device you want to manage. The minimum password size is 12
characters. Please note that for security, this password cannot be retrieved if
you lose or forget it.
BLACKPHONE USER GUIDE
14 • Create Account Credentials to access https://manage.blackphone.ch. Again,
the password selected must be at least 12 characters. Whereas the device
password is not retrievable, a new account password for the website can be
retrieved if you lose the old one. That’s why an email account is required in this
step.
BLACKPHONE USER GUIDE
15 • Name your Blackphone. We ask the user for a device name to identify it within
the management portal. A single user can manage multiple Blackphones; all of
these will be listed in the portal.
• Once registration is completed, the user can chose which applications will be
killed when using the Brace for Impact feature. Once Remote Wipe is set up, this
screen will appear when you click on the corresponding icon.
BLACKPHONE USER GUIDE
16 Managing your Blackphone
Managing your Blackphone is quite easy. Simply go to https://manage.blackphone.ch,
log in, and click on the device you want to manage. A simple interface will offer you
three different actions you can perform: Device Wipe, Brace for Impact and Power Off.
• Device Wipe allows you to remotely wipe all the information on the device. Please
take note that the information on your external SD card will not be erased using
this feature. We recommend not storing sensitive information on the external SD
card.
• Brace for Impact allows you to remotely close the applications that you defined
previously (during the setup process).
• The Power Off command will power off the device remotely. If you have
encrypted your device, once it is switched off, the information inside now will be
secured.
BLACKPHONE USER GUIDE
17 BLACKPHONE USER GUIDE
18 App Updater
App Updater ensures that you have access to the latest releases and updates of apps
that ship with your Blackphone. By default, App Updater will check for updates every
day and notify you when an update is available. [Note: App Updater was added to
PrivatOS as of release 1.0.5. If you do not see App Updater on your phone, ensure that
you have updated to the latest version of PrivatOS.]
When you open the app, you will see a list of applications and their current status. If
updates are available for any of them, App Updater will indicate it. Using the button at
the bottom, you can also force the app to check for updates immediately.
There are three settings for App Updater, which you can access by opening the app
and clicking on the overflow menu icon on the top right.
• Automatically check: if checked, the app will check for updates every day
• Notify when available: if checked, the app will notify you when updates are
available
• Wi-Fi only: if checked, updates will only be downloaded when the device is on a
wireless network. This prevents App Updater from using your mobile device’s
data plan to download updates.
Blackphone recommends that you keep the default settings enabled to check for
updates every day and be notified when they are available. This will ensure that you
maintain access to the latest features and security updates for your apps.
BLACKPHONE USER GUIDE
19 Silent Circle Mobile Overview
When setting up your Silent Circle apps for the first time, do so in the following order
for the simplest setup:
1. Launch Silent Contacts. It will ask you to set up a password for the key
manager. Do not lose this password!
2. Launch Silent Phone. It will ask you for your Silent Circle username and
password.
3. Launch Silent Text. No further action is needed – your Silent Circle apps are
now set up.
Silent Phone
Silent Phone is your secure mobile video and voice solution. It provides
you with HD-quality calling over 3G, 4G and WiFi networks using the
ZRTP encryption software invented by Silent Circle co-founder Phil
Zimmermann and used worldwide. The ZRTP software detects when the
call starts, initiates a cryptographic key agreement between the two
callers, and then proceeds to encrypt and decrypt the voice data packets
on the fly. Key negotiations are purely peer-to-peer through the media
stream. The encryption keys are destroyed at the end of the call.
Video Tutorial - http://youtu.be/v-efcAaYZ9Q/
Silent Text
Silent Text is a secure instant messaging application that allows you
security and governance over content delivered across the Silent
Network to other subscribers.
Video Tutorial - http://youtu.be/UB5i-wYR5zw/
Silent Contacts
Silent Contacts is a secure, encrypted alternative to the native Android
People application on your Blackphone. Silent Contacts lets you access
your contacts and call log. The app can be locked and password
protected using Silent Circle’s KeyManager, giving you added control
over your privacy. Silent Contacts can also import and encrypt your
existing contacts.
Tutorial - http://youtu.be/H0sKKsOGx6Q/
BLACKPHONE USER GUIDE
20 For more help with Silent Circle Mobile please see the link below.
https://silentcircle.com/support/
Disconnect Secure Wireless
The first time you access Disconnect Secure Search you will see a short introduction.
You will then be able to use Disconnect.me to search securely and privately.
The Disconnect.me VPN (Virtual Private Network) encrypts data traffic from your
Blackphone to the Disconnect.me VPN servers, thus protecting it from local
monitoring via a non-secured WiFi location or other local monitoring. The traffic is not
protected once it leaves the VPN servers on the way to/from the destination server.
4. Tap the Secure Wireless app
5. Read the introduction dialog box
6. Take the brief tour that explains what SW is and how it works. You can re-take
the tour at any time via Menu > Retake Tour
7. If you are on a secure wireless network, such as your home or office, tap the
menu button (three vertical squares in the top right corner of the screen), then
tap Trusted Networks and tap the “TRUST” button on the lower right. That will
turn SW off so you don't waste your transfer allocation.
8. If you are on an untrusted wireless network, you may still choose to turn SW off
by tapping the button in the center.
9. If you tap the white button in the center to connect, you will get a dialog
reminding you about the details.
10. You will then need to “trust” the application to allow it to intercept all network
traffic.
11. SW will state, “Connecting...” for a few seconds, then the center button will turn
green and you will have a tiny key in the notification bar at the top.
12. If you swipe down, you will have options related to SW in your notification list,
such as “Disconnect Secure Wireless: Connected to VPN”.
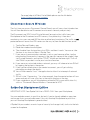
SpiderOak Blackphone Edition
IMPORTANT NOTE: Your SpiderOak Hive is READ-ONLY from your Blackphone.
You can read documents in your Hive, but only if you've already added an app store
and an app that can read a document. You can't backup Blackphone to your Hive -you can't backup Blackphone in general either!
A SpiderOak passcode is an extra layer of security for the app itself, similar to the lock
screen for the phone.
BLACKPHONE USER GUIDE
21 Q: I’ve added a file in my Hive but do not see it on my Blackphone. How do I refresh the
screen?
A: You must move to another top-level screen (a device, settings, etc.) then back to
Hive to refresh. We are working on a refresh button for all folder screens for a future
release.
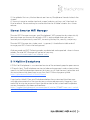
Kismet Smarter WiFi Manager
Smarter WiFi Manager manages your Blackphone’s WiFi connection by automatically
learning where you use certain networks. WiFi is only enabled when you are in a
location you have previously used WiFi, increasing battery life, security, and privacy.
Smarter WiFi Manager aims to be smart - in general, it should be invisible and will
manage your WiFi state in the background.
Airplane mode and WiFi Tethering modes are detected and respected - when in these
modes, Smarter WiFi Manager will get out of your way.
https://www.kismetwireless.net/android-swm/
K-9 Mail for Blackphone
K-9 Mail for Blackphone is a customized version of the extremely popular open source
K-9 email client. The Blackphone version includes enhancements and customizations
specific to the Blackphone environment, but you can still find the most up to date and
accurate information about how to use it on the K-9 Manual page on github:
https://github.com/k9mail/k-9/wiki/Manual
If you had installed K-9 on your Blackphone before the customized client became
available, please note that the two versions can be used separately. However, if you
would like to migrate your email from the old version to the customized Blackphone
version, the process has been outlined here:
https://support.blackphone.ch/customer/portal/articles/1718897-how-can-i-switchover-to-k-9-mail-for-blackphone
BLACKPHONE USER GUIDE
22 Troubleshooting
Blackphone will not turn on
Connect Blackphone to the charger to ensure that the battery has sufficient charge.
Note that if your battery is completely discharged, it may take some time before you
can turn the device back on.
Blackphone is displaying text in the wrong language
Please make sure that you have selected the correct default language for your device.
Set the default language in Settings => Language & input
Audio files can’t be played
Blackphone cannot play audio files that are copy protected with digital rights
management (DRM). Please ensure that only files that contain no copy protection are
transferred to Blackphone.
A webpage will not display
Please ensure that you have an active WCDMA/GSM/LTE data connection or active
WiFi connection.
SUPPORT CONTACT INFORMATION
For more information please visit https://support.blackphone.ch/
BLACKPHONE USER GUIDE
23 Blackphone Safety Information
Be sure to read through this section before you turn on your Blackphone for the first
time.
Online help and support is available at https://www.blackphone.ch/
Safe Operating Conditions
Please observe the following guidelines while operating your Blackphone.
• Operating temperature: Do not store your Blackphone at temperatures lower
than -20°C or higher than 55°C, even if it is fully turned off. Do not operate your
Blackphone at temperatures lower than -10°C or higher than 45°C. Doing so may
cause permanent damage the device’s components.
• In-vehicle use: Stay in compliance with all local traffic regulations regarding
mobile phone usage while operating a vehicle. Do not rest your phone on top of a
vehicle’s airbag compartment; should the airbag deploy, the phone may be
propelled toward you and cause serious injury. Always secure your Blackphone
while in a moving vehicle. Do not mount your Blackphone in a location that will
create an obstructed view of the road or other surroundings.
• Airport and in-air use: Your Blackphone can safely be passed through X-ray
machines at airport security. When flying, follow all posted and spoken
instructions regarding in-air use of mobile electronic devices.
• Hazardous environments: Do not operate your Blackphone in areas where a
spark could ignite a fire or explosion. This includes gas/petrol stations. Follow
posted signs regarding mobile phone use.
• Operating distance: While operating your Blackphone, maintain a distance of
1.5cm from your body.
• Safe volumes: To prevent possible hearing loss, do not listen to
audio on your Blackphone at high volume levels for long periods of
time.
BLACKPHONE USER GUIDE
24 Preventing Damage
Use your Blackphone only with the stock battery. There is a risk of explosion if the
battery is replaced with an incorrect type. Dispose of used batteries according to the
instructions on the battery.
Use only the power adapter provided with your Blackphone, manufactured by
PHIHONG, model number PSAI05R-050Q.
Input: 100-240V ~ 0.3A 50/60Hz 12-15VA
Output: 5V 1.0A MAX.
Please use USB 2.0 or higher to connect to your device.
When traveling, be sure to use the proper country or region power adapter when
charging your Blackphone to prevent damage.
Avoid exposing your Blackphone to liquids and heat sources. These can cause serious
damage to your device or cause the device’s battery to explode.
Handle your Blackphone with care. Dropping your Blackphone may crack the display or
cause other damage. If you do drop your phone, use caution while checking for
cracked or broken glass.
Emergency Calling
Your Blackphone must be powered on and located within a mobile carrier’s service
area in order to place an emergency call. A SIM card or mobile carrier subscription may
not be required in order to place emergency calls
BLACKPHONE USER GUIDE
25 EU Regulatory Conformance
This product complies with the essential requirements and other relevant provisions
of the following Directives and carries the CE mark accordingly: R&TTE Directive
1999/5/EC and RoHS Recast Directive 2011/65/EU.
The Declaration of Conformity made under Directive 1999/5/EC (HG nr. 88/2003) is
available for viewing at the following location in the EU community:
https://www.blackphone.ch/go/conformity/
BLACKPHONE USER GUIDE
26 FCC Regulations
This mobile phone complies with part 15 of the Federal Communications
Commission's rules and regulations. Operation is subject to the following two
conditions: (1) This device may not cause harmful interference, and (2) this device
must accept any interference received, including interference that may cause
undesired operation.
Pursuant to Part 15 of the FCC rules and regulations, this mobile phone has been
tested and found to comply with the limits for a Class B digital device. These limits are
designed to provide reasonable protection against harmful interference in a
residential installation. This equipment generates, uses, and can radiate radio
frequency energy and, if not and used in accordance with the instructions, may cause
harmful interference to radio communications. SGP makes no guarantee that
interference will not occur.
If this equipment does cause interference to radio or television reception, which can
be determined by turning the equipment off and on, the following measures may
resolve the issue:
-
Reorient or relocate the receiving television or radio antenna.
Increase the distance between the device and receiver.
If the interference was caused while the device was plugged in, connect the
device to an outlet on a circuit different from that of the receiver.
Consult the dealer or an experienced radio/TV technician for help.
Changes or modifications not expressly approved by the party responsible for
compliance could void the user’s authority to operate the equipment.
BLACKPHONE USER GUIDE
27 Specific Absorption Rate (SAR) Information
This phone is designed and manufactured not to exceed the emission limits for exposure to
radio frequency (RF) energy set by the Federal Communications Commission of the United
States, and Industry Canada of Canada.
During SAR testing, this device was set to transmit at its highest certified power level in all
tested frequency bands, and placed in positions that simulate RF exposure in usage against
the head with no separation, and near the body with the separation of 15 mm (1.5 cm).
Although the SAR is determined at the highest certified power level, the actual SAR level of
the device while operating can be well below the maximum value. This is because the phone is
designed to operate at multiple power levels so as to use only the power required to reach the
network. In general, the closer you are to a wireless base station antenna, the lower the power
output.
The exposure standard for wireless devices employing a unit of measurement is known as the
Specific Absorption Rate, or SAR. The SAR limit set by the FCC is 1.6W/kg, and 1.6W/kg by
Industry Canada.
This device is complied with SAR for general population /uncontrolled exposure limits in
ANSI/IEEE C95.1-1992 and Canada RSS 102, and had been tested in accordance with the
measurement methods and procedures specified in OET Bulletin 65 Supplement C, and
Canada RSS 102. This device has been tested, and meets the FCC and IC RF exposure
guidelines when tested with the device directly contacted to the body.
The FCC has granted an Equipment Authorization for this model phone with all reported SAR
levels evaluated as in compliance with the FCC RF exposure guidelines. SAR information on
this model phone is on file with the FCC and can be found under the Display Grant section of
www.fcc.gov/oet/ea/fccid after searching on FCC ID: 2ACDKBP1.
For this device, the highest reported SAR value for usage against the head is 0.687W/kg; the
highest SAR value for usage near the body is 0.893W/kg.
While there may be differences between the SAR levels of various phones and at various
positions, they all meet the government requirements.
SAR compliance for body-worn operation is based on a separation distance of 15 mm
between the unit and the human body. Carry this device at least 15 mm away from your body
to ensure RF exposure level compliant with the set exposure standards. To support body-worn
operation, choose belt clips or holsters that do not contain metallic components, and which
maintain a separation of 15 mm between this device and your body.
RF exposure compliance with any body-worn accessory that contains metal was not tested
and certified, and the use of such body-worn accessories should be avoided.
BLACKPHONE USER GUIDE
28 Blackphone Limited Warranty
DISCLAIMER: This Limited Warranty does not affect your legal (statutory) rights
under your applicable national laws relating to the sale of consumer products.
SGP Technologies ("SGP") provides this Limited Warranty to you who have purchased
the SGP product(s) included in the sales package ("Product").
SGP warrants to you that during the warranty period SGP or an SGP authorized service
company will in a commercially reasonable time remedy defects in materials, design
and workmanship free of charge by repairing or, should SGP in its discretion deem it
necessary, replacing the Product in accordance with this Limited Warranty (unless
otherwise required by law). This Limited Warranty is only valid and enforceable in the
country where you have purchased the Product provided that SGP has intended the
Product for sale in that country. Some limitations to the warranty service may apply
because of country-specific elements in the Products.
Warranty Period
The warranty period starts at the time of Product's original purchase by the first enduser. The Product may consist of several different parts and different parts may be
covered by a different warranty period (hereinafter "Warranty Period"). SGP warrants
the Product against defects for a period of twelve months from the date of purchase
by the original end user purchaser, except where prohibited by applicable law. This
warranty is nontransferable and is limited to the original purchaser. This warranty
gives you specific legal rights; you may also have other rights that vary under local
laws.
As far as your national laws permit, the Warranty Period will not be extended or
renewed or otherwise affected due to subsequent resale or SGP authorized repair or
replacement of the Product. However, part(s) repaired or replacement products issued
during the Warranty Period will be warranted for the remainder of the original Warranty
Period or for sixty (60) days from the date of repair or replacement, whichever is
longer.
How to Obtain Warranty Service
If you wish to make a claim under this Limited Warranty, please return your Product or
the affected part (if it is not the entire Product) to an SGP authorized service company.
You can contact SGP by regular mail, electronic means (such as e-mail) and/or
telephone. In order to expedite the process, we encourage you to contact us via e-mail
or through other provided electronic means as you may get a more prompt and
complete reply from our team.
BLACKPHONE USER GUIDE
29 Any claim under this Limited Warranty is subject to you notifying SGP or an SGP
authorized service company of the alleged defect within a reasonable time of it having
come to your attention and prior to the expiry of the Warranty Period.
When making a claim under this Limited Warranty you will be required to provide:
1. The Product (or the affected part) and
2. The original proof of purchase, which clearly indicates the name and address of
the seller, the date and place of purchase, the product type and the IMEI or other
serial number.
What is not covered?
1. This Limited Warranty does not cover user manuals or any third party software,
settings, content, data or links, whether included or downloaded in the Product,
whether included during setup, assembly, shipping or at any other time in the
delivery chain or otherwise and in any way acquired by you. SGP does not warrant
that any SGP software will meet your requirements, will work in combination with
any hardware or software provided by a third party, that the operation of any
software will be uninterrupted or error free or that any defects in the software are
correctable or will be corrected.
2. Warranties, if any, covering third party software and services are the sole
responsibility of the makers and providers of such software and services. The
terms and conditions of bundled applications shall govern your use of such
applications and services.
3. This Limited Warranty does not cover a) normal wear and tear (including, without
limitation, wear and tear of camera lenses, batteries or displays), b) defects
caused by rough handling (including, without limitation, defects caused by sharp
items, by bending, compressing or dropping, etc.), or c) defects or damage
caused by misuse of the Product, including use that is contrary to the
instructions provided by SGP (e.g. as set out in the Product's user guide), or d)
defects or damaged caused by a malfunction of the included or user-installed
software, even if its source is SGP, the user, or a third party, and/or e) other acts
beyond the reasonable control of SGP.
4. This Limited Warranty does not cover defects or alleged defects caused by the
fact that the Product was used with, or connected to, any product, accessory,
software and/or service not manufactured, or supplied by SGP or was used
otherwise than for its intended use. Defects can be caused by viruses from your
or from a third party's unauthorized access to services, other accounts,
computer systems or networks. This unauthorized access can take place
through hacking, password mining or through a variety of other means.
BLACKPHONE USER GUIDE
30 5. This Limited Warranty does not cover defects caused by the fact that the battery
has been short-circuited or by the fact that the seals of the battery enclosure or
the cells are broken or show evidence of tampering or by the fact that the battery
has been used in equipment other than those for which it has been specified.
6. This Limited Warranty is not enforceable if the Product has been opened,
modified or repaired by anyone other than an authorized service center; if it is
repaired using unauthorized spare parts; or if the Product's serial number, the
mobile accessory date code or the IMEI number has been removed, erased,
defaced, altered or are illegible in any way. This shall be determined at the sole
discretion of SGP.
7. This Limited Warranty is not enforceable if the Product has been exposed to
moisture, to dampness or to extreme thermal or environmental conditions or to
rapid changes in such conditions, to corrosion, to oxidation, to spillage of food or
liquid or to influence from chemical products.
Other Important Notices
A third party, independent operator provides the SIM card and cellular and/or other
network or system on which the Product operates. Therefore, SGP is not responsible
under this warranty for the operation, availability, coverage, services or range of the
cellular or other network or system. Before SGP or an SGP authorized service
company can repair or replace the Product, the operator may need to unlock any SIMlock or other lock that may have been added to lock the Product to a specific network
or operator. In such situations kindly first contact your operator to unlock the Product.
Before having your device serviced, please remember to make backup copies of all
important content and data stored in your Product, as content and data may be lost
during repair or replacement of the Product. SGP, in a manner consistent with the
provisions of the section entitled "Limitation of SGP’s Liability" below, shall not under
any circumstances be liable, either expressly or impliedly, for any damages or losses
of any kind whatsoever resulting from loss of, damage to, or corruption of, content or
data during repair or replacement of the Product.
All parts of the Product or other equipment that SGP has replaced shall become the
property of SGP. If the Product is found not to be covered by the terms and conditions
of this Limited Warranty, SGP and its authorized service companies reserve the right
to charge a handling fee, besides the costs of replacement materials and/or pieces
and a re-stocking fee. When repairing or replacing the Product, SGP may use products
or parts that are new, equivalent to new, or re-conditioned.
Your Product may contain country specific elements, including software. If the
Product has been re-exported from its original destination country to another country,
BLACKPHONE USER GUIDE
31 the Product may contain country-specific elements that are not considered to be a
defect under this Limited Warranty.
Limitation of SGP’s Liability
This Limited Warranty is your sole and exclusive remedy against SGP and SGP’s sole
and exclusive liability in respect of defects in your Product. This Limited Warranty
replaces all of other SGP’s warranties and liabilities, whether oral, written, (nonmandatory) statutory, contractual, in tort or otherwise, including, without limitation,
and where permitted by applicable law, any implied conditions, warranties or other
terms as to satisfactory quality or fitness for purpose. However, this Limited Warranty
shall neither exclude nor limit i) any of your legal (statutory) rights under the applicable
national laws or ii) any of your rights against the seller of the Product.
To the extent permitted by applicable law(s), SGP does not assume any liability for
loss of or damage to or corruption of data, for any loss of profit, loss of use of Products
or functionality, loss of business, loss of contracts, loss of revenues or loss of
anticipated savings, increased costs or expenses or for any indirect loss or damage,
consequential loss or damage or special loss or damage.
By purchasing and using this Product you agree to indemnify and hold harmless SGP
Technologies, SA and its subsidiaries, successors and assigns against all damages of
any kind arising from its use of bundled apps and services.
To the extent permitted by applicable law, SGP’s liability shall be limited to the
purchase value of the Product. The above limitations shall not apply in case of gross
negligence or intentional misconduct of SGP or in case of death or personal injury
resulting from SGP’s proven negligence.
To the extent permitted by applicable law, any disputes arising under this Limited
Warranty shall be resolved by binding arbitration between SGP and you.
NOTE: SGP strongly encourages you to familiarize yourself with the user guide and
instructions provided with and for the Product. Please also note that the Product may
contain high precision displays, camera lenses and other such parts, which could be
scratched or otherwise damaged if not handled very carefully.
BLACKPHONE USER GUIDE
32 SUPPORT CONTACT INFORMATION
For more information please visit https://support.blackphone.ch/
BLACKPHONE USER GUIDE
33