1
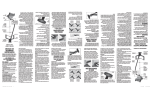
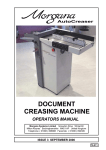
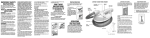
gs95_13pa140688_ib_final.indd 1
To reduce the risk of
burns, electrocution, fire, or injury to persons:
1. This appliance should never be left
unattended when plugged in.
2. This appliance should not be used by, on,
or near children or individuals with certain
disabilities. Unsupervised use could result in
fire or personal injury.
3. Use this appliance only for its intended
use as described in this manual. Do not
use attachments not recommended by the
manufacturer.
WARNING –
cally live even when the switch is off.
To reduce the risk of death by electric shock:
1. Always unplug appliance immediately
after using.
2. Do not place or store appliance where it
can fall or be pulled into a tub or sink.
3. Do not place in, or drop into water or
other liquids.
4. If an appliance falls into water, unplug it
immediately. Do not reach into the water.
READ ALL INSTRUCTIONS
BEFORE USING
DANGER – Any appliance is electri-
When using electrical appliances, especially when children are present, basic
safety precautions should always be taken,
including the following:
IMPORTANT SAFETY
INSTRUCTIONS
4. Never operate this appliance if it has a
damaged cord or plug, if it is not working properly, or if it has been dropped or
damaged, or dropped into water. Do not
attempt to repair the appliance. Incorrect
reassembly or repair could cause a risk
of fire, electric shock, or injury to persons
when the appliance is used. Return the
appliance to an authorized service center
for examination and repair.
5. Keep the cord away from heated surfaces.
Do not allow cord to touch heated surfaces.
Do not pull or twist cord. Let appliance cool
completely before putting away.
6. To reduce the risk of electric shock, this
appliance has a polarized plug (one blade
is wider than the other). This plug will fit in
a polarized outlet only one way. If the plug
does not fit fully in the outlet, reverse the
plug. If it still does not fit, contact a qualified
electrician to install the proper outlet. Do not
change the plug in any way.
7. Never drop or insert any object into any
opening or hose.
8. Do not use outdoors or operate where
aerosol (spray) products are being used or
where oxygen is being administered.
9. Do not use an extension cord to operate
appliance.
10. Surfaces of this appliance may be hot
when in use. Do not let heated surfaces
touch eyes or skin.
11. Do not place the steam nozzle directly on
any surface or on the appliance power cord
while it is hot or plugged in. Use the stand
provided.
12. Unplug this appliance before filling or
emptying. Do not overfill.
13. While emitting steam, this appliance may
cause burns if it is used too close to the skin,
scalp or eyes, or if it is used incorrectly. To
reduce the risk of contact with hot water
discharging from steam vents, test appliance
before each use by holding it away from body.
14. Do not operate steamer without properly
filling the water tank.
15. Always keep the hose and nozzle
elevated above the water tank.
16. Never yank cord to disconnect from
outlet. Instead, grasp plug and pull to
disconnect.
17. Burns could occur from touching hot
metal parts, hot water, or steam. Use care
when removing water tank or when you turn
a steam appliance upside down – there may
be hot water in reservoir.
18. To reduce likelihood of circuit overload,
do not operate another high-wattage appliance on the same circuit.
19. If an extension cord is absolutely
necessary, a 15 ampere rated cord should
be used. Cords rated for less amperage may
overheat. Care should be taken to arrange
the cord so that it cannot be pulled or
tripped over.
20. Always remove the water tank from the
appliance before filling it with water.
21. When changing attachments, please be
sure the unit is off and no steam is being
released in order to avoid contact with hot
water.
22. Use caution when changing attachments,
as there may be hot water from condensation.
Ensure the attachments are dry or cooled off,
to avoid contact with hot water.
Ready to use
indicator light
(green light)
Main On/Off
switch
(red light)
cool-touch
insulated hose
Telescoping
pole for height
adjustment
360˚ rotating,
collapsible
hanger
Steam nozzle with
aluminum faceplate
2 large
diameter
casters
Removable,
easy-to-fill
large capacity
water tank
Clips for
steaming
pants
T-nozzle On/Off
button for steam
GET TO KNOW YOUR STEAMER
FOR HOUSEHOLD USE ONLY
UNPACKING INSTRUCTIONS
Place the box on a large, sturdy flat surface.
Carefully remove the appliance from the
packing material. Keep all plastic bags away
from children.
STEAMER ASSEMBLY
Attaching the Telescopic Pole and
Rotating Hanger
1. Turn the lock on top of base unit to unlock
position and place telescopic pole into opening. Turn clockwise to lock.
2. Fully extend the telescopic pole, making
sure to lock the pole upright by engaging
the two clips, and hang the steam nozzle
from the cradle atop the 360 degree rotating
hanger assembly.
3. Pull lower pants clips towards you and
rotate clockwise to lock into place.
4. This unit comes with a rotating hanger. To
use the hanger, simply place on top of pole
firmly. Then tighten lower nut to keep hanger
upright or untighten to collapse hanger. It
is now in place to rotate 360˚. Hang your
garment and steam away wrinkles. Turn as
you wish.
5. Attach the top pants clip bar to the rotating hanger by inserting mounting pegs into
the hanger’s two keyhole openings. Push in
and pull down to lock. See instruction
booklet "Using pant clip system", Fig.3
for more details.
SAVE THESE
INSTRUCTIONS
(Fig. 1)
TURNING STEAMER ON
1. Push the On/Off switch on
base of unit to On – red light
A
will go on (A).
B
2. The unit will heat up in
approximately 100 seconds
and will be ready to use when
(Fig. 2)
green light is on (B).
3. Push button on T-nozzle –
light will go on and steam
will start. Button on T-nozzle
can be used On or as a Pause
feature.
Always hold the nozzle about ½ inch from
fabric while steaming.
6. With telescopic pole now fully assembled,
place the T-Nozzle onto holder above the
hanger.
7. When you are ready to steam, fill the water
tank from the top opening. Note, do not open
the bottom cap as this is used for cleaning or
removing excess water only.
8. Plug the steamer unit into a standard 120V
AC power outlet.
9. The bristle brush attachment easily
snaps over the T-nozzle for use. To use the
creaser attachment, simply line up at base
and slide into back under T-nozzle and push
firmly to attach. See instruction booklet
"Attachments" section figures 5 and 6
for more details.
The bottom clips can be
adjusted by loosening the
knob (on the telescopic
pole) and moving the pole
up and down, depending
upon the length of pants.
Clip pants as shown and
steam. Please note: some
pants may be too long to
use the bottom clips. If
that is the case, just simply use the top clips and
let your pants hang freely.
hanger by inserting mounting pegs into the
hanger’s two keyhole openings (Fig. 3).
Push in and pull down to
lock (as highlighted above).
Attach the top pants clip bar to the rotating
(Fig. 3)
USING PANT CLIP SYSTEM
This fabric steamer is equipped with a pant
clip system for holding pants taut for faster
and more effective steaming.
DO NOT FILL THE TANK WITH HOT WATER.
DISTILLED OR FILTERED WATER IS BEST.
Do not unscrew the bottom
cap unless for cleaning (Fig. 4).
Note, be sure always empty or
fill the tank over a sink, being
careful not to spill water from
BOTTOM
the top of the tank.
(Fig. 4)
FILLING THE WATER TANK
(PRIOR TO PLUGGING IN THE APPLIANCE)
Remove the water tank using
handle on front of tank. Fill
reservoir using opening on top
of tank by holding it under a
source of cold running water
TOP
until it is filled to the desired
level. Do not overfill. Position the water tank
on the base and make certain it is seated
properly in the unit.
OPERATING
INSTRUCTIONS
(Fig. 6)
(Fig. 5)
Creaser Attachment
3/1/13 3:11 PM
Bristle brush attachment
ATTACHMENTS
The bristle brush attachment easily snaps
over the T-nozzle as shown below (Fig. 5).
For the creaser attachment, simply line up at
base and slide into back under T-nozzle and
push firmly to attach as shown below (Fig. 6).
Make sure your steamer is off and has cooled
before adding or removing attachments.
gs95_13pa140688_ib_final.indd 2
To decalcify, add a solution of 1/3 white vinegar and 2/3 water in the water tank. Place
the water tank in the unit. Plug the unit into
electrical outlet. Turn to the On position and
run until half the amount has steamed (1
liter). Turn the unit to the Off position, unplug
from electrical outlet, and allow to sit for
30 minutes.
DECALCIFICATION
If the appliance begins to produce steam
more slowly than usual or stops producing
steam and then starts again, you may need to
decalcify your steamer. Decalcification refers
to removing the calcium deposits that form
over time on the metal parts of the steamer.
For best performance from the Conair ®
Extreme Steam™ Fabric Steamer, decalcify the unit once a month. The frequency
depends upon the hardness of your tap water
and how often you use the steamer.
CLEANING AND STORING
1. Turn the On/Off switch to the Off position
and unplug from the power source.
2. Wait for the steamer to cool completely for
at least 30 minutes.
3. Remove the water tank from unit, open
bottom cover and empty unused contents.
Allow to air dry.
4. Collapse telescopic hanger pole.
5. Replace water tank.
6. Store the unit.
Do not directly touch velvet or silk with the
steam head.
With practice, you will gain speed and
efficiency. You will soon learn which
fabrics require multiple steam applications.
Heavier fabrics may require repeated steaming. Repeat as necessary.
NOTE: Test fabric for color fastness in an
inconspicuous spot. Drape linens, towels,
handkerchiefs and napkins over a rod or
place on a towel rack.
HOW TO STEAM
Grasp the handle of the steam nozzle with
the steam jets facing away from you. Begin
at the bottom of the fabric to allow the
steam to rise inside and outside, removing
wrinkles. Slowly move the nozzle from the
bottom to the top of the fabric. Remove the
nozzle from the garment and smooth the
fabric with your free hand. Some fabrics are
best steamed on the underside of the material. This will allow the fibers of the fabric to
relax, eliminating wrinkles.
Repeat the above procedure as many
times as necessary until a normal steam
rate returns, usually 2–3 times. With each
repeated cycle, use a fresh solution of vinegar and water. Run one cycle of fresh, cold
water without vinegar through the unit at the
completion of decalcification before using
the unit again to steam garments.
in use. Avoid prolonged contact.
CAUTION: Hose will be hot when
TO STEAM DRAPES
Wash and dry drapes as directed, according
to fabric type. Rehang drapes and steam
when they are in place.
Always steam with hose in upright
position, so any condensation is free
to flow back into the steamer. Always
hold the nozzle about ½ inch from fabric
while steaming.
If you steam in a low position, condensation
will collect inside the hose. This will cause
gurgling and some water droplets to form
near the steam jets on the handle. To avoid
this, frequently lift the steam handle upward
until the hose is extended to its full height.
TROUBLESHOOTING THE STEAMER
• PROBLEM - Steamer fails to heat
CAUSE - Steamer not plugged in
SOLUTION - Plug into electrical outlet
• PROBLEM - No steam
CAUSE - Water level is low (beep will sound)
SOLUTION - Turn On/Off switch off
and refill water tank
• PROBLEM - Water drips from nozzle
CAUSE - Condensation in hose
SOLUTION - Hold the hose vertically
and allow water to drain back into unit
• PROBLEM - Nozzle gurgles
CAUSE - Condensation in hose
SOLUTION - Hold the hose vertically
and allow water to drain back into unit
• PROBLEM - Poor steam performance
CAUSE - Sediment in tank
SOLUTION - Decalcify reservoir and
water tank. See decalcification instructions.
• PROBLEM - Dye on T-nozzle
CAUSE - Fabric not colorfast / Touching
T-nozzle to fabric
SOLUTION - Move T-nozzle 1/2 inch away
from fabric during use. Clean T-nozzle
with household cleaner and rinse with soap
and water
• PROBLEM - Discoloring of fabric
CAUSE - Dye on surface of fabric needs
specialty treatment and cleaning / Fabric
not suitable for steaming
SOLUTION - Some custom specialty fabrics
have dyes that are NOT COLORFAST and
are not suitable for steaming. Test fabric
for colorfastness in an inconspicuous spot
before steaming.
NOTE: Amounts of chemicals in water will
vary in different areas. To ensure continued operation of the steamer, never store
without cleaning and removing excess
water from the reservoir and water tank.
LIMITED ONE-YEAR WARRANTY
Conair will repair or replace (at our option)
your unit free of charge for 12 months from
the date of purchase if the appliance is
defective in workmanship or materials.
To obtain service under this warranty,
return the defective product to the service
center listed, together with your purchase
receipt and $3.00 for postage and handling.
California residents need only provide proof
of purchase and should call 1-800-366-0937
for shipping instructions. In the absence of a
purchase receipt, the warranty period shall
be 12 months from the date of manufacture.
ANY IMPLIED WARRANTIES, INCLUDING
BUT NOT LIMITED TO THE IMPLIED
WARRANTY OF MERCHANTABILITY AND
FITNESS FOR A PARTICULAR PURPOSE,
SHALL BE LIMITED IN DURATION TO THE
12-MONTH DURATION OF THIS WRITTEN,
LIMITED WARRANTY. Some states do not
allow limitations on how long an implied
warranty lasts, so the above limitations may
not apply to you.
IN NO EVENT SHALL CONAIR BE LIABLE
FOR ANY SPECIAL, INCIDENTAL, OR
CONSEQUENTIAL DAMAGES FOR BREACH
OF THIS OR ANY OTHER WARRANTY,
EXPRESS OR IMPLIED, WHATSOEVER.
Some states do not allow the exclusion or
limitation of special, incidental, or consequential damages, so the above limitation
may not apply to you.
This warranty gives you specific legal rights,
and you may also have other rights, which
vary from state to state.
13PA140688
IB-12095
©2013 Conair Corporation
East Windsor, NJ 08520/Glendale, AZ 85307
For information on any Conair product call:
1-800-3-CONAIR or visit us on the web at
www.conair.com
Service Center
Conair Corporation
Service Department
7475 N. Glen Harbor Blvd.
Glendale, AZ 85307
Please register this product at:
www.conair.com/registration
D U A L
3/1/13 3:11 PM
®
H E A T
Model GS95
For your safety
afety
and continued
ued
enjoyment of this
product, always
lways
nstruction
read the instruction
ully
book carefully
before using.
Instructions
ons
for Use
with
FABRIC STEAMER
™