1
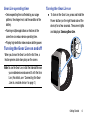
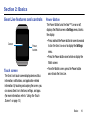
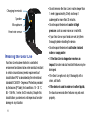
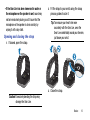
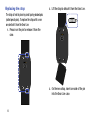
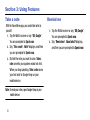
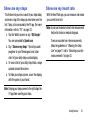
A N D R O I D
S M A R T W A T C H
User Manual
Please read this manual before operating your
device and keep it for future reference.
GH68_3XXXXA Printed in KoreaXX
Warning! This product contains chemicals known to the State of California to cause cancer and reproductive toxicity.
Intellectual Property
All Intellectual Property, as defined below, owned by or which is otherwise the property of Samsung or its respective suppliers
relating to the SAMSUNG Phone, including but not limited to, accessories, parts, or software relating there to (the “Phone
System”), is proprietary to Samsung and protected under federal laws, state laws, and international treaty provisions. Intellectual
Property includes, but is not limited to, inventions (patentable or unpatentable), patents, trade secrets, copyrights, software,
computer programs, and related documentation and other works of authorship. You may not infringe or otherwise violate the
rights secured by the Intellectual Property. Moreover, you agree that you will not (and will not attempt to) modify, prepare
derivative works of, reverse engineer, decompile, disassemble, or otherwise attempt to create source code from the software. No
title to or ownership in the Intellectual Property is transferred to you. All applicable rights of the Intellectual Property shall remain
with SAMSUNG and its suppliers.
Open Source Software
Some software components of this product incorporate source code covered under GNU General Public License (GPL), GNU Lesser
General Public License (LGPL), OpenSSL License, BSD License and other open source licenses. To obtain the source code covered
under the open source licenses, please visit:
http://opensource.samsung.com.
Disclaimer of Warranties; Exclusion of Liability
EXCEPT AS SET FORTH IN THE EXPRESS WARRANTY CONTAINED ON THE WARRANTY PAGE ENCLOSED WITH THE PRODUCT, THE
PURCHASER TAKES THE PRODUCT "AS IS", AND SAMSUNG MAKES NO EXPRESS OR IMPLIED WARRANTY OF ANY KIND
WHATSOEVER WITH RESPECT TO THE PRODUCT, INCLUDING BUT NOT LIMITED TO THE MERCHANTABILITY OF THE PRODUCT OR
SM-R382_UM_Eng_78T_CB_070814_F1
ITS FITNESS FOR ANY PARTICULAR PURPOSE OR USE; THE DESIGN, CONDITION OR QUALITY OF THE PRODUCT; THE
PERFORMANCE OF THE PRODUCT; THE WORKMANSHIP OF THE PRODUCT OR THE COMPONENTS CONTAINED THEREIN; OR
COMPLIANCE OF THE PRODUCT WITH THE REQUIREMENTS OF ANY LAW, RULE, SPECIFICATION OR CONTRACT PERTAINING
THERETO. NOTHING CONTAINED IN THE INSTRUCTION MANUAL SHALL BE CONSTRUED TO CREATE AN EXPRESS OR IMPLIED
WARRANTY OF ANY KIND WHATSOEVER WITH RESPECT TO THE PRODUCT. IN ADDITION, SAMSUNG SHALL NOT BE LIABLE FOR
ANY DAMAGES OF ANY KIND RESULTING FROM THE PURCHASE OR USE OF THE PRODUCT OR ARISING FROM THE BREACH OF
THE EXPRESS WARRANTY, INCLUDING INCIDENTAL, SPECIAL OR CONSEQUENTIAL DAMAGES, OR LOSS OF ANTICIPATED PROFITS
OR BENEFITS.
Modification of Software
SAMSUNG IS NOT LIABLE FOR PERFORMANCE ISSUES OR INCOMPATIBILITIES CAUSED BY YOUR EDITING OF REGISTRY SETTINGS,
OR YOUR MODIFICATION OF OPERATING SYSTEM SOFTWARE.
USING CUSTOM OPERATING SYSTEM SOFTWARE MAY CAUSE YOUR DEVICE AND APPLICATIONS TO WORK IMPROPERLY. YOUR
CARRIER MAY NOT PERMIT USERS TO DOWNLOAD CERTAIN SOFTWARE, SUCH AS CUSTOM OS.
Samsung Telecommunications America (STA), LLC
Address:
1301 E. Lookout Drive
Richardson, TX 75082
Phone: 1-800-SAMSUNG (726-7864)
Phone: 1-888-987-HELP (4357)
Internet Address:
www.samsung.com
©2014 Samsung Telecommunications America, LLC. Samsung is a registered trademark of Samsung Electronics Co., Ltd.
Do you have questions about your Samsung Mobile Device?
For 24 hour information and assistance, we offer a new FAQ/ARS System (Automated Response System) at:
www.samsung.com/us/support
The actual available capacity of the internal memory is less than the specified capacity because the operating system and default
applications occupy part of the memory. The available capacity may change when you upgrade the device.
The Bluetooth® word mark, figure mark (stylized “B Design”), and combination mark (Bluetooth word mark and “B Design”) are
registered trademarks and are wholly owned by the Bluetooth SIG.
Legal Information
The online version of the Health, Safety, and Warranty guide for your device can be found at:
www.samsung.com.
The online version of the End User Licensing Agreement for your device can be found at:
www.samsung.com/us/Legal/EULA.
Table of Contents
Section 1: Getting Started ...........................3
Charging the battery . . . . . . . . . . . . . . . . . . . . . 3
Turning the Gear Live on and off . . . . . . . . . . . . 6
Connecting the Gear Live to a mobile device . . . 7
Section 2: Basics .......................................10
Gear Live features and controls . . . . . . . . . . . . 10
Wearing the Gear Live . . . . . . . . . . . . . . . . . . . 11
Using the Touch Screen . . . . . . . . . . . . . . . . . . 14
Features list . . . . . . . . . . . . . . . . . . . . . . . . . . 18
Start (apps) menu . . . . . . . . . . . . . . . . . . . . . . 20
Section 3: Using Features .........................21
Take a note . . . . . . . . . . . . . . . . . . . . . . . . . . . 21
Remind me . . . . . . . . . . . . . . . . . . . . . . . . . . . 21
Show me my steps . . . . . . . . . . . . . . . . . . . . . 22
Show me my heart rate . . . . . . . . . . . . . . . . . . 22
Send a text . . . . . . . . . . . . . . . . . . . . . . . . . . . 24
Email . . . . . . . . . . . . . . . . . . . . . . . . . . . . . . . . 25
Agenda . . . . . . . . . . . . . . . . . . . . . . . . . . . . . . 26
Navigate . . . . . . . . . . . . . . . . . . . . . . . . . . . . . 26
1
Set a timer . . . . . . . . . . . . . . . . . . . . . . . . . . . .27
Start stopwatch . . . . . . . . . . . . . . . . . . . . . . . .28
Set an alarm . . . . . . . . . . . . . . . . . . . . . . . . . .28
Show alarms . . . . . . . . . . . . . . . . . . . . . . . . . .29
Settings . . . . . . . . . . . . . . . . . . . . . . . . . . . . . .29
Section 4: Using Applications .................. 31
Accessing the Start menu . . . . . . . . . . . . . . . .31
Compass . . . . . . . . . . . . . . . . . . . . . . . . . . . . .32
Fit . . . . . . . . . . . . . . . . . . . . . . . . . . . . . . . . . .32
Heart rate . . . . . . . . . . . . . . . . . . . . . . . . . . . .34
Keep . . . . . . . . . . . . . . . . . . . . . . . . . . . . . . . .34
Stopwatch . . . . . . . . . . . . . . . . . . . . . . . . . . . .35
Section 5: Using Android Wear ................. 36
Installing Android Wear . . . . . . . . . . . . . . . . . .36
Launching Android Wear . . . . . . . . . . . . . . . . .36
Changing to your new Gear Live . . . . . . . . . . .36
Disconnecting from Gear Live . . . . . . . . . . . . .36
Configuring Gear Settings . . . . . . . . . . . . . . . .37
Customizing your Gear Live . . . . . . . . . . . . . . .38
Getting to know your Gear Live . . . . . . . . . . . 39
Section 6: Customizing Your Gear Live ... 40
Launching the Settings menu . . . . . . . . . . . . .
Adjusting Display Brightness . . . . . . . . . . . . .
Always-on screen . . . . . . . . . . . . . . . . . . . . .
Airplane mode . . . . . . . . . . . . . . . . . . . . . . . .
Power off . . . . . . . . . . . . . . . . . . . . . . . . . . . .
Restart . . . . . . . . . . . . . . . . . . . . . . . . . . . . . .
Reset device . . . . . . . . . . . . . . . . . . . . . . . . .
Change watch face . . . . . . . . . . . . . . . . . . . .
About . . . . . . . . . . . . . . . . . . . . . . . . . . . . . . .
40
40
40
41
41
41
42
42
43
Index .......................................................... 44
2
Section 1: Getting Started
With the Gear™ Live (also referred to as Gear Live or
Gear) connected to your mobile device, you can use
the Gear Live to do the following:
• Save and review notes, and set reminders or alarms,
• Send and receive text messages and email more
conveniently,
• Navigate to a desired destination, and/or
• Help monitor your health;
all this and more with a few spoken words or screen
taps.
Charging the battery
Before using the Gear Live for the first time, you
should charge the battery.
Use the charging dock provided with the Gear Live to
charge the device’s battery.
3
You can also use a computer to charge the device’s
battery by connecting the computer to the charging
dock using the USB cable provided with the Gear.
Important! Use only Samsung-approved chargers,
batteries, and cables. Unapproved
chargers or cables can cause damage to
the battery to the Gear Live.
Note: When the battery power is low, the battery icon
displays as empty.
If the battery is completely discharged, you
cannot turn on the Gear Live as soon as the
charger is connected.
Allow a depleted battery to charge for a few
minutes before turning on the device.
While charging, some features are not available.
1.
Locate the charging terminals on the
Gear™ Live and on the charging dock.
Charging
terminals
2.
Place the charging dock on the Gear Live
with the charging terminals facing each
other.
Charging dock
Note: The Charging dock is designed only for
use with the Gear Live and may not be
compatible with other devices.
Getting Started
4
3.
Plug the small end of the provided USB
cable into the USB port on the charging
dock, and then plug the large end of the
cable into the Charger head.
Important! While charging, the Gear Live may
become warm. This is normal. If
the battery gets hotter than usual,
disconnect the charger.
5.
4.
Plug the Charger head into a wall outlet.
Important! If power to the Gear Live is unstable
while charging, the touch screen
may not function.
5
After fully charging the Gear Live battery,
open the retainer, and then separate the
device from the charging dock.
Gear Live operating time
• Device operating time is affected by your usage
patterns, the charge level, and the condition of the
battery.
• Running multiple applications or features at the
same time can reduce device operating time.
• Playing high-definition video reduces battery power.
Turning the Gear Live on
To turn on the Gear Live, press and hold the
Power button (on the right hand side of the
device) for a few seconds. The screen lights
and displays Samsung Gear Live.
Turning the Gear Live on and off
When you turn on the Gear Live for the first time, a
feature preview slide show plays on the screen.
Note: To use the Gear Live, install the Android Wear on
your mobile device and connect it with the Gear
Live. (For details, see “Connecting the Gear
Live to a mobile device” on page 7.)
Getting Started
6
Turning the Gear Live off
To turn the Gear Live off, press and hold the
Power button, and then tap Power off.
2. When prompted Power off: Are you sure?,
tap
.
1.
Connecting the Gear Live to a
mobile device
Install the Android Wear application on your mobile
device and connect your Gear Live to the device using
a Bluetooth connection.
1. Using your mobile device, open Google Play
Store and search for Android Wear, or visit
http://play.google.com, to download it.
2. Install and open Android Wear on your
mobile device.
3. Turn on your Gear Live. The Gear Live model
name displays on the Android Wear screen.
7
Place your Gear Live close to your mobile
device.
5. From the Android Wear screen, select the
Gear Live model name. The Bluetooth
pairing request pop-up displays.
6. Tap OK. The Confirm passkey pop-up
displays.
7. Tap OK. A Paired with... alert displays on
your mobile device.
4.
When the devices connect, the Gear Live
screen displays on the mobile device and
the clock screen displays on the Gear Live.
FPO
• You can configure the Gear Live using the Android
Wear application.
• Screens may vary depending on the type of mobile
device and its software version.
Connecting to another mobile device
To connect your Gear Live to another device, you must
reset the Gear Live to erase all your data from its
memory.
1. With your Gear Live on, press and hold the
Power button until the Settings menu
displays.
2. Swipe upward until the Reset device option
displays, and then tap it.
3. When the Install Android Wear on your phone
prompt displays, tap it, and then follow
succeeding prompts to connect the new
mobile device to your Gear Live. (For more
information, refer to “Connecting the Gear
Live to a mobile device” on page 7.)
Getting Started
8
Tips for using Bluetooth
• When connecting your Gear Live to your mobile
device, place both devices close to each other.
• Bluetooth uses a relatively low power radio signal.
Some industrial, scientific, medical, and other low
power products can cause interference for Bluetooth
connections.
• In an open space, the Bluetooth communication
range is usually up to approximately 30 feet.
• Your Gear Live is not compatible with all Bluetoothcapable mobile devices. Some devices, especially
those not tested or approved by the Bluetooth SIG,
may not be compatible with your Gear Live.
9
Section 2: Basics
Gear Live features and controls
Screen
Power
button
Touch screen
The Gear Live’s touch screen displays device status
information, notifications, and application-related
information. By touching and swiping the screen, you
can access Gear Live’s features, settings, and apps.
(For more information, refer to “Using the Touch
Screen” on page 14.)
Power Button
The Power Button turns the Gear™ Live on or off,
displays the Watch screen or Settings menu, blanks
the display.
• Press and hold the Power button for several seconds
to turn the Gear Live on or to display the Settings
menu.
• Press the Power button once to hide or display the
Watch screen.
• From the Watch screen, press the Power button
once to lock the Gear Live.
Basics
10
Charging terminals
Speaker
Microphone
Heart rate sensor
Wearing the Gear Live
Your Gear Live has been tested in a controlled
environment and shown to be water and dust resistant
in certain circumstances (meets requirements of
classification IP67 as described by the international
standard IEC 60529 - Degrees of Protection provided
by Enclosures [IP Code]; test conditions: 15 - 35 °C,
86 - 106 kPa, 1 meter, for 30 minutes). Despite this
classification, your device is not impervious to water
damage in any situation.
11
• Do not immerse the Gear Live in water deeper than
1 meter (approximately 3 feet) and keep it
submerged for more than 30 minutes.
• Do not expose the device to water at high
pressure, such as ocean waves or a waterfall.
• If your Gear Live or your hands are wet, dry them
thoroughly before handling the device.
• Do not expose the device to salt water, ionized
water, or soapy water.
• I If the Gear Live is dropped or receives an
impact, its water and dust resistant features may be
damaged.
• f the Gear Live gets wet, dry it thoroughly with a
clean, soft cloth.
• If the device is used in water or in other liquids,
the touch screen and other features may not work
properly.
• If the Gear Live has been immersed in water or
2.
the microphone or the speaker is wet, sound may
not be heard clearly during a call. Ensure that the
microphone or the speaker is clean and dry by
wiping it with a dry cloth.
Tip: To measure your heart rate more
accurately with the Gear Live, wear the
Gear Live comfortably around your forearm,
just above your wrist.
Opening and closing the strap
1.
Fit the strap to your wrist using the clasp
pins as guides to size it.
If closed, open the clasp.
3.
Close the clasp.
Caution! Excessively bending the strap may
damage the Gear Live.
Basics
12
Replacing the strap
2.
Lift the strap to detach it from the Gear Live.
3.
On the new strap, insert one side of the pin
into the Gear Live case.
The strap is held in place by small spring-loaded pins
(called presto pins). To replace the strap with a new
one, detach it from the Gear Live.
1. Press in on the pin to release it from the
case.
13
4.
Press in on the pin. Slip the band into the
case and then release the pin to secure the
band in place.
Note: If you replace the strap on your Gear Live with a
strap not manufactured by Samsung, please use
a strap with a standard 22mm spring bar pin,
and refer to the manufacturer’s instructions to
properly attach the band.
Using the Touch Screen
Important! Do not allow the touch screen to come into
contact with other electrical devices.
Electrostatic discharges can cause the
touch screen to malfunction.
Locking and unlocking the touch screen
When not in use, press the Power button or cover the
display with your palm to lock the Gear Live touch
screen and prevent unwanted operations. The Gear
automatically locks its touch screen if it is inactive for
a period of time.
With the Watch screen displayed, press the
Power button or cover the display with the
palm of your hand to lock the touch screen.
With the Gear Live touch screen locked, tap
the screen or press the Power button to
unlock the touch screen.
Basics
14
Viewing status icons
Your Gear Live displays status icons at the top of the
Watch screen.
Mobile device disconnected
Gear Live muted
Additional status icons
15
To display today’s date and the current
charge level of your Gear Live’s battery, with
one finger swipe from the top of the Watch
screen to its middle and hold there. These
icons roll up when you lift your finger.
Finger Gestures
You can use your fingers to navigate among the Gear
Live screens.
Important! To avoid damaging the touch screen, do
not tap it with anything sharp or apply
excessive pressure to it with your
fingertips.
Note: The Gear Live may not recognize touch inputs
close to the edges of the screen, which are
outside of the touch input area.
Tapping
Tap with one finger to display a menu, to select a
menu option, to open an application, or to press a
displayed button.
• Swipe up across a menu to display succeeding
options.
• Swipe downward across a menu to return to
preceding options.
From the Watch screen, tap to launch
Google voice menu.
Swiping
• Swipe left across a screen to see another panel.
Mute/Unmute
• Swipe downward across the entire Watch screen to
mute or unmute your Gear Live.
• Swipe right across a screen to close it.
Basics
16
Viewing notification cards
Notifications appear as cards at the bottom of the
Watch screen.
• To display a complete card, swipe upward across
the screen.
• To display any additional cards, swipe upward
across the screen.
• To close a card, sweep to the right across the
screen.
17
Viewing feature and app cards
Gear Live features and apps display their information
on cards that fill the display.
• To display any additional cards, swipe upward or to
the left across the screen.
• To close a feature or app card set and leave the
feature or app running, swipe to the last card, and
then place your palm over the display.
• To close a feature or app card set and stop the
feature or app running, swipe to the right across the
screen.
Customizing the Watch screen
You can change the contents of the Gear Live Watch
screen to suit your needs and/or taste.
• You can adjust the brightness of the Gear Live
display to a brighter or dimmer setting.
• You can select a different Watch Face from the 12
available.
For more information, refer to “Customizing Your
Gear Live” on page 40.
Features list
From the Features list, you can:
• Access Gear Live features,
• Monitor your mobile device’s text messaging and
email apps and create new text and email
messages,
• Navigate to a desired destination,
• Change some of the Gear Live’s settings, and more.
The Gear Live’s Features list is available from the
Watch screen and is voice and touch screen
compatible.
Note: For more information, refer to “Using Features”
on page 21.
Basics
18
Accessing the Features list
If your Gear Live’s screen is blank, tap it to
display the Watch screen.
2. From the Watch screen, say “OK Google”.
– or –
1.
Tap the Watch screen.
You are prompted to Speak now.
To open a feature by voice:
19
Say the name of the feature as shown in
bold-face text in the Features list.
To open a feature by touch:
Say nothing and tap the screen. The first
few options of the Features list display.
2. To navigate the Features list, swipe upward
and/or downward across the screen.
3. Highlight a desired feature by centering it’s
name in the screen, and then tap the
feature to open it.
1.
Start (apps) menu
The Start menu lists applications included with the
Gear Live.
Note: For more information, refer to “Using
Applications” on page 31.
Opening an app
1. From the Apps menu, swipe upward and/or
downward across the screen to highlight
the app you want to open.
2. Tap the app icon to open the app.
Closing the current app
Accessing the Start menu
1.
Drag the app screen to the right to close it.
From the Watch screen, say “OK Google”.
– or –
Tap the Watch screen.
You are prompted to Speak now.
2.
Say “Start”.
– or –
Swipe through the Features list, and then
tap Start.
The Start menu displays.
Basics
20
Section 3: Using Features
Take a note
With the Voice Memo app, you can dictate notes to
yourself.
1. Tap the Watch screen or say “OK, Google”.
You are prompted to Speak now.
2. Say “Take a note”. Note? displays, and then
you are prompted to Speak now.
3. Dictate the note you want to save. Take a
note converts your spoken words into text.
When you stop speaking, Take a note saves
your text note to Google Keep on your
mobile device.
Note: To read your notes, open Google Keep on your
mobile device.
21
Remind me
Tap the Watch screen or say “OK, Google”.
You are prompted to Speak now.
2. Say “Remind me”. About what? displays,
and then you are prompted to Speak now.
1.
Show me my steps
This feature lets you view a count of your steps today,
and review a log of the steps you have taken over the
last 7 days, all as measured by the Fit app. (For more
information, refer to “Fit” on page 32.)
1. Tap the Watch screen or say “OK, Google”.
You are prompted to Speak now.
2. Say “Show me my steps”. Your step count,
progress to your fitness goal, and a bar
chart of your daily step counts display.
3. To view a list of your daily step totals, swipe
upward across the screen.
4. To hide your steps screen, cover the display
with the palm of your hand.
Show me my heart rate
With the Heart Rate app, you can measure and record
your current heart rate.
Note: Do not use the device’s heart rate measurement
feature for clinical or medical diagnosis.
To ensure accurate hear rate measurements,
follow the guidelines in “Wearing the Gear
Live” on page 11 and in “Ensuring accurate
measurements” on page 23.
Note: Swiping your steps screen to the right stops the
Fit app from counting your steps.
Using Features
22
Ensuring accurate measurements
Depending on measurement conditions and
surroundings, heart rate figures may not be accurate.
For more accurate hear rate readings, do the
following:
• Do not smoke or consume alcohol before measuring
your heart rate. Smoking and/or consuming alcohol
may cause your heart rate to differ from your normal
rate.
• Do not take heart rate measurements at low
temperatures; otherwise, keep yourself warm when
measuring your heart rate.
• Users with thin wrists may receive inaccurate heart
rate measurements.
23
Measuring heart rate
1. Tap the Watch screen or say “OK, Google”.
You are prompted to Speak now.
2. Say “Show me my heart rate”.
3. To begin measuring your heart rate, tap the
heart icon.
After a brief delay, your heart rate displays
on the screen, along with a list of the 4 most
recent hear rates and the dates and times
they were measured.
To take another measurement, tap Check
again.
5. To close the Heart Rate screen, swipe to the
left, and then cover the screen with your
palm.
4.
Send a text
With this feature, you can use your Gear Live to dictate
text messages to your contacts stored on your mobile
device. You can also respond to incoming text
messages that display in text message cards.
Replying to a message
1.
Tap Message menu ➔ Reply.
Sending a message
Tap the Watch screen or say “OK, Google”.
You are prompted to Speak now.
2. Say “Send a text”. The To Whom? screen
displays.
You are prompted to Speak now.
Note: You can use pre-defined phrases saved in
the Android Wear app, S Voice, and
emoticons in composing your reply.
1.
3.
Say the name of the contact who is to
receive your text message.
You are prompted to .
4.
Say the text of your message.
Send your message.
5.
From the message navigation screen, tap
Message reply.
– or –
2.
To select the text input options, tap Message
setting in the reply menu.
Using Features
24
Email
You can use your Gear Live to compose email
messages and read email messages you receive on
your mobile device.
1. From the Watch screen, say “OK Google”.
– or –
Tap the Watch screen.
You are prompted to Speak now.
2.
Say “Email”.
– or –
Checking email on your mobile device
Tap Message menu ➔ Show on device.
Deleting email messages
From the email message navigation screen,
tap Message menu ➔ Delete.
To delete selected multiple messages, from
the email list, tap Gallery delete, select one
or more messages, and then tap Delete.
To delete all messages from the email list,
tap Gallery all, and then tap Delete.
Swipe through the Features list, and then
tap Email.
A list of your recently received email
messages displays.
3.
25
To open a message, tap the message in the
list. The email message navigation screen
displays.
To return to reading your email on your
mobile device, tap Show on device on the
email message navigation screen.
– or –
Agenda
You can use your Gear Live to view the events
scheduled on your mobile device’s calendar.
1. From the Watch screen, say “OK Google”.
– or –
2.
You can use the Gear Live to guide you to a selected
destination.
1. From the Watch screen, say “OK Google”.
– or –
Tap the Watch screen.
Tap the Watch screen.
You are prompted to Speak now.
You are prompted to Speak now.
Say “Agenda”.
– or –
2.
Say “Navigate”.
– or –
Swipe through the Features list, and then
tap Agenda.
Swipe through the Features list, and then
tap Navigate.
A list of your scheduled events displays.
You are prompted how to compose a
Navagate command.
To view the details of an event, tap the
event.
4. To change the date, swipe left or right
across the screen.
3.
Navigate
Using Features
26
Set a timer
You can use the Gear Live as a countdown timer.
1. From the Watch screen, say “OK Google”.
– or –
Tap the Watch screen.
You are prompted to Speak now.
2.
Say “Timer”.
– or –
Swipe through the Features list, and then
tap Timer.
27
3.
Swipe through the available durations, and
then tap the desired duration to start the
timer.
• To pause the timer, tap .
• To resume the countdown, tap .
• To restart the timer, swipe to the right and tap
Restart.
• To stop the timer, swipe to the right twice and tap
Delete.
Start stopwatch
With the Stopwatch app, you can measure elapsed
time.
1. From the Watch screen, say “OK Google”.
– or –
Set an alarm
You can set multiple alarms on your Gear Live.
1. From the Watch screen, say “OK Google”.
– or –
Tap the Watch screen.
Tap the Watch screen.
You are prompted to Speak now.
2.
You are prompted to Speak now.
2.
Say “Stopwatch”.
– or –
Swipe through the Features list, and then
tap Stopwatch.
The following options are available:
• Start: Begin measuring elapsed time.
• Lap: Record time elapsed during one or more
laps.
• Stop: End time recording.
• Reset: Clear time record(s).
Say “Set an alarm”.
– or –
Swipe through the Features list, and then
tap Set an alarm.
Say “Set an alarm”. A list of times, each of
them separated by 15 minutes, displays.
4. Swipe up or down to find the desired alarm
time.
5. Center the desired alarm time in the screen,
and then tap it to set the alarm.
3.
Using Features
28
Show alarms
1.
From the Watch screen, say “OK Google”.
– or –
Tap the Watch screen.
You are prompted to Speak now.
2.
Settings
With the Controls app, you can view connection status
and remaining battery charge, and you can adjust the
volume and display brightness.
1. From the Watch screen, say “OK Google”.
– or –
Say “Show alarms”.
– or –
Swipe through the Features list, and then
tap Show alarms.
A list of the alarms you have set on your
Gear Live displays.
Tap the Watch screen.
You are prompted to Speak now.
2.
Say “Settings”.
– or –
Swipe through the Features list, and then
tap Settings.
The Settings menu displays.
29
The following settings are available:
• Adjust brightness: Scroll to the desired
brightness value, and then tap it.
• Always-on screen: Tap to select what the Gear
Live screen does after remaining inactive for a
time (On – displays a subdued watch face, or
Off – the screen goes dark).
• Airplane mode: Turns off the Gear Live Bluetooth
function.
• Power off: Turns off the Gear Live power.
• Restart: Re-boots the Gear Live.
• Reset device: Erase your current data from the
Gear Live, preparing it for connecting to another
mobile device.
• Change watch face: Page through the 12
available watch faces, then tap the desired one.
Using Features
30
Section 4: Using Applications
Accessing the Start menu
1.
From the Watch screen, say “OK Google”.
– or –
Tap the Watch screen.
You are prompted to Speak now.
2.
Say “Start”.
– or –
Swipe through the Features list, and then
tap Start.
The Start menu displays.
31
Launching an app
Voice method
1. From the Watch screen, say “OK Google”.
2. Say “Start” followed by the name of the
app.
Touch method
1. From the Start menu, swipe upward or
downward across the screen to find a
desired app.
2. Center the app in the screen.
3. Tap the app’s icon to launch the app.
Compass
You can display a compass face on your Gear Live to
show you which direction you are looking or moving.
1. From the Watch screen, say “OK Google”.
2. Say “Start Compass”.
You are prompted to move your Gear Live in
a figure 8 pattern to calibrate the Compass
app.
Fit
With the Fit app, you can count your steps, view the
distance you have walked, and view the calories you
have burned.
Important! Before using this app, if you have just
purchased or have reset your Gear Live,
read the displayed information about the
app and tap OK.
Counting steps
1.
2.
3.
From the Watch screen, say “OK Google”.
Say “Start Fit”.
The Step count page displays.
To review your earlier Step counts, swipe
upward across the page.
(For more information on counting your
steps, see “Show me my steps” on
page 22.)
Using Applications
32
Measuring heart rate
From the Watch screen, say “OK Google”.
2. Say “Start Fit”.
The Step count page displays.
1.
To display the Heart Rate page, swipe to the
left across the Step count page.
4. To begin measuring your Heart Rate, tap the
Heart icon.
(For more information on measuring your
heart rate, see “Show me my heart rate” on
page 22.)
3.
33
Fit settings
You can review and change Fit settings to suit your
personal fitness goal.
1. From the Watch screen, say “OK Google”.
2. Say “Start Fit”.
The Step count page displays.
3.
Swipe to the left twice to display the Fit
settings menu. The following settings are
available:
• Show step card: When set to On, displays the
step card containing your step count on the Watch
screen.
• Daily step goal: Select a value in thousands of
steps from None to 20,000.
• Save fitness data: When set to On, saves your
step counts and heart rates to your mobile device
for use with your health/fitness app.
Heart rate
From the Watch screen, say “OK Google”.
2. Say “Start Heart rate”.
The Heart Rate page displays.
1.
3.
To begin measuring your Heart Rate, tap the
Heart icon.
(For more information on measuring your
heart rate, see “Show me my heart rate” on
page 22.)
Keep
With the Keep app, you can review your text notes
stored on your mobile device.
1. From the Watch screen, say “OK Google”.
2. Say “Start Keep”.
A series of text note cards displays.
3.
To see succeeding cards, swipe upward.
Using Applications
34
Stopwatch
With the Stopwatch app, you can measure elapsed
time.
1. From the Watch screen, say “OK Google”.
2. Say “Start Stopwatch”.
The following options are available:
• Start: Begin measuring elapsed time.
• Lap: Record time elapsed during one or more
laps.
• Stop: End time recording.
• Reset: Clear time record(s).
35
Section 5: Using Android Wear
Using Android Wear, you can connect your Gear Live to
a mobile device and you can customize your Gear’s
settings and apps. You can also use Android Wear to
access the connected mobile device’s features.
Installing Android Wear
For more information, refer to “Connecting the Gear
Live to a mobile device” on page 7.
Launching Android Wear
Note: Some Android Wear features may not be
available depending on the type of connected
mobile device.
3. From the connected mobile device’s Apps
screen, tap Android Wear. The Android Wear
Choose a device screen displays.
Changing to your new Gear Live
1. From the Android Wear Choose a device
screen, tap your new Gear Live’s name.
2. From the Bluetooth pairing request pop-up,
tap OK.
3. From the Pairing code card on your Gear
Live, tap the check mark.
1. On your mobile device, unpair any
currently-used Gear device’s name in the
Bluetooth paired devices list.
2. Power your Gear Live on.
Using Android Wear
36
Configuring Gear Settings
Voice actions
The settings in this list allow you to select which
feature or app is launched when you speak the
associated voice command.
Changing a Voice action setting
1. On the Android Wear screen, under Voice
actions, tap the desired Voice action.
The related Voice action pop-up displays,
with the currently selected feature or app
highlight in gray.
2. Tap the desired alternate feature or app
icon. The pop-up closes, and the name of
the new feature or app appears in the Voice
actions list.
37
Adding compatible apps
You can search for apps compatible with your Gear
Live and/or your mobile device.
1. On the Android Wear screen, under Voice
actions, tap Browse compatible apps.
The Complete action using pop-up displays
with the following apps available:
• Chrome: Google Chrome web browser.
• Internet: Web browser. For more information
refer to your mobile device’s User Manual.
• Play Store: Google Play Store.
2. Tap the desired app for finding new
compatible apps.
3. Tap the desired action from the following
options:
• Always: Permanently assigns your selection to
this action.
• Just once: Launches your selection without
assigning it for later use.
Customizing your Gear Live
Using this app you customize your Gear Live
smartwatch with your mobile device.
At the top of the Android Wear screen, tap
Settings. The Settings screen displays.
The following options are available:
• Mute app notifications: Tap to stop notifications
from specific apps displaying on your Gear Live.
• Screen always on: When enabled, a dimmed
watch face appears on your Gear Live’s screen
when idle.
• Hide cards on dimmed screen: Tap to select
whether cards Always show on the Gear Live’s
dimmed screen, or Always hide.
• Silence connected phone: Tap to select whether
the call connected alert appears on your watch
and phone or only on your watch.
• Show calendar event cards: When enabled,
calendar event reminders display in cards on your
Gear Live.
• Debugging over Bluetooth: When enabled, you
can link your Gear Live and mobile device to a
personal computer using Bluetooth. You can use
these connections to debug apps.
• Resync apps: Tap to resynchronize the app data
on your mobile device with the app data on your
Gear Live.
Using Android Wear
38
Getting to know your Gear Live
The Android Wear app offers some added information,
demonstrations, and tutorials about your Gear Live
device.
From the Android Wear screen, tap your
mobile device’s Menu icon or key.
The following options are available:
• Pair with a new wearable:
• Demo cards:
• Tutorial:
• Help & Feedback:
• About:
39
Section 6: Customizing Your Gear Live
On your Gear Live, you can select how bright the
display is, whether a watch face displays when your
Gear Live is idle, and what watch face displays when
your Gear Live is active.
For information on more Gear Live settings, see
“Using Android Wear” on page 36.
Launching the Settings menu
1.
From the Watch screen, say “OK Google”,
and then at the Speak now prompt, say
“Settings”.
– or –
Tap the Watch screen, and then swipe
upward until the Settings option displays,
and then tap it.
Adjusting Display Brightness
You can adjust the brightness of the Gear Live display
on the device itself.
1. From the Settings screen, tap Adjust
brightness.
2. Swipe upward or downward, then select the
desired display brightness.
Always-on screen
You can select whether a watch face displays when
your Gear Live is idle.
From the Settings screen, tap Always-on
screen to toggle this setting between the
following values:
• On: A subdued watch face displays when your
Gear Live is idle.
• Off: The Gear Live screen goes dark when idle.
Customizing Your Gear Live
40
Airplane mode
With Airplane mode set to On, allows you can use
many of your Gear’s features, such as Compass, Heart
Rate, and more, when you are in an airplane or in any
other area where sending or receiving data is
prohibited.
Important! When your Gear Live is in Airplane Mode, it
cannot access information stored on your
mobile device.
Also, you should place your mobile device
in Airplane mode.
41
From the Settings screen, tap Always-on
screen to toggle this setting between the
following values:
• On: Your Gear Live’s Bluetooth interface is disabled
(disconnected from your mobile device).
• Off: Your Gear Live’s Bluetooth interface is enabled
(can connect with your mobile device).
Power off
This setting shuts off power to your Gear Live.
1. From the Settings screen, tap Power off.
You are prompted to confirm that you want
to turn off power to your Gear Live.
2.
Tap the check mark to power off your Gear
Live.
Restart
This setting powers your Gear Live off, and then on
again.
1. From the Settings screen, tap Restart.
You are prompted to confirm that you want
to restart your Gear Live.
2.
Tap the check mark to power your Gear Live
off, and then on again.
Reset device
This setting resets your Gear Live’s settings to their
factory default values and deletes all of your data.
Note: Pre-loaded applications are not deleted.
1.
From the Settings screen, tap Reset device.
You are prompted to confirm that you want
to reset your Gear Live’s settings.
2.
Tap the check mark to reset your Gear
Live’s settings.
Change watch face
Change the type of clock that displays on the Watch
screen.
1. From the Settings screen, tap Change watch
face.
2. Drag left or right across the screen to select
a Watch Face.
Tip: When connecting the Gear Live to
another mobile device
(either a newly purchased mobile device or
another mobile device for the first time).
Resetting the Gear removes your data from
memory. After the reset, you can connect
the Gear to a different mobile device.
Customizing Your Gear Live
42
About
Access information about your Gear Live.
From the Settings screen, tap About.
Model, Software version, Serial number,
Build number, Connection, and Battery
information displays:
The following options are available:
• System updates: Checks that you have the latest
software loaded on your Gear Live.
• Legal notices: Directs you to your mobile device
for legal notices.
43
Index
A
Android Wear 36
Apps
Accessing the Apps screen 31
Controls 29
Email 25
Launching an app 31
Messages 24
Stopwatch 28, 35
Timer 27
Voice Memo 21
Apps screen 20
B
Bluetooth
Tips for using 9
C
Charging the battery 3
D
Display Brightness
Adjusting 40
P
Displaying 10
F
Finger Gestures 15
G
Gear Live
Connect to a mobile device 7
Connect to another mobile device
8
Controls 10
Gear settings 37
Locking and unlocking 14
Opening and closing the strap 12
Operating time 6
Replacing the strap 13
Turning off 7
Turning on 6
Wearing 11
Gear Manager
Connecting Gear Live to a mobile
device 7
Install 36
Launching 36
Power Button 10
S
Settings
Resetting your Gear Live 42
Selecting the Clock type 42
W
Watch screen 10
Locking the Gear Live 14
44