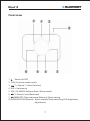
1
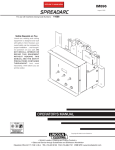
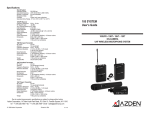
Uhrenradio mit iPod/iPhone Dock
iClock 10
iClock 10
SAFETY INFORMATION
INSTRUCTION
Thanks a lot for choosing our new generation of multi-functional mini music
station.
This mini music station is designed with multi function, perfect sound, high
liability and exquisite appearance, which brings you super happy when enjoy
your music with it.
Please refer to the belows to learn more about iClock 10:
.
.
.
.
.
.
.
.
.
IPHONE/IPOD play
Incoming call alert function
Time synchronization function between main unit and iPhone/iPod
AUX external input
FM radio(87.5-108MHz)
Clock
Alarm Clock
Sleep
Snooze
1.
All the safety and operating instructions should be read before the
product is operated.
2.
Retain Instructions - The safety and operating instructions should
be retained for future reference.
3.
All warnings on the product and in the operating instructions should be
adhered to.
4.
All operating and use instructions should be followed.
1
iClock 10
Important Notes
This safety and operating instruction should be retained for future reference.
The apparatus should not be exposed to dripping or splashing or placed in a
humid atmosphere such as a bathroom.
Do not install the product in the following areas:
Places exposed to direct sunlight or close to radiators
On top of other stereo equipment that radiate too much heat
Blocking ventilation or in a dusty area
Areas where there is constant vibration
Humid or moist places.
Do not place near candles or other naked flames
Operate the product only as instructed in this manual
Before turning on the power for the first time, make sure the power adaptor is
properly connected.
For safety reasons, do not remove any covers or attempt to gain access to the
inside of the product. Refer any servicing to qualified personnel.
Do not attempt to remove any screws, or open the casing of the unit; there
are no user serviceable parts inside, refer all servicing to qualified service
personnel.
CE Declaration of conformity
CE Hereby, Blaupunkt Competence Center Audio M3 Electronic GmbH,
declares that this product is in compliance with the essential reqirement and
other relevant provisions of Directive 1999/5/EC. You can consulted at
www.blaupunkt.com.
2
iClock 10
Safety instruction
1.
READ INSTRUCTIONS – All the safety and operating instructions should
be read before appliance s operated.
2.
RETAIN INSTRUCTIONS - The safety and operating instructions should
be retained for future reference.
3.
HEED WARNINGS – All warnings on the appliance and in the operating
instructions should be adhered to.
4.
FOLLOW INSTRUCTIONS –
followed.
5.
WATER AND MOISTURE – The appliance should not be used near water,
for example, near a bathtub, washbowl, kitchen sink, laundry tub,
swimming pool or in web basement.
6.
VENTILATION – The appliance should be situated so that its location or
position does not interfere with its proper ventilation. Do not place on
bed, sofa, rug or similar surface that may block the ventilation
openings, in a built-in installation, such as a bookcase or cabinet that
may impede the flow of air through the ventilation openings.
7.
HEAT – The appliance should be situated away from heat sources such
as radiators, stoves, or other appliances (including amplifiers) that
produce heat.
8.
POWER SOURCE – the appliance should be connected to power supply
only of the type described in the operating instructions or as marked on
the appliance.
9.
POWER CORD PROTECTION – power supply cords should be routed so
that they are not likely to be walked on or pinched by items placed
upon or against them.
10.
POWER LINES – an outdoor antenna should be located away from
power lines.
11.
OBJECT AND LIQUID ENTRY – care should be taken so that objects do
not fall and liquids are not spilled into the enclosure through openings.
12.
ESD WARNING – the display does not function properly or not reaction
to operation of any the control may due to the electrostatic discharge.
Switch off and unplug the set. Reconnect after a few seconds.
All operating instructions should be
3
iClock 10
13.
DAMAGE REQUIRING SERVICE – the appliance should be serviced by
qualified service personal when:
a.
the power-supply cord or plug has been damaged.
b.
Objects have fallen into, or liquid has been spilled into the
appliance enclosure.
c.
The appliance has been exposed to rain.
d.
The appliance has been dropped, or the enclosure damaged.
e.
The appliance does not appear to operate normally.
14.
SERVICING – the user should not attempt to service the appliance
beyond that described in the user operation instructions. All other
servicing should be referred to qualified service personnel.
15.
DO ensure that all electrical connections (including the mains plug,
extension leads and inter-connections between the pieces of
equipment) are proper ly made and in accordance with the
manufacturer's instructions. Switch off and unplug the power before
making or changing connections.
16.
Unplug this apparatus during lightning storms or when unused for long
periods of time.
17.
Never unplug your radio by pulling on the power cord. Always grasp the
plug firmly and pull straight out from the outlet.
18.
DON'T remove any fixed cover as this may expose dangerous voltages.
19.
DON'T place hot objects or naked flame sources such as lighted candles
or nightlights on, or close to equipment. High temperatures can melt
plastic and lead to fires.
20.
DON'T leave equipment switched on when it is unattended unless it is
specifically stated that it is designed for unattended operation. Switch
off using the switch on the equipment and make sure that your family
knows how to do this. Special arrangements may need to be made for
infirm or handicapped people.
21.
DON'T continue to operate the equipment if you are in any doubt about
if it's working normally or if it's damaged in any way. Switch it off,
unplug the mains power and consult your dealer.
22.
REPAIR OR REPLACE all electric service cords that have become frayed
or otherwise damaged immediately. Do not use a cord that shows
cracks or abrasion damage along its length, the plug, or the connector
end.
4
iClock 10
CATALOGUE
Interface Information ...............................................................................2
General Operation.....................................................................................3
Play Music...................................................................................................4
Radio Operation ........................................................................................5
Setting.........................................................................................................5
Specifications.............................................................................................7
Packing content:
1 main unit
1 user manul
1 quick start guide
2 warranty card
1 power adaptor
5
iClock 10
INTERFACE INFORMATION
Back view
1
FM ANT: FM antenna
2
DC 5V: DC input slot
3
AUX: External music source input ( 3.5mm jack)
6
iClock 10
Front view
1
2
3
4
5
6
7
8
: Power On/Off
FUN: Function mode switch
/T+: Search +/ Next/Forward
VOL+: Volume up
VOL-/AL MODE: Volume down /Alarm mode
/T-: Search-/Last/Backward
/MEM/SET: Play and pause/Memory/Clock setting
SNOOZE/SLEEP/dimmer: Alarm snooze/Sleep selecting/LCD brightness
adjustment
7
iClock 10
GENERAL OPERATION
Power On
1. After plugging DC5V AC adapter into DC power input jack at the back of the
unit, then the display screen lightens, clock appears on the screen, then click
press “ ” to power on.
2. Volume: VOL- and VOL+ can be adjusted within 00-20.
Play music
IPHONE: The music station will enter to ”IPHONE” function directly when
power on. Dock IPHONE/IPOD on the iPhone/iPod dock, and play the music
from IPHONE/IPOD. (IPOD/IPHONE can be changed when the main unit
connects to power)
Pause: Under “IPHONE/IPOD” mode, press “ ”for pause. (Note: there is no
“
”on the IP19 LCD when “IPHONE/IPOD”is played or paused, but on the
IPHONE/IPOD itself ).
Music selection: Press “
/T- /
“IPHONE/IPOD”is played or paused.
/T+”for music selection when
Rewind/Forward: Press "
/T- /
/T+”and hold it for rewind or
forward when “IPHONE/IPOD”is played or paused.
IPHONE Incoming call alert: If IPHONE plays music, a call is incoming, the
unit will auto switch, stop playing music and switching into call music, when
auto hang up, it will return to music playing.
Time synchronization function between the main unit and iPhone/iPod:
Under the state of power-on or power-off, plug iPhone/iPod, the main unit
can synchronize the current time on iPhone/iPod.
LINE operation: Select AUX under power on,and input the external music
source to AUX,turn on volume and the music is ready.
8
iClock 10
Radio operation
Manual Tuner or Auto matic Tuner:Press
pr ess “
/T- /
/T- /
/T+” for manual tuner, while
/T+ ”and hold it for two seconds when enter to automatic tuner.
The tuner will stop automatically when get access to channels.
Manual chan nel memory: when get acess to the channels by manual, press
“
/MEM/SET”and hold for a while. Press “
/T- /
/T+ ” to choose the saving
location. 20 channles can be memorized and saved.
Memory selection:Pr ess “
/MEM/SET”to alter nate the memor y channel.
Timing setting
1. Hold and press “
/MEM/SET”key around 2 seconds, “24H” charac ter s ar e flashing
on LCD screen, enter into 12/24H system option, then c lick press “
/T+”k ey to select ”12/24” system, finally click press “
/T- /
/MEM/SET” key to
confirm, which enters into time setting.
2. Enter into the time setting mode, set the hour first, click press “
/T+”k ey to select preset hour, finally click press “
/T- /
/MEM/SET”k ey to confir m,
then use the same methods to set the minutes.
Alarm clock setting
When it’s in STAND By status, hold and press“VOL-/AL MODE”key to enter into setting,
then display clock, “Hour” digits are flashing on LCD, and clic k pr ess “
/T- /
/T+”
key to adjust the hour, click press “VOL-/AL MODE” key to confirm, then “Minute” digits
ar e flashing on LC D, and clic k press“
/T- /
/T+” k ey to adjust the minutes, click
press “VOL-/A L MODE” key to confirm the setting and return to clock status.
9
iClock 10
Snooze/sleep/dimmer
After alarm clock rings, press “SNOOZE” key to start snooze function,the alam
clock stops,and it will resume after 9 minutes, if you press “
” key, the alarm
clock stops, it will not ring again until the same time of the next day.(For
example, we set the alarm clock's time “9:05” today, if you press “
” key, the
alarm clock will stop temporarily, and ring again till “9:05” tomorrow.
Sleep :Press “SNOOZE/SLEEP/LIGHT” under any mode and then start to set
the snooze and select 120M-90M-60M-30M-15M-OFF.
dimmer: There are three brightness modes of LCD when the unit is in standby.
10
iClock 10
SPECIFICATION
Support play iPhone (Compatible with most iPods)
iPod Mini
iPod Touch 1st Generation
4GB 6GB
8GB 16GB 32GB
iPod 4th Generation
iPod Touch 2nd Generation
20GB 60GB
8GB 16GB 32GB
iPod Classic
iPod Touch 3rd Generation
80GB
8GB 16GB 32GB
iPod Nano 2nd Generation
iPod Touch 4th Generation
1GB 2GB 4GB
8GB 16GB 32GB
iPod Nano 6th Generation
iPhone 3G
8GB 16GB
8GB 16GB
iPod Nano 1st Generation
iPhone 4
1GB 2GB 4GB
16GB 32GB
iPod
Nano
5th
Generation(Video
iPod Nano 3rd Generation(Video)
Camera) 8GB 16GB
8GB 16GB
iPod 5th Generation(Video)
iPod Classic
30GB 60GB 80GB
120GB 160GB(2009)
iPod 4th Generation(Colour Display)
iPhone 3GS
40GB 60GB
8GB 16GB 32GB
iPod Nano 4th Generation(Video)
iPod Classic
4GB 8GB
160GB(2007)
S/N Ratio
≥60dB
Max. distortion
≤10%
Output power (8Ω)
≥1.2W
Power supply input
DC 5V
FM sensitivity
≤20dB
11
iClock 10
iPod / iPhone
“Made for iPod,” and “Made for iPhone,” mean that an electronic accessory has
been designed to connect specifically to iPod or iPhone respectively, and has
been certified by the developer to meet Apple performance standards. Apple
is not responsible for the operation of this device or its compliance with
safety and regulatory standards. Please note that the use of this accessory
with iPod or iPhone may affect wireless performance.
iPhone & iPod are trademarks of Apple Inc., registered in the U.S. and other
countries.
INTENDED USE
This appliance is intended for recieving and playing audio and video signals.
Only use according to these instructions. Improper use is dangerous and will
void any warranty claim. Observe the safety instructions.
If at any time in the future you should need to dispose of this product please note that:
Waste electrical products should not be disposed of with household waste. Please
recycle where facilities exist. Check with your Local Authority or retailer for recycling
advice. (Waste Electrical and Electronic Equipment Directive)
12
BB 12-1/BB 12-3
c 2010 ALL rights reserved by Blaupunkt Competence Center Audio M3 Electronic GmbH. This
material may be reproduced, copied or distributed for personal use only.