1
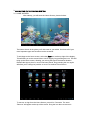
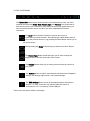
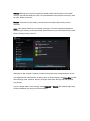
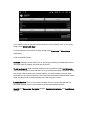
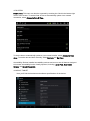
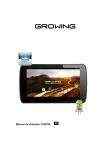
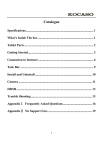
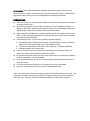
ATTENTION: This handbook contains important information regarding the safe and correct use of your tablet. Please be sure to read the following in order to maximize your enjoyment of the device and to avoid complications stemming from misuse. PRECAUTIONS: Store the device in a dry, temperate location. Avoid extreme temperatures, moisture, and high levels of dust. Avoid severe impacts (such as drops and falls). Do not put significant pressure or weight on the device, particularly the display. Doing so may permanently distort the display image or lead to decreased touchscreen functionality. When using new headphones or earbuds with the device, first set the volume to low (25% or less) and adjust upward until you find the desired level. Excessive volumes may lead to hearing damage. If the following occur, your device most likely requires charging: A、 The battery power ICON shows No Power, as indicated by an empty or flashing battery icon in the bottom right corner of the display screen. B、 The device automatically shuts down, will not start up, or restarts repeatedly. C、 Operation buttons are unresponsive. If device contents and memory are lost or corrupted due to damage, misuse, or repairs, the seller and manufacturer shall not be liable. Do not disconnect the device from the power source when it is undergoing software updates, downloads, or is re-formatting. Do not disassemble the device. Do not use alcohol or benzene-based products to clean the device. Do not use the device where the use of electronic devices is prohibited. Under no circumstances should you use the tablet while driving. Note: The manufacturer reserves to right to improve or alter this product at any time. This information is subject to change with notice. All images in this manual are included for reference only. They may not reflect software updates and other device changes. 1. SCREEN AND BUTTON FUNCTIONALITY: 1.1 LCD TFT Touchscreen Display Panel The primary control interface of this tablet is its 7” capacitive touchscreen panel. To interact with software and applications, use your finger as you would a conventional mouse. Move items and scroll by dragging your finger across the display; click and select by tapping once. Additional touch gestures include: Double Tap: Zooms into content. Selects text, when appropriate. Swipe: Slides between home screens; scrolls overflowing content, such as web pages and navigation apps. Pinch Open: Zooms into content. Pinch Closed: Zooms out of content. 1.2 POWER Start-Up: Press and hold the Power Button. The display will activate and enter the main home screen. Full Shutdown: While in the main menu interface, press and hold the power button for 5 seconds. A "power off" dialogue will appear. Select “Okay,” and the device will shut down safely. To Lock: Short-press the Power Button to lock or unlock the screen. Note: When power has been fully depleted, the device will shut down automatically. If the tablet has been shut down improperly, it may take longer to restart. 1.3 VOLUME +/To increase or decrease the device’s volume, press up (+) or down (-) on the rocker key located beside the headphone jack. PORTS AND COMPATIBILITY: 1.4 EARPHONE JACK Standard 3.5 mm headphone jack, compatible with all headphones utilizing a standard connection. 1.5 HDMI OUTPUT HD Video output for streaming video via microUSB port. Allows for connection to supported HDTVs via microUSB-to-HDMI. (Cable not included.) 1.6 TF-CARD SLOT Supports external T-FLASH memory cards for expanded removable storage. 1.7 Micro-USB Standard microUSB jack, allowing for data transfer (with a home PC, as well as other peripherals) and charging. 1.8 DC-5V PORT Standard 5 volt DC port for connection with included charger. Provides the most efficient charging solution for this tablet. 2. GETTING STARTED WITH YOUR TABLET 2.1 BATTERY MANAGEMENT AND CHARGING Before your first use, fully charge the device by connecting the included power adapter. This will help ensure that the battery charges to full capacity and that it maintains its maximum charging capacity. For the first two complete charges, expect roughly 6 hours of charging time. All subsequent charges should require roughly 4 hours for a full charge. This tablet uses a built-in LI-polymer battery. Charging may be performed via a standard adaptor (Input: AC110~240V 50/60Hz Output: DC5V/2A), or via the microUSB interface. During charging, the battery icon will illuminate and indicate charging process. When charging is complete, the battery icon will turn green. In order to prolong the life of the included battery, we suggest that you generally attempt to fully drain the battery before recharging. Avoid extended periods (greater than one month of disuse). In the event that the device has shut down due to low battery, connect the DC adapter. The screen will indicate charging progress, as the device will not be able to boot up until the battery receives a partial charge. To minimize charging time, Shut Down or Lock the device before charging. 2.2 CONNECTION WITH PC Use the included USB cable to connect the device to your PC. In the bottom right hand corner, you will notice three new icons. Click the icons, and you will see three sets of options: Connected as an Installer: Clicking on this tab will reveal a series of options for transferring media of various formats, including Media Device (MTP), which allows the transfer of files through Windows or Mac (via Android File Transfer), Camera (PTP), allowing for the transfer of photos, and USB Large Storage. USB Debugging Connected: Clicking this box will open up a series of settings related to PC connectivity, include security measures. USB Mass Storage: Allows you to initiate storage transfers between the tablet (included removable memory card) and your PC. 3. NAVIGATING THE OPERATING SYSTEM 3.1 HOME SCREEN After startup, you will enter the Home Screen, pictured below: The Home Screen is the place you’ll visit most on your tablet. It’s where all of your most important apps and functions can be accessed. To add Apps to the home screen, select the Apps icon at the top right of the display. This will take you to the screen below. Add an App by long-pressing the icon. This will bring up the home screen, allowing you to drag the App to the desired location. Release the App to place it; once it has been placed, long-pressing the icon again will allow you to change its position or move it to another Home Screen. To remove an App from the Home Screen, press it for 5 seconds. The word “Remove” will appear at the top of the screen. Drag the icon there to remove it. 3.2 THE SYSTEM BAR The System Bar makes up the bottom portion of the tablet screen. Here you’ll find essential shortcuts like Home, Back, Recent Apps, and Volume. The System Bar is also where you’ll access a number of other helpful shortcuts that appear when you have connected another device and when you have established an internet connection: The Back Button should be familiar to anyone who’s used a contemporary internet browser. Short-pressing the Back Button returns you to the previous screen. Long-pressing the Back Button returns you to the Home Screen. Short-pressing the Home Button brings you back to the Home Screen. The Recent Apps Button recalls the Apps you’ve used recently and displays them in window at the side of the screen. The Volume Buttons allow you to easily raise and lower the volume of your audio. The Options Button reveals a small window with shortcuts to Wallpaper settings, the Manage Apps screen, and System Settings. The USB Settings Button opens up the settings options discussed in Section 2.2. Note: this button only appears when the device is connected to a PC or accessory via the USB port. These icons will remain visible in most Apps. 4. SETTINGS The Settings Menu can be accessed two different ways: via the Options button highlighted in Section 3.2 or via the Settings Icon found in the Apps window. Selecting either will take you to the following screen: 4.1 WIRELESS & NETWORKS How to turn on Wi-Fi: Sliding the Wi-Fi bar in the Settings Menu to the ON position will reveal a list of the available wireless networks in your area. Select your network and, if necessary, enter the password. If your network does not appear, select Scan. If it still does not appear, select Add Network, and enter the network name, along with its security certificate, if applicable. If you still cannot connect to the desired network, slide Wi-Fi to the OFF position and turn off your tablet. Turn off your router for one minute, restart it, turn on your tablet, and turn Wi-Fi on. Data Usage: This screen displays the amount of data you have used over a given time frame. Note: Data Usage only applies to users who have subscribed to a mobile data plan. This tablet requires a 3G dongle to receive mobile data. 4.2 DEVICE Sound: Here you’ll be able to change default sounds, including Notification alerts, Touch Sounds, and the Screen Lock Sound. Display: Adjust screen Brightness, choose from a variety of Wallpapers, activate or disable Automatic Screen Rotate (from portrait to landscape and vice versa, based on the angle at which the device is held), adjust Sleep settings (the period of inactivity before the device goes into Sleep mode), adjust Font Size, initiate Accelerometer Coordinate System (to calibrate the device’s Accelerometer, a sensor that detects motion), adjust Screen Adaptation (how the screen adjusts to different Apps), and turn Smart Backlight (automatic screen brightness adjustment) on or off. Storage: Manage your device storage and enable media scanning for the removable memory card slot and USB port. Also, view a breakdown of the amount of memory used by Apps, Media, and more. Battery: View stats on your battery, and the amount of battery life used by various activities. Apps: This window allows you to manage your apps. Four tabs organize applications based on type: those you’ve downloaded, those stored on your removable memory card, those currently running, and All. Selecting an App reveals a number of options, along with data corresponding to its use: If an App becomes unresponsive or will not open or close properly, use Force Stop to shut down the app. Note, however, that any changes made since the App was last opened may be lost. If you no longer wish to have an App, select Uninstall or Disable. Pre-existing Apps may not be uninstalled, but nearly all can be disabled. . If you wish to move an App from internal memory to your memory card, or vice versa, simply select Move to SD Card. To clear the data of cache from an App, simply select Clear Data or Clear Cache, respectively 4.4 ACCOUNTS & SYNC Accounts: Adding accounts allows you to sync and coordinate your tablet with various online services. By default, Accounts are set to OFF. To add an Account: Slide the on/off switch into the on position. Select Add Accounts. There are three types of accounts that can be synced with this tablet: Corporate, Email, and Google. After selecting any of these options, you will be asked to provide log in information for the relevant services. Once the account has been authenticated, certain Apps, including email, will automatically sync with the given account. Location Services: Turn on and off and Location Services, which allow Google and third-party Apps to access your location to provide personalized services. Security: Set Passwords, Encryption settings, Device Administrators, and Lock Screen settings. Language & Input: Set the default Language, adjust automatic Spelling Correction settings, and set Keyboard and typing settings. Backup & Reset: Back up device data to Google services and Reset factory settings and data. 4.5 SYSTEM Date & Time: This menu can also be accessed by touching the Clock in the bottom right corner of the screen. To set the Date & Time to automatically update via a network connection, select Automatic Date & Time. To set the time to automatically update to your current location, select Automatic Time Zone. To set the date and time manually, select Set Date and Set Time. Accessibility: Review installed accessibility services and turn on and off features designed to increase accessibility for the visually impaired, including: Large Text, Auto-rotate Screen, and Speak Passwords. 4.9 ABOUT TABLET Here you’ll find the hardware and software specifications of the device: 5. INSTALLING APPS To download and install new Apps, touch the Play Store icon. Note: You must be connected to the internet to access the Play Store. In the Play Store, you’ll find a vast selection of Apps for the Android platform, including those developed by Google and by third-party developers. First, however, you will have to set up a Google account if you do not already have one. Once you have set up or signed into an account you can search or browse various categories and Apps. To download an App, simply touch the icon and select Download. In some cases, Apps will be free; in others, you will need to submit credit card information. Once the App has downloaded, it will appear in the Apps window. Touching the icon will open the App. To move it to the Home Screen, refer to Section 3.1. 6. WIDGETS Widgets can be found in the second tab of the Apps window. Widgets provide live-updating information of various kinds. The Calendar Widget, for example, provides a compact list of the appointments you’ve entered in the Calendar App that can be displayed on the Home Screen for quick reference. To add a Widget to your Home Screen, follow the same steps you would you to add an App: long-press the widget until the Home Screen appears, and drag it to the desired location. Widgets can then be moved or removed from the Home Screen by long-pressing the icon. 7. TROUBLESHOOTING 7.1 If the tablet does not load past the “Android” logo or will not enter the Home Screen: 1. The device most likely needs to be Reset. 2.Charge the tablet for 10 minutes. Then press and hold the power button until the tablet is completely shut down. 3. Once the tablet is shut down, charge it for an additional 2-3 hours. Press and hold the power button until the start sequence initiates. 7.2 If the tablet will not turn on: 1. Charge the tablet for 10 minutes. 2. Hold the power button until the start sequence initiates. 7.3 If no sound comes through a connected headset or earphones: 1. Check that the volume is above zero. 2. Download the file again. If the problem persists, try a different audio file. If this file works properly, the original file may be corrupted. If not, check the earphones with a different device. 7.4 If you are unable to transfer files to and from the tablet: 1. Check that the connection between the tablet is secure. 2. Confirm that the internal memory or memory card is not full. 3. If the problem persists, try again with a different USB cable. 8. 3G PERIPHERAL SUPPORT: Part name Part type HUAWEI-E153 HUAWEI-E156G HUAWEI-E160E HUAWEI-K3520 HUAWEI-E170 HUAWEI-E172 HUAWEI-E173 HUAWEI-E176G 3G Wireless Network Card HUAWEI-E1782 WCDMA HUAWEI-E180 HUAWEI-E220 HUAWEI-E226 HUAWEI-E230 HUAWEI-E261 HUAWEI-E270 HUAWEI-E1552 HUAWEI –E1786 ZTE-MF110 HUAWEI-E353 HUAWEI –E1756