1
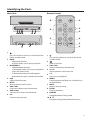
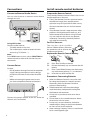
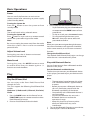
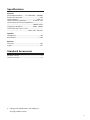
Contents Important Safety Instructions..........................................................................................................................2 Safety...................................................................................................................................................................................... 2 Identifying the Parts............................................................................................................................................3 Main Unit: ............................................................................................................................................................................ 3 Remote Control.................................................................................................................................................................. 3 Connections...........................................................................................................................................................4 Connect to External Audio Device.............................................................................................................................. 4 Connect Power................................................................................................................................................................... 4 Install remote control batteries.......................................................................................................................4 Prepare the Remote Control.......................................................................................................................................... 4 Replace the Remote Control Battery.......................................................................................................................... 4 Precautions Concerning Batteries............................................................................................................................... 4 Basic Operations...................................................................................................................................................5 Power..................................................................................................................................................................................... 5 Adjust Volume Level......................................................................................................................................................... 5 Mute Sound......................................................................................................................................................................... 5 Play............................................................................................................................................................................5 Play iPod/iPhone/iPad...................................................................................................................................................... 5 Play With Bluetooth Device............................................................................................................................................ 5 Play With an External audio Device............................................................................................................................. 6 Troubleshooting...................................................................................................................................................6 Specifications.........................................................................................................................................................7 Standard Accessories..........................................................................................................................................7 1 Important Safety Instructions WARNING RISK OF ELECTRIC SHOCK DO NOT OPEN CAUTION: TO REDUCE THE RISK OF ELECTRIC SHOCK, DO NOT REMOVE COVER (OR BACK). NO USER-SERVICEABLE PARTS INSIDE. REFER SERVICING TO QUALIFIED SERVICE PERSONNEL. The lightning flash with arrowhead symbol, within an equilateral triangle, is intended to alert the user to the presence of uninsulated “dangerous voltage” within the product’s enclosure that may be of sufficient magnitude to constitute a risk of electric shock to persons. The exclamation point within an equilateral triangle is intended to aler t the user to the presence of important operating and maintenance (servicing) instructions in the literature accompanying the appliance. Safety 1 Read these instructions. 2 Keep these instructions. 3 Heed all warnings. 4 Follow all instructions. 5 Do not use this apparatus near water. 6 Clean only with dry cloth. 7 Do not block any ventilation openings. Install in accordance with the manufacturer’s instructions. 8 Do not install near any heat sources such as radiators, heat registers, stoves, or other apparatus (including amplifiers) that produce heat. 9 Do not override the safety purpose of the polarized or grounding-type plug. A polarized plug has two blades - one wider than the other. A grounding plug has two blades and a third grounding prong. The wide blade or the third prong is provided for your safety. If the provided plug does not fit into your outlet, consult electrician for replacement of the obsolete outlet. 10 Protect the power cord from being walked on or pinched particularly at plugs, convenience receptacles, and the point where it exit from the apparatus. 2 11 Only use attachment/accessories specified by the manufacturer. 12 Use only with a cart, stand, tripod, bracket or table specified by the manufacturer, or sold with the apparatus. When a cart is used, use caution when moving the cart/ apparatus combination to avoid injury from tip-over. 13 Unplug this apparatus during lightning storms or when unused for long periods of time. 14 Refer all servicing to qualified service personnel. Servicing is required when the apparatus has been damaged in any way, such as power- supply cord or plug is damaged, liquid has been spilled or objects have fallen into the apparatus, the apparatus has been exposed to rain or moisture, does not operate normally, or has been dropped. 15 Do not expose this equipment to dripping or splashing and ensure that no objects filled with liquids, such as vases, are placed on the equipment. 16 This is CLASS II apparatus with double insulation, and no protective earth provided. 17 Warning: to reduce the risk of electric shock, do not expose this apparatus near moisture. 18 Warning: the battery (battery or batteries or battery pack) shall not be exposed to exceessive heat such as sunshine, fire or the lick. 19 The mains plug is used as the disconnect device, the disconnect device shall remain readily operable. Identifying the Parts Main Unit: Remote Control AUX AUX AUX AC ~ 1 Press this button to turn on or switch to the Eco Power standby mode. 2 DOCK - Select Dock function. - In DOCK mode, start or pause playback. 3 BLUETOOTH - Select Bluetooth function. - In Bluetooth mode, start or pause playback (press the button once). - In Bluetooth mode, pair the Bluetooth- enabled device (press and hold the button). 4 AUX Select AUX IN function. 5 MUTE Mute or resume sound of unit. 6 VOL+/VOL Increase or decrease the volume level. 7 AUX socket Connect to an external audio device. 8 AC~ Connect to power cord. 1 Turn on this product or switch to Eco Power standby mode. 2 Select a function. 3 VOL+/VOL Increase or decrease volume level. 4 H , G Skip to previous track/next track. 5 BF Start or pause playback. 6 MENU Switch between the folder list and the file list for iPod/iPhone. 7 MUTE Mute or resume sound. 8 ENTER Confirm selections. 9 PAIRING Enable Bluetooth Pairing mode. 10 , Navigate through iPod/iPhone/iPad menu. 3 Connections Install remote control batteries Connect to External Audio Device Prepare the Remote Control You can also listen to an external audio device through this unit. Using AUX socket Connect audio cable to: - The AUX socket on this unit. - The audio output socket on external audio device (e.g. TV, iPhone......) . Note: Press AUX button on main unit or FUNCTION on remote control to select AUX function for your connection. Connect Power Caution: - Risk of product damage! Ensure that the power supply voltage corresponds to the voltage printed on the back or the underside of the unit. - Before connecting the power cord, ensure you have completed all other connections. The provided Remote Control allows the unit to be operated from a distance. Even if the Remote Control is operated within the effective range (6m), remote control operation may be impossible if there are any obstacles between the unit and the remote control. If the Remote Control is operated near other products which generate infrared rays, or if other remote control devices using infrared rays are used near the unit, it may operate incorrectly. Conversely, the other products may operate incorrectly. For First-time use The unit has a pre -installed lithium CR2025 battery. Remove the protective tab to activate the remote control battery. Replace the Remote Control Battery (A): (B) : (C): (D): Precautions Concerning Batteries AUX AC ~ Connect the power adaptor to the AC socket on the unit and a wall outlet. 4 Press down the flip on the left. Pull out the battery tray and remove the old battery. Place a new CR2025 battery into the battery tray with correct polarity (+/-) as indicated. Insert the tray back into the slot. When the Remote Control is not to be used for a long time (more than a month), remove the battery from the Remote Control to prevent it from leaking. If the batteries leak, wipe away the leakage inside the battery compartment and replace the batteries with new ones. Do not use any batteries other than those specified. Do not heat or disassemble batteries. Never throw them in fire or water. Do not carry or store batteries with other metallic objects. Doing so could cause batteries to short circuit, leak or explode. Never recharge a battery unless it is confirmed to be a rechargeable type. Basic Operations Power You can use all the functions on main unit or remote control after connecting to power supply (called Standby Mode). Turning the System On Press the button to turn the system on from standby mode. Note: The set will switch to last selected source. Turning the System Off Press button on main unit or on remote control to turn the system off and go to Eco mode. Note: Be sure to unplug the power cord from the outlet when the system is not in use for an extended period of time. Adjust Volume Level During play, press the +/- buttons to increase/ decrease the volume level. Mute Sound During play, press the MUTE button to mute or restore sound. Press this button again or -/+ buttons to cancel the effect. Play Play iPod/iPhone/iPad You can enjoy audio from iPod/iPhone/iPad through this unit. This unit support the following iPod/iPhone/iPad models: iPod nano 7, iPod touch 5, iPhone 5, iPad mini, iPad 4 1 2 Press the DOCK button on the front of unit or FUNCTION button on remote control to select iPod/iPhone/iPad source. Place an iPod/iPhone/iPad to the dock. 3 Start to play the connected iPod/iPhone/iPad. - To pause/resume play, press the BFbutton on remote control or DOCK button on front panel of unit. - To skip to a track, press the H/G buttons. - To navigate through the menu: press M button, then press , to select and press BF to confirm. Note: When you use , to navigate through the menu, the interval between each operation should be within some seconds, or it will return to normal function. Charge the iPod/iPhone/iPad The docked iPod/iPhone/iPad begins to charge while the unit is connected to AC power. Play with Bluetooth Device You can listen to music from a Bluetooth-enable device via this player. Pair the Bluetooth-enabled devices The first time you connect your Bluetooth device to this player, you need to pair your device to this player. Note: - The operational range between this player and a Bluetooth device is approximately 8 meters. - Before you connect a Bluetooth device to this unit, familiarize yourself with the Bluetooth capabilities of the device. - Compatibility with all Bluetooth devices is not guaranteed. - Any obstacle between this unit and a Bluetooth device can reduce the operational range. - Keep this player away from any other electronic device that may cause interference. 1 Turn on the Bluetooth function on your device. 2 Switch player's source to Bluetooth. 5 3 4 5 6 7 Press and hold BF/ Pair button on remote control or BLUETOOTH button on front panel of unit for seconds to activate Bluetooth pairing mode, the LED indicator lights up every two seconds. Search for Bluetooth device with your device. Select “MXSP-BT3100” in the pairing list. Enter default password "0000" if necessary, if the pairing succeeds, the LED indicator lights off every two seconds. To disconnect connection, turn off the Bluetooth function on your device or switch the player to other source. Tip - - - - - - - If there's a connection exist, press and hold BF/ Pair button on remote control or BLUETOOTH button on front panel of unit for seconds will re-activate the pairing mode, the connection will be interrupted. If there's no other Bluetooth device pair with this player in two minutes, the player will recovery previous connection. The player will also be disconnected when your device is moved beyond the operational range. If you want to reconnect your device to this player, place it within the operational range. If the device is moved beyond the operational range, when it is brought back, please check if the device is still connected with the player. If they are connected, the LED indicator lights off every two seconds. If the connection is lost, the LED indicator is always on, follow the instruction above to pair your device to the player again. Listen to music from Bluetooth device If the connected Bluetooth device supports Advanced Audio Distribution Profile (A2DP), you can listen to the music stored on the device through the player. If the device also supports Audio Video Remote Control Profile (AVRCP) profile, you can use the player's remote control to play music stored on the device. 1. Pair your device with the player. 2. Start play music via your device (if it support A2DP) 3. Use supplied remote control to control play(if it support AVRCP) - To pause/resume play, press the BF/ Pair button on remote control or BLUETOOTH button on front panel of unit. - To skip to a track, press the H/G buttons. 6 Play with an External Audio Device There is one AUX socket at the rear of unit. Analogue audio sound signals from other sources can be connected to the unit through these socket. 1 In the ON mode, press AUX button on main unit or FUNCTION on remote control to select AUX IN function. 2 Press the +/- buttons to adjuct the volume to your desired level. 3 In AUX IN mode, operate your audio device directly for playback features. Troubleshooting To keep the warranty valid, never try to repair the system yourself. If you encounter problems when using this unit, check the following points before requesting service. No power - Ensure that the AC cord of the apparatus is connected properly. - Ensure that there is power at the AC outlet. - Press standby button to turn the unit on. Remote control does not work - Before you press any function button, first select the correct source. - Reduce the distance between the remote control and the unit. - Insert the battery with its polarities (+/-) aligned as indicated. - Replace the battery. - Aim the remote control directly at the ensor on the front of the unit. Using iPhone to play music - While the iPhone is playing the music throught the docking, there may be a chance that the iPhone may not be under a good receiption mode to get the incoming call signal. No Response From the Unit - Disconnect and reconnect the AC power plug, then turn on the unit again. Specifications General Power Requirements.........AC 220-240V ~ 50/60Hz Power Consumption............................................... 15W Output Power......................................................25W x 2 Total Harmonic Distortion.................. 1%(1kHz, 1W) Audio Input Sensitivity/Impedance........................... .......................................................................500mV/47kΩ Frequency Response.............................. 20Hz - 20kHz Unit Dimensions (W x H x D)......................................... ......................................................... 480 x 169 x 107 mm Speaker Impedance......................................................................8Ω Rate Power.................................................................. 25W Remote Distance..........................................................................6m Angle............................................................................... 30O Standard Accessories Remote Control . ..........................................................x 1 Owner’s manual............................................................x 1 Design and specifications are subject to change without notice. 7