1
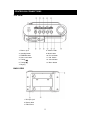
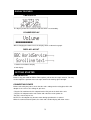
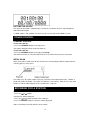
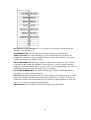
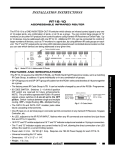
DA500 DAB+/FM RADIO
UK Instruction Manual
SAFTY
•
•
•
•
•
•
•
•
•
•
•
FOR HOUSEHOLD AND INDOOR USE ONLY
PLACE THE APPLIANCE ON A FLAT, STABLE SURFACE WITH ADEQUATE
VENTILATION AND AWAY FROM OTHER SOURCES OF HEAT. MINIMUM
DISTANCES AROUND THE APPLIANCE FOR ADEQUATE VENTILATION IS 5CM.
DO NOT COVER OR RESTRICT VENTILATION OPENINGS.
CHILDREN SHOULD BE SUPERVISED TO ENSURE THEY DO NOT PLAY WITH
THE APPLIANCE, AND THE APPLIANCE AND CABLE SHOULD BE KEPT
COMPLETELY OUT OF REACH OF YOUNG CHILDREN.
THIS APPLIANCE IS NOT DESIGNED FOR USE BY CHILDREN, OR PERSONS
WITH REDUCED PHYSICAL, SENSORY OR MENTAL CAPABILITIES, AND
SHOULD NOT BE USED BY SUCH PERSONS UNLESS THEY CAN DO SO
SAFELY. WHERE NECESSARY, SUCH PERSONS (OR ANYONE WITH LACK OF
EXPERIENCE OR KNOWLEDGE) SHOULD FIRST BE GIVEN SUPERVISION OR
INSTRUCTION CONCERNING USE OF THE APPLIANCE BY A PERSON
RESPONSIBLE FOR THEIR SAFETY.
FULLY UNWIND THE CABLE BEFORE PLUGGING IN AND ENSURE THE CABLE
IS POSITIONED AWAY FROM AREAS WHERE IT IS LIKELY TO GET DAMAGED
OR CAUSE A TRIP HAZARD.
DO NOT OPERATE THE APPLIANCE IF DAMAGED OR AFTER IT
MALFUNCTIONS. IN THE EVENT THE SUPPLY CORD IS DAMAGED, IT MUST
ONLY BE REPLACED BY A QUALIFIED SERVICE ENGINEER, WITH A SUITABLY
APPROVED PART.
DO NOT PULL ON CABLE TO DISCONNECT FROM MAINS SUPPLY.
KEEP APPLIANCE, CABLE AND PLUG DRY AND AWAY FROM AREAS WHERE IT
IS LIKELY TO GET SPLASHED. AVOID USING IN HOT, HUMID ENVIRONMENTS.
DO NOT PLACE ITEMS WITH NAKED FLAMES OR CONTAINERS WITH LIQUIDS
ON THIS APPLIANCE.
SWITCH OFF AND UNPLUG WHEN NOT IN USE AND BEFORE CLEANING OR
SERVICING THE APPLIANCE. SERVICING OF THIS APPLIANCE MUST ONLY BE
CARRIED OUT BY A QUALIFIED ELECTRICIAN.
ALWAYS ENSURE THE MAINS PLUG IS READILY UNPLUGGABLE – DO NOT
USE WITH ‘LOCKABLE’ SOCKETS OR PERMANENTLY WIRE TO MAINS.
WARNING
RISK OF ELECTRIC SHOCK
DO NOT OPEN
The lightning flash with arrowhead
s y m bo l, wi th in a n eq ui la te r al
triangle, is intended to alert the
user to the presence of uninsulated
d a n g e ro u s v o lt a g e " w i th i n th e
product's enclosure that may be of
sufficient magnitude to constitute a
risk of electric shock to persons
TO REDUCE THE RISK OF
E L EC T R IC S H OCK , D O N OT
REMOVE COVER ( OR BACK)
NO USER-SERVICEABLE PARTS
INSIDE. REFER SERVICING TO
QU AL I FIED SE RVI CE
PERSONNEL.
The exclamation point within
a n e q u i l a t e ra l tr i a n g l e i s
intended to alert the user to
the p resence of im portant
operating and maintenance
(servicing) instructions in the
literature accompanying the
appliance.
LASER SAFETY
This unit employs an optical laser beam system in the CD
mechanism, designed with built-in safeguards. Do not
attempt to disassemble, refer to qualified service personnel.
INVISIBLE LASER RADIATION
Exposure to this invisible laser light beam may be harmful to
WHEN OPEN AND INTERLOCK
the human eye.
FAILED OR DEFEATED.
1
CONTROLS & CONNECTIONS
TOP VIEW
1. Phones jack
8. Volume knob
2. Standby button
9. Mute button
3. FM/DAB button
10. Preset button
4. Auto scan button
11. Info. button
5. Tuning
12. Select button
6. Tuning
13. Menu button
7. Display
BACK VIEW
1. DC input jack
2. Battery door
3. FM antenna
2
DISPLAY FEATURES
TIME DISPLAY
The display shows the current time and date when set to Standby.
VOLUME DISPLAY
When changing the volume level, the display shows a volume bar graph.
DISPLAY LAYOUT
1. Station name/Source display
2. Info display
GETTING STARTED
DAB/FM AERIAL
Before using your radio for DAB or FM reception, pull out the telescopic antenna. You may
need to adjust the position of the telescopic antenna for maxing signal strength.
CONNECTING POWER
Before connecting the power, check that the mains voltage on the rating plate of the AC
adaptor is the same as the voltage in your area.
• Plug the DC cord from the AC adaptor into the DC jack on the back of the unit.
• Plug the AC adaptor into the wall socket and switch the mains power on.
The unit is now ready for use.
NOTE:-The AC adaptor may become warm during operation-this is normal.
When first connected to the power, the clock and calendar display will show “zeros”.
3
SETTING THE CLOCK
The clock on your radio is automatically set when first used from the time signal broadcast
with DAB radio stations.
If a DAB station is not available, the clock may be set manually via the MENU system.
POWER CONTROL
STANDBY CONTROL
To turn the radio on:
• Press the STANDBY button on the top panel.
The display will light and the radio will switch on.
To turn the radio off:
• Press the STANDBY button on the top panel briefly.
The radio will switch off. The clock will continue to run whilst mains power is connected.
INTIAL SCAN
When your radio is switched on for the first time the scanning display will be shown while the
scanning process takes place:
The radio scans all usable stations (full scan) and stores them alphanumerically -1 Radio, 2
Radio, AA Radio, AB Radio…The initial scan will take a few minutes. After the scan, the clock
will be set and the radio will play the first station in the sequence.
BROWSING FOR A STATION
To browse for another DAB station from the front panel controls:
• Press the
or
button.
<Station list> will be displayed.
• Press the
or
button to browse the station list.
• Press the SELECT button to select the station displayed.
After s short delay, the radio will tune to the station
4
ADJUSTING THE VOLUME
To adjust the volume from the front panel controls:
• Turn the VOLUME knob to increase or decrease the volume level.
When the volume is adjusted the display will change to show the current volume setting on a
bar graph.
To mute the sound:
• Press the MUTE button.
The sound will mute and ‘Muted’ will be displayed.
• Press the MUTE button again to restore the sound to its previous volume level.
DAB SCANNING
RE-SCANNING FOR DAB STATIONS
When first used, your radio scanned the DAB band for available stations. The station services
found were then stored in your system’s memory.
You can re-scan the band at any time if you move to a different area or just to refresh the
stored list of available stations.
To scan for DAB stations manually:
• Select the DAB band.
• Press the AUTO SCAN button on the top panel.
The scanning process will take a few minutes. The number of services found during the scan
will be-shown at the right side of the display.
After the scan, the radio will re-tune to the first station in the station list to play if it is available.
Alternatively, you can continue to browse for another station as described on the previous
page.
DAB DISPLAY MODES
DISPLAY MODE OPTIONS
The bottom line of the display can be switched to show different items of information that may
be transmitted with a DAB station.
Choosing the information display:
Press the INFO. button on the top panel repeatedly to change the information displayed while
playing a DAB radio station.
The full range of display options are shown below. Some stations may not broadcast all of
these options.
5
DLS (Dynamic Label Segment): This is a scrolling message giving real-time informationsong titles, news headlines, etc.
PROGRAMME TYPE: This describes the style of the programme being broadcast.
SIGNAL STENGTH: This setting will display a signal strength bargraph. The longer the
bargraph, the stronger the signal. Setting the display to show signal strength is useful when
setting up the aerial for the strongest signal.
MULTIPLEX NAME: DAB Digital radio stations are broadcast in multiplexes. Each multiplex
is a bundle of radio stations transmitted in a signal frequency. There are national and local
multiplexes; local ones contain stations specific to your area. This option displays the name of
the multiplex name that contains the station you are listening to .
MULTIPLEX NUMBER/FREQ: This option will display the multiplex number and frequency
that contains the station you are listening to.
BIT RATE: DAB allows broadcasters to vary the BIT RATE (or the amount by which an audio
signal can be compressed) depending on the type of broadcast. This enables the amount of
stations on a multiplex to be maximized. Speech and News are often broadcast at a lower Bit
Rate; music needs a higher Bit Rate for good fidelity.
TIME AND DATE: Time and date are updated by broadcasted information.
6
FM DISPLAY MODE OPTIONS
FM DISPLAY MODE OPTIONS
The bottom line of the display can be switched to show different items of information that may
be transmitted with an FM station.
To change the display mode:
Press the INFO. button on the top panel repeatedly to change the information displayed while
playing an FM radio station.
The full range of display options are shown below. Some stations may not broadcast all of
these options.
HEADPHONES
There is a headphone output jack on the top panel of the radio. If headphones are connected
to this socket for private listening, the speakers will cut out automatically.
CARE AND MAINTENANCE
CARE AND CLEANING
All care and cleaning operations should be carried out with the unit unplugged from the mains
power.
The surface of the unit can be cleaned with a barely damp cloth and then dried carefully.
Never use abrasives, abrasive cloths or chemical solvents.
TROUBLESHOOTING
Poor quality radio reception
The aerial signal not be adequate. Try repositioning the aerial while watching the signal
strength. Signal strength can be displayed by tuning to a DAB station and pressing the INFO.
button.
7
WARRANTY&SPECIFICATIONS
SPECIFICATIONS
Supply voltage, current :9V
2500mAh
Output power…………..:2W
Frequency range………:174.928-239.200MHz (DAB)
87.5-108MHz (FM)
RECYCLING ELECTRICAL PRODUCTS
You can now recycle your waste electrical goods and in doing so help the
environment. This symbol means an electrical product is designed for recycling when
finished with. Visit www.recycle-more.co.uk, click on “bank locator” and enter your
postcode to find your nearest recycling site.
8