1
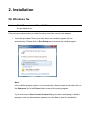
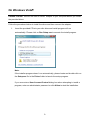
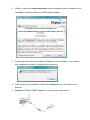
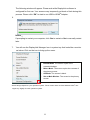
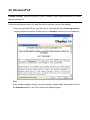
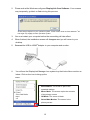
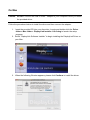
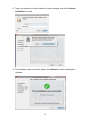
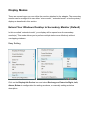
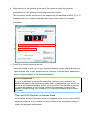
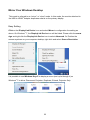
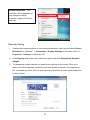
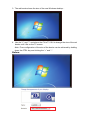
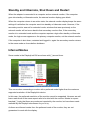
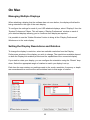
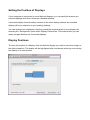
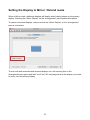
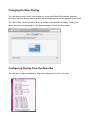
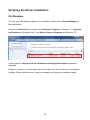
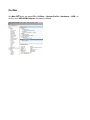
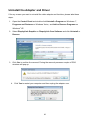
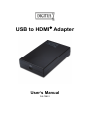
® USB to HDMI Adapter User’s Manual DA-70851 Table of Contents 1. Introduction ....................................................................................................... 2 Applications ........................................................................................................ 3 Features.............................................................................................................. 3 Package Contents............................................................................................... 4 System Requirements......................................................................................... 4 2. Installation ......................................................................................................... 6 On Windows 7®................................................................................................... 6 On Windows Vista® ............................................................................................. 9 On Windows® XP .............................................................................................. 12 On Mac ............................................................................................................. 14 3. Using the Adapter ........................................................................................... 19 On Windows ..................................................................................................... 19 Display Properties ............................................................................................. 19 Display Modes .................................................................................................. 20 Extend Your Windows Desktop to Secondary Monitor (Default) ....................... 20 Video and DVD Playback in Extened Mode .................................................. 22 Mirror Your Windows Desktop ........................................................................... 23 Be the Primary Monitor ..................................................................................... 24 Adjusting Resolution and Refresh Rate ............................................................ 25 Configure the components ................................................................................ 26 Fit to TV Function.............................................................................................. 29 Standby and Hibernate, Shut Down and Restart............................................... 32 Inferred Modes .................................................................................................. 32 Disconnecting the Adapter ................................................................................ 33 Using Dual Adapters ......................................................................................... 33 On Mac ............................................................................................................. 35 Managing Multiple Displays .............................................................................. 35 Setting the Display Resolutions and Rotation ................................................... 35 Setting the Position of Displays ........................................................................ 36 Display Positions .............................................................................................. 36 Setting the Display to Mirror / Extend mode...................................................... 37 Changing the Main Display ............................................................................... 38 Configuring Display from the Menu Bar ............................................................ 38 Verifying the Driver Installation.......................................................................... 39 On Windows ..................................................................................................... 39 On Mac ............................................................................................................. 40 Uninstall the Adapter and Driver ....................................................................... 41 4. Troubleshooting .............................................................................................. 42 5. Specifications .................................................................................................. 44 6. Regulatory Compliance .................................................................................. 46 FCC Conditions ................................................................................................ 46 CE ..................................................................................................................... 46 WEEE Information ............................................................................................ 46 1 1. Introduction This USB to HDMI® Adapter enables you to connect one more monitor, LCD or projector to a computer with a USB 2.0 port. For desktop users adding an extra monitor via USB connection is easier than ever without having to open the computer chassis to install an internal video card. Once the installation is done, the USB-attached monitor soon wakes up. No function key hassle to swap a second monitor. With this handy adapter, you can enjoy many benefits brought by an add-on monitor. The most obvious one is that you get more desktop area to have more applications visible at one time. For example, you may work on one monitor while your family watching video on the other. No more stacking windows within the confines of a single display. Or you may span an application, e.g. spreadsheets, across two sides of displays. What’s more, the adapter is hot pluggable. If your system performance is an important issue when using multiple monitors. Another benefit of this adapter is that it uses little computer resource; ensuring users get quality display without comprising computer performance. HDMI monitor USB-enabled computer Applications Office workstation View your large spreadsheets across two screens with display continuity Multitask more effectively without overlapping windows Edit on one screen while surfing the Internet information on the other On the road Do multiple screen presentations without bringing another computer Easily provide multiple screen exhibitions in a trade show Graphics workstation Use second display for palettes/tools Get a panoramic view of large documents Editing workstation Type documents on one screen while viewing reference material on the other Compare two documents simultaneously across two screens Financial analysis Have one monitor per data stream View charts and live data at the same time Entertainment View videos/TV on one screen and reviews on the other Get additional perspectives when playing games Features Add-on monitor, LCD or projector through a single USB 2.0 port Hot-plug; add or remove monitor without system reboot Small in size, works with all HDMI® displays Supports High Resolution up to 1920 x 1080 Extend and Mirror mode support Resumes from hibernation and suspend modes Supports up to 6 USB display adapter to work simultaneously 3 Package Contents Before installation, please check the items in the package. The package should contain the following items: USB to HDMI® Adapter x1 Product support CD(User’s Manual) x1 USB Cable x1 Quick Installation Guide x1 System Requirements The minimum requirements for the PC are: ® With Single Core CPU at 1.2GHz or higher processor clock. Intel ® ® ® ® Pentium /Celeron family, or AMD K6 /Athlon/Duron family, or compatible processor 512MB memory At least one USB 2.0 port 30MB of available disk space ® ® Windows XP Home or Professional SP2 or SP3, Windows Vista SP1 or SP2 ® (32-bit or 64-bit), and Windows 7 (32-bit or 64-bit). Supports all Intel-based Macs. (Including Snow Leopard 10.6.2, Leopard 10.5.8, Tiger 10.4.11). Super VGA (800 x 600) or higher resolution monitor To play DVD on the adapter-attached monitor, in addition to the requirements above, the following requirements should also be met: With dual core CPU at 2.0 GHz processor clock If the PC specification is below this, performance will be lower (or CPU loading higher than acceptable). Windows® XP For 1-2 monitors, business usage, productivity target. This may not provide full frame rate DVD playback at full screen. 1.2GHz Single Core CPU 512MB memory For 3 monitors, where 1 could run DVD video while also targeting productivity and business apps. Will support only 1 video of DVD resolution at full screen:. 1.8GHz CPU 1GB memory For 6 screen where 1 screen can run full screen DVD video: 1.6GHz Dual Core 1GB memory 5 2. Installation On Windows 7® Caution: DO NOT connect the USB to HDMI® Adapter to your computer before you install the provided driver. Follow the procedures below to install the driver and then connect the adapter: 1. Insert the provided CD into your disc drive and installer program will run automatically. Please click on Run Setup.exe to execute the install program. Note: If the installer program doesn’t run automatically, please locate and double-click on the Setup.exe file in the Driver folder to launch the setup program. If you encounter a User Account Control dialog box when attempting to install a program, enter an administrator password or click Yes to start the installation. 2. When you see the License Agreement screen prompted as below, please click on I Accept to install the software for USB display adapter... 3. Please wait while Windows configures DisplayLink Core Software. Your screens may temporarily go black or flash during this process. 4. When finished, the installation screen will disappear and you will return to your desktop. 5. Connect the USB to HDMI® Adapter to your computer and monitor. 7 6. When yohe following window will appear. Please wait while DisplayLink software is configured for first use. Your screens may temporarily go black or flash during this process. Please click “OK” to start to use USB to HDMI® Adapter. 7. You can change the appearance of your displays through the Window. Moreover, additional controls are available in Windows® 7: Orientation (Portrait, landscape, rotated portrait, rotated landscape) 8. To control the behavior of an attached DisplayLink device (or screen), it is possible to use Windows Key+P to display a menu (and cycle through it) to allow: Disconnect Projector, Duplicate, Extend, Projector Only. *Actual strings depend on your operation system. These screen shots are from Windows® 7 and might vary slightly for each operation system. On Windows Vista® Caution: DO NOT connect the USB to HDMI® Adapter to your computer before you install the provided driver. Follow the procedures below to install the driver and then connect the adapter: 1. Insert the provided CD into your disc drive and install program will run automatically. Please click on Run Setup.exe to execute the install program. Note: If the installer program doesn’t run automatically, please locate and double-click on the Setup.exe file in the Driver folder to launch the setup program. If you encounter a User Account Control dialog box when attempting to install a program, enter an administrator password or click Allow to start the installation. 9 2. When you see the License Agreement screen prompted as below, please click on I Accept to install the software for USB display adapter. 3. Please wait while Windows configures DisplayLink Core Software. Your screens may temporarily go black or flash during this process. 4. When finished, the installation screen will disappear and you will return to your desktop. 5. Connect the USB to HDMI® Adapter to your computer and monitor. The following window will appear. Please wait while DisplayLink software is configured for first use. Your screens may temporarily go black or flash during this process. Please click “OK” to start to use USB to HDMI® Adapter. 6. Notice: If prompting to restart your computer, click Yes to restart or No to manually restart later. 7. You will see the DisplayLink Manager Icon in system tray that looks like a monitor as below. Click on the icon to bring up the menu. - Extend Mode: The screen is part of the extended desktop. - Mirror Mode: The screen copies the contents of the primary screen. - Off Mode: The screen is black. - Set as Main Monitor: The screen is the primary screen. *Actual strings depend on your operation system. These screen shots are from Windows Vista® and might vary slightly for each operation system. 11 On Windows® XP Caution: DO NOT connect the USB to HDMI® Adapter to your computer before you install the provided driver. Follow the procedures below to install the driver and then connect the adapter: 1. Insert the provided CD into your disc drive. You may see the License agreement screen prompted as below. Please click on I Accept to start the Driver installation. Note: If the installer program doesn’t run automatically, please locate and double-click on the Autorun.exe file in the CD to launch the install program. 2. Please wait while Windows configures DisplayLink Core Software. Your screens may temporarily go black or flash during this process. *Actual strings depend on your operation system. These screen shots are from Windows® XP and might vary slightly for each operation system. 3. 4. You must restart your computer before the new setting will take effect. When finished, the installation screen will disappear and you will return to your desktop. 5. Connect the USB to HDMI® Adapter to your computer and monitor. 6. You will see the DisplayLink Manager Icon system tray that looks like a monitor as below. Click on the icon to bring up the menu. - Extend Mode: The screen is part of the extended desktop. - Mirror Mode: The screen copies the contents of the primary screen. - Off Mode: The screen is black. - Set as Main Monitor: The screen is the primary screen. 13 On Mac Caution: DO NOT connect the USB to HDMI® Adapter to your computer before you install the provided driver. Follow the procedures below to install the driver and then connect the adapter: 1. Insert the provided CD into your disc drive. Locate and double-click the Driver folder > Mac folder > DisplayLink Installer 1.6b3.dmg to launch the setup program. 2. Select “DisplayLink Software Installer” to begin installing the DisplayLink Driver on your Mac. 3. When the following Window appears, please click Continue to install the driver. 4. Click Continue to install this software. 5. Please click Continue after reading Software License Agreement. 15 6. Click Agree to continue the installation and quit the installer. 7. Click Install to perform a standard installation of this software on the disk “Macintosh HD”. 8. Type your password to allow Installer to make changes. And click Continue Installation to install. 9. The installation was successful, please click Restart to finfish installing the software. 17 7. When finished, the installation screen will disappear and you will return to your desktop. 8. Connect the USB to HDMI® Adapter to your computer and monitor. 3. Using the Adapter On Windows Display Properties Display Properties allows you to configuration the display mode, screen resolution, and physical arrangement of your monitors. Easy Setting Click on the DisplayLink Device icon and select Advanced to configuration Display Properties as above or manually setting as below description. On Windows® 7, the DisplayLink Device icon will be hidden. Please click the arrow sign and right click the DisplayLink Device icon to select Advanced. Manually Setting Position the mouse anywhere on your computer desktop, right-click and select Screen Resolution on Windows® 7, Personalize > Display Settings on Vista® or Properties > Settings on Windows® XP. 19 Display Modes There are several ways you can utilize the monitor attached to the adapter. The secondary monitor can be configured to use either “mirror mode”, “extended mode” or be the primary display as described in this section. Extend Your Windows Desktop to Secondary Monitor (Default) In this so-called “extended mode”, your display will be spread over the secondary monitor(s). This mode allows you to perform multiple tasks more effectively without overlapping windows. Easy Setting Click on the DisplayLink Device icon and select Exchange or Extend to Right; Left; Above; Below to configuration the setting as above, or manually setting as below description. Notice: The full DisplayLink User Interface as above is not supported on Windows® 7. Displays Configuration on Windows® 7 should be carried out using the improved Windows Display Properties dialog box (figure1), and using the Windows-P key combination (figure2). Figure 1 Figure 2 Manually Setting Extended mode is the default setting. To set up the adapter to use or restore extended mode, follow these steps: 1. Position the mouse anywhere on your computer desktop, right-click and select Screen Resolution on Windows® 7, Personalize > Display Settings on Windows Vista® or Properties > Settings on Windows® XP. 2. In the Display drop-down menu, select the option with the string “DisplayLink Graphics Adapter”. 3. Check the Multiple Displays> Extend these displays on Windows® 7, Extend the desktop onto this monitor box on Windows Vista® or Extend my Windows desktop onto this monitor box on Windows® XP. 21 4. Drag the icons in the window at the top of the screen to match the physical arrangement of your primary monitor and secondary monitor. The secondary monitor connected to the adapter may be identified as either "2" or “3”, depending on your computer, although there may not be a total of 3 screens connected. c. a. b. 5. Click OK to close the settings screen. Once the setting is done, to use your extended desktop, simply drag and drop your open windows over to your second monitor. However, note that some applications may not support display on the extended desktop. Cursor disappeared ? If you’re in extneded mode but the secondary monitor is not connected, the desktop still pans to the secondary monitor and it’s possible that your cursor has moved to the extended desktop so that you cannot find it on the primary display. To solve the problem in such a case, connect the secondary monitor to the adapter or keep moving your mouse to try or unplug the adapter first to restore the cursor. Video and DVD Playback in Extened Mode On Windows Vista with extended mode, it’s suggested that you run video or DVD playback programs on your primary monitor instead of the secondary monitor to ensure the playback performance. Mirror Your Windows Desktop This mode is referred to as “mirror” or “clone” mode. In this mode, the monitor attached to the USB to HDMI® Adapter duplicates what is on the primary display. Easy Setting Click on the DisplayLink Device icon and select Mirror to configuration the setting as above. On Windows® 7, the DisplayLink Device icon will be hided. Please click the arrow sign and right click the DisplayLink Device icon to select Advanced. Or Position the mouse anywhere on your computer desktop, right-click and select Screen Resolution. It is possible to use Windows Key+P to display a menu (and cycle through it) on Windows® 7 to allow: Disconnect Projector, Duplicate, Extend, Projector Only. 23 Manually Setting In mirror mode, the adapter will automatically select the settings (screen resolution, color quality and refresh rate) for the secondary monitor. But you can manually adjust the settings as required. However, the settings of the secondary monitor are limited by that of the primary monitor. For example, even though your secondary monitor supports a resolution of up to 1920x1080, you can only configure it to use 1280x1024 due to the primary monitor only supports a resolution of up to 1280x1024. Be the Primary Monitor To make the secondary monitor the primary display: 1. Position the mouse anywhere on your computer desktop, right-click and select Screen Resolution on Windows® 7, Personalize > Display Settings on Windows Vista® or Properties > Settings on Windows® XP. 2. In the Display drop-down menu, select the option ends with DisplayLink Graphics Adapter. 3. Check the This is my main monitor box on Windows® 7/ Windows Vista® or Use this device as the primary monitor box on Windows® XP. On some PCs and laptops it is necessary to disable the main display (i.e. uncheck the Extend the desktop onto this monitor or Extend my Windows desktop onto this monitor box for the main display) as part of the same settings change. 4. Click OK to close the settings screen. The add-on monitor stays primary if the PC enters hibernate or suspend mode or is rebooted. If the add-on monitor is unplugged, the main display becomes primary again. Adjusting Resolution and Refresh Rate There are three components that make up the screen mode: Resolution: In common usage, this refers to the number of pixels displayed on screen horizontally and vertically. Refresh rate: Measures the speed that the entire screen is rescanned. Higher frequencies reduce flicker. Some monitors advertise the supported modes through the video connector. If this is the case, the adapter identifies the supported modes from the monitor. If the monitor does not advertise the supported modes, the adapter software chooses a set of common screen modes for the monitor. The software supports the modes listed below. Color Depth Refresh rates Refresh rates available at 16 bit available at 32 bit color quality color quality 60 72 75 85 60 72 75 85 56 60 72 75 85 56 60 72 75 85 XGA 60 70 75 85 60 70 75 85 720p 60 60 WXGA+ 60 75 85 60 75 85 WXGA 60 60 SXGA 60 75 85 60 75 WXGA+ 60 60 SXGA+ 60 75 85 60 75 85 UXGA 60 60 WSXGA+ 60 60 1080p 60 60 Name Resolution 640x480 800x600 1024x768 1280x720 1280x768 1280x800 1280x1024 1366x768 1400x1050 1600x1200 1680x1050 1920x1080 VGA SVGA *Note that interlaced modes and reduced blanking modes are not supported. 25 About the resolutions and refresh rates available to users The resolutions and refresh rates available to the user through Windows are a comprise of the support from the following elements: ■ The USB display adapter ■ The primary monitor and the secondary monitor ■ The primary video card on your computer and installed drivers Therefore, for example, if your monitor doesn’t support a resolution of 1920x1080, then 1920x1080 is not possible even you are using a USB display adapter with 1920x1080 support. This ensures that the monitor cannot be put into an unsupported mode, which might damage it. If cloning the primary display, the video component will try to use the preferred monitor mode. In some cases, this may not be the most appropriate mode for the cloned desktop. It is recommended that the primary display resolution be changed to closer match the default resolution of the secondary monitor. Configure the components To configure the three components (resolution and refresh rate) of a screen mode, follow these steps: Easy Setting Click on the DisplayLink Device icon and select Screen Rotation; Screen Resolution to configuration the setting as above, or manually setting as below description. Screen Rotation :There are four kinds of screen rotation, the Normal, Rotated Left, Rotated Right and Upside-Down. Screen Resolution:The resolution will be depends on your computer setting, resolution support of monitor and else…. Manually Setting 1. Position the mouse anywhere on your computer desktop, right-click and select Screen Resolution on Windows® 7, Personalize > Display Settings on Windows Vista® or Properties > Settings on Windows® XP. 2. In the Display drop-down menu, select the option ends with DisplayLink Graphics Adapter. 3. To change the screen resolution or select those options on the screen. Be sure to select one of the supported resolutions and color quality numbers in the table above. For a secondary monitor, you can also select any resolution or color quality supported by that monitor. 27 4. To change the refresh rate, click Advanced… and then click Monitor. 5. Select a refresh rate from the Screen refresh rate drop-down list and then click Apply. 6. Click OK to close the settings screen. Fit to TV Function ”Fit to TV” function is for HDMI® TV connections. A new user interface option allows the correction of overscan on TVs when using a USB to HDMI® adapter. The”Fit to TV” function allows a user to change the size of their Windows desktop to allow the entire desktop to be viewed. Setting 1. Click on the DisplayLink Device icon and select “Fit to TV” to enable this function. 2. To configure Fit to TV, the following interface appears 29 3. The red border shows the size of the new Windows desktop... 4. Use the "+" and "-" controls on the Fit to TV GUI to change the size of the red border until it fits on the TV screen. Note: Finer configuration of the size of the border can be achieved by holding down the CTRL key and clicking the “+” and “-”. Before: 5. Once the red border is at the edges of the TV screen, click "Apply" to resize the Windows desktop. After: Note: Fit to TV function only works in extend mode and does not support rotated modes. 31 Standby and Hibernate, Shut Down and Restart When the adapter is connected to a computer and an external monitor, if the computer goes into standby or hibernate mode, the external monitor display goes blank. When the computer returns to an active state, the external monitor display keeps the same settings it had before the computer went into standby or hibernate mode. However, if the secondary monitor was set for extended mode, windows that were previously on the external monitor will not move back to that secondary monitor. Also, if the secondary monitor is in extended mode and the computer requires a login after standby or hibernate mode, the login screen appears on the primary computer monitor, not the external monitor. If the computer is shut down, restarted and logged in, again the secondary monitor returns to the same mode as it was before shutdown. Inferred Modes Some modes in the DisplayLink GUI are shown with [ ] around them. This occurs when connecting a monitor with a preferred mode higher than the maximum supported resolution of the DisplayLink device. In this case, the preferred resolution of the monitor cannot be supported. However we add lower resolutions of the same aspect ratio to be tried with the monitor. Modes in square brackets [ ] imply that these are modes not reported by the monitor, but have been made available by the DisplayLink software for you to try. As these are inferred modes from the preferred mode of the monitor, they are not guaranteed to work with the display. Disconnecting the Adapter If the adapter is unplugged from the computer, the secondary monitor goes blank. All windows and icons move to the primary screen. On reconnection of the adapter, the adapter returns to the same mode as it was before disconnection. However, windows and icons that were previously on the screen will not be moved back. Using Dual Adapters Up to two adapters can be simultaneously attached to one computer. To use two adapters: 1. Install the driver as described in the “2. Installation” section and connect the first adapter to your computer. 2. Then connect the second adapter to your computer. The system will automatically complete the installation. While two adapters are connected to a computer, in most cases both adapters’ supports extended and mirror modes. The only exception is on Windows Vista XDDM mode as described below. Limitation for dual adapters on Windows Vista®/Windows® 7 in XDDM mode: In this mode one extended screen and one mirrored screen is supported. Only the first connected adapter can be configured to use extended mode; the second adapter is forced to use mirror mode. When you bring out the Windows display settings dialog box, you will find that only one …DisplayLink Graphics Adapter (representing your first attached adapter) is configurable. 33 What is Vista XDDM mode? XDDM refers to Windows® XP Driver Mode. It is a video card driver mode used in some legacy computers that running the new generation Vista OS. It provides an interface similar to Windows® XP user Interface on Windows Vista® and one of its characteristics is that it doesn’t support Windows Aero interface. To see current display video driver mode, right-click Computer on the desktop and select Device Manager. Then expand the Display adapters item. On Mac Managing Multiple Displays When attaching a display that the software has not seen before, the display will default to being extended to the right of the main display. To configure the settings for each of your USD attached displays, select “Displays” from the “System Preferences” Menu. This will open a “Display Preferences” window on each of your attached displays allowing you to comfiture each display as required. It is possible to use the “Gather Windows” button to bring all the “Display Preferences” Windows on to the main display. Setting the Display Resolutions and Rotation To change the display’s resolution, select an available resolution from the Display Preferences windows of the display you wish to change. The resolutions available depend on both the DisplayLink enabled product and the capabilities of the connected display. If you wish to rotate your display, you can configure the orientation using the “Rotate” drop down. Select the appropriate angle of rotation to match you display’s set up. Each time the user rotates, any settings made to the mode, resolution, frequency or depth are remembered the next time the user switches back to that angle of rotation. 35 Setting the Position of Displays If your computer is connected to more than two displays, you can specify that some are mirrored displays and others show the extended desktop. A mirrored display shows the same content as the main display whereas an extended display will be an extension to your existing desktop. You can arrange your displays so that they match the physical layout of your displays by selecting the “Arrangement” pane within Display Preferences. This ensures that you can easily navigate between all connected displays. Display Positions To move the position of a display, click and hold the display you wish to move then drag it to the desired position. The display will be highlighted with a red border whilst you are moving the display to its new position. Setting the Display to Mirror / Extend mode When in Mirror mode, additional displays will display what is being shown on the primary display. Checking the “Mirror Display” on the “Arrangement” pane enables this feature. To extend connected displays, make sure that the “Mirror Display” on the “Arrangement” pane is unchecked. To work with both extended and mirrored displays, turn off mirroring then in the Arrangement pane press and hold “cmd” and “alt” and drag and drop the display uour wish to mirror over the primary display. 37 Changing the Main Display You can change which is the main display by moving the Menu Bar between displays. Changing the main display affects where new windows appear and the position of the Dock. The “Menu Bar” cab be moved so that it is shown on an alternative display. Clicking the white menu bar and dragging it to the desired display will perform this action. Configuring Display from the Menu Bar You can also configure displays by clicking the display icon in the menu bar. Verifying the Driver Installation On Windows To verify your USB display adapter driver installation, please launch Device Manager by the steps below: Open the Control Panel and double-click Uninstall a Program on Windows® 7, Programs and Features on Windows Vista®, and Add or Remove Programs on Windows® XP. A string similar to DisplayLink Core Software and DisplayLink Graphics should be displayed. If there is a question or exclamation mark next to that item, then the driver is not properly installed. Please delete the item, unplug the adapter and repeat the installation steps. 39 On Mac On Mac OS® X you can open GO > Utilities > System Profile > Hardware > USB > to verify if your USB HDMI Adapter is properly installed. Uninstall the Adapter and Driver If for any reason you want to uninstall the video adapter and its driver, please take these steps: 1. Open the Control Panel and double-click Uninstall a Program on Windows® 7, Programs and Features on Windows Vista®, and Add or Remove Programs on Windows® XP. 2. Select DisplayLink Graphics or DispalyLink Core Software and click Uninstall or Remove. 3. Click Yes to confirm the removal. During the removal process a couple of DOS windows will pop up. 4. Click Yes to restart your computer and then unplug the adapter now. 41 4. Troubleshooting Q1: The display on the secondary monitor is blank. A: If the monitor power LED is green (in most cases), wait a moment for the monitor to show the video as sometimes it takes time for the secondary monitor to show the video. You can also reboot your system to try again. Also make sure the computer is not in standby or hibernation mode, which will lead the secondary monitor to be blank. If the monitor power LED is red (in most cases), check if the connection is properly made. If problem still exists, uninstall the driver, unplug the adapter and reinstall the driver to try again. Q2: The secondary monitor is flickering. A: This is usually caused by a low refresh rate. To solve this problem: • In mirror mode, increase the refresh rate of the main monitor. This will in turn increase the refresh rate of the secondary monitor. • In extended mode, increase the refresh rate of the secondary monitor. Q3: When I play MPEG file by Windows Media Player on the extended monitor, how come the display becomes abnormal when I switch it to full screen mode? A: If your system is Windows® XP SP1, we suggest you upgrade it to SP2 to solve this problem. Q4: When playing the video in full screen mode, the motion is not smooth. A: Try the following tips to improve the smoothness of the movie playback: • Reduce the resolution of the display to 640x480 or 800x600. • Use the adapter in extended mode. • Terminate any other CPU intensive applications running on the computer. If you still have issues playing media content on the adapter, try the following steps: • As some media players require DirectX hardware support to correctly operate, try a different media player which requires less DirectX support. • Drag the media player to the secondary screen and close the player. Restart the player and it should open on the secondary monitor. Now try playing the media file again. • Try reducing the hardware acceleration level of the primary display (NOT the secondary monitor) to levels 1,2 or 3 and restarting the media player. The hardware acceleration can be found by right-clicking on your desktop and click Properties > Settings > Advanced > Troubleshoot. Some players use this setting even when playing on a different display. • The video playback may be unusual when the secondary monitor is mirroring the primary display and there is another extended screen connected to the computer. The extended screen must be disabled before the content will be correctly cloned to the secondary monitor. Q5: In extended mode, the secondary monitor appears to have a black border around the desktop. A: This happens when the resolution used by the secondary monitor is larger than the resolution used by the primary monitor. To solve this problem, configure the secondary monitor to use the same resolution as the primary monitor. 43 5. Specifications Host Interface USB 2.0 Video Interface HDMI® Connectors Video output: HDMI® 19 pin Female Connector Host upstream link: USB Mini-B Type Female Connector Connectivity Up to 6 adapters on a computer RAM 8M x 16 DDR Synchronous DRAM (SDRAM) Power Mode Bus-powered Power Consumption 350mA Operation System Support Windows® XP Home or Professional SP2 or SP3, Windows Vista® SP1 or SP2 (32-bit or 64-bit), Windows® 7 (32-bit or 64-bit) and all Intel-based Macs. (Including Snow Leopard 10.6.2, Leopard 10.5.8, Tiger 10.4.11). Supported Modes Resolutions, Refresh rate and color depth Extended Desktop (Default), Mirrored Desktop, Primary Display Color Depth Name Resolution 640x480 VGA 800x600 SVGA 1024x768 Refresh rates Refresh rates at 16 bit color quality at 32 bit color quality 60 72 75 85 60 72 75 85 56 60 72 75 85 56 60 72 75 85 XGA 60 70 75 85 60 70 75 85 1280x720 720p 60 60 1280x768 WXGA+ 60 75 85 60 75 85 1280x800 WXGA 60 60 1280x1024 SXGA 60 75 85 60 75 1366x768 WXGA+ 60 60 1400x1050 SXGA+ 60 75 85 60 75 85 1600x1200 UXGA 60 60 WSXGA+ 60 60 1680x1050 1920x1080 1080p 60 60 *Note that interlaced modes and reduced blanking modes are not supported. Housing ABS Plastic Dimensions 84.5 (L) x 55.5 (W) x18 (H) mm USB Cable Separated from the body Type: USB A -Type Male to 5pin Mini USB B-Type Male Length: 1M Operating temperature 10-40 degree Storage temperature -10~80degree Relative Humidity < 85% non-condensing * Specifications are subject to change without notice. 45 6. Regulatory Compliance FCC Conditions This equipment has been tested and found to comply with Part 15 of the FCC Rules. Operation is subject to the following two conditions: (1) This device may not cause harmful interference (2) This device must accept any interference received. Including interference that may cause undesired operation. Important! Changes or modifications not expressly approved by the manufacturer responsible for compliance could void the user’s authority to operate the equipment. Use an approved phone set. CE This equipment is in compliance with the requirements of the following regulations: EN 55 022: CLASS B WEEE Information For EU (European Union) member users: According to the WEEE (Waste electrical and electronic equipment) Directive, do not dispose of this product as household waste or commercial waste. Waste electrical and electronic equipment should be appropriately collected and recycled as required by practices established for your country. For information on recycling of this product, please contact your local authorities, your household waste disposal service or the shop where you purchased the product. SAFETY INSTRUCTIONS Always read the safety instructions carefully: Keep this User’s Manual for future reference Keep this equipment away from humidity If any of the following situation arises, get the equipment checked by a service technician: • The equipment has been exposed to moisture. • The equipment has been dropped and damaged. • The equipment has obviously signed of breakage. • The equipment has not been working well or you cannot get it to work according to the User’s Manual. COPYRIGHT This document contains proprietary information protected by copyright. All rights are reserved. No part of this manual may be reproduced by any mechanical, electronic or other means, in any form, without prior written permission of the manufacturer. 47