1
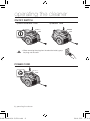
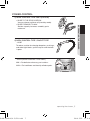
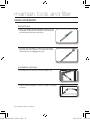
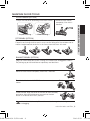
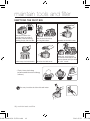
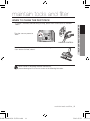
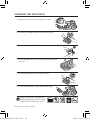
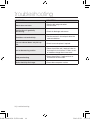
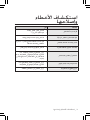
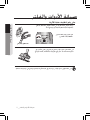
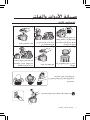
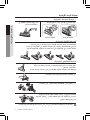
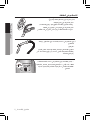
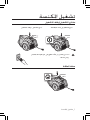
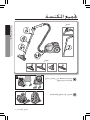
Vacuum Cleaner user manual ✻ Before operating this unit, please read the instructions carefully. ✻ For indoor use only. DJ68-00461H(0.2)-EN.indd English imagine the possibilities Thank you for purchasing a Samsung product. To receive a more complete service, please register your product at www.samsung.com/register Code No. DJ68-00461H REV(0.2) 1 2010.2.23 11:9:2 safety information SAFETY INFORMATION WARNING WARNING • Before operating the appliance, please read this manual thoroughly and retain it for your reference. • Because these following operating instructions cover various models, the characteristics of your vacuum cleaner may differ slightly from those described in this manual. CAUTION/WARNING SYMBOLS USED WARNING CAUTION Indicates that a danger of death or serious injury exists. Indicates that a risk of personal injury or material damage exists. OTHER SYMBOLS USED Represents something you must NOT do. Represents something you must follow. Indicates that you must disconnect the power plug from the socket. 2_ safety information DJ68-00461H(0.2)-EN.indd 2 2010.2.23 11:9:2 safety information IMPORTANT SAFEGUARDS 1. Read all instructions carefully. Before switching on, make sure that the voltage of your electricity supply is the same as that indicated on the rating plate on the bottom of the cleaner. 2. WARNING: Do not use the vacuum cleaner when rug or floor is wet. Do not use to suck up water. 3. Close supervision is necessary when any appliance is used by or near children. Do not allow the vacuum cleaner to be used as a toy. Do not allow the vacuum cleaner to run unattended at any time. Use the vacuum cleaner only for its intended use as described in these instructions. 4. Do not use the vacuum cleaner without a dust bin. Empty the dust bin before it is full in order to maintain the best efficiency. 5. Slide to the Stop(or Min)position before inserting a plug into the electrical outlet. 6. Do not use the vacuum cleaner to pick up matches, live ashes or cigarette butts. Keep the vacuum cleaner away from stoves and other heat sources. Heat can deform and discolour the plastic parts of the unit. 7. Avoid picking up hard, sharp objects with the vacuum cleaner as they may damage the cleaner parts. Do not stand on the hose assembly. Do not put weight on the hose. Do not block the suction or the exhaust port. 8. Switch the vacuum cleaner off on the body of the machine before unplugging from the electrical outlet. Disconnect the plug from the electrical outlet before changing the dust bag or dust container. To avoid damage, please remove the plug by grasping the plug itself, not by pulling on the cord. 9. This appliance is not intended for use by persons (including children) with reduced physical, sensory or mental capabilities, or lack of experience and knowledge, unless they have been given supervision or instruction concerning use of the appliance by a person responsible for their safety. 10. Children should be supervised to ensure that they do not play with the appliance. 11. The plug must be removed from the socket outlet before cleaning or maintaining the appliance. 12. The use of an extension cord is not recommended. 13. If your vacuum cleaner is not operating correctly, switch off the power supply and consult an authorized service agent. 14. If the supply cord is damaged, it must be replaced by the manufacturer or its service agent or a similarly qualified person in order to avoid a hazard. 15. Don’t carry the vacuum cleaner by holding the hose. Use the handle on the vacuum cleaner set. 16. Unplug the cleaner when not in use. Turn off the power switch before unplugging. DJ68-00461H(0.2)-EN.indd safety information _3 3 2010.2.23 11:9:2 contents assembling the cleaner 05 OpeRATING The CleANeR 06 mAINTAIN TOOls ANd fIlTeR 08 05 Assembling the Cleaner 06 On/Off Switch 06 Power cord 07 Power control 08 09 10 11 12 13 13 Using accessory Maintain floor tools Emptying the dust bin When to clean the dust pack Cleaning the dust pack Cleaning the motor protection filter Cleaning the outlet filter TROUbleshOOTING 14 4_ contents DJ68-00461H(0.2)-EN.indd 4 2010.2.23 11:9:2 assembling the cleaner OPTION 01 assembling the cleaner OPTION • Please do not press the button of dust bin handle when carrying machine. • For storage, park the floor nozzle. DJ68-00461H(0.2)-EN.indd assembling the cleaner _5 5 2010.2.23 11:9:4 operating the cleaner ON/OFF SWITch 1) BODY CONTROL TYPE CAUTION 2) ON/OFF TYPE • When removing the plug from the electrical outlet, grasp the plug, not the cord. POWER cORD 6_ operating the cleaner DJ68-00461H(0.2)-EN.indd 6 2010.2.23 11:9:6 POWER-CONTROL 1) SLIDE CONTROL TYPE ONLY (OPTION) • SLIDE TO THE STOP POSITION Vacuum-cleaner switches off (stand by mode) 02 operating the cleaner • SLIDE FORWARD TO MAX Suction capacity increases smoothly up to maximum. 2) BODY-CONTROL TYPE / ON/OFF TYPE - HOSE To reduce suction for cleaning draperies, small rugs, and other light fabrics, pull the tap air until the hole is open. - BODY (BODY-CONTROL TYPE ONLY) MIN = For delicate surface e.g. net curtains. MAX = For hard floors and heavily soiled carpets. DJ68-00461H(0.2)-EN.indd operating the cleaner _7 7 2010.2.23 11:9:8 maintain tools and filter USING AccESSORY Pipe (Option) • Adjust the length of the telescopic pipe by sliding the length control button located in the center of the telescopic pipe back and forth. • To check for blockages, separate the telescopic pipe and adjust to shorten. This allows for easier removal of waste clogging the tube. Accessory (Option) • Dusting brush for furniture. shelves, books, etc. • Crevice tool for radiators, crevices, corners, between cushions. 8_ maintain tools and filter DJ68-00461H(0.2)-EN.indd 8 2010.2.23 11:9:10 MAINTAIN FlOOR TOOlS 2-Step Brush (Option) • Adjust the inlet lever according to the floor surface. 03 maintain tools and filter Carpet Cleaning • Remove waste matter completely if the inlet is blocked. Floor Cleaning Pet Brush (Option) For improved pick-up of pet hair and fibre on carpets. Frequent vacuuming of hair or pet fur may cause a falling-off of the rotation due to matters tangled around the drum. In this case, clean the drum with care. Blanket brush (Option) Clogs on turbine keep brush from turning, thus need to be unclogged as follows. For picking up pet hair and fibre on upholstery and bed linen. Remove waste matter completely when inlet is blocked. Turn the lock button to ‘UNLOCK’, and remove waste matter. Turbine Brush To reassemble, align the cover to the front of the main body and close. After closing the cover, ensure that the lock button is turned to the ‘LOCK’ position. WARNING Use for bedclothes only. Be cautious not to damage brush during unclogging. DJ68-00461H(0.2)-EN.indd maintain tools and filter _9 9 2010.2.23 11:9:49 maintain tools and filter EMPTYING ThE DUST bIN 1 2 3 Once dust reaches the dust full mark, or sution is Take the dust bin out by noticeably reduced during cleaning, empty the dust bin. pressing the button. Separate the dust bin cover. 4 6 5 Throw away dust into the bin. Close the dust bin cover. Before use, push the dust bin into the main body of the vacuum cleaner until you hear the “click” sound. - Empty into a plastic bag (recommended for asthma/allergy sufferers) You may rinse the dust bin with cold water. 10_ maintain tools and filter DJ68-00461H(0.2)-EN.indd 10 2010.2.23 11:9:58 maintain tools and filter WhEN TO clEAN ThE DUST PAcK Turn the vacuum power to 'MAX'. HANDLE CONTROL If suction is noticeably reduced with the inlet floating 10cm above flat floor, clean it. 03 maintain tools and filter - If suction is noticeably reduced during cleaning, please check the dust pack as indicated below. When suction is noticeably reduced continuously, please cleaning the Dust Pack as shown in the following illustration. DJ68-00461H(0.2)-EN.indd maintain tools and filter _11 11 2010.2.23 11:10:1 clEANING ThE DUST PAcK 1. Remove the dust bin and dust pack as shown. 2. Remove the sponge and filter from the dust pack. 3. W ash the sponge and the filter of the dust pack with water. 4. L et the sponge and filter dry in the shade for more than 12 hours. 5. Put the sponge and filter into the dust pack. 6. Put the assembled dust pack into the main body. Make sure the filter is completely dry before putting it back into the vacuum cleaner. Allow 12 hours for it to dry. 12_ maintain tools and filter DJ68-00461H(0.2)-EN.indd 12 2010.2.23 11:10:3 maintain tools and filter clEANING ThE MOTOR PROTEcTION FIlTER 03 maintain tools and filter Take out both the dust bin and the dust pack. Remove the motor protection filter from the vacuum cleaner. Shake and tap the dust from it and put back in machine. clEANING ThE OUTlET FIlTER OPTION - MICRO FILTER Press the fixed frame part at the back of the main body to remove. Remove and replace the blocked outlet filter. OPTION Replacement filters are available at your local Samsung distributor. DJ68-00461H(0.2)-EN.indd maintain tools and filter _13 13 2010.2.23 11:10:5 troubleshooting PROBLEM SOLUTION Motor dows not start. • Check cable, pulg and socket. • Leave to cool. Suction force is gradually decreasing. • Check for blockage and remove. Cord does not rewind fully. • Pull the cord out 2-3m and push down the cord rewind button. Vacuum cleaner dows not pick up dirt. • Check hose and replace if required. Low or decreasing suction • Please check filter and, if required, clean as illustrated in the instructions. if filters are out of condition change them to new ones. Body overheating • Please check filters, If required clean as illustrated in the instruction. Static electicity discharge • Please decrease power suction. 14_ troubleshooting DJ68-00461H(0.2)-EN.indd 14 2010.2.23 11:10:5 memo DJ68-00461H(0.2)-EN.indd 15 2010.2.23 11:10:5 DJ68-00461H(0.2)-EN.indd 16 2010.2.23 11:10:6 MEMO استكشاف األخطاء وإصالحها املشكلة احلل احملرك ال يبدأ التشغيل • • افحص قابس الكبل واملأخذ. اترك احملرك حتى يبرد . قوة االمتصاص تتناقص تدريجيًا. • افحص وجود انسداد ثم قم بإزالته. ال تتم إعادة لف السلك بالكامل •قم بسحب السلك للخارج مقدار 3-2متر ثم اضغط زر إعادة لف السلك. املكنسة ال تقوم بالتقاط األتربة • انخفاض أو تناقص االمتصاص •يرجى التحقق من الفلتر وتنظيفه ،عند الضرورة ،كما هو موضح في التعليمات .إذا كان هناك تغير في حالة الفالتر ،استبدلها بأخرى جديدة. السخونة الزائدة جلسم اجلهاز •يرجى التحقق من الفالتر وتنظيفها ،عند الضرورة ،كما هو موضح في التعليمات. تفريغ الكهرباء السكونية _14استكشاف األخطاء وإصالحها • افحص اخلرطوم واستبدله إذا لزم األمر. يرجى التقليل من امتصاص الطاقة. صيانة األدوات والفلتر صيانة األدوات والفلتر 3 تنظيف مرشح حماية احملرك أخرج كالً من كيس األتربة وعلبة األتربة. فك مرشح حماية احملرك من املكنسة. هز األتربة ونظفها من املرشح ثم ضعه مرة أخرى في املكنسة. تنظيف مرشح مخرج الهواء خيار الفلتر الدقيق اضغط على جزء اإلطار الثابت في مؤخرة الهيكل الرئيسي إلزالة املرشح. أزل مرشح مخرج الهواء واستبدله. اختياري تتوافر مرشحات االستبدال لدى املوزع احمللي لشركة .Samsung صيانة األدوات والفلتر _13 تنظيف علبة األتربة .1انزع صندوق األتربة و كيس األتربة كما هو موضح . .2قم بإخراج االسفنجة والفلتر من حاوية األتربة. .3اغسل االسفنجة وكيس فلتر األتربة باملاء. .4اترك االسفنجة والفلتر يجفان في الظل ألكثر من 12ساعة. .5ضع االسفنجة والفلتر في حاوية األتربة. .6ضع كيس األتربة بعد تركيبه في جسم املكنسة. تأكد أن املرشح جاف متاما ً قبل وضعه مرة أخرى في املكنسة .اتركه 12ساعة ليجف. _12صيانة األدوات والفلتر صيانة األدوات والفلتر متى يتم تنظيف علبة األتربة صيانة األدوات والفلتر 3 برجاء فحص علبة األتربة في حالة انخفاض الشفط بشكلملحوظ أثناء التنظيف كما هو موضح أدناه. قم بتغيير قوة املكنسة إلى <( >MAXاحلد األقصى). التحكم باملقبض في حالة تغير ضوء مؤشر فحص املرشح إلى اللون األحمر مع انحراف الفتحة 10سم فوق األرضية املسطحة ،نظف املرشح. في حالة ظهور ضوء املؤشر ،برجاء تفريغ علبة األتربة كما هو موضح في الرسومات التالية. صيانة األدوات والفلتر _11 صيانة األدوات والفلتر تفريغ كيس األتربة 1 2 3 مبجرد وصول األتربة إلي عالمة االمتالء باألتربة .أو انخفاض الشفط بشكل ملحوظ أثناء التنظيف .قم اسحب كيس األتربة للخارج عن طريق الضغط على الزر. بتفريغ صندوق األتربة . 5 4 6 تخلص من األتربة بإلقائها في سلة أغلق غطاء كيس األتربة. املهمالت. قبل االستخدام ،ادفع كيس األتربة داخل الهيكل الرئيسي للمكنسة حتى تسمع صوت طقطقة. أفرغ األتربة في كيس بالستيك.(ينصح بهذا ملرضى الربو/والذين يعانون من احلساسية) قد يتطلب األمر شطف كيس األتربة باملاء البارد. _10صيانة األدوات والفلتر افصل غطاء كيس األتربة. صيانة أدوات األرضية تنظيف األرضية تنظيف السجاد الفرشاة األليفة (اختيارية) لاللتقاط شعر وألياف احليوانات األليفة بصورة محسنة من على السجاد. قد يؤدي االلتقاط املتكرر للشعر وفرو احليوانات األليفة إلى تعطيل التدوير بسبب تشابك الشعر حول األسطوانة .في هذه احلالة ،قم بتنظيف األسطوانة بعناية. فرشاة البطاطني (اختيارية) تعوق االنسدادات حول احملرك الفرشاة عن التحرك ،ولذلك يجب إزالة االنسدادات كما يلي. إللتقاط شعر احليوانات األليفة واأللياف على فرش التنجيد وماليات األسرة. أزل الفضالت متاما ً إذا كان هناك انسداد بالفتحة. المحرك أدر زر التأمني على ‘“ ’UNLOCKإلغاء التأمني” ،وأزل الفضالت. الفرشاة إلعادة التجميع ،قم مبحاذاة الغطاء باحلافة األمامية للهيكل الرئيسي ثم أغلقه .بعد غلق الغطاء ،تأكد أن زر التأمني مضبوط على وضع ‘( ’LOCKتأمني). حتذير لالستخدام مع الشراشف فقط .كن على حذر حتى تتجنب تلف الفرشاة أثناء إزالة االنسداد. صيانة األدوات والفلتر _9 صيانة األدوات والفلتر 3 -2فرشاة الدواسة (اختيارية) •قم بضبط زراع اإلدخال حسب سطح األرضية. •قم بإزالة النفايات بالكامل في حالة انسداد املدخل. صيانة األدوات والفلتر استخدام امللحقات املاسورة )اختيارية( • قم بضبط طول املاسورة التليسكوبية من خالل حتريك زر التحكم في الطول املوجود في منتصف املاسورة التليسكوبية للخلف واألمام. • لفحص وجود انسداد ،قم بفصل املاسورة التليسكوبية وقم بضبطها على أقصر طول .سوف يسمح ذلك بسهولة إزالة النفايات التي تسد األنبوبة. امللحقات )اختيارية( • فرشاة األتربة لألثاث واألرفف والكتب وخالله. • أداة الشقوق ألجهزة الرادياتير والشقوق والزوايا املناطق بني الوسائد. _8صيانة األدوات والفلتر التحكم في الطاقة تشغيل املكنسة 2 )1قم بتحريك نوع التحكم فقط (أخياري) • قم بالتحريك إلي وضع التوقف إيقاف تشغيل املكنسة الكهربائية ( وضع االستعداد ) • قم بالتحريك إلي اإلمام حتى الوصول إلي MAX تتزايد سعة الشفط تدريجيا حتى تصل إلي احلد األقصى )2نوع التحكم في جسد المكنسة /نوع التشغيل /إيقاف التشغيل اخلرطوملتقليل االمتصاص للستائر املائلة والسجاد صغير احلجم واألقمشة اخلفيفة األخرى ،اسحب جزء تهوية السدادة حتى يتم فتح الفتحة. جسم املكنسة (نوع التحكم في جسد املكنسة فقط ) ( MINاحلد األدنى ) = لألسطح الناعمة مثل الستائر الشبكية. (MAXاحلد األقصى) = لألرضيات اخلشنة والسجاجيد شديدة االتساخ. تشغيل املكنسة _7 تشغيل املكنسة مفتاﺡ التشغيل/إيقاف التشغيل (1نوع التحكم في جسد المكنسة تنبيه (2نوع التشغيل /إيقاف التشغيل • عند نزع القابس من املأخذ الكهربائي ،قم باإلمساك بالقابس وليس السلك. سلﻚ الطاقة _6تشغيل املكنسة جتميع املكنسة جتميع املكنسة 1 اختياري اختياري • الرجاء عدم الضغط علي زر مقبض صندوق األتربة عند حمل الجهاز . • للتخزين ،قم بتجميع فوهة األرضية. جتميع املكنسة _5 احملتويات جتميع املكنسة 5 تشغيل املكنسة 6 صيانة األدوات والفلتر 8 استكشاف األخطاء وإصالحها 14 _4احملتويات 5 جتميع املكنسة 6 6 7 مفتاح التشغيل/إيقاف التشغيل سلك الطاقة التحكم في الطاقة 8 9 10 11 12 13 13 استخدام امللحقات صيانة أدوات األرضية تفريغ كيس األتربة متى يتم تنظيف علبة األتربة تنظيف علبة األتربة تنظيف مرشح حماية احملرك تنظيف مرشح مخرج الهواء معلومات السالمة احتياطات هامة .1اقرأ كافة التعليمات بعناية .وقبل التشغيل ،تأكد من أن فرق اجلهد ملصدر التيار الكهربائي بنفس القيمة املشار إليها على لوحة التقييم أسفل املكنسة. .2حتذير:ال تستخدم املكنسة عندما تكون السجادة أو األرضية مبللة. ال تستخدم املكنسة لشفط املياه. .3يجب اإلشراف عن قرب عن استخدام اجلهاز بواسطة األطفال أو بالقرب منهم. ال تسمح باستخدام املكنسة كلعبة .ال تسمح بتشغيل املكنسة بدون رقابة في أي وقت. ال تستخدم املكنسة إال في الغرض املقصود منها املوضح في هذه التعليمات. .4ال تستخدم املكنسة الكهربائية بدون صندوق األتربة . قم بإفراغ صندوق األتربة قبل امتالءه للحفاظ علي أعلي مستوي من الكفاءة. .5حرك إلي موضع ( Stopاإليقاف ) أو ( Minاحلد االدني ) قبل توصيل القابس في منفذ توصيل الكهرباء. .6ال تستخدم املكنسة في التقاط أعواد الثقاب أو الرماد احلي أو أعقاب السجائر .احرص على إبعاد املكنسة عن األفران أو مصادر التسخني األخرى .ميكن أن تؤدي احلرارة إلى تشويه أو تغيير لون األجزاء البالستيكية للوحدة .7جتنب التقاط األجسام الصلبة أو احلادة باستخدام املكنسة ألنها قد تؤدي إلى تلف أجزاء املكنسة. جتنب الوقوف على اخلرطوم .جتنب وضع أوزان على اخلرطوم .ال تقم بسد منفذ الشفط أو منفذ العادم. .8احرص على إيقاف تشغيل املكنسة من املفتاح املوجود على جسم املكنسة قبل فصل املكنسة عن املأخذ الكهربائي .قم بفصل القابس عن املأخذ الكهربائي قبل تغيير كيس األتربة أو حاوية األتربة. لتجنب التلف ،برجاء إزالة القابس من خالل اإلمساك بالقابس نفسه وليس من خالل سحب السلك. .9هذا اجلهاز غير معد لالستخدام من جانب األطفال الصغار أو األشخاص املعاقني بدون إشراف ما لم تتم مراقبتهم بصورة كافية بواسطة شخص مسئول لضمان قدرتهم على استخدام اجلهاز بأمان. .10يجب اإلشراف على األطفال الصغار للتأكد من أنهم ال يلعبون باجلهاز. .11يجب نزع القابس من املأخذ قبل تنظيف أو صيانة اجلهاز. .12ال يوصى باستخدام سلك تطويل. .13إذا لم يتم تشغيل املكنسة بشكل صحيح ،قم بإيقاف تشغيل الطاقة ثم استشر وكيل خدمة مخول. .14في حالة حدوث تلف في كبل التزويد بالطاقة ،يجب أن يتم استبداله بواسطة املصنع ،أو وكيل اخلدمة أو شخص مؤهل لهذا العمل لتجنب اخملاطر. .15جتنب حمل املكنسة من خالل اإلمساك باخلرطوم .استخدم املقبض املوجود على وحدة املكنسة. .16قم بفصل التيار عن املكنسة في حالة عدم استخدامها .قم بإيقاف تشغيل الطاقة قبل نزع القابس. معلومات السالمة _3 معلومات السالمة معلومات السالمة حتذير حتذير • قبل تشغيل اجلهاز ،برجاء قراءة هذا الدليل بالكامل واالحتفاظ به كمرجع لك. •نظرًا ألن تعليمات التشغيل التالية تغطي مجموعة متنوعة من الطرازات ،فقد تكون خصائص املكنسة اخلاصة بك مختلفة نو ًعا ما عن تلك املوضحة في هذا الدليل. رموز التنبيه/التحذير املستخدمة حتذير .يشير إلى وجود خطر يسبب الوفاة أو إصابة خطيرة. تنبيه .يشير إلى خطر يسبب إصابة شخصية أو تلف في املمتلكات. الرموز األخرى املستخدمة .ميثل شيء يجب عدم القيام به. .ميثل شيء يجب اتباعه. .يشير إلى أنه يجب فصل سلك الطاقة عن املأخذ. _2معلومات السالمة املكنسة دليل املستخدم ✻ ✻ Arabic قبل استخدام هذه الوحدة برجاء قراءة التعليمات بعناية. لالستخدام الداخلي فقط. تخيل اإلمكانات شكرًا على شراء منتج Samsungللحصول على. خدمة كاملة ،برجاء تسجيل املنتج لديك على املوقع www.samsung.com/register )Code No. DJ68-00461H REV(0.2