1
Overview
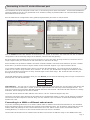
A Net2 plus can connect to the Net2 PC using either an un-shielded RJ45 patch cable or an RS485 data line. This
greatly increases the number of installation options available to the installer.
One Net2 plus can also be used as the TCP/IP interface for an RS485 daisy chain of Net2 plus and Net2 classic units.
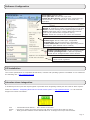
When used with a TCP/IP connection, it must first be detected using the Net2 Server Configuration Utility. See later
section of this instruction and AN1006 - Installing remote sites using TCP/IP < http://paxton.info/51 >
When used with an RS485 data line, on-board termination resistors can be put in circuit with a simple slide switch.
Ensure that units installed in the middle of the data line have this switch turned OFF.
A dedicated Intruder Alarm connection is provided.
Site Layout Examples
Media Detect
0V
Power
Relay 1
Outputs
Relay 2
N.C.
Exit Button
Inputs
End of Line Termination
OFF
ON
Clock/D1
0V
Server Connected
10
100
RS485 Network
CAT5 Cable Coding
Tx
Rx
Green
Server Link
10/100 Ethernet
Orange
PSU
N.C.
N.O.
COM
N.O.
COM
Green LED
Exit
0V
Contact
Green LED
Data/D0
0V
Tamper
0V
Alarm
PSU/Tamper
Power
Relay 1
Outputs
Relay 2
Exit Button
Contact
Inputs
Amber LED
0V
PSU/Tamper
Power
Relay 1
Outputs
Relay 2
Exit Button
Inputs
Contact
Power
Relay 1
Outputs
Relay 2
Exit Button
Inputs
Contact
Power
Relay 1
Outputs
Relay 2
Exit Button
Inputs
Contact
Power
Relay 1
Outputs
Relay 2
Exit Button
Inputs
Contact
Exit
Contact
12V
12V
Wht/Grn
Green
PSU/Tamper
Rx
Red LED
Wht/Orng
PSU/Tamper
Tx
0V
12V
Green LED
PLACE SERIAL
NUMBER
LABEL HERE
Screen or spare
cores from data
cable
PSU/Tamper
OFF
RS485 Network
CAT5 Cable Coding
Orange
10
100
Wht/Grn
Server Link
Intruder Alarm
Net2 plus
Reader 2
End of Line Termination
Server Connected
10/100 Ethernet
Wht/Orng
Green
Orange
Wht/Grn
Wht/Orng
0V
Set
Red LED
Amber LED
Green LED
Data/D0
Clock/D1
Media Detect
Caution: For 12V DC readers only
Media Detect
N.C.
N.O.
COM
Alarm
ON
Clock/D1
0V
N.O.
COM
Reader 1
Green LED
Data/D0
0V
PSU
0V
Amber LED
0V
Tamper
COM
Exit
Contact
N.O.
Rx
12V
0V
12V
Screen or spare
cores from data
cable
Tx
Red LED
Sense
RS485 Network
CAT5 Cable Coding
Screen or spare
cores from data
cable
Orange
Green
10
100
0V
12V
Green LED
12V
N.C.
PLACE SERIAL
NUMBER
LABEL HERE
Arm
OFF
ON
Server Link
Intruder Alarm
Net2 plus
Reader 2
End of Line Termination
Server Connected
10/100 Ethernet
Set
Red LED
Amber LED
Green LED
Data/D0
Clock/D1
Media Detect
Alarm
Media Detect
0V
N.C.
N.O.
COM
Caution: For 12V DC readers only
Data/D0
N.O.
COM
12V
Clock/D1
0V
12V
Reader 1
Green LED
0V
PSU
0V
Amber LED
0V
Tamper
COM
Exit
Contact
N.O.
Rx
Sense
Tx
Arm
OFF
RS485 Network
CAT5 Cable Coding
Wht/Grn
10
100
Wht/Orng
Green
Orange
Server Link
10/100 Ethernet
Reader 2
Server Connected
0V
Red LED
0V
Net2 plus
Expansion
12V
N.C.
PLACE SERIAL
NUMBER
LABEL HERE
Caution: For 12V DC readers only
Media Detect
Reader 1
Clock/D1
0V
0V
12V
Green LED
0V
End of Line Termination
ON
0V
PSU
Intruder Alarm
Net2 plus
Clock/D1
Media Detect
Net2 plus
Expansion
Set
Red LED
Amber LED
Green LED
Data/D0
COM
Green LED
Data/D0
12V
2
N.O.
Amber LED
0V
Tamper
N.C.
N.O.
COM
Sense
Exit
Contact
N.O.
COM
Alarm
Expansion
12V
Arm
Rx
PLACE SERIAL
NUMBER
LABEL HERE
Screen or spare
cores from data
cable
Tx
Red LED
Reader 2
OFF
RS485 Network
CAT5 Cable Coding
Wht/Grn
10
100
Wht/Orng
Green
Orange
Wht/Orng
Wht/Grn
Server Link
10/100 Ethernet
12V
Green LED
0V
N.C.
Net2 plus
0V
Caution: For 12V DC readers only
End of Line Termination
Server Connected
0V
Clock/D1
Media Detect
12V
Intruder Alarm
Red LED
Amber LED
Green LED
Data/D0
N.O.
Reader 1
Media Detect
N.C.
Set
COM
12V
ON
Clock/D1
0V
0V
Green LED
Data/D0
0V
PSU
COM
Amber LED
0V
Tamper
N.O.
Exit
Contact
Sense
Rx
N.O.
COM
Alarm
Screen or spare
cores from data
cable
Tx
Red LED
PLACE SERIAL
NUMBER
LABEL HERE
Arm
RS485 Network
CAT5 Cable Coding
Screen or spare
cores from data
cable
10
100
0V
OFF
ON
Server Link
12V
Green LED
Reader 2
End of Line Termination
Server Connected
10/100 Ethernet
Arm
0V
Caution: For 12V DC readers only
Clock/D1
Media Detect
12V
Clock/D1
0V
Data/D0
N.O.
COM
12V
0V
N.C.
Net2 plus
Amber LED
Green LED
N.C.
12V
Intruder Alarm
Red LED
N.O.
COM
Alarm
Media Detect
Set
Reader 1
Reader 2
Caution: For 12V DC readers only
Amber LED
Green LED
Data/D0
PLACE SERIAL
NUMBER
LABEL HERE
COM
Reader 1
12V
Red LED
12V
N.C.
Net2 plus
0V
N.O.
0V
Net2 plus
Net2 plus
Expansion
12V
Intruder Alarm
Red LED
Amber LED
Green LED
Data/D0
Clock/D1
Sense
Expansion
Set
Media Detect
Net2 plus
0V
COM
N.O.
Sense
12V
Arm
1
Expansion
PSU/Tamper
Net2 plus
Contact
0V
0V
Tamper
PSU
RS485 data line
TCP/IP
LAN
TCP/IP
LAN
TCP/IP
LAN
TCP/IP
LAN
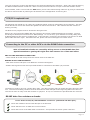
Here are three typical site layouts.
Power
Relay 1
Relay 2
CAUTION: for 12v d.c. readers only. For
correct connection of old 5v readers, refer to
instructions.
N.O.
0v
0v
Inputs
Power
Relay 1
Outputs
Relay 2
Exit Button
Inputs
Contact
Power
Relay 1
Outputs
Relay 2
Exit Button
Inputs
Contact
N.C.
Contact
4
PSU/Tamper
0v
N.C.
N.O.
Com
Com
Exit
0v
Tamper
PSU
5v
OK
12v
Tx
Rx
Exit
PSU
Tamper
Orange
Relay 2
White/Orange
Relay 1
Green
Contact
TCP/IP
LAN
24898 00000
White/Green
4
+12v
Alarm Output
Network
Green
RS485 data line
3
Screen or spare cores
from network cable
2
3
Brown
Orange
1
CAT5 cable coding
0V
PSU
1 - The Net2 plus ACU's can be individually connected to
the Net2 PC via the site LAN network.
Red
Yellow
0V
Tamper
Keypad 1
0V
Contact
Orange
Reader 1
Rx
Serial number
241821
Tx
Test ID: 012345678901
OFF
RS485 Network
CAT5 Cable Coding
Orange
10
100
Wht/Grn
Green
Orange
Wht/Grn
Server Link
Reader 2
z-1440
Server Connected
10/100 Ethernet
Brown
End of Line Termination
ON
0V
Blue
Data/D0
Clock/D1
Media Detect
Blue
Brown
Yellow
0V
PSU
Green
Yellow
Black/White
Exit
Mauve
0V
Tamper
Keypad 2
Red 12v dc
Brown
Orange
Mauve
Green LED
Green
Green LED
0V
Contact
Wht/Orng
Rx
Screen or spare
cores from data
cable
Tx
Wht/Orng
10/100 Ethernet
RS485 Network
CAT5 Cable Coding
Screen or spare
cores from data
cable
10
100
N.C.
N.O.
COM
Yellow
OFF
ON
Server Link
Reader 2
End of Line Termination
Server Connected
Red LED
Amber LED
Exit
N.O.
COM
Alarm
12V
Black/White
12V
Green LED
0V
N.C.
PLACE SERIAL
NUMBER
LABEL HERE
Caution: For 12V DC readers only
0V
12V
12V
Orange
Reader 1
Reader 2
Caution: For 12V DC readers only
Clock/D1
Media Detect
Net2 classic
0V
Intruder Alarm
Net2 plus
Amber LED
Green LED
Data/D0
COM
Reader 1
N.C.
N.O.
COM
Clock/D1
N.O.
Set
Red LED
N.O.
COM
Sense
12V
0V
Alarm
Media Detect
0V
12V
N.C.
PLACE SERIAL
NUMBER
LABEL HERE
Arm
0V
12V
Red LED
Amber LED
Green LED
COM
N.O.
Intruder Alarm
Net2 plus
0V
Net2 plus
Expansion
Set
Clock/D1
Media Detect
Data/D0
Sense
12V
Red LED
Amber LED
Green LED
Data/D0
Arm
3
Expansion
PSU/Tamper
Net2 plus
2 - The Net2 plus ACU's can be hardwired on a daisy
chain RS485 data line with ONE of them connected to
the Net2 PC via the site LAN network.
3 - The Net2 plus ACU can be used as the TCP/IP
converter for a line of Net2 plus and Net2 classic ACU's.
The TCP/IP interface allows an RS485 data line to be controlled by the Net2 Server running across a LAN network.
An RS485 data line has a 1 km maximum length. This distance can be increased by using Paxton high speed
repeaters or by using shorter independant data lines using multiple LAN connections controlled from the same PC.
Control unit installation
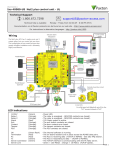
Wire the components to the Access Control Unit (ACU) as shown on the first page. Power up the unit and wait for
the OK heartbeat.
Press the exit button or in the absence of an exit button, short the 0V and exit terminals together. The lock relay
LED will come on and the lock should release.
The reader's default indication has all the LED's on. Access granted is denoted with a single flashing Green LED.
Access Denied is a single flashing Red LED.
Remember, the Net2 plus is a combined TCP/IP interface and an Access Control unit. If the TCP/IP interface is
being used, you will need to detect the interface first using the procedure on the following page.
This is important if you are replacing an existing Net2 plus. The Replace wizard in the Doors screen does NOT
reconfigure the IP address so it must be done manually. The wizard will then copy across the user data.
Each time the unit is powered on, it will run an internal health check. During this phase (about 5 secs) the OK
LED will flash quickly before changing to a slower heartbeat.
Page 2