1
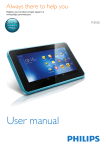
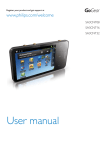
Register your product and get support at
www.philips.com/welcome
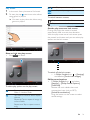
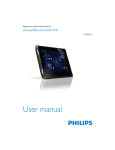
Pi3000/93
User manual
Contents
1 Important safety information
General maintenance
Notice
2 Your new tablet
What's in the box
Files loaded on the device
Overview
Controls
Home screen
3 Get started
Charge power
Switch the device on or off
4 Basics
Find applications
Use applications
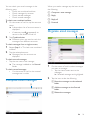
8VHWKHQRWLÀFDWLRQVDQGVWDWXVEDU
6HOHFWVHWXSRSWLRQV
&KHFNQRWLÀFDWLRQV
Use the screen
Rotate the screen
Lock/ unlock the screen
Customize the Home screen
Add items
Rearrange items
Text entry
Select options for text entry
Use Google Pinyin to enter text
Use QQ input to enter text
Use the Android keyboard to
enter text
Edit text
5 Connections
3
3
4
6
6
6
6
6
7
8
8
8
9
9
9
11
11
11
11
11
12
12
12
13
13
13
14
Connect to Wi-Fi
Connect to the Internet
Join your home network
Connect to your PC
Use a Micro SD card
Move applications to the SD card
6 Applications
15
15
15
16
17
17
17
18
18
18
18
18
Install applications
HiMarket
Other sources
Manage applications
7 Music, videos, and pictures
21
22
22
22
22
23
23
23
23
24
25
8 Search
27
27
27
3OD\PXVLFIURP3KLOLSV6RQJELUG
%URZVHWKHPXVLFOLEUDU\
Play music
Playlists
Play videos from Philips Songbird
Browse the videos library
Play videos
Philips sound options
Play from Gallery
Play videos
Play pictures
Share media on your home network
Control the media play remotely
Use the quick search box
Select search options
9 Email
28
28
28
28
29
29
Set up your email account
Select account settings
Check your email messages
Compose email messages
Organize email messages
EN
1
10 Browser
11 Tools
31
31
31
31
32
32
32
$GGDERRNPDUN
Camera
Take photos or record videos
Use the lens for video chat
Sound recorder
Calendar
Alarm clock
34
Install secure credentials
34
Set up your Microsoft Exchange account 34
Add VPN
35
Wireless & networks
Wi-Fi
Airplane mode
VPN settings
Sound
Display
Storage
Battery
Apps
Accounts & sync
Location services
Security
Screen lock
Encrypt tablet
Visible passwords
Device administrators
Unknown sources
Language & input
Language
Personal dictionary
Text-to-speech output
39
41
&KHFNIRUÀUPZDUHXSGDWH
42
15 Technical data
43
44
8SGDWHWKHÀUPZDUHRQWKHGHYLFH
12 Use the device in corporate
networks
13 Settings
Backup & reset
'DWHWLPH
$XWRPDWLFVHWWLQJ
0DQXDOVHWWLQJ
$FFHVVLELOLW\
$ERXWWDEOHW
6\VWHPXSGDWHV
Status and information about the
device
PC system requirements
36
36
36
36
36
36
37
37
37
37
37
38
38
38
38
38
39
39
39
39
39
39
Need help?
Please visit www.philips.com/welcome where
you can access a full set of supporting materials
such as user manual, the latest software updates
and answers to frequently asked questions.
2
EN
1 Important safety
information
Replacement parts/accessories:
Visit www.philips.com/support to order
replacement parts/accessories.
Hearing Safety
General maintenance
The translation of this document is for
reference only.
In the event of any inconsistency between the
English version and the translated version, the
English version shall prevail.
Caution
To avoid damage or malfunction:
Do not expose the product to excessive heat caused
by heating equipment or direct sunlight.
Do not drop the product or allow objects to fall on
your player.
Do not allow the product to be submerged in
water. Do not expose headphone socket or battery
compartment to water, as water entering the set may
cause major damage.
Active mobile phones in the vicinity may cause
interference.
%DFNXS\RXUÀOHV(QVXUHWKDW\RXUHWDLQWKHRULJLQDO
ÀOHV\RXKDYHGRZQORDGHGWR\RXUGHYLFH3KLOLSVLVQRW
responsible for any loss of data if the product becomes
damaged or not readable / legible.
0DQDJHWUDQVIHUGHOHWHHWF\RXUPXVLFÀOHVRQO\ZLWK
the supplied music software to avoid problems.
Do not use any cleaning agents containing alcohol,
ammonia, benzene, or abrasives as these may harm the
product.
About operating and storage temperatures
Operate in a place where temperature is
DOZD\VEHWZHHQDQG&WR)
Store in a place where temperature is
DOZD\VEHWZHHQDQG&WR
)
Battery life may be shortened in low
temperature conditions.
Listen at a moderate volume:
Using headphones at a high volume can impair
your hearing. This product can produce sounds
in decibel ranges that may cause hearing loss for
a normal person, even for exposure less than
a minute. The higher decibel ranges are offered
for those that may have already experienced
some hearing loss.
Sound can be deceiving. Over time your hearing
'comfort level' adapts to higher volumes of
sound. So after prolonged listening, what sounds
'normal' can actually be loud and harmful to
your hearing. To guard against this, set your
volume to a safe level before your hearing
adapts and leave it there.
To establish a safe volume level:
Set your volume control at a low setting.
Slowly increase the sound until you can hear it
comfortably and clearly, without distortion.
Listen for reasonable periods of time:
Prolonged exposure to sound, even at normally
'safe' levels, can also cause hearing loss.
Be sure to use your equipment reasonably and
take appropriate breaks.
Be sure to observe the following guidelines
when using your headphones.
Listen at reasonable volumes for reasonable
periods of time.
Be careful not to adjust the volume as your
hearing adapts.
Do not turn up the volume so high that you
can’t hear what’s around you.
You should use caution or temporarily
discontinue use in potentially hazardous
situations.
EN
3
Do not use headphones while operating a
motorized vehicle, cycling, skateboarding, etc.; it
PD\FUHDWHDWUDIÀFKD]DUGDQGLVLOOHJDOLQPDQ\
areas.
0RGLÀFDWLRQV
0RGLÀFDWLRQVQRWDXWKRUL]HGE\WKH
manufacturer may void user's authority to
operate the product.
Copyright information
All other brands and product names are
trademarks of their respective companies or
organizations.
Unauthorized duplication of any recordings
whether downloaded from the Internet or
made from audio CDs is a violation of copyright
laws and international treaties.
The making of unauthorized copies of copyprotected material, including computer
SURJUDPVÀOHVEURDGFDVWVDQGVRXQG
recordings, may be an infringement of
copyrights and constitute a criminal offense.
This equipment should not be used for such
purposes.
The Windows Media and the Windows logo are
registered trademarks of Microsoft Corporation
in the United States and/or other countries.
Be responsible! Respect copyrights.
Philips respects the intellectual property of
others, and we ask our users to do the same.
Multimedia content on the internet may have
been created and/or distributed without the
original copyright owner's authorization.
Copying or distributing unauthorized content
may violate copyright laws in various countries
including yours.
Compliance with copyright laws remains your
responsibility.
4
EN
The recording and transfer to the portable
player of video streams downloaded to your
computer is intended only for use with public
domain or properly licensed content. You
may only use such content for your private,
non-commercial use and shall respect eventual
copyright instructions provided by the copyright
owner of the work. Such instruction may
state that no further copies shall be made.
Video streams may include copy protection
technology that prohibits further copying. For
such situations the recording function will not
ZRUNDQG\RXZLOOEHQRWLÀHGZLWKDPHVVDJH
Data logging
Philips is committed to improving the quality
of your product and enhancing the Philips user
H[SHULHQFH7RXQGHUVWDQGWKHXVDJHSURÀOHRI
this device, this device logs some info / data to
the non-volatile memory region of the device.
These data are used to identify and detect
any failures or problems you as a user may
experience while using the device. The data
stored, for example, will be the duration of
playback in music mode, duration of playback
in turner mode, how many times battery low
was encountered, etc. The data stored do not
reveal the content or media used on the device
or the source of downloads. The data stored on
the device are retrieved and used ONLY if the
user returns the device to the Philips service
center and ONLY to simplify error detection
and prevention. The data stored shall be made
DYDLODEOHWRXVHURQXVHU·VÀUVWUHTXHVW
Notice
This product is partly based on Open Source
software. The license text, acknowledgment,
and written offer can be retrieved from the
device under
> About tablet > Legal
information.
© 2009, Xiph.Org Foundation
Redistribution and use in source and binary
IRUPVZLWKRUZLWKRXWPRGLÀFDWLRQDUH
permitted provided that the following
conditions are met:
Redistributions of source code must retain
the above copyright notice, this list of
conditions and the following disclaimer.
Redistributions in binary form must
reproduce the above copyright notice,
this list of conditions and the following
disclaimer in the documentation and/
or other materials provided with the
distribution.
Neither the name of the Xiph.
org Foundation nor the names of its
contributors may be used to endorse
or promote products derived from this
VRIWZDUHZLWKRXWVSHFLÀFSULRUZULWWHQ
permission.
This software is provided by the copyright
holders and contributors "as is" and any express
or implied warranties, including, but not limited
to, the implied warranties of merchantability and
ÀWQHVVIRUDSDUWLFXODUSXUSRVHDUHGLVFODLPHG
In no event shall the foundation or contributors
be liable for any direct, indirect, incidental,
special, exemplary, or consequential damages
(including, but not limited to, procurement of
substitute goods or services; loss of use, data,
RUSURÀWVRUEXVLQHVVLQWHUUXSWLRQKRZHYHU
caused and on any theory of liability, whether
in contract, strict liability, or tort (including
negligence or otherwise) arising in any way out
of the use of this software, even if advised of
the possibility of such damage
EN
5
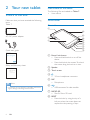
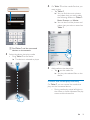
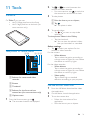
2 Your new tablet
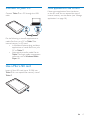
What's in the box
Make sure that you have received the following
items:
Tablet 7
Files loaded on the device
7KHIROORZLQJÀOHVDUHORDGHGRQTablet 7:
User manual
Overview
Controls
a
l
AC/ DC power adapter
k
b
j
i
h
g
f
e
c
Quick start guide
d
Philips GoGear audio player
Quick start guide
Safety and Warranty sheet
a Power/ lock button
Press and hold: switch on or off the
device.
Press: lock/unlock the screen; To unlock
the screen, drag the lock to an icon.
b Speaker
Safety and Warranty
c Touch screen
Before using your set:
Check out details inside this booklet
d
3.5-mm headphone connector
Note
The images serve as reference only. Philips reserves the
right to change color/design without notice.
e MIC
Microphone
f
USB connector for data transfer
g MICRO SD
Slot for Micro SD card
h RESET
Press the hole by using the tip of a
ball pen when the screen does not
respond to the pressing of keys.
6
EN
i DC IN
Power connector for the AC/ DC
adapter
j Front camera lens
k Rear camera lens (for some versions
only)
l
,
Press: increase/decrease the volume.
Press and hold: increase/decrease fast.
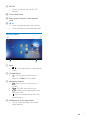
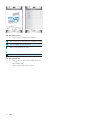
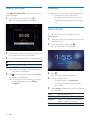
Home screen
b
a
c
d
a Apps
: List all applications in alphabetical
order.
b Google Search
: Use the quick search box to
search on Tablet 7 or the Web.
c Navigation buttons
: Tap to return to the Home
screen.
: Go back one level or exit.
: Display recent applications that
you have used.
(for some applications): View the
options menu.
d 1RWLÀFDWLRQVWLPHVHWXSVWDWXV
Tap to check the details and select
setup options.
EN
7
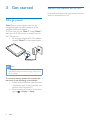
3 Get started
Switch the device on or off
Press and hold the power/ lock button until the
device is switched on or off.
Charge power
Tablet 7 has a built-in battery that can be
charged through the USB connector of the
supplied USB power adapter.
7KHÀUVWWLPH\RXXVHTablet 7, charge Tablet 7:
ÀYHKRXUVIRU*%YHUVLRQRUWKUHHKRXUVIRU
the 2 GB version.
By using the supplied AC/ DC adapter,
connect Tablet 7 to the power supply.
Note
Rechargeable batteries have a limited number of charge
cycles. Battery life and number of charge cycles vary by
use and settings.
To conserve battery power and increase the
play time, do the following on the device:
Switch off the functions when they are
unnecessary, such as Wi-Fi and the sync
options (see 'Accounts 37).
Set the screen-off timer to a low value
(go to
> Display > Sleep).
8
EN
4 Basics
Find applications
1DYLJDWHRQWKH+RPHVFUHHQWRÀQGDQ
application:
Swipe left/ right to select a page;
Alternatively, tap
to open the
list of applications that are sorted in
alphabetical order. Swipe left/ right to
scroll through the list;
Use the navigation buttons
/
to switch between screens. Tap
to go to the applications that you use
recently.
Tip
On Tablet 7, you can install applications from the
HiMarket or other sources (see 'Applications' on page
18).
HiMarket: Download different applications,
games, and others.
Philips Songbird: Play music and videos
through Philips Songbird.
SimplyShare: Stream music, videos, and
pictures to Philips DLNA-compliant
KLJKGHÀQLWLRQ79V+'79VRUKLÀDXGLR
systems.
Gallery: View pictures and videos that you
store or make on Tablet 7.
Camera: Take photos or record videos.
Over the Internet, enjoy the online services
through the applications.
91PandaReader: Online book store
Amazon: Online book store
weibo: Social networking service
Sina: News portal
Sina Music: Online music service
QIYI: Online video service
QQ Live: Online video service
Tudou: Online video service
Youku: Online video service (for the 8 GB
version only)
QQ: Social networking service (for the 8
GB version only)
QQ browser: Web browser (for the 8 GB
version only)
QQ Hall: Online games (for the 8 GB
version only)
Weixin: Online instant messaging by text
or voice (for the 8 GB version only)
Use applications
When you run applications, do the following:
Tap a menu at the top bar of the
screen. You can switch between
different menus and select your
options.
Drag upward quickly at the base of the
VFUHHQ<RXFDQÀQG
,
,
.
Sound recorder: Make sound recordings.
Browser: Browse Web pages.
Email: Set up your email account on the
device.
Settings: Customize the settings of Tablet 7.
Calendar: Sync your calendar, add events,
and set reminders for your events.
Alarm clock: Set the alarm clock.
EN
9
Select setup options
1
At the base of the screen, tap an icon of
setup status.
» A pop-up screen is displayed.
» ,IWKHUHDUHQRWLÀFDWLRQV\RXFDQÀQGD
OLVWRIQRWLÀFDWLRQVLQDSDQH
2
Tap .
» A list of setup options is displayed.
8VHWKHQRWLÀFDWLRQVDQG
status bar
a
b
c
a 1RWLÀFDWLRQV
b Current clock time
c Setup status
$WWKHEDVHRIWKHVFUHHQ\RXFDQÀQGWLPHDQG
WKHLFRQVIRUQRWLÀFDWLRQVDQGVHWXSVWDWXV
Battery charging underway
Connected to a Wi-Fi network
Open Wi-Fi network available
3
4
Tap your option.
To close the pop-up screen, tap on the
Home screen.
Airplane mode on: Access to Wi-Fi
disabled
Email received
Airplane
mode
Wi-Fi
Application updates available in the
HiMarket
Application downloaded successfully
Tap the icon to start installation.
Auto-rotate
screen
Brightness
EN
Enable or disable the access to
Wi-Fi connection.
Select your options for Wi-Fi
setup.
Allow or disallow the rotation
of the screen.
Drag the slider to select the
screen brightness.
1RWLÀFDWLRQV
Switch on or off the
QRWLÀFDWLRQVIRURSHQ:L)L
networks.
Settings
Go to the
Settings menu.
&KHFNQRWLÀFDWLRQV
7DSDQRWLÀFDWLRQLFRQWRFKHFNWKHGHWDLOV
Use the screen
Rotate the screen
To select the landscape or portrait view,
1
2
Make sure that you have switched on
Auto-rotate screen in
> Display.
Alternatively, select your setup options
at the base of the screen (see 'Select
setup options' on page ).
By locking the screen, you can lock all the
touch controls on the screen. Thus, undesired
operations are prevented.
Auto lock
After a time duration, the screen dims and is
locked automatically. To set the time duration,
go to
> Display > Sleep.
To lock the screen manually
Press the power/ lock button.
To unlock the screen
2
Drag the lock to an icon.
» You enter the application.
Rotate the screen.
Lock/ unlock the screen
1
3
Customize the Home screen
To access functions quickly from the Home
screen, you can add and rearrange items.
Add items
Add application icons and widget
1
If necessary, press the power/ lock button
to display the lock.
2
Drag the lock.
» Icons are displayed for the applications
that you use recently.
3
Swipe left/ right to select a page.
If necessary, tap
to return to the
Home screen.
0DNHVXUHWKDWWKHSDJHLVQ
WÀOOHG
Tap
to open the list of application
icons and widgets.
Tap and hold an icon or widget until the
page is displayed.
» The icon or widget is added to the
selected page.
EN
11
Add wallpapers
1
2
3
Go to the Home screen.
Tap
to return to the Home screen.
Tap and hold on the screen until the list of
options is displayed.
Tap your options.
Delete items
Tap and hold an item to unlock.
Drag the item to
12
Tap and hold an item to unlock.
Drag the item to a space on the page.
Release the item.
» The item moves to the space.
EN
Show or hide the onscreen keyboard
Tap a text box to show the onscreen
keyboard.
To hide the onscreen keyboard, tap
.
Relocate items
1
2
3
With the onscreen keyboard, you can enter
text in multiple languages.
Select options for text entry
Rearrange items
1
2
Text entry
Select input methods
At the base of the screen, tap
.
.
» You can select the following input
methods:
Android keyboard: for multiple
languages other than Chinese
QQ input: for Chinese input through
handwriting recognition, stroke, and
Pinyin, and English input
Google Pinyin: for Chinese Pinyin input
and English input
Select keyboard settings
1
2
At the base of the screen, tap
.
Tap
next to the input method.
» You can select the keyboard settings
for the input method.
Use Google Pinyin to enter text
Select the text entry mode
On the keyboard, tap Ё᭛ / 㣅᭛ to
switch between Chinese Pinyin and
English input;
Tap
to enter or exit the entry
mode for numbers/ symbols.
Tip
On the numeric/symbol keyboard, tap
to switch
between numbers/symbols and more symbol choices.
To switch between upper and lower cases,
Tap / to switch between and
.
»
: Letters you enter are in upper
case.
»
: Letters you enter are in lower
case.
To move to the next line
Tap
.
To delete the entry before the cursor,
Tap
.
Use QQ input to enter text
Select the text entry mode
Tap
to switch between the text
entry modes.
Tap
to enter the entry mode for
numbers; Tap
to exit.
Tap অ to enter the entry mode for
symbols; Tap
to exit.
Tap
to hide the keypad.
Use the Android keyboard to enter
text
1
2
On the onscreen keyboard, tap keys to
enter text.
To select a word suggestion,
Swipe left/ right to see more options;
Tap the selected option.
To delete the entry before the cursor,
Tap
.
To move to the next line,
Tap
.
Switch between upper and lower cases
Tap
repeatedly to switch between
and
.
: The next letter you enter is in upper
case.
: All letters you enter are in lower case.
To switch to the input mode of all upper
cases,
1
2
Tap and hold
or
.
» The button changes to blue.
When the button changes back to black,
release the button.
»
is displayed.
» All letters you enter are in upper case.
Switch between letters and numbers/
symbols
Tap
or
.
EN
13
Tip
On the numeric/symbol keyboard, tap ~\{ to switch
between numbers/symbols and more symbol choices.
Get more choices for letters and
symbols
Tap and hold a letter or symbol button
until the pop-up screen is displayed.
Copy or cut the selected text
Tap Copy or Cut.
» The selected text is copied or cut.
Paste the selected text
1
2
Tip
The extra choices on one key are available on the
keyboards of some languages.
Edit text
You can cut, copy, and paste the text that you
have entered.
Select the text
1
2
14
Tap and hold the text until the pop-screen
is displayed.
» Current word is selected, with marks
for start and end positions.
Tap Select all to select all the text.
Drag the marks to select or change the
start/ end positions.
EN
Put the cursor in a position.
Tap and hold the position until the popscreen is displayed.
» In the pop-up screen, the option Paste
is displayed.
» Tap Paste.The text is pasted in the
selected position.
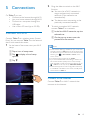
5 Connections
On Tablet 7, you can
Connect to the Internet through Wi-Fi;
Join your home network through Wi-Fi;
Connect to a computer through the
USB cable;
Use a Micro SD card (up to 32 GB).
2
» The device starts connecting to the
previously connected network.
3
b On the pop-up screen, enter the
password to the network.
Connect Tablet 7 to a wireless router (Access
Point). You can connect Tablet 7 to the network
that is built around the router.
At the base of the screen, start your Wi-Fi
setup:
a Tap an icon of setup status.
b Tap
to display a list of setup
options.
c Tap
.
To switch to another Wi-Fi network,
connect Tablet 7 to a network:
a In the list of Wi-Fi networks, tap the
selected one.
Connect to Wi-Fi
1
Drag the slider to switch on the Wi-Fi
function.
» You see a list of Wi-Fi networks in
range, and previously connected
networks (if the networks are
remembered).
Note
,I0$&DGGUHVVÀOWHULQJLVHQDEOHGRQ\RXUURXWHUDGG
the MAC address of Tablet 7 to the list of devices that
DUHDOORZHGWRMRLQWKHQHWZRUN7RÀQGWKH:L)L0$&
address, go to
> About tablet > Status on the
Home screen.
To refresh the list of networks, tap SCAN.
If you have disabled SSID broadcasting or hidden the
6HUYLFH6HW,GHQWLÀHU66,'RIWKHURXWHUPDQXDOO\
enter the SSID or public name for the network. Go to
> Wi-Fi. On the top bar, tap ADD NETWORK.
,IWKH'+&3'\QDPLF+RVW&RQÀJXUDWLRQ3URWRFRO
is unavailable or disabled on the router, manually enter
the IP address of Tablet 7.
Connect to the Internet
Connect Tablet 7 to a Wi-Fi network that
connects to the Internet.
EN
15
Note
Make sure that the router connects to the Internet
directly and no dial-up is required on the computer.
Join your home network
Connect Tablet 7 to your home Wi-Fi network.
With
SimplyShare, you can stream music,
videos, and pictures from Tablet 7 to Philips
DLNA-compliant devices that are also
connected to the network. In this way, you can
HQMR\WKHPHGLDSOD\WKURXJKKLJKGHÀQLWLRQ79V
+'79VRUKLÀDXGLRV\VWHPV
The DLNA-compliant device can be:
3KLOLSV'/1$FRPSOLDQW79VRUKLÀ
audio systems;
16
EN
Philips DLNA-compliant HD media
SOD\HUVWKDWFRQQHFWWRD79RUKLÀ
audio system through an HDMI cable
or AV cable.
Connect to your PC
Move applications to the SD card
Connect Tablet 7 to a PC through the USB
cable.
Move some applications from the device
to the SD card. You can expand the size of
internal memory on the device (see 'Manage
applications' on page 18).
Do the following to transfer applications or
PHGLDÀOHVIURP\RXU3&WRTablet 7,the
internal memory or SD card:
In Windows Explorer, drag and drop
DSSOLFDWLRQVRUPHGLDÀOHVIURP\RXU
PC to Tablet 7.
$OWHUQDWLYHO\WUDQVIHUPHGLDÀOHVWR
Tablet 7 through media management
software, such as Windows Media
Player 11.
Use a Micro SD card
Insert a Micro SD card (up to 32 GB) into
Tablet 7. You can expand the memory size of
Tablet 7.
EN
17
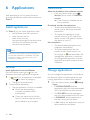
6 Applications
Other sources
With applications, you can access functions,
services, and different audio/ video contents on
Tablet 7.
Allow the installation from unknown sources
From the Home screen, go to
>
Security. Tap to switch on Unknown
sources.
» If the function is enabled, the tick
box is selected.
Install applications
On Tablet 7, you can install applications from
the HiMarket over the Internet; or
other sources, such as
other online sources,
the internal storage of the device, and
the Micro SD card that you have
inserted into the device.
Note
HiMarket is an open platform for apps developers to
promote their applications. Compatibility and quality
of execution of apps in HiMarket may vary from
developers to developers.
Download/ transfer the applications
To download the applications from
online sources, follow the onscreen
instructions;
To transfer the application to the
internal memory or SD card of the
device, use the USB cable to connect
the device to your PC.
Start installation
The downloaded applications start
installation automatically;
7RÀQGWKHDSSOLFDWLRQVWKDW\RX
transfer to the internal memory or
SD card, go to DQGGRZQORDGDÀOH
management application. Launch the
ÀOHPDQDJHPHQWDSSOLFDWLRQ)LQGWKH
application and tap the option to start
installation.
HiMarket
Install applications from the HiMarket
From the Home screen, go to . You can
download and install applications and games.
1
2
In , search for an application as needed:
Tap
for search by category;
Tap
for keyword search.
Download the application:
7DSWKHDSSOLFDWLRQ&RQÀUPDVQHHGHG
» When the downloading is
complete, installation starts
automatically.
» &KHFNWKHVWDWXVEDUWRÀQGWKH
status. If necessary, tap the icon to
start installation as prompted.
18
EN
Manage applications
You can manage the applications on the device,
for example, install/ uninstall applications, stop
running applications, or select other options.
1
From the Home screen, select
Settings
> Apps:
In DOWNLOADEDÀQGWKH
applications that you have downloaded
from the HiMarket or other sources.
On SD CARDÀQGWKHDSSOLFDWLRQV
that you have installed on the SD card.
In RUNNINGÀQGWKHDSSOLFDWLRQV
that are running on the device.
In ALLÀQGDOOWKHDSSOLFDWLRQVWKDW\RX
have installed on the device.
2
3
Tap an application.
» Options and information are displayed.
Tap to select an option.
EN
19
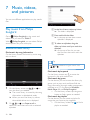
7 Music, videos,
and pictures
You can use different applications to play media
ÀOHV
Play music from Philips
Songbird
Go to
Philips Songbird to play music and
videos that you store on Tablet 7.
With
Philips Songbird, you can select Philips
sound options for your music play.
Browse the music library
Find music by song informtion
2QWKHOLEUDU\VFUHHQÀQGPXVLFE\DUWLVWVRQJ
title, or album.
a In the list of items, swipe up/ down.
» The slider is displayed.
b Press and hold the slider.
» In the pop-up text box, current
alphabet is displayed.
c To select an alphabet, drag the
slider up/ down until you reach the
alphabet.
» At the top of the list, you see
WKHÀUVWLWHPWKDWVWDUWVZLWKWKH
alphabet.
Tip
Superscroll is available in a long list of items under
,
1
On the library screen, tap , , or
to
sort the library as needed.
» The music library is sorted by the song
information in alphabetical order.
» When you sort the library by album,
the available album art is displayed.
2
On , , or , use Superscroll to
search for items that start with a selected
alphabet:
EN
, or
.
Find music by keyword
On the library screen, tap to enter the
keyword in the quick search box.
Find music by genre
On the device, you can browse the library by
genre, such as pop, rock, and blues. Edit the
song information through media management
software on a PC, for example, Windows
Media Player 11 and Philips Songbird.
On the library screen, tap the genre
EXWWRQWRÀQGDJHQUHDVQHHGHG
Find music by playlist
On the device, you can create a playlist for
songs that you want to play together.
On the library screen, tap WRÀQGD
playlist as needed.
Play music
1
2
,QWKHPXVLFOLEUDU\EURZVHWRÀQGPXVLF
To start play, tap next to an artist, album,
song, genre, or playlist.
» You start to play the artist, album, song,
genre, or playlist.
Tap to pause/resume play.
/
/
Tap to skip songs.
To switch between screens,
Tap to return to the list of items.
Tap to return to the library screen.
Set the play screen as lock screen
During music play, the screen is locked
automatically after a certain time duration.
With the play screen set as lock screen, press
the power/ lock button and you can select play
options on the lock screen.
Show or hide the play screen
Drag
up/ down.
To select play options on the play screen,
Tap to play all songs in current
folder in random order.
Tap once or more to select repeat
options:
Repeat all: Tap to repeat all songs in
current folder.
Repeat one: Tap to repeat current
song.
To switch off the lock screen,
In Philips Songbird, tap
> [Settings]
and deselect [Lock screen widget].
Philips sound options
In Philips Songbird, tap
and select
[Settings] > [Philips Sound Options]:
[FullSound]
Restore the sonic details that music
compression loses (such as MP3).
[Sound Personalization]
Drag the button on the screen to select
sound settings.
EN
21
» The selected song is removed from the
playlist.
Delete a playlist
1
2
Tip
When you select one of [FullSound] and [Sound
Personalization], you switch off another.
Select a playlist.
Tap and hold the playlist until the pop-up
screen is displayed. Tap [Delete].
» The playlist is deleted.
Play videos from Philips
Songbird
With
Philips Songbird, you can select Philips
sound options for your video play.
Playlists
Browse the videos library
You can create a playlist for songs that you want
to play together.
Add songs to a playlist
Find videos by title
On the library screen, tap .
» The videos library is sorted by the title
in alphabetical order.
1
2
3
On the library screen, select an artist,
album, song, or genre.
Tap and hold the artist, album, song, or
genre until the pop-up screen is displayed.
Tap [Add to playlist...].
Select or create a playlist.
» The selected song, or all the songs
under an artist, album, or genre are
added to the playlist.
Rename a playlist
1
2
3
Select a playlist.
Tap and hold the playlist until the pop-up
screen is displayed. Tap [Rename].
» The onscreen keyboard is displayed.
22
Play videos
1
In a playlist, select or play a song.
Tap and hold the song until the pop-up
screen is displayed. Tap [Remove from
playlist].
EN
,QWKHYLGHRVOLEUDU\EURZVHWRÀQGD
video.
2
To start play, tap next to the video.
» You start to play the video.
To select play options on the play screen,
/
Edit the name of the playlist.
» The playlist is renamed.
Remove a song from the playlist
1
2
Find videos by keyword
On the library screen, tap to enter the
keyword in the quick search box.
Alternatively, tap the search box in the
videos library.
Tap to pause/resume play.
Hold to search forward or backwards
within current video.
/
/
Tap to skip videos.
Philips sound options
On the video play screen, tap
and
select [Settings] > [Philips Sound
Options].
Surround Sound
Surround sound effect
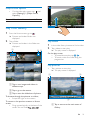
Play from Gallery
1
2
From the Home screen, go to
.
» Pictures and videos folders are
displayed.
Tap a folder.
» Pictures and videos in the folder are
displayed.
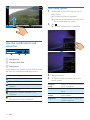
a
b c
Play videos
1
2
,QWKHYLGHROLEUDU\EURZVHWRÀQGDYLGHR
Tap a video to start play.
» The play screen is displayed.
On the play screen,
To pause/resume play, tap / .
To search within the video, drag the
progress bar.
Play pictures
Tap a picture to start play.
» The play screen is displayed.
a
b
a Tap to sort images and videos in
different ways.
b Tap to go to the camera.
c Tap to start the slideshow of photos.
To browse through the pictures or videos,
Swipe left/ right on the screen.
To return to the previous screens or Home
screen,
Drag upward quickly at the base of the
VFUHHQ<RXFDQÀQG
,
,
.
c
a Tap to return to the main menu of
Gallery.
EN
23
b Tap to select your options:
: Share current photo through
online services;
: Delete current photo;
> Set picture as: Set current photo
as wallpaper, or the photo of a contact.
Share media on your home
network
c Swipe left/ right browse through all
the photos in current album. Tap to
play the selected photo.
To crop current photo,
1
2
3
Select
> Crop.
» A cropping frame is displayed.
Within the cropping frame, select an area
that you want to keep:
Swipe left/ right or up/ down to select
the area;
To enlarge/ reduce the area in
proportion, drag a corner of the frame;
To enlarge/ reduce the area as needed,
drag the edges of the frame.
Tap OK.
» You save the cropped version.
1
2
Make sure that you have connected Tablet
7 tothe same Wi-Fi network as your
3KLOLSV'/1$FRPSOLDQW79VRUKLÀDXGLR
systems (see 'Join your home network' on
page 16).
From the Home screen, go to
SimplyShare:
a 7KHÀUVWWLPH\RXODXQFK
SimplyShare, enter the activation code
74963893 as prompted.
24
EN
4
74963893
On Tablet 7ÀQGWKHPHGLDÀOHVWKDW\RX
want to play:
Tap Tablet 7.
» <RXFDQÀQGWKHPXVLFSKRWRV
and videos that you store under
the following folders on Tablet 7:
Music, Pictures, and Movies.
» <RXFDQDOVRÀQGWKHSKRWRVDQG
videos that you take or record on
Tablet 7.
b Find Tablet 7 and the connected
devices on the network.
3
Select the device that plays media:
Drag Tablet 7 to the device.
» The device is selected as player.
5
Add media to the shared list:
Tap RQWKHPHGLDÀOH
» <RXSOD\WKHVHOHFWHGÀOHVRQWKH
device.
Control the media play remotely
On Tablet 7, you can control the media that
plays on the connected device.
During media play, swipe left/right on
the screen to switch between the play
screen and the shared list:
EN
25
On the play screen,
Tap icons to select play options:
Tap to play the shared list in random order.
Tap to repeat the shared list.
Tap to pause/resume play.
/
Tap to stop play.
On the shared list,
Tap WRUHPRYHWKHPHGLDÀOHIURP
the shared list.
7DSDPHGLDÀOHWRVWDUWSOD\
26
EN
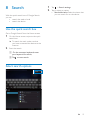
8 Search
With the quick search box of Google Search,
you can
search the web; or/ and
search the device
1
2
Tap
> Search settings.
Tap to select an option:
Searchable items: Select the items that
you can search for on the device.
Use the quick search box
Go to Google Search from the Home screen.
1
2
On the Home screen, swipe to the quick
search box.
» To search the web, make sure that
you have connected the device to the
Internet.
Start the search:
a On the onscreen keyboard, enter
your keyword for search;
b Tap
to start search.
Select search options
EN
27
9 Email
Select account settings
On Tablet 7, you can receive and send email as
you do on a computer. Do the following:
Set up your email accounts on the
device.
Set up your email account
On Tablet 7, set up your email accounts in the
following ways:
Set up your POP3 or IMAP mail
accounts, or
Set up your Microsoft Exchange
account to access your Exchange
mailbox at work (see 'Set up your
Microsoft Exchange account' on page
34).
Set up your POP3/ IMAP account
1
2
3
28
From the Home screen, go to
.
Set up your email account:
Enter the information about your
account;
Select pop3 or IMAP account.
Follow the onscreen instructions to
complete the setup.
Consult your email service provider
for the setup information, such as the
outgoing server, incoming server.
EN
1
On the screen of mail list, tap
>
Settings.
» A pop-up screen is displayed.
If necessary, tap
repeatedly to
return to the screen of mail list.
2 Select your options for the account.
To add an account,
On
> Settings, tap Add account.
To remove an account,
On
> Settings, select Remove account.
» Current account is removed.
Check your email messages
You can check your email messages in the
following ways:
Check one combined mailbox;
Check messages by account;
Check starred messages;
Check unread messages.
To check one combined mailbox,
1
2
On the screen of mail list, tap the account
name.
» A drop-down list of account names is
displayed.
If necessary, tap
repeatedly to
return to the screen of mail list.
When you read a message, tap the icons to do
the following:
a Compose a new message
b Reply
c Reply all
d Forward
Organize email messages
a
bc
Tap Combined view.
» Different colors are used to mark the
messages from different accounts.
To check messages from a single account,
1
2
Repeat Step 1 in "To check one combined
mailbox".
Tap the selected account.
» Messages from the account are
displayed.
To check starred messages,
Tap the star next to the message.
» The message is added to the Starred
folder.
1
To check unread messages,
On the screen of mail list, the unread
messages are in white.
Compose email messages
a
2
On the screen of mail list, select messages
you want to manage:
Tap the check boxes next to the
messages.
» Selected messages are highlighted.
Tap the icons to do the following:
a Move the messages to the selected
folder.
b Add the messages to the Starred
folder.
c Delete the messages.
bc d
EN
29
10 Browser
Add a bookmark
With
Add a bookmark. You can quickly access a
visited Web page.
b
1
2
, you can browse Web pages.
c d
a
From the Home screen, tap
a b
.
Tap the icons or text box to do the
following:
a Enter the address of web pages. Tap
to start search.
b Tap the icons to search backwards,
forward, or refresh the Web page.
c Close the Web page.
d Open a new Web page.
To switch between Web pages,
At the top bar, tap the tab of the selected
Web page.
EN
a Add a bookmark to current Web
page.
b Go to the bookmarked Web pages.
11 Tools
2
Camera
3
Tap
or
to switch between the
camera and video recorder.
For some versions, tap
to switch to
the camera lens at the front or back.
To take photos:
a Point the lens at you or objects;
On Tablet 7, you can use:
WKH0HJDSL[HOOHQVDWWKHIURQW
the 2 Mega-pixel lens at the back (for
some versions only).
b Tap .
» The photo is taken.
4
To record videos:
Tap
/
to start or stop video
recording.
To view photos/ videos in the Gallery,
Tap the thumbnail .
» You can view the photos/ videos
that you have taken or recorded.
Take photos or record videos
ed
c ba
a Selector for camera and video
recorder
b Shutter
c Thumbnail
d Selector for the front and rear
camera lens (for some versions only)
e Options menu
1
From the Home screen, go to .
» The onscreen buttons are displayed.
Select settings
Tap
to select your options for the
camera or video recorder:
For the camera:
White balance
Tap to select the option according to
current source of lights. You can reduce
the effects on colors by lights.
For the video recorder:
White balance
Tap to select the option according to
current source of lights. You can reduce
the effects on colors by lights.
Video quality
Tap to select high or standard
GHÀQLWLRQDFFRUGLQJWR\RXUSXUSRVH
Use the lens for video chat
1
2
3
From the HiMarket, download the video
chat application.
On the device, launch the application.
To use the camera lens,
Follow the instructions of the
application;
Point the lens at you or objects.
EN
31
Sound recorder
Calendar
With
Sound Recorder, you can record your
voice messages.
On the device, you can sync the calendar with:
the calendar of your Microsoft
Exchange account (see 'Set up your
Microsoft Exchange account' on page
34).
1
From the Home screen, go to .
» The sound recorder is displayed.
Alarm clock
On the device, you can set several alarms.
Set an alarm
1
2
2
3
Make sure that you have set the clock time
(see 'Date ).
From the Home screen, tap .
» The next alarm is displayed.
Make sure that the microphone is close to
the sound source to be recorded.
Do the following to start or stop recording.
Tap to start recording.
Tap to stop recording.
» After the message is recorded, a popup screen is displayed.
4
Tap to review the recording. Tap Done
WRVDYHWKHUHFRUGLQJÀOH
» You can play the recording in a media
player application, such as Philips
Songbird.
3
4
5
Tap .
» The set alarms are displayed.
To set an alarm clock,
To add an alarm, tap Add alarm.
To change an alarm, tap the preset
alarm time.
Tap SettingsWRVHOHFW\RXURSWLRQ&RQÀUP
as prompted.
Time
Repeat
Ringtone
Label
32
EN
Set the alarm time.
Select how the alarm repeats.
Select the ringtone for the alarm:
silence, buzzer, or ringtone.
Add description for the alarm.
Switch an alarm on or off
In
> , tap the tick box next to
the set alarm time.
» If the function is enabled, the tick
box is selected.
Use the alarm
At the set alarm time, the alarm sounds. A popup screen is displayed.
To interrupt the alarm, tap Snooze.
» 7KHDODUPVRXQGVPLQXWHVODWHU
To stop the alarm, tap Dismiss.
» The alarm repeats at the next set
alarm time.
EN
33
12 Use the device
in corporate
networks
You can use Tablet 7 in corporate networks.
Install the secure credentials or security
FHUWLÀFDWHVEHIRUH\RXDFFHVVFRUSRUDWH
networks.
The access to corporate network may allow
you to set up your Microsoft Exchange account
and add VPN on the device. With the Microsoft
Exchange account, you can access your
exchange mailbox at work.
To apply the secure credentials,
1
2
1
0DNHVXUHWKDW\RXWUDQVIHUWKHÀOHVRI
secure credentials from a PC to the SD
card that you have mounted onto the
device.
Note
On Tablet 7, make sure that the secure credentials are
saved to the root directory of the SD card, instead of
under a folder.
2
Install the secure credentials:
a From the Home screen, go to
>
Security > Install from SD card.
b 7DSWKHÀOHWRVWDUWLQVWDOODWLRQ
c Set the password and name for the
credentials as prompted.
34
EN
Make sure that the credential is selected.
» If the function is enabled, the tick box
is selected.
» On the device, you allow the
applications to use the secure
credentials.
Set up your Microsoft
Exchange account
1
2
Install secure credentials
Ask your network administrator for secure
FUHGHQWLDOVRUVHFXULW\FHUWLÀFDWHV
To install the secure credentials,
In , select Security > Trusted
credentials.
3
From the Home screen, go to
.
Set up your email account:
Enter the information about your
account, and select Exchange as the
account type.
If you have set up other email
accounts, select
> Settings on the
screen of mail list. Tap Add account.
Follow the onscreen instructions to
complete the setup.
For the server address, enter the web
address for your Outlook web access,
for example, owa.company name.com
or mail. company name.com/owa.
For other setup information, such as
domain name, user name, check with
your system administrator.
Note
7KHGHYLFHFDQZRUNZLWK0LFURVIW([FKDQJH
DQG
Add VPN
Virtual private network (VPN) allows you to
connect to private networks through secure
access.
Sometimes, you need VPN access to connect to
corporate networks.
To add VPN on the device
1
2
3
4
Ask your network administrator for the
FRQÀJXUDWLRQLQIRUPDWLRQ
From the Home screen, go to
>
Wireless & networks > More > VPN.
&RQÀJXUHWKH931DVSURPSWHG
Install the secure credentials as needed
(see 'Install secure credentials' on page 34).
To connect to the VPN,
1
2
3
Make sure that you have connected Tablet
7 to the Internet.
From the Home screen, go to
Wireless & networks > More.
» A list of VPNs is displayed.
>
Tap the VPN to start connection.
EN
35
13 Settings
To select your settings,
1
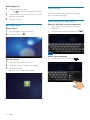
2
3
At the base of the screen, tap an icon of
setup status. Tap .
Alternatively, go to
from the Home
screen.
Swipe up or down to scroll through lists of
options.
Tap an option to select it.
Wireless & networks
Wi-Fi
In WIRELESS & NETWORKS > Wi-Fi, select
your Wi-Fi settings on the device (see 'Connect
to Wi-Fi' on page 15).
Add Wi-Fi network
Enter SSID manually
66,'6HUYLFH6HW,GHQWLÀHULVWKHQDPHRID
router. By the name, the router is recognized by
other Wi-Fi devices. If you have hidden the SSID
of the router (for example, disable the SSID
broadcasting), the router is invisible in the list of
available networks. To connect Tablet 7 to the
router, enter the SSID of the router manually
before you search for available networks on the
Tablet 7.
1
2
3
In Wi-Fi, drag the slider to switch on Wi-Fi.
On the top bar, tap ADD NETWORK.
Enter the SSID of the router.
» The Tablet 7 starts searching for the
network.
» <RXFDQÀQGWKHQHWZRUNLQWKHOLVWRI
networks.
4
Connect Tablet 7 to the network.
36
EN
1HWZRUNQRWLÀFDWLRQ
Switch on 1HWZRUNQRWLÀFDWLRQ. At the base of
the screen,
is displayed when an open Wi-Fi
network is available.
1
2
In Wi-Fi, drag the slider to switch on Wi-Fi.
At the top bar, tap
and select Advanced
> 1HWZRUNQRWLÀFDWLRQ.
Airplane mode
Switch on the airplane mode when:
you need to disable the access to
Wi-Fi for safety purposes, such as on
an airplane.
In WIRELESS & NETWORKS, select More >
Airplane mode. You can disable or enable the
access to Wi-Fi.
VPN settings
Use VPN settings to access private networks,
such as corporate networks (see 'Use the
device in corporate networks' on page 34).
Sound
In Sound, select sound settings for your device.
Volume
Default
QRWLÀFDWLRQ
Touch
sounds
Screen
lock sound
Drag the slider to select
the volume level for media,
QRWLÀFDWLRQVDQGDODUPV
6HWDQDXGLRÀOHDVULQJWRQH
Sounds play when you tap on the
screen.
Sounds play when you lock/
unlock the screen.
Display
Apps
In Display, select your display settings:
In Apps, manage the applications on the
device and SD card. You can install/ uninstall
applications, or select other options.
Brightness
Wallpaper
Auto-rotate
screen
Sleep
Font size
Drag the slider to change the
display brightness.
Set the wallpaper of the device.
Switch on/ off the screen
rotation between the landscape
and portrait views.
After the selected time
duration, the screen switches
off automatically. To save battery
power, select a low value.
Select font size for the onscreen display.
Storage
In Storage, learn the space information about
the internal memory and SD card on your
Tablet 7.
In Storage > Erase it, you can erase all the data
that you have stored on the internal memory of
the player, or SD card.
Battery
1
2
3
Find the applications:
In DOWNLOADEDÀQGWKH
applications that you have downloaded
from the HiMarket, or other sources.
In ON SD CARDÀQGWKHDSSOLFDWLRQV
that you have installed on the SD card.
In RUNNINGÀQGWKHDSSOLFDWLRQV
that are running on the device.
In ALLÀQGDOOWKHDSSOLFDWLRQVWKDW
you have installed on the device and
SD card.
Tap an application.
» Options and information are displayed.
Tap to select an option.
Accounts & sync
In Accounts & sync, add, remove, or manage an
account.
Tap ADD ACCOUNT to add an
account.
Tap an account to manage the account,
for example, remove the account or
select sync options.
In Battery, check the battery use by
applications.
EN
37
a Do factory reset on the device (see
'Backup 39).
» All the data are erased from the
internal storage of Tablet 7.
Location services
In Location services, switch on or off
Google's location service.
» If the function is enabled, the tick box
is selected.
b Set pin or password as the unlock
security for screen lock (see 'Screen
lock' on page 38).
» You can allow or disallow your location
information to be used in online
location services of Google, such as
Maps, or other relevant services and
applications.
d Use the by-packed USB adapter to
connect Tablet 7 to power.
Security
2
Screen lock
By default, to unlock the screen of Tablet 7,
press the power/ lock button and then, drag the
lock to an icon.
In Screen lock, you can set a pattern, pin, or
password as the unlock security. To unlock the
screen, such unlock security is required.
None
Pattern
PIN
Password
Switch off the lock.
Set a pattern as the unlock
security.
Set a PIN that consists of
numbers.
Set a password that consists of a
combination of numbers, letters,
and symbols.
Encrypt tablet
In Encrypt tablet, you can encrypt all the data
on the device, such as your Google accounts,
PHGLDÀOHVDQGGRZQORDGV:LWKWKHGDWD
encrypted, you need to enter a pin or password
each time you switch on Tablet 7.
1
38
Before you encrypt the device, do the
following:
EN
c Charge Tablet 7.
» When the power charging is
complete, the power indicator
switches off.
3
4
Go to Security > Encrypt tablet.
» If Tablet 7 is ready for encryption, the
Encrypt tablet button lights up.
Tap the Encrypt tablet button.
Follow the onscreen instructions to
complete encryption.
» The encryption process takes an hour
or more.
» During the process, the device
switches off and on several times.
To un-encrypt the device,
Do factory reset on the device (see
'Backup 39).
Visible passwords
Your password consists of several characters. To
make sure that you have entered the characters
correctly, show the characters as you type the
password. Switch Make passwords visible on or
off as needed.
Tap the tick box.
» If the function is enabled, the tick
box is selected.
Device administrators
Applications in corporate networks require the
rights of device administrator, such as the email
and calendar under your Microsoft Exchange
account.
Before you uninstall such an application, disable
the rights of device administrator.
In Device administrators, tap an
application.
» The rights of device administrator are
disabled.
» You cannot sync data for the
application.
Unknown sources
On Tablet 7, you can install applications that
you download from , or from sources other
than .
For the applications from sources
other than , tap Unknown sources
to allow installation on the Tablet 7.
» If the function is enabled, the tick
box is selected.
Language & input
Language
In Language, select the language for the
onscreen instructions of Tablet 7.
Personal dictionary
In Personal dictionary, add or remove words
or phrases to/ from the user dictionary. You
can customize the word suggestions that are
displayed on the pop-up screen during your
text entry on the Android keyboard.
To add a word or phrase,
Tap to add a word or phrase.
To edit a word or phrase,
1
Tap on the word or phrase.
» A pop-up screen is displayed.
2 Edit the word or phrase.
To remove a word or phrase,
Tap
next to the word or phrase.
Text-to-speech output
In Text-to-speech output, select your options
for:
voice output for the accessibility
function on the device (see
'Accessibility' on page ).
Install voice data
Download from the Marketthe voice data for
speech synthesis.
1
2
Connect the device to the Internet.
In Text-to-speech settings, tap Install voice
data.
» Search for and download the voice
data.
Select your options for the voice output
1
2
3
In Pico TTS, tap
> Language. Select a
language as needed.
In Speech rate, select a speed at which the
text is read, normal, fast, or slow.
Tap Listen to an example.
» Your options are used to play the
demo of speech synthesis.
Backup & reset
In Backup & reset > Factory data reset, you
can erase all the data that you have stored on
the internal memory of the player.
EN
39
Date & time
Use the accessibility function
1
Automatic setting
2
Over the Internet, you can sync the date and
time on Tablet 7 from Philips online services.
To switch on the automatic clock setting,
3
1
2
3
In Date & time, tap to switch on
Automatic date & time.
» If the function is enabled, the tick
box is selected.
2
Select your options for voice output (see
'Text-to-speech output' on page 39).
About tablet
In About tablet, learn the status and
information about your Tablet 7.
In Use 24-hour format and Select date
format, select your options for time and
date display.
System updates
In Date & time, tap to switch off
Automatic date & time.
» If the function is disabled, the tick box
is deselected.
Tap to set date, time, and time zone in Set
date, Set time, and Set time zone.
To select a date, tap the date in the
calendar.
To select the digits, tap or hold
,
.
Accessibility
With the accessibility function, actions on the
screen of the device are read out through
the text-to-speech technology, such as the
taps, selection of menu items. For people who
cannot read the screen clearly, the function
allows them to use the device in an easier way.
Install the accessibility applications
From , download an application,
such as Talkback. Install the application
on your device.
Select an accessibility application that you
have installed.
In Select time zone, select your current
time zone.
Manual setting
1
Select Accessibility.
» If the function is enabled, the tick box
is selected.
EN
In System updates, check for the system
updates of Tablet 7. Make sure that you have
connected the device to the Internet.
Register your Tablet 7 WRDFFHVVWKHÀUPZDUH
upgrades.
Register
1
2
Make sure that you have connected the
device to the Internet.
To register Tablet 7with www.philips.com/
welcome,
a Select System updates > Register.
b Enter your valid email address.
» You receive an email message from
[email protected].
c Use the Web page link in the email to
complete registration.
To check registration information
You can check whether you have registered
your Tablet 7, whether you have completed the
registration, and what account you have used
for registration.
Tap Register > Registration
information.
To unregisterTablet 7
To use another email address as your account
with www.philips.com/welcome, you can
unregister Tablet 7.
1
2
Tap Register > Unregister.
&RQÀUPDVSURPSWHG
Upgrade
1
2
3
Make sure that your device is more than
75% charged.
Make sure that you have connected the
device to the Internet.
Select System updates > Upgrade.
» The device starts to check for the
ÀUPZDUHXSGDWH
Wi-Fi MAC address: Display the
XQLTXHLGHQWLÀHUWKDWLVDVVLJQHGWRWKH
network adapter of Tablet 7. If MAC
DGGUHVVÀOWHULQJLVHQDEOHGRQ\RXU
router, add the MAC address of Tablet
7 to the list of devices that are allowed
to join the network.
Battery use: Display the power consumption by
each running application.
Legal information: Legal information for Tablet
7
Model number: Model no. of the device
Android version:Firmware version of the
Android platform that the deviceis running on
Build number: Software version of Tablet 7
» 7KHÀUPZDUHLQIRUPDWLRQLVGLVSOD\HG
4
5
Follow the onscreen instructions to
GRZQORDGWKHÀUPZDUHXSGDWHWR\RXU
device.
» When the message "An update.zip is
detected from your Device Storage.
Do you want to have this update?" is
displayed, the downloading is complete.
Select the option to start upgrading.
Note
During the upgrading process, keep the screen or
button untouched.
.HHSWKHGHYLFHSRZHUHGRQEHIRUHWKHÀUPZDUH
update is complete.
Status and information about the
device
In Status,Battery status: Display the
status of power charging.
Battery level: Display remaining power
by percentage.
IP address: Display the IP address that
is assigned to Tablet 7 when the device
is connected a Wi-Fi network.
EN
41
14 Check for
firmware update
Connect Tablet 7 to Wi-Fi. You can receive
QRWLÀFDWLRQVDERXWÀUPZDUHXSGDWHV&KHFN
QRWLÀFDWLRQVDWWKHEDVHRIWKHVFUHHQ
<RXFDQXSGDWHWKHÀUPZDUHRITablet 7
on the device.
8SGDWHWKHÀUPZDUHRQWKH
device
On Tablet 7, \RXFDQXSGDWHWKHÀUPZDUH
through Philips online services over the Internet
(see 'System updates' on page ).
42
EN
15 Technical data
Power
Power adapter
3KLOLSV$68&,
,QSXW9a+]$
2XWSXW'&9$
Power supply:
*%YHUVLRQP$K/LLRQSRO\PHU
internal rechargeable battery
*%YHUVLRQP$K/LLRQSRO\PHU
internal rechargeable battery
Play time¹
music (MP3, Wi-Fi off, display off,
earphones only): 25 hours (8 GB version),
KRXUV*%YHUVLRQ
video (MP4, Wi-Fi off, earphones only):
5 hours (8 GB version), 3 hours (2 GB
version)
internet access (Web pages): 5 hours (8
GB version), 3 hours (2 GB version)
Display
Type: LCD Touch-sensitive screen
Diagonal screen size (inch): 7
5HVROXWLRQ[SL[HOV
Platform
Android™ 4
Connectivity
Headphone: 3.5 mm
86%+LJKVSHHG0LQLW\SH
:LUHOHVV/$1:L)LEJQ
Headphone sound
Channel separation: > 45 dB
)UHTXHQF\UHVSRQVH+]
2XWSXWSRZHU[P:PD[LPXP
6LJQDOWRQRLVHUDWLR!G%
Speaker sound
)UHTXHQF\UHVSRQVH+]
2XWSXWSRZHUP:
6LJQDOWRQRLVHUDWLR!G%
Audio playback
Supported formats:
WAV, MP3, AAC/. m4a, OGG Vorbis, 3GPP,
AMR-NB (mono), AMR-WB (stereo)
0,',7\SHDQGPLG[PIP[PI
RTTTL/RTX (.rtttl, .rtx), OTA (.ota), and
iMelody(.imy)
Audio capturing
AMR-NB
Bitrate: 4.75 to 12.2 kbps
Sampling rate: 8 kHz
File supported: 3GPP (.3gp)
6SHFLÀHG
Bitrate: 128 kbps
Sampling rate: 44.1 kHz
File format: MP3
Built-in microphone: mono
Video playback
Supported formats:
MPEG-4 (.avi), H.264 (3gpp, .mp4), H.263
Sorenson, H.263 (3GPP container), FLV
(supported for the Internet streaming),
MKV (AVC + AC3), MPEG-4 (AVC +
AC3), AVI (Xvid + MP3), 3GPP
Video capturing
H.264 Aspect ratio (4:3 or 16:9 selectable)
9LGHRUHVROXWLRQ9*$[
)UDPHUDWHIUDPHVSHUVHFRQG
Container: .mp4
Audio format: MP3
Lens: Fixed focus length
Recording time: Depending on the storage
Still picture playback
Supported formats:
JPEG, BMP, PNG, GIF
Still picture capturing
3LFWXUHUHVROXWLRQ9*$[
Picture format: JPEG, PNG
Lens: Fixed focus length
Storage media
Built-in memory capacity²:
8 GB NAND Flash
2 GB NAND Flash
External storage:
Micro SD memory card slot (Maximum
memory card capacity: 32 GB)
EN
43
Preloaded applications
8 GB version: HiMarket™, 91PandaReader,
Amazon™, Sina™ Weibo, Sina™ News,
Sina™ Music, QIYI Video™, QQ™ Live,
TuDou.com™, Youku™, QQ™, QQ™ Hall,
QQ™ Browser, Weixin
2 GB version: HiMarket™, 91PandaReader,
Amazon™, Sina™ Weibo, Sina™ News,
Sina™ Music, QIYI Video™, QQ™ Live,
TuDou.com™
Search, Browser, QQ input, Gallery, Music,
Camera, Email, Calendar, Clock
Philips Songbird, SimplyShare
Note
6SHFLÀFDWLRQVDUHVXEMHFWWRFKDQJHZLWKRXWQRWLFH
¹ Rechargeable batteries have a limited number of
charge cycles. Battery life and number of charge cycles
vary by use and settings.
² 1GB = 1 billion bytes; available storage capacity is less.
Full memory capacity may not be available as some
memory is reserved for the device. Storage capacity
is based on 4 minutes per song and 128 kbps MP3
encoding.
PC system requirements
Windows®XP (SP3 or above), Vista/7 (32bit, 64-bit)
3HQWLXP,,,0+]SURFHVVRURUKLJKHU
512 MB RAM
0%KDUGGLVNVSDFH
Internet connection
:LQGRZV,QWHUQHW([SORUHURUODWHU
USB port
44
EN
Specifications are subject to change without notice
© 2012 Koninklijke Philips Electronics N.V.
All rights reserved.
Pi3000_93_UM_V1.1 wk1216.3