1
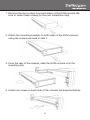
Turning on the console
Make sure all cables and the power cord are connected properly. Using
two hands, grasp the rear of the drawer, lift the tab and pull the panel
up and forward. This will disengage the momentary on/off switch and
the unit should power on.
The LED located to the left of the monitor panel should turn from
orange to green, verifying that the unit is operational.
Configuring display settings
After connecting the drawer and turning on your computer, you may
need to configure one or more of the following display settings to
allow the computer to display at the console’s native resolution. See
Specifications on page 9 for the correct resolution mode for your model.
• Display mode (also called desktop area or video resolution)
• Refresh rate (also called vertical scan rate or vertical sync)
• Color depth (also called color palette or number of colors)
Each video card has several controls that allow you to adjust the
display settings, however, the software and driver for each video card is
unique. In most cases, you can adjust these settings using a program
or utility provided by the manufacturer of the video card. Most video
cards use the Windows Display Properties control panel to configure
the display. To open the Windows Display Properties, click the right
mouse button in a blank area of the Windows desktop and then select
Properties. The Settings tab usually lets you change the Color Palette
and the Desktop Area (X by Y pixel resolution).
Some video cards integrate additional features into the Windows
Display Properties control panel giving you an extra setup options
that are flexible and easy to use. For example, the control panel
may include an Advanced Properties button, an Adjustment tab, or
a Refresh tab for changing other settings. Other video cards have a
separate utility for setting display properties.
7