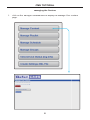
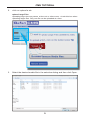
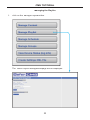
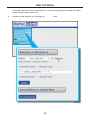
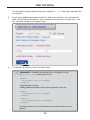
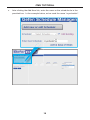
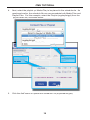
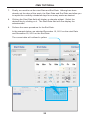
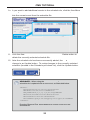
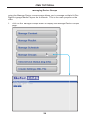
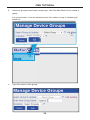
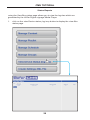
1
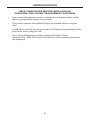
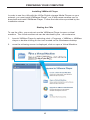
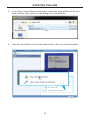
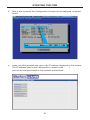
®
User Ma
Manual
<pull
<
<p
p
Confi
onfig>
<p
<pul
u
ullMo
de va
alue=”
lue enabl
enable”
e />
<
<di
<d
dis
isab
isabl
i
isa
s
sa
sab
bl
b
le /
/>
>
<ena
nable
e>
<pu
pullUR
URL value=”192
”192.168
168.2
2.70”
70” />
/
<set
tting
ngP
Pull value=”192.168.2.70” />
<sc
ched
edule
le
ePull value
value=”192
”192.168
168.2
2.70/sche
70/schedules
dules”
” />
<
<pla
p ayli
ist
tPull value=”192.168.2.70/play
/p ylists” />
/
<co
onte
tent
ntP
Pull value=”192.168.2.70/media” />
<p
<
<pul
pul
llLo
LogU
gU
Upload
l d value
l e=”192
”192.168
168.2
2.70”
70” />
<us
serNa
se
ame
e value=”User” />
<
<u
u
use
us
se
serP
Pas
ss value=”Pass” />
<
<p
po
po
or
ort
rt val
lue=
ue=”21”
21 />
<s
<s
sy
y
yn
nc
cMe
Medi
ia value=”disable” />
<
<sy
<s
s
sy
yn
y
nc
cP
P
Pl
lay
ylist value=”disable” />
<
<sy
sy
sy
yn
nc
cS
S
Sc
che
edule value
value=”dis
= disable”
able />
</en
</
na
nab
abl
ble>
e>
..
..
. ..
..
..
</p
pu
ul
ull
ll
lCo
C
Co
on
on
nfi
fig
g>
>
www.gefen.com
ASKING FOR ASSISTANCE
Technical Support:
Telephone
Fax
(818) 772-9100
(800) 545-6900
(818) 772-9120
Technical Support Hours:
8:00 AM to 5:00 PM Monday through Friday, Pacific Time
Write To:
Gefen, LLC
c/o Customer Service
20600 Nordhoff St
Chatsworth, CA 91311
[email protected]
www.gefen.com
Notice
Gefen, LLC reserves the right to make changes in the hardware, packaging and
any accompanying documentation without prior written notice.
Hi-Def Digital Signage Media Player is a trademark of Gefen, LLC
HDMI, the HDMI logo, and High-Definition Multimedia Interface are trademarks
or registered trademarks of HDMI Licensing in the United States and other
countries.
VMWare, the VMWare “boxes” logo and design, Virtual SMP, and vMotion
are registered trademarks of VMWare, Inc. in the United States and/or other
jurisdictions.
© 2011 Gefen, LLC, All Rights Reserved
All trademarks are the property of their respective owners.
Rev A1
CONTENTS
1
Introduction
2
Operation Notes
3
Features
4
Preparing your Computer
4
Installing VMWare® Player
4
Starting the CMS
7
CMS Tutorial
8
Managing the Content
11
Managing the Playlist
16
Managing the Schedule
24
Managing Device Groups
28
Viewing Status Reports
30
Creating the Settings XML File
INTRODUCTION
Congratulations on your purchase of the Content Management System for the
Hi-Def Digital Signage Media Player. Your complete satisfaction is very important
to us.
Gefen
Gefen delivers innovative, progressive computer and electronics add-on solutions
that harness integration, extension, distribution and conversion technologies.
Gefen’s reliable plug-and-play products, supplement cross-platform computer
systems, professional audio/video environments, and HDTV systems of all sizes
with hard-working solutions that are easy to implement and simple to operate.
The Gefen Content Management System
The Content Management System (CMS) is a software application developed for
the Hi-Def Digital Signage Media Player to simplify the implementation and the
daily management of Digital Signage content and scheduling.
From hospitality to advertising, education and business communications, the
Content Management System provides users a simple and general purpose
interface to manage content on a single Hi-Def Digital Signage Media Player on
a network.
1
OPERATION NOTES
READ THESE NOTES BEFORE INSTALLING OR
OPERATING THE CONTENT MANAGEMENT SOFTWARE
•
This Content Management System is designed to manage multiple Hi-Def
Digital Signage Media Players on a network.
•
This product requires that VMWare Player be installed, before using the
CMS.
•
A USB device must be connected to the Hi-Def Digital Signage Media Player
at all times, while using the CMS.
•
The Content Management System supports Windows 7® and
Windows XP®. Both 32-bit and 64-bit versions of these operating systems
are supported.
2
FEATURES
Features
•
Manage multiple Hi-Def Digital Signage Media Players in Pull Mode
•
Create / edit playlists and schedules
•
Manage media content
•
Create groups to manage multiple boxes.
Package Includes
(1) Content Management Software
(1) User Manual
3
PREPARING YOUR COMPUTER
Installing VMWare® Player
In order to use the CMS with the Hi-Def Digital Signage Media Players on your
network, you must install VMWare® Player. Go to http://www.vmware.com to
download and install VMWare® Player. Follow the instructions provided by the
installation wizard.
Starting the CMS
To use the CMS, you must first use the VMWare® Player to open a virtual
machine. The virtual machine file can be identified by the *.vmx extension.
1.
Launch VMWare Player by selecting Start > Programs > VMWare > VMWare
Player or double-clicking on the icon located on the Windows® desktop.
2.
Once the following screen is displayed, click on Open a Virtual Machine.
4
STARTING THE CMS
3.
In the Open Virtual Machine dialog box, select the GefenCMS.vmx file and
then click the Open button on the dialog box to load the file.
4.
After the GefenCMS.vmx file has been loaded, click Play virtual machine.
5
STARTING THE CMS
5.
After a few moments, the Configuration Console will be displayed, as shown
below.
6.
Open your Web browser and type in the IP address displayed on this screen.
The IP address listed in the Configuration Console is the defaultt IP address
and can be changed based on the network requirements.
6
CMS TUTORIAL
CMS Home
The CMS Home page provides the starting point for every project. Each of the
six (6) buttons on the CMS Home page manages a separate stage and are
ordered in the way each step should be completed.
Manage Groups
Manage groups.
Create Settings XML File
Create / customize the settings.xml
file using a user-friendly interface.
Manage Schedule
Manage the schedule.gsh file.
View Device Status
Access the Media Player log files.
Manage Playlist
Manage the playlist.gpl file.
Manage Content
Allows you to manage your media
content (upload / download).
7
CMS TUTORIAL
Managing the Content
1.
Click on the Manage Contentt button to display the Manage Your Content
page.
8
CMS TUTORIAL
2.
Click on Upload a file.
Upload Large Files
Uploading large files may cause a time-out or other errors. Check this box when
uploading larger files. Only one file can be uploaded at a time.
3.
Select the desired media file in the selection dialog and then click Open.
9
CMS TUTORIAL
NOTE: The Gefen CMS supports drag-and-drop plus multiple file
selection on both Mozilla Firefox® and Google Chrome™ browsers.
It is recommended to use the latest version of either browser.
Once the upload begins, the Gefen CMS will display the upload progress.
You can click the Cancel button at any time to abort the upload process.
If the upload is successful, the file will be displayed under Browse / Remove
Media files.
To remove files, place a check box next to the file you want to
delete. Then, click the Remove Selected
d button.
10
CMS TUTORIAL
Managing the Playlist
1.
Click on the Manage Playlistt button.
The Gefen Playlist Managementt page will be displayed:
11
CMS TUTORIAL
Currently, we don’t have any playlists. Any existing playlists would be listed
in the Playlist drop-down list.
2.
Create a new playlist by clicking the Add New
w link.
12
CMS TUTORIAL
3.
Provide a name for the playlist. For this tutorial, you can use the name
“myplaylist”.
4.
Since we have already uploaded some media content (2.mov), click the
Select a Media File pull-down list to select the content.
13
CMS TUTORIAL
The illustration below shows that the media file 2.mov has been selected for
our playlist.
5.
If you have additional media content to add to the playlist, you will need to
click the Add More Rowss link. Each media file must have its own row. Use
the Remove Row
w link to delete a row.
6.
To upload the playlist, click the Add button.
ADVANCED: By adding the media file to our playlist, our file
(myplaylist.gpl) would look like this:
<media>
<FileName>2.mov</FileName>
</media>
Using Add More Rowss (plus adding more content) would result in
adding additional media events to the playlist file, such as:
<media>
<FileName>3.mov</FileName>
</media>
<media>
<FileName>big.mov</FileName>
</media>
Pressing Remove Row
w would delete the selected media from the
playlist.
14
CMS TUTORIAL
7.
After the playlist has been successfully added, the Add button will change to
an Update button. The current playlist is now also visible from the Playlist
pull-down list.
8.
If you want to add more content to the currently selected playlist, make sure
that you press the Update button.
15
CMS TUTORIAL
Managing the Schedule
1.
Click on the Manage Schedule button. This is where you assign a playlist or
media content to be played in a given day, time, and period.
The Gefen Schedule Managementt page will be displayed:
16
CMS TUTORIAL
2.
Since we don’t have a schedule yet, we need to create one. Click the Add
New
w link under Add new or edit Schedule:
17
CMS TUTORIAL
3.
After clicking the Add New link, enter the name of the schedule file in the
provided box. In the example below, we’ve used the name “myschedule”.
18
CMS TUTORIAL
4.
Next, select the playlist (or Media File) to be placed in the schedule file. As
mentioned earlier, the schedule file can accommodate both Media Files and
Playlist Files. For this example, select the Playlist (myplaylist.gpl) from the
pp
top
pull-down list,, as shown below:
5.
Click the Add
d button to upload the Schedule File (myschedule.gsh).
19
CMS TUTORIAL
6.
Finally, select the day(s) and time(s) that you want the content to be played
back.
We’re going to start with selecting the days when we want the content to be
played back. In this example, we’re going to select Mondays, Tuesdays,
and Thursdays. Click the mouse to place a check mark next to the days of
the week you want. Click the mouse again to remove the check mark and
unselect the day(s).
NOTE: The top row of days cannot be changed. By default, if you
do not select any days of the week, the content will be played every
day of the week (Sunday - Saturday).
20
CMS TUTORIAL
7.
Next, select the Start Time and End Time. As before, with selecting the
days, if a Start Time and End Time are not entered, then the content will play
all day long (12:00:00 - 23:59:59).
For this example, we’re going to have the content play from 8:00 am in the
morning until 5:00 pm in the evening.
NOTE: The Content Management System (CMS) only recognizes a
24-hour clock. All Start Times and End Times must be entered as such.
When entering the Start Time and End Time, the full time must be entered
as HH:MM:SS. Each field will automatically display (as shown above) the
correct format while the time values are entered. If the time value is
incomplete (e.g. seconds are not entered), after proceeding to the next field,
the time field will be erased and you will need to re-enter the data.
21
CMS TUTORIAL
7.
Finally, we need to set the Start Date and End Date. Although we have
already set the days of the week, the Start Date and End Date end allow you
to repeat the currently scheduled days for as many weeks as desired.
8.
Clicking the Start Date field will display a calendar widget. Select the
desired day by clicking on it. The Start Date field will now display the
selected date.
9.
Perform the same procedure for the End Date.
In the example below, we selected December 12, 2011 for the Start Date
and December 23, 2011 for the End Date.
The current date will outlined in yellow.
22
CMS TUTORIAL
10. If you want to add additional events to the schedule file, click the Add More
Eventss link. Each event has its own row. Use the Remove Row
w link to delete the current event from the schedule file.
d button to add the schedule file. Click the Delete button to
11. Click the Add
delete the currently selected schedule file.
12. After the schedule file has been successfully added, the Add
d button will
change to an Update button. To make changes to the currently selected
schedule (located in the Schedule pull-down list), click the Update button.
ADVANCED: When using the Add More Eventss link, the
schedule file is updated with a new event, as illustrated below:
<Event>
<StartDate>12/12/2011</StartDate>
<EndDate>12/23/2011</EndDate>
<DayOfWeek>0,1,1,0,1,0,0</DayOfWeek>
<EventStart>08:00:00</EventStart>
<EventEnd>17:00:00</EventEnd>
<FileName>/playlists/myplaylist.gpl</FileName>
</Event>
Pressing Remove Row
w would delete the current event from the
schedule file.
23
CMS TUTORIAL
Managing Device Groups
Using the Manage Device Groups page allows you to manage multiple Hi-Def
Digital Signage Media Players on a network. This is the main purpose of the
CMS.
1.
Click on the Manage Groupss button to display the Manage Device Groups
page.
24
CMS TUTORIAL
2.
Since no groups have been created yet, click the Add New link to create a
group.
If a group exists, it can be selected from the Select Group to Update pulldown list
list.
3.
Type the name of the group.
25
CMS TUTORIAL
2.
Select the schedule file from the pull-down list. In this example, the
schedule file is myschedule.gsh.
3.
Click the Add
d button to create the group.
26
CMS TUTORIAL
Once the group is created, the group name will appear in the Select Group
to Update pull-down list.
4.
Use the edit button to upload the associated files (schedule file, playlist file,
and content) to the current group.
Use the Delete button to remove the group.
27
CMS TUTORIAL
Status Reports
Using the View Box Status page allows you to view the log files which are
generated by the Hi-Def Digital Signage Media Player.
1.
Click on the View Device Status (log info) button to display the View Box
Status page.
28
CMS TUTORIAL
After a log file is selected from the Groups pull-down list, the following information
is listed in a column under the View Box Status header.
In order to view a log file, you may be required to enter your user name and
password. To view the log file, click on the link. You can also right-click and
select “Save As...” to save the log file to your computer.
NOTE: In order to access a log file from the server, the default login
is ftp and the password is pass. The default login info can be
changed but is beyond the scope of this manual. If you require
support on changing the default login, contact VMWare.
ID Columns
All log file information is separated into five (5)
different columns displayed under the View Box
Status header: Group Name, MAC Address /
Log File, Status (Last Played), Update Time, and
Delete (status).
Remove
Deletes the currently
selected log file
Groups
Click the arrow on the pulldown list box to select the
log file to be viewed.
29
CMS TUTORIAL
Creating the Settings XML File
Using the View Box Status page allows you to view the log files which are
generated by the Hi-Def Digital Signage Media Player.
1.
Click on the Create Settings XML File button to display the Create Settings
page.
30
CMS TUTORIAL
2.
Click the Create Settings XML File button to create the settings.xml file.
The settings.xml file contains all information required by the Hi-Def Digital
Signage Media Player to function correctly.
3.
Create a name for the Hi-Def Digital Signage Media Player device and type
it in the Device Name field. In the example below, the Device Name is set to
my_first_device.
4.
Select the IP Configuration from the IP Config drop-down list. For DHCP
configuration, select Automatic. If you have a user-assigned IP address for
the Media Player, select Manual.
31
CMS TUTORIAL
5.
For the OSD Lockk field, select Disable or Enable. If no password is
required to access the OSD, then select Disable. Otherwise, select
Enable. Refer to the Hi-Def Digital Signage Media Player User Manuall for
information on setting the OSD password.
6.
Set the Reboot Config to Disable or Enable. This option can be used in
rare cases when the Media Player has exhibited abnormal behavior and
performing a reboot returns the Media Player to normal operation.
If the Reboot Config is set to Enable, the Reboot Time field will be
displayed. It is recommended to set the Reboot Time, during a period when
content is not scheduled to play. After the reboot procedure has completed,
the Media Player will continue with the current schedule.
7.
Select the Time Zone (GMT) from the Timezone drop-down list.
32
CMS TUTORIAL
8.
Select Yes or No from the Daylight Saving
g drop-down list.
9.
Set the Time Mode by selecting either External or Internal from the
drop-down list. When using schedules, it is highly recommended that an
NTP server be used to maintain all time settings. Refer to the Hi-Def Digital
Signage Media Player User Manuall for more information.
10. Provide the NTP server address(s) if using the External Time Mode
setting.
11. If you are using Push Mode, set the Push Mode drop-down list to Enable.
Push Mode describes a process whereby content is (manually) “pushed
to” the Hi-Def Digital Signage Media Player using an FTP client. In this
configuration, the Hi-Def Digital Signage Media Player becomes the FTP
server. Refer to the Hi-Def Digital Signage Media Player User Manuall for
more information on this feature.
33
CMS TUTORIAL
12. Set Pull Mode to Enable or Disable. When we refer to Pull Mode, we are
describing a process whereby content is (automatically) “pulled from” an FTP
server to the Hi-Def Digital Signage Media Player. In this configuration, the
Hi-Def Digital Signage Media Player becomes the FTP client. The CMS is
designed specifically for managing multiple units on a network. Refer to the
Hi-Def Digital Signage Media Player User Manuall for more information on
this feature.
13. Use the pull-down list to select the Group that this settings.xml file will
be associated with. In the example below, the mygroup Group has been
selected.
34
CMS TUTORIAL
14. The Pull URL, Username, Password, and Portt fields will automatically be
filled in for you. You should not change the values in any of these fields.
15. Enabling Sync Media will instruct the Hi-Def Digital Signage Media Player
to receive new content while erasing current content. Disabling Sync Media
will instruct the Hi-Def Digital Signage Media Player to receive new content
without deleting the current content. One advantage of enabling Sync Media
is that it will reduce the space requirement for media content on the USB
drive. Refer to the Hi-Def Digital Signage Media Player User Manuall for
more information on this feature.
35
CMS TUTORIAL
16. Sync Playlist and Sync Schedule function in the same way as Sync Media.
If either of these settings are enabled, then the new schedule file and/or
playlist file will be updated from the server to the Media Player. The current
schedule file and playlist(s) will be replaced with the new files. Refer to the
Hi-Def Digital Signage Media Player User Manuall for more information on
these features.
17. Set the Pull Repeat value to specify when the Hi-Def Digital Signage Media
Player will pull content from the server. If you want to only pull content on
a daily basis, then set the Pull Repeat value to Daily. Conversely, if you
want to pull content on an hourly basis, then set the Pull Repeat value to
Hourly. Pull Mode can be disabled by setting the Pull Repeat value to
Never.
18. Set the Start Time. The maximum value for the Pull Repeat Start Time is
23:59. Refer to the Hi-Def Digital Signage Media Player User Manuall for
more information on this feature.
19. The Set Active Schedule pull-down list. If only one schedule file is present,
then this field will automatically be assigned once the group is selected (see
Step 11).
20. Select the output resolution using the Display pull-down list. Refer to the
Hi-Def Digital Signage Media Player User Manuall for more details on
available output resolutions.
21. The Video Reduce option enables or disables the underscan mode.
22. Save the settings.xml file to the USB drive (or external storage) by
clicking the Save As File button. After the XML file is saved to the USB
device, connect the USB device to the Media Player. Once the Media
Player is powered, the settings.xml file will be processed by the Media
Player and the associated playlist and schedule files will be executed.
Refer to the Hi-Def Digital Signage Media Player User Manuall for detailed
information on file nomenclature and functionality.
23. When editing an existing settings.xml file, use the Save To Selected
Group button. The file is being saved to the server. Since the Media Player
is in Pull Mode, the changes in the settings.xml file will be applied after
the next Pull event.
36
*MA-HD-HDSMP-CMS*
Rev A1
20600 Nordhoff St., Chatsworth CA 91311
1-800-545-6900
818-772-9100
www.gefen.com
fax: 818-772-9120
[email protected]