1
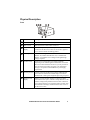
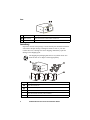
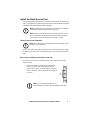
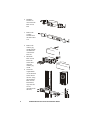
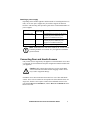
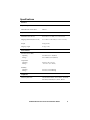
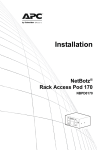
Installation Guide
NetBotz®
Rack Access Pod 170
NBPD0170
This manual is available in English on the enclosed CD.
Dieses Handbuch ist in Deutsch auf der beiliegenden CD-ROM
verfügbar.
Este manual está disponible en español en el CD-ROM adjunto.
Ce manuel est disponible en français sur le CD-ROM ci-inclus.
Questo manuale è disponibile in italiano nel CD-ROM allegato.
本マニュアルの日本語版は同梱の CD-ROM からご覧になれます。
Instrukcja obsługi w języku polskim jest dostępna na CD.
O manual em Português está disponível no CD-ROM em anexo.
Данное руководство на русском языке имеется на
прилагаемом компакт-диске.
anual finns tillgänglig på svenska på medföljande CD.
您可以从包含的 CD 上获得本手册的中文版本。
동봉된 CD 안에 한국어 매뉴얼이 있습니다 .
Contents
Introduction. . . . . . . . . . . . . . . . . . . . . . . . . . . . . . . . . . . . . . . . . . . 1
Product description . . . . . . . . . . . . . . . . . . . . . . . . . . . . . 1
Document overview . . . . . . . . . . . . . . . . . . . . . . . . . . . . . 1
Additional documentation . . . . . . . . . . . . . . . . . . . . . . . . . 1
Additional options . . . . . . . . . . . . . . . . . . . . . . . . . . . . . . . 2
InfraStruxure-certified . . . . . . . . . . . . . . . . . . . . . . . . . . . 2
Physical Description . . . . . . . . . . . . . . . . . . . . . . . . . . . . . . . . . . . 3
Front . . . . . . . . . . . . . . . . . . . . . . . . . . . . . . . . . . . . . . . . 3
Rear . . . . . . . . . . . . . . . . . . . . . . . . . . . . . . . . . . . . . . . . . 4
Inventory . . . . . . . . . . . . . . . . . . . . . . . . . . . . . . . . . . . . . . . . . . . . . 4
Install the Rack Access Pod . . . . . . . . . . . . . . . . . . . . . . . . . . . . . 5
Toolless peg-mount installation . . . . . . . . . . . . . . . . . . . . 5
Rack-mount installation (with Sensor Pod 150) . . . . . . . . 5
Attaching a power supply . . . . . . . . . . . . . . . . . . . . . . . . . 7
Connecting Door and Handle Sensors. . . . . . . . . . . . . . . . . . . . . 7
Configure and Monitor Sensors . . . . . . . . . . . . . . . . . . . . . . . . . . 8
Upgrade the Rack Access Pod . . . . . . . . . . . . . . . . . . . . . . . . . . . 8
Clean the Rack Access Pod . . . . . . . . . . . . . . . . . . . . . . . . . . . . . 8
Specifications . . . . . . . . . . . . . . . . . . . . . . . . . . . . . . . . . . . . . . . . 9
Two-Year Factory Warranty. . . . . . . . . . . . . . . . . . . . . . . . . . . . . 10
Terms of warranty . . . . . . . . . . . . . . . . . . . . . . . . . . . . . 10
Non-transferable warranty . . . . . . . . . . . . . . . . . . . . . . . 10
Exclusions . . . . . . . . . . . . . . . . . . . . . . . . . . . . . . . . . . . 10
Warranty claims . . . . . . . . . . . . . . . . . . . . . . . . . . . . . . . 11
Obtaining service . . . . . . . . . . . . . . . . . . . . . . . . . . . . . . 12
NetBotz Rack Access Pod 170 Installation Guide
i
Introduction
Product description
The American Power Conversion (APC®) NetBotz Rack Access Pod 170
(NBPD0170) connects to a NetBotz appliance and allows you to monitor and
control access to a rack in your data center. You can connect the Rack Access
Pod to one of the following appliances: NetBotz Room Monitor 455
(NBWL0455, NBWL0456), NetBotz Rack Monitor 550 (NBRK0550), or
NetBotz Rack Monitor 570 (NBRK0570).
The Rack Access Pod includes two sets of sensor ports for monitoring input
from APC door sensors and handle mechanisms on APC or third-party racks.
Two doors can be monitored with a single Rack Access Pod, and multiple Rack
Access Pods can be linked together to be monitored by a single NetBotz
appliance. The total number of Rack Access Pods that you can use depends
upon the specific appliance to which the Rack Access Pod is connected.
The Rack Access Pod also includes a pair of A-Link ports for connecting
additional Rack Access Pods or a monitoring NetBotz appliance.
Document overview
The NetBotz Rack Access Pod 170 Installation Manual describes how to install
the Rack Access Pod in a rack and attach it to a NetBotz appliance. Specific
instructions on installing door contacts and handle mechanisms are contained in
the installation instructions for each component.
Additional documentation
Unless otherwise noted, the following documentation is available on the CD
provided with the device or on the applicable product page on the APC Web
site, www.apc.com. To quickly find a product page, enter the product name or
part number in the Search field.
NetBotz Appliance User’s Guide – Includes all details for using, managing, and
configuring a NetBotz system with one of the following appliances: NetBotz
Room Monitor 455 (NBWL0455, NBWL0456), NetBotz Rack Monitor 550
(NBRK0550), or NetBotz Rack Monitor 570 (NBRK0570).
NetBotz Rack Access Pod 170 Installation Guide
1
Additional options
The following options are available for the Rack Access Pod. Some options
may not be supported by each rack or room monitor to which the Rack Access
Pod can be connected. See the options listed in the installation instructions
included with your rack or room monitor. For more information about any of
the options, contact your APC representative or the distributor from whom you
purchased your APC product.
• NetBotz Door Switch Sensor for APC Racks (NBES0303)
• NetBotz Door Switch Sensor for Rooms or Third Party Racks
(NBES0302)
• Power Supply 100-230 VAC/24 VDC (AP9505I)
InfraStruxure-certified
This product is certified for use in APC InfraStruxure® systems.
2
NetBotz Rack Access Pod 170 Installation Guide
Physical Description
Front
Item
Description
1 Handle #1 Port
Port for the Handle sensor on Door #1.
2
Door #1 Port
Port for the Door Contact sensor on Door #1.
3
Access LED
display
Blinks when a proximity card is swiped near a handle sensor
connected to the Rack Access Pod. See the NetBotz Appliance
User’s Guide for details on blinking patterns.
4
A-Link port (in)
Used for connecting the Rack Access Pod to a NetBotz Room
Monitor 455, NetBotz Rack Monitor 550, or NetBotz Rack
Monitor 570. Standard CAT-5 cabling with straight-through
wiring is required.
5
24 VDC Power
Connects to an external 24V power supply (AP9505I).
Depending on the NetBotz appliance and number of cascaded
Rack Access Pods attached to the device, you may need one or
more external power supplies to support your configuration.
See page 7 for specific recommendations on power supply
requirements.
6
A-Link port (out)
Used for connecting the Rack Access Pod to additional Rack
Access Pods or Sensor Pods cascaded along an A-Link bus.
Standard CAT-5 cabling with straight-through wiring is required.
7
Identifier LED
display
Displays a unique identifier number. The first time a Rack
Access Pod receives power, it obtains a unique Identifier #. This
number is displayed in parenthesis after the name of the Rack
Access Pod in the Device List in Advanced View or Basic View.
The Identifier LED display will blink when an alert occurs on
the Rack Access Pod
NetBotz Rack Access Pod 170 Installation Guide
3
Rear
Item
Description
1 Door #2 Port
2
Handle #2 Port
Port for the Door Contact sensor on Door #2.
Port for the Handle sensor on Door #2.
Inventory
Inspect the contents of the package to ensure that the parts included match those
shown below. Report missing or damaged contents to APC or your APC
reseller. However, if damage was due to shipping, immediately report the
damage to the shipping agent.
The shipping and packaging materials are recyclable. Please save
them for later use or dispose of them appropriately.
Item
Description
1
Rack Access Pod 170
2
8-32 x 1/4-in Phillips head screws (6)
3
Brackets for a standard 19-in rack (3)
Rack Access Pod 170 Utility CD (not shown)
This NetBotz Rack Access Pod 170 Installation manual (not shown)
4
NetBotz Rack Access Pod 170 Installation Guide
Install the Rack Access Pod
Choose the option below that meets your needs. Then connect the Rack Access
Pod to your appliance by following the instructions in the installation and quick
configuration manual included with the appliance.
Note: Install the Rack Access Pod in an environment compatible
with the environmental specifications on page 9.
Note: When you install the Rack Access Pod in the rack, do not
create a hazardous condition due to uneven mechanical loading.
For example, do not use the Rack Access Pod as a shelf.
Toolless peg-mount installation
Note: The toolless peg-mount installation is only available with a
NetShelter VX or SX rack.
In the left or right cable channel in the rear panel of the rack enclosure, install
the Rack Access Pod in a set of mounting holes. Be sure to push down until it
locks.
Rack-mount installation (with Sensor Pod 150)
The Rack Access Pod can be mounted in the same U-space as an existing
Sensor Pod 150.
1. Choose a location for the Rack Access Pod in the
front or rear of the rack. The Rack Access Pod
occupies one U-space. A notched hole or a number
on the vertical rail of the rack denotes the middle of
a U-space.
Note: To avoid equipment damage, use
only the hardware provided when installing the brackets.
NetBotz Rack Access Pod 170 Installation Guide
5
2. Install the
brackets on
each end of the
Rack Access
Pod.
3. Remove the
existing
brackets from
the Sensor Pod
150.
4. Remove the
toolless pegmount from the
left-hand side
of the Sensor
Pod 150.
5. Mount the
Rack Access
Pod to the
Sensor Pod
using the
toolless pegmount.
6. Secure the
coupled Rack
Access Pod and
Sensor Pod to
the rack, using
the remaining
Rack Access
Pod bracket,
cage nuts and
screws
(provided with
the rack).
6
NetBotz Rack Access Pod 170 Installation Guide
Attaching a power supply
Depending on the NetBotz appliance and the number of cascading Rack Access
Pods, one or more power supplies may be needed to support the attached
hardware. The following chart provides a guide to the recommended number of
power supplies:
Appliance
Rack Monitor 570
Rack Monitor 550
Room Monitor 455
Max Rack
Power Supply Recommendation
Access Pods
13
One AP9505I power supply for the fourth
attached pod plus an additional power
supply for each additional four pods.
13
One AP9505I power supply for the third
attached pod plus an additional power
supply for each additional third pod.
2
One AP9505I power supply.
Note: Additional Sensor Pods can be added to the A-Link cascade
containing the Rack Access Pods. See your appliance installation
guide for details.
Connecting Door and Handle Sensors
Only connect sensors supported by the appliance to which the Rack Access Pod
is connected. See the installation and quick configuration manual included with
your appliance.
Caution: Only connect approved devices to ports on the Rack
Access Pod as directed in this manual. Plugging in other devices
may result in equipment damage.
Each Rack Access Pod can monitor and control two sets of door and handle
sensors. These sets are assumed to correspond to the front and back doors on a
single rack, but this is not required. Connect door and handle sensors to the
ports labeled Door #1 and Handle #1, and also Door #2 and Handle #2 on the
Rack Access Pod.
NetBotz Rack Access Pod 170 Installation Guide
7
Configure and Monitor Sensors
Once your system is installed and receiving power, configure sensors and begin
monitoring your system using the software interface for the appliance.
See your appliance installation and quick configuration manual for
system installation details and for instructions on accessing the
software interface of the appliance.
Upgrade the Rack Access Pod
Firmware upgrades for Rack Access Pods are included with firmware upgrades
for NetBotz appliances. When you upgrade firmware for the appliance to which
the Rack Access Pod is connected, the Rack Access Pod firmware will be
updated automatically, if required.
Note: The Rack Access Pod Identifier # LED shows 88 during a
firmware upgrade. During the upgrade, data from sensors connected
to the Rack Access Pod will be invalid.
For more information on firmware upgrades, see your appliance
user’s guide. For details on how to access your appliance user’s
guide, see “Additional documentation” on page 1.
Clean the Rack Access Pod
To clean the device, gently wipe surfaces with a clean, dry cloth.
8
NetBotz Rack Access Pod 170 Installation Guide
Specifications
Electrical
Input voltage, nominal
24 VDC; 100-230 mA
Maximum total current draw
230 mA
Physical
Dimensions (H x W x D)
43.2 x 95.3 x 73.7 mm (1.7 x 3.75 x 2.9 in)
Shipping dimensions (H x W x D)
78.7 x 222.3 x 139.7 mm (3.1 x 8.75 x 5.5 in)
Weight
0.4 kg (0.9 lb)
Shipping weight
0.7 kg (1.5 lb)
Environmental
Elevation (above MSL)
Operating
Storage
0 to 3000 m (0 to 10,000 ft)
0 to 15 000 m (0 to 50,000 ft)
Temperature
Operating
Storage
0 to 45ºC (32 to 113°F)
–15 to 65°C (5 to 149°F)
Humidity
Operating
Storage
0 to 95%, non-condensing
0 to 95%, non-condensing
Compliance
Immunity/Emissions
CE, ICES-003 Class A, VCCI Class A, EN 55022,
EN 55024, GOST-R, KN-1, KN-2, IRAM
NetBotz Rack Access Pod 170 Installation Guide
9
Two-Year Factory Warranty
This warranty applies only to the products you purchase for your use in
accordance with this manual.
Terms of warranty
APC warrants its products to be free from defects in materials and
workmanship for a period of two years from the date of purchase. APC will
repair or replace defective products covered by this warranty. This warranty
does not apply to equipment that has been damaged by accident, negligence or
misapplication or has been altered or modified in any way. Repair or
replacement of a defective product or part thereof does not extend the original
warranty period. Any parts furnished under this warranty may be new or
factory-remanufactured.
Non-transferable warranty
This warranty extends only to the original purchaser who must have properly
registered the product. The product may be registered at the APC Web site,
www.apc.com.
Exclusions
APC shall not be liable under the warranty if its testing and examination
disclose that the alleged defect in the product does not exist or was caused by
end user’s or any third person’s misuse, negligence, improper installation or
testing. Further, APC shall not be liable under the warranty for unauthorized
attempts to repair or modify wrong or inadequate electrical voltage or
connection, inappropriate on-site operation conditions, corrosive atmosphere,
repair, installation, exposure to the elements, Acts of God, fire, theft, or
installation contrary to APC recommendations or specifications or in any event
if the APC serial number has been altered, defaced, or removed, or any other
cause beyond the range of the intended use.
THERE ARE NO WARRANTIES, EXPRESS OR IMPLIED, BY
OPERATION OF LAW OR OTHERWISE, OF PRODUCTS SOLD,
SERVICED OR FURNISHED UNDER THIS AGREEMENT OR IN
CONNECTION HEREWITH. APC DISCLAIMS ALL IMPLIED
WARRANTIES OF MERCHANTABILITY, SATISFACTION AND
FITNESS FOR A PARTICULAR PURPOSE. APC EXPRESS
WARRANTIES WILL NOT BE ENLARGED, DIMINISHED, OR
AFFECTED BY AND NO OBLIGATION OR LIABILITY WILL ARISE
OUT OF, APC RENDERING OF TECHNICAL OR OTHER ADVICE
OR SERVICE IN CONNECTION WITH THE PRODUCTS. THE
FOREGOING WARRANTIES AND REMEDIES ARE EXCLUSIVE
10
NetBotz Rack Access Pod 170 Installation Guide
AND IN LIEU OF ALL OTHER WARRANTIES AND REMEDIES. THE
WARRANTIES SET FORTH ABOVE CONSTITUTE APC’S SOLE
LIABILITY AND PURCHASER’S EXCLUSIVE REMEDY FOR ANY
BREACH OF SUCH WARRANTIES. APC WARRANTIES EXTEND
ONLY TO PURCHASER AND ARE NOT EXTENDED TO ANY THIRD
PARTIES.
IN NO EVENT SHALL APC, ITS OFFICERS, DIRECTORS,
AFFILIATES OR EMPLOYEES BE LIABLE FOR ANY FORM OF
INDIRECT, SPECIAL, CONSEQUENTIAL OR PUNITIVE DAMAGES,
ARISING OUT OF THE USE, SERVICE OR INSTALLATION, OF THE
PRODUCTS, WHETHER SUCH DAMAGES ARISE IN CONTRACT
OR TORT, IRRESPECTIVE OF FAULT, NEGLIGENCE OR STRICT
LIABILITY OR WHETHER APC HAS BEEN ADVISED IN ADVANCE
OF THE POSSIBILITY OF SUCH DAMAGES. SPECIFICALLY, APC IS
NOT LIABLE FOR ANY COSTS, SUCH AS LOST PROFITS OR
REVENUE, LOSS OF EQUIPMENT, LOSS OF USE OF EQUIPMENT,
LOSS OF SOFTWARE, LOSS OF DATA, COSTS OF SUBSTITUENTS,
CLAIMS BY THIRD PARTIES, OR OTHERWISE.
NO SALESMAN, EMPLOYEE OR AGENT OF APC IS AUTHORIZED
TO ADD TO OR VARY THE TERMS OF THIS WARRANTY.
WARRANTY TERMS MAY BE MODIFIED, IF AT ALL, ONLY IN
WRITING SIGNED BY AN APC OFFICER AND LEGAL
DEPARTMENT.
Warranty claims
Customers with warranty claims issues may access the APC customer support
network through the Support page of the APC Web site, www.apc.com/
support. Select your country from the country selection pull-down menu at the
top of the Web page. Select the Support tab to obtain contact information for
customer support in your region.
NetBotz Rack Access Pod 170 Installation Guide
11
Obtaining service
To obtain support for problems with your Rack Access Pod 170:
1. Note the serial number. The serial number is printed on a label located on
the bottom of the unit.
2. Contact Customer Support using the information on the back cover of
this manual. A technician will try to help you solve the problem by
phone.
3. If you must return the product, the technician will give you a return
material authorization (RMA) number. If the warranty expired, you will
be charged for repair or replacement.
4. Pack the unit carefully. The warranty does not cover damage sustained in
transit. Enclose a letter with your name, address, RMA number and
daytime phone number; a copy of the sales receipt; and a check as
payment, if applicable.
5.
Mark the RMA number clearly on the outside of the shipping carton.
6. Ship by insured, prepaid carrier to the address provided by the Customer
Support technician.
12
NetBotz Rack Access Pod 170 Installation Guide
Radio Frequency Interference
Changes or modifications to this unit not expressly approved by the
party responsible for compliance could void the user’s authority to
operate this equipment.
USA—FCC
This equipment has been tested and found to comply with the limits for a Class A
digital device, pursuant to part 15 of the FCC Rules. These limits are designed to
provide reasonable protection against harmful interference when the equipment is
operated in a commercial environment. This equipment generates, uses, and can
radiate radio frequency energy and, if not installed and used in accordance with this
user manual, may cause harmful interference to radio communications. Operation of
this equipment in a residential area is likely to cause harmful interference. The user
will bear sole responsibility for correcting such interference.
Canada—ICES
This Class A digital apparatus complies with Canadian ICES-003.
Cet appareil numérique de la classe A est conforme à la norme NMB-003 du
Canada.
Japan—VCCI
This is a Class A product based on the standard of the Voluntary Control Council for
Interference by Information Technology Equipment (VCCI). If this equipment is
used in a domestic environment, radio disturbance may occur, in which case, the
user may be required to take corrective actions.
この装置は、情報処理装置等電波障害自主規制協議会(VCCI)の基準
に基づくクラス A 情報技術装置です。この装置を家庭環境で使用すると、電波
妨害を引き起こすことがあります。この場合には、使用者が適切な対策を講ず
るように要求されることがあります。
Taiwan—BSMI
警告使用者 :
這是甲類的資訊產品 , 在居住的
環境中使用時 , 可能會造成射頻
干擾 , 在這種情況下 , 使用者會
被要求採取某些適當的對策。
Australia and New Zealand
Attention: This is a Class A product. In a domestic environment this product may
cause radio interference in which case the user may be required to take adequate
measures.
European Union
This product is in conformity with the protection requirements of EU Council
Directive 2004/108/EC on the approximation of the laws of the Member States
relating to electromagnetic compatibility. APC cannot accept responsibility for any
failure to satisfy the protection requirements resulting from an unapproved
modification of the product.
This product has been tested and found to comply with the limits for Class A
Information Technology Equipment according to CISPR 22/European Standard EN
55022. The limits for Class A equipment were derived for commercial and industrial
environments to provide a reasonable protection against interference with licensed
communication equipment.
Attention: This is a Class A product. In a domestic environment this product may
cause radio interference in which case the user may be required to take adequate
measures.
APC Worldwide Customer Support
Customer support for this or any other APC product is available at no charge in any of
the following ways:
• Visit the APC Web site to access documents in the APC Knowledge Base and to
submit customer support requests.
– www.apc.com (Corporate Headquarters)
Connect to localized APC Web sites for specific countries, each of which
provides customer support information.
– www.apc.com/support/
Global support searching APC Knowledge Base and using e-support.
• Contact the APC Customer Support Center by telephone or e-mail.
– Local, country-specific centers: go to www.apc.com/support/contact for
contact information.
For information on how to obtain local customer support, contact the APC
representative or other distributors from whom you purchased your APC product.
© 2011 APC by Schneider Electric. APC, the APC logo, NetBotz, InfraStruxure, and NetShelter are
owned by Schneider Electric Industries S.A.S., American Power Conversion Corporation, or their
affiliated companies. All other trademarks are property of their respective owners.
990-4230-001
1/2011