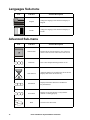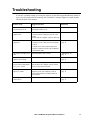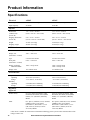
1
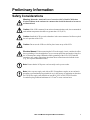
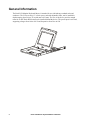
Installation, Specifications, and Settings Rack LCD Monitor Keyboard Mouse This manual is available in English on the enclosed CD. Dieses Handbuch ist in Deutsch auf der beiliegenden CD-ROM verfügbar. Este manual está disponible en español en el CD-ROM adjunto. Ce manuel est disponible en français sur le CD-ROM ci-inclus. Questo manuale è disponibile in italiano nel CD-ROM allegato. 本マニュアルの日本語版は同梱の CD-ROM からご覧になれます。 Instrukcja Obsługi w jezyku polskim jest dostepna na CD. O manual em Português está disponível no CD-ROM em anexo. Данное руководство на русском языке имеется на прилагаемом компакт-диске. Bu kullanim kilavuzunun Türkçe'sä, äläxäkte gönderälen CD äçeräsände mevcuttur. 您可以从包含的 CD 上获得本手册的中文版本。 Contents Preliminary Information.................................................. 1 Safety Considerations . . . . . . . . . . . . . . . . . . . . . . . . . . . . . . . . . . . . . 1 General Information . . . . . . . . . . . . . . . . . . . . . . . . . . . . . . . . . . . . . . . 2 Before Installation. . . . . . . . . . . . . . . . . . . . . . . . . . . . . . . . . . . . . . . . . 3 Tool required (not provided) . . . . . . . . . . . . . . . . . . . . . . . . . . . . 3 Please recycle . . . . . . . . . . . . . . . . . . . . . . . . . . . . . . . . . . . . . . . 3 Disclaimer . . . . . . . . . . . . . . . . . . . . . . . . . . . . . . . . . . . . . . . . . . 3 Receiving inspection . . . . . . . . . . . . . . . . . . . . . . . . . . . . . . . . . . 3 Inventory . . . . . . . . . . . . . . . . . . . . . . . . . . . . . . . . . . . . . . . . . . . 3 Inventory . . . . . . . . . . . . . . . . . . . . . . . . . . . . . . . . . . . . . . . . . . . . . . . . 4 Installation and Removal................................................ 5 Attach the Cable Arm to the LCD . . . . . . . . . . . . . . . . . . . . . . . . . . . . 5 Install the Power Cord and Communication Cable . . . . . . . . . . . . . . 6 Install the Slides . . . . . . . . . . . . . . . . . . . . . . . . . . . . . . . . . . . . . . . . . . 7 Installation using square holes . . . . . . . . . . . . . . . . . . . . . . . . . . 7 Installation using round or threaded holes . . . . . . . . . . . . . . . . . . 8 Install the LCD . . . . . . . . . . . . . . . . . . . . . . . . . . . . . . . . . . . . . . . . . . . . 9 Attach the Cable Arm to the Slide . . . . . . . . . . . . . . . . . . . . . . . . . . . 10 Remove the LCD . . . . . . . . . . . . . . . . . . . . . . . . . . . . . . . . . . . . . . . . . 11 On-screen Display......................................................... 12 Component Identification. . . . . . . . . . . . . . . . . . . . . . . . . . . . . . . . . . 12 Using the On-screen Display . . . . . . . . . . . . . . . . . . . . . . . . . . . . . . . 13 Main Menu . . . . . . . . . . . . . . . . . . . . . . . . . . . . . . . . . . . . . . . . . . . . . . 13 Image Adjust Sub-menu . . . . . . . . . . . . . . . . . . . . . . . . . . . . . . . . . . . 14 Colors Sub-menu . . . . . . . . . . . . . . . . . . . . . . . . . . . . . . . . . . . . . . . . 15 Rack LCD Monitor Keyboard Mouse Installation i Languages Sub-menu . . . . . . . . . . . . . . . . . . . . . . . . . . . . . . . . . . . . 16 Advanced Sub-menu . . . . . . . . . . . . . . . . . . . . . . . . . . . . . . . . . . . . . 16 Troubleshooting ............................................................ 17 Product Information ...................................................... 18 Specifications . . . . . . . . . . . . . . . . . . . . . . . . . . . . . . . . . . . . . . . . . . . 18 Maintenance . . . . . . . . . . . . . . . . . . . . . . . . . . . . . . . . . . . . . . . . . . . . 19 APC Limited Factory Warranty..................................... 20 Terms of Warranty . . . . . . . . . . . . . . . . . . . . . . . . . . . . . . . . . . .20 Non-transferable Warranty . . . . . . . . . . . . . . . . . . . . . . . . . . . . .20 Exclusions . . . . . . . . . . . . . . . . . . . . . . . . . . . . . . . . . . . . . . . . .20 Warranty Claims . . . . . . . . . . . . . . . . . . . . . . . . . . . . . . . . . . . . .21 Life-Support Policy. . . . . . . . . . . . . . . . . . . . . . . . . . . . . . . . . . . . . . . 22 General policy . . . . . . . . . . . . . . . . . . . . . . . . . . . . . . . . . . . . . .22 Examples of life-support devices . . . . . . . . . . . . . . . . . . . . . . . .22 ii Rack LCD Monitor Keyboard Mouse Installation Preliminary Information Safety Considerations Warning: Mount the American Power Conversion (APC®) Rack LCD Monitor Keyboard Mouse in the enclosure in a manner that avoids the hazards of an uneven mechanical load. Caution: If the LCD is mounted in an enclosed communications rack, the recommended rack ambient temperature should be no greater than 113°F (45°C). Caution: Install the LCD in a rack so that there is the correct amount of air flow required for safe operation of the LCD. Caution: Do not use the LCD as a shelf or place items on top of the LCD. Electrical Hazard: When connecting the LCD to the supply circuit, consider the effect that overloading of circuits might have on over-current protection and supply wiring. See the LCD nameplate ratings. Maintain reliable grounding of the LCD. Give particular attention to any supply connections other than direct connections to the branch circuit (e.g., use of power distribution units). Note: Ensure that the LCD power cord can easily reach a power outlet. Note: Select a power supply cord with an IEC-320 appliance coupler on one end and a grounding-type attachment plug suitable for use in the country of application on the other end. The power supply cord should be at least HO3-VV-F or HO3-VVH2-F and be 2-conductor plus ground and minimum of 0.75 mm2 in cross-sectional area. Rack LCD Monitor Keyboard Mouse Installation 1 General Information The Rack LCD Monitor Keyboard Mouse is intended for use with industry-standard racks and enclosures. The LCD uses only 1 U of rack space, and with adjustable slides, can be installed in depths ranging from 26 in to 32 in (660 mm to 812 mm). The size of the device provides enough room for an APC Rack KVM switch to be installed behind the device. The power input is universal, supporting voltages from 100 to 240 V and frequencies from 50 to 60 Hz. 2 Rack LCD Monitor Keyboard Mouse Installation Before Installation Tool required (not provided) #2 Phillips screwdriver Please recycle The shipping materials are recyclable. Please save them for later use, or dispose of them appropriately. Disclaimer American Power Conversion is not responsible for damage sustained during reshipment of this product. Receiving inspection Inspect the package and contents for shipping damage. Report any damage immediately to the shipping agent. Report missing contents, damage, or other problems immediately to APC or your APC reseller. Inventory After unpacking the carton, verify that all required components and hardware have been shipped. See “Inventory” on page 4 for a list of components. Rack LCD Monitor Keyboard Mouse Installation 3 Inventory 4 LCD monitor keyboard mouse Cable arm Slides Left and right threaded and non-threaded hole mounting adapters Power cord Communication cable Phillips screw M6 x 12 mm screws Rack LCD Monitor Keyboard Mouse Installation Installation and Removal Attach the Cable Arm to the LCD Rack LCD Monitor Keyboard Mouse Installation 5 Install the Power Cord and Communication Cable Connect the LCD using the communication cable (provided). 1. Plug the power cord into the LCD and route it through the upper clips of the cable arm. 2. Plug the communication cable into the correct port on the LCD and route it through the lower clips of the cable arm. 6 Rack LCD Monitor Keyboard Mouse Installation Install the Slides Installation using square holes Rack LCD Monitor Keyboard Mouse Installation 7 Installation using round or threaded holes Left and right threaded hole mounting adapters Left and right non-threaded hole mounting adapters 1. Remove two Phillips screws from each mounting adapter using a #2 screwdriver. 2. Remove the square-hole mounting adapter from each end of the outer slides. 3. Attach the appropriate mounting adapters using the previously removed screws. 8 Rack LCD Monitor Keyboard Mouse Installation Install the LCD Note: Support the cable arm during installation of the LCD. 1. Insert the LCD into the rack using the slides attached to the LCD and those already installed in the rack. 1. Push the LCD into the rack until it stops. Pull the release keys (located on the outside of each LCD slide) while pushing the LCD into place. 2. Ensure that the LCD is installed on its rails properly by pulling the LCD in and out of the rack several times. Rack LCD Monitor Keyboard Mouse Installation 9 Attach the Cable Arm to the Slide Secure the cable arm to the slide using the slotted thumbscrew. Caution: Do not overtighten thumbscrews if you are using a screwdriver. 10 Rack LCD Monitor Keyboard Mouse Installation Remove the LCD 1. Pull the LCD out until it stops. 2. Disconnect the power cord and communication cable. 3. Remove the cable arm from the slides by removing the slotted thumbscrews. 4. Gently pull the tabs toward the front of the LCD, while pulling outward on the LCD to remove it from the enclosure. Rack LCD Monitor Keyboard Mouse Installation 11 On-screen Display Component Identification 12 Exit key Caps Lock LED Left arrow key Scroll Lock LED Right arrow key Power LED Menu key Touch pad Auto Setup key Left/right mouse keys Num Lock LED Rack LCD Monitor Keyboard Mouse Installation Using the On-screen Display To adjust the LCD, use the five control keys above the keyboard. Exit Menu Auto 1. Press the Menu key to display the main menu. 2. Use the Left and Right arrow keys to move among the function icons. Press the Menu key to select a function. 3. Use the left or right arrow keys to make changes to a function, or to move to a sub-menu. a. To change a function when there are no sub-menus, press the Menu key once after you have completed your changes. Use the arrow keys to scroll to another function. b. To change a function within a sub-menu, scroll to the sub-menu, press the Menu key, use the arrow keys to move to the function, and push the Menu key again. Use the left or right arrow keys to make changes to the function, and press the Menu key to finalize the changes. Then scroll to the Back function, and press the Menu key to return to the main menu. Scroll to another function using the arrow keys. 4. At any time, press the Exit key to exit the menu system completely. 5. Press the Auto key at any time to automatically adjust the position, color levels, and picture quality of the screen. Main Menu Icon Function Description Contrast Adjust level of color difference between foreground and background colors. Brightness Image Adjust Colors Adjust the brightness level of the screen. Access the Image Adjust sub-menu. Access the Colors sub-menu. Rack LCD Monitor Keyboard Mouse Installation 13 Icon Function Description Languages Access the Languages sub-menu. Advanced Access the Advanced sub-menu. Exit Exit the On-screen Display. Image Adjust Sub-menu Icon 14 Function Description Clock Adjust the clock setting of the screen so that no dark vertical bands are visible. Phase Adjust the phase setting of the screen so that no dark horizontal bands are visible. H Position Adjust the horizontal position of the screen. V Position Adjust the vertical position of the screen. Edge Enhance Type Select the type of edge enhancement (sharpness) for the screen. Enhance Level Adjust the level of edge enhancement (sharpness) of the screen. Rack LCD Monitor Keyboard Mouse Installation Icon Function Description Autosetup Automatically center, sharpen, and adjust the clock and phase settings of the screen. Resets the LCD to its default settings. Back Go back to the main menu. Colors Sub-menu Icon Function Autolevel Function Descriptions Automatically adjust the color levels displayed on the screen. Color Mode Change the mode in which the screen displays color. Available modes are Manual, Native, sRGB, and TV. Gamma Adjust the level of gamma correction (how gray levels between black and white are displayed on-screen). Available in Manual or TV Color Modes only. White Temperature Hue Adjust the color balance level of white light displayed on the screen. Adjust the hue level of the screen. Saturation Adjust the saturation level of the screen. Color Warp Adjust the level of each color displayed on the screen. Available in Manual Color Mode only. Back Go back to the main menu. Rack LCD Monitor Keyboard Mouse Installation 15 Languages Sub-menu Icon Function Function Descriptions English Change the language of the On-Screen Display to English. French Change the language of the On-Screen Display to French. Advanced Sub-menu Icon Function OSD Position Half Tone OSD Timeout Position the On-Screen Display in one of the four corners of the screen or in the center of the screen. Turn a semi-transparent background on or off. Adjust the number of seconds before the On-Screen Display shuts down due to inactivity. Information Display information about the LCD Monitor Keyboard Mouse. Test Pattern Display several test-patterns to verify that the monitor is working properly. Back 16 Function Descriptions Go back to the main menu. Rack LCD Monitor Keyboard Mouse Installation Troubleshooting If you have a problem setting up or using the monitor, use the following troubleshooting actions to try to solve the problem before contacting APC Worldwide Customer Support at a phone number listed at the back of this manual. What is seen... Suggested Action Reference The screen is blank, and the power indicator is off Ensure that the power cord is firmly connected and that the monitor is on. “No Connection, Check Signal Cable” • Ensure that the signal cable is firmly connected to the computer system or video board. • Ensure that the computer system is turned on. “Video mode not supported” • Check the maximum resolution and the frequency on the video port of the computer system. • Compare these values with the data in the Display resolution section of the LCD Panel specifications table. “Specifications” on page 18 The image is too light or too dark Adjust Brightness and Contrast. “Main Menu” on page 13 Vertical bars flicker, or shimmer on the image Adjust the Phase function. “Main Menu” on page 13 The screen is blank and the power indicator light blinks every 0.5–1 second The monitor is using its power management system. Move the computer system’s mouse, or press a key on the keyboard. The image is not stable or appears to vibrate Check that the display resolution and frequency from your computer system or video board matches an available mode for your monitor. “Specifications” on page 18 The image is not centered on the screen Adjust the horizontal and vertical positions. “Main Menu” on page 13 Rack LCD Monitor Keyboard Mouse Installation 17 Product Information Specifications Electrical AP5015 AP5017 Power input 100–240 VAC, 1 Amp† 100–240 VAC, 1 Amp† Input frequency 50/60 Hz 50/60 Hz Dimensions (without rails) (H×W×D) 1.75 × 18.75 × 21.88 in (44.45 × 476.25 × 555.75 mm) 1.75 × 18.75 × 21.88 in (44.45 × 476.25 × 555.75 mm) Shipping dimensions (H×W×D) 9.50 × 23.75 × 32.50 in (241.30 × 603.25 × 825.50 mm) 9.50 × 23.75 × 32.50 in (241.30 × 603.25 × 825.50 mm) Weight 31.50 lb (14.32 kg) 32.50 lb (14.77 kg) Shipping weight 42.50 lb (19.32 kg) 43.50 lb (19.77 kg) Size 15-inch diagonal 17-inch diagonal Display size (horizontal × vertical) 304.1 × 228.1 mm 336.0 × 273.0 mm Type a-si TFT active matrix a-si TFT active matrix Pixel pitch (horizontal × vertical) 0.297 × 0.297 mm 0.297 × 0.297 mm Display resolution Maximum Mode 1024 × 768 @ 60 Hz 1280 × 1024 @ 60 Hz 1280 × 1024 @ 75 Hz Display color 16.2 million colors 16.2 million colors Temperature Operating Storage 32 to 113°F (0 to 45°C) –13 to 149°F (–25 to 65°C) 32 to 113°F (0 to 45°C) –13 to 149°F (–25 to 65°C) Humidity Operating Storage 5–95% RH, non-condensing 5–95% RH, non-condensing 5–95% RH, non-condensing 5–95% RH, non-condensing Product safety UL/C-UL Listed UL 60950-1 VDE, EN 60950, IEC 60950, GOST (M1K 60950), CCC (GB-4943, GB-9254), IRAM UL/C-UL Listed UL 60950-1 VDE, EN 60950, IEC 60950, GOST (M1K 60950), CCC (GB-4943, GB-9254), IRAM EMC FCC part 15, ICES-003, VCCI, AS/NZS CISPR 22 Class A, EN 55024, EN 61000-3-2, EN 61000-3-3, CCC (GB-17465.1), GOST (51318.22/ 51318.24), IRAM FCC part 15, ICES-003, VCCI, AS/NZS CISPR 22 Class A, EN 55024, EN 61000-3-2, EN 61000-3-3, CCC (GB-17465.1), GOST (51318.22/ 51318.24), IRAM Physical LCD Panel Environmental Regulatory Approvals † This device is suitable for connection to information technology power systems with a maximum line-to-line voltage of 240 V rms. 18 Rack LCD Monitor Keyboard Mouse Installation Maintenance Warning: To avoid risk of electrical shock, do not disassemble the monitor cabinet. Users cannot service the monitor. User maintenance is restricted to cleaning as explained below. Unplug the monitor from the power outlet before cleaning. • To clean your monitor screen, lightly dampen a soft clean cloth with water or mild detergent. If possible, use a special cleaning tissue or solution suitable for the anti-static coating. • To clean the monitor cabinet, use a cloth lightly dampened with a mild detergent. • Never use a flammable cleaning material to clean your monitor or any other electrical apparatus. Rack LCD Monitor Keyboard Mouse Installation 19 APC Limited Factory Warranty The limited warranty provided by American Power Conversion (APC®) in this Statement of Limited Factory Warranty applies only to Products you purchase for your commercial or industrial use in the ordinary course of your business. Terms of Warranty American Power Conversion warrants its products to be free from defects in materials and workmanship for a period of two years from the date of purchase. Its obligation under this warranty is limited to repairing or replacing, at its sole discretion, any such defective products. This warranty does not apply to equipment that has been damaged by accident, negligence, or misapplication or has been altered or modified in any way. Repair or replacement of a defective product or part thereof does not extend the original warranty period. Any parts furnished under this warranty may be new or factoryremanufactured. Non-transferable Warranty This warranty applies only to the original purchaser who must have properly registered the product. Product may be registered at http://www.warranty.apc.com . Exclusions APC shall not be liable under the warranty if its testing and examination disclose that the alleged defect in the product does not exist or was caused by end user’s or any third person’s misuse, negligence, improper installation or testing. Further APC shall not be liable under the warranty for unauthorized attempts to repair or modify wrong or inadequate electrical voltage or connection, inappropriate on-site operation conditions, corrosive atmosphere, repair, installation, start-up by non-APC designated personnel, a change in location or operating use, exposure to the elements, Acts of God, fire, theft, or installation contrary to APC recommendations or specifications or in any event if the APC serial number has been altered, defaced, or removed, or any other cause beyond the range of the intended use. THERE ARE NO WARRANTIES, EXPRESS OR IMPLIED, BY OPERATION OF LAW OR OTHERWISE, OF PRODUCTS SOLD, SERVICED OR FURNISHED UNDER THIS AGREEMENT OR IN CONNECTION HEREWITH. APC DISCLAIMS ALL IMPLIED WARRANTIES OF MERCHANTABILITY, SATISFACTION AND FITNESS FOR A PARTICULAR PURPOSE. APC EXPRESS WARRANTIES WILL NOT BE ENLARGED, DIMINISHED, OR AFFECTED BY AND NO OBLIGATION OR LIABILITY WILL ARISE OUT OF, APC RENDERING OF TECHNICAL OR OTHER ADVICE OR SERVICE IN CONNECTION WITH THE PRODUCTS. THE FOREGOING WARRANTIES AND REMEDIES ARE EXCLUSIVE AND IN LIEU OF ALL OTHER WARRANTIES AND REMEDIES. THE WARRANTIES SET FORTH ABOVE CONSTITUTE APC SOLE LIABILITY AND PURCHASER’S EXCLUSIVE REMEDY FOR ANY BREACH OF SUCH WARRANTIES. APC WARRANTIES RUN ONLY TO PURCHASER AND ARE NOT EXTENDED TO ANY THIRD PARTIES. 20 Rack LCD Monitor Keyboard Mouse Installation IN NO EVENT SHALL APC, ITS OFFICERS, DIRECTORS, AFFILIATES OR EMPLOYEES BE LIABLE FOR ANY FORM OF INDIRECT, SPECIAL, CONSEQUENTIAL OR PUNITIVE DAMAGES, ARISING OUT OF THE USE, SERVICE OR INSTALLATION, OF THE PRODUCTS, WHETHER SUCH DAMAGES ARISE IN CONTRACT OR TORT, IRRESPECTIVE OF FAULT, NEGLIGENCE OR STRICT LIABILITY OR WHETHER APC HAS BEEN ADVISED IN ADVANCE OF THE POSSIBLY OF SUCH DAMAGES. SPECIFICALLY, APC IS NOT LIABLE FOR ANY COSTS, SUCH AS LOST PROFITS OR REVENUE, LOSS OF EQUIPMENT, LOSS OF USE OF EQUIPMENT, LOSS OF SOFTWARE, LOSS OF DATA, COSTS OF SUBSTITUANTS, CLAIMS BY THIRD PARTIES, OR OTHERWISE. NO SALESMAN, EMPLOYEE OR AGENT OF APC IS AUTHORIZED TO ADD TO OR VARY THE TERMS OF THIS WARRANTY. WARRANTY TERMS MAY BE MODIFIED, IF AT ALL, ONLY IN WRITING SIGNED BY AN APC OFFICER AND LEGAL DEPARTMENT. Warranty Claims Customers with warranty claims issues may access the APC worldwide customer support network by visiting http://www.apc.com/support. Select your country from the country selection pull-down menu. Open the Support tab at the top of the web page to obtain contact information for customer support in your region. Rack LCD Monitor Keyboard Mouse Installation 21 Life-Support Policy General policy American Power Conversion (APC) does not recommend the use of any of its products in the following situations: • In life-support applications where failure or malfunction of the APC product can be reasonably expected to cause failure of the life-support device or to affect significantly its safety or effectiveness. • In direct patient care. APC will not knowingly sell its products for use in such applications unless it receives in writing assurances satisfactory to APC that (a) the risks of injury or damage have been minimized, (b) the customer assumes all such risks, and (c) the liability of APC is adequately protected under the circumstances. Examples of life-support devices The term life-support device includes but is not limited to neonatal oxygen analyzers, nerve stimulators (whether used for anesthesia, pain relief, or other purposes), autotransfusion devices, blood pumps, defibrillators, arrhythmia detectors and alarms, pacemakers, hemodialysis systems, peritoneal dialysis systems, neonatal ventilator incubators, ventilators (for adults and infants), anesthesia ventilators, infusion pumps, and any other devices designated as “critical” by the U.S. FDA. Hospital-grade wiring devices and leakage current protection may be ordered as options on many APC UPS systems. APC does not claim that units with these modifications are certified or listed as hospitalgrade by APC or any other organization. Therefore these units do not meet the requirements for use in direct patient care. 22 Rack LCD Monitor Keyboard Mouse Installation Radio Frequency Interference Warning: Changes or modifications to this unit not expressly approved by the party responsible for compliance could void the user’s authority to operate this equipment. USA—FCC This equipment has been tested and found to comply with the limits for a Class A digital device, pursuant to part 15 of the FCC Rules. These limits are designed to provide reasonable protection against harmful interference when the equipment is operated in a commercial environment. This equipment generates, uses, and can radiate radio frequency energy and, if not installed and used in accordance with this user manual, may cause harmful interference to radio communications. Operation of this equipment in a residential area is likely to cause harmful interference. The user will bear sole responsibility for correcting such interference. Canada—ICES This Class A digital apparatus complies with Canadian ICES-003. Cet appareil numérique de la classe A est conforme à la norme NMB-003 du Canada. Japan—VCCI This is a Class A product based on the standard of the Voluntary Control Council for Interference by Information Technology Equipment (VCCI). If this equipment is used in a domestic environment, radio disturbance may occur, in which case, the user may be required to take corrective actions. この装置は、情報処理装置等電波障害自主規制協議会(VCCI)の基準 に基づくクラス A 情報技術装置です。この装置を家庭環境で使用すると、電波 妨害を引き起こすことがあります。この場合には、使用者が適切な対策を講ず るように要求されることがあります。 Taiwan—BSMI 警告使用者 : 這是甲類的資訊產品 , 在居住的 環境中使用時 , 可能會造成射頻 干擾 , 在這種情況下 , 使用者會 被要求採取某些適當的對策。 APC Worldwide Customer Support Customer support for this or any other APC product is available at no charge in any of the following ways: • Visit the APC Web site to access documents in the APC Knowledge Base and to submit customer support requests. – www.apc.com (Corporate Headquarters) Connect to localized APC Web sites for specific countries, each of which provides customer support information. – www.apc.com/support/ Global support searching APC Knowledge Base and using e-support. • Contact an APC Customer Support center by telephone or e-mail. – Regional centers Direct InfraStruXure Customer Support Line (1)(877)537-0607 (toll free) APC headquarters U.S., (1)(800)800-4272 (toll free) Canada Latin America (1)(401)789-5735 (USA) Europe, Middle East, Africa (353)(91)702000 (Ireland) Japan (0) 35434-2021 Australia, New Zealand, (61) (2) 9955 9366 South Pacific area (Australia) – Local, country-specific centers: go to www.apc.com/support/contact for contact information. Contact the APC representative or other distributor from whom you purchased your APC product for information on how to obtain local customer support. Entire contents copyright 2006 American Power Conversion Corporation. All rights reserved. Reproduction in whole or in part without permission is prohibited. APC, the APC logo, InfraStruXure, and NetShelter are trademarks of American Power Conversion Corporation. All other trademarks, product names, and corporate names are the property of their respective owners and are used for informational purposes only. 990-1605B-001 *990-1605B-001* 08/2006