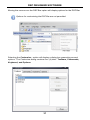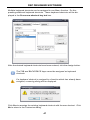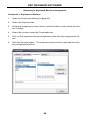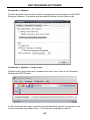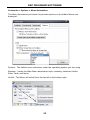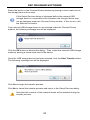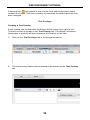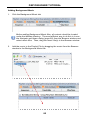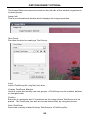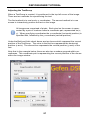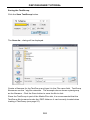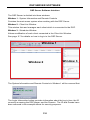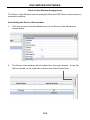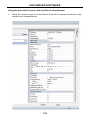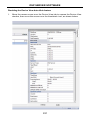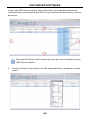
1
Hi Def Digital
Signage Player
EXT-HD-DSP
User Manual
www.gefen.com
f
ASKING FOR ASSISTANCE
Technical Support:
Telephone
Fax
(818) 772-9100
(800) 545-6900
(818) 772-9120
Technical Support Hours:
8:00 AM to 5:00 PM PST Monday thru Friday.
Write To:
Gefen LLC
c/o Customer Service
20600 Nordhoff St
Chatsworth, CA 91311
www.gefen.com
[email protected]
Notice
Gefen LLC reserves the right to make changes in the hardware, packaging and
any accompanying documentation without prior written notice.
Hi Def Digital Signage Player is a trademark of Gefen LLC
© 2010 Gefen LLC, All Rights Reserved.
All trademarks are the property of their respective owners.
Windows® is a registered trademark of Microsoft Corporation in the United
States and in other countries.
Rev X8
CONTENTS
1
Introduction
2
Operating Notes
3
Features
4
Panel Layout
5
Panel Descriptions
6
RMT-HD-DSP-IR Remote Layout
7
RMT-HD-DSP-IR Remote Descriptions
8
Connecting and Operating the Hi Def Digital Signage Player
10 Gefen DSP Pro Software
10
Downloading the Gefen DSP Professional Software
11 - 15
Installing the Gefen DSP Pro Software
16
Gefen DSP Server Professional Features
17
Gefen DSP Designer Features
18 Hi Def Digital Signage Player
18 - 24
Configuration
25 Gefen DSP Designer
25
Starting the DSP Software
26
Required Folders
27
Folders and Files
29
The DSP Designer Interface
30
Menu Bar
30
File Menu
32
View Menu
34
Configuration Menu
35
Help Menu
36
Toolbars
37
Modifying Toolbars
43
Floating Toolbars
45
Keyboard Shortcuts
50
Customizing the Workspace
55
Loading Schedules
56
Transferring Schedules to an External USB Device
60
Browser Window
CONTENTS
63 DSP Designer Tutorial
63
Creating a Schedule
65
Creating a Playlist
67
Adding Media to the Playlist
70
Setting Playback Times
71
Assigning Media Identifiers
72
Setting Playback Duration for Images
73
Working with Text Overlays
79
Text Overlay Playback Duration
80
Text Overlay Playback Speed
81
Text Overlay Orientation
82
Changing Text Overlay Order
83
Deleting Text Overlays
84
Background Music
87
Using the Image Editor
90
Positioning Images
91
TextGroup Overlays
93
Changing TextGroup Attributes
97
Positioning TextGroups
98
Using Coordinates
99
Using a Mouse
101
Saving TextGroups
102
Working with Multiple TextGroups
104
Loading TextGroups
108
Using Multi-Edit
111 Gefen DSP Server Professional
111
System Information Menu
115
Remote Control Menu
118
DSP Server Professional Login
120
DSP Server Options
128
Device View Window
129
Hiding Sections in the Device View Window
131
Advanced Section
132
Network Section
133
Server Section
134
System Section
135
System.Extra Section
136
Device View Window Arrangement
136
Auto-Hiding
141
Floating Windows
143
Restoring Device View to Default Position
INTRODUCTION
Congratulations on your purchase of the Hi Def Digital Signage Player. Your
complete satisfaction is very important to us.
Gefen
Gefen delivers innovative, progressive computer and electronics add-on solutions
that harness integration, extension, distribution and conversion technologies.
Gefen’s reliable, plug-and-play products supplement cross-platform computer
systems, professional audio/video environments and HDTV systems of all sizes
with hard-working solutions that are easy to implement and simple to operate.
The Gefen Hi Def Digital Signage Player
The Gefen Digital Signage Player is a compact schedulable media playback
device that allows user to create effective digital signage solutions in minutes.
Supporting 1080p Full HD on its HDMI output, this player is well suited for high
resolution digital signage applications.
Using pre-created video and audio files, user can easily schedule and distribute
these files for playback on the compact unit located at the digital signage
location. A multitude of audio and video codecs are supported for playback by
the player, including Full HD H.264 and WMV-HD. Connecting these units to
a network will allow the included server software to manage and upload new
schedules and files in a mater of minutes. The internal 2GB of flash memory
ensures ample space for hours of content.
A single user can literally control one hundred units, with grouping functions,
and see the live status of each player. If internet access is available to each
player, off-site management becomes possible with users creating content at one
location and uploading new schedules to a network of one, many, or all players.
Schedule designing software and server management software is included.
An HDMI and VGA output is available for connection to both analog and digital
displays, while a separate analog audio output is also provided for connection to
a separate audio amplifier.
How It Works
Using the included software suite, content can be scheduled into a playlist in
the Gefen Hi Def Digital Signage Player. Playlists can be created in a matter of
minutes. Content is transferred over IP to the internal memory.
User-created playlists are supported and can contain multiple digital signage file
formats such as audio files, video files, scrolling text messages, and background
images. This content can be set to play individually or combined for playback at
different times of the day, week, or month. Landscape and portrait-style displays
are supported. 2GB of built-in internal memory is provided to store multiple
playlists.
1
OPERATION NOTES
READ THESE NOTES BEFORE INSTALLING OR
OPERATING THE HI DEF DIGITAL SIGNAGE PLAYER
•
Hi Def Digital Signage Player is only compatible with the Windows®
operating system.
•
This unit can be used as a standalone solution, however, it is recommended
that each unit be connected to a network, thereby its full potential can be
realized by using the remote management software.
•
The network settings on the player must be configured first so that the server
PC and unit can properly communicate with each other.
•
Once connected and configured on the network, playlists can be set up and
timings can be created for practically any type of displayed media using the
Designer software which creates schedules and sends playlists to the device
for onward transmission.
•
The maximum internal storage capacity of the DSP is 2 Gigabytes.
•
The unit will continue playing its current schedule while a new schedule
is being uploaded. If there is not enough free space to upload this new
schedule, which includes all media content, the unit must be formatted to
create the space needed for this new schedule. This can be done using the
FORMAT option in the server software. Please see page 117 for details.
•
The USB port cannot be used to expand its storage space. This port is
utilized for firmware updates and live ingestion of content directly into its
internal flash memory.
•
This unit does not support the use of proxy servers
2
FEATURES
Features
•
Selectable output resolutions range from 720p and 1080p60Hz up to 1280
•
Portrait and Landscape displays supported
•
Easy to use software suite which includes content creation and management
features
•
Individual content playback can have multiple time, day, and month settings
•
Video codecs supported: MPEG DivX, Xvid, H.264 encoding MPEG4 Full
HD, WMV9 (1080p), AVI
•
Audio codecs supported: MP3
•
Image formats: JPG (2732x)
•
ARM7 200 MHz Processor with 128MB RAM
•
Integrated USB 2.0 port for firmware updates
•
Remote upload via integrated software suite
•
Low power consumption (3W max) for extended usage applications
•
Cool and quiet operation
Package Includes
(1) Hi-Def Digital Signage Player
(1) 6 ft. HDMI Cable (M-M)
(1) EXT-RMT-HD-DSP-IR Remote Control
(1) 5V DC Locking Power Supply
(1) User Manual
3
PANEL LAYOUT
Front
1
2
3
4 5 6 7
Back
8
9
10
4
11
12
13
PANEL DESCRIPTIONS
1
Infrared (I/R) Sensor
This receiver will communicate with the included RMT-HD-DSP-IR remote
control. Proper line-of-sight must be preserved between the remote and I/R
sensor at all times.
2
Emergency Recovery Button
Use this button to reboot the DSP when the firmware application has become
unstable.
3
Reset Button
This button can be used to preform a hardware reset.
4
Power On Console LED
When power is applied to the unit, this LED will light red.
5
Link LED
When This blue LED will indicate the presence of a network link showing a
connection.
6
HDD Activity LED
When data is being read from or written to the internal hard drive, this blue LED
will become active.
7
Device Status LED
When the device is working normally, this blue LED will be unlit. During
Emergency Recovery mode or a firmware update, the LED will become active.
8
HDMI Output Port
This port will accept a single HDMI device. Both audio and video are supported
on this connector type.
9
VGA Output Port
This port will accept a single Standard VGA (Video Graphics Array) device. Only
video is supported on this connector type.
10 Analog Audio Output Port
Stereo analog audio is output via this 3.5mm mini-jack port. This connector is
active at all times.
11 10/100 Ethernet Connector
This port is used for the connection to a standard TCP/IP network. A network
connection between this unit and the server management PC in necessary for
remote management.
12 USB 2.0 Port
Standard USB interface for uploading content and firmware.
13 5V DC Power Receptacle
Connect the included 5V DC power supply to this input.
5
RMT-HD-DSP-IR REMOTE LAYOUT
1
15
14
2
3
13
4
12
5
11
6
10
7
9
8
6
RMT-HD-DSP-IR REMOTE DESCRIPTIONS
1
Power On/Off
This will toggle the unit between the ON and STANDBY power states.
2
Enter Key (OK)
This button is used to complete commands.
3
Up, Down, Left Right Keys
These buttons are used to navigate the on-screen setup menu.
4
Stop Button
This button will immediately stop the playback of media.
5
Previous Media Button
If the loaded playlist contains multiple media files, this will begin playback of the
previous media item in the list.
6
Return Key
Some options in the setup menu will display a secondary pop-up window. This
button will remove this window and return the user to the previous screen.
7
Clear Key
When entering letter or numbers any mistakes can be cleared using this button.
8
Alphanumeric Buttons
These buttons are used to input letters and numbers for options in the setup
menu.
9
Mute Button
Use this button to toggle the mute function. Currently this feature is only
available for media that contains audio. Separate background audio is not
affected.
10 TV Out Button
This button will toggle between the HDMI and VGA output modes.
11 Next Media Button
If the loaded playlist contains multiple media files, this will begin playback of the
next media item in the list.
12 Play Pause Button
This button will pause/resume the playback of media.
13 Volume Down Button
This button can be used to lower the volume of media during playback. If the
media being played does not have audio this function will not be available.
14 Volume Up Button
This button can be used to raise the volume of media during playback. If the
media being played does not have audio this function will not be available.
15 Set-Up Button
When playing content this will display the on-screen picture controls. When
media is not being played, this will initialize the on-screen setup menu.
7
CONNECTING AND OPERATING THE
HI DEF DIGITAL SIGNAGE PLAYER
How to Connect the Hi Def Digital Signage Player
1.
Each unit can be placed in close proximity of the display. The integrated wall
mounting brackets are provided for installation on a wall or in a cabinet.
2.
Connect an HDMI compliant display to the HDMI output located on the rear
panel of the unit using the provided HDMI cable.
3.
Optionally, connect a VGA compliant display to the VGA port located on the
rear panel of the unit using a user supplied cable.
4.
If audio needs to be routed to an external amplifier or audio device, the
3.5mm mini-jack stereo port can be used. Connect an appropriate audio
cable between this port and the audio device.
5.
Connect this unit to a local TCP/IP network (necessary for usage of the
remote management features) using a standard network cable. This unit is
capable of 10/100 Mbps transfer speeds.
6.
Connect the included 5V DC power supply to power input on the rear panel
of the unit. Connect the plug end into an open wall socket.
Operating the Hi Def Digital Signage Player
This unit can operate as a standalone unit with manual updates via the integrated
USB port. To realize the full potential of the EXT-HD-DSP, it is recommended
that the unit be connected to the same network as the Server PC (DSP management software installed). Once connected, remote management, monitoring, and
schedule/content-updates will be possible over the network from the server PC.
To begin using the DSP please follow the steps below:
1.
Install software
2.
Configure DSP hardware
3.
Create schedule
4.
Upload the schedule to the DSP
8
CONNECTING AND OPERATING THE
HI DEF DIGITAL SIGNAGE PLAYER
Registering the Hi Def Digital Signage Player
In order to use the Hi Def Digital Signage Player, the unit must be registered. To
register the unit, make sure the Hi Def Digital Signage Player is connected to the
Internet via the network cable in step 5 on page 8. Registration can be accomplished with a Mac or PC with an Internet browser. However, the software can
only be installed and run under the Windows® operating system.
1.
Open the following URL in an Internet browser
http://www.gefen.com/signage/player
NOTE: This page can also be reached from the Support tab of the EXT-HDDSP product page on the Gefen web site.
2.
Login to the Gefen web site.
a.
If an account has already been created, enter this information
into the provided fields.
b.
If no user account has been created, please use the Create
New Account link at the bottom of the page to create an
account.
3.
Once logged in, the Digital Signage Player User Manager will be displayed.
4.
Register the Hi Def Digital Signage Player product by clicking on the Register Product link from navigation menu to the left of the page. The Register
Product page will open.
5.
The Register Product page will display the user’s account information as
well as the Product Information section. Select the EXT-HD-DSP product
from the SKU menu under the Product Information section.
6.
Enter the Serial Number of the EXT-HD-DSP unit. This is located on a
sticker on the bottom of the EXT-HD-DSP unit.
7.
Enter the Purchase Date of the EXT-HD-DSP.
8.
Once all information has been entered press the Register button at the the
bottom of the page. The user will be returned to the Digital Signage Player
User Manager page.
9
HI DEF DIGITAL SIGNAGE PLAYER SOFTWARE
Downloading the Gefen DSP Server Pro Software
Once the EXT-HD-DSP has been registered, the total number of registered players will be indicated on the navigation menu of the Digital Signage Player User
Manager page.
To create a user for user with the Gefen DSP Server Pro software:
1.
Click on the Create User option in the navigation menu.
2.
Follow the on-screen instructions.
NOTE: Only one user can be created for each EXT-HD-DSP player registered.
Management of user will be possible once a user has been created.
To download the Gefen DSP Server Pro software:
1.
Click on the Download Software option in the navigation menu.
2.
The download page will open. Click on the link for the current version of the
software.
The Gefen DSP Software package installs the following:
• The Gefen DSP Server Professional
Used to remotely manage DSP Servers.
• Gefen DSP Designer
Used to create scheduling as well as design and create content.
Minimum System Requirements:
Windows 2000®, Windows XP®, Windows Server 2003®, Windows Vista®,
and Windows 7® operating system
Intel Pentium 3 or later
128 MB RAM
At least 128MB of free space on the drive.
10
HI DEF DIGITAL SIGNAGE PLAYER SOFTWARE
Installing the Gefen DSP Server Pro Software
1.
Launch the installer by double-clicking on the GefenDSPServerPro_V2.0.11_
setup.exe file.
As of this writing, the current version of the DSP Software is 2.0.11.
2.
Click Next to continue to the next dialog in the installer.
11
HI DEF DIGITAL SIGNAGE PLAYER SOFTWARE
3.
You must agree to the terms in the End User Licence Agreement before installing the software. After you have read the license terms, click the I Agree
button to continue with the software installation.
12
HI DEF DIGITAL SIGNAGE PLAYER SOFTWARE
4.
By default, the installation will select a Normal Install. The installation type
can be selected from the pull-down list in the Choose Components dialog.
Other installation options include Custom Install or Reinstall. If the DSP
Software is already installed on the computer, the installer will detect the
previous installation and default to the Reinstall option. Click the Next button
to continue with the installation.
5.
The default location for installing the Gefen DSP Server Pro software is
C:\Program Files\Gefen\DSP
Click the Install button to install the Gefen DSP Server Pro software to the
selected location.
The installation locating may be changed by clicking the Browse... button. If
the Browse... button is selected, a Browse for Folder dialog will be displayed.
Network path names are not accepted as valid installation locations.
13
HI DEF DIGITAL SIGNAGE PLAYER SOFTWARE
The Browse for Folder also allows you to create a new folder on the destination
drive. Click the Make New Folder to create a new directory path and install the
Gefen DSP Server Pro software to that location. Click OK to accept the new
directory location. Click the Install button to install the Gefen DSP Server Pro
software to the selected location.
6.
The Installing dialog will be displayed and show the installation progress.
This should only take a few moments.
14
HI DEF DIGITAL SIGNAGE PLAYER SOFTWARE
7.
After the installation process has completed successfully, another dialog will
be presented. Click Finish to exit the installer.
The Run Gefen DSP Server Pro checkbox may be selected to launch the
Gefen DSP Server application.
Click the Finish button to exit the installer.
15
HI DEF DIGITAL SIGNAGE PLAYER SOFTWARE
Gefen DSP Server Professional
Features
•
Enables remote functions (the sending of contents, device management,
scheduling) through the local or internet network.
•
DSP basic control functions: Play, Pause, Stop, Mute, Sleep, Reboot, Playtime settings, firmware updates, etc.
•
DSP basic content manageability: Delete content, update, send schedule.
•
DSP unit management: DSP group control, individual DSP control according
to status (off-line list, on-line list, etc.), confirm available storage space and
DSP playing status, etc.
•
Individual DSP network setting management. (Individual DSP playing time,
network access, Time Zone, Client server access, Slideshow effect, etc)
•
Time synchronization function. (Time setting in DSP is auto-searched and
synchronized to time of server when client and server are connected.)
DDNS Support
DSP supports IP and domain setting for server access, and the program itself
supports DDNS for the domain.
DDNS features make the DSP automatically detects changes of server IP and
domain setting, and auto-connection capability.
For example, start the server program without changing the server address on
each DSP unit. Login to the DSP Server software to manage up to 100 DSP
units, remotely from the DSP deployment site. The built-in DDNS support will
automatically provide a connection to each DSP unit.
16
HI DEF DIGITAL SIGNAGE PLAYER SOFTWARE
Gefen DSP Designer
Features
•
Scheduler basic functions: able to set schedule per day, weekday, other
periodic time, even for multiple playlists.
•
Playlist basic function: Multiple Playlists can be set for one day of playing,
and time-setting per content is also available.
•
Overlay text function for all content or specific content is registered in
playlists, and background music is also able to be set.
•
Supports image editing (e.g. The user can select an image to edit, re-size,
rotate, and even edit multiple files etc).
•
Enables the previewing of media content (e.g. picture, video, audio).
•
An additional menu is provided to create overlay text, control caption sizes,
styles, colors, background colors, caption scrolling-down speed like PC.
•
Drag and drop functionality for ease of use.
•
Support for vertical or horizontal display types.
17
CONFIGURING THE HI DEF DIGITAL SIGNAGE PLAYER
Connecting the DSP:
• Connect the DSP to a display using the steps listed in the section
Connecting and Operating the Hi Def Digital Signage Player. Once the
DSP is connected the initial background splash screen should be visible on
the connected display.
The steps in this section require the use of the supplied IR
remote control.
Navigation:
• Use the navigation button on the IR remote control to navigate the on-screen
GUI. To modify an option, use the navigation keys to select the option
and press the OK button to begin making changes. Use the alphanumeric
buttons on the IR remote control to modify all fields that require numbers or
letters.
Setting Up the Network:
• To connect the DSP unit to the server PC its network configuration first must
be configured.
• Press “Setup” on the remote control and the setup screen will appear on the
splash screen.
• There are four sections in the Setup screen: Network, Server, System and
Quit.
Network Settings
18
CONFIGURING THE HI DEF DIGITAL SIGNAGE PLAYER
Network > Network Device
• Choose a network connection device. Ethernet is the only option.
Network > DHCP
• Choose to enable or disable the use of DHCP (Dynamic Host Configuration
Protocol). When DHCP is enabled and a DHCP server is located on the
network, an IP address will automatically be assigned to the DSP.
Network > MAC
• This will display the DSP’s MAC address.
Network > IP
• Displays the DSP IP address.
The IP cannot be configured option is not configurable when DHCP is
ON.
Network > Subnet Mask
• The subnet mask cannot be configured when DHCP is ON.
• This will display the DSP’s subnet mask.
Network > Gateway
• This option is not configurable when DHCP is ON.
• This will display the DSP’s gateway address.
Network > DNS1 Server
• This will display the DSP’s DNS 1 server address.
• This option can always be modified.
• The configuration window that opens for this option will allow configuration of
both DNS 1 & 2 addresses.
Network > DNS2 Server
• This will display the DSP’s DNS 2 server address.
• The configuration window that opens for this option will allow configuration of
both DNS 1 & 2 addresses.
Always use the “Apply” function at the bottom of each tab before
changing tabs. Otherwise changes made in the tab will not be
saved.
19
CONFIGURING THE HI DEF DIGITAL SIGNAGE PLAYER
Server Settings
Server > Server Type
• Choose a server type for DSP access. DSP is the only option.
Server > IP
• Use this option to enter the IP address of the server PC that has the DSP
Server Professional software installed.
Server > Domain
• Use this option to enter the domain address of the server PC that has the
DSP Server Professional software installed.
• The address entered should be the one supplied by the DSP Server
Professional software. This is to allow access of the DSP through the
internet.
Server > Search local DSP Server
• Use this option to search the local network for the server PC that has the
DSP Server Professional software installed.
If the server is not found at the address that was manually entered in
the IP field above will be lost.
20
CONFIGURING THE HI DEF DIGITAL SIGNAGE PLAYER
Server > Test server connection
• Use this option to test the connection to the server PC with the DSP Server
Professional software installed.
Server > Time Zone
• Use this option to set the Time Zone of DSP.
The time will automatically be set by the server PC once a connection
has been established.
Server > Apply
• Apply the current changes.
21
CONFIGURING THE HI DEF DIGITAL SIGNAGE PLAYER
System Settings
System > System Date
• This will display the current system date and time.
• This will automatically be set by the server PC once a connection has been
established.
System > Running Hours
• Displays the current running hours from the last reboot.
System > Slideshow Effect
• Use this option to select the slide show effect for images. This option only
applies when there is no schedule loaded into the DSP. Options are:
Random, Fade, None
22
CONFIGURING THE HI DEF DIGITAL SIGNAGE PLAYER
System > Slideshow Interval
• Use this option to set the slides how interval for images. This option only
applies when there is no schedule loaded into the DSP. Options are:
5 Secs, 10 Secs, 1 Minute, 1 Hour, 1 Day, 10 Secs
System > Background Music
• Use this option to set background music. This option will only affect audio
that is set as background audio in the DSP Designer software. Options are
On, Off.
System > Defeat HDMI Overscan
• Use this option to slightly underscan the output. This is to allow a greater
field of view for display that natively apply an overscan. Options are: Enable,
Disable.
System > Firmware Version
• Displays the current firmware version.
System > Built At
• Displays the creation date of the firmware.
System > Product Type
• This will display the product name.
System > Storage Usage
• This will display the maximum storage capacity and available space.
Options are: Format All.
The Format All command will erase all data on the DSP hard drive!
System > Restore Defaults
• Use this option to return the unit to its factory defaults.
System > Apply
• Apply the current settings.
23
CONFIGURING THE HI DEF DIGITAL SIGNAGE PLAYER
Quit
• Closes the on-screen menu.
24
DSP DESIGNER SOFTWARE
The Gefen DSP Designer Software is a simple-to-use program aimed at assembling media into playlists for use in a user-defined schedule. This software uses
drag-and-drop functionality to easily generate custom media playback schedules
for a particular day/date or range of days.
Files adhere to the following hierarchy:
Schedule - This file will contain information on playlists and scheduling. No
playlist can be created until a schedule is first generated. This is the primary file
which will be used to upload to each DSP unit.
Playlist - This file will contain all of the playback information for a period. This
playlilst can be assigned for playback on a single day or range of days. A playlist
can also be set to play on all days if desired.
Media - Individual media contents can be assigned to a playlist. Once in a playlist, the hours of operation between 0:00 and 23:59 hours for each type of media
(video files, overlay text, etc.) can be individually set. No media can be inserted
until a playlist is created.
Starting the DSP Designer Software for the First Time
Upon loading the DSP Designer software for the first time, a dialog window will
be presented, indicating that a Data Directory has not been created. The Data
Directory is the working folder for the DSP Designer software.
Click OK to acknowledge and close the dialog box warning.
25
DSP DESIGNER SOFTWARE
The Browse For Folder dialog box will be displayed, allowing the data directory to
be selected.
The default location for the data directory is C:\Program Files\Gefen\DSP
Under the Windows 7® operating system, this default working directory
will be C:\Program Files (x86)\Gefen\DSP. Due to the Windows 7® operating system nomenclature, the files under this directory
cannot be modified. Therefore, it is recommended to create the data
directory under C:\Gefen DSP\Data.
If desired, a new folder can be created by clicking on the desired directory and
selecting the Make New Folder button.
Once the desired directory has been selected, press the OK button.
A warning message will also be displayed indicating that the schedule list cannot
be loaded. This is because a schedule has not yet been created. Click the OK
button to dismiss the error dialog box.
26
DSP DESIGNER SOFTWARE
The following folders will be generated in the selected Data Directory.
Medias - All media content must be loaded into this directory for ease of access.
When using the DSP Designer software, media can simple be dragged into the
Medias directory from any Windows® Explorer window.
OverlayTexts - Scrolling overlay text objects that are created in the DSP Designer
software will be sotred in this folder.
Playlists - This folder will contain all playlists that are created in the DSP Designer software.
Schedules - This folder will contain all schedule files created in the DSP Designer
software.
Please be aware that the DSP Designer will automatically create new
directories under each of these subdirectories as required, except the
Medias folder.
Folder and File Naming Structure
For ease of tracking schedules and playlists, a standard naming convention is
used by the DSP Designer software when creating files and directories.
Schedules Directory
When a new schedule is created, a new subdirectory will be generated in the
Schedule directory. The name of this directory will be the date on which it was
created. The format will be as follows:
YYYYMMDD
Four-digit Year
Two-digit Month
Two-digit Day
YYYY
MM
DD
Schedule Files
Schedule files are comprised of three parts. The first part of the Schedule filename will have the same format as the Schedule directory: YYYYMMDD. The
second part of the Schedule file is the time at which the file was created. The
format is as follows:
HHMMSS
Hour (24-hour format)
Month
Second
HH
MM
SS
27
DSP DESIGNER SOFTWARE
The final part of the Schedule filename is provided manually. The complete filename will appear as below, with .SCC as the filename extension:
YYYYMMDD_HHMMSS_FILENAME.SSC
Any subsequent overlay text created on the same day will be placed in the folder
created for that day.
28
DSP DESIGNER SOFTWARE
The DSP Interface
The DSP Designer is divided into three windows:
Window 1 - Application Menu and DSP Bar
Contains the main menu system used for configuring the DSP Designer and setting up the work environment.
Window 2 - Browser window
Allows navigation of all media content stored on the local computer. See page
60 for details.
Window 3 - Scheduler Window
Used to configure and display the contents of playlists, schedules, and all related
media.
Window 1
Window 2
Window 3
Application Menu and DSP Bar
The Application Menu is located at the top portion of the DSP Designer software
in Window 1 and contains five (5) Menus:
•
File
•
View
•
Language
•
Configuration
•
Help
29
DSP DESIGNER SOFTWARE
File Menu
File > Add New Schedule
Creates a New Schedule.
File > Open Schedule
Opens an existing Schedule under the current working data directory.
File > Save
Saves the loaded Schedule file to the data directory. It is recommended to
periodically Save the Schedule File as changes are being made.
30
DSP DESIGNER SOFTWARE
File > Recent Files
Contains a listing of previously opened Schedule files. The most recent file is
listed at the top of the Recent Files submenu.
File > Exit
Exit will close the DSP Designer software.
By default, the DSP Designer software will display a prompt, asking to verify the
Exit action. Please see Configuration > Action on page 34 for details.
31
DSP DESIGNER SOFTWARE
View Menu
View > Toolbars > Standard | DSP Bar
Removes or displays the Standard and/or DSP Bar under the Application Menu.
Standard Toolbar
By default, the Standard Toolbar contains New, Open and Save icons. These
icons represent commonly used operations. Additional icons may be added to
this toolbar (please see page 40 for details).
•
New - Located on the left-hand side and is denoted by a small sheet of paper. Pressing the New icon on the Standard toolbar is equivalent to selecting File > Add New Schedule from the Main Menu.
•
Open - Located in the middle and is represented by a yellow folder. The
Open icon is equivalent to selecting File > Open Schedule from the Main
Menu.
•
Save - Located on the right-hand side of the toolbar and represented by a
blue floppy disk. The Save icon is equivalent to selecting File > Save from
the Main Menu.
DSP Toolbar
The DSP Toolbar contains information about the device settings.
Platform displays the device being used (this will always show EXT-HD-DSP).
The information in this pull-down dialog cannot be changed.
Horizontal Type sets the media orientation to horizontal.
Vertical Type sets the media orientation to vertical.
32
DSP DESIGNER SOFTWARE
•
Resolution allows selection of different resolutions based on the media
orientation (Horizontal Type or Vertical Type).
Changing the values for Horizontal Type or Vertical Type will change the
resolution. The DSP Designer will attempt to select the proper resolution based on the selection of either Horizontal Type or Vertical Type
orientation.
•
Tailword Use - This option adds the string “_Edited” to the filename. This
feature is used when Media Files are being edited using the “Multi Edit” button. Enabling this feature prevents the current file from being overwritten.
View > Status Bar
Enables or disables the Status Bar at the bottom of the DSP Designer window.
Status Bar
Language Menu
Language > (KO) Korean | (EN) English
The Language Menu will localize the DSP Designer software to the language
selected.
Only Korean and English languages are supported at this time.
33
DSP DESIGNER SOFTWARE
Configuration Menu
Configuration > Default Data Directory
Indicates the current working directory. Clicking the marked path will display the
Browse for Folder dialog, allowing the working directory to be changed.
It is not recommended that the working directory be changed once it is
initially configured.
Configuration > Action for Exit
Sets the default action when the DSP Designer is closed.
Save Schedule - Automatically saves the currently open Schedule File before
exiting the DSP Designer.
Always Ask - A dialog will be presented to confirm that the DSP Designer is to be
closed and provide you with the option of saving the Schedule File or not.
The Don’t ask me again option may be enabled by clicking this box. If this option
is enabled, this dialog will not be presented and the DSP Designer will exit without saving the currently open Schedule file.
34
DSP DESIGNER SOFTWARE
Help Menu
Help > About
Displays information about the DSP Designer software including the version of
the software.
Click the OK button to dismiss the About Box.
35
DSP DESIGNER SOFTWARE
Toolbars
Toolbar Options
The Toolbar Options arrow, in the Standard Toolbar allows modification of the
icons that appear in the Standard Toolbar and DSP Toolbar. Click the Toolbar
Options arrow to display the context menu.
Clicking the Toolbar Options arrow will display the Add or Remove Buttons menu.
Moving the mouse over the Add or Remove Buttons option will expand the menu.
Moving the mouse over the Standard option, will allow the addition or removal of
icons on the Standard Toolbar. A check mark indicates that the icon is present in
the Standard Toolbar.
36
DSP DESIGNER SOFTWARE
Moving the mouse over the DSP Bar option will display options for the DSP Bar.
Options for customizing the DSP Bar are not permitted.
Selecting the Customize... option will display a dialog box presenting several
options. The Customize dialog contains four (4) tabs: Toolbars, Commands,
Keyboard, and Options.
37
DSP DESIGNER SOFTWARE
Customize > Toolbars > Menu Bar
This option cannot be changed. The Menu Bar must always be displayed as part
of the DSP Designer software.
Customize > Toolbars > Standard
Use this option to show or hide the Standard Toolbar.
Customize > Toolsbars > DSP Bar
Use this option to show or hide the DSP Bar.
Customize > Toolbars > New...
Allows the creation of a custom toolbar. After clicking the New... button, a dialog
will be displayed prompting for the name of the new Toolbar. Type the name for
the new toolbar and press ENTER.
38
DSP DESIGNER SOFTWARE
The new Toolbar name will appear in the Toolbars window.
An empty Toolbar will be created and displayed as part of the DSP Toolbar.
New Toolbar
In order to add commands to the empty Toolbar, click the Commands tab. See
Customize > Commands on page 35.
39
DSP DESIGNER SOFTWARE
Customize > Toolbars > Rename...
Rename a created toolbar. Select the toolbar to be renamed, click the Rename...
button then type the new name for the toolbar.
The Menu Bar, Standard Toolbar, and the DSP Toolbar cannot be
renamed.
Customize > Toolbars > Reset...
In order to revert the DSP Toolbar to its original appearance, click the Reset...
button. This will set the Application Menu or Standard Toolbar to the default setting, removing all added commands. The DSP Designer will prompt to confirm
the action.
Click OK to reset the selected toolbar. Click Cancel to abort the operation.
Toolbars which have been created using the Customize > Toolbars >
New... command cannot be reset. These toolbars can only be deleted
(see page 39).
40
DSP DESIGNER SOFTWARE
Customize > Toolbars > Delete...
Deletes a created toolbar. Select the toolbar to be deleted under the Toolbars.
Then, press the Delete button.
The DSP Designer will prompt to confirm the action.
Press the OK button to delete the toolbar. Click Cancel to abort the operation
and return to the Customize dialog box.
The Menu Bar, Standard Toolbar, and DSP bar cannot be deleted. Only
created toolbars can be deleted.
41
DSP DESIGNER SOFTWARE
Customize > Commands
Used to add commands to a new or existing Toolbar. To add a command to a
Toolbar using the New... button (see page 36), first select a category under the
Categories window. Under the Commands window, drag the command to the
new toolbar in the DSP Toolbar.
In the example below, the Exit command has been selected. Using the mouse,
click and drag the Exit command to the Toolbar.
Commands can also be added to the existing Standard Toolbar (page
30) in the same manner. Commands cannot be added to the DSP
Toolbar.
42
DSP DESIGNER SOFTWARE
Unlike the Standard Toolbar, a new Toolbar cannot be modified using the Add or
Remove buttons . However, the Customize option (page 32) is always available.
Floating Toolbars
The DSP Toolbar and any created toolbars can be detached from the DSP Designer and repositioned within the DSP Designer or outside of the DSP Designer
interface.
Floating toolbar indicator
When the mouse is positioned over the Floating Toolbar Indicator, the mouse cursor will change to a crossed-arrows icon:
43
DSP DESIGNER SOFTWARE
To move the toolbar, click and drag the Toolbar outside of the DSP Designer, then
release the mouse to finish positioning the toolbar.
In order to replace a Floating Toolbar to the DSP Designer, click and hold the top
portion of the toolbar. The mouse cursor will change to the crossed arrows icon.
Drag the toolbar over the toolbar area of the DSP Designer.
Note that a Floating Toolbar can also be repositioned anywhere within the top
portion of the DSP Designer.
44
DSP DESIGNER SOFTWARE
Customize > Keyboard
This tab allows the assignment of keyboard shortcuts. CTRL+S is a good example of a common keyboard shortcut in many PC applications, which saves a file
to disk. Using the Keyboard tab, other shortcuts can be created and/or changed
for the desired use.
Clicking on the Category pull down dialog, lists each menu item in the Application
Menu. Select the category of the Menu containing the operation to be assigned
a keyboard shortcut.
45
DSP DESIGNER SOFTWARE
Assigning a Keyboard Shortcut
Customize > Keyboard > Assign
In the example below, the Open Schedule (page 28) function from the File Menu
will be assigned SHIFT+O as the keyboard shortcut.
1.
Select Open Schedule under the Commands window.
2.
Click the mouse cursor in the Press new shortcut key text box.
3.
Simultaneously press the SHIFT key and the letter O on the computer keyboard.
4.
The text Shift+O will be displayed in the text box.
5.
Click the Assign button to assign the shortcut to the function. The keyboard
shortcut will be listed under the Key assignments box.
6.
Click the Close button to dismiss the dialog box and return to the DSP Designer.
46
DSP DESIGNER SOFTWARE
Multiple keyboard shortcuts can be assigned to one Menu function. Do this
pressing additional keyboard shortcuts. These keyboard shortcuts will be displayed in the Press new shortcut key text box.
After the desired keyboard shortcuts have been entered, click the Assign button.
The TAB and BACKSPACE keys cannot be assigned as keyboard
shortcuts.
If a keyboard shortcut is assigned to a function which has already been
assigned, a warning dialog will be displayed.
Click Yes to reassign the existing keyboard shortcut with the new shortcut. Click
No to return to the Customize dialog.
47
DSP DESIGNER SOFTWARE
Removing a Keyboard Shortcut Assignment
Customize > Keyboard > Remove
1.
Open the Customize dialog box (page 32).
2.
Select the Keyboard tab.
3.
Under the Category pull-down menu, select the Menu under which the function is listed.
4.
Select the function under the Commands box
5.
Click on the keyboard shortcut assignment under the Key assignments list
box.
6.
Click the Remove button. The keyboard shortcut will be removed from the
Key assignments list box.
48
DSP DESIGNER SOFTWARE
Customize > Keyboard > Reset All
The Reset All button will restore all Main Menu shortcuts to their default settings.
All custom keyboard shortcuts will be removed from the Standard Toolbar and the
DSP Toolbar.
The DSP Designer will prompt to confirm the operation. Click Yes to restore all
keyboard shortcuts to their default settings. Click No to cancel the operation.
49
DSP DESIGNER SOFTWARE
Customize > Options
This tab provides options which affect the appearance and behavior of the DSP
Designer software. List below are the default settings for the Options tab.
Customize > Options > Large Icons
Checking the Large Icons box increases the size of the icons in the Standard
Toolbar and DSP Toolbar.
If other toolbars have been created, these toolbars will also be increased in size
to accommodate any added icons. This feature is enabled by default.
50
DSP DESIGNER SOFTWARE
Customize > Options > Show Screentips on Toolbars
Checking this box will display information about the command when hovering the
mouse over each icon in the toolbar. By default this feature is enabled.
In the example below, the mouse is hovering over the Save icon. The screentip
indicates that this icon is responsible for saving a Schedule File.
Customize > Options > Show Shortcut Keys in Screentips
Placing a check mark next to this feature will display the shortcut key associated
with the icon. By default, this feature is disabled.
51
DSP DESIGNER SOFTWARE
Customize > Options > Menu Animations
The Menu Animations pull-down list provides options on how Main Menus are
displayed.
System - The default menu animation under the operating system you are using.
Random - Varies the Main Menu anaimation style, randomly, between Unfold,
Slide, Fade, and None.
Unfold - The Menu will unfold from the top left to the bottom right.
52
DSP DESIGNER SOFTWARE
Slide - Opens the menu vertically from the top to the bottom.
Fade - Opens the menu vertically from the top to the bottom by applying a fade
effect, going from transparent to opaque. Once the fade effect is complete, the
menu will be opaque.
Transparent
p
Opaque
None - Displays the menu without any animation effects.
53
DSP DESIGNER SOFTWARE
Customize > Options > Always Show Full Menus
Always displays full customized menus.
Customize > Options > Show Full Menus After a Short Delay
Always displays full customized menus after a short delay.
Customize > Options > Reset Menu and Toolbar Usage Data
Deletes the record of commands which have been used and restores the default
set of visible commands to the menus and toolbars.
54
DSP DESIGNER SOFTWARE
Located under the Standard Toolbar and DSP Bar shows the full path to the data
directory of the currently loaded Schedule filename.
To the right of the full path of the working directory are two more buttons:
Load Schedule
Clicking the Load Schedule button will display a list all created projects. Moving
the mouse to the right will list all the Schedules created on a particular day (if
available).
Example 1
A Schedule folder was created on April 9, 2010 under the working directory.
Within this directory, there is a file named 20100409_163555_myschedule (see
page 26 - 27 for directory and filename conventions).
Example 2
In the next example, another Schedule File was created on the same day (April
9, 2010) but with a different filename. The DSP Designer placed this Schedule
File under the same Schedule Directory. Since there are two Schedule Files in
the same Schedule Directory, either one of these files can be loaded into the
DSP Designer.
If another Schedule was created on a different day (e.g. April 10, 2010), there
would be two Schedule Folders (20100410 and 20100411) listed under the Load
Schedule button.
55
DSP DESIGNER SOFTWARE
Transfer to External Storage
Uploads the current schedule file to the external USB storage device connected
to your computer.
Click OK to upload the schedule to the external USB storage device.
56
DSP DESIGNER SOFTWARE
Select the device in the Choose Drivers window by placing a check mark next to
the storage device to be used.
If the Select Devices dialog is displayed before the external USB
storage device is connected to the computer, the storage device may
not be displayed under the Choose Drivers window. If this occurs, click
the Refresh List button.
If an external USB storage device is not selected under the Choose Drivers
window, the following message box will be displayed:
Click the OK button to dismiss the dialog. Then, select the external USB storage
media by placing a check mark next to the device.
Once the USB storage device has been selected, click the Start Transfer button.
The following message box will be displayed:
Click Yes to begin the transfer process.
Click No to cancel the transfer process and return to the Select Devices dialog.
Note that the contents of the external device will be deleted during the
transfer process.
57
DSP DESIGNER SOFTWARE
If the Yes button is pressed, a second message box will be displayed, prompting
to confirm the transfer process.
Click the Yes button to confirm the transfer process.
Click No to cancel and return to the Select Devices dialog box.
Once the transfer process has started, a progress bar dialog will be displayed
indicating the status of all files being copied to the external storage device:
58
DSP DESIGNER SOFTWARE
After the transfer process has completed successfully, another message box will
be displayed:
Click OK to dismiss the message box and return to the Select Devices dialog
box.
To remove the external USB storage device, click the Safety Removal Devices
button. Once the USB device is ready to be removed from the computer, the following dialog will be displayed:
59
DSP DESIGNER SOFTWARE
Browser Window
The Browser Window is located on the left side of the DSP Designer. The
Browser Window allows navigation of the folders and files on the local computer.
Media, Schedule, and Playlist files for the project are easily accessible for use in
the project.
Below is a closer view of the Browser window showing the default directory
structure used by the DSP Designer.
Browser Menu
The Browser Window has its own set of menus:
1
2
3
4
5
6
60
DSP DESIGNER SOFTWARE
Browser Menu > Go to last Folder visited
Return to last folder viewed.
Browser Menu > Up One Level
Moves up one level from the current directory.
Browser Menu > Create New Folder
A new folder is displayed with the default name, New Folder. Type the name for
the new folder and press ENTER.
View Menu
View Menu > Thumbnails
Displays the images a folder contains in order to quickly identify the contents of
the folder. This is useful for browsing the Media folder.
View Menu > Tiles
Displays files and folders as icons. The icons are larger than when using the
Icons view and contain more descriptive information about the file.
View Menu > Icons
Displays files and folders as icons. The filename is displayed under the icon but
unlike the Tiles view, no additional file information is displayed
View Menu > List
Displays the contents of a folder as a list of files or folders. The folder names are
preceded by small icons.
View Menu > Details
Displays the most comprehensive view of all files and folders, including name,
type, size, and date modified.
By default the View Menu is set to Details.
61
DSP DESIGNER SOFTWARE
4.
Go to Default working directory
Immediately jumps to the default working directory, which was set during the
initial configuration.
5.
Navigator
Each item in the Navigator pull-down menu represents a folder name used
by the DSP Designer. Clicking on one of these selections will navigate
directly to that directory.
The Media Files selection will navigate to the \Medias directory.
62
DSP DESIGNER TUTORIAL
Creating a Schedule
1.
Launch the DSP Designer software by double-clicking on the DSPDesigner
icon.
If the DSP Designer software is being started for the first time, please
refer to Starting the DSP Designer Software for the First Time for
details.
If the DSP Designer is unable to locate the Schedule List, a dialog will be
presented indicating that no Schedule can be loaded.
Click the OK button to dismiss the dialog and display the DSP Designer
software interface.
2.
From the Application Menu, click File > Add New Schedule.
63
DSP DESIGNER TUTORIAL
A dialog box will be displayed, prompting for the name of the Schedule.
Click the Make New Schedule button on the dialog to create a new Schedule or click Cancel to abort the operation and return to the DSP Designer
software interface.
Once the Make New Schedule button has been pressed, another dialog will
be displayed. Type the Schedule Name in this text box.
In this example, myschedule will be the name of the Schedule File.
Click OK to continue or click Cancel to abort the operation.
After the OK button is pressed, the Schedule name dialog will close and the
Playlists tab will become enabled.
The remaining three (3) tabs, Media Files, Text Overlay, and Background
Music will be disabled until a Playlist is created.
64
DSP DESIGNER TUTORIAL
Creating a Playlist
1.
Locate the Add Playlist button in the lower portion of the screen, next to the
calendars.
Press the Add Playlist button.
A dialog will be displayed.
2.
Click Make New Playlist
If there is an existing Playlist, it can be loaded by pressing the Open Saved
Playlist button.
The Cancel button will abort the operation and close the dialog.
65
DSP DESIGNER TUTORIAL
3.
Another dialog is displayed, prompting for the name of the Playlist to be
In this example, the name of the Playlist will be is myplaylist
Click OK to accept the name of the Playlist or click Cancel to abort the
operation.
The Updated DSP Designer Interface
Once the Schedule File and the Playlist have been created, additional features
will be enabled.
The Calendar section, at the bottom portion of Window 3 is now enabled. Each
day of each month is highlighted in Blue.
There are two (2) different colors which DSP Designer uses to highlight the period in which Playlist is scheduled to run (played).
Blue:
The default period in which the currently selected Playlist will run.
Yellow: The defined period in which a currently selected Playlist will run.
By default, a new Playlist will be scheduled to play all day on each day
or every month. The example above illustrates a new Playlist without
any defined schedule.
66
DSP DESIGNER TUTORIAL
All tabs (Playlist, Media Files, Text Overlays, and Background Music) at the top
portion of Window 3 are now enabled.
The full path to the created Playlist is also displayed above the tabs.
Below the tabs is the Playlist schedule which displays the Playlist file along with
the Period and Weekday which the Playlist will run. In the illustration below, the
playlist is set to play every day, all day, seven days per week.
Adding Media
Click on the Media Files tab.
Before adding Media files, all content should be located under the Medias directory. The most efficient way to do this is to use the Navigator
pull-down dialog (page 58) from the Browser window and select Media
Files. Then, drag the media file(s) to the Browser window.
Add the media to the playlist by dragging the content from the Medias folder to
the Media window.
Video, audio, and images can be added to the Playlist in the Media Files window.
67
DSP DESIGNER TUTORIAL
1.
Add media to Playlist by dragging-and-dropping media from the Browser
window to the Media Files tab.
Video, audio, and images can be added to the Playlist in Media window.
68
DSP DESIGNER TUTORIAL
2.
At the bottom of the Media Files tab there is a Preview window.
•
Select media files in the Media Files tab to display information in
this window.
•
Media files can be previewed in this window when the proper video
codec(s) are installed on the computer.
Press this button to begin playback of video content.
Press this button to stop playback.
3.
Use the “Up” and “Down” buttons, located in between the Media Files tab
and the Preview window, to change the order of the media.
4.
Use the “Delete Items” and “Delete All” buttons, located in between the
Media Files tab and the Preview window, to delete media files added to the
Media Files tab.
Delete Items - deletes the currently selected items.
Delete All - deletes all items in the Media Window.
Delete Items or Delete All will not delete the files from the Media Files
directory. These buttons only remove the files from the Media window.
69
DSP DESIGNER TUTORIAL
Setting Playback Times
Once media has been imported into the Media Files tab, individual playtimes, as
well as other additional options, can be configured.
1.
To set the playback time for media content double click on the value under
the Timetable column.
2.
The Update Timetable dialog will be displayed.
All times in this window are set in 24 hour format. Use the 24 Hrs Set
button to reset all times to 00:00.
3.
Set a start and end time.
70
DSP DESIGNER TUTORIAL
5.
Press the Apply button when modifications are completed.
Once media have been assigned a period for playback it will be assigned to
a new group according to its new time period.
All media in the list that is not allocated for a time period will be grouped
together. These media files will play during periods that do not have
specific content set to playback.
Assigning Media Identifiers
Media that has been imported into the Media Files tab can be assigned letters
(A-H) for tracking or convenience purposes. Assigning a media file using this
column will not affect the folder structure or files in any way.
1.
Double click on the Folder field (will be blank if none has been selected) of
the desired media to access up the drop-down menu for the object.
2.
Click on the arrow to the right of the field to see the available folder options.
3.
Click on the desired folder option.
71
DSP DESIGNER TUTORIAL
Setting Playback Duration for Image
All video content in the Media Files tab will be set to play according to their
media lengths. Images can be set to display for a specified length of time. By
default, this is 5 seconds.
1.
Double click on the Playtime field (default is 5 seconds) of the desired
media to modify the length in seconds.
This parameter can only be configured for Image files.
Adding additional options
Media content in the Media Files tab have the option of adding additional
elements for enhancement purposes. The following options are possible.
Video files
Addition of text overlays to use with the selected media. The text overlay must
be created using the DSP Designer software.
Image files
In addition to adding text overlay(s), background music can be selected to play
with the image(s).
1.
To add an text overlay to the selected media (videos or images), Single click
the icon to display a selection window.
2.
Select the desired text overlay file which will playback only when the
selected media is running.
NOTE: The text overlay must already be created and in the same playlist. To
create a text overlay, please see the Using the Text Overlay Tab section.
3.
To add background music to the selected media (images only), Single click
the headphone icon to display a selection window.
4.
Select the desired background music file which will playback only when the
selected media is playing back.
The background music file must already be created and in the same playlist.
To create a text overlay, please see the Using the Background Music Tab
section.
72
DSP DESIGNER TUTORIAL
A warning icon
will appear in this column if the path to the listed media
content is not valid. This error normally occurs when the default directory has
been changed.
Text Overlays
Creating a Text Overlay
A text overlay can scroll across the bottom of the screen from right to left.
This text overlay is created in the Text Overlay tab. The display orientation
(landscape or portrait) will also determine the location of this text.
1.
Click on the Text Overlays tab in the programs section.
2.
The text overlay creator will be located at the bottom of the Text Overlay
tab.
73
DSP DESIGNER TUTORIAL
Additional Options (WARNING)
A warning icon
will appear in this column if the path to the listed media
content is not valid. This error normally occurs when the default directory has
been changed.
Enter the desired text (up to 200 characters) in the text box.
After the text has been entered, bold and/or italic effects can be applied.
Text color and background color can also be changed.
By default, white text on a black background are the default colors.
3.
Press the Preview Overlay button to see a preview of the Text Overlay.
74
DSP DESIGNER TUTORIAL
4.
Change the vertical position of the text and background by checking the
Change Vertical Position box.
Click and drag the text up or down in the Preview Area using the mouse.
5.
The text attributes can also be modified:
In the example above, the Bold text attribute has been selected and applied
to the Overlay Text. Changing a text attribute will not take effect until the
Preview Overlay button is pressed. Multiple text attributes can be applied at
one time.
75
DSP DESIGNER TUTORIAL
To change the color of the text, click the Text Color swatch. The current text
color is surrounded by an orange box.
Current text color
Move the mouse over the color swatch and click the desired color for the
text. In the example below, the Theme Color Blue, Accent 1 is being selected:
76
DSP DESIGNER TUTORIAL
When the mouse moves over each color, a text box displays details of the
current color.
After the color has been selected, the Text Color swatch will close. The
selected color will appear under the “A” in the text color swatch pull down
menu.
To apply the color to the text, click the Preview Overlay button:
The background color can also be changed in the same way. Click the
Background Color swatch and follow the same steps as as setting the Text
Color. In the example below, the background color has been changed from
black to white. As with all changes to the text attributes, the Preview Overlay
must be pressed in order to preview the result:
77
DSP DESIGNER TUTORIAL
6.
Once the text for the Text Overlay has be designed, click the Create Overlay
button.
Click in the text box and type the name of the Text Overlay. In the example
below, mytext is being used as the name of the Text Overlay.
Click the Create Overlay button to create the Text Overlay.
The Text Overlay file will be loaded under the Text Overlays tab, as
illustrated below:
78
DSP DESIGNER TUTORIAL
Setting Playback Time for Text Overlays
Newly created and previously created text overlays will appear in the Text
Overlay tab. This list will operate in the same manner as the Media Files tab in
terms of functionality.
1.
To set the playback time for text overlays, double click on the timetable in the
Timetable column for the text overlay.
2.
The Update Timetable window will open.
In this window, the runtime for the selected text overlay can be set. All times
in this window are in 24-hour format.
3.
Set a start and end time.
4.
If the selected text overlay is intended to play all day, press the 24 Hrs Set
button.
5.
To deallocate the time set for the selected text overlay, press the Not
Allocating button. This will return all values to 00:00 and list the selected
text overlay in the Unallocated Items group.
6.
Press the Apply button when modifications are completed.
Once text overlays have been assigned a period for playback it will be
assigned to a new group according to its new time period.
79
DSP DESIGNER TUTORIAL
All text overlays in the list that have not been allocated for a time period
will be grouped together. These text overlays will play during periods
that do not have specific content allocated to play.
Setting speed for text overlays
The speed of the scrolling action for a selected text overlay can be adjusted.
1.
Double click on the Speed field of the desired text overlay (by default this
option will be set to Normal) to access up the drop-down menu for the
object.
2.
Click on the arrow to the right of the field to see the available options.
Choose the desired option by clicking on it.
80
DSP DESIGNER TUTORIAL
Adjusting the orientation for text overlays
The orientation for text overlays can be set using this option. This setting should
be adjusted based on the orientation of the intended display.
1.
Double click on the Direction field of the desired text overlay (by default this
option will be set to Horizontal Type) to access up the drop-down menu for
the object.
2.
Click on the arrow to the right of the field to see the available options.
Choose the desired option by clicking on it.
81
DSP DESIGNER TUTORIAL
Changing the order of Text Layers
If multiple Text Overlays exist, the order can be changed between the two layers.
1.
Highlight the desired Text Overlay by clicking on it. Selecting a layer can
be done by clicking under any column (Sequence, Timetable, etc). In the
example below, Text Overlay 1 has been selected:
2.
Use the Up and Down buttons, located between the Text Overlay tab and
the Preview Area window, to adjust the order of the text overlay.
In the example below, the Text Overlay with the name mytext.sot will be
moved from layer 1 to layer 2 by pressing the Down button.
82
DSP DESIGNER TUTORIAL
Clicking the Down button moves the Text Overlay mytext.sot below the Text
Overlay mytext2.sot.
Deleting text overlays
In this example, the Text Overlay mytext2.sot will be deleted from the schedule:
1.
Highlight the desired text overlay by clicking on it.
2.
Click the Delete Items button, to delete the text Overlay
83
DSP DESIGNER TUTORIAL
Text Overlay mytext2.sot has now been deleted. Note that in removing
mytext2.sot, that the orginal Text Overlay, mytext.sot, has been moved to
Text Overlay 1.
If several Text Overlays exist in the schedule, multiple Text Overlays can be
selected by holding down the SHIFT key while selecting each Text Overlay.
Alternatively, the Delete All button can be used to remove all Text Overlays
without making mulitple selections with the SHIFT key.
The Delete Items and Delete All buttons do not delete the Text Overlay
files in the \overlaytexts directory. Only the Text Overlay files are
removed from the schedule.
The DSP Designer will not provide a prompt to verify that the selected
Text Overlay files are to be removed from the project. If the Text
Overlay file is deleted by accident, navigate to the overlaytexts directory,
double-click directory containing the Text Overlay file then click-anddrag the .sot file to the Text Overlay window.
Background Music
Background music can be added and scheduled using this tab. This can be set
for use with slideshows and static images. Background music can be set to play
at anytime, however it is recommended that the playtime set for background
music not conflict with video files that already contain audio.
Background Music can only be assigned to static images only and
cannot be used when playing video files.
84
DSP DESIGNER TUTORIAL
Adding Background Music
1.
Click the Background Music tab
Before adding Background Music files, all content should be located
under the Medias directory. The most efficient way to do this is to use
the Navigator pull-down dialog (page 58) from the Browser window and
select music files. Then, drag the music file(s) to the Browser window.
2.
Add the music to the Playlist File by dragging the music from the Browser
window to the Background Music tab.
85
DSP DESIGNER TUTORIAL
Select the music file(s) in the Background Music tab to display information in
this window.
Music files can be previewed in this window when the proper audio codecs for
the music files have been installed on the computer.
Press this button to begin playback of video content.
Press this button to stop playback.
Use the Up and Down buttons, located in between the Background Music tab
and the Preview window, to change the order of the media.
Use the Delete Items and Delete All buttons, located in between the Background
Music tab and the Preview window, to delete media files added to the
Background Music tab.
Delete Items - deletes the currently selected items.
Delete All - deletes all items in the Media Window.
Delete Items and Delete All will not delete the files from the Background
Music tab. These buttons only remove the files from the Media window.
86
DSP DESIGNER TUTORIAL
DSP Designer Image Editing Software
Since it is often necessary for images to be resized or rotated when preparing
them for use in a digital signage application, the DSP Designer provides a built-in
image editor.
In the example below, an image (.JPG format) has been added to the Media Files
window. The image has been highlighted by clicking on it with the mouse. As
with all media files, the content should be placed under the \medias folder.
Toward the bottom of the DSP Designer window is the Preview Window which
provides a preview of the image in addition to Summary Info on the image which
includes image filename, format, resolution, color depth and file size.
87
DSP DESIGNER TUTORIAL
With the image file highlighted in the Media Files window, click the Picture Edit
button near the bottom of the screen
The Image Editor window will appear:
Note that the image that appears in the Image Editor window is displayed
differently than in the Preview Window.
88
DSP DESIGNER TUTORIAL
The Image Editor has several controls on the left side of the window, organized in
to three groups.
Image Info
This is an informational window which displays the image resolution.
Text Group
Provides controls for creating a Text Group.
Load
Load a TextGroup file (.stg file) from disk.
Overlay TextGroup Window
Used to create and modify new text groups. A TextGroup can be created, deleted
or changed order.
Position
Enter the X coordinate and Y coordinate on the image where TextGroup is to be
placed. The TextGroup can also be moved interactively by using the mouse.
Save TextGroup
Saves the currently loaded Overlay TextGroup to a TextGroup file.
89
DSP DESIGNER TUTORIAL
Image Processing Group
This group contains buttons to manipulate the orientation and size of the image.
Resize to Default
Resizes the loaded image to the default resolution.
Rotate 90
Rotates the image, clockwise, in 90-degree increments.
Apply
Applies changes to the current image file. The current image filename is copied
then renamed with the “_Edited” suffix. The updated (edited) image is then
loaded into the DSP Designer. The original image file is preserved.
Close
Closes the Image Editor window.
Moving the Image
Position the mouse over the image. The mouse cursor will change to a hand
cursor.
90
DSP DESIGNER TUTORIAL
Click and hold the mouse button while moving the image.
The image can be moved up, down, left, right or in a circular motion.
Working with an Overlay TextGroup
Click the New button in the top portion of the Overlay TextGroup window, as
shown below. A new TextGroup is created.
91
DSP DESIGNER TUTORIAL
Type the desired text in the text field. In the example below, the text “Gefen
DSP” is used. Once the text entry has been completed, press the ENTER key on
they keyboard.
The font controls for customizing the look of the text in the image window are
now enabled.
By default, the created text will appear in the upper left corner of the image. Use
the mouse to move the image and view the text.
92
DSP DESIGNER TUTORIAL
Changing TextGroup Attributes
To change the color of the text, click the color swatch pull-down menu.
Set the Bold and/or Italic font attributes if desired.
The text color can be changed by positioning the mouse over one of the colors
available in the color swatch and clicking the mouse.
Once a new color is selected in the color swatch, the selected color will be applied to the text in the image window and the color swatch will close.
The selection labled Automatic Color will create white text.
93
DSP DESIGNER TUTORIAL
Standard Colors Swatch
Additional colors are availble by clicking the More Colors... option in the color
swatch pull-down menu.
94
DSP DESIGNER TUTORIAL
Using the mouse, click on one of the colors on the color swatch. Once a color
has been selected, it will be highlighted in the color swatch and the color will
be displayed in the box, above the current color. This method provides a color
comparison between the original color and the selected color.
Unlike the TextGroup color swatch pull-down menu, selecting a color from the
Standard colors swatch will not directly apply the color change to the text.
Click OK to apply the selected color to the text and close the Standard Colors
swatch.
Click the Cancel button to close the Standard Colors without making changes
and return to the Image Editor.
When a color is selected (after clicking OK) from the Standard Colors swatch, the
color is added to the text color swatch:
Added colors
95
DSP DESIGNER TUTORIAL
Custom Colors Swatch
The Custom Colors swatch is slightly different than that of the Standard Colors
swatch in that additional control over the color attributes are provided: Red,
Green, Blue, Hue, Saturation, and Luminance values can all be adjusted independently. A slider bar to the right of the color swatch can be moved up or down
to allow swift adjustment of the Luminance value of the current color.
A particular color can also be selected directly from the color swatch. The attributes can then be adjusted to the desired color.
Click the mouse in the color swatch window. A cross-hair will indicate the currently selected color. Click and hold the mouse button while moving within the
color swatch window to quickly browse through colors and compare them with
the current color.
Click the OK button to apply the color to the text, close the Custom Colors swatch
and return to the Image Editor.
Click the Cancel button to close the
Custom Colors swatch without making any
changes and return to the Image Editor.
96
DSP DESIGNER TUTORIAL
Adjusting the TextGroup
When a TextGroup is created, it is positioned in the top-left corner of the image.
There are two methods for repositioning the text.
The first method is to use local x-y coordinates. The second method is to use
mouse to interactively position the text on the image.
All images are comprised of pixels. Each pixel on the screen is represented by a pair of numbers called a coordinate pair, represented as (x,
y). When specifying coordinates the x-coordinate (horizontal position) is
specified first, followed by the y-coordinate (vertical position).
Under the Bold and Italic check boxes are two boxes which represent the current
position of the TextGroup. The value in the first box represents the horizontal
position (x-axis). The second box represents the vertical position (y-axis) of the
text.
Note that in the example below, there are also two numbers grouped within parentheses. This coordinate pair is representing the current positiion of the mouse
within the image window.
97
DSP DESIGNER TUTORIAL
Positioning the TextGroup Using Coordinates
In the example below, the text will be moved to position (160, 120).
Click the mouse in the first box (the x-coordinate) on the left and type in the number 160 then press the TAB key to advance to the next field. The TextGroup will
move to the right 160 pixels.
In the second box (y-coordinate), type in the value 120. The TextGroup will move
down, vertically, 120 pixels.
Enter values in
these boxes
120 pixels
160 pixels
98
DSP DESIGNER TUTORIAL
Positioning the TextGroup using the Mouse
The second method for position a TextGroup is to use the mouse to interactively
move the TextGroup to the desired position within the image window.
Place the mouse in the image window and position the mouse cursor over the
TextGroup.
Click and drag the text to another portion of the screen. The mouse cursor will
change to an arrow as the text is being moved.
Release the mouse when the TextGroup is at the desired position.
99
DSP DESIGNER TUTORIAL
Note that after moving the TextGroup, the values in both Position boxes have
been updated. The coordinates (93, 99) represent the top-left corner of the
bounding box of the TextGroup, “Gefen DSP”. The numbers in parentheses represent the current location of the mouse cursor in the image window.
Current mouse position
100
DSP DESIGNER TUTORIAL
Saving the TextGroup
Click the Save TextGroup button.
The Save As... dialog will be displayed.
Create a filename for the TextGroup and type it in the File name field. TextGroup
filenames use the *.stg file extension. The example above shows mytextgroup
as the filename. Click the Save button to save the file to disk.
Since the TextGroup is part of the Media Files tab, it is recommended that the
TextGroup file be saved under the \DSP folder so it can be easily located when
loading a TextGroup (see page 97).
101
DSP DESIGNER TUTORIAL
Working with Multiple TextGroups
In the example below, a second TextGroup has been created. The text and color
of the second TextGroup has been changed in order to tell the two TextGroups
apart.
When a new TextGroup is created, the DSP Designer automatically places the
new TextGroup below the first TextGroup in the Overlay TextGroup list box. The
TextGroup listing order can be changed using the Move Up or Move Down buttons.
Move Up / Move Down
Changing the order of the TextGroup in the Overlay TextGroup list does
not affect whether a TextGroup appears in front of or behind another
TextGroup in the image window.
102
DSP DESIGNER TUTORIAL
When moving a TextGroup in the image window, when multiple TextGroups are
being used, the TextGroup to be moved must be selected in the Overlay TextGroup list box. Once the TextGroup has been selected in the Overlay TextGroup
list, move the mouse over the TextGroup in the image window and position the
TextGroup to the desired position.
In the example below, the TextGroup “More Text” has been selected in the Overlay TextGroup list.
The “More Text” TextGroup can now be moved without changing the position of
the “Gefen DSP” TextGroup.
103
DSP DESIGNER TUTORIAL
Loading a TextGroup
To load a saved TextGroup, click the load button to the left of the Load text field.
The Open File dialog will be displayed. Select the TextGroup to be loaded. TextGroup files have the extension .stg. In the example below, the TextGroup being
loaded is the mytextgroup.stg file (see page 94).
104
DSP DESIGNER TUTORIAL
Click the Open button on the Open Dialog. The selected TextGroup will be loaded into the Image Editor. The filename along with the full path to the TextGroup
file will be displayed in the Load text field.
Once the TextGroup has been loaded, the text can be positioned to the desired
portion of the image.
105
DSP DESIGNER TUTORIAL
Click the Apply button to “glue” the text group to the image. After the Apply button has been pressed and the changes have been made to the image, the following message box will be displayed:
Click OK to dismiss the message box.
106
DSP DESIGNER TUTORIAL
Multi Edit
This Multi Edit button applies the same resolution to mulitple images. There are
five (5) available resolutions in the Resolution pull-down list:
Select the resolution at which the selected imaged are to be sized.
Re-sizing images which have different resolutions may result in distortion in either or both images. The aspect ratio is not preserved.
Select the images to be re-sized in the Media Files window. Multiple images may
be selected by holding down the SHIFT key and selecting each image with the
mouse.
Once all desired files have been selected, click the Multi Edit button in the Media
Files window.
107
DSP DESIGNER TUTORIAL
After the Multi Edit button is pressed the following message box is displayed:
In this example, the Multi Edit resolution is set to 1280x1024. This information dialog will appear to confirm that both images are to be set to the selected
resolution.
Click No to abort the operation and return to the DSP Designer.
Click Yes to continue with the operation.
If the Yes button is clicked, the DSP Designer will initiate re-sizing the highlighted
images to the selected resolution. After the resolution change has been made,
the following message box will be displayed:
Click OK to dismiss the message box.
108
DSP DESIGNER TUTORIAL
During the conversion process, the original files are copied and given temporary
filenames. The DSP Designer will then perform the resolution change on the
selected files. These modified files are then loaded into the DSP Designer
in place of the original files. The updated files will have the “_Edited” string
appended to the filename, as shown below:
Updated Files
The DSP Designer performs a nondestructive conversion of the original files
should they need to be used at a later time.
In the Browser Window, under the \mediafiles directory, both sets of files will
now be present:
Original media files
Edited media files
109
DSP SERVER SOFTWARE
DSP Server Software Interface
The DSP Server is divided into three windows:
Window 1 - System Information and Remote Controls
Contains the main menu system when working with the DSP Server.
Window 2 - Client List Window
This window lists and manages each client which is connected to the DSP.
Window 3 - Scheduler Window
Allows modification of each client connected in the Client List Window.
See page 117 for details on how to log in to the DSP Server.
Window 1
Window 2
Window 3
The System Information and Remote Controls in Window 1 will be covered first:
The Login Information button provides information about the log-in time, the ID
currently accessing the DSP player, and the Domain. The ID and Doman have
been removed in the example above for security purposes.
110
DSP SERVER SOFTWARE
System Information > Network Information
Displays information about the Internet IP, Gateway IP, and Local IP of the DSP
Player. The IP information has been removed in the example above for security
purposes.
System Information > Server Engine
Connects to the specified DSP on the network with the specified address.
To connect to the DSP, press the Start Server button. The status will display
ServerRunning, as illustrated below:
Press the Stop Server button to disconnect from the DSP. The server status will
now display ServerStopped
111
DSP SERVER SOFTWARE
System Information > Clients List
Saves the clients list in the Client List Window (see page 110).
After the clients list has been saved, the following dialog will be displayed:
System Information > Exit Program
Disconnects and exits the DSP Server software. Upon exiting the
DSP Server software, the following dialog will be displayed:
112
DSP SERVER SOFTWARE
A progress bar will indicate the exit-status of the DSP Server
software. This process will take a few moments.
A secondary option exists which will minimizes the DSP Server software to the
System Tray. To do this, click the down arrow next to the Exit Program text:
Click arrow to expand Exit Program options.
Click the Go to Systemtray option.
The DSP Server will minimize to the System Tray but will continue to run in the
background:
To restore the DSP Server software to the normal window size, double-click the
DSPServer icon in the System Tray.
113
DSP SERVER SOFTWARE
Remote Controls Menu
Remote Controls > Play / Pause / Stop
Controls for playing, pausing or stopping the content from being displayed.
Press the Play button to continue playing content that was paused using the
Pause button.
Press the Pause button to pause the content.
Press the Stop button to halt the presentation. The Play button will need to be
pressed to start the presentation from the beginning.
Remote Controls > Display On / Display Off
Display Off will mask (hide) the content being presented. Display On will unmask
(show) the content being presented. These two buttons permit hiding a presentation without having to stop it.
Remote Controls > Reboot
The Reboot button allows the DSP to be restarted without having to power-cycle
the unit. This process is usually referred to as a “warm boot.” Three audible
beeps are heard from the unit each time the DSP is rebooted.
114
DSP SERVER SOFTWARE
Remote Controls > Sound On / Sound Off
The “Sound On” and “Sound Off” buttons toggle the audio portion of video files
sent to the DSP unit.
Remote Controls > Running Hours
Allows the duration each device is to play content. Pressing this button will
bring up the following dialog:
Use the Start Time and End Time dialog spinners to set the start and end time.
Press the Always (24 Hours) button to set the device to run constantly.
Click Apply to save the changes and dismiss the dialog. Click the Cancel button to cancel the current operation.
115
DSP SERVER SOFTWARE
Remote Controls > Format
Formats the DSP internal hard drive.
This operation will erase all data from the hard drive!
Remote Controls > Abort Commands
Use the Abort Commands button to halt all commands which have been sent to
the DSP.
Remote Controls > Send Schedule
Uploads the media to the DSP device. This may take anywhere from few seconds to a several minutes depending on the media size and the network speed.
The command may be aborted any time during the upload process by pressing
the Abort Schedule button.
Remote Controls > Abort Schedule
Sends an abort message in order to cancel the Send Schedule process.
Remote Controls > Upgrade Device
Updates the DSP to the latest version of firmware. The firmware can be retrieved
from a USB storage device.
116
DSP SERVER SOFTWARE
Gefen DSP Server Login
In order to log into the server, you must have direct Internet access. The use
of a proxy or other restrictive protocols will prevent connection to the DSP
Server. Please contact your network adminstrator for further information.
Log on to http://www.gefen.com/signage/player to create additional
usernames and passwords for the customization of individual systems.
Configure the IP settings for the DSP. A valid IP address must be provided
in order to connect to the DSP. Please see page 18 for details.
Double-click the Gefen DSP Server icon on the Desktop. The Gefen DSP Server
icon can also be found under Programs menu under Gefen DSP Server Pro.
After launching the Gefen DSP Server software, the following dialog is displayed:
Type in the User ID and Password which were provided after
registration. Click the Login button to log on to the DSP Server.
When logging in, the password can be saved for a future log in by clicking
the Save my password checkbox.
Enabling Save my password is a less secure
method of logging in to the DSP Server. This option
should never be used in a multi-user environment.
117
DSP SERVER SOFTWARE
If there is a Gefen DSP Server software encounters a problem when attempting to
connect to the DSP Player, the following message box will be displayed:
Ensure that no restrictions have been placed between the client (the computer)
and the server (the DSP Player) such as a proxy, etc.
Incorrect login information, such as the User ID or Password, the following
message box will be displayed:
Please check that the correct login information is being entered.
Click the Start Server button.
118
DSP SERVER SOFTWARE
Gefen DSP Server Options
In the top-right corner of the screen, click the Options button to open the Options
dialog.
Gefen DSP Server Options > Other Options
Always On Top Window
The DSP Server window will always be the top window.
Use UPnP Auto Detect
Turn On/Off UPnP-based auto-detection.
Enable Systemtray Icon when closing window
When the window is closed, the DSP Server icon will appear in the Systemtray.
Automatic Login
Check to enable auto-login when starting the program.
Start Server at Login
The Server is automatically started after login. There is no need to press the
Start Server button (System Information > Start Server, see page 111).
Use time synchronization for the devices
The local time is read from the LAN / Internet and is used by the DSP Server
software.
119
DSP SERVER SOFTWARE
Gefen DSP Server Options > Directory
The Directory section holds the path to current working directories.
Data Directory
The current working directory of the DSP Server software. By default, this path
usually appears as: C:\Program Files\Gefen\DSP
It is not recommended that the Data Directory path be changed while
the DSP Server software is running. Doing so may cause undesirable
results or possibly a DSP Server crash, interrupting the playback of the
current digital signage media.
Firmware File
The current path to the location of the firmware file. If the DSP Server software is
to be updated, the firmware file should be located in this directory.
Gefen DSP Server Options > Time Sync
Displays time information allows resetting to Standard Time.
Refresh
Refreshes the current Local System TIme and Standard Time for TimeZone.
Reset to Standard Time
Resets System Time to Standard Time for TimeZone.
120
DSP SERVER SOFTWARE
Network Device for System Authentication
This section lists the current network settings. No options can be modified from
this location.
121
DSP SERVER SOFTWARE
In Window 2 of the DSP Server software, there are seven (7) columns listing
information about the current connection:
Connection information
Device Alias
Lists an alias given to the DSP.
IP Address
Lists the IP address of the connection to the DSP.
MAC Address
The MAC address of the listed DSP unit.
122
DSP SERVER SOFTWARE
Free Spaces
Represents the amount of free disk space available on the DSP. In the example
above, a total of 1.81GB is available for media storage.
Running Hours
Indicates when the media is played. In the example above, the current schedule has not been assigned a particular play schedule. Therefore, the Running
Hours state is Always.
Client State
Represents the current client state:
Playing - The DSP is playing the content.
Waiting - The DSP is waiting for a command.
Formatting - The DSP hard drive is currently being formatted.
Network State
The last column indicates the current status of the network. In the image below,
the Network State is Stopped, indicating that the DSP Server is stopped.
123
DSP SERVER SOFTWARE
The following is a description of the Network State messages:
Network Message
Description
No Response Confirmed
DSP device not found by DSP Server
First Handshaking Confirmed
DSP connection successful
Stopped Confirmed
Stop operation successful
Requesting Stopped
Stop Server button pressed
Requesting PAUSED
Pause button pressed
Requesting PLAY
Play button pressed
Requesting STOP
Stop button pressed
Requesting Sleep
Display Off button pressed
Requesting WakeUp
Display On button pressed
Requesting Sound Off
Sound Off button pressed
Requesting Sound On
Sound On button pressed
Requesting WakeUp
Display On button pressed
Stopped
DSP Server has stopped
OK
Network connection valid
Groups
Groups allow for a graphical representation of various client attributes. Each
attribute can be sorted (ascending or descending). To attach a client attribute to
a group, click and drag the selected column to the Group box.
In the example below, the client attribute Device Alias has been moved under the
Group tag. Note that the Device Alias column is no longer a part of the original
set of columns, which identify each attribute for the client.
124
DSP SERVER SOFTWARE
Device View
Window 3 of the DSP Server software provides information about the DSP device
to which the DSP Server is connected. This window is called the Device View
window. The Device View contains five (5) sections:
1.
Advanced
2.
Network
3.
Server
4.
System
5.
System.Extra
Window 3
In addition to displaying information about the DSP, the Device View window
allows the option to modify the data under the Network, Server, and System sections. This option can be enabled by placing a check mark in the Edit Mode box,
under the Advanced section. By enabling Edit Mode, three additional options will
appear under the Advanced section. Place a check mark in the box, next to the
section where changes are to be made (see page 128). After making the desired
changes, press the Apply button at the bottom of the Device View window.
The next page shows the overall layout of the Device View window. Note that the
Edit Mode option has been enabled, exposing the Network, Server, and System
check boxes.
125
DSP SERVER SOFTWARE
The Device View Window
126
DSP SERVER SOFTWARE
Device View Window Description
Each section (Advanced, Network, Server, System, and System.Extra) of the
DeviceView window contains information relating to the status of the DSP device.
The information in the Device View will change depending on which device is
selected in Window 2 (see page 122).
It is possible to reduce the amount of information displayed in the Device View
window by hiding the desired section(s).
Hiding a section within the Device View window
1.
Place the mouse cursor over the minus icon, next to the section name to be
hidden. In the example below, the Advanced section will be hidden.
2.
Click the mouse while positioned over the minus icon. The Advanced section will now be hidden.
The remaining sections will be moved up in the DeviceView window (see
page 128).
127
DSP SERVER SOFTWARE
The plus icon next to the Advanced section (circled above) indicates that the section can be expanded to show additional details. To expand the selection, click
on the plus icon next to the Advanced section.
128
DSP SERVER SOFTWARE
Device View Window Description
Each section (Advanced, Network, Server, System, System.Extra) can be hidden
by clicking the minus (-) symbol next to the name of the section. Once a section
has been hidden, it can be expanded by clicking the plus (+) symbol next to the
section name.
DeviceView > Advanced
DeviceView > Advanced > Schedule
The name of the schedule which is currently running.
DeviceView > Advanced > Playlist
The title of the playlist which is currently running.
DeviceView > Advanced > Playing Media
The name of the media currently playing.
DeviceView > Advanced > Platform
The platform to which the DSP Server is connected. This information in this section will always EXT-HD-DSP.
DeviceView > Advanced > Version
The DSP Server firmware version.
DeviceView > Advanced > FileSystem
The file system which is used.
DeviceView > Advanced > DiskCapacity
Lists the remaining space on the DSP hard drive.
129
DSP SERVER SOFTWARE
DeviceView > Advacned > Edit Mode
If this box is checked, three (3) additional options will be listed below Edit Mode:
•
Network Section
•
Server Section
•
System Section
Place a check mark in any of these sections to edit the section information.
DeviceView > Network
The information contained under this section can be edited when the
Edit Mode > Network Section box is checked.
DeviceView > Network > Network Device
Indicates the type of connection being used. The only available option if Edit
Mode > Network Section is enabled is LAN.
DeviceView > Network > MAC
The MAC address of the DSP. If Edit Mode > Network Section is enabled, the
MAC address can be changed.
DeviceView > Network > IP Type
The IP type being used to connect to the DSP. If Edit Mode > Network Section is
enabled, the available options are: static or DHCP
DeviceView > Network > IP
The IP address of the DSP. If Edit Mode > Network Section is enabled, the IP
address can be changed.
DeviceView > Network > Subnet
The subnet address for the DSP. If Edit Mode > Network Section is enabled, the
Subnet address can be changed.
130
DSP SERVER SOFTWARE
DeviceView > Network > Gateway
The IP gateway used by the DSP Server. If Edit Mode > Network Section is
enabled, the IP gateway address can be changed.
DeviceView > Network > DNS1
The first DNS used to resolve the domain name. If Edit Mode > Network Section
is enabled, the address for the first DNS server can be changed.
DeviceView > Network > DNS2
The DNS used to resolve the domain name if it cannot be found using DNS1. If
Edit Mode > Network Section is enabled, the address for the second DNS server
can be changed.
DeviceView > Server
The information contained under this section can be edited when the
Edit Mode > Server box is checked.
DeviceView > Server > Server Type
The server type. This information will always indicate DSP Server. DSP Server
is the only available option when Edit Mode > Server Section is enabled.
DeviceView > Server > HeartBeat
The HeartBeat is a message which is sent to the DSP Server and the DSP unit at
regular intervals (usually seconds). The HeartBeat is used to negotiate the availability of the DSP unit on the network.
DeviceView > Server > Host
Specifies the host.
DeviceView > Server > IP
The address of the computer running the DSP Server software. If Edit Mode >
Server Section is enabled, the IP address can be changed.
DeviceView > Server > Port
The port used by the DSP Server software to access the DSP. If Edit Mode >
Server Section is enabled, the port can be changed.
131
DSP SERVER SOFTWARE
DeviceView > System
The information contained under this section can be edited when the
Edit Mode > System box is checked.
DeviceView > System > TimeZone
Displays the current time zone. The time zone can be set from GMT -12 to GMT
+12 if the Edit Mode is enabled.
DeviceView > System > Use BGM
Allows the use of background music. If Edit Mode > System Section is enabled,
a check box will appear next to the Use BGM option. The check box must be
enabled in order to play background music.
DeviceView > System > RunningHours
The number of hours which the playlist has been running.
The information in this field cannot be directly edited when Edit Mode
> System Section is enabled. Use the Start and End fields to update
the RunningHours field. The RunningHours field will always reflect the
information in the Start and End fields.
DeviceView > System > Slideshow Effects
Enables a slideshow effect when individual images are uploaded to the DSP.
DeviceView > System > Slideshow Interval
Sets the slideshow interval.
DeviceView > System > Defeat HDMI Overscan
Prevents overscan.
132
DSP SERVER SOFTWARE
DeviceView > System.Extra
The information contained under this section can be edited when the
Edit Mode > System Section box is checked.
System.Extra > Volume
If audio is used in the digital signage presentation, this box displays the volume
level. If Edit Mode is enabled, the slider control adjusts the volume level (0 - 31).
System.Extra > Brightness
Displays the brightness level. If Edit Mode > System Section is enabled, the
slider bar allows control of the brightness (0 - 31).
System.Extra > Contrast
Displays the contrast level. If Edit Mode > System Section is enabled, the slider
bar allows adjustment of the contrast (0 - 31).
System.Extra > Saturation
Displays the (color) saturation level. If Edit Mode > System Section is enabled,
the slider bar allows adjustment of the color saturation (0 - 31).
133
DSP SERVER SOFTWARE
Device View Window Arrangement
The Device View Window can be arranged within the DSP Server environment to
maximize workflow.
Auto-Hiding the Device View window
1.
Click the mouse on the thumbtack icon on the Device View Window as
shown below:
2.
The Device View window will be hidden from the main window. A new tab
will be created on the right side of the screen titled DeviceView.
134
DSP SERVER SOFTWARE
Using the Auto-Hide Feature with the Device View Window
1.
Move the mouse cursor over the Device View tab to expose the Device View
window, as indicated below.
135
DSP SERVER SOFTWARE
2.
Move the mouse cursor outside the Device View window to auto-hide the
Device View window. The Device View window will automatically slide to the
left and become hidden.
When this window is in auto-hide mode, the Device View window can be
accessed only when needed, allowing for a larger window used to monitor
each DSP device connected.
136
DSP SERVER SOFTWARE
Disabling the Device View Auto-Hide feature
1.
Move the mouse cursor over the Device View tab to expose the Device View
window, then move the mouse over the thumbtack icon, as shown below.
137
DSP SERVER SOFTWARE
2.
The Device View window tab will be removed and the window will be restored to its default state, as shown below.
138
DSP SERVER SOFTWARE
Relocating the Device View window
Sometimes it will be more convenient to have continued access to the Device
View window but have the window positioned elsewhere on the screen. The
Device View can be detached from the main DSP Server window, converting
the window to a floating window. There are two ways to make the Device View
window a floating window.
Detaching the Device View window (first method)
1.
Click the title bar portion of the Device View window and hold down the
mouse button.
2.
Move the mouse away from the original position of the window, as shown
below. The window’s current position will appear as a transparent blue rectangle until the mouse button is released.
139
DSP SERVER SOFTWARE
In the main DSP Server window, there will be four (4) rectangles with arrows
(outlined below) indicating that the Device View window can be moved in various
directions.
Note that the Device View window can also be moved outside the main
DSP Server window.
3.
Once the Device View window is in the desired position, release the mouse
button.
140
DSP SERVER SOFTWARE
From this position, the Device View window can be moved at any time simply by
clicking and dragging the title bar portion of the window to the desired position.
When moving the window to a new position, the Device View window will become
a transparent blue rectangle.
Restoring the floating Device View window to the DSP Server window
To restore the Device View window to its default position, double-click the title bar
of the Device View window.
The Device View window is now in the default position.
141
DSP SERVER SOFTWARE
Detaching the Device View window (method 2)
1.
Double-click the title bar portion of the Device View window, as shown below.
2.
The Device View window now becomes a floating window.
142
TROUBLESHOOTING
Sometimes the DSP may not behave in the way you expect it to. In this case, you
need to step through some basic troubleshooting procedures.
Why is there no sound?
When creating a new schedule, the timing has to be set by double-clicking the
Timetable portion of the Timetable bar in the Background Music Section. Even
though the changes have been saved, if this has not been done, there will be no
sound.
Check that the file you are playing as Background Music is an MP3 file. The
system will not play a FLAC, OGG, or AC3 file as a Background Music source.
Try converting the file format to MP3.
If the overall format of the signage sequence has something wrong with it, then
there is a possibility that only part of the schedule has been incorporated by the
DSP unit and this will be a good reason for no sound. (I.e.: the Text Overlay May
be the only thing working.) Go back and check that everything “agrees” - like if
the orientation is vertical, the pictures are vertical and the overlay has been set to
vertical too.
Why are there no images?
The reason for no image can be down to the orientation being wrong or the
image size being too large. The pictures might not have been rotated 90 degrees.
Also, the images may be in the wrong format. However, if the images appear
wrong to the system when it first discovers them, it announces the fact and then
tries to change them to JPG format.
Why won’t my video play?
It is possible that the file is too large to play. Although the internal storage
capacity is 1.80 GB, the system may have difficulty playing files close to this size.
Video files of over 1 GB in size will take up to a half hour to upload to the DSP
unit. If the video is fairly short, the other possibility is that file may not be in the
proper format (i.e. the video codec may be incorrect). Check that the codec is
correct for the video. Video codecs supported are: MPEG DivX, Xvid, H.264
encoding MPEG4 Full HD, WMV9 (1080p).
143
NOTES
144
NOTES
145
NOTES
146
SPECIFICATIONS
Video Codecs:.....................................MPEG DivX, Xvid, H.264 encoding MPEG4
Full HD, WMV9 (1080p)
Audio Codecs:..................................................................................................MP3
Image Format:......................................................................................JPG (2732x)
Output Resolutions Supported:...................................................Up to 1080p/60Hz
Video Output Connector:.............................................Type A 19-pin HDMI Female
Video Output Connector:..........................................................VGA HD-15 Female
Audio Output Connector:...........................................................3.5mm Mini-Stereo
Ethernet Connector:................................................................RJ-45 (10/100Mbps)
USB Connector:.............................................................................USB 2.0, Type A
Operating Temperature:..............................................................................0 - 50 C
Storage Temperature:..............................................................................-20 - 60 C
Storage Humidity:........................................................5% - 90% Relative Humidity
Power Supply:............................................................................................12 V DC
147
WARRANTY
Gefen warrants the equipment it manufactures to be free from defects in material
and workmanship.
If equipment fails because of such defects and Gefen is notified within two (2)
years from the date of shipment, Gefen will, at its option, repair or replace the
equipment, provided that the equipment has not been subjected to mechanical,
electrical, or other abuse or modifications. Equipment that fails under conditions
other than those covered will be repaired at the current price of parts and labor in
effect at the time of repair. Such repairs are warranted for ninety (90) days from
the day of reshipment to the Buyer.
This warranty is in lieu of all other warranties expressed or implied, including
without limitation, any implied warranty or merchantability or fitness for any
particular purpose, all of which are expressly disclaimed.
1.
Proof of sale may be required in order to claim warranty.
2.
Customers outside the US are responsible for shipping charges to and from
Gefen.
3.
Copper cables are limited to a 30 day warranty and cables must be in their
original condition.
The information in this manual has been carefully checked and is believed to
be accurate. However, Gefen assumes no responsibility for any inaccuracies
that may be contained in this manual. In no event will Gefen be liable for
direct, indirect, special, incidental, or consequential damages resulting from
any defect or omission in this manual, even if advised of the possibility of such
damages. The technical information contained herein regarding the features and
specifications is subject to change without notice.
For the latest warranty coverage information, please visit Gefen’s Warranty web
page at http://www.gefen.com/kvm/aboutus/warranty.jsp
PRODUCT REGISTRATION
Please register your product online by visiting Gefen’s web site at
http://www.gefen.com/kvm/Registry/Registration.jsp
148
*ma-EXT-HD-DSP*
Rev X8
20600 Nordhoff St., Chatsworth CA 9
1-800-545-6900
818-772-9100
www.gefen.com
Pb
fax: 818-772-9120
[email protected]