1
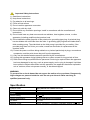
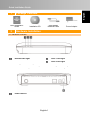
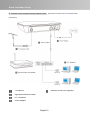
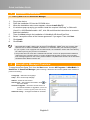
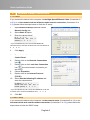
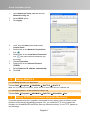
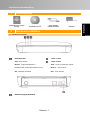
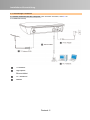
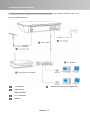
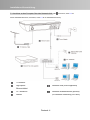
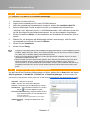
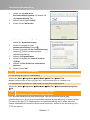
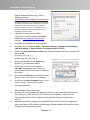
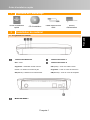
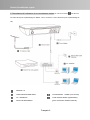
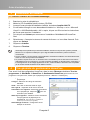
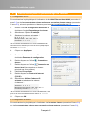
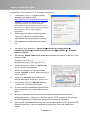
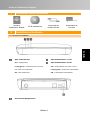
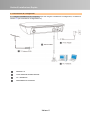
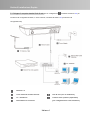
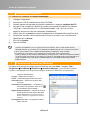
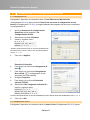
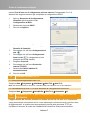
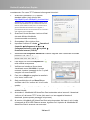
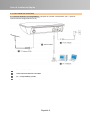
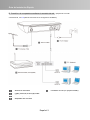
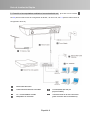
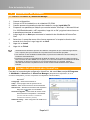
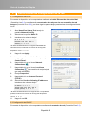
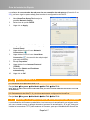
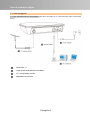
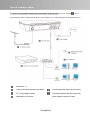
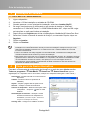
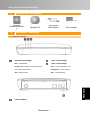
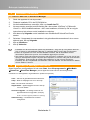
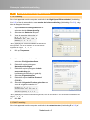
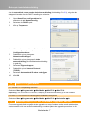
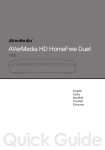
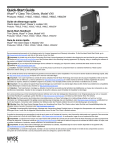
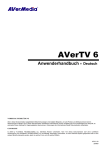
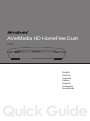
AVerMedia HD HomeFree Duet
F200
English
Deutsch
Francais
Italiano
Espanol
Português
Nederlands
Quick Guide
European Community Compliance Statement
Class B
This product is herewith confirmed to comply with the requirements set
out in the Council Directives on the Approximation of the laws of the
Member States relating to Electromagnetic Compatibility Directive
2004/108/EC.
Safety- Low Voltage Directive 2006/95/EC
ErP Directive- 2009/125/EC
Disclaimer
All the screen shots in this documentation are only example images. The images may vary
depending on the product and software version. Information presented in this documentation
has been carefully checked for reliability; however, no responsibility is assumed for
inaccuracies. The information contained in this documentation is subject to change without
notice.
Copyright
©2010 by AVerMedia Technologies, Inc. All rights reserved.
No part of this document may be reproduced or transmitted in any form, or by any means
without the prior written permission of AVerMedia Technologies Inc. AVerMedia Technologies
Inc. reserves the right to modify its models, including their characteristics, specifications,
accessories and any other information stated herein without notice. The official printout of any
information shall prevail should there be any discrepancy between the information contained
herein and the information contained in that printout.
"AVerMedia" is a trademark (or registered trademark) of AVerMedia Technologies, Inc. Other
trademarks used herein for description purpose only belong to each of their companies.
THE MARK OF CROSSED-OUT WHEELED BIN INDICATES THAT THIS PRODUCT MUST
NOT BE DISPOSED OF WITH YOUR OTHER HOUSEHOLD WASTE. INSTEAD, YOU NEED
TO DISPOSE OF THE WASTE EQUIPMENT BY HANDING IT OVER TO A DESIGNATED
COLLECTION POINT FOR THE RECYCLING OF WASTE ELECTRICAL AND ELECTRONIC
EQUIPMENT. FOR MORE INFORMATION ABOUT WHERE TO DROP OFF YOUR WASTE
EQUIPMENT FOR RECYCLING, PLEASE CONTACT YOUR HOUSEHOLD WASTE DISPOSAL
SERVICE OR THE SHOP WHERE YOU PURCHASED THE PRODUCT.
Important Safety Instructions
1.) Read these instructions.
2.) Keep these instructions.
3.) Pay attention to all warnings.
4.) Follow all instructions.
5.) Do not use this apparatus near water.
6.) Clean only with dry cloth.
7.) Do not block any ventilation openings. Install in accordance with the manufacturer's
instructions.
8.) Do not install near any heat sources such as radiators, heat registers, stoves, or other
apparatus (including amplifiers) that produce heat.
9.) Do not defeat the safety purpose of the polarized or grounding-type plug. A polarized plug
has two blades with one wider than the other. A grounding type plug has two blades and a
third rounding prong. The wide blade or the third prong is provided for your safety. If the
provided plug does not fit into your outlet, consult an electrician for replacement of the
obsolete outlet.
10.) Protect the power cord from being walked on or pinched particularly at plugs, convenience
receptacles, and the point where they exit from the apparatus.
11.) Only use the attachments/accessories specified by the manufacturer.
12.) Unplug this apparatus during lightning storms or when unused for long periods of time.
13.) Refer all servicing to qualified service personnel. Servicing is required when the apparatus
has been damaged in any way, such as power-supply cord or plug is damaged, liquid has
been spilled or objects have fallen into the apparatus, the apparatus has been exposed to
rain or moisture, does not operate normally, or has been dropped.
WARNING
To prevent fire or shock hazard do not expose the unit to rain or moisture. Dangerously
high voltages are present inside the unit. Do not open the unit. Refer servicing to
qualified personnel only.
Specification
Product name
AVerMedia HD HomeFree Duet
Model name
Power
F200
Power Rating
5V
Power consumption
< 5W (USB device not included)
Off Mode
< 0.5W
Adapter Power
Input: 100-240V~, 50-60Hz, 0.3A Max. Output: 5V
, 2A
, 2A
Quick Instillation Guide
Quick Installation
Guide
2
English
Package Contents
Installation CD
High-Speed
Ethernet Cable
Power Adaptor
Hardware Installation
Deutsch
1
Tuner 1 LED light
OFF – Power off
Tuner 2 LED light
Blinking – Network checking / Network
OFF – Tuner unused / error
error / Network not working
Blinking – Tuner scanning
ON – Tuner streaming
Power ON/OFF
English-1
Ελληνική
Nederlands
Português
ON – Network working
Español
Ethernet LED light
Italiano
Français
2.1 Hardware Overview
Quick Instillation Guide
2.2 Making Connections
A. Directly connect to the computer (after well-connected, see 5.1 for IP setup instructions)
TV Antenna
High-Speed Ethernet Cable
PC / Notebook
Power Adaptor
English-2
Quick Instillation Guide
B. Connect to the computer via the network router (after well-connected, see 5.2 for DHCP setup
instructions)
TV Antenna
Network Router (not supplied)
High-Speed Ethernet Cable
PC / Notebook
Power Adaptor
English-3
Quick Instillation Guide
C. Connect to the computer via the network hub
(If with
connection, see 5.2 for DHCP setup
instructions; otherwise, see 5.1 for IP setup instructions)
TV Antenna
High-Speed Ethernet Cable
Network Hub (not supplied)
PC / Notebook
Network Wall Outlet (Optional)
Power Adaptor
(for outside network connection)
English-4
Quick Instillation Guide
3
Software Installation
3.1 Installing AVerTV 6 and HomeFree Manager
1.
2.
3.
4.
Plug in the device.
Place the Installation CD into the CD-ROM drive.
When the installation main screen appears, choose Install AVerTV.
If a windows pops up saying you need to install the required “WinPcap” or “Microsoft
Visual C++ 2008 Redistributable –x86”, click OK and follow the instructions on screen to
finish the installation.
Then click Next to begin the installation of AVerMedia HD HomeFree Duet.
Select “I accept the terms of the license agreement” if you agree. Then click Next.
Click Install.
Click Finish.
5.
6.
7.
8.
z
z
z
4
If DirectX 9.0c or above is not installed in your system, usually the installation CD will
automatically install it during the process of installation. Make sure your system has
DirectX 9.0c or above installed so that the TV software utility can function properly.
If your system is not equipped with Acrobat Reader, the installation wizard will automatically
be called up during the process of installation.
The product does not come with a software DVD decoder. If users can playback DVD or MPEG-2
video files on the computer, there is no need to install a DVD decoder. However, if the Decoded
Error message appears on the screen, please install the compatible DVD decoder via the Windows®
XP Media Center Edition Partners site.
HomeFree Manager Overview
To open HomeFree Setup Tool, from the Start menu, choose All Programs Æ AVerMedia Æ
HomeFree Æ HomeFree Manager. (After scanning, if the device is not found, please check if device is
power-on and retry.)
z
z
z
z
z
Scan – Choose to rescan the device.
Language – Select the UI language.
Help – Go to online help webpage.
About – Check the tool version.
Device Info. – Show device information. Click
see more details.
to
z
Firmware Upgrade – Check the current version of
your device firmware or upgrade it. (Please refer
z
Network Config. – Configure the Static IP or DHCP.
to section 7. Firmware Upgrade problem and solution)
English-5
Quick Instillation Guide
5
Network Setup Instructions
5.1 IP Setup
If you connect the device to the computer via the High-Speed Ethernet Cable (Connection A
in 2.2) or via the network hub but without outside network connection (Connection C in
2.2), please follow the steps below to finish the IP setup.
1.
2.
3.
Open HomeFree Setup Tool and choose
Network Config. tab.
Select Static IP option.
Enter the values below:*
IP : 2 · 3 · 4 · 5
Netmask : 255 · 255 · 255 · 0
Gateway : 2 · 3 · 4 · 6
*If you simultaneously use a second AVerMedia HD
HomeFree Duet, enter the IP values of the second device as
2 · 3 · 4 · 8
4.
Click Apply.
5.
Then, click the Start button and choose
Control Panel.
Double-click on the Network Connections
icon
.
Double-click on the Local Area Connection
icon
(the main network connection you
are using).
Choose Properties.
Double-click on the Internet Protocol
(TCP/IP).
Select Use the following IP address and
enter the values below*:
6.
7.
8.
9.
10.
IP address : 2 · 3 · 4 · 7
Subnet mask : 255 · 255 · 255 · 0
Default gateway : 2 · 3 · 4 · 6
*If you simultaneously use a second PC/Notebook, enter the
IP values of the second PC/Notebook as 2 · 3 · 4 · 9
11.
Click OK.
5.2 DHCP Setup
If you connect the device to the computer via the network router (Connection B in 2.2) or via
the network hub with outside network connection (Connection C in 2.2), please follow the
steps below to finish the DHCP setup.
English-6
Quick Instillation Guide
1.
2.
Open HomeFree Setup Tool and choose
Network Config. tab.
Select DHCP option.
3.
Click Apply.
4.
9.
Then, click the Start button and choose
Control Panel.
Double-click on the Network Connections
icon
.
Double-click on the Local Area Connection
icon
(the main network connection you
are using).
Choose Properties.
Double-click on the Internet Protocol
(TCP/IP).
Select Obtain an IP address automatically.
10.
Click OK.
5.
6.
7.
8.
6
Using AVerTV 6
6.1 Activating the AVerTV 6 Application
Choose Start ÆPrograms Æ AVerMedia Æ AVerTV 6 Æ AVerTV 6.
Note: For more AVerTV 6 instructions, please refer to the User’s Manual in the Installation CD.
6.2 Uninstalling AVerTV 6 and HomeFree Setup Tool
Choose Start Æ Programs Æ AVerMedia Æ AVerTV 6 Æ Uninstaller ÆYes.
7
Using TFTP for Firmware Upgrade Recovery
Firmware upgrade may fail if upgrade is interrupted for any reason, such as when a power
blackout occurs during upgrading procedure. If so, you need the TFTP tool to restore the
firmware, so AVerMedia HD HomeFree Duet can function normally. To use TFTP, please do
the followings:
English-7
Quick Instillation Guide
1.
Download the TFTP tool (tftpd32 standard
edition (zip)) from the website:
http://tftpd32.jounin.net/tftpd32_download.html
(AVerMedia is not responsible for any third-party software
and will have no liability of any kind for your use of such
third-party software and make no warranty of any kind with
respect to such third-party software, whether
included/downloaded in the Product or under AVerMedia’s
suggestion.)
2.
Download the firmware file “vmlinux.ub” from
AVerMedia official website
(www.avermedia.com/avertv).
3.
Unzip the file to your hard drive.
4.
Set up your IP address: Start Æ Control
Panel Æ Network Connections Æ Local
Area Connection Æ PropertiesÆ Internet
Protocol (TCP/IP).
5.
Select Use the following IP address and enter the values below. Then click OK.
IP address : 192 · 168 · 0 · 1
Subnet mask : 255 · 255 · 255 · 0
6.
Double click on the tftpd32.exe icon
the unzipped folder.
in
7.
Check if Server interfaces is shown as
192.168.0.1. If not, repeat Step 3 to 5 and
recheck.
8.
Click Browse and choose the folder where
“vmlinux.ub” is located.
9.
You can click Show Dir to check if
“vmlinux.ub” is in the directory.
10.
Then connect AVerMedia HD HomeFree Duet
to the computer via the High-Speed Ethernet
Cable.
11.
Turn on the AVerMedia HD HomeFree Duet and wait for a few seconds. The
“vmlinux.ub” download from TFTP Server begins. (If the downloading window does not
appear, please repeat this step and retry.)
12.
When it is done, AVerMedia HD HomeFree Duet will be reset. If you see the Ethernet
LED light is solely on, it suggests AVerMedia HD HomeFree Duet is successfully
recovered.
English-8
Installations-Kurzanleitung
Installations-Kurzanl
eitung
2
English
Lieferumfang
Installations-CD
High-Speed
Ethernet-Kabel
Netzteil
Hardwareinstallation
Deutsch
1
Tuner 2 LED
Blinken – Zugriff auf Netzwerk /
AUS – Tuner nicht benutzt / Fehler
Netwerk-Fehler / Netzwerk funktioniert nicht
Blinken – Tuner scannt
AN – Netzwerk in Betrieb
EIN – Tuner streamt
Español
Tuner 1 LED
AUS – Ausschalten
Netzversorgung EIN/AUS
Deutsch -1
ÅëëçíéêÞ
Nederlands
Português
Ethernet-LED
Italiano
Français
2.1 Hardware-Überblick
Installations-Kurzanleitung
2.2 Verbindungen Herstellen
A. Direkter Anschluss an den Computer (nach korrektem Anschluss, siehe 5.1 für
IP-Installationshinweise)
TV-Antenne
High-Speed
Ethernet-Kabel
PC / Notebook
Netzteil
Deutsch -2
Installations-Kurzanleitung
B. Anschluss an den Computer über den Netzwerk-Router (nach korrektem Anschluss, siehe 5.2 für
DHCP-Installationshinweise)
TV-Antenne
Netzwerk-Router (nicht mitgeliefert)
High-Speed
Ethernet-Kabel
PC / Notebook
Netzteil
Deutsch -3
Installations-Kurzanleitung
C. Anschluss an den Computer über den Netzwerk-Hub (Bei
Anschluss, siehe 5.2 für
DHCP-Installationshinweise; ansonsten, siehe 5.1 für IP-Installationshinweise)
TV-Antenne
High-Speed
Netzwerk-Hub (nicht mitgeliefert)
Ethernet-Kabel
PC / Notebook
Netzwerk Wandsteckdose (optional)
Netzteil
(für Netzwerk-Verbindung im Freien)
Deutsch -4
Installations-Kurzanleitung
3
Softwareinstallation
3.1 Installation von AVerTV 6 und HomeFree Manager
1.
2.
3.
4.
Schließen Sie das Gerät ein.
Legen Sie die Installations-CD in das CD-ROM-Laufwerk.
Wenn der Installations-Hauptbildschirm erscheint, wählen Sie Installation AVerTV.
Falls ein Mitteilungs-Fenster erscheint und Sie zur Installation des erforderlichen
“WinPcap” oder “Microsoft Visual C++ 2008 Redistributable –x86” auffordert, klicken Sie
auf OK und folgen Sie den Bildschirmhinweisen, um mit der Installation fortzufahren.
Klicken Sie dann auf Weiter, um die Installation von AVerMedia HD HomeFree Duet zu
starten.
Wählen Sie „Ich akzeptiere die Bedingungen dieses Lizenzvertrags“, falls Sie damit
einverstanden sind. Klicken Sie dann auf Weiter.
Klicken Sie auf Installieren.
Klicken Sie auf Fertig.
5.
6.
7.
8.
z
z
z
4
Falls DirectX 9.0c oder eine neuere Version nicht auf Ihrem System installiert ist, wird dieses
Programm in der Regel während des Installationsvorgangs automatisch von der Installations-CD aus
installiert. Stellen Sie sicher, dass in Ihrem System DirectX 9.0c oder eine neuere Version installiert
ist, sodass das TV-Software-Utility korrekt funktionieren kann.
Wenn kein Acrobat Reader installiert ist, werden Sie während der Installation gefragt, ob dieser
automatisch installiert werden soll.
Dieses Produkt wird ohne DVD Decoder geliefert. Wenn Sie DVD oder MPEG-2 Filme auf Ihrem
Rechner abspielen können, müssen Sie keinen DVD Decoder installieren. Wenn jedoch ein
Decoder-Fehler in der Windows® Media Center Edition erscheint, dann installieren Sie bitte einen
kompatiblen DVD-Decoder, den Sie auf der Windows ® Media Center Edition MCE Partnerseite
finden.
HomeFree Manager Überblick
Um das HomeFree Einrichten-Hilfsprogramm zu öffnen, wählen Sie im Start Menü die Option
Alle Programme Æ AVerMedia Æ HomeFree Æ HomeFree Manager. (Falls das Gerät nach
dem Scannen nicht gefunden wurde, prüfen Sie, ob das Gerät eingeschaltet ist und versuchen Sie es erneut.)
z
z
z
z
z
z
Scannen – Zum erneuten Scannen des Geräts.
Sprache – Wahl der UI-Sprache.
Hilfe – Aufrufen der Online-Hilfe-Webseite.
Info zu – Überprüfen Sie die Hilfsprogramm-Version.
Geräte-Info. – Zeigt Geräteinformationen an. Klicken
Sie auf , um weitere Details zu sehen.
Firmware-Aktualisierung – Zeigt die aktuelle Version
Ihrer Geräte-Firmware an oder aktualisiert sie.
(Lesen Sie Abschnitt 7.
Firmware-Aktualisierungsprobleme und Lösungen)
z
Netzwerkkonfig. – Konfiguriert Statische IP oder
HDCP.
Deutsch -5
Installations-Kurzanleitung
5
Hineise zum Einrichten des Netzwerks
5.1 IP Einrichten
Falls Sie das Gerät über das High-Speed Ethernetkabel (Anschluss A in 2.2) oder über den
Netzwerk-Hub, ohne Netzwerkverbindung im Freien (Anschluss C in 2.2) an den Computer
anschließen, gehen Sie beim IP-Einrichten wie folgt vor.
1.
2.
3.
Öffnen Sie das HomeFree
Einrichten-Hilfsprogramm und wählen Sie
das Netzwerkkonfig. Tab.
Wählen Sie die Option Statische IP.
Geben Sie folgenden Werte ein:*
IP : 2 · 3 · 4 · 5
Netzmaske : 255 · 255 · 255 · 0
Gateway : 2 · 3 · 4 · 6
*Falls Sie gleichzeitig ein zweites AVerMedia HD HomeFree
Duet benutzen, geben Sie die IP-Werte des zweiten Geräts
mit 2 · 3 · 4 · 8 an.
4.
5.
6.
7.
8.
9.
10.
Klicken Sie auf Anwenden.
Klicken Sie dann auf die Start Taste und
wählen Sie Systemsteuerung.
Klicken Sie doppelt auf das
Netzwerkverbindung Symbol
.
Klicken Sie doppelt auf das LAN-Verbindung
Symbol
(die am meisten genutzte
Netzwerkverbindung).
Wählen Sie Eigenschaften.
Klicken Sie doppelt auf Internetprotokol
(TCP/IP).
Wählen Sie Diese IP-Adresse nutzen und
geben Sie folgende Werte ein*:
IP-Adresse: 2 · 3 · 4 · 7
Subnetzmaske: 255 · 255 · 255 · 0
Standard Gateway: 2 · 3 · 4 · 6
*Falls Sie gleichzeitig ein(en) zweites(n) PC/Notebook benutzen, geben Sie die IP-Werte des zweiten
PCs/Notebooks mit 2 · 3 · 4 · 9 an.
11.
Klicken Sie auf OK.
5.2 DHCP Einrichten
Falls Sie das Gerät über den Netzwerk-Router (Anschluss B in 2.2) oder über den
Netzwerk-Hub, mit Netzwerkverbindung im Freien (Anschluss C in 2.2) an den Computer
anschließen, gehen Sie beim DHCP-Einrichten wie folgt vor.
Deutsch -6
Installations-Kurzanleitung
1.
2.
Öffnen Sie das HomeFree
Einrichten-Hilfsprogramm und wählen Sie
das Netzwerkkonfig. Tab.
Wählen Sie die Option DHCP.
3.
Klicken Sie auf Anwenden.
4.
Klicken Sie dann auf die Start Taste und
wählen Sie Systemsteuerung.
Klicken Sie doppelt auf das
Netzwerkverbindung Symbol
.
Klicken Sie doppelt auf das LAN-Verbindung
Symbol
(die am meisten genutzte
Netzwerkverbindung).
Wählen Sie Eigenschaften.
Klicken Sie doppelt auf Internet Protocol
(TCP/IP).
Wählen Sie Die IP-Adresse automatisch
beziehen.
5.
6.
7.
8.
9.
10.
6
Klicken Sie auf OK.
AVerTV 6 benutzen
6.1 Aktivierung der AVerTV 6 Anwendung
Wählen Sie Start ÆProgramme Æ AVerMedia Æ AVerTV 6 Æ AVerTV 6.
Hinweis: Weiter Hinweise zu AVerTV 6 finden Sie in der Benutzeranleitung der Installations-CD.
6.2 Deinstallation von AVerTV 6 und HomeFree Einrichten-Hilfsprogramm
Wählen Sie Start ÆProgramme Æ AVerMedia Æ AVerTV 6 Æ Deinstallationsprogramm
Æ Ja.
7
TFTP zur Wiederherstellung nach
Firmware-Aktualisierung nutzen
Die Firmware-Aktualisierung kann fehlschlagen, falls der Aktualisierungsvorgang
unterbrochen wird, z.B. bei einem Stromausfall während der Aktualisierung. In einem solchen
Fall können Sie das TFTP-Hilfsprogramm zur Wiederherstellung der Firmware benutzen,
sodass AVerMedia HD HomeFree Duet normal funktioniert. Gehen Sie bei der Nutzung von
TFTP wie folgt vor:
Deutsch -7
Installations-Kurzanleitung
1.
Laden Sie sich das TFTP-Hilfsprogramm
(tftpd32 Standard Edition (zip)) von der
Webseite herunter:
http://tftpd32.jounin.net/tftpd32_download.html
(AVerMedia übernimmt keine Verantwortung für Software
von Dritten und haftet nicht für die Nutzung einer solchen
Software von Dritten und übernimmt keine Haftung
bezüglich Software von Dritten, unabhängig davon, ob
diese dem Produkt beiliegt/heruntergeladen oder von
AVerMedia empfohlen wurde.)
2.
Laden Sie sich die Firmware-Datei
„vmlinux.ub“ von der offiziellen AVerMedia
Webseite (www.avermedia.com/avertv)
herunter.
3.
Entzippen Sie die Datei auf Ihre Festplatte.
4.
Einrichten Ihrer IP-Adresse: Start Æ Systemsteuerung Æ Netzwerkverbindung Æ
LAN-Verbindung Æ EigenschaftenÆ Internetprotokol (TCP/IP).
5.
Wählen Sie Diese IP-Adresse nutzen und geben Sie folgende Werte ein. Klicken Sie
dann auf OK.
IP-Adresse: 192 · 168 · 0 · 1
Subnetzmaske: 255 · 255 · 255 · 0
6.
Klicken Sie doppelt auf das tftpd32.exe
im entzippten Ordner.
Symbol
7.
Prüfen Sie, ob unter Server-Interface
192.168.0.1 angegeben wird. Falls nicht,
wiederholen Sie die Schritte 3 bis 5 und prüfen
Sie erneut.
8.
Klicken Sie auf Browsen und wählen Sie den
Ordner, in dem sich „vmlinux.ub“ befindet.
9.
Sie können auf Verz. Anzeigen klicken, um zu
prüfen, ob sich „vmlinux.ub“ in diesem
Verzeichnis befindet.
10.
Verbinden Sie dann AVerMedia HD HomeFree Duet über ein High-Speed
Ethernetkabel mit dem Computer.
11.
Schalten Sie nun AVerMedia HD HomeFree Duet ein und warten Sie einen Moment.
Die „vmlinux.ub“ Datei wird vom TFTP-Server heruntergeladen. (Falls sich kein
Herunterlade-Fenster öffnet, wiederholen Sie die Schritte und versuchen Sie es
erneut.)
12.
Nach Abschluss des Vorgangs wird AVerMedia HD HomeFree Duet zurückgesetzt.
Wenn die Ethernet LED leuchtet, bedeutet dies, dass AVerMedia HD HomeFree Duet
erfolgreich wiederhergestellt wurde.
Deutsch -8
Guide d’installation rapide
Guide d’installation
rapide
2
CD d’installation
English
Contenu de l’emballage
Câble Ethernet haut
débit
Source
d’alimentation
Installation du matériel
Deutsch
1
Témoin LED tuner 1
OFF – Arrêt
Témoin LED tuner 2
Clignotant – Vérification réseau / Erreur
OFF (Arrêt) – Tuner non utilisé / erreur
réseau / Le réseau ne fonctionne pas
Clignotant – Tuner en cours de recherche
ON (Marche) – Réseau en fonctionnement
ON (Marche) – Tuner en cours de réception
MARCHE/ARRÊT
Français-1
ÅëëçíéêÞ
Nederlands
Português
Témoin LED Ethernet
Español
Italiano
Français
2.1 Vue générale du matériel
Guide d’installation rapide
2.2 Branchements
A. Branchement direct à l’ordinateur (une fois correctement connecté, voir dans 5.1 les instructions pour
le paramétrage de l’IP)
Antenne TV
Câble Ethernet haut débit
PC / Notebook
Source d’alimentation
Français-2
Guide d’installation rapide
B. Branchement à l’ordinateur via le routeur du réseau (une fois correctement connecté, voir dans
5.2 les instructions pour le paramétrage du DHCP)
Antenne TV
Routeur réseau (non fourni)
Câble Ethernet haut débit
PC / Notebook
Source d’alimentation
Français-3
Guide d’installation rapide
C. Branchement à l’ordinateur via le concentrateur réseau (en cas de connexion , voir dans 5.2
les instructions pour le paramétrage du DHCP ; sinon, voir dans 5.1 les instructions pour le paramétrage de
l’IP)
Antenne TV
Câble Ethernet haut débit
Concentrateur réseau (non fourni)
PC / Notebook
Prise murale réseau (optionnelle)
Source d’alimentation
(pour connexion réseau externe)
Français-4
Guide d’installation rapide
3
Installation du matériel
3.1 Installation d’AVerTV 6 et de HomeFree Manager
1.
2.
3.
4.
Branchez la prise du périphérique.
Mettez le CD d’installation dans le lecteur CD-ROM.
Lorsque l’écran principal d’installation s’affiche, choisissez Installer AVerTV.
Si une fenêtre émerge en vous demandant d’installer le « WinPcap » ou le « Microsoft
Visual C++ 2008 Redistributable –x86 » requis, cliquez sur OK et suivez les instructions
de l’écran pour terminer l’installation.
Puis cliquez sur Suivant pour commencer l’installation d’AVerMedia HD HomeFree
Duet.
Sélectionnez « J'accepte les termes du contrat de licence » si vous êtes d'accord. Puis
cliquez sur Suivant.
Cliquez sur Installer.
Cliquez sur Terminer.
5.
6.
7.
8.
z
z
z
4
Si DirectX 9.0c ou supérieur n’est pas installé dans votre système, le logiciel l’installera
automatiquement pendant le processus d’installation. Assurez-vous que votre système possède
DirectX 9.0c ou supérieur installé pour que le logiciel utilitaire de télévision puisse fonctionner
correctement.
Si votre système n’est pas équipé d’Acrobat Reader, l’assistant d’installation sera automatiquement
activé au cours de la procédure d’installation.
Le produit n’est pas fourni avec un décodeur DVD. Si l’utilisateur peut lire des DVD et des fichiers
vidéo MPEG-2 sur son ordinateur, il n’est pas nécessaire d’installer un décodeur DVD. Cependant, si
le message Erreur de décodage apparaît sur l’écran, veuillez installer le décodeur DVD compatible
par le site Windows® XP Media Center Edition Partners.
Vue générale du gestionnaire HomeFree
Pour ouvrir l’outil de configuration HomeFree, dans le menu Démarrer choisissez Tous les
programmes Æ AVerMedia Æ HomeFree Æ Gestionnaire HomeFree (Après recherche, si le
programme n’est pas trouvé, vérifiez que le périphérique soit sur « Marche » et réessayez.)
z
Balayage – Choix d’une nouvelle recherche dans le
périphérique.
z
Langue – Sélection de la lange de l’interface
utilisateur.
z
Aide – Pour aller au site Web d’aide en ligne.
Au sujet de - Vérification de la version de l'outil.
Information sur l’appareil – Montre des informations
sur le périphérique. Cliquez sur
pour une
information plus détaillée.
Mise à jour logicielle – Vérifiez la version actuelle du
microprogramme du périphérique ou
actualisez-la. (Voir la section 7. Problèmes et
z
z
z
solutions pour la mise à jour logicielle)
z
Paramétrage du réseau - Configuration de l'IP
statique ou du DHCP.
Français-5
Guide d’installation rapide
5
Instructions pour le paramétrage du réseau
5.1 Configuration de l’IP
Si vous branchez le périphérique à l’ordinateur via le câble Ethernet haut débit (connexion A
sous 2.2) ou via le concentrateur réseau mais sans connexion réseau externe (connexion
C sous 2.2), suivez la procédure ci-dessous pour terminer la configuration de l’IP.
1.
2.
3.
Ouvrez l’Outil de configuration HomeFree et
choisissez l’onglet Paramétrage du réseau.
Sélectionnez l’option IP statique.
Saisissez les valeurs suivantes :*
IP : 2 · 3 · 4 · 5
Masque réseau : 255 · 255 · 255 · 0
Passerelle : 2 · 3 · 4 · 6
*Si vous utilisez simultanément un second AVerMedia HD
HomeFree Duet, saisissez pour l’IP du second périphérique
les valeurs : 2 · 3 · 4 · 8
4.
Cliquez sur Appliquer.
5.
Ensuite, cliquez sur le bouton Démarrer et
choisissez Panneau de configuration.
Double-cliquez sur l’icône
Connexions
réseau.
Double-cliquez sur l’icône
Connexion au
réseau local (la connexion au réseau
principal que vous utilisez).
Choisissez Propriétés.
Double-cliquez sur Protocole Internet
(TCP/IP).
Sélectionnez Utiliser l'adresse IP
suivante et saisissez les valeurs
ci-dessous* :
6.
7.
8.
9.
10.
Adresse IP : 2 · 3 · 4 · 7
Masque de sous-réseau : 255 · 255 · 255 · 0
Passerelle par défaut : 2 · 3 · 4 · 6
*Si vous utilisez simultanément un second PC/Notebook, saisis
pour l’IP du second PC/Notebook les valeurs : 2 · 3 · 4 · 9
11.
Cliquez sur OK.
5.2 Configuration du DHCP
Si vous branchez le périphérique à l’ordinateur via le routeur réseau (connexion B sous 2.2)
ou via le concentrateur réseau avec connexion réseau externe (connexion C sous 2.2),
Français-6
Guide d’installation rapide
suivez la procédure ci-dessous pour terminer la configuration du DHCP.
1.
2.
Ouvrez l’outil de configuration HomeFree et
sélectionnez l’onglet Paramétrage du
réseau.
Sélectionnez l’option DHCP.
3.
Cliquez sur Appliquer.
4.
Ensuite, cliquez sur le bouton Démarrer et
choisissez Panneau de configuration.
Double-cliquez sur l’icône
Connexions
réseau.
Double-cliquez sur l’icône
Connexion au
réseau local (la connexion au réseau
principal que vous utilisez).
Choisissez Propriétés.
Double-cliquez sur Protocole Internet
(TCP/IP).
Sélectionnez Obtenir une adresse IP
automatiquement.
5.
6.
7.
8.
9.
10.
6
Cliquez sur OK.
Utilisation de l’AVerTV 6
6.1 Activation de l’application AVerTV 6
Choisissez Démarrer ÆProgrammes Æ AVerMedia Æ AVerTV 6 Æ AVerTV 6.
NB : Pour de plus amples instructions sur l’AVerTV6, voyez le Mode d’emploi dans le CD d’installation.
6.2 Désinstallation d’AVerTV 6 et de l’outil de configuration HomeFree
Choisissez Démarrer ÆProgrammes Æ AVerMedia Æ Désinstaller Æ Oui.
7
Utilisation du TFTP pour la récupération de la mise à
jour logicielle
La mise à jour logicielle peut échouer si elle est interrompue pour une raison quelconque, telle
qu’une panne de courant pendant le processus. Dans ce cas, il vous faut l’outil TFTP pour
restaurer le microprogramme afin qu’AVerMedia HD HomeFree Duet puisse fonctionner
Français-7
Guide d’installation rapide
normalement. Pour utiliser le TFTP, procédez comme suit :
1.
Téléchargez l’outil TFTP [tftpd32 édition
standard (zip)] depuis le site :
http://tftpd32.jounin.net/tftpd32_download.html
(AVerMedia ne se porte pas responsable de logiciels
appartenant à des tiers et ne saurait encourir de
responsabilités ni offrir des garanties d’aucune sorte en
rapport avec ces logiciels, qu’ils soient inclus/téléchargés
dans le produit ou utilisés d’après suggestion
d'AVerMedia.)
2.
Téléchargez le fichier du microprogramme
“vmlinux.ub” depuis le site Web officiel
d’AVerMedia (www.avermedia.com/avertv).
3.
Décompressez le fichier dans votre disque
dur.
4.
Configurez votre adresse IP : Démarrer Æ Panneau de configuration Æ
Connexions réseau Æ Connexion au réseau local Æ PropriétésÆ Protocole
Internet (TCP/IP).
5.
Sélectionnez Utiliser l'adresse IP suivante et saisissez les valeurs ci-dessous. Puis
cliquez sur OK.
Adresse IP : 192 · 168 · 0 · 1
Masque de sous-réseau : 255 · 255 · 255 · 0
6.
Double cliquez sur l’icône
tftpd32.exe
dans le dossier décompressé.
7.
Vérifiez si Interfaces du serveur s’affiche
comme 192.168.0.1. Sinon, refaites les pas 3
à 5 et revérifiez.
8.
Cliquez sur Parcourir et sélectionnez le
dossier dans lequel se trouve « vmlinux.ub ».
9.
Vous pouvez cliquer sur Montrer le rép. si
« vmlinux.ub » est dans le répertoire.
10.
Ensuite, branchez AVerMedia HD HomeFree
Duet à l’ordinateur via le câble Ethernet haut
débit.
11.
Allumez l’AVerMedia HD HomeFree Duet et attendez quelques secondes. Le
téléchargement de « vmlinux.ub » depuis le serveur TFTP commence. (Si la fenêtre
de téléchargement ne s’affiche pas, recommencez ce pas et réessayez.)
12.
Ceci terminé, l’AVerMedia HD HomeFree Duet se réinitialisera. Si seul le témoin LED
Ethernet est allumé, c'est qu’AVerMedia HD HomeFree Duet a été rétabli avec
succès.
Français-8
Guida di Installazione Rapida
Guida di
Installazione Rapida
2
CD di installazione
Inglese
Contenuto della confezione
Cavo Ethernet
ad Alta Velocità
Alimentatore di
Corrente
Installazione Hardware
Tedesco
1
Spia Sintonizzatore 1 LED
OFF – Spegnimento
Spia Sintonizzatore 2 LED
Lampeggiante – Controllo di rete / Errore di
OFF – Sintonizzatore non usato / errore
rete / Rete non funzionante
Lampeggiante – Scansione sintonizzatore
ON – Rete funzionante
ON – Trasmissione sintonizzatore
Accensione/Spegnimento
Italiano-1
Ελληνική
Olandese
Portoghese
Spia LED Ethernet
Spagnolo
Italiano
Francese
2.1 Panoramica Hardware
Guida di Installazione Rapida
2.2 Esecuzione dei collegamenti
A. Collegare direttamente al computer (dopo aver eseguito correttamente il collegamento, consultare la
sezione 5.1 per le istruzioni di configurazione IP)
Antenna TV
Cavo Ethernet ad Alta Velocità
PC / Notebook
Alimentatore di Corrente
Italiano-2
Guida di Installazione Rapida
B. Collegare al computer tramite il router di rete(dopo aver eseguito correttamente il collegamento,
consultare la sezione 5.2 per le istruzioni di configurazione DHCP)
Antenna TV
Router di rete (non in dotazione)
Cavo Ethernet ad Alta Velocità
PC / Notebook
Alimentatore di Corrente
Italiano-3
Guida di Installazione Rapida
C. Collegare il computer tramite l'hub di rete (se con collegamento
, consultare la sezione 5.2 per
le istruzioni di configurazione DHCP; in caso contrario, consultare la sezione 5.1 per istruzioni di
configurazione IP)
Antenna TV
Cavo Ethernet ad Alta Velocità
Hub di rete (non in dotazione)
PC / Notebook
Presa di rete a parete (Opzionale)
Alimentatore di Corrente
(per collegamento di rete all'esterno)
Italiano-4
Guida di Installazione Rapida
3
Installazione software
3.1 Installazione di AVerTV 6 e HomeFree Manager
1.
2.
3.
4.
Collegare il dispositivo.
Posizionare il CD di installazione nel drive CD-ROM.
Quando appare la schermata principale di installazione, scegliere Installare AVerTV.
Nel caso in cui compaia una finestra che indica la necessità di installare i file richiesti
“WinPcap” o “Microsoft Visual C++ 2008 Redistributable –x86”, fare clic su OK e
seguire le istruzioni a video per completare l'installazione.
Quindi, fare clic su Avanti per avviare l'installazione di AVerMedia HD HomeFree Duet.
Selezionare "Accetto i termini dell'accordo di licenza" nel caso in cui si sia d'accordo.
Quindi fare clic su Avanti.
Fare clic su Installa.
Fare clic su Fine.
5.
6.
7.
8.
z
z
z
4
Generalmente DirectX 9.0c o le versioni successive vengono installati automaticamente durante il
processo di installazione se non vengono trovati sul computer. Per il corretto funzionamento
dell’utilità software TV, accertarsi che sul sistema sia installato DirectX 9.0c o versione successiva.
Se nel vostro sistema non è installato Acrobat Reader, l’installazione verrà annullata.
Il prodotto non viene fornito con un software per decoder DVD. Se gli utenti possono
presincronizzare un DVD o dei file video MPEG-2 sul computer non c’è alcuna necessità di installare
un decoder DVD. Comunque se sullo schermo compare un messaggio di Errore Decodificazione si
prega di installare un decoder DVD compatibile attraverso il sito Windows® XP Media Center
Edition Partners.
Panoramica HomeFree Manager
Per aprire lo strumento di configurazione HomeFree, dal menu Start , scegliere Tutti i
Programmi Æ AverMedia Æ HomeFree Æ HomeFree Manager. (Al termine della scansione,
nel caso in cui il dispositivo non venga trovato si prega di verificare che sia accesso, quindi riprovare).
z
Scansione – Scegliere per eseguire una nuova
scansione del dispositivo.
z
Lingua – Selezionare la lingua UI.
Aiuto – Andare alla pagina web di aiuto online.
Informazioni su – Verificare la versione dello
strumento.
Informazioni sul dispositivo. – Visualizzare le
informazioni sul dispositivo. Fare clic su
per visualizzare ulteriori dettagli.
z
z
z
z
Aggiornamento Firmware – Verificare la versione
attuale del firmware del proprio dispositivo
oppure aggiornarla. (Si prega di consultare la
sezione 7. Problemi con aggiornamento firmware e
soluzione)
z
Configurazione di rete – Configurazione dell'IP
statico o DHCP.
Italiano-5
Guida di Installazione Rapida
5
Istruzioni per la Configurazione di Rete
5.1 Configurazione IP
Collegando il dispositivo al computer tramite il Cavo Ethernet ad Alta Velocità
(Collegamento A in 2.2) oppure tramite l'hub di rete ma senza il collegamento di rete
esterno (Collegamento C in 2.2), si prega di attenersi alle seguenti istruzioni per completare
la configurazione IP.
1.
2.
3.
Aprire lo Strumento di Configurazione
HomeFree quindi scegliere il tab
Configurazione di Rete .
Selezionare l'opzione IP Statico .
Inserire i seguenti valori:*
IP : 2 · 3 · 4 · 5
Netmask : 255 · 255 · 255 · 0
Gateway : 2 · 3 · 4 · 6
*Usando contemporaneamente un secondo AVerMedia HD
HomeFree Duet, inserire i valori IP del secondo dispositivo
come 2 · 3 · 4 · 8
4.
Fare clic su Applica.
5.
Quindi, fare clic sul tasto Start e scegliere
Pannello di Controllo.
Fare doppio clic sull'icona Collegamenti di
rete
.
Fare doppio clic sull'icona Collegamento
Area Locale
(il collegamento di rete
principale che si sta usando).
Scegliere Proprietà.
Fare doppio clic sull'icona Protocollo
Internet (TCP/IP).
Selezionare Usa il seguente indirizzo IP e
inserire i seguenti valori*:
6.
7.
8.
9.
10.
indirizzo IP: 2 · 3 · 4 · 7
Subnet mask : 255 · 255 · 255 · 0
Gateway preimpostato: 2 · 3 · 4 · 6
*Usando contemporaneamente un secondo PC/Notebook, inserire i valori IP del secondo PC/Notebook come 2 · 3 · 4 · 9
11.
Fare clic su OK.
5.2 Configurazione DHCP
Collegando il dispositivo al computer tramite il router di rete (Collegamento B in 2.2) oppure
Italiano-6
Guida di Installazione Rapida
tramite l'hub di rete con il collegamento alla rete esterna (Collegamento C in 2.2),
attenersi alle seguenti istruzioni per completare la configurazione DHCP.
1.
2.
Aprire lo Strumento di Configurazione
HomeFree quindi scegliere il tab
Configurazione di Rete .
Selezionare l'opzione DHCP .
3.
Fare clic su Applica.
4.
Quindi, fare clic sul tasto Start e scegliere
Pannello di Controllo.
Fare doppio clic sull'icona Collegamenti di
rete
.
Fare doppio clic sull'icona Collegamento
Area Locale
(il collegamento di rete
principale che si sta usando).
Scegliere Proprietà.
Fare doppio clic sull'icona Protocollo
Internet (TCP/IP).
Selezionare Ottieni indirizzo IP
automaticamente.
5.
6.
7.
8.
9.
10.
6
Fare clic su OK.
Utilizzo di AVerTV 6
6.1 Attivazione dell'applicazione AVerTV 6
Scegliere Start ÆProgrammi Æ AVerMedia Æ AVerTV 6 Æ AVerTV 6.
Nota: Per ulteriori istruzioni su AVerTV 6, consultare il Manuale dell'Utente nel CD di installazione.
6.2 Disinstallazione di AVerTV 6 e dello Strumento di Configurazione HomeFree
Scegliere Start Æ Programmi Æ AVerMedia Æ AVerTV 6 Æ Uninstaller ÆSì.
7
Utilizzo di TFTP per il Ripristino dell'Aggiornamento
Firmware
L'aggiornamento del firmware potrebbe non andare a buon fine nel caso in cui l'operazione
venga interrotta per un qualsiasi motivo, come ad esempio un'interruzione di corrente in fase
di aggiornamento. In questo caso sarà necessario servirsi dello strumento TFTP per
ripristinare il firmware, di modo che AVerMedia HD HomeFree Duet possa funzionare
Italiano-7
Guida di Installazione Rapida
correttamente. Per usare TFTP attenersi alle seguenti istruzioni:
1.
Scaricare lo strumento TFTP (tftpd32
standard edition (zip)) dal sito web:
http://tftpd32.jounin.net/tftpd32_download.html
(AVerMedia non è responsabile dei software di terzi e non si
assume responsabilità di alcun tipo relativamente all'uso che
farete di questo software di terze parti e non fornisce alcuna
garanzia relativamente al software di cui in oggetto, a
prescindere dal fatto che sia incluso/scaricato con il Prodotto o
sotto suggerimento di AVerMedia).
2.
Scaricare il file del firmware “vmlinux.ub”dal
sito web ufficiale AVerMedia
(www.avermedia.com/avertv).
3.
Scompattare il file sul disco fisso.
4.
Impostare l'indirizzo IP: Avvio Æ Pannello di
Controllo Æ Collegamenti di Rete Æ
Collegamento Area Locale Æ Proprietà Æ
Protocollo Internet (TCP/IP).
5.
Selezionare Usa il seguente indirizzo IP e inserire i seguenti valori. Quindi fare clic su OK.
indirizzo IP: 192 · 168 · 0 · 1
Subnet mask : 255 · 255 · 255 · 0
6.
Fare doppio clic sull'icona tftpd32.exe
nella cartella scompressa.
7.
Verificare se Interfacce Server viene
visualizzato come 192.168.0.1. In caso
contrario, ripetere i passaggi da 3 a 5, quindi
eseguire una nuova verifica.
8.
Fare clic su Sfoglia e scegliere la cartella in
cui si trova “vmlinux.ub”.
9.
Sarà possibile fare clic su Show Dir per
verificare che il file “vmlinux.ub” si trovi nella
cartella.
10.
Quindi, collegare AVerMedia HD HomeFree Duet al computer tramite il Cavo Ethernet
ad Alta Velocità.
11.
Accendere il AVerMedia HD HomeFree Duet e attendere alcuni secondi. Il download
“vmlinux.ub” dal server TFTP inizia. (Nel caso in cui non appaia la finestra di
download, ripetere questo passaggio e riprovare).
12.
Al termine, AVerMedia HD HomeFree Duet sarà reimpostato. Nel caso in cui si veda
unicamente la SPIA LED Ethernet accesa, significa che il ripristino di AVerMedia HD
HomeFree Duet è avvenuto con successo.
Italiano-8
Guía de Instalación Rápida
Guía de Instalación
Rápida
2
CD de instalación
English
Contenidos del paquete
Cable Ethernet de
alta velocidad
Adaptador de
corriente
Instalación de Hardware
Deutsch
1
Luz LED del sintonizador 1
APAGADA – Apagada
Luz LED del sintonizador 2
Destellante – Verificación de la red / Error
APAGADA – Sintonizador sin usar / error
de la red / La red no funciona
Destellante – Sintonizador en exploración
ENCENDIDA – Red en funcionamiento
Encendida – Sintonizador en transmisión
Encendida/Apagada
Español-1
Ελληνική
Nederlands
Português
Luz LED Ethernet
Español
Italiano
Français
2.1 Vistazo del Hardware
Guía de Instalación Rápida
2.2 Cómo hacer las conexiones
A. Conexión directa a la computadora (después de conectar correctamente, vea 5.1 para las
instrucciones de configuración de los IP)
Antena de televisión
Cable Ethernet de alta velocidad
PC / Computadora portátil
Adaptador de corriente
Español-2
Guía de Instalación Rápida
B. Conexión a la computadora mediante el enrutador de red (después de conectar
correctamente, vea 5.2 para las instrucciones de configuración del DHCP)
Antena de televisión
Enrutador de red (no proporcionado)
Cable Ethernet de alta velocidad
PC / Computadora portátil
Adaptador de corriente
Español-3
Guía de Instalación Rápida
C. Conexión a la computadora mediante el concentrador de red (Si se hizo con la conexión
vea 5.2 para las instrucciones de configuración de DHCP ; de otro modo, vea 5.1 para las instrucciones de
configuración de los IP)
Antena de televisión
Concentrador de red (no
proporcionado)
Cable Ethernet de alta velocidad
PC / Computadora portátil
Tomacorriente de la red (Opcional)
Adaptador de corriente
(para conexión de la red externa)
Español-4
,
Guía de Instalación Rápida
3
Instalación del software
3.1 Instalación de AVerTV 6 y HomeFree Manager
1.
2.
3.
4.
Conecte el dispositivo.
Coloque el CD de instalación en la unidad de CD-ROM.
Cuando aparezca la pantalla principal de instalación, escoja Install AVerTV.
Si aparece una pantalla que indique que necesita instalar “WinPcap” o “Microsoft Visual
C++ 2008 Redistributable –x86” requeridos, haga clic en OK y siga las instrucciones en
la pantalla para terminar la instalación.
Luego haga clic en Next para comenzar la instalación de AVerMedia HD HomeFree
Duet.
Seleccione “I accept the terms of the license agreement” si acepta los términos del
acuerdo de la licencia. Luego haga clic en Next.
Haga clic en Install.
Haga clic en Finish.
5.
6.
7.
8.
z
z
z
4
Si DirectX 9.0c o superior no está instalado en su sistema, el CD de instalación lo instalará
automáticamente durante el proceso de instalación. Asegúrese de que el sistema tenga DirectX
9.0c o superior para que el software de TV pueda funcionar de manera apropiada.
Si su sistema no tiene instalado Acrobat Reader, el proceso de instalación le abrirá el diálogo de
instalación automáticamente
El producto no incluye un descodificador de DVD de software. Si los usuarios pueden reproducir
DVD o archivos de vídeo MPEG-2 en el equipo, no es necesario instalar un descodificador de DVD.
No obstante, si aparece el mensaje de error de descodificación en la pantalla, instale el
descodificador de DVD compatible a través del sitio de Windows® XP Media Center Edition
Partners.
Vistazo del administrador HomeFree
Para abrir la herramienta de configuración HomeFree, del menú Start, escoja All Programs
Æ AVerMedia Æ HomeFree Æ HomeFree Manager. (Después de la exploración, si no se
encuentra el dispositivo, por favor compruebe si el dispositivo está encendido.)
z
Scan – Se escoge para volver a explorar el
dispositivo.
z
Language – Selecciona el idioma UI.
Help – Va a la página web de ayuda en línea.
About – Para verificar la versión de la herramienta.
Device Info. – Muestra la información del dispositivo.
Haga clic en
para ver más detalles.
z
z
z
z
Firmware Upgrade – Para revisar la versión actual
del firmware de su dispositivo o actualizarlo.
(Por favor consulte la sección 7. Problema de
actualización de firmware y solución)
z
Network Config. – Para configurar la IP estática o el
DHCP.
Español-5
Guía de Instalación Rápida
5
Instrucciones de configuración de la red
5.1 Configuración de los IP
Si conecta el dispositivo a la computadora mediante el cable Ethernet de alta velocidad
(Conexión A en 2.2) o mediante el concentrador de red pero sin una conexión de red
externa (Conexión C en 2.2), por favor siga los pasos abajo para terminar la configuración de
los IP.
1.
2.
3.
Abra HomeFree Setup Tool escoja la
pestaña Network Config.
Seleccione la opción Static IP.
Introduzca los valores abajo:*
IP : 2 · 3 · 4 · 5
Netmask : 255 · 255 · 255 · 0
Gateway : 2 · 3 · 4 · 6
*Si utiliza simultáneamente un segundo AVerMedia HD
HomeFree Duet, introduzca los valores IP del segundo
dispositivo como 2 · 3 · 4 · 8
4.
Haga clic en Apply.
5.
Luego haga clic en el botón Start y escoja
Control Panel.
Haga doble clic en el icono Network
Connections
.
Haga doble clic en el icono Local Area
Connection
(la conexión de red principal
que está utilizando).
Escoja Properties.
Haga doble clic en Internet Protocol
(TCP/IP).
Seleccione Use the following IP address e
introduzca los valores abajo*:
6.
7.
8.
9.
10.
IP address : 2 · 3 · 4 · 7
Subnet mask : 255 · 255 · 255 · 0
Default gateway : 2 · 3 · 4 · 6
*Si utiliza simultáneamente una segunda PC o computadora
portátil, introduzca los valores IP del segundo dispositivo
como 2 · 3 · 4 · 9
11.
Haga clic en OK.
5.2 Configuración del DHCP
Si conecta el dispositivo a la computadora mediante el enrutador de red (Conexión B en 2.2)
Español-6
Guía de Instalación Rápida
o mediante el concentrador de red pero sin una conexión de red externa (Conexión C en
2.2), por favor siga los pasos abajo para terminar la configuración del DHCP.
1.
2.
Abra HomeFree Setup Tool escoja la
pestaña Network Config.
Seleccione la opción DHCP.
3.
Haga clic en Apply.
4.
Luego haga clic en el botón Start y escoja
Control Panel.
Haga doble clic en el icono Network
Connections
.
Haga doble clic en el icono Local Area
Connection
(la conexión de red principal
que está utilizando).
Escoja Properties.
Haga doble clic en Internet Protocol
(TCP/IP).
Seleccione Obtain an IP address
automatically.
5.
6.
7.
8.
9.
10.
6
Haga clic en OK.
Uso del AVerTV 6
6.1 Activación de la aplicación AVerTV 6
Escoja Start ÆPrograms Æ AVerMedia Æ AVerTV 6 Æ AVerTV 6.
Nota: Para ver más instrucciones sobre AVerTV 6, por favor consulte el Manual del Usuario en el CD
de instalación.
6.2 Desinstalación del AVerTV 6 y de la herramienta de configuración HomeFree
Escoja Start ÆPrograms Æ AVerMedia Æ AVerTV 6 Æ AVerTV 6.
7
Uso del TFTP para recobrar actualización del firmware
La actualización del firmware puede fallar si se interrumpe la actualización por alguna razón,
así como cuando ocurre un apagón durante el proceso de actualización. Si es así, tiene que
instalar la herramienta TFTP para restaurar el firmware, para que AVerMedia HD HomeFree
Español-7
Guía de Instalación Rápida
Duet pueda funcionar normalmente. Para usar TFTP, por favor haga lo siguiente:
1.
Descargue la herramienta TFTP (edición
estándar tftpd32 (zip)) desde el sitio web:
http://tftpd32.jounin.net/tftpd32_download.html
(AVerMedia no es responsable de ningún software
tercerista y no tendrá responsabilidad de ninguna
clase por usar un software tercerista y no dará
garantía de ninguna clase con respecto a tal software
tercerista, ya sea que se haya incluido o descargado
en el Producto o bajo sugerencia de AVerMedia.)
2.
Descargue el archivo de firmware
“vmlinux.ub” del sitio web oficial de
AVerMedia (www.avermedia.com/avertv).
3.
Descomprima el archivo a su disco duro.
4.
Configure su dirección IP: Start Æ Control Panel Æ Network Connections Æ Local
Area Connection Æ PropertiesÆ Internet Protocol (TCP/IP).
5.
Seleccione Use the following IP address e introduzca los valores abajo. Luego haga
clic en OK.
IP address : 192 · 168 · 0 · 1
6.
Subnet mask : 255 · 255 · 255 · 0
7.
Haga doble clic en el icono tftpd32.exe
en la carpeta descomprimida.
8.
Compruebe si Server interfaces se muestra
como 192.168.0.1. Si no, repita los pasos 3
a 5 y vuelva a verificar.
9.
Haga clic en Browse y escoja la carpeta
donde está ubicado “vmlinux.ub”.
10.
Puede hacer clic en Show Dir para
comprobar si “vmlinux.ub” está en el
directorio.
11.
Luego conecte AVerMedia HD HomeFree Duet la computadora mediante el cable
Ethernet de alta velocidad.
12.
Encienda el AVerMedia HD HomeFree Duet y espere unos cuantos segundos.
Empezará la descarga de “vmlinux.ub” desde el servidor TFTP. (Si no aparece la
ventana de descarga, por favor repita este paso y vuelva a intentar)
13.
Cuando haya terminado AVerMedia HD HomeFree Duet se reiniciará. Si ve que la
luz LED Ethernet permanece encendida, indicará que AVerMedia HD HomeFree Duet
se ha recuperado con éxito.
Español-8
Guia de instalação rápida
Guia de instalação
rápida
2
CD de instalação
English
Conteúdo da embalagem
Cabo de Ethernet
de alta velocidade
Adaptador de
corrente
Instalação do hardware
Deutsch
1
Luz LED do sintonizador 1
OFF – Desligar
Luz LED do sintonizador 2
A piscar – Verificação de rede / Erro de
OFF – Sintonizador não utilizado / erro
rede / A rede não está a funcionar
A piscar – Sintonizador em busca
ON – Rede a funcionar
ON – Sintonizador em transmissão
Ligar/Desligar (ON/OFF)
Português-1
Ελληνική
Nederlands
Português
Luz LED de Ethernet
Español
Italiano
Français
2.1 Vista geral do hardware
Guia de instalação rápida
2.2 Fazer as ligações
A. Ligue directamente ao computador (após bem conectado, ver 5.1 para instruções sobre configuração
do IP)
Antena de TV
Cabo de Ethernet de alta velocidade
PC / Computador portátil
Adaptador de corrente
Português-2
Guia de instalação rápida
B. Ligue ao computador através do router de rede (após bem conectado, ver 5.2 instruções de
configuração para DHCP)
Antena de TV
Router da rede (não fornecido)
Cabo de Ethernet de alta velocidade
PC / Computador portátil
Adaptador de corrente
Português-3
Guia de instalação rápida
C. Ligue ao computador através do concentrador (hub) de rede (Se com a conexão
, ver 5.2
para instruções sobre configuração de DHCP; caso contrário, ver 5.1 para instruções de configuração do IP)
Antena de TV
Cabo de Ethernet de alta velocidade
Concentrador de rede (não fornecido)
PC / Computador portátil
Tomada de parede da rede (opcional)
Adaptador de corrente
(para ligação externa de rede)
Português-4
Guia de instalação rápida
3
Instalação do software
3.1 Instalar AVerTV 6 e Gestor HomeFree
1.
2.
3.
4.
Ligue o dispositivo.
Introduza o CD de instalação na unidade de CD-ROM.
Quando aparecer o menu principal de instalação, seleccione Instalar AVerTV.
Se surgir uma janela pop up informando-o que precisa de instalar o “WinPcap”
necessário ou o “Microsoft Visual C++ 2008 Redistributable–x86”, clique em OK e siga
as instruções no ecrã para finalizar a instalação.
Depois clique em Seguinte para iniciar a instalação do AVerMedia HD HomeFree Duet.
Seleccione “Aceito os termos do acordo de licença", se concordar. Depois, clique em
Seguinte.
Clique em Instalar.
Clique em Terminar.
5.
6.
7.
8.
z
z
z
4
Se o DirectX 9.0c ou superior não estiver instalado no seu sistema, normalmente o CD de
instalação fá-lo-á automaticamente durante processo de instalação. Certifique-se de que o seu
sistema tenha instalado o DirectX 9.0c ou superior para que o software utilitário de TV possa
funcionar correctamente.
Caso o seu sistema não esteja equipado com Acrobat Reader, o assistente de instalação será
activado automaticamente durante o processo de instalação.
Este produto não é fornecido com um software de descodificador de DVD. Se o utilizador conseguir
reproduzir DVD ou ficheiros de vídeo MPEG-2 no computador, não haverá necessidade de instalar
um descodificador de DVD. No entanto, caso apareça no ecrã a mensagem de Erro de
Descodificação, deverá instalar o descodificador de DVD compatível no site dos parceiros do
Windows® XP Media Center Edition.
Vista geral do Gestor HomeFree
Para abrir a Ferramenta de configuração do HomeFree, a partir do menu Iniciar escolha
AVerMedia
HomeFree
Gestor HomeFree. (Após a
Todos os programas
Æ
Æ
Æ
digitalização, se o dispositivo não for encontrado, verifique se o dispositivo está ligado e volte a tentar.)
z
z
z
z
z
z
Varrimento – Escolha executar novo varrimento do
dispositivo.
Idioma – Escolha o idioma IU (Interface de
Utilizador).
Ajuda – Vá para a página Web de ajuda on-line.
Acerca – Verifique a versão da ferramenta.
Inform. do dispositivo – Mostrar informações sobre
o dispositivo. Clique em
para ver mais
detalhes.
Actualização do firmware – Verifique a versão
actual do firmware do seu dispositivo ou
actualize-a. (Consulte a secção 7. Problemas e
soluções na actualização do firmware)
z
Config. rede – Configure o IP estático ou DHCP.
Português-5
Guia de instalação rápida
5
Instruções sobre configuração de rede
5.1 Configuração do IP
Se ligar o dispositivo ao computador através do cabo Ethernet de alta velocidade (Ligação
A em 2.2) ou através do concentrador de rede mas sem ligação de rede externa (Ligação
C em 2.2), siga os passos abaixo para finalizar a configuração do IP.
1.
2.
3.
Abra a Ferramenta de configuração do
HomeFree e seleccione o separador Config.
rede .
Seleccione a opção IP estático .
Introduza os valores abaixo:*
IP : 2 · 3 · 4 · 5
Máscara de rede : 255 · 255 · 255 · 0
Gateway : 2 · 3 · 4 · 6
*Se usar simultaneamente um segundo AVerMedia HD
HomeFree Duet, introduza os valores do IP do segundo
dispositivo como 2 · 3 · 4 · 8
4.
Clique em Aplicar.
5.
Depois, clique no botão Iniciar e escolha
Painel de controlo.
Clique duas vezes no ícone Ligações de
rede
.
Clique duas vezes no ícone Ligação de área
local
(a ligação da rede principal que
está a utilizar).
Seleccione Propriedades.
Clique duas vezes em Protocolo de Internet
(TCP/IP).
Seleccione Usar o seguinte endereço de IP
e introduza os valores abaixo*:
6.
7.
8.
9.
10.
Endereço de IP : 2 · 3 · 4 · 7
Máscara de sub-rede : 255 · 255 · 255 · 0
Gateway predefinida : 2 · 3 · 4 · 6
*Se usar simultaneamente um segundo PC/Computador portátil, introduza os valores de IP do segundo
PC/Computador portátil como 2 · 3 · 4 · 9
11.
Clique em OK.
5.2 Configuração DHCP
Se ligar o dispositivo ao computador através do router de rede (Ligação B em 2.2) ou
através do concentrador de rede com ligação de rede exterior (Ligação C em 2.2), siga
Português-6
Guia de instalação rápida
os passos abaixo para finalizar a configuração de DHCP.
1.
2.
Abra a Ferramenta de configuração do
HomeFree e seleccione o separador Config.
rede .
Seleccione a opção DHCP .
3.
Clique em Aplicar.
4.
Depois, clique no botão Iniciar e escolha
Painel de controlo.
Clique duas vezes no ícone Ligações de
rede
.
Clique duas vezes no ícone Ligação de área
local
(a ligação da rede principal que
está a utilizar).
Seleccione Propriedades.
Clique duas vezes em Protocolo de Internet
(TCP/IP).
Seleccione Obter um endereço de IP
automaticamente.
5.
6.
7.
8.
9.
10.
6
Clique em OK.
Usar AVerTV 6
6.1 Activar a aplicação AVerTV 6
Seleccione Iniciar Æ Programas Æ AVerMedia Æ AVerTV 6 Æ AVerTV 6. Nota: Para mais
instruções sobre AVerTV 6, consulte o manual do utilizador no CD de instalação.
6.2 Desinstalar a ferramenta de configuração do AVerTV 6 e HomeFree
Escolha Iniciar Æ Programas Æ AVerMedia Æ AVerTV 6 Æ Desinstalar ÆSim.
7
Usar TFTP para recuperar a actualização do firmware
A actualização do firmware pode falhar se a mesma for interrompida por qualquer razão, tal
como uma falha eléctrica ocorrida durante o procedimento de actualização. Se for o caso,
Português-7
Guia de instalação rápida
precisará da ferramenta TFTP para restabelecer o firmware, para que o AVerMedia HD
HomeFree Duet possa funcionar normalmente. Para usar o TFTP, faça o seguinte:
1.
Descarregue a ferramenta TFTP (edição
padrão tftpd32 (zip)) da página web:
http://tftpd32.jounin.net/tftpd32_download.html
(A AVerMedia não se responsabiliza por nenhum software
de terceiros, não terá qualquer envolvimento no uso de tal
software e nem oferecerá qualquer garantia do mesmo,
quer seja incluído/descarregado no Produto ou sob a
sugestão da AVerMedia.)
2.
Descarregue o ficheiro do firmware
“vmlinux.ub” na página Web oficial da
AVerMedia (www.avermedia.com/avertv).
3.
Descomprima o ficheiro para o seu disco
rígido.
Configure o seu endereço de IP: Iniciar Æ
Painel de controlo Æ Ligações de rede Æ
Ligação da área local Æ PropriedadesÆ
Protocolo de Internet (TCP/IP).
4.
Seleccione Usar o seguinte endereço de IP e introduza os valores abaixo. Depois,
clique em OK.
Endereço de IP : 192 · 168 · 0 · 1
Máscara de sub-rede : 255 · 255 · 255 · 0
5.
Clique duas vezes no ícone tftpd32.exe
na pasta descomprimida.
6.
Verifique se Interfaces do servidor é exibida
como 192.168.0.1. Se não, repita os passos
de 3 a 5 e verifique novamente.
7.
Clique em Navegar e escolha a pasta onde o
“vmlinux.ub” está localizado.
8.
Pode clicar em Mostrar Dir para verificar se o
“vmlinux.ub” está no directório.
9.
Depois ligue AVerMedia HD HomeFree Duet
ao computador através do cabo de Ethernet
de alta velocidade.
10.
Ligue o AVerMedia HD HomeFree Duet e aguarde alguns segundos. Inicia-se o
descarregamento do “vmlinux.ub” a partir do servidor TFTP. (Se não aparecer a janela
de descarregamento, repita este passo e volte a tentar.)
11.
Quando estiver efectuado, AVerMedia HD HomeFree Duet será reiniciado. Se reparar
que unicamente a luz LED de Ethernet está acesa, isto indica que o AVerMedia HD
HomeFree Duet foi recuperado com sucesso.
Português-8
Beknopte installatiehandleiding
Beknopte
installatiehandleidin
g
2
Installatie-CD
English
Inhoud van het pakket
High-Speed
Ethernetkabel
Stroomadaptor
Hardware installatie
Deutsch
1
Tuner 1 LED-lampje
OFF – Uitschakelen
Tuner 2 LED-lampje
Knipperend – Netwerk controle / Netwerk
OFF – Tuner ongebruikte / fout
fout / Netwerk werkt niet
Knipperend – Tuner scannen
ON – Netwerk werkt
ON – Tuner streaming
Power AAN/UIT
Nederlands -1
Ελληνική
Nederlands
Português
Ethernet LED-lampje
Español
Italiano
Français
2.1 Hardware overzicht
Beknopte installatiehandleiding
2.2 Verbindingen maken
A. Rechtstreeks aansluiten op de computer (na goede verbinding, zie 5.1 voor IP-installatie-instructies)
TV-antenne
High-Speed Ethernet-kabel
PC / notebook
Stroomadaptor
Nederlands -2
Beknopte installatiehandleiding
B. Aansluiten op de computer via de netwerkrouter (na goede verbinding, zie 5.2 voor
DHCP-installatie-instructies)
TV-antenne
Netwerkrouter (niet meegeleverd)
High-Speed Ethernet-kabel
PC / notebook
Stroomadaptor
Nederlands -3
Beknopte installatiehandleiding
C. Aansluiten op de computer via de netwerkhub (Indien een
verbinding, zie 5.2 voor
DHCP-installatie-instructies op, anders zie 5.1 voor IP-installatie-instructies)
TV-antenne
High-Speed Ethernet-kabel
Netwerkhub (niet meegeleverd)
PC / notebook
Netwerk stopcontact (optioneel)
Stroomadaptor
(voor buitenverbinding)
Nederlands -4
Beknopte installatiehandleiding
3
Software installatie
3.1 Installeren AVerTV 6 en HomeFree Manager
1.
2.
3.
4.
Steek het apparaat in het stopcontact.
Plaats de installatie CD in de CD-ROM drive.
Als het installatiescherm verschijnt, klikt u op Install AverTV.
Als een venster verschijnt met het bericht dat u de vereiste “WinPcap” of "Microsoft
Visual C++ 2008 Herdistribueerbare –x86" moet installeren, klik dan op OK en volg de
instructies op het scherm om de installatie te voltooien.
Klik daarna op Volgende om de installatie van AVerMedia HD HomeFree Duet te
starten.
Selecteer “Ik aanvaard de voorwaarden in de gebruiksrechtovereenkomst“ als u ermee
akkoord gaat. Klik op Volgende.
Klik op Installeren.
Klik op Voltooien.
5.
6.
7.
8.
z
z
z
4
Wanneer DirectX 9.0c of hoger niet geïnstalleerd is op uw systeem, installeert de
installatie-CD dit automatisch tijdens het installeren. Zorg dat op uw systeem DirectX
9.0c of hoger is geïnstalleerd zodat de TV software utility correct kan functioneren.
Indien uw systeem niet over Acrobat Reader beschikt, zal de installatie wizard
automatisch tijdens het proces van installatie opgeroepen worden.
Het product wordt niet geleverd met een dvd-decoder in software. Als u een dvd of een
mpeg-2-videobestand op de computer kunt afspelen, is het niet nodig een dvd-decoder
te installeren. Evenwel als de melding Decodeerfout op het scherm verschijnt,
installeer dan de compatibele dvd-decoder vanaf de website van Windows® XP Media
Centre Edition Partners.
HomeFree Manager overzicht
Open HomeFree configuratietool in het menu Start, kies Alle programma's ÆAVerMedia
ÆHomeFree ÆHomeFree Manager. (Als het apparaat na het scannen niet wordt gevonden,
controleert u of het apparaat is ingeschakeld en probeer het opnieuw.)
z
Scan – Het apparaat opnieuw scannen.
z
Taal – Taal van de gebruikersinterface selecteren.
z
Help – Naar de webpagina van de on-line help.
z
Info – De toolversie controleren.
z
Apparaatinfo – Apparaatgegevens tonen. Klik op /
z
Firmware Upgrade – De huidige versie van uw
voor meer details.
apparaat firmware of upgraden. (Raadpleeg
sectie 7. Firmware Upgrade probleem en oplossing)
z
Netwerkconfig. – Het statische IP of DHCP
configureren.
Nederlands -5
Beknopte installatiehandleiding
5
Netwerkinstellinginstructies
5.1 IP-instelling
Als u het apparaat met de computer verbindt via de High-Speed Ethernetkabel (Verbinding
A in 2.2) of via de netwerkhub, maar zonder de buitenverbinding (Verbinding C in 2.2), volg
dan de stappen hieronder.
1.
2.
3.
Open HomeFree configuratietool en
selecteer de tab Netwerkconfig.
Selecteer de Statische IP-optie.
Voer de waarden hieronder in:*
IP : 2 · 3 · 4 · 5
Netmasker : 255 · 255 · 255 · 0
Gateway : 2 · 3 · 4 · 6
*Als u gelijktijdig een tweede AverMedia HD HomeFree
Duet gebruikt, voer de IP-waarden in van het tweede
apparaat als volgt 2 · 3 · 4 · 8
4.
Klik op Toepassen.
5.
Klik vervolgens op de knop Start en
selecteer Configuratiescherm.
Dubbelklik op het pictogram
Netwerkverbindingen.
Dubbelklik op het pictogram Lokale
zoneverbinding (de
hoofdnetwerkverbinding in gebruik).
Selecteer Eigenschappen.
Dubbelklik op het Internet Protocol
(TCP/IP).
Selecteer Volgende IP-adres gebruiken en
voer de volgende waarden in*:
6.
7.
8.
9.
10.
IP-adres : 2 · 3 · 4 · 7
Subnetmasker : 255 · 255 · 255 · 0
Standaard gateway : 2 · 3 · 4 · 6
*Als u gelijktijdig een tweede PC/Notebook gebruikt, voer de IP-waarden in van de tweede PC/Notebook als
volgt 2 · 3 · 4 · 9
11.
Klik OK.
5.2 DHCP-instelling
Als u het apparaat met de computer verbindt via de netwerkrouter (Verbinding B in 2.2) of
Nederlands -6
Beknopte installatiehandleiding
via de netwerkhub, maar zonder de buitenverbinding (Verbinding C in 2.2), volg dan de
stappen hieronder om de DHCP-instelling te voltooien.
1.
2.
Open HomeFree configuratietool en
selecteer de tab Netwerkconfig.
Selecteer de DHCP-optie.
3.
Klik op Toepassen.
4.
9.
Klik vervolgens op de knop Start en selecteer
Configuratiescherm.
Dubbelklik op het pictogram
Netwerkverbindingen.
Dubbelklik op het pictogram Lokale
zoneverbinding (de hoofdnetwerkverbinding
in gebruik).
Selecteer Eigenschappen.
Dubbelklik op het Internet Protocol
(TCP/IP).
Selecteer Automatisch IP-adres verkrijgen.
10.
Klik OK.
5.
6.
7.
8.
6
AverTV 6 gebruiken
6.1 De AVerTV 6 toepassing activeren
Selecteer Start ÆProgramma's Æ AVerMedia Æ AVerTV 6 Æ AVerTV 6.
Opmerking: voor meer AVerTV 6 instructies, raadpleeg de Gebruikershandleiding op de CD-installatie.
6.2 AVerTV 6 en HomeFree instellingstool installatie verwijderen
Selecteer Start ÆProgramma's Æ AVerMedia Æ AVerTV 6 Æ Uninstaller ÆJa.
7
Gebruik van TFTP for Firmware Upgrade herstel
Firmware upgrade faalt mogelijk als de upgrade om een of andere reden wordt onderbroken,
zoals wanneer zich een stroomonderbreking voordoet tijdens de upgrade-procedure. In dit
Nederlands -7
Beknopte installatiehandleiding
geval moet het TFTP-tool de firmware herstellen, zodat AVerMedia HD HomeFree Duet
normaal kan werken. Gebruik TFTP op de volgende manier:
1.
download het TFTP-tool (tftpd32 standaard
editie (zip)) van de website:
http://tftpd32.jounin.net/tftpd32_download.html
(AVerMedia is niet verantwoordelijk voor de software van
derden en zal niet aansprakelijk zijn voor enig gebruik van
dergelijke software van derden en biedt geen enkele
garantie met betrekking tot dergelijke software van
derden, al wordt die meegeleverd/gedownload in het
Product of bij suggestie van AVerMedia.)
2.
Download het firmware-bestand “vmlinux.ub”
van de officiële AverMedia website
(www.avermedia.com/avertv).
3.
Decomprimeer het bestand op uw harde
schijf.
4.
Configureer uw IP-adres: Start Æ Configuratiescherm Æ Netwerkverbindingen Æ
LAN-verbinding Æ EigenschappenÆ Internet Protocol (TCP/IP).
5.
Selecteer Volgende IP-adres gebruiken en voer de volgende waarden in*: Klik
vervolgens op OK.
IP-adres: 192 · 168 · 0 · 1
Subnetmasker: 255 · 255 · 255 · 0
6.
Dubbelklik op het pictogram tftpd32.exe
in de gedecomprimeerde map.
7.
Controleer of de Server-interfaces worden
weergegeven als 192.168.0.1. Indien niet,
herhaal de Stappen 3 tot 5 en verifieer.
8.
Klik op Bladeren en kies de map waar
“vmlinux.ub” zich bevindt.
9.
Klik op Dir weergeven om te confroleren of
“vmlinux.ub” zich in de map bevindt.
10.
Verbind vervolgens AVerMedia HD HomeFree
Duet met de computer via de High-Speed
Ethernetkabel.
11.
Schakel AVerMedia HD HomeFree Duet in en wacht enkele seconden. "vmlinux.ub"
begint met downloaden van de TFTP-server. (Als het downloadvenster niet verschijnt,
herhaal deze stap en probeer opnieuw.)
12.
Als u klaar bent, is AVerMedia HD HomeFree Duet opnieuw geconfigureerd. Als het
Ethernet LED continu brandt, is AVerMedia HD HomeFree Duet met succes hersteld.
Nederlands -8
Model No.: F200
P/N 300AF200-DJ L
M a d e i n Ta i w a n