1
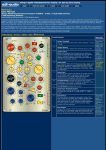
WARNING
TO PREVENT FIRE OR SHOCK HAZARD, DO NOT EXPOSE THIS APPLIANCE TO RAIN OR MOISTURE.
IMPORTANT
SINCE THE CD CIRUITRY MAY CAUSE INTERFERENCE TO OTHER RADIO TUNERS NEARBY, SWITCH
THIS UNIT OFF WHEN NOT IN USE OR MOVE IT AWAY FROM THE AFFECTED RADIO TUNER.
CAUTION
The exclamation point
within the triangle is a
warning sign alerting
the user of important
I n s t r u c t i o n s
accompanying
the
product.
ATTENTION: To reduce the risk of
electric shock, do not remove the
cover.
There are no user
serviceable parts inside the unit.
Refer all servicing to qualified service
personnel.
The Lightening flash
with arrowhead symbol
within the triangle is a
warning sign alerting
the user of “Dangerous
Voltage” inside the unit.
DANGER
MAINTENANCE AND CARE
1.
2.
3.
4.
Read the instruction manual before operating this unit.
Do not expose the unit to high temperature or humidity. Use dampened soft cloth to clean the unit. Do not
use strong detergent or solvent to clean the unit.
Ensure that all electrical connections (including the main plug, extension leads and interconnections between
pieces of equipment) are properly made and in accordance with the manufacturer’s instructions.
Consult your dealer if you are ever in doubt about the installation, operation or safety of your equipment.
LOCATION OF CONTROL:
1.
2.
3.
4.
5.
6.
7.
8.
9.
10.
11.
12.
13.
14.
15.
16.
17.
18.
19.
CD STOP
CD BACK BUTTON
CD REPEAT BUTTON
CD DISPLAY
CD PROGRAM BUTTON
CD DOOR
CD NEXT BUTTON
CD PLAY/PAUSE BUTTON
CARRYING HANDLE
TELESCOPIC ANTENNA
DIAL SCALE
SPEAKER
PHONES JACK
VOLUME CONTROL
TUNING CONTROL
FUNCTION SWITCH (CD-FM-OFF)
FM STEREO/MONO SWITCH
AC SOCKET
BATTERY COMPARTMENT
POWER SUPPLY
1. BATTERY OPERATION
- Remove the battery compartment door and insert 6 pieces UM2 (C size) batteries into the battery compartment
with battery polarity positioned as indicated. NOTE: We recommend the use of alkaline batteries.
- Close the battery compartment door.
2. AC OPERATION
- The power cord is located inside the battery compartment.
- Plug the AC line cord into any normal household AC mains outlet in correct voltage and the mains socket.
RADIO OPERATION
1. Set FUNCTION SWITCH to “FM” position
2. Rotate the TUNING CONTROL to select a radio station
3. Adjust VOLUME CONTROL to listen to the sound level to your preference.
FM/FM ST. BAND
Normally, the FM STEREO/MONO SWITCH should be set the “STEREO” position. If a station is too weak or noisy,
select “MONO” to improved reception. Fully extend the TELESCOPIC ANTENNA and adjust its direction for best
FM reception.
To turn unit’s POWER “OFF”, simple set FUNCTION SWITCH to “OFF” position.
LISTENING TO COMPACT DISC (CD)
CONCERNING COMPACT DISC:
Only compact discs identified with this mark can be used with this player.
HANDLING DISCS: To remove the disc from its storage case, press down on the center of the case and lift the
disc out. Hold carefully by the edges as shown below:
1.
2.
3.
4.
Insert the disc into the unit with the label of the disc facing up.
Gently wipe the disc using a soft cloth from the center to the outer direction to remove dust, fingerprints or
any other articles on the disc surface. Never use chemicals, such as record sprays, anti-static sprays or
benzene etc. to clean the CD. These chemicals can damage the disc surface permanently.
To void serious scratches on CD, keep them in the cases after each use. Scratches can cause the laser
pick-up skip in the future play.
Do not place stickers or write anything on the disc.
COMPACT DISC PLAYBACK
1.
2.
3.
4.
5.
Set FUNCTION switch to “CD” position.
Lift the CD DOOR up
Insert a disc with the label side facing up.
Close the CD door. The disc will rotate and the total tracks of the disc will show on the display.
Press the PLAY/PAUSE button. Track number “1” will be shown.
PLAYING THE ENTIRE DISC
1. Playback will start by pressing CD PLAY/PAUSE button; playback starts with the first track. The display will
show the current track number.
2. To interrupt playback, press CD PLAY/PAUSE button. The CD PLAY/PAUSE indicator will be flashing.
3. To resume playback, press CD PLAY/PAUSE button once again.
4. To stop playback, press CD STOP button.
SELECTING A DIFFERENT TRACK DURING PLAY
1. Press CD BACK or CD NEXT button on the unit continuously until the desired track number appears in the
display
2. Playback starts from the desired track. (Press CD PLAY/PAUSE button to start playback in stop mode)
STARTING AGAIN WITH THE TRACK THAT IS CURRENTLY PLAYING
1. Press CD BACK button once.
2. The playback will start again from the beginning of the track.
STOPPING PLAY
1. Press CD STOP button if you wish to stop play. The total track number that can be played will now appear in the
display.
2. Open the CD door on the unit to remove the CD.
REPEAT PLAY
When play, press CD REPEAT button once “RPT” will be shown flashing on the display for playing the same track
only. If repeat all tracks, press the CD REPEAT button again, “RPT” will be shown on the display. To cancel repeat
play, press the CD REPEAT button until the ‘RPT’ letter disappears.
PROGRAM PLAY
1. Press CD PROGRAM button to make program memory in stop mode.
2. “Pr” will be shown flashing on the display.
3. Press CD BACK/CD NEXT button to select a track number. The track number will show on display.
4. Press the CD PROGRAM button to store the track number.
5. “Pr” flashes again, Repeat step (3) or (4) to program other desired tracks.
6. Press CD PROGRAM button once more and all the programmed track numbers will be shown one by one.
7. Press CD PLAY/PAUSE button, playback will start from the first programmed track.
8. You can press CD BACK/NEXT button to select the track number in memory.
9. In stop mode, press STOP button to cancel the program play.
HEADPHONE JACK
For private listening, insert a 3.5 mm headphone (not included) into the PHONES JACK. The speaker output is
automatically cut off.
CAUTION: LISTENING AT HIGH POWER FOR A LONG PERIOD, COULD DAMAGE USERS’ EARS.
SPECIFICATIONS
CD SECTION
Channels:
Optical pick up:
Frequency response:
2 channels
3 beams laser
100 Hz – 16 KHz
RADIO SECTION
Tuning ranges:
Antenna:
FM 87.5 – 108 MHz
FM rod antenna
GENERAL
Output power:
Speaker impedance:
Phones jack:
Power source:
Max 1.2W x 2 (RMS)
4 Ohm
3.5 MM
AC 230 V 50 Hz
DC 9V 6 x 1.5V UM2/”C” size
Power consumption:
10.5W
Headphone impedance: 4-32 Ohm
Due to continuing improvement, the features and the design are subject to change without notice.