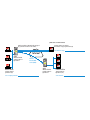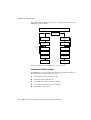
1
S E R V E R
■ ISDN
■ DSL
■ Fi r e w a l l
■ VPN
AVM Access Server
Secure Access for Your Network
S E R V E R
This manual is printed on chlorine-free paper and is therefore completely recyclable.
S10/03-L10/03-?-R&P 10/03
■ Internet Access ■ Remote Access ■ Network Access
Example
The ABC company has its main office in Berlin and a branch location in London. Jane Doe is employed at the main office in Berlin. Because Ms. Doe lives in Hamburg, however, she works from
her home. The objective now is to give her a VPN link to the company network, with access to the
LAN's mail server. Another VPN link will connect the LANs in Berlin and London.
Technical Requirements
•
In the Berlin office and at the London location:
– T-DSL lines
– unmetered Internet access through the Internet Service Provider T-Online
– a computer in working order with all the prerequisites listed in the section
“System Requirements” an installed and operational FRITZ!Card DSL
•
At Jane Doe's home-office in Hamburg:
– an ISDN line
– Internet access through the Internet Service Provider T-Online
– a computer in working order
Diagram
The diagram below illustrates the example described. Alongside the addresses used in the example,
you can use the spaces provided to note the IP addresses used in your network.
This will make it easier for you to choose the appropriate addresses when configuring your network
by referring to the examples in the manual.
Jane Doe's home-office
Public IP address (dynamically assigned
by your Internet Service Provider)
Sample address: IP address
from address range: 192.168.110.0/24
Your address range:
Internet
AVM
Access Server
Sample address:
192.168.10.1
Virtual
Private Network (VPN)
Berlin office
AVM
Access Server
London office
Sample address:
192.168.10.0/24
Sample address:
192.168.20.1
Sample address:
192.168.20.0/24
Your company network:
Your network:
AVM Access Server
This manual and the software it describes are protected by copyright. The manual and
software as presented are the object of a license agreement and may be used only in accordance with the license conditions. The licensee bears all risk in regard to hazards and
impairments of quality which may arise in connection with the use of this product.
This manual and the software it describes may not be transmitted, reproduced or altered
in whole or in part, in any form, by any means, nor may they be translated into any other
natural or computer language. The creation of a backup copy for personal use is excepted. The information hereby made available to the licensee may be communicated to
third parties only with the written permission of AVM.
This software and documentation have been produced with all due care and checked for
correctness in accordance with the best available technology. AVM disclaims all liability
and warranties, whether express or implied, relating to this product’s quality, performance or suitability for any given purpose which deviates from the performance specifications contained in the product description.
AVM will not be liable for damages arising directly or indirectly from the use of the manual or related software, nor for incidental or consequential damages, except in case of intent or gross negligence. AVM expressly disclaims all liability for loss of or damage to
hardware, software or data as a result of direct or indirect errors or destruction and for
any costs, including ISDN, GSM and ADSL connection charges, related to the software
and manual supplied and due to incorrect installations not performed by AVM itself.
The information in this manual and the software it describes are subject to change without notice for the purpose of technical improvement.
The product identification code is part of the license agreement.
© AVM GmbH 2003. All rights reserved.
Documentation release 10/2003
AVM Audiovisuelles Marketing
und Computersysteme GmbH
Alt-Moabit 95
AVM Computersysteme
Vertriebs GmbH
Alt-Moabit 95
10559 Berlin
Germany
10559 Berlin
Germany
AVM Access Server Support by Fax: +49 (0)30-39 97 62 66
AVM in the Internet: www.avm.de/en
Trademark notice: AVM and AVM Access Server are registered trademarks of AVM GmbH.
Windows is a registered trademark of Microsoft Corporation. All other trademarks are
trademarks or registered trademarks of the respective owners.
2
AVM Access Server
Contents
1
1.1
1.2
1.3
1.4
2
2.1
2.2
3
3.1
3.2
3.3
3.4
3.5
4
4.1
4.2
5
5.1
5.2
5.3
5.4
5.5
5.6
5.7
5.8
5.9
Welcome to the AVM Access Server
6
The AVM Access Server Connects. . . . . . . . . . . . . . . . . . . . . . . . . . . . . . . . . . . . 6
AVM Access Server Features. . . . . . . . . . . . . . . . . . . . . . . . . . . . . . . . . . . . . . . . 8
Package Contents . . . . . . . . . . . . . . . . . . . . . . . . . . . . . . . . . . . . . . . . . . . . . . . 14
System Requirements . . . . . . . . . . . . . . . . . . . . . . . . . . . . . . . . . . . . . . . . . . . . 14
Installation and Initial Configuration
15
Installation and Initial Configuration: An Example . . . . . . . . . . . . . . . . . . . . . 15
Removing the AVM Access Server . . . . . . . . . . . . . . . . . . . . . . . . . . . . . . . . . . 29
The AVM Access Server Window
30
The AVM Access Server Menus. . . . . . . . . . . . . . . . . . . . . . . . . . . . . . . . . . . . . 31
The Toolbar . . . . . . . . . . . . . . . . . . . . . . . . . . . . . . . . . . . . . . . . . . . . . . . . . . . . 33
Configuration View . . . . . . . . . . . . . . . . . . . . . . . . . . . . . . . . . . . . . . . . . . . . . . 34
Monitoring View . . . . . . . . . . . . . . . . . . . . . . . . . . . . . . . . . . . . . . . . . . . . . . . . 36
Connection Control and Monitoring Functions . . . . . . . . . . . . . . . . . . . . . . . . 36
AVM Access Server Use Scenarios
44
LAN-to-LAN Link Using AVM ISDN-Controller C4 and Eight B Channels . . . . . 44
AVM Access Server and a Router . . . . . . . . . . . . . . . . . . . . . . . . . . . . . . . . . . . 50
AVM Access Server Concepts and Functional Principles
58
Filters . . . . . . . . . . . . . . . . . . . . . . . . . . . . . . . . . . . . . . . . . . . . . . . . . . . . . . . . . 58
IP Masquerading and Forwarding Profiles . . . . . . . . . . . . . . . . . . . . . . . . . . . . 74
Static and Dynamic Routing . . . . . . . . . . . . . . . . . . . . . . . . . . . . . . . . . . . . . . . 77
Reserving B Channels . . . . . . . . . . . . . . . . . . . . . . . . . . . . . . . . . . . . . . . . . . . . 78
Restricting Access to Scheduled Times . . . . . . . . . . . . . . . . . . . . . . . . . . . . . . 79
Cost Assignment (COSO, Charge One Site Only) . . . . . . . . . . . . . . . . . . . . . . . 80
Virtual Private Network (VPN) . . . . . . . . . . . . . . . . . . . . . . . . . . . . . . . . . . . . . . 81
Dynamic DNS . . . . . . . . . . . . . . . . . . . . . . . . . . . . . . . . . . . . . . . . . . . . . . . . . . . 95
Windows Name Resolution and File and Printer Sharing . . . . . . . . . . . . . . . . 95
AVM Access Server – Contents
3
6
6.1
6.2
6.3
6.4
6.5
6.6
6.7
6.8
7
7.1
7.2
7.3
4
AVM Access Server for Experts
100
Architecture of the AVM Access Server . . . . . . . . . . . . . . . . . . . . . . . . . . . . . . 100
Internet Access with the AVM Access Server . . . . . . . . . . . . . . . . . . . . . . . . . 102
Connections to Remote Users . . . . . . . . . . . . . . . . . . . . . . . . . . . . . . . . . . . . . 104
Remote Network Connections . . . . . . . . . . . . . . . . . . . . . . . . . . . . . . . . . . . . . 107
Windows Name Resolution, File and Printer Sharing . . . . . . . . . . . . . . . . . . 107
Filter and Forwarding Profiles . . . . . . . . . . . . . . . . . . . . . . . . . . . . . . . . . . . . . 107
VPN and the IPsec Protocol . . . . . . . . . . . . . . . . . . . . . . . . . . . . . . . . . . . . . . . 108
Interoperability. . . . . . . . . . . . . . . . . . . . . . . . . . . . . . . . . . . . . . . . . . . . . . . . . 111
Updates, Registration and Support
114
Sources of Information . . . . . . . . . . . . . . . . . . . . . . . . . . . . . . . . . . . . . . . . . . 114
Updates . . . . . . . . . . . . . . . . . . . . . . . . . . . . . . . . . . . . . . . . . . . . . . . . . . . . . . 115
AVM Support . . . . . . . . . . . . . . . . . . . . . . . . . . . . . . . . . . . . . . . . . . . . . . . . . . 116
Glossary
119
Index
139
AVM Access Server – Contents
Typographical Conventions
The following typographic conventions and symbols are used in this
manual to make reading easier and to emphasize important information.
Highlighting
The table below explains the highlighting conventions used in this
manual.
Highlighting
Function
Example
Quotation marks
Keys, buttons, icons, tabs,
menus, commands
“Start / Programs”;
“Enter”
Capital letters
Path and file names in running
text
SOFTWARE\INFO
or CAPIPORT.HLP
Pointed brackets
Variables
<CD-ROM drive>
Typewriter font
Entries made using the
keyboard
a:\setup
Gray italics
Information, tips and warnings;
allways appear with the
corresponding symbols
... For more information see ...
Symbols
The following graphic symbols in the manual always appear in connection with text printed in gray italics:
This symbol indicates useful tips and supplementary information.
The exclamation mark designates sections which contain important
information.
AVM Access Server – Typographical Conventions
5
Welcome to the AVM Access Server
1 Welcome to the AVM Access
Server
The AVM Access Server seamlessly connects remote users and networks in the company’s communication processes. This means that
telecommuters, mobile employees in the field, branch offices and subsidiaries can use the company LAN’s applications and resources from
wherever they are. The connection can be a direct ISDN or GSM dial-up
link, or a virtual privaten network (VPN) carried over the Internet.
The AVM Access Server also acts as a professional router, connecting
the local network to the Internet over ADSL or ISDN. The AVM Access
Server’s design as a software router ensures optimum scalability
through two product variants, and support for up to four active AVM
ISDN-Controllers and any number of network interfaces. Moreover, future technological advances can be added by simple software updates.
1.1 The AVM Access Server Connects
In modern corporate communications, interconnecting geographically
separate LANs into a company-wide WAN (wide-area network) is increasingly important, as is providing access to the Internet. Connecting
employees in the field, telecommuters, service technicians and smaller
branch offices without their own LANs is an urgent task that many companies face. The AVM Access Server provides you with a powerful tool
for this purpose.
The AVM Access Server allows you to combine networks over ISDN or
VPN links; connect Windows XP, 2000 and NT networks with other
TCP/IP networks over ISDN; provide access to the Internet over ISDN
and ADSL; and connect remote PCs and mobile notebooks to your company’s network over ISDN or GSM.
6
AVM Access Server – 1 Welcome to the AVM Access Server
The AVM Access Server Connects
The following diagram illustrates the uses of the AVM Access Server:
Uses of the AVM Access Server
The AVM Access Server interconnects geographically separate networks. In this way central LAN resources, such as servers, mainframes
or databases, are available in subsidiary locations and small branch
offices as well. The AVM Access Server has the advantage of handling
all the necessary routing activities such as line control automatically,
so that no additional tasks are placed on the employees in the branch
location.
Conversely, users in the head office can also access the LANs in the
other locations, to perform network administration or database updates, for example.
The AVM Access Server allows you to connect remote PCs and mobile
notebooks to your company’s network over ISDN or GSM. Remote users
can then use LAN services and data just as if they were at a local workstation. Possible uses include client/server applications, database
programs, and e-mail.
Moreover, the AVM Access Server provides versatile access to the Internet. The AVM Access Server can connect all users in the LAN and WAN
to the Internet over one or more ISDN dial-up or leased lines, or over
ADSL, for access to all Internet resources, including e-mail, the World
AVM Access Server – 1 Welcome to the AVM Access Server
7
AVM Access Server Features
Wide Web, net news, and more. The AVM Access Server also supports
the use of web, e-mail and proxy servers, such as AVM KEN! and
KEN! DSL.
The AVM Access Server interconnects local networks over ISDN based
on the open standard PPP over ISDN (Point-to-Point Protocol). This ensures that the AVM Access Server can connect to all ISDN routers that
support this standard. For ADSL Internet routing, the Access Server
supports PPP over Ethernet (PPPoE), or PPP over ATM (PPPoA) with AVM
FRITZ!Card DSL. VPN connections are secured using the IPsec protocol
suite.
1.2 AVM Access Server Features
The features of the AVM Access Server are summarized briefly below.
Optimum Utilization of ADSL
ADSL (Asymmetric Digital Subscriber Line) is a communication technology that permits Internet access with high bandwidth over ordinary
telephone cables. ISDN and ADSL use different frequency bands for simultaneous operation over the same wire.
The AVM Access Server supports the PPP over Ethernet protocol
(PPPoE) for ADSL communication. This protocol uses a network adapter
to communicate with the ADSL line. With FRITZ!Card DSL, the AVM
Access Server also supports the PPP over ATM protocol (PPPoA).
The AVM Access Server computer is connected to the ADSL line either
by FRITZ!Card DSL, or by an Ethernet LAN adapter and an external ADSL
modem. In either case a 10BASE-T cable can be used. The AVM Access
Server provides ADSL Internet access to the entire LAN.
Optimum Utilization of ISDN
The digital telecommunication network ISDN provides a number of significant advantages for LAN-to-LAN and Internet connections. The AVM
Access Server makes optimum use of these ISDN features.
For example, because dialing up a connection in ISDN takes less than
one second, costs can be saved by dropping ISDN lines when idle and
dialing them up again dynamically in the background.
The ISDN feature CLIP (Calling Line Identification Presentation) sends
the caller’s ISDN numbers to the subscriber called over the D channel.
The AVM Access Server uses this feature to authenticate the caller.
8
AVM Access Server – 1 Welcome to the AVM Access Server
Virtual Private Networks (VPN)
Throughput can also be increased by bundling the ISDN B channels–
even channels connected to several different ISDN-Controllers. The
AVM Access Server in the basic product variant is expandable up to ten
channels, thanks to support for up to four AVM ISDN-Controllers B1 or
one ISDN-Controller C4 on ISDN BRI (Basic Rate Interface) lines. The PRI
(Primary Rate Interface) variant supports the use of up to 120
B channels.
The AVM Access Server controls the ISDN connections through active
AVM ISDN-Controllers, which can be connected either directly to the
public ISDN network (in point-to-multipoint or point-to-point configuration), or to PBX extension lines.
The AVM ISDN-Controllers B1, C2, C4, T1 and T1-B also support GSM
connections in accordance with the Mobile ISDN standard
(GSM 07.08). This permits reliable, transparent ISDN connections from
cellular networks over GSM or HSCSD (High-Speed Circuit-Switched
Data).
Virtual Private Networks (VPN)
The AVM Access Server allows you to connect both remote users and
remote networks to the LAN over a VPN (Virtual Private Network). The
AVM Access Server sets up VPN links over existing Internet connections, taking advantage of the Internet Services Provider’s infrastructure. The AVM Access Server itself establishes the VPN connections
and routes the network communication among the remote systems,
however. In a VPN, each participating site incurs only the costs for the
connection to its Internet Service Provider. This makes VPN connections an extremely economical way to interconnect remote systems.
Optimum Throughput
The AVM Access Server offers the following functions to ensure optimum utilization of the ISDN bandwidth and to increase throughput:
Data compression per CAPI standard Stac LZS, MPPC and IPComp
TCP/IP header compression in accordance with the Van Jacobson
standard
CAPI standard channel bundling, as well as static and dynamic
Multilink-PPP
AVM Access Server – 1 Welcome to the AVM Access Server
9
Connection Charge Reduction and Limitation
Connection Charge Reduction and Limitation
Thanks to intelligent line management, the AVM Access Server ensures
that the costs for ISDN connections to remote networks are kept to the
bare minimum. The following features minimize costs:
The AVM Access Server maintains a logical ISDN connection while
interrupting the physical connection. A logical ISDN connection
constitutes a record of all the connection information negotiated
at the initial connection set-up between the systems at either end
of an ISDN WAN link. This information includes the network protocols used, authentication procedures, spoofing mechanisms and
channel bundling.
The physical ISDN connection is established when one or more
B channels are in use and accruing connection charges. When no
data is being transferred over the ISDN line, the AVM Access
Server can drop the physical connection automatically to save
connection costs. The logical connection is maintained for a time
specified in the remote network’s configuration in the AVM Access
Server, so that the remote user or network is still considered
present in the LAN, and any resources in use remain available. As
soon as data needs to be transported again, either the AVM
Access Server or the remote site can reestablish the physical
connection.
Proven filtering and spoofing mechanisms intercept certain overhead data packets and prevent them from being transported unnecessarily over the ISDN link. This reduces the total physical connection up-time. These AVM Access Server features ensure that
the ISDN line is dialed up almost exclusively for user data, and
that most LAN overhead traffic is kept off the ISDN link.
Connection charges are kept under full control by configurable
budget limits (per day, week and month) on the charges themselves, on the connection up-time and on the number of outgoing
calls.
Budgets can be defined for each remote network or user individually.
Connection charges can be assigned using COSO (Charge One
Site Only) to ensure that all WAN costs are charged to the main office, for example.
10
AVM Access Server – 1 Welcome to the AVM Access Server
Security Functions
Security Functions
The AVM Access Server provides security functions on two different levels. The AVM Access Server incorporates sophisticated features to ensure the authenticity of every site that connects to the LAN over ISDN.
Furthermore, data privacy and integrity ensure that no eavesdropping
or manipulation of data can take place during transmisssion.
Authenticity
The AVM Access Server provides the following capabilities:
Verification of caller’s number on the ISDN D channel
Authentication using the PPP protocols PAP and CHAP
The AVM Access Server supports authentication of both the local
and remote systems. The two systems can be assigned different
passwords.
Security call-back on incoming calls
Firewall capability through pre-defined and configurable IP filter
profiles
IP masquerading/Network Address Translation (NAT)
The following diagram illustrates the security checks that can be applied to an incoming call from a remote user:
AVM Access Server – 1 Welcome to the AVM Access Server
11
Simple to Install and Configure
Remote Site
(e.g. AVM Access Server
or NetWAYS/ISDN)
ISDN
D channel
B channel
Name/Password
D and B channel
B channel
B channel
Event
Local Site
(AVM Access Server)
D-channel number
verifcation
After call acceptance,
authentication
with PAP or CHAP
If requested,
connection cleared
and security call-back
by AVM Access
Server
If required,
login information
forwarded to RADIUS
Server
Further PPP
negotiations like IP
address, spoofing,
point-to-multipoint
Transmission of
user data, e.g.
e-mail, database
information.
If necessary,
encryption and
packet filtering.
ISDN connection
dialed and cleared
dynamically
Security checks performed on remote dial-in
Data Privacy and Integrity
The AVM Access Server offers data encryption options to protect data
packets against eavesdropping during transmission. VPN connections
are encrypted in accordance with the IPsec protocol. IPsec data encryption can also be applied over direct ISDN connections, if desired.
Simple to Install and Configure
The AVM Access Server is installed by a simple, menu-driven program.
All AVM Access Server configuration and administration tasks can be
performed in a single Windows application.
Configuration and administration can also be performed over HTTP using a standard web browser.
12
AVM Access Server – 1 Welcome to the AVM Access Server
Logs and Use Statistics
Logs and Use Statistics
Comprehensive statistics and logging abilities permit precise analysis
of all events in the router.
Status information is always available on
– the AVM Access Server and the installed ISDN and ADSLControllers
– the current IP routing table and the ARP (Address Resolution
Protocol) table
– active physical ISDN connections
Summary of connection charges and use over selectable periods
Events can be displayed as a daily report or filtered by selected
criteria, such as the message type (“Information”, “Warning”,
“Error”).
Packet trace with PPP decoding
Connection Control
ISDN connections are usually dialed up automatically when resources
at the remote site are requested. The AVM Access Server monitoring
window also provides commands to dial up and clear down connections manually.
It also provides detailed information on the currently active logical
ISDN connections, with their negotiated connection parameters.
The AVM Access Server in Conjunction with Other CAPI
2.0 Applications
The AVM Access Server ensures practical, efficient shared use of the
ISDN-Controllers installed in the computer.
The ISDN-Controllers can be used both by the AVM Access Server and
by other CAPI 2.0 applications, such as KEN! or NDI. If other CAPI 2.0
applications on the same computer use the same ISDN services as the
AVM Access Server (such as file transfer programs in server mode), you
must ensure that all applications are assigned distinct dial-in numbers
for correct incoming call handling. The CAPI 2.0 standard supports multiple applications using multiple subscriber numbers (MSNs) on pointto-multipoint BRI lines, or extension numbers (or DDI, for direct dial-in
numbers) on point-to-point BRI and PRI lines.
AVM Access Server – 1 Welcome to the AVM Access Server
13
Package Contents
1.3 Package Contents
The product is available in three variants:
AVM Access Server PRI: 1 to 120 B channels; unlimited simultaneous VPN tunnels; 10 NetWAYS/ISDN licenses
AVM Access Server: 1 to 10 B channels; 10 simultaneous VPN tunnels; 5 NetWAYS/ISDN licenses
AVM Access Server Basic: 1 to 10 B channels, 10 simultaneous
VPN tunnels
The AVM Access Server package contains:
“AVM Access Server” CD-ROM with Product Identification Code
AVM Access Server manual
NetWAYS/ISDN manual (only in the AVM Access Server and AVM
Access Server PRI variants)
If you do not have all of these components, please contact your dealer.
1.4 System Requirements
Windows XP with ServicePack 1 or
Windows 2000 with Service Pack 3 or
Windows NT 4.0 with Service Pack 6a and Microsoft Jet 4.0 with
Service Pack 6
Ethernet or Token Ring network adapter
TCP/IP, bound to the network adapter with a fixed IP address, subnet mask and default gateway setting
Intel Pentium or comparable CPU at 200 MHz or above
64 MB of RAM
50 MB of hard disk storage; up to 250 MB may be necessary in operation
For ISDN connections, one of the following active AVM ISDN-Controllers: B1, C2, C4, T1 or T1-B
For ADSL-Connections, a FRITZ!Card DSL, or an external ADSL modem and an Ethernet adapter
14
AVM Access Server – 1 Welcome to the AVM Access Server
Installation and Initial Configuration
2 Installation and Initial
Configuration
The AVM Access Server is installed by a simple, menu-driven program.
When the initial installation is completed, the Configuration Wizard
starts automatically and supports you in configuring the basic settings
to start the AVM Access Server.
We recommend that you plan the basic configuration that you will set
up using the Configuration Wizard ahead of time, before you install the
AVM Access Server.
In the instructions below, the installation and set-up procedures are
described using a hypothetical application scenario. In this scenario,
for the sake of example, VPN connections over the Internet will be set
up to a remote user and to a remote network.
2.1 Installation and Initial Configuration:
An Example
This section describes the installation and configuration of the AVM
Access Server using an example that combines two common requirements:
setting up a remote user with VPN access
setting up a LAN-to-LAN VPN link
The fold-out diagram inside the front cover illustrates this sample scenario. The diagram contains the IP addresses used throughout all examples, as well as space for you to note the IP addresses used in your
configuration.
In following the procedures described here, remember to replace the
IP addresses used in the examples with those actually used in your
LAN!
AVM Access Server – 2 Installation and Initial Configuration
15
Step by Step: AVM Access Server Installation and Basic Configuration
Step by Step: AVM Access Server Installation and Basic
Configuration
The instructions below describe the installation and first configuration
steps for the AVM Access Server. The general instructions are accompanied by examples using the settings for the hypothetical scenario.
Verify the Network Settings in the Windows Control Panel
Before you begin installing the AVM Access Server, you must make sure
that certain network settings are present in the Windows Control Panel.
In the example, these settings must be verified on both of the computers on which the AVM Access Server is to be installed: one in Berlin and
one in London.
Make sure that the following conditions are met:
A default gateway must be entered in the TCP/IP properties for at
least one LAN adapter.
If no DNS server address settings are present, then the addresses
of the AVM Access Server’s virtual DNS servers must be entered.
All LAN adapters to be used in conjunction with the AVM Access
Server must be configured with fixed IP addresses.
Proceed as follows:
1.
In the Control Panel, open the “Network Connections”.
2.
Select the LAN connection to be used in conjunction with the AVM
Access Server.
3.
Click it with the right mouse button and select “Properties” in the
context menu.
4.
Select “Internet Protocol (TCP/IP)” in the list of network componets and click “Properties”.
5.
Enter the following settings:
Field
IP address
16
The IP address of the AVM Access Server
computer in the LAN
Subnet mask
The subnet mask of the LAN network address.
Default gateway
Any IP address in the AVM Access Server’s
subnetwork.
AVM Access Server – 2 Installation and Initial Configuration
Step by Step: AVM Access Server Installation and Basic Configuration
In the example, the following settings must be entered:
6.
In Berlin
In London
IP address
192.168.10.1
192.168.20.1
Subnet mask
255.255.255.0
255.255.255.0
Default gateway
192.168.10.2
192.168.20.2
If no DNS server address is configured, you must enter addresses
of the AVM Access Server’s virtual DNS servers. These addresses
are as shown in the example.
Preferred DNS server
Alternative DNS server
192.168.116.252
192.168.116.253
7.
Confirm your settings by clicking “OK”.
8.
If you want to use any other additional LAN adapters with the AVM
Access Server, you must enter a fixed IP address for each such
adapter as described above.
Install the AVM Access Server
In the example, the AVM Access Server is installed at two locations.
Before installing the AVM Access Server software, make sure the
required Service Pack is installed for your operating system, as
specified in the chapter “System Requirements” on page 14. If you are
using Windows NT 4.0, you must also install Microsoft Jet 4.0 with
Service Pack 6. All of the service packs listed are provided on the AVM
Access Server installation CD, so that you can install those you require
before you proceed.
1.
Insert the AVM Access Server CD in your CD-ROM drive.
A CD introduction starts automatically.
2.
Select the language and the product you want to use. Then select
the operating system in use on the computer on which you want
to install the AVM Access Server.
Install the required Service Pack for your operating system, and if
you are using Windows NT 4.0, install the Microsoft Jet 4.0 software with the accompanying service pack.
3.
Start the AVM Access Server installation.
4.
Click “Next” in the Setup program’s sign-on dialog to proceed
with the installation.
AVM Access Server – 2 Installation and Initial Configuration
17
Step by Step: AVM Access Server Installation and Basic Configuration
5.
In the dialog that appears, enter the Product Identification Code
that is printed on the back of the CD.
6.
In the “Choose Destination Location” dialog, specify the folder in
which you want to install the AVM Access Server’s program files.
If you are installing the software on a computer running Windows
XP, messages about the Windows logo test may appear. Click
“Continue Anyway”.
7.
Click “Finish” to close the Setup program and restart your computer. Before the computer restarts, remove the CD from the CDROM drive.
After the computer has restarted, the AVM Access Server’s Configuration Wizard starts automatically to support you in configuring
the basic settings.
The AVM Access Server starts automatically as an operating system service each time the computer starts up.
Select ISDN and ADSL-Controllers
1.
In the Configuration Wizard’s sign-on dialog, click “Next”.
2.
Select the controllers you want the AVM Access Server to use. To
configure a controller, select it in the list and click the “Properties” button. The controller properties dialog appears. This dialog
allows you to specify the properties of the ISDN line to which the
controller is connected.
In the example, no controllers need to be selected for configuration here, since the Internet connection takes place over ADSL.
ADSL-Controllers such as FRITZ!Card DSL are configured automatically, and do not need to be set up using the Configuration Wizard.
18
AVM Access Server – 2 Installation and Initial Configuration
Step by Step: AVM Access Server Installation and Basic Configuration
Set up Internet Access
In the example, Internet access is set up using ADSL, both in Berlin and
in London.
1.
In the dialog that follows, specify how the AVM Access Server is to
connect to the Internet.
In the example, “FRITZ!Card DSL” is selected at both locations
2.
Then select the type of Internet Service Provider used.
In the example, the option “Internet Service Provider with authentication”
is selected
3.
In the next dialog, select the Internet Service Provider.
AVM Access Server – 2 Installation and Initial Configuration
19
Step by Step: AVM Access Server Installation and Basic Configuration
4.
Enter the authentication information for your Internet access account.
Create a User Group
1.
If you want to provide LAN access to remote users, then specify
here how they will be allowed to connect to the AVM Access
Server. If you do not want to set up remote users at this time, then
deactivate both options.
In the example, the option “Internet (VPN)” is activated and the option
“Direct ISDN dial-in” deactivated in Berlin; in London, both options are
deactivated
2.
Select an option to create a user group, then enter a name for the
group.
In the example, a user group is created at the Berlin location with the
name “VPN telecommuters”
20
AVM Access Server – 2 Installation and Initial Configuration
Step by Step: AVM Access Server Installation and Basic Configuration
3.
Select an IP address range. Users in the new group will be assigned IP addresses from this address range.
In the example, the IP address range 192.168.110.0/24 is selected
Create the First User in the User Group
1.
Enter the authentication information for the user. In the “Full
name” field, enter the user’s first and last names. In the “User
name” field, you can retain the login name suggested by the AVM
Access Server Configuration Wizard, or change it as desired. In the
“Password” field, enter the password that the employee will be
required to present in order to connect to the AVM Access Server.
The password must be at least eight characters long. Enter the
same password again for confirmation in the “Repeat password”
field.
In the example, the authentication information for the user Jane Doe has
been entered
2.
The next dialog allows you to activate a budget. This budget applies to all connections configured in the AVM Access Server.
AVM Access Server – 2 Installation and Initial Configuration
21
Step by Step: AVM Access Server Installation and Basic Configuration
In the example, the option “Activate pre-defined budget” is selected
3.
All the settings you have selected are then presented in a summary. Click “Finish” to close the Configuration Wizard.
Settings for Unmetered Internet Access
If you pay only a flat monthly fee for Internet access, you should activate the AVM Access Server option “Flat rate”. The connection is then
maintained continuously, even when idle.
In the example, the flat rate option is activated on both AVM Access
Servers, in Berlin and in London.
1.
In the AVM Access Server window, select “T-Online DSL” in the
“Internet” folder. Under “Inactivity timeout” on the “General” dialog page, activate the option “Flat rate: maintain connection”.
2.
Then click “Apply” to activate all of the new settings in the AVM
Access Server configuration.
Set up Dynamic DNS
Before you can set up dynamic DNS in the AVM Access Server, you
must register with a dynamic DNS provider. In the example, Dynamic
DNS is set up on both AVM Access Servers, in Berlin and in London.
The procedure described below must be carried out twice: once for the
AVM Access Server in Berlin and once for the AVM Access Server in London.
22
1.
Open your web browser for a LAN connection.
2.
Deactivate any proxy server settings in your browser configuration.
3.
In the browser's address field, enter www.dns4biz.com.
4.
Click “Sign Up” then on “free service”.
5.
Fill out the “Host details” form.
AVM Access Server – 2 Installation and Initial Configuration
Step by Step: AVM Access Server Installation and Basic Configuration
In the example, the following names are entered in the “subdomain name” and “username” fields.
For Berlin
For London
Subdomain
name
company-abc-berlin
company-abc-london
Username
hqberlin
brlondon
The fully qualified domain names at which the two AVM Access
Servers will later be addressed in the Internet are then “companyabc-berlin.dns4biz.de” and “company-abc-london.dns4biz.de”.
6.
Fill in your personal information in the other forms, and in the last
form, click “Finish”.
7.
After a few minutes, you will receive your password for the dynamic DNS service by e-mail.
Configure the AVM Access Server for Dynamic DNS
1.
In the AVM Access Server window, select the “Internet” folder,
then click the “Gateway Services” tab.
2.
Click the button at the top right corner of the “Dynamic DNS” list
to create a new entry in the list.
3.
Fill in the fields in the “Create New Dynamic DNS Record” dialog.
In the example, the information registered with the dynamic DNS
provider is filled in as follows:
For Berlin
For London
Domain
name
company-abcberlin.dns4biz.de
company-abclondon.dns4biz.de
Dynamic
DNS
provider
dns4biz.de
dns4biz.de
ID
hqberlin
brlondon
Password
The password you received by e-mail from the dynamic
DNS provider
4.
Confirm your settings by clicking “OK”.
5.
Then select the “VPN” dialog page, and make sure that the fully
qualified domain name that you specified in Step 3 above appears in the “Internet address” field.
AVM Access Server – 2 Installation and Initial Configuration
23
Step by Step on the User’s Home Computer
Create an Export File with the Users’ Configuration for NetWAYS/ISDN
The AVM Access Server allows you to save the user configuration for an
individual remote user in an export file. This file can then be imported
in NetWAYS/ISDN on the remote user’s computer. The import operation
automatically configures the remote user’s connection to the AVM
Access Server. In the example, an export file is created with the user
configuration for Jane Doe.
1.
In the “Remote users” folder in the AVM Access Server window,
select the desired remote user. In the example this is the user
“Jane Doe”.
2.
Click the user with the right mouse button and select “Export User
Settings for NetWAYS/ISDN” in the context menu. The dialog “Export VPN User Settings for NetWAYS/ISDN” appears.
3.
Enter any password you choose.
The export file NETWAYS.EFF is saved in the folder NWUSERS\J_
DOE in the AVM Access Server installation directory.
4.
Confirm your settings by clicking “OK”.
5.
Copy the resulting NETWAYS.EFF file to a floppy disk.
Step by Step on the User’s Home Computer
The following installation and configuration procedures must be performed on the remote user’s home computer in order to connect it to
the AVM Access Server.
NetWAYS/ISDN Installation
Install NetWAYS/ISDN according to the instructions in the NetWAYS/ISDN manual.
Internet Connection Configuration
24
1.
In the “Settings” menu, select “Call destinations / New call destination...”. The NetWAYS/ISDN wizard starts, and assists you in
configuring an Internet connection.
2.
In the “Type of network” dialog, select the option “Internet”.
3.
In the dialog that follows, select the type of Internet Service Provider used. In the example, the option “Internet Providers with
Registration” is selected on Jane Doe’s home computer.
AVM Access Server – 2 Installation and Initial Configuration
Step by Step on the User’s Home Computer
4.
Select the desired Internet Service Provider.
5.
Enter a name for your Internet connection.
6.
Enter the authentication information for your Internet access account.
7.
Click “Next”, then “Finish” to complete the configuration.
An icon representing the Internet connection now appears in the
NetWAYS/ISDN window.
Set up the AVM Access Server as a Remote Network
1.
Insert the floppy disk containing the export file created by the
AVM Access Server. In the NetWAYS/ISDN configuration, select
“VPN import” in the “File” menu. The Windows file selection dialog opens.
2.
Select the file with the file name extension .EFF on the floppy disk,
and confirm your selection by clicking “Open”.
3.
Enter the password you chose for the export file on creating it in
the AVM Access Server.
Test the Internet Connection
You can test the Internet connection by sending a “ping” to any server
in the Internet.
1.
In the NetWAYS/ISDN window, select the Internet connection,
then the “Standby to connect” command in the “File” menu.
2.
Open a command prompt and enter ping www.avm.de.
If the server's responses are received, then NetWAYS/ISDN has
successfully established a connection to the Internet.
Test the VPN Connection from the Home PC to the AVM Access Server
1.
In order for the NetWAYS/ISDN computer to activate a VPN connection to the AVM Access Server, the AVM Access Server’s connection to the Internet must be active. In the example, the “flat
rate” option is activated on the AVM Access Server, so the Internet connection is active all the time.
2.
The NetWAYS/ISDN Internet connection must be on stand-by. In
the NetWAYS/ISDN window, select the Internet connection, then
click “Standby to connect” in the “File” menu.
AVM Access Server – 2 Installation and Initial Configuration
25
Step by Step on the User’s Home Computer
3.
On the NetWAYS/ISDN computer, open a command prompt and
enter ping followed by the domain name or the IP address of the
AVM Access Server. In the example, the command entered on Jane
Doe’s NetWAYS/ISDN computer is:
ping company-abc-berlin.dns4biz.de
If the server’s responses are received, then NetWAYS/ISDN has
successfully contacted the AVM Access Server over the Internet.
Test Access to a Specific Server in the Company Network from the
Remote Workstation
1.
Open the file %WINDIR%\SYSTEM32\DRIVERS\ETC\HOSTS in a
text editor. (See also the section “Windows Name Resolution and
File and Printer Sharing” on page 95.)
Add a line to this file containing the following information about
the server you want to access in the company network:
<server's
IP
address>
qualified domain name>
<server's
fully
In the example, the following information is entered for the company’s e-mail server:
192.168.10.100 mail.abc.de
Now the e-mail server’s name can be resolved to its IP address locally on the NetWAYS/ISDN computer.
2.
At the command prompt, enter ping followed by the domain
name of the server indicated above. In the example, the command entered is:
ping mail.abc.de
If the server’s reponses to the ping are received, then Jane Doe
now has access to the e-mail server over a VPN. You can now configure an e-mail client program.
26
AVM Access Server – 2 Installation and Initial Configuration
Step by Step: Configuration of the LAN-to-LAN Link
Step by Step: Configuration of the LAN-to-LAN Link
To configure the LAN-to-LAN link, proceed as follows:
Set up a VPN Connection to the Remote Network
In the example, the remote network “London Office” is created on the
AVM Access Server in Berlin, and the remote network “Berlin Office” is
created on the AVM Access Server in London.
1.
In the AVM Access Server window, click the “Remote networks”
folder with the right mouse button. Select “Add Network...” in the
context menu. The “Create New Remote Network” wizard starts.
2.
In the first dialog, select the option “VPN connection over the Internet”.
3.
Enter a name for the remote network. In the example, the name
entered for the remote network is as follows:
In Berlin
In London
London Office
Berlin Office
4.
Enter the same password for authentication with the remote site
at the both locations.
5.
At each location, enter the name of the remote AVM Access Server
as the remote VPN. Enter the name of the local AVM Access Server
as the local VPN gateway. In the example, the VPN gateway settings are as follows:
In Berlin
Remote VPN gateway:
company-abc-london.dns4biz.de
Local VPN gateway:
company-abc-berlin.dns4biz.de
In London
Remote VPN gateway:
company-abc-berlin.dns4biz.de
Local VPN gateway:
company-abc-london.dns4biz.de
The domain name must be registered with a dynamic DNS provider (dns4biz.de in the example) in order for the AVM Access Server
to be accessible at a dynamically assigned IP address.
AVM Access Server – 2 Installation and Initial Configuration
27
Step by Step: Configuration of the LAN-to-LAN Link
6.
7.
8.
Enter the network address of the local network. In the example,
the local network addresses are:
In Berlin
In London
Network address
192.168.10.0
192.168.20.0
Subnet mask
24-255.255.255.0
24-255.255.255.0
Enter the network address of the remote network. In the example,
the remote network addresses are:
In Berlin
In London
Network address
192.168.20.0
192.168.10.0
Subnet mask
24-255.255.255.0
24-255.255.255.0
Click “Next”, then “Finish” to complete the configuration.
The new remote network is shown in the “Remote networks” folder in the AVM Access Server window.
Test the VPN Connection from Both LANs
1.
In order for the VPN connection to be activated, the Internet connections of the AVM Access Server at both locations must be active. In
the example, the “flat rate” option is activated both in Berlin and in
London, so the Internet connections are active all the time.
2.
Open a command prompt on the AVM Access Server computer at
either location and ping the domain name of the remote location’s AVM Access Server. In the example, the command entered
on the AVM Access Server computer in the London office is:
ping company-abc-berlin.dns4biz.de
If the responses to the ping are received, then the remote AVM
Access Server is reachable over the Internet.
3.
Now switch to the Monitoring View in the AVM Access Server window and select the “Connection control” folder.
4.
Click the “London Office” in the list with the right mouse button,
and select “Connect” in the context menu.
If the connection is successfully activated, a blue arrow appears
in the connection control list. The connection is automatically
cleared down again after a brief delay.
5.
28
Now repeat Steps 2 through 4 at the other location.
AVM Access Server – 2 Installation and Initial Configuration
Removing the AVM Access Server
2.2 Removing the AVM Access Server
1.
Double-click the “Add/Remove Programs” icon in the Windows
Control Panel.
2.
Select “AVM Access Server” in the list of installed software components.
3.
Click the “Change/Remove” button to begin the de-installation
procedure.
If you want to reinstall the AVM Access Server after removing it, you
should first restart the computer after the removal in order to update
the entries in the Windows registry.
AVM Access Server – 2 Installation and Initial Configuration
29
The AVM Access Server Window
3 The AVM Access Server Window
The AVM Access Server window provides all of the configuration and
monitoring functions for the AVM Access Server. Once you have installed the AVM Access Server, the Windows Start menu contains the
program group “AVM Access Server”. Click the “AVM Access Server”
icon in this program group to open the AVM Access Server window.
The AVM Access Server window
The Access Server window has two different functions:
1.
Configuration of the Access Server
2.
Connection control, logging and diagnostics
Accordingly, the Access Server’s user interface provides two view
modes, the Configuration View and the Monitoring View. You can alternate between the two views using the commands in the “View” menu.
30
AVM Access Server – 3 The AVM Access Server Window
The AVM Access Server Menus
The Access Server window contains the following interactive elements:
the menu bar containing the AVM Access Server menus
the toolbar, which provides key functions of the AVM Access
Server at a mouse-click
the Configuration View
the Monitoring View
the status bar, containing brief information about the operational
status of the AVM Access Server
3.1 The AVM Access Server Menus
The menu bar provides the commands most frequently used in operating the AVM Access Server. The commands in each menu are briefly described below.
The ‘File’ Menu
Menu Command
Function
Apply Changes...
A dialog prompts you to confirm that you want
to activate the configuration changes made
since the Access Server was last restarted.
Alternatively, you can export the new settings
to a file.
Discard Changes
A dialog prompts you to confirm that you want
to abandon the configuration changes made
since the Access Server was last restarted.
Alternatively, you can export the new settings
to a file.
Import...
A file selection dialog appears allowing you to
select a configuration file to be loaded in the
AVM Access Server.
Export...
A dialog appears in which you can select a
location and file name to export the current
AVM Access Server configuration in a database
format.
Exit
This command closes the AVM Access Server
window.
AVM Access Server – 3 The AVM Access Server Window
31
The ‘Internet’ Menu
The ‘Internet’ Menu
Menu Command
Function
Add Internet Service
Provider...
The “Create New Internet Connection” wizard starts
and assists you in configuring the connection to a
new Internet Service Provider.
Delete Internet Service
Provider
Deletes the Internet Service Provider currently
selected in the object tree.
The ‘Remote Users’ Menu
Menu Command
Function
Add User...
This command starts a Wizard to aid you in
configuring a new user.
Delete User
Deletes the user currently selected in the
configuration object tree.
Add Group...
Starts a Wizard to aid you in configuring a new user
group.
Delete Group
Deletes the user group currently selected in the
configuration object tree.
The ‘Remote Networks’ Menu
Menu Command
Function
Add Network...
Starts the “Create New Remote Network” wizard to
aid you in configuring a new remote network.
Delete Network
Deletes the remote network currently selected in
the configuration object tree.
The ‘View’ Menu
Menu Command
32
Function
Configuration
Switches the display to the Configuration View.
Monitoring
Switches the display to the Monitoring View.
Toolbar
Toggles the toolbar display.
Status bar
Toggles the status bar display.
AVM Access Server – 3 The AVM Access Server Window
The ‘?’ Menu
The ‘?’ Menu
Menu Command
Function
Help Topics
Opens the AVM Access Server’s Online Help.
Manual
Opens the AVM Access Server Manual in the
Acrobat Reader.
Diagnostics
Switches the AVM Access Server window to
Monitoring View and the selects the “Diagnostics”
folder. There you can start a series of diagnostic
tests. (See also the section “Diagnostics” on
page 43.)
Online Registration
Opens the online registration page on the AVM web
site in your default browser. On the AVM web site
you can register your AVM Access Server on line.
About AVM Access
Server
Displays the AVM Access Server's version number
and Product Identification Code.
3.2 The Toolbar
Key AVM Access Server commands are quickly accessible through
icons in the toolbar. Each button has a “tooltip” to indicate the associated command. The tooltip appears when you hold the mouse pointer
over the button.
AVM Access Server – 3 The AVM Access Server Window
33
Configuration View
3.3 Configuration View
The AVM Access Server Configuration View is composed of two parts.
The left side of the window shows an object tree, while the right panel
shows the properties of the object selected in the tree.
Object Tree
The AVM Access Server object tree has the following structure:
Object tree in the Configuration View
The AVM Access Server groups configuration objects in the predefined folders “Internet”, “Remote users”, “Remote networks”,
“Security”, and “Administration”. The “Security” and “Administration” folders contain additional pre-defined folders.
All configuration objects created in the AVM Access Server, such
as Internet Service Providers, users and filter profiles, are displayed in the appropriate folders.
By clicking a selected folder or an object in the tree with the right
mouse button, the context menu is opened, containing commands to operate on the selected object.
34
AVM Access Server – 3 The AVM Access Server Window
Object Properties
Object Properties
The right panel in the Access Server window displays the properties, or
settings, of the object or folder selected in the tree in the left panel.
The properties display can contain one or more dialog pages, depending on the folder or object selected. The configuration settings can be
edited on these dialog pages.
Selecting Folders
If you select a principal or secondary folder in the tree structure, then
the properties display shows general settings affecting all objects in
the folder.
Example:
Internet
The “General” dialog page allows you to choose
whether the AVM Access Server itself should provide
Internet access. If so, then the settings shown here
apply to all Internet connections established using the
AVM Access Server, regardless of the Internet Service
Provider used.
Remote users
These dialog pages allow you to specify whether the
AVM Access Server also provides network access to
remote users managed in a RADIUS server.
<User group>
User groups you have defined are shown as secondary
folders in the “Remote users” folder. All of the selected
user group’s properties apply to every user that is a
member of that user group.
Security
The “General” dialog page here allows you to edit a list
of IP services. The IP services listed here can then be
used in creating filter rules and VPN access rules.
Selecting Objects
When an object within a folder is selected, the dialog pages in the
properties display show the settings that apply to the specific object.
AVM Access Server – 3 The AVM Access Server Window
35
Monitoring View
3.4 Monitoring View
The Monitoring View provides connection control, monitoring and diagnostics functions. Like the Configuration View, the Monitoring View is
also composed of two parts. The monitoring functions are shown in the
tree display on the left.
The object tree in Monitoring View
The display panel on the right contains one or more dialog pages, depending on the function selected in the object tree in the left panel.
These pages display the results of monitoring functions, and in some
cases allow you to set appropriate options.
The connection control and monitoring functions are explained in detail in the following section.
3.5 Connection Control and Monitoring
Functions
For WAN administrators it is especially important to be able to supervise the AVM Access Server in operation. The Monitoring View provides
numerous functions for this purpose.
It provides detailed information on the server status, current routing tables and services, physically active connections, user status, cost and
connection statistics, and events. Furthermore, the AVM Access Server
also provides a packet trace function.
Use the commands in the “View” menu to switch between the Configuration and Monitoring Views. The window structure in the Monitoring
View is similar to that in the Configuration View. The object tree in the
left panel allows you to select one of the various monitoring functions.
The right panel displays the results of the given function.
The program functions are explained in detail below.
36
AVM Access Server – 3 The AVM Access Server Window
AVM Access Server Monitor
AVM Access Server Monitor
Select “AVM Access Server Monitor” in the object tree to display information about the installed product version and a brief summary of the
AVM Access Server’s momentary status.
Connection Control
The “Connection Control” page lists the AVM Access Server’s ISDN,
ADSL and VPN connections with their momentary status. Commands
are also provided to trigger various actions, depending on the connection status.
The list displays the status of all the connections to Internet Service
Providers, remote networks and remote users configured in the AVM
Access Server.
The display includes name of the remote network or user and the current connection status, as well as statistical information about the connection.
The connection status is indicated by one of the following icons in the
“Connection” column:
Icon
Status
None
If no icon is shown in the “Connection” column for a given remote
network or Internet connection, then the connection is not currently
active.
The icon in the column “Destination or User” is shown in color:
If the entry refers to an Internet connection, the colored icon
indicates the Internet Service Provider currently activated in the
AVM Access Server configuration.
If the entry refers to a remote network, then the colored icon
indicates that there is a route to this network in the AVM Access
Server’s routing table. The AVM Access Server will activate the
connection automatically when data needs to be sent to the remote
network.
The icon in the column “Destination or User” is gray:
There is no route to the remote site in the routing table. In other
words, no route to this destination is known. The AVM Access
Server cannot dial up the connection automatically. You may
activate the connection to this destination manually, however.
There is a logical connection to this destination. The physical
connection has been cleared down by the AVM Access Server due to
inactivity.
AVM Access Server – 3 The AVM Access Server Window
37
Connection Control
Icon
Status
ADSL outgoing
One B channel outgoing
One B channel incoming
Two B channels outgoing
Two B channels incoming
VPN outgoing
There is a logical and physical
connection to the remote user or
network. In other words, the
ISDN B channel or the ADSL
channel is connected, and
connection charges are
accumulating. The direction of
the arrow illustrates the direction
of the connection request.
VPN incoming
VPN user
VPN negotiation outgoing
VPN negotiation incoming
The VPN connection to the
remote user or network is in the
negotiation phase. This means
that the Internet connection is
currently active. The direction of
the arrow illustrates the direction
of the connection request.
Commands
Three buttons appear above the top left corner of the connection list.
When you select a connection in the list, these buttons are individually
either activated or deactivated, depending on the status of the connection.
For information on the available commands, see the Online Help.
Button
Command
Connect
Disconnect
Test the connection (ping)
38
AVM Access Server – 3 The AVM Access Server Window
ISDN B Channels
Properties
Click a connection in the list with the right mouse button and select
“Properties” in the context menu to display the IP address assignment,
compression and filtering options, and the security associations (SAs)
of VPN connections. For a detailed description of the properties, see
the Online Help.
ISDN B Channels
Select “ISDN B channels” to display all of the ISDN connections that
are currently active.
The display includes the following information:
Column
Display
Controller
The CAPI number of the controller through which the
connection has been established
B channel
LED is gray: the B channel is not in use
LED is green: the B channel is active
Number
The remote site’s ISDN number
Connection up-time
Duration of the physical connection
Data throughput
Current throughput in kbit/s
Traffic volume
The amount of data exchanged over the connection
up to now, in kilobytes
Data compression
LED is gray: data compression is not active
LED is green: data compression is active
Charges
The connection costs accumulated up to now
Dial-in time
The date and time at which the connection began
Routing Table
Select “Routing Table” to display the currently active IP routes. The
number of routes visible in the table depends on how many connections are currently active, and how many routes have been entered
statically in the AVM Access Server or propagated from the LAN by RIP.
The routing table displayed is that of the AVM Access Server. The operating system’s routing table is no longer in use once the AVM Access
Server has been started, except for the default route entered in the
Windows network settings (see also the section “Architecture of the
AVM Access Server” on page 100).
AVM Access Server – 3 The AVM Access Server Window
39
Events
Events
Events displayed in the Monitoring View include all ISDN, ADSL, and
VPN operations, as well as error and informational messages.
These events are divided into categories indicated by different icons.
The messages types are:
Icon
Event type
Warning, such as a user budget or global threshold that has been
exceeded.
Informational message, such as a successful connection setup or
clear-down.
Incoming direct ISDN connection
Outgoing direct ISDN connection
Alarm, such as a violation of the filter rules (firewall).
Error, such as “User does not answer.”
All the ISDN error messages and AVM Access Server messages are listed in the Online Help.
You can also limit the display to certain selected events by selecting
one or more criteria. You can select a specific event type, a remote site
and/or an interface. In diagnosing connection problems, for example,
it may be helpful to display all events of the type “Errors”, or all events
concerning a certain remote site or a certain interface.
The events are stored in a database. You can limit the maximum size of
the database file in the “Administration” folder in the Configuration
View. When the database file reaches this maximum size, a second file
is created. The first database file is not deleted until the second also
reaches the specified maximum size.
Use Statistics
The use statistics provide you with detailed connection information for
a specific period of your choice. You can select the period for which you
want a statistical analysis using the options at the top of the dialog
page.
40
AVM Access Server – 3 The AVM Access Server Window
Packet Trace
The following information is supplied for all connections established
between the AVM Access Server and the remote site, broken down by
user and network:
the total number of connections
the number of direct dial-in connections
the number of VPN connections
the number of incoming connections
the number of outgoing connections
the total connection up-time
the total up-time of all direct dial-in connections
the total up-time of all VPN connections
the total traffic volume
Connections that are still active are not reflected in the statistics. Active connections can be monitored in “Connection control” (see the
section “Connection Control” on page 37).
The statistics are ordinarily collated by user and network, but can also
be displayed for each connection individually.
The statistics are displayed using the Microsoft Internet Explorer inside
the Access Server window. The Internet Explorer’s context menu is thus
available by clicking the right mouse button. Context menu commands
can be used to print the use statistics, for example.
Packet Trace
The “Packet Trace” function in the Monitoring View can be used to
identify what packets for which networking protocols are being sent in
the LAN and over ISDN, ADSL and VPN connections. In this way you can
locate the causes of excessive ISDN calls, record the PPP negotiation of
remote users’ connections, and verify the effectiveness of the enabled
spoofing functions.
You can set a number of criteria for a selective packet trace. For example, you may choose the protocol layer on which you want to log packets. By specifying a remote user or network, you can limit the packet
trace to the traffic over the corresponding connection. You may capture
packets through all network adapters, or only a certain one. You may
also specify the maximum size of the packet trace buffer.
AVM Access Server – 3 The AVM Access Server Window
41
Packet Trace
The following instructions describe how to generate a packet trace
based on two typical examples.
Packet Trace for Negotiation Diagnostics
1.
Select the “Packet trace” folder.
2.
Select the following options on the “Settings” dialog page:
Option
Setting
Interface (Ethernet, PPP, PPPoE)
Activate
User or network
Activate and select the desired user
or network
Interface
Activate and select the desired
interface
3.
Use the default settings for the buffer and packet size.
4.
Now switch to the “Packet Trace” dialog page.
5.
Click the “Start” button to start the packet trace.
6.
In the “Connection control” folder, select the user or network and
activate the connection.
7.
Wait until errors occur.
8.
Stop the packet trace by clicking the “Stop” button.
9.
Click the “Save” button to save the results of the packet trace in a
file for further analysis.
Packet Trace for Polling Problems
1.
Select the “Packet trace” folder in the Monitoring View.
2.
Set the following options:
3.
42
Option
Setting
Network protocol layer
Activate
User or network
Activate and select the desired user or
network
Interface
Activate and select the desired interface
Switch to the “Packet Trace” dialog page and click the “Start”
button to start the packet trace.
AVM Access Server – 3 The AVM Access Server Window
Diagnostics
4.
Wait until 20 to 100 packets have been captured, then stop the
packet trace by clicking the “Stop” button.
5.
Save the results of the packet trace in a file for further analysis.
For further details on the Packet Trace function, please see the Online
Help.
Diagnostics
The “Diagnostics” folder provides a diagnostic tool that allows you to
test all the components that are important for the AVM Access Server in
just a few seconds. If problems occur during operation of the AVM
Access Server, you can use this function to determine whether the
problems are caused by basic configuration errors.
Database Management
The AVM Access Server provides a solid platform for recording and processing all important configuration, event, connection and cost data
for all ISDN connections using standard Microsoft database technology. The AVM Access Server generates the following database files:
NTR.MDB
General configuration data
NTRLOG1.MDB
Connection events
NTRLOG2.MDB
NTRACT1.MDB
NTRACT2.MDB
Connection use statistics
You can limit the size of the NTRLOG1.MDB, NTRLOG2.MDB,
NTRACT1.MDB and NTRACT2.MDB files by setting the options on the
“General” dialog page in the “Administration” folder of the Configuration View. Events are logged at first in the file NTRLOG1.MDB and use
statistics in NTRACT1.MDB. When one of these files has reached the
size limit, the file NTRLOG2.MDB or NTRACT2.MDB is created. When
NTRLOG2.MDB or NTRACT2.MDB reaches the size limit, then the old
NTRLOG1.MDB or NTRACT1.MDB file is deleted and created anew.
These databases are stored in the AVM Access Server’s installation directory, and can be further processed using Microsoft Access 2000 or a
later version.
AVM Access Server – 3 The AVM Access Server Window
43
AVM Access Server Use Scenarios
4 AVM Access Server Use Scenarios
This chapter describes the use of the AVM Access Server in various
configurations and application scenarios. The installation and configuration of the AVM Access Server is described in detail for each scenario, with special attention to points that are important for you to note.
4.1 LAN-to-LAN Link Using AVM ISDN-Controller
C4 and Eight B Channels
A company has its main office in Berlin and a subsidiary in London. The
two locations’ networks are to be linked over ISDN using eight
B channels. The B channels should be set up dynamically on demand.
The connection should only be available during business hours, from
9:00 a.m. to 5:00 p.m. In this way the subsidiary will be permanently
connected to the main office in order to enter data in centralized servers.
Configuration Objectives
In the main office in Berlin, set up a “Remote network” for the
connection to the London office.
In the London office, set up a “Remote network” for the
connection to the main office in Berlin.
Configure the remote network connections at both locations to
use channel bundling with seven dynamically added B channels.
Create a schedule for the remote network connections at both
locations.
44
AVM Access Server – 4 AVM Access Server Use Scenarios
Technical Requirements
The following illustration shows a diagram of the LAN-to-LAN connection.
Berlin main office
London office
IP address: 192.168.10.0
Subnet mask: 255.255.255.0
IP address: 192.168.20.0
Subnet mask: 255.255.255.0
ISDN
AVM Access Server
AVM Access Server
LAN
LAN
LAN-to-LAN connection
Technical Requirements
The following technical prerequisites apply to each of the two locations:
1 AVM ISDN-Controller C4
4 ISDN BRI lines in point-to-point configuration with the linegroup option
For the eight B channels, a maximum of two numbers can be configured in the AVM Access Server. In order to operate eight
B channels using two numbers, all four lines should be grouped
under the same dial-in number or numbers. Such multiple lines
with a shared number are known as a subscriber line group.
1 computer, in working order, which fulfills the system
requirements for the AVM Access Server
AVM Access Server – 4 AVM Access Server Use Scenarios
45
Task Checklist
Task Checklist
The following steps must be carried out both in the main office in Berlin
and at the London subsidiary:
Installation and configuration
A
Verify the network settings in the Windows Control Panel
B
Install the AVM Access Server
C
Configure the ISDN-Controller for the appropriate line type
D
Create a remote network in the AVM Access Server with channel bundling
for a total of eight B channels
E
Create a schedule and activate it in the remote network configuration
F
Test the connection
Step by Step
Steps A through F listed above must be performed both in Berlin and in
London. The procedures are described in detail below. Please note that
there are several differences in the instructions for the two locations.
A
Verify the Network Settings in the Windows Control Panel
Make sure that the following conditions are fulfilled:
A default gateway must be entered in the TCP/IP properties for at
least one LAN adapter.
All LAN adapters to be used in conjunction with the AVM Access
Server must be configured with fixed IP addresses.
Proceed as follows:
46
1.
In the Control Panel, open the “Network Settings”.
2.
Click the LAN connection you will use with the AVM Access Server
with the right mouse button, and select “Properties” in the context menu.
3.
Select “Internet Protocol (TCP/IP)” in the list of network componenets and click “Properties”.
AVM Access Server – 4 AVM Access Server Use Scenarios
Step by Step
4.
Enter the following settings at the two locations:
In Berlin
In London
IP address
192.168.10.1
192.168.20.1
Subnet mask
255.255.255.0
255.255.255.0
Default gateway
192.168.10.2
192.168.20.2
The default gateway entry can be any IP address in the AVM
Access Server’s subnetwork.
B
5.
Confirm by clicking “OK”.
6.
If want to use any other additional LAN adapters with the AVM
Access Server, you must enter a fixed IP address for each such
adapter as described above.
Install the AVM Access Server
Install the AVM Access Server as described in the section “Installation
and Initial Configuration: An Example” on page 15.
After the AVM Access Server has been installed and the computer restarted, the AVM Access Server Configuration Wizard starts automatically. In this scenario, the Configuration Wizard is only used to configure the ISDN-Controller.
C
Configure the ISDN-Controller for the Appropriate Line Type
The AVM-ISDN-Controller B1, C2 or C4 must be configured to use its
special driver software for the “point-to-point BRI”. Please observe the
instructions in the manual accompanying your ISDN-Controller.
1.
In the Configuration Wizard’s sign-on dialog, click “Next”.
2.
In the dialog that prompts you to “Select the ISDN and ADSL-Controllers ...”, select the AVM ISDN-Controller C4 in the list and click
“Properties”.
3.
Activate the “Point-to-point BRI” option and confirm the setting by
clicking “OK”.
4.
In the dialog that asks “How should the AVM Access Server connect to the Internet?”, select the option “Do not set up Internet access”.
5.
In the “Access for remote users” dialog, disable the two options
“Over the Internet (VPN)” and “Direct ISDN dial-in”.
AVM Access Server – 4 AVM Access Server Use Scenarios
47
Step by Step
D
6.
In the “Budget settings” dialog, select the option “Start with no
pre-defined budget”.
7.
Click “Finish” to close the Configuration Wizard.
Create a Remote Network in the AVM Access Server with Channel
Bundling for a Total of Eight B Channels
The remote network “London Office” must be set up on the AVM Access
Server in Berlin, and the remote network “Berlin Office” must be set up
on the AVM Access Server in London.
1.
In the AVM Access Server window, click with the right mouse button on the “Remote networks” folder and select the command
“Add Network...” in the context menu. The “Create New Remote
Network” wizard starts.
2.
In the wizard’s first dialog, select the option “Direct ISDN Connection”.
3.
In the next dialog, enter a name and and the information to be
used for authentication with the remote site.
4.
Enter the dial-up number of the remote site.
5.
Do not activate any budget settings.
6.
In Berlin, enter the IP address of the network in London. In London, enter the IP address of the network in Berlin.
7.
In Berlin
In London
Network address
192.168.20.0
192.168.10.0
Subnet mask
24 - 255.255.255.0
24 - 255.255.255.0
Close the “Summary” dialog by clicking “Finish”.
The new remote network configuration with the name you specified now appears in the “Remote networks” folder.
8.
Select the new remote network in the “Remote networks” and
click the “ISDN Bandwidth” tab in the properties display.
9.
In the field “Maximum number of B channels”, enter “8”. In the
field “Additional dynamic B channels”, enter “7”. All other settings on this dialog page can be left as they are.
10. Click “Apply” to activate all of the new settings in the AVM Access
Server configuration.
48
AVM Access Server – 4 AVM Access Server Use Scenarios
Step by Step
E
Create a Schedule and Activate it in the Remote Network Configuration
In order to allow use of the connection only during business hours,
from Monday through Friday between 9:00 a.m. and 5:00 p.m., you
must define a schedule and activate it in the settings for the remote
network.
1.
Click with the right mouse button on the folder “Administration /
Schedules”, and select “Add Schedule...” in the context menu.
2.
On the “General” dialog page, enter a name for the schedule.
3.
Make sure the options “Treat holidays the same as Sundays” and
“Access enabled” are activated.
4.
Now you can begin to create the schedule using the graphic tool.
– Click with the mouse at the position for 9:00 a.m. on Monday,
and hold the mouse button pressed as you move the mouse
pointer down and to the right.
– As you move the mouse pointer, a tool tip displays the day of
the week and the time of day corresponding to the currrent
position.
– In this way, draw a rectangle enclosing the area from “Mon
9:00” to “Fri 17:00”. Then release the mouse button.
F
5.
Now return to the newly defined network in the “Remote networks” folder.
6.
In the “Schedule” field on the “General” dialog page, select the
schedule you just defined.
7.
Then click “Apply” to activate all of the new settings in the AVM
Access Server configuration.
Test the Connection
1.
Select the command “Monitoring” in the “View” menu.
2.
Select the “Connection control” folder.
3.
Click with the right mouse button on the new connection in the
list, then select the command “Test Connection” in the context
menu.
The AVM Access Server then runs the “ping” command with the
remote site’s IP address. The ping program’s output appears in a
DOS box. If the ping is successful, then the IP connection to the
remote AVM Access Server is functional.
AVM Access Server – 4 AVM Access Server Use Scenarios
49
AVM Access Server and a Router
4.2 AVM Access Server and a Router
A translation agency with ten employees uses a dedicated router to
provide Internet access for all the workstations in the LAN.
Now the AVM Access Server and NetWAYS/ISDN will be added to permit all employees to access the company’s e-mail server from home.
The employees will access the company LAN from their home offices
over VPN links. The router will continue to provide Internet access.
Configuration Objectives
The objectives to be met are as follows:
Configure the AVM Access Server to use Internet access through
the external router
The LAN workstations’ Internet access through the router should
not be affected by the deployment of the AVM Access Server.
Set up remote users with VPN access
Each employee in the translation agency is to be provided with
VPN access from a home office to the company LAN, so that all
employees can use the e-mail server from home.
The following illustration shows a diagram of the VPN connection.
Server at the translation agency
Employees’ home offices
IP address: 192.168.10.0
Subnet mask: 255.255.255.0
NetWAYS/ISDN with
IP addresses from the
IP address range 192.168.100.0
Router
Default gateway:
192.168.10.1
Default gateway:
192.168.10.1
Leased-line
connection
LAN adapter with fixed
public IP address
Internet
Virtual
Private Network
(VPN)
AVM Access Server
Lotus Domino Server
IP Address:
192.168.10.10
LAN adapter with the
IP address 192.168.10.1
LAN
VPN connections between AVM Access Server and home offices; LAN Internet
connection through a dedicated router
50
AVM Access Server – 4 AVM Access Server Use Scenarios
Technical Requirements
Technical Requirements
In the translation agency office
– a computer in working order which fulfills the system
requirements for the AVM Access Server
– a leased-line connection to the Internet (2 Mbit/s)
– Internet access through a router connected to the leased line
– a Lotus Domino e-mail server
In the employees’ home offices:
– a computer in working order
– FRITZ!Card PCI
– an ISDN line with unmetered access
– an account with an Internet Service Provider
Task Checklist
In the translation agency office:
Installation and configuration
A
Verify the network settings in the Windows Control Panel
B
Install the AVM Access Server
C
Configure the AVM Access Server to use Internet access through the
external router
D
Test the accessibility of the AVM Access Server from the Internet
E
Create a user group “VPN telecommuters” with VPN access authorization
F
Create a user configuration for each employee in the “VPN
telecommuters” group
G
Create export files with the users’ settings for NetWAYS/ISDN
H
Define a route to the virtual private network for the Lotus Domino server
AVM Access Server – 4 AVM Access Server Use Scenarios
51
Step by Step: On the Server in the Translation Agency Office
In the employees’ home offices:
Installation and configuration
A
Install NetWAYS/ISDN
(included in the AVM Access Server package)
B
Configure the connection to the Internet Service Provider
C
Configure the AVM Access Server as a remote VPN network
D
Test the Internet connection
E
Test the VPN connection from the home PC to the AVM Access Server
F
Test access to the e-mail server from the home computer
Step by Step: On the Server in the Translation Agency
Office
The following installation and configuration procedures must be performed on the server at the translation agency’s office:
A
Verify the Network Settings in the Windows Control Panel
The router will continue to provide Internet access. The computer on
which the AVM Access Server will be installed must therefore be configured beforehand to access the Internet through its LAN adapter. Make
sure that the following settings have been configured:
The LAN adapter that connects the AVM Access Server with the
router must have a fixed, public IP address. This IP address must
be in the IP subnetwork assigned to your leased line by the
Internet Service Provider. The IP address of the router must be
entered as the default gateway.
The leased-line provider’s DNS servers must be entered as the
two DNS servers in the LAN adapter settings.
All LAN adapters to be used in conjunction with the AVM Access
Server must be configured with fixed IP addresses.
Proceed as follows:
52
1.
In the Control Panel, open the “Network Connections”.
2.
Click with the right mouse button on the LAN connection that connects the AVM Access Server with the router and select “Properties”.
3.
Select “Internet Protocol (TCP/IP)” in the list of network components and click “Properties”.
AVM Access Server – 4 AVM Access Server Use Scenarios
Step by Step: On the Server in the Translation Agency Office
B
4.
In the “IP address” field, enter a fixed, public IP address. This IP
address must be in the IP subnetwork assigned to your leased
line by the service provider.
5.
If no DNS server address is configured, you must enter addresses
of the leased-line provider’s DNS servers.
6.
Confirm your choices by clicking “OK”.
7.
If want to use any other additional LAN adapters with the AVM
Access Server, you must enter a fixed IP address for each such
adapter as described above.
Install the AVM Access Server
Install the AVM Access Server as described in the section “Installation
and Initial Configuration: An Example” on page 15.
After the AVM Access Server has been installed and the computer restarted, the AVM Access Server Configuration Wizard starts automatically. The Configuration Wizard allows you to configure the Access
Server to use the existing Internet connection.
C
Configure the AVM Access Server to Use Internet Access through the
External Router
1.
In the Configuration Wizard’s sign-on dialog, click “Next”.
2.
In the dialog that prompts you to “Select the ISDN and ADSL-Controllers ...”, you do not need to select anything.
3.
In the dialog that asks, “How should the AVM Access Server connect to the Internet? ”, select the option “Use existing Internet access”.
4.
In the dialog that prompts you to “Select the network adapter
through which the Internet is accessible”, select the adapter that
has a network connection to the external router.
5.
In the “Access for remote users” dialog, disable the two options
“Over the Internet (VPN)” and “Direct ISDN dial-in”.
6.
In the “Budget settings” dialog, select the option “Start with no
pre-defined budget”.
7.
Click “Finish” to close the Configuration Wizard.
AVM Access Server – 4 AVM Access Server Use Scenarios
53
Step by Step: On the Server in the Translation Agency Office
D
Test the Accessibility of the AVM Access Server from the Internet
In order for the remote users to establish VPN connections to the AVM
Access Server, the AVM Access Server must be accessible at a known
address in the Internet.
E
F
1.
Select the “Internet” folder in the object tree in the AVM Access
Server window.
2.
On the “VPN” dialog page, make sure that the field “Internet address” contains the IP address that you specified in the network
settings for the LAN adapter that connects the AVM Access Server
to the external router (see Step A4 above).
Create a User Group “VPN telecommuters” with VPN Access
Authorization
1.
In the AVM Access Server window, click the “Remote users” folder
with the right mouse button and select “Add Group...” in the context menu.
2.
As the group’s name, enter “VPN telecommuters”.
3.
Leave the option “Over the Internet (VPN)” activated, and deactivate the option “Direct ISDN dial-in”.
4.
For the IP address range, select “User-defined”.
5.
Enter the IP address range 192.168.100.0/24. Users in the group
will then be assigned IP addresses in this range.
Create a User Configuration for Each Employee in the “VPN
telecommuters” Group
1.
In the object tree in the AVM Access Server window, select the user group “VPN telecommuters” in the “Remote users” folder. Select “Add User...” in the context menu.
The “Create New Remote User” wizard starts.
54
2.
Enter the user information for an employee, and click “Next”.
3.
Select the user group “VPN telecommuters”.
4.
Click “Finish” to complete the user configuration.
5.
Repeat Steps 1 through 4 for each employee.
AVM Access Server – 4 AVM Access Server Use Scenarios
Step by Step: On the Server in the Translation Agency Office
G
Create Export Files with the Users’ Settings for NetWAYS/ISDN
The AVM Access Server allows you to save the user settings for individual remote users in an export file. This file can then be imported in
NetWAYS/ISDN on the remote user’s home computer. The import operation automatically configures the remote user’s connection to the
AVM Access Server. Carry out the following steps for each employee
individually.
1.
In the object tree of the AVM Access Server’s Configuration View,
select the desired user in the “Remote users” folder.
2.
Click the user with the right mouse button and select “Export User
Settings for NetWAYS/ISDN” in the context menu.
The dialog “Export VPN User Settings for NetWAYS/ISDN” appears.
H
3.
In the “Password” field, enter a password that will be used to encrypt the export file. The VPN user will need to type in this password to import the configuration in NetWAYS/ISDN.
4.
The export file is generated with the name “NETWAYS.EFF” in the
folder you specify in the “Folder” field.
5.
Confirm your choices by clicking “OK”.
6.
Copy the resulting NETWAYS.EFF file to a floppy disk.
Define a Route to the Virtual Private Network for the Lotus Domino
Server
The network settings of the Lotus Domino server need not contain a default gateway setting. If the AVM Access Server is not the default gateway, however, then the Lotus Domino server must be informed that IP
addresses in the VPN user group’s address range are reachable
through the AVM Access Server. In other words, a route to this address
block must be configured on the Lotus Domino server.
If the Lotus Domino server is running on a Windows operating system,
proceed as described below. The procedure for other operating systems (such as SunOS) is similar. Consult the documentation of your operating system to see how to define local routes.
1.
Open a command prompt on the Lotus Domino server computer.
2.
Enter the following command:
route add 192.168.100.0
192.168.10.1 metric 1 -p
mask
255.255.255.0
AVM Access Server – 4 AVM Access Server Use Scenarios
55
Step by Step: On the Employees’ Home Computers
Step by Step: On the Employees’ Home Computers
Steps A through F described below must be carried out on each employee’s home computer.
A
Install NetWAYS/ISDN (Included in the AVM Access Server Package)
Install NetWAYS/ISDN according to the instructions in the NetWAYS/ISDN manual.
B
Configure the Connection to the Internet Service Provider T-Online
1.
In the “Settings” menu, select “Call destinations / New call destination...”. The NetWAYS/ISDN wizard starts, and assists you in
configuring an Internet connection.
2.
In the “Type of Network” dialog, select the option “Internet”.
3.
In the next dialog, select the option “Internet Providers with Registration”.
4.
In the list of Internet Service Providers, select “T-Online ISDN”.
5.
Confirm the suggested name for the Interent connection, “T-Online ISDN”.
6.
Enter the authentication information for your T-Online Internet access account.
7.
Click “Next”, then “Finish” to complete the configuration.
An icon representing the Internet connection now appears in the
NetWAYS/ISDN window.
C
56
Configure the AVM Access Server as a VPN Remote Network
1.
Insert the floppy disk containing the export file created by the
AVM Access Server. In the NetWAYS/ISDN configuration, select
“VPN import” in the “File” menu. The Windows file selection dialog opens.
2.
Select the file on the floppy disk with the file name extension .EFF,
and confirm your selection by clicking “Open”.
3.
Enter the password you chose for the file on creating it in the AVM
Access Server.
AVM Access Server – 4 AVM Access Server Use Scenarios
Step by Step: On the Employees’ Home Computers
D
Test the Internet Connection
You can test the Internet connection by sending a “ping” to any server
in the Internet.
1.
The NetWAYS/ISDN Internet connection must be on stand-by. In
the NetWAYS/ISDN window, select the Internet connection, then
click “Standby to connect” in the “File” menu.
2.
Open a command prompt and enter ping www.avm.de.
If the server’s responses are received, then NetWAYS/ISDN has
successfully established a connection to the Internet.
E
Test the VPN Connection from the Home PC to the AVM Access Server
1.
The AVM Access Server in the agency’s office is connected to the
Internet by a leased line. To verify that the connection is working,
open a command prompt on the AVM Access Server computer and
enter ping www.avm.de -t.
When you have tested the VPN connection, press Ctrl+C to stop
the ping program.
2.
The NetWAYS/ISDN Internet connection must be on stand-by. In
the NetWAYS/ISDN window, select the Internet connection, then
click “Standby to connect” in the “File” menu.
3.
On the NetWAYS/ISDN computer, open a command prompt and
enter ping followed by the permanent, public IP address of the
AVM Access Server.
If the server’s responses are received, then NetWAYS/ISDN has
successfully reached the AVM Access Server over the Internet.
F
Test Access to the E-mail Server from the Home Computer
1.
Open a command prompt on the NetWAYS/ISDN computer.
2.
Enter the following command:
ping 192.168.10.10
If a response to the ping is received, then NetWAYS/ISDN computer is able to communicate with the e-mail server over the VPN link.
You can now configure an e-mail client program.
AVM Access Server – 4 AVM Access Server Use Scenarios
57
AVM Access Server Concepts and Functional Principles
5 AVM Access Server Concepts and
Functional Principles
This chapter presents a number of the features and options provided
by the AVM Access Server. Settings are described with their underlying
concepts, areas of application, and actual functions in the AVM Access
Server as a whole.
5.1 Filters
Filters are used both to prevent unauthorized intrusion into your network–from the Internet, for example–and to select which data and services are available for access from outside the LAN. This selective access also helps to minimize connection costs. The AVM Access Server
provides extensive filtering options in the “Security / Filter profiles”
folder.
IP Packet Filter Firewall
The AVM Access Server provides your network with IP packet filtering in
the following instances:
destination-specific input filters
destination-specific output filters
global input filter
global output filter
forwarding filter
You may set filtering rules for each of these instances to define how the
AVM Access Server deals with incoming and outgoing packets and
packets to be forwarded to other networks. The possible actions in
each case are “Drop” (discard the packet), “Reject” (return an error
message) and “Accept”. For example, you may specify precisely which
stations can communicate with one another, or you can stipulate that
certain IP services, such as “HTTP” services for access to web servers,
are only accepted from certain stations in your network.
58
AVM Access Server – 5 AVM Access Server Concepts and Functional Principles
Filters and Rules
Because the filter rules are grouped in several instances, they provide
very flexible and extensive control. The packet filtering performed by
the AVM Access Server is one way of setting up what is called a firewall,
a protective barrier around your network.
The individual filter instances in the AVM Access Server perform the following tasks:
Destination-specific input filters
Inspection of packets arriving from one of the AVM Access
Server’s ISDN or ADSL connections, or from a LAN adapter.
Destination-specific output filters
Inspection of packets leaving the AVM Access Server for
transmission over ISDN or ADSL to a remote user or network, or
through a LAN adapter.
Global input filter
Inspection of packets arriving in the AVM Access Server through
any interface (LAN, ISDN, GSM, ADSL or VPN).
Global output filter
Inspection of packets about to leave the AVM Access Server
through any interface (LAN, ISDN, GSM, ADSL or VPN ).
Forwarding filter
Inspection of all packets that enter the AVM Access Server from
any network for forwarding to their ultimate destination in a
different network. These may include packets from the LAN
addressed to an ISDN or VPN remote network, for example, or
from one remote network to another.
For a complete description with examples of the various filter instances, see page 62.
Filters and Rules
Filters are made up of the following components:
An ordered sequence of rules.
A default action which is performed on all packets not treated by
any rule in the filter.
AVM Access Server – 5 AVM Access Server Concepts and Functional Principles
59
Filters and Rules
Rules consist of the following components:
A description of the packet type to which the rule applies. The
AVM Access Server tests packets against the descriptions in the
filter rules by three criteria.
– Service: The rule may apply to all IP-based services, or only to
certain services such as FTP or telnet, or just to specific service
operations, such as FTP access to the LAN from the Internet.
– Source of the packet: this is specified in the form of a network
or host address.
– Destination of the packet: this is also specified in the form of a
network or host address.
One of three actions, to be performed on packets that fit the description.
– Accept: The packet is sent on to the destination address (or
passed to the next filter.
– Drop: The packet is not forwarded, but simply discarded, without notifying the sender. To the sender (and potential intruder), the effect is the same as if the AVM Access Server were not
on line, or inexistent.
– Reject: The packet is discarded, and an error message is returned to the sender.
A logging instruction for packets handled by this rule. Log information is primarily used to detect intrusion attempts into the LAN
and, if necessary, to trace their source. The log can also be used
to test whether the filters are working as intended, and whether
the rules actually match the packets to be filtered.
Each packet is tested against all rules in the list order, until it matches
a rule’s description. That rule’s action is then applied to the packet. If
the applicable action is “Drop” or “Reject”, then no other filtering is
performed on the packet. If the applicable action is “Accept”, the packet is passed on to the next filter instance (or transmitted to its destination, if there are no further filters).
If no rule matches the packet and the default action of the filter profile
is “Accept”, the packet is passed on to the next filter.
60
AVM Access Server – 5 AVM Access Server Concepts and Functional Principles
Filters and Rules
When creating a filter, you should bear these two important points in
mind:
Each filter profile always treats all packets: the specific rules apply to certain packets; the default action applies to all others.
The order of the rules in the list is important! You must always
make sure that rules with more specific packet descriptions are
placed higher in the list than more general rules. Otherwise, packets matching the general description would never be tested
against the more specific description.
When ordering the rules within a filter profile, apply the following
basic principle: Treat special cases first.
A Simple Example
Suppose you want computer B in the LAN to be accessible only from
location A. To achieve this goal, you define the following rules in the
global input filter:
1.
Location A may access computer B. In other words, the first filter
rule states: Accept packets for any service whose source is in IP
address block A and whose destination is the IP address of
computer B. This is the special case, the exception to the second,
more general, rule.
2.
No one may access computer B. In other words, the second filter
rule states: Drop packets for all services which have any IP
address as the source and computer B’s IP address as the
destination. This rule will be applied to all packets except the
special case covered by the first rule.
The following diagram illustrates the order in which the filter instances
are traversed by incoming, outgoing and forwarded packets. The diagram illustrates the longest possible packet path, assuming that filter
profiles have been selected for all filter instances, and every filter profile contains a matching rule for the packet or the default action
“Accept”.
AVM Access Server – 5 AVM Access Server Concepts and Functional Principles
61
Examples of IP Filter Profiles
The diagram below illustrates the order in which packets traverse the
AVM Access Servers filters.
Local IP stack of the operating system
Global forwarding
filter
Accept
Decrypted
data
Global input filter
Upper outgoing
filter profile
Upper incoming
filter profile
Global output filter
Masquerading/NAT
Accept
Masquerading/NAT
IPSec Decryption
IPSec Encryption
Lower incoming
filter profile
Lower outgoing
filter profile
ISDN / ADSL / GSM /
LAN
ISDN / ADSL / GSM /
LAN
Path of IP packets through the AVM Access Server’s filters
Examples of IP Filter Profiles
The AVM Access Server provides the following pre-defined IP filter profiles which can be used for Internet access:
Incoming Internet profile (upper only)
Outgoing Internet filter profile
Incoming Internet profile (upper, stateful)
Incoming Internet profile (lower, stateful)
VPN packets only (lower)
62
AVM Access Server – 5 AVM Access Server Concepts and Functional Principles
Examples of IP Filter Profiles
The profiles “Incoming Internet profile (upper, stateful)” and “Incoming
Internet profile (lower, stateful)” should be used only if IP masquerading is not activated. The “Outgoing Internet filter profile” can be used
in any case.
You can also customize the filter profiles to suit your needs. In filtering
services, you can also distinguish between inbound and outbound
connection set-up by matching the flags in the TCP header. For further
details, please see “Further Reading” from page 115.
For standard Internet access, the profiles provided can be used without
modification. They contain filter rules to protect your network reliably
against outside access, while allowing users in the LAN to access Internet services.
In the incoming Internet profiles a number of rules have the status
“Inactive” while others have the status “Active”. All those rules that
prevent connections to your LAN from outside are active. The rules preconfigured with the status “Inactive” are provided in case you want to
permit access from the Internet to services in your LAN, such as your
local FTP, web or e-mail server. If you want to provide such services,
you must first edit this Internet filter profile to activate the
corresponding rules, then select the profile in your Internet settings.
The rules in the filter profiles are listed with explanations in the following tables below.
In reading the tables, please bear in mind the following points:
The rules in all profiles have been created with general conditions
for “Source IP address” and “Destination IP address”. The rules
match packets from any source (i.e., the source network in each
rule is specified as 0.0.0.0 / 0) and addressed to any destination
(i.e., the destination network is also specified as 0.0.0.0 / 0). For
the sake of easier reading, this information has not been repeated
for each rule in the tables.
The log setting for all rules is “No log”. This information has also
been omitted in the tables below.
AVM Access Server – 5 AVM Access Server Concepts and Functional Principles
63
Examples of IP Filter Profiles
Incoming Internet Profile (Lower Only)
“Incoming Internet profile (lower only)”
Profile active
Yes
Name
Incoming Internet profile (lower only)
Default action
Drop
Rules
Status
64
Service/Source/Destination Action
Remarks
Inactive HTTP connection set-up
Accept
(Hypertext Transfer Protocol)
Activate this rule if you want
to allow access to a local
web server.
Inactive FTP connection set-up
(File Transfer Protocol)
Accept
Activate this rule if you want
to allow access to a local FTP
server.
Inactive SMTP connection set-up
(Simple Mail Transfer
Protocol)
Accept
Activate this rule if you want
incoming e-mail to be
transmitted directly by SMTP
to your local e-mail server,
rather than using a POP3
server in the Internet, for
example.
Inactive DNS queries
(Domain Name System)
Accept
Activate this rule if your
Internet domain is
administrated by your own
name server, or if you have
set up a secondary name
server.
Inactive DNS zone transfers
(Domain Name System)
Accept
Activate this rule if your
Internet domain is
administrated by your own
name server and you have
set up a primary name
server.
Inactive NNTP connection set-up
(Network News Transfer
Protocol)
Accept
Activate this rule if you want
to receive news by NNTP
from your Internet Service
Provider, rather than using a
news reader client to access
the Internet Service
Provider’s server.
AVM Access Server – 5 AVM Access Server Concepts and Functional Principles
Examples of IP Filter Profiles
Status
Service/Source/Destination Action
Remarks
Inactive NTP packets
(Network Time Protocol)
Accept
Activate this rule if you
operate an NTP time server
in your LAN and want it to be
accessible from the Internet.
Inactive UUCP connection set-up
Accept
Activate this rule if your
Internet Service Provider
sends you data, such as
news or mail, by UUCP.
Inactive Telnet connection set-up
Accept
Activate this rule if you want
to allow Telnet access to
your computers (for remote
administration of UNIX
computers, for example).
Inactive SSH connection set-up
Accept
Activate this rule if you want
to allow SSH (Secure Shell)
access to your computers
(for remote administration of
UNIX computers, for
example).
Active
ISAKMP packets
(Virtual Private Network)
Accept
This rule is automatically
activated by the Wizard
when you create a VPN user
group or a VPN remote
network.
Active
DNS replies
(Domain Name System)
Accept
Activate this rule if you want
to use the Internet Service
Provider’s DNS servers.
Accept
To ensure that the AVM
Access Server uses only
routes you have configured,
RIP information arriving from
the Internet is not accepted.
This prevents “man in the
middle” attacks through the
insertion of fraudulent
routing information in your
router.
Inactive RIP packets
(Routing Information
Protocol)
AVM Access Server – 5 AVM Access Server Concepts and Functional Principles
65
Examples of IP Filter Profiles
66
Status
Service/Source/Destination Action
Remarks
Active
FTP data connection set-up
(File Transfer Protocol)
Accept
This ensures that your local
users can download files
from FTP servers in the
Internet.
Note: You can deactivate this
filter rule if all FTP clients in
your network use “passive
FTP”.
Active
TCP connection set-up
Drop
This rule discards all
attempts to set up TCP
connections, except those
explicitly accepted by one of
the active rules listed above.
Active
TCP packets
Accept
This rule admits reply
packets to connections
initiated from within your
network.
Active
ICMP packets
(Internet Control Message
Protocol)
Accept
This rule allows error
messages from Internet
servers to reach computers
in your network. ICMP
packets carry error messages
about other Internet
services, such as the
indication that a requested
computer in the Internet is
not reachable.
Active
AH packets
(Virtual Private Network)
Accept
If you have configured VPN
connections, activate this
rule for the Internet
connection over which the
VPN links are carried.
Active
ESP packets
(Virtual Private Network)
Accept
If you have configured VPN
connections, activate this
rule for the Internet
connection over which the
VPN links are carried.
AVM Access Server – 5 AVM Access Server Concepts and Functional Principles
Examples of IP Filter Profiles
Status
Service/Source/Destination Action
Remarks
Inactive GRE packets
(Generic Routing
Encapsulation)
Accept
Activate this rule if you are
using GRE-based tunneling
mechanisms in your LAN,
such as the PPTP VPN
gateway incorporated in
Microsoft NT 4.0. This rule is
not necessary if you are only
using the AVM Access
Server’s VPN functions.
Active
Drop
All packets that have not
been accepted or dropped
above this point are treated
as intrusion attempts. These
may be tunneled packets (i.
e. IP-over-IP encapsulated
packets), or routing
protocols, such as OSPF or
EGP packets. These packets
would also be dropped by
the filter profile’s default
action, of course. This rule is
nonetheless included so
that you can activate its log
option if you want to trace an
attack on your firewall.
All packets
AVM Access Server – 5 AVM Access Server Concepts and Functional Principles
67
Examples of IP Filter Profiles
Outgoing Internet Filter Profile
“Outgoing Internet filter profile”
Profile active
Yes
Name
Outgoing Internet filter profile
Default action
Accept
Rules
68
Status
Service/Source/Destination Action
Remarks
Active
ESP packets
(Virtual Private Network)
Accept
If you have configured VPN
connections, activate this
rule for the Internet
connection over which the
VPN links are carried.
Active
AH packets
(Virtual Private Network)
Accept
If you have configured VPN
connections, activate this
rule for the Internet
connection over which the
VPN links are carried.
Active
ISAKMP packets
(Virtual Private Network)
Accept
If you have configured VPN
connections, activate this
rule for the Internet
connection over which the
VPN links are carried.
Active
RIP packets
(Routing Information
Protocol)
Drop
This prevents the local
network’s routing
information from being sent
out over the Internet.
Active
NetBIOS packets
Drop
This ensures that local
Windows resources (shared
drives, printers etc.) are not
accessible from outside.
Active
NetBIOS packets 2
Drop
This ensures that local
Windows resources (shared
drives, printers etc.) are not
accessible from outside.
Active
NetBIOS packets 3
Drop
This ensures that local
Windows resources (shared
drives, printers etc.) are not
accessible from outside.
AVM Access Server – 5 AVM Access Server Concepts and Functional Principles
Examples of IP Filter Profiles
Incoming Filter Profile (Upper, Stateful)
“Incoming Internet profile (upper, stateful)”
Profile active
Yes
Name
Incoming Internet profile (upper, stateful)
Default action
Drop
Rules
Status
Service/Source/Destination Action
Remarks
Active
All packets for outgoing
connections
Accept
This rule is part of the AVM
Access Server’s “stateful”
packet inspection. Do not
change this rule if you want
to use stateful inspection.
Active
All packets for incoming
connections
Accept
This rule is part of the AVM
Access Server’s “stateful”
packet inspection. Do not
change this rule if you want
to use stateful inspection.
Active
All packets
Drop
All packets that have not
been accepted or dropped
above this point are treated
as intrusion attempts. These
may be tunneled packets
(i.e. IP-over-IP encapsulated
packets), or routing
protocols, such as OSPF or
EGP packets. These packets
would also be dropped by
the filter profile’s default
action, of course. This rule is
nonetheless included so
that you can activate its log
option if you want to trace an
attack on your firewall.
AVM Access Server – 5 AVM Access Server Concepts and Functional Principles
69
Examples of IP Filter Profiles
Incoming Internet Profile (Lower, Stateful)
“Incoming Internet profile (lower, stateful)”
Profile active
Yes
Name
Incoming Internet profile (lower, stateful)
Default action
Drop
Rules
Status
Service/Source/Destination Action
Remarks
Active
All packets for outgoing
connections
Accept
This rule is part of the AVM
Access Server’s “stateful”
packet inspection. Do not
change this rule if you want
to use stateful inspection.
Active
ISAKMP packets
(Virtual Private Network)
Accept
If you have configured VPN
connections, activate this
rule for the Internet
connection over which the
VPN links are carried.
Active
AH packets
(Virtual Private Network)
Accept
If you have configured VPN
connections, activate this
rule for the Internet
connection over which the
VPN links are carried.
Active
ESP packets
(Virtual Private Network)
Accept
If you have configured VPN
connections, activate this
rule for the Internet
connection over which the
VPN links are carried.
Active
ICMP packets
(Internet Control Message
Protocol)
Accept
This rule allows error
messages from Internet
servers to reach computers
in your network. ICMP
packets carry error messages
about other Internet
services, such as the
indication that a requested
computer in the Internet is
not reachable.
Accept
This rule is part of the AVM
Access Server’s “stateful”
packet inspection. Do not
change this rule if you want
to use stateful inspection.
Inactive All packets for incoming
connections
70
AVM Access Server – 5 AVM Access Server Concepts and Functional Principles
Examples of IP Filter Profiles
Status
Service/Source/Destination Action
Remarks
Inactive HTTP connection set-up
Accept
(Hypertext Transfer Protocol)
Activate this rule if you want
to allow access to a local
web server.
Inactive FTP connection set-up
(File Transfer Protocol)
Accept
Activate this rule if you want
to allow access to a local FTP
server.
Inactive SMTP connection set-up
(Simple Mail Transfer
Protocol)
Accept
Activate this rule if you want
incoming e-mail to be
transmitted directly by SMTP
to your local e-mail server,
rather than using a POP3
server in the Internet, for
example.
Inactive DNS queries
(Domain Name System)
Accept
Activate this rule if your
Internet domain is
administrated by your own
name server, or if you have
set up a secondary name
server.
Inactive DNS zone transfers
(Domain Name System)
Accept
Activate this rule if your
Internet domain is
administrated by your own
name server and you have
set up a primary name
server.
Inactive NNTP connection set-up
(Network News Transfer
Protocol)
Accept
Activate this rule if you want
to receive news by NNTP
from your Internet Service
Provider, rather than using a
news reader client to access
the Internet Service
Provider’s news server.
Inactive NTP packets
(Network Time Protocol)
Accept
Activate this rule if you want
to synchronize the local
system time with time
servers in the Internet.
Inactive UUCP connection set-up
Accept
Activate this rule if your
Internet Service Provider
sends you data, such as
news or e-mail, by UUCP.
AVM Access Server – 5 AVM Access Server Concepts and Functional Principles
71
Examples of IP Filter Profiles
Status
72
Service/Source/Destination Action
Remarks
Inactive Telnet connection set-up
Accept
Activate this rule if you want
to allow Telnet access to
your computers (for remote
administration of UNIX
computers, for example).
Inactive SSH connection set-up
Accept
Activate this rule if you want
to allow SSH (Secure Shell)
access to your computers
(for remote administration of
UNIX computers, for
example).
Inactive NetBIOS
Drop
This ensures that local
Windows resources (shared
drives, printers etc.) are not
accessible from outside.
Active
Drop
All packets that have not
been accepted or dropped
above this point are treated
as intrusion attempts. These
may be tunnelled packets
(i.e. IP-over-IP encapsulated
packets), or routing
protocols, such as OSPF or
EGP packets. These packets
would also be dropped by
the filter profile’s default
action, of course. This rule is
nonetheless included so
that you can activate its log
option if you want to trace an
attack on your firewall.
All packets
AVM Access Server – 5 AVM Access Server Concepts and Functional Principles
Examples of IP Filter Profiles
VPN Packets Only (Lower)
This pre-configured profile can be used to prevent the Access Server
from establishing any connections with computers in the Internet except VPN connections.
“VPN packets only (lower)”
Profile active
Yes
Name
VPN packets only (lower)
Default action
Drop
Rules
Status
Service/Source/Destination Action
Remarks
Active
ISAKMP packets
(Virtual Private Network)
Accept
If you have configured VPN
connections, activate this
rule for the Internet
connection over which the
VPN links are carried.
Active
AH packets
(Virtual Private Network)
Accept
If you have configured VPN
connections, activate this
rule for the Internet
connection over which the
VPN links are carried.
Active
ESP packets
(Virtual Private Network)
Accept
If you have configured VPN
connections, activate this
rule for the Internet
connection over which the
VPN links are carried.
Active
ICMP packets
(Internet Control Message
Protocol)
Accept
This rule allows error
messages from Internet
servers to reach computers
in your network. ICMP
packets carry error messages
about other Internet
services, such as the
indication that a requested
computer in the Internet is
not reachable.
AVM Access Server – 5 AVM Access Server Concepts and Functional Principles
73
IP Masquerading and Forwarding Profiles
Status
Service/Source/Destination Action
Remarks
Active
All packets
All packets that have not
been accepted or dropped
above this point are treated
as intrusion attempts. These
may be tunnelled packets
(i.e. IP-over-IP encapsulated
packets), or routing
protocols, such as OSPF or
EGP packets. These packets
would also be dropped by
the filter profile’s default
action, of course. This rule is
nonetheless included so
that you can activate its log
option if you want to trace an
attack on your firewall.
Drop
5.2 IP Masquerading and Forwarding Profiles
The AVM Access Server uses IP masquerading over connections to the
Internet. IP masquerading hides a whole private LAN behind a single
public IP address. The LAN’s Internet gateway “masks” all the other
LAN computers’ IP addresses. This also prohibits access from the Internet to individual computers in the LAN. If you want to permit access to
certain servers in your local network from the Internet, however, you
can do so using forwarding profiles.
IP Masquerading
On connecting to the Internet, the AVM Access Server is generally assigned a public IP address by the Internet Service Provider. In IP masquerading, the Access Server substitutes this address for the source
address of all LAN computers’ TCP, UDP and ICMP communications to
computers in the Internet. From the Internet, it appears as if all connections from the LAN’s computers come directly from the Access Server.
On receiving responses from the Internet, the Access Server performs
the reverse operation, substituting the address in the destination field
and forwarding the packet to whichever LAN computer actually requested the data. In this way, the computers in the private LAN can
continue using their internal (“unofficial”) IP addresses when
74
AVM Access Server – 5 AVM Access Server Concepts and Functional Principles
Forwarding Profiles
communicating with Internet hosts. Because only requested data is
forwarded into the LAN, the private LAN is protected against unauthorized access from the Internet.
The AVM Access Server’s use of IP masquerading provides the following advantages:
Each time the connection to the Internet Service Provider is reestablished after an inactivity timeout, the Access Server is
assigned a new IP address. Thanks to IP masquerading, the computer’s routing table does not need to be updated each time the
official IP address changes. The IP masquerading function always
substitutes the current official IP address for the source address
of packets traveling from the LAN to the Internet.
By default, IP masquerading prohibits all incoming TCP connections. Incoming packets that have not been requested by an
application in the LAN are discarded. This makes the local network more secure.
Forwarding Profiles
When IP masquerading is active, forwarding profiles can be used to forward requests from the Internet to specific servers in the LAN, such as
web, e-mail or FTP servers. A forwarding profile consists of one or more
forwarding rules. These rules specify which IP packets are forwarded to
which servers in the LAN—in other words, which services are accessible from outside.
To create or edit forwarding profiles, select “Security / Forwarding profiles” in the object tree of the AVM Access Server window. To activate
forwarding for Internet connections, select the “Internet” folder, click
the “Gateway Services” tab, and select the desired forwarding profile.
The AVM Access Server provides a pre-defined forwarding profile
named “Gateway Services” in the “Security / Forwarding profiles” folder. This profile contains deactivated forwarding rules for common Internet services. To permit access from the Internet to certain local services, you must activate the corresponding rules in this profile. If the
desired service is provided by the same computer on which the AVM
Access Server is installed, use the address 0.0.0.0 as the new destination to which the packets are forwarded. If the desired service is provided by a different computer in the LAN, enter that computer’s IP address as the new destination to which the packets are forwarded.
AVM Access Server – 5 AVM Access Server Concepts and Functional Principles
75
Forwarding Profiles
The rules in the forwarding profiles are listed with explanations in the
tables below.
Forwarding Profile “Gateway Services”
Profile active
Name
Yes
Gateway Services
Rules
Status
76
Service/Source/Dest Protocols
ination
Remarks
Inactive FTP/
0.0.0.0 : 21/
0.0.0.0 : 21
TCP
Activate this rule if you have
an FTP server in your localarea network and want to
make it accessible from the
Internet.
Inactive SSH/
0.0.0.0 : 22/
0.0.0.0 : 22
TCP
Activate this rule if you have
an SSH server in your localarea network and want to
make it accessible from the
Internet.
Inactive Telnet/
0.0.0.0 : 23/
0.0.0.0 : 23
TCP
Activate this rule if you have
a Telnet server in your localarea network and want to
make it accessible from the
Internet.
Inactive WWW/
0.0.0.0 : 80/
0.0.0.0 : 80
TCP
Activate this rule if you have
a web server in your localarea network and want to
make it accessible from the
Internet.
Inactive POP3/
0.0.0.0 : 110/
0.0.0.0 : 110
TCP
Activate this rule if you have
a POP3 e-mail server in your
local-area network and want
to make it accessible from
the Internet.
AVM Access Server – 5 AVM Access Server Concepts and Functional Principles
Static and Dynamic Routing
Status
Service/Source/Dest Protocols
ination
Remarks
Inactive HTTPS/
0.0.0.0 : 443/
0.0.0.0 : 443
TCP
Activate this rule if you have
an HTTPS server (i.e. a
secure web server) in your
local-area network and want
to make it accessible from
the Internet.
Inactive ISAKMP (VPN)/
0.0.0.0 : 500/
0.0.0.0 : 500
UDP
If you have configured VPN
connections, activate this
rule for the Internet
connection over which the
VPN links are carried.
Inactive AVM Web Server/
0.0.0.0 : 4000/
0.0.0.0 : 4000
TCP
Activate this rule if you want
an AVM web server in your
local-area network to be
accessible from the Internet.
Remote configuration using
the web interface over the
Internet is not
recommended, since
communication with the web
server is not encrypted.
Instead, use a secure VPN
connection to access the
web interface.
5.3 Static and Dynamic Routing
Like any IP router, the AVM Access Server operates at the network protocol level (Layer 3 of the ISO/OSI reference model), and forwards incoming data packets from one connected network to another. To route
packets between networks, the Access Server needs the following information:
the logical address of the destination
a path to the destination
For a detailed explanation of TCP/IP addressing, see “IP address” on
page 127 in the glossary.
Information about the possible paths along which packets can be forwarded is compiled in a routing table. Routing tables can be static, or
they can be generated dynamically.
AVM Access Server – 5 AVM Access Server Concepts and Functional Principles
77
Reserving B Channels
Static routing
All information about destination networks and the paths by
which they can be reached is configured manually, and changed
only by the administrator.
Dynamic routing
All routers in the network can exchange information about subnetworks and the paths to them by means of a routing protocol. Routers regularly update their own routing tables automatically based
on the information received.
The AVM Access Server uses dynamic routing with RIP 2 (Routing Information Protocol, Version 2) on its LAN interfaces, and static routes over
ISDN. The use of static routes over ISDN prevents excessive ISDN calls
due to the exchange of RIP packets. When configuring a remote user or
network, you may choose whether the static route to the user should
always be known in the WAN, or whether it should be known only when
the logical ISDN connection has been set up.
In the former case, a packet addressed to a destination outside the
LAN causes the logical ISDN connection to be set up automatically.
In the latter case, packets can only be sent to a user when a logical
ISDN connection to the remote user or network exists, because this is
the only time the route is known.
5.4 Reserving B Channels
The B channels of all ISDN-Controllers used by the AVM Access Server
are allocated from a common pool to all remote networks and users.
This principle is a flexible basis for optimum utilization of the available
channels. Furthermore, the configuration of remote users and networks is thus independent of specific ISDN B channels. (ADSL connections to remote networks are an exception, since the ADSL line is dedicated to a specific remote network—usually the Internet.)
Furthermore, at any given time there may be more logical ISDN connections to remote users or networks than there are ISDN B channels available. This is due to the inactivity timeout which automatically clears
down idle ISDN connections in the background. When a connection is
idle, the AVM Access Server makes the last B channel it used available
for other connections. The physical connection is dialed up again as
soon as data packets are queued for transport to or from the remote
system.
78
AVM Access Server – 5 AVM Access Server Concepts and Functional Principles
Restricting Access to Scheduled Times
The system administrator must ensure that enough B channels are always available if most of the remote sites have been configured to
maintain logical ISDN connections (i.e., their disconnect timeout under
“End idle logical connection” is set to “Later than Inactivity Timeout” or
“Never”).
For this case, the AVM Access Server offers several ways of ensuring
that “important” networks or users always have access, even if fewer
B channels are available:
B channels can be reserved in the ISDN-Controller settings (“Administration / Interfaces / ISDN#<number>”) for remote users, for
remote networks, or for a specific remote network. These reserved
B channels are then removed from the pool of shared channels.
Remote users and networks can be assigned a priority (high,
medium, or low) in the user group or network settings. This ensures that users with high priority can always obtain a B channel.
If all B channels are busy when a connection is requested, a lower-priority connection is cleared down. Note that Caller ID must be
activated in order for remote users and networks with high priority
to be identified, and a B channel freed, before a call is answered.
5.5 Restricting Access to Scheduled Times
To limit access to the LAN to certain times of day and days of the week,
you define schedules in the “Administration / Schedules” folder.
These schedules can then be assigned to remote users and networks
in the user group and network settings. For example, you may define a
time restriction configuration that permits access only from Monday
through Friday during business hours. When you then assign this
schedule to a remote network or a user group, the remote network or
the remote users cannot access the LAN outside the specified times.
AVM Access Server – 5 AVM Access Server Concepts and Functional Principles
79
Cost Assignment (COSO, Charge One Site Only)
5.6 Cost Assignment (COSO, Charge One Site
Only)
The ISDN feature “D channel signaling” is provided free of charge by
most ISDN operators, and is used by the AVM Access Server to implement cost allocation (COSO, Charge One Site Only).
COSO allows you to specify which end of the network link bears the
connection charges. For each remote network user group, this may be
the local ISDN Access Server, or the remote site, or whichever site initiates the connection.
Because COSO uses unique ISDN features and is not yet incorporated
in PPP standards, the remote user must have access software that also
supports this function, such as NetWAYS/ISDN.
The following diagram illustrates how an incoming call is handled with
cost allocation set to “Local site” (in other words, the AVM Access
Server bears the connection charges).
Remote Site
(AVM Access Server)
Local Site
(AVM Access Server)
ISDN
Data packets for
the remote
network
D channel
Signal of connection
request
D and B channel
Acceptance of the
incoming call
(after authentication,
if required)
D and B channel
Transmission of
data packets in
both directions
Idle ISDN
connection
cleared
D and B channel
Acceptance of the
incoming call
(after authentication,
if required)
D and B channel
Remote site identified
by means of the
D-channel number
Connection request
rejected.
Call-back with
costs carried by the
local end
Data packet for
the remote
site, e.g. e-mail
Transmission of
data packets in
both directions
Incoming call handling when Cost Allocation is set to “Local site”
80
AVM Access Server – 5 AVM Access Server Concepts and Functional Principles
Virtual Private Network (VPN)
5.7 Virtual Private Network (VPN)
The AVM Access Server allows you to set up Virtual Private Network
(VPN) connections. VPN connections are an economical way to connect
both remote networks and single remote PCs to the company LAN. Until recently, remote systems were usually interconnected using direct
dial-up or leased line connections over public telecommunication networks, such as ISDN or GSM. The costs for such direct connections
increase with the distance between the remote systems. Systems separated by long distances can be economically linked by VPN connections.
VPNs in General
A remote network is connected to the local network by a VPN link transported over the Internet.
Local Network
R emote Network
Tunnel
Internet
AVM Access Server
AVM Access Server
Example: a VPN connection over the Internet
The private connection carried over the public Internet between the
two communicating parties is called a tunnel. The two networks exchange data through this tunnel. The two LANs do not share a physical
network connection: the shared network is a virtual one. The virtual
network is a higher-order data structure that uses the existing public
infrastructure of the Internet for data transport. The other interfaces
and applications of the two connected systems are not affected by the
VPN link. The connection is economical because both sites only incur
charges for a connection to an Internet Service Provider.
AVM Access Server – 5 AVM Access Server Concepts and Functional Principles
81
VPNs in the AVM Access Server
VPNs in the AVM Access Server
The term VPN refers simply to a private link carried over a public infrastructure. Which mechanisms are used to accomplish this is not specified.
The AVM Access Server sets up its VPN links over existing Internet connections, taking advantage of the Internet Service Provider’s infrastructure. The Internet Service Provider has nothing to do with the actual
VPN connections, however, nor with the network communication
between the systems involved. The AVM Access Server contains the
software needed to operate VPN connections. Because the VPN connection is independent of the Internet Service Provider, practically any
Internet access can be used for VPN communication.
The VPN link acts as a tunnel through the public Internet through which
data can be transported. The AVM Access Server’s VPN software provides a transparent connection between the private networks, authentication of the communicating parties, and encryption of all data transported over the public network. Once the VPN tunnel has been set up,
neither the tunnel nor the Internet as the underlying medium is visible
at the application level.
The AVM Access Server allows remote networks and remote users to
connect to the LAN over VPN links.
Remote Networks
The configuration for connections to remote networks is stored in
the “Remote networks” folder. Click the folder with the right
mouse button and select “Add Network...” in the context menu to
start the Wizard that supports you in configuring a new VPN
connection to a remote network. The Wizard’s first dialog prompts
you to specify whether you want to set up a VPN connection.
If the “Remote networks” folder already contains a VPN
connection configuration, select it to view and edit the connection
settings on the various dialog pages in the properties display.
Remote Users
The “Remote users” folder contains user groups, which represent
the connection parameters configured for groups of remote users.
Individual remote user settings are stored in the folder for the
user group to which they belong. The user group properties
determine whether the group’s members are authorized to
connect over VPN links. Click the “Remote users” folder with the
82
AVM Access Server – 5 AVM Access Server Concepts and Functional Principles
Security
right mouse button and select “Add Group...” in the context menu
to start the Wizard that supports you in configuring the VPN
connection settings for a new user group. In the process you will
specify whether the users in the group are authorized to connect
over VPN links.
When you select a user group in the “Remote users” folder, the
settings for the group are shown on a number of dialog pages in
the properties display. The settings can be edited on these dialog
pages.
Security
Because the VPN connection is carried over the public Internet, there is
a danger of eavesdropping or manipulation by unauthorized third parties. Appropriate security mechanisms must therefore guarantee the
following three kinds of security:
Privacy
The data interchange must be encrypted to prevent eavesdropping.
Authenticity
When a connection is opened, the communicating parties must
be authenticated to ensure that all data comes from the authentic
source, and is not simply being replayed by an interceptor for example.
Integrity
The VPN must ensure that data cannot be modified by third
parties (as in “man-in-the-middle” attacks) on its way through Internet.
The VPN Protocol IPsec
A protocol used to set up VPN connections must bring with it the following characteristics:
Support for security mechanisms that guarantee privacy, authenticity and integrity as described above.
The ability to connect through a tunnel.
The IPsec suite provides these characteristics, and is therefore used by
the AVM Access Server as the standard VPN protocol.
AVM Access Server – 5 AVM Access Server Concepts and Functional Principles
83
The VPN Protocol IPsec
IPsec is a network-layer (ISO OSI Layer 3) protocol, and hence independent of the underlying infrastructures. However, IPsec is limited to the
IP network protocol. In other words, only IP can be transported over an
IPsec-based VPN.
IPsec permits two different operating modes: Tunnel Mode and Transport Mode. Transport Mode does not create a tunnel, and strictly
speaking does not provide a virtual private network. Only Tunnel Mode
is used in VPN connections.
In Tunnel Mode, a tunnel is set up through a public network. In other
words, the IP packets are encapsulated before transmission. Each IP
packet, with its complete IP header, is transmitted as the payload of a
new IPsec packet. The new packet also has its own IP header. In this
way both single computers and whole networks using private IP addresses can communicate over the public Internet.
The following figure shows the original networking packet and the encapsulated packet with new IP header.
Original packet
Payload data
IP header
Ipsec-encapsulated packet
New IP header
IPSec
IP header
Possibly encrypted payload data
Original packet and IPsec encapsulated packet with new IP header
The illustration below shows a sample VPN connection in Tunnel Mode.
Here a remote LAN is connected to the local company network (see also the fold-out diagram of a sample scenario in the front cover).
Local Network
Remote Network
Network address: 192.168.10.0 /24
Network address: 192.168.20.0 /24
IP address:
192.168.10.10
IP address:
192.168.20.10
AVM Access Server
IP address:
192.168.10.20
Tunnel
IP address:
192.168.10.30
AVM Access Server
(remote)
(local)
Internet
Public IP address: dynamically
assigned by the
Internet Service Provider
Private IP address: 192.168.10.1
Public IP address: dynamically
assigned by the
Internet Service Provider
Private IP address: 192.168.20.1
Example: VPN connection in Tunnel Mode
84
AVM Access Server – 5 AVM Access Server Concepts and Functional Principles
IP address:
192.168.20.20
IP address:
192.168.20.30
The VPN Protocol IPsec
The IP addresses in the example above are used in different ways:
Local Network
– The local network has the network address 192.168.10.0/24.
– Each client computer in the local network has an IP address in
the address range defined by this network address. These are
all private IP addresses which must never appear in the public
Internet. They are reserved under RFC 1918 for communication
within private LANs.
AVM Access Server (local)
– The AVM Access Server computer is likewise in the local network.
– It communicates with the other computers in the LAN using an
internal IP address.
– The AVM Access Server also provides the LAN with its gateway
to the Internet.
– Its external IP address, a valid public Internet address, is dynamically assigned by the Internet Service Provider.
Remote Network
– The remote network
192.168.20.0/24.
has
the
network
address
– Each client computer in the local network has an IP address in
the address space defined by this network address. Here
again, these are all private IP addresses which must never appear in the public Internet. They are used only for internal communication within the remote LAN.
AVM Access Server (remote)
– The remote AVM Access Server computer also has an address
in the remote network.
– It communicates with the other computers in its LAN using this
internal IP address.
– The AVM Access Server also provides the remote LAN with its
gateway to the Internet.
– Its external IP address, a valid public Internet address, is dynamically assigned by the Internet Service Provider.
AVM Access Server – 5 AVM Access Server Concepts and Functional Principles
85
The VPN Protocol IPsec
In the encapsulated packets transported over the IPsec tunnel between
the two AVM Access Servers, different IP addresses appear in the original packet's IP header and in the encapsulating packet header:
IP addresses in the original packet
Destination The private IP address of the computer in the local network that
is the intended recipient of the communication.
Source
The private IP address of the computer in the remote network
that wants to communicate with the destination computer in the
local network.
IP addresses in the tunnel packet
Destination The official, public IP address of the local network’s AVM Access
Server in the Internet.
Source
The official, public IP address of the remote network’s AVM
Access Server in the Internet.
The diagram below shows sample IP addresses for source and destination in the two packet headers:
IP address of the recipient: 172.16.0.1
IP address of the sender: 172.16.0.10
Original packet
New IP header
IPSec
IP header
Payload data
IP header
Payload data (possibly encrypted)
IPsec-encapsulated packet with new IP header in
Tunnel Mode
IP address of the recipient: 193.96.242.157
IP address of the sender: IP address assigned
by the Internet Service Provider
IP addresses in the original and encapsulating packet headers
Access Rules in the AVM Access Server
Access rules are based on the internal IP addresses of the systems interconnected by VPN links. Access rules, like filter rules, are tested
against a given packet in the list order, from the top down. Hence the
same principle applies here: Deal with the exceptions first! As soon as
a rule matches the packet, that rule’s action is applied to the packet.
The possible actions are “Encrypt” and “Do not encrypt”. Once a match
is found, no further rules are tested against the packet.
86
AVM Access Server – 5 AVM Access Server Concepts and Functional Principles
The IPsec Transport Protocols
Remote Networks
In configuring a VPN connection, you must indicate the IP network
addresses of the local and remote networks. The Wizard then
automatically generates an access rule in the AVM Access Server
which specifies that packets with a source IP address in the local
network and a destination in the remote network are transported
with IPsec encapsulation.
To view or edit the access rules, select a VPN connection in the
“Remote networks” folder and open the “Access Rules” dialog
page. You can also define new access rules for the connection.
Remote Users
For remote users, the VPN authorization is governed by the
properties of the user group. In configuring the user group, you
must specify the IP address block in which the members of the
group will be assigned their IP addresses in the virtual private
network. An access rule is then automatically generated in the
AVM Access Server which specifies that only packets with source
and destination IP addresses in that address range are
transported with IPsec encapsulation.
To view or edit the access rules, select a VPN user group in the
“Remote users” folder and open the “VPN” dialog page. You can
also define new access rules on this page.
The IPsec Transport Protocols
IPsec uses two different transport protocols: Authentication Header
(AH) and Encapsulation Security Payload (ESP). These two protocols
can be combined, and can be used in both Tunnel and Transport
Modes.
Properties of the Authentication Header (AH)
Authenticates the source of the payload data: AH includes a
mechanism that allows the recipient to verify whether the source
of the data is authentic.
Ensures the integrity of the payload data: The same mechanism
that provides authentication also allows the recipient to detect
any manipulation of the payload data.
AVM Access Server – 5 AVM Access Server Concepts and Functional Principles
87
The IPsec Transport Protocols
Prevents replay and detects man-in-the-middle attacks: AH contains a unique serial number that can be used to identify packets
replayed by a third party.
AH does not provide encryption of the data payload.
The diagram below illustrates the original packet and the IPsec encapsulated packet with AH.
Original packet
IP header
Authentication
IP header
Header
Packet with Authentication Header in Tunnel Mode
New IP header
Payload data
Payload data
Packet in its original state and encapsulated with Authentication Header
Properties of the Encapsulating Security Payload (ESP)
Encrypts the user data payload. In Tunnel Mode, the IP header is
also encrypted. The symmetrical encryption methods available include DES, 3DES, AES and others.
Authenticates the source of the payload data: ESP includes a
mechanism that allows the recipient to verify whether the source
of the data is authentic.
Prevents replay and detects man-in-the-middle attacks: ESP contains a unique serial number that can be used to identify packets
replayed by a third party.
The diagram below illustrates the original packet and the ESP encapsulated packet.
Original packet
IP header
New
IP header
ESP header
IP header
Payload data
Payload data
encrypted
authenticated
Packet with ESP in Tunnel Mode
Packet in its original state and encapsulated with ESP
88
AVM Access Server – 5 AVM Access Server Concepts and Functional Principles
ESP trailer
ESP
authentication
Negotiation
Negotiation
Many combinations of encryption and authentication parameters are
possible in VPN connections. When establishing a secure VPN connection, the communicating parties must agree on the parameters they
want to use.
Negotiation of the connection parameters requires another protocol,
called Internet Key Exchange (IKE). The agreed parameters determined
by IKE negotiation are stored in a Security Association (SA). The SA defines:
the type of authentication used (certificates, a pre-shared key or
another method)
the encryption algorithm used
the hash algorithm used
the duration of validity, or “lifetime”, of the SA
SAs are security policies with a limited period of validity. When the lifetime of an SA has elapsed, a new SA must be negotiated. A separate SA
is negotiated for each direction of communication. IKE negotiation
takes place in two phases. A separate security policy must be defined
for each phase. IKE Phase 1 serves to negotiate an IKE SA, which is applied in IKE Phase 2 to negotiate the IPsec SA.
Security policies are possible SAs proposed by the Access Server to the
remote system. If the remote system accepts the proposal, then an SA
is established between the negotiating parties. A proposal must
include settings for all parameters of the given IKE phase. For this reason, compatible security policies must be configured on the two connecting systems. The policies are designated using a special notation
which is described in detail in the chapter “AVM Access Server for Experts” from page 100.
When a VPN connection is active, the SAs in effect are shown in the Access Server’s Monitoring View. Click “Connection control” in the object
tree with the right mouse button, and select “Properties” in the context
menu. The active SAs are shown on the “VPN SAs” dialog page.
AVM Access Server – 5 AVM Access Server Concepts and Functional Principles
89
Negotiation
IKE Phase 1
The purpose of IKE Phase 1 is to negotiate an SA to provide secure communication during IKE Phase 2. In IKE Phase 1, the two peer systems
perform the following steps:
They communicate their identities.
They authenticate themselves.
They negotiate an encryption algorithm to be used in IKE Phase 2.
They negotiate a Diffie-Hellman group to use in generating keys.
Each system generates a private key, and generates a corresponding public key using the negotiated Diffie-Hellman group. The
public keys are exchanged. Each system generates the secret key
to be used for the encryption of IKE Phase 2 communication
based on its own private key, the peer’s public key and the negotiated Diffie-Hellman group. The resulting key is identical in both
systems.
The two systems negotiate the lifetime of the SA.
There are two protocol modes to choose from in IKE Phase 1: “main
mode” and “aggressive mode”. Main mode requires more messages to
be exchanged than aggressive mode. In aggressive mode, the identities are exchanged in the first and second messages. In main mode
this occurs later. If authentication takes place using pre-shared keys,
and the remote site’s public IP address is dynamically assigned by the
Internet Service Provider and hence not known, then IKE Phase 1 must
be conducted in aggressive mode. Because the dynamically assigned
IP address is not sufficient to identify the remote site, the identities
must be exchanged earlier. This is only possible in aggressive mode.
When certificates are used for authentication, main mode is preferable.
90
AVM Access Server – 5 AVM Access Server Concepts and Functional Principles
Authentication Using Certificates
IKE Phase 2
The goal of IKE Phase 2 is to negotiate the SAs for the encryption of actual user data. This negotiation is itself encrypted based on the SA that
was negotiated in Phase 1. The following parameters are negotiated:
the IPsec transport protocol (AH and/or ESP)
the encryption algorithm for user data transmitted over the VPN
connection
The AVM Access Server provides the encryption algorithms DES,
3DES and AES for this purpose. AES is the most advanced and the
most secure of these algorithms, and supports key lengths of up
to 256 bits.
the hash algorithm used to ensure the integrity of the user data
the IPsec operating mode (Tunnel or Transport Mode)
the lifetime of the SA
the random key material for the encryption and authentication
algorithm
Once IKE negotiation has been completed, secure IPsec communication begins.
Authentication Using Certificates
Authentication in IKE Phase 1 can be performed using digital certificates. The AVM Access Server allows the administrator to create local
certification authorities for this purpose.
Certificates
A certificate in the conventional sense is a document that certifies that
a person has certain qualities. Certificates are issued and signed by
generally recognized and trusted authorities. Such an authority might
be a public agency, a company, or another kind of institution.
Digital Certificates
A digital certificate is a digital document that can be used to confirm
the authenticity of digital signatures. Asymmetrical encryption techniques are used to generate and certify such a signature. A digital certificate is issued and signed by a trusted institution called a certification authority (CA).
AVM Access Server – 5 AVM Access Server Concepts and Functional Principles
91
Authentication Using Certificates
Asymmetrical Encryption Techniques
Asymmetrical or “public key” encryption techniques do not use the
same key for encryption and decryption. Rather, a pair of keys is required with the following properties:
Neither key can be reconstructed from the other.
Either key can be used for encryption, but a string encrypted with
one key can only be decrypted with the other key.
One key is made publicly available, while the other is kept strictly secret.
Certification Authorities in the AVM Access Server
Certification authorities can be created can in the “Security” folder in
the AVM Access Server window. These certification authorities can
then issue digital certificates for remote users and remote networks.
The creation of a certification authority entails the generation of a
“root certificate”, which is shown on the “Trusted Certification Authorities” dialog page in the “Security / Certificate management”
folder.
The AVM Access Server trusts only those certification authorities
for which a root certificate is present.
In authentication of remote VPN sites, the Access Server only accepts certificates issued by a trusted certification authority.
If you want the Access Server to accept certificates issued by an external certification authority, then you must import the public part of its
root certificate.
Certificates in the AVM Access Server
The certificates used in the AVM Access Server are digital public-key
certificates in conformance with ITU-T Recommendation X.509. The certificates are saved for export in the standard PKCS#12 format.
A certificate consists of:
a list of properties of the applicant (i.e., the remote user or network)
a public key
the digital signature of the certification authority
92
AVM Access Server – 5 AVM Access Server Concepts and Functional Principles
Authentication Using Certificates
When a certificate is issued, a key pair is generated consisting of a
public and a private key. The public key is a component of the certificate, while the private key is given to the applicant alongside the certificate in the PKCS#12 file.
The AVM Access Server manages all the certificates issued by its certification authorities, along with their key pairs, in an internal list. Each
certification authority’s certificates are listed on its “Certificates
Issued” dialog page.
The certificates listed can also be revoked, and are then added to the
issuing certification authority’s certificate revocation list, or CRL. Revoked certificates can no longer be used for authentication. Revocation
of a certificate is irreversible.
Authentication Using Certificates with the AVM Access Server
When a remote user or a remote network presents a certificate to the
AVM Access Server to authenticate itself for a VPN connection, the AVM
Access Server performs the following tests:
Does the remote site possess the private key that matches the
certificate?
Is the certificate valid?
The first question is answered by the following test:
1.
The AVM Access Server sends the remote system a random string.
2.
The remote system generates a hash (or “fingerprint”) of the
string using the hash algorithm specified in the certificate.
3.
The AVM Access Server also creates a hash fingerprint of the same
string using the same algorithm.
4.
The remote site encrypts its fingerprint using the certificate’s
private key. The encrypted hash fingerprint is a digital signature.
5.
The remote site sends this encrypted fingerprint to the AVM
Access Server.
6.
The AVM Access Server decrypts the encrypted hash fingerprint
using the certificate’s public key.
7.
Then the AVM Access Server compares hash fingerprint created by
the remote system with the one it generated itself. If they are the
same, then it is certain that the remote site possesses the
certificate’s secret key.
AVM Access Server – 5 AVM Access Server Concepts and Functional Principles
93
Compression Techniques (IPComp)
In this case, the digital signature is considered to be valid.
A certificate is valid if the following conditions are met:
The certificate was issued by a certification authority that the AVM
Access Server trusts. In other words, the certification authority’s
root certificate must be present in the AVM Access Server.
The certification authority’s digital signature must be valid. The
AVM Access Server can verify this using the certification authority’s root certificate. The digital signature is a hash fingerprint of
the certificate encrypted with the secret key of the root certificate.
The certificate has not expired.
The certificate has not been revoked. In other words, it is not listed in the issuing certification authority’s revocation list.
Compression Techniques (IPComp)
Encrypted data cannot be compressed. This is because compression
techniques generally take advantage of repetition within a data string.
When a repetition is found, the encryption algorithm substitutes a
symbolic reference to the first occurrence. A good encryption algorithm
produces a seemingly random string, however—that is, one containing
few repetitions. (Otherwise it would be relatively easy to decrypt a
message using statistical methods, such as letter frequencies, if the
language used is known.) For this reason, if compression is desired, it
must be applied before encryption is performed. This is done by the IPComp protocol. Three compression methods are possible in IPComp:
Deflate (RFC 2394)
LZS (RFC 3051), also used in Stac compression (RFC 1974)
LZJH (RFC 2395), which corresponds to V.44, used in the modem
protocol V.92
The AVM Access Server implements all three compression methods.
94
AVM Access Server – 5 AVM Access Server Concepts and Functional Principles
Dynamic DNS
5.8 Dynamic DNS
Dynamic DNS is an Internet service that allows the AVM Access Server
to be continuously identifiable by a constant domain name even when
it does not have a constant public IP address.
Dynamic DNS is offered by both free and commercial providers. The
AVM Access Server supports two dynamic DNS providers, “Dynamic
DNS Network Services” and “companity, Andreas Wilkens”.
In order to use this service for your AVM Access Server, you must register with one of these two dynamic DNS providers. Registration gives
you a fixed domain name and the access information for the dynamic
DNS server. Enter this information in the AVM Access Server configuration on the “Gateway Services” dialog page in the “Internet” folder.
Each time the Internet connection is activated, the AVM Access Server
automatically informs the dynamic DNS provider of the current IP address to be assigned to its domain name.
If you want to set up VPN Connections with the AVM Access Server, but
do not have a fixed IP address, you must use dynamic DNS in order to
identify the AVM Access Server by its domain name in the remote site’s
VPN connection configuration.
5.9 Windows Name Resolution and File and
Printer Sharing
The NetBIOS Name System
Windows networks today generally use IP, the Internet Protocol. In IP
communication, computers are addressed by four-byte numbers, such
as 192.168.10.1. Numeric IP addresses are difficult for human users to
work with, however. In Windows networking, mechanisms are provided
to map IP addresses to NetBIOS names.
The NetBIOS interface, used by Windows File and Printer Sharing, allows resources such as computers, drives and printers to be accessed
by alphanumeric names. The network browsing service, which allows
the Windows Explorer to list the shared resources on all computers in a
LAN, is also based on NetBIOS.
AVM Access Server – 5 AVM Access Server Concepts and Functional Principles
95
Windows Name Resolution with the AVM Access Server
NetBIOS names are easier for users to work with than the purely numeric IP addresses. In order for NetBIOS services to be transported
over the network, however, the NetBIOS names must be mapped to IP
addresses. A number of mechanisms serve this purpose.
In a Windows LAN, NetBIOS names are resolved automatically. This
takes place by means of name information which all Windows computers in the network broadcast to one another. Each computer identifies
itself by its name in a message bearing its IP number as the source address. Other computers can then initiate NetBIOS sessions over IP using that address.
In larger networks, name resolution using broadcasts can consume a
significant proportion of the available bandwidth. Moreover, dial-up
lines, which generally offer very limited bandwidth, would be severely
burdened by such broadcasts, and lines would be constantly busy. For
this reason, broadcasts are generally not routed in IP networks.
This restriction limits automatic Windows name resolution to the local
subnet. If name resolution is required across IP subnetworks, over a
remote-access or LAN-to-LAN connection, for example, then other appropriate name resolution mechanisms can be used.
Windows Name Resolution with the AVM Access Server
Preparation
NetBIOS was originally developed for small LANs, and has certain drawbacks when used with on-demand WAN connections. Frequent keepalive packets can cause a dial-up line to remain continuously connected.
Furthermore, NetBIOS name resolution can pose security risks.
For these reasons the AVM Access Server incorporates a NetBIOS filter
that discards all NetBIOS packets in traffic to remote sites. In order to
use NetBIOS names over remote users’ or remote network connections,
this NetBIOS filter must be deactivated. This setting can be activated or
deactivated in the properties of each user group and remote network.
Because NetBIOS broadcasts can cause undesired ISDN connections,
the filter should only be deactivated if NetBIOS is absolutely necessary. At the same time NetBIOS spoofing should be activated so that
NetBIOS keep-alive packets are answered locally instead of causing
unnecessary ISDN connections.
NetBIOS is not needed for Internet name resolution. The NetBIOS filter
should always be activated for Internet connections.
96
AVM Access Server – 5 AVM Access Server Concepts and Functional Principles
Windows Name Resolution with the AVM Access Server
Name Resolution Methods
In addition to deactivating the NetBIOS filter, you should set up a suitable method of NetBIOS name resolution in the Windows network. Possible methods are listed here only as a first hint. Please see the Online
Help in your Microsoft operating system and www.microsoft.com for
detailed instructions.
NetBIOS name resolution can be performed statically or dynamically.
Static Name Resolution using LMHOSTS
Static name resolution is performed by looking up names or
addresses in a text file named LMHOSTS. The Windows
installation directory, or a subdirectory of it, contains a sample
LMHOSTS file named LMHOSTS.SAM. This file can be edited and
saved using Notepad.
The name of the file used must be simply LMHOSTS with no
extension. You may have to rename the file to delete the
extension .SAM or .TXT.
The structure of the LMHOSTS file is simple. Each line contains the
IP address of a computer (such as 192.168.10.1) followed by one
or more space or tab characters and then the computer’s NetBIOS
name (such as Server Berlin). Each address-name pair is written
on a separate line.
A simple LMHOSTS file might thus contain the following:
192.168.10.1 Server-Berlin
192.168.20.1 Server-London
Name resolution using the LMHOSTS file is practical only in
simple networks that seldom change. If computer names are
often added or changed, however, dynamic name resolution is
recommended.
Once you have compiled an LMHOSTS file with entries for all
computers in the network, you can install the file on each
computer. In Windows 9x, LMHOSTS must be saved in the
Windows installation directory (usually C:\Windows). In Windows
NT, 2000 and XP, it must be saved in %SYSTEMROOT%\
SYSTEM32\DRIVERS\ETC.
AVM Access Server – 5 AVM Access Server Concepts and Functional Principles
97
Windows Name Resolution with the AVM Access Server
Dynamic Name Resolution using WINS
The static LMHOSTS file is not practical in networks in which
computers’ IP addresses or names change frequently (due to
dynamic IP address assignment by DHCP, for example). For such
cases Microsoft has developed the Windows Internet Naming
Service (WINS). WINS is an integral part of Windows NT and 2000
servers, and can be installed as an additional network
component.
WINS automatically creates a database in which all computers in
the network can register their names and current IP addresses.
Name resolution is then performed by sending a query to the
WINS database. In order for a computer to use the WINS service,
the IP address of the network’s WINS server must be entered in
the IP settings of the network adapter.
Because name resolution no longer requires broadcasts, but only
a query addressed specifically to the WINS server, WINS name
resolution can be used in routed networks and over dial-up and
VPN connections.
WINS and Remote Access with NetWAYS/ISDN
NetWAYS/ISDN clients that access the company LAN over direct
dial-in connections are automatically provided with the IP
address of the WINS server that is specified in the IP settings of
the AVM Access Server computer. The remote clients then register
automatically with the WINS server and can use its name
resolution service.
The IPsec specification does not provide a mechanism to pass
WINS server address on initiating a VPN connection, however. For
VPN connections, the WINS server address can be entered
statically in the IP settings of the NetWAYS/ISDN adapter. Note
however that the IP address of the WINS server must be in the IP
network defined for the VPN tunnel. Otherwise the WINS queries
would not be transported over the VPN.
NetBIOS name resolution can also take place using the DNS. DNS
server addresses can be passed to the remote site on initiating a
VPN connection. Because NetBIOS name resolution over DNS is
only possible in a pure Windows 2000 and XP environment, and
requires an appropriate DNS server configuration, the details are
beyond the scope of this manual.
98
AVM Access Server – 5 AVM Access Server Concepts and Functional Principles
Note on the Microsoft Browsing Service
WINS over LAN-to-LAN links
In order to use WINS name resolution over a remote network
connection, a WINS server must be used in each of the two
networks. WINS includes replication functions that allow the two
WINS servers to collate their databases at regular intervals, so
that name resolution can take place across the subnet boundary.
Note on the Microsoft Browsing Service
The browsing service creates a list of all the resolved computer names
for display in the Windows Explorer. The Windows Explorer then allows
the user to browse in the network.
Although LMHOSTS and WINS permit name resolution across IP subnetworks, the browsing service is limited to the local subnetwork. For
this reason it is generally not possible to browse the remote network in
the Windows Explorer, even after the connection to a remote user or remote network has been established.
AVM Access Server – 5 AVM Access Server Concepts and Functional Principles
99
AVM Access Server for Experts
6 AVM Access Server for Experts
This chapter is a compact technical summary of the AVM Access
Server’s architecture and functions, and is intended only for networking experts. It is aimed at providing a rapid overview of the product.
6.1 Architecture of the AVM Access Server
The components of the AVM Access Server include:
Services (User Mode)
AVM Access Server (ntmpri, start type: automatic)
AVM User Manager for Access Server (ntreud, start type: automatic)
AVM Web Server for Access Server (webserver, start type: manual)
AVM IKE Service for Access Server (avmike, start type: manual)
AVM Cert Service for Access Server (certsrv, start type: manual)
AVM Crypt Service for Access Server (ntrcrypt, start type: manual)
Because it is integrated in the operating system as a service, the AVM
Access Server is fully operational as soon as the system starts up, before any user logs in.
The services can be stopped and started in the Control Panel (“Administrative Tools / Services”) or from the command prompt, using the
commands net start <‘name’> to start and net stop
<‘name’> to stop a service, where ‘name’ is the short name of the
service.
Driver (Kernel Mode)
AVM Access Server Driver (avmasim.sys)
The “AVM Access Server Driver” is an intermediary between the NDIS
network adapter driver and the Windows TCP/IP stack.
100 AVM Access Server – 6 AVM Access Server for Experts
Databases
The diagram below illustrates the interoperation between the Access
Server Driver and other components.
Microsoft TCP/IP
AVM Access Server
Access Server Driver
Network adapter
(NDIS)
Interoperation between the Access Server Driver and other components
As an intermediate driver, the “AVM Access Server Driver” is able to
control all communication between the network adapter and the operating system’s Layer 3 protocol stack. Incoming packets from the network adapter can thus be routed, manipulated or filtered independently of the operating system’s IP stack. In order for the Microsoft TCP/IP
stack to send packets whose destination address is not in the local
subnetwork to the network adapter driver, a default gateway must be
entered for at least one network adapter in the Windows network settings. The default gateway can be any address in the network adapter’s
subnetwork, but need not be an IP address actually in use in the LAN.
The operating system’s routing table is irrelevant, except for the fact
that a default gateway is required. Only the AVM Access Server’s internal routing table is used.
Databases
All AVM Access Server settings are stored in Microsoft Access databases. The database files are stored in the AVM Access Server’s installation folder, and have the file name extension “.mdb”. These databases
are accessed through the Microsoft ADO interface. The Microsoft Jet 4.0
Service Pack 6 is required. Please see the Readme file for further details.
AVM Access Server – 6 AVM Access Server for Experts 101
User Interface
User Interface
Windows user interface (gui.exe)
This is the main user interface to the AVM Access Server. This Windows application provides convenient, wizard-driven configuration of all AVM Access Server settings.
Web user interface (AVM Webserver)
This user interface is accessible through any browser with Javascript 1.2 capability (such as MS Internet Explorer Version 4.0 or
later). It is accessible from other computers in the network, but
does not offer the full convenience of the Windows application.
The web user interface is provided by the HTTP server “AVM Webserver”, which listens on TCP port 4000. Authentication is required for access to the web interface. Every Windows user who is
a member of the local group “Administrators” on the Access Server computer can access the web interface using the Windows user
name and password.
The web interface makes changes directly in the active settings
database (NTR.MDB). The Windows application creates a copy of
the database, however. For this reason all settings made in the
Windows user interface must be explicitly “applied” before they
take effect. Make sure that both user interfaces are not used
simultaneously! Otherwise inconsistent settings may result.
6.2 Internet Access with the AVM Access Server
The AVM Access Server can provide an Internet connection for the local
network over ISDN and ADSL, or use an existing Internet connection
through a third-party router. For ISDN and ADSL Internet access, the
AVM Access Server provides the following features:
Dial on Demand: Connection set-up and clear-down on demand
IP masquerading (source NAT) for TCP, UDP, GRE, ICMP
Port forwarding (destination NAT) for incoming TCP, UDP, and GRE
packets
DNS forwarding: DNS queries received on configurable IP addresses (default: 192.168.116.252 and .253) are forwarded to the
DNS server dynamically assigned by the current ISP
IP firewall: incoming and outgoing IP packet filters, stateful inspection
102 AVM Access Server – 6 AVM Access Server for Experts
Installation Alongside AVM KEN! or AVM KEN! DSL
Dynamic DNS, to remain accessible from the Internet at a fixed domain name using a dynamically assigned IP address. Direct support for dynamic DNS providers (currently implemented for the
providers http://www.dyndns.org and http://www.dns4biz.com).
Support for unmetered access: The connection is kept active as
long as the service is running, rather than on demand. The connection is reestablished immediately after an interruption by the
service provider.
Activate Internet connection on call: The Internet connection can
be activated by a voice telephone call to the Access Server
ISDN
Supports all Internet Service Providers offering PPP over ISDN
(RFC 1618), with one or more active ISDN-Controllers
Supports channel bundling with up to 30 ISDN B channels
Data compression at the PPP level using Stac or MPPC payload
compression (Fast Internet over ISDN)
ADSL
PPP over Ethernet (RFC 2516) with AVM FRITZ!Card DSL
PPP over Ethernet with external ADSL modems (connected
through an Ethernet adapter)
PPP over ATM (RFC 2386) with AVM FRITZ!Card DSL
Installation Alongside AVM KEN! or AVM KEN! DSL
The AVM Access Server can be installed alongside KEN! on the same
computer. In this case, either AVM KEN! (or KEN! DSL) or the AVM
Access Server can be used to provide Internet access.
Internet Access Through the AVM Access Server
KEN!’s e-mail and proxy server features can use an Internet connection
configured in the AVM Access Server. All that is necessary is to deactivate the KEN! setting “Internet access activated”.
Note: In this case, the firewall filters configured in KEN! are no longer in
effect. Instead, Internet security is controlled by the AVM Access
Server’s packet filters. The Access Server normally acts as an Internet
router. If you want the LAN to have Internet access only for certain
AVM Access Server – 6 AVM Access Server for Experts 103
Internet Access Through a Third-party Router
services (such as HTTP, FTP) using the proxy server in KEN!, then you
must activate appropriate IP packet filters in the Access Server to prohibit direct routing between the LAN and the Internet.
Internet Access Through a Third-party Router
The Access Server can also use an Internet connection through an existing router in the LAN. If the router performs Network Address Translation (NAT, or IP masquerading), then it must be configured to forward
two ports from the Internet interface to the IP address of the AVM
Access Server in order to allow VPN connections:
UDP destination port 500 (ISAKMP) -> IP address of the Access
Server, destination port 500
ESP -> IP address of the Access Server
The IPsec “Authentication Header” (AH) protocol cannot be used
through NAT on an external router. This restriction is minor, since ESP
alone includes a checksum over the entire packet. Only the new IP
header carrying the public IP addresses of the tunnel endpoints is not
secured by a checksum.
Dynamic DNS
Dynamic DNS is a service in the Internet that associates a fixed domain
name with a dynamically assigned IP address. The computer concerned must notify the dynamic DNS provider every time its IP address
changes. With most ISDN and ADSL Internet Service Providers, a new IP
address is assigned each time the line is dialed up, so that the IP number must be registered with each new connection. The AVM Access
Server currently implements automatic updates for dynamic DNS providers: www.staticip.de and www.dyndns.org. Both of these providers
require registration before service can begin. These two providers offer
basic dynamic DNS service free of charge.
6.3 Connections to Remote Users
Every user configured in the AVM Access Server is a member of a user
group. All properties of the user group apply to each group member.
Each individual user also has individual properties.
On creating a user group, an IP address range is defined for address assignments to the users in the group.
104 AVM Access Server – 6 AVM Access Server for Experts
IP Address Assignment: Static or Dynamic?
IP Address Assignment: Static or Dynamic?
The AVM Access Server defines two kinds of address ranges: those for
static and those for dynamic address assignments. With dynamic IP
address ranges, the user is only assigned an IP address when the connection is activated, and the address may be a different one each time
the connection is dialed up. With a static address range, the user is assigned an IP address before the connection is dialed up, and the user
always has the same address. The IP address range is defined for a
group of remote users. When an IP address range for static assignments has been defined, a free IP address from that address range is
suggested for assignment to the new user each time a user is created.
IP addresses can be assigned both from the local IP subnetwork and
from a new subnetwork.
IP Addresses from the Local Subnetwork
Example:
AVM Access Server:
192.168.10.1
Local network:
192.168.10.0 / 24 (192.168.10.1 to 192.168.10.254)
IP address range for
assignment to remote
users:
192.168.10.192 / 26 (192.168.10.193 to
192.168.10.254)
In this case the Access Server performs “proxy ARP”. This means that
all ARP (Address Resolution Protocol) requests concerning IP addresses in the remote users’ range (e.g. “Who has 192.168.10.200?”) are answered by the Access Server with its own MAC address. This ensures
that packets from LAN hosts for remote users are sent to the Access
Server, which forwards them to the remote users.
If the remote user group is assigned an IP address range in the LAN
subnet, make sure that no addresses from this range are used by computers in the LAN! Otherwise, an ARP request for the address with a duplicate assignment would be answered by two computers, the Access
Server and the other computer in the LAN. There is no way to predict
which answer would reach the requesting computer first.
AVM Access Server – 6 AVM Access Server for Experts 105
IP Addresses From a Dedicated Subnetwork
IP Addresses From a Dedicated Subnetwork
Example:
AVM Access Server:
172.16.1.1
Local network:
172.16.0.0 / 16 (172.16.0.1 to 172.16.255.254)
IP address range for
assignment to remote
users:
192.168.20.0 / 24 (192.168.20.1 to 192.168.20.254)
In this case, all computers in the LAN must have a route to the network
192.168.20.0/24.
If the Access Server is the default gateway in the LAN (this is the case if
the Access Server provides Internet access for the LAN, for example),
then no further routing configuration is necessary.
If the default gateway is another router, then a route to the IP network
defined for dial-in users must be entered in its routing table, with the
AVM Access Server’s address as the gateway. In the example, the route
would be added as follows (in Windows notation):
192.168.20.0 mask 255.255.255.0 172.16.1.1 metric 1
Other Parameters Transmitted to Remote Users
All settings transmitted to remote users, by IPCP on direct dial-in connections or by IKE mode configuration on VPN connections, are taken
from the first LAN adapter in the AVM Access Server computer. These
parameters include the two DNS server addresses and, on direct dialin, two WINS server addresses. The gateway address communicated to
dial-in peers is the IP address of the first LAN adapter. On VPN connection set-up, IKE mode configuration is used to communicate the two
DNS server entries only if they are within an IP network that is reachable from the remote site over the VPN.
Remote Users Database
The AVM Access Server has its own user database. The user’s properties can be configured in the internal database in detail. Alternatively,
however, an existing external user database can be used for authentication by means of the RADIUS protocol. For example, RADIUS can be
used to access the Windows user database. Microsoft provides the “Internet Authentication Service” for this purpose.
106 AVM Access Server – 6 AVM Access Server for Experts
Remote Network Connections
6.4 Remote Network Connections
The AVM Access Server allows you to connect entire remote LANs to the
local network. The Access Server provides the following features for remote network connections:
IP routing
direct ISDN connections (with up to 30 bundled B channels)
VPN connections over the Internet
NetBIOS spoofing
As for remote user connections, the two locations can use IP addresses
in the same subnetwork. In this case, the Access Server performs proxy
ARP. Addresses in different subnetworks are recommended, however.
Example: The London office has the subnetwork 192.168.20.0/24, and
the main office in Berlin has the subnetwork 192.168.10.0/24.
6.5 Windows Name Resolution, File and Printer
Sharing
The AVM Access Server does not route broadcasts. As a result, Windows name resolution cannot be performed automatically among the
workstations, as it is in a LAN. If you want to address shared resources
by their NetBIOS names, you must either operate a WINS server, or enter the necessary computer names in the file “LMHOSTS” on each computer.
When interconnecting Microsoft networks with Active Directory, it is
recommended that you operate domain controller at each site. For detailed instructions on configuring WAN-linked Microsoft networks, see
the “Active Directory Branch Office Planning Guide” from Microsoft. For
a link to this document, see the section “Further Reading” on page 115.
6.6 Filter and Forwarding Profiles
You may choose to restrict access over remote network and Internet
connections using IP packet filters. Filters can be applied to specific remote users or networks, as well as globally, to all remote users and
networks and all network adapters. If a packet matches an “Accept”
rule in a network or user-specific filter profile, it cannot be dropped by
any rule in the global incoming or outgoing filter profile.
AVM Access Server – 6 AVM Access Server for Experts 107
VPN and the IPsec Protocol
Global forwarding
filter
Accept
Decrypted
data
Global input filter
Upper outgoing
filter profile
Upper incoming
filter profile
Global output filter
Masquerading/NAT
Masquerading/NAT
IPSec Decryption
IPSec Encryption
Lower incoming
filter profile
Lower outgoing
filter profile
ISDN / ADSL / GSM /
LAN
ISDN / ADSL / GSM /
LAN
Accept
Architecture of the filter profiles
6.7 VPN and the IPsec Protocol
The AVM Access Server incorporates a complete implementation of
IPsec in conformance with the standards. Its features include:
AES, DES and 3DES encryption
payload compression with IPComp
authentication with MD5, SHA-1
authentication using pre-shared keys
XAuth and IKE mode configuration
Negotiation of an IPsec connection takes place using the “Internet Key
Exchange” (IKE) protocol. IKE negotiation results in a set of security parameters used in common with the remote site, known as a “security
association” (SA). IKE negotiation takes place in two phases. The first
phase is concerned primarily with authentication and with obtaining a
key for encrypted communication in Phase 2. Phase 1 generally yields
exactly one SA.
108 AVM Access Server – 6 AVM Access Server for Experts
VPN and the IPsec Protocol
The identities (IDs) exchanged in IKE Phase 1 can be:
user fully qualified domain name (User FQDN)
fully qualified domain name (FQDN)
Key ID
IP host address
IP network address with subnet mask
IP address range
For remote users, the configured user name is accepted as User FQDN,
FQDN and Key ID. For remote networks, all of the identity types listed
above are configurable. If the identity is set to “automatic”, the ID is
derived as follows:
If the Access Server is connected to the Internet through a LAN
adapter (or through AVM KEN!, since KEN! acts as a network adapter in the system), then the IP address of the given network adapter is used as the local identity.
If the AVM Access Server manages the Internet connection itself,
then the IP address assigned to it by the Internet Service Provider
is used as the local identity. If a dynamic DNS provider is used,
then the dynamic DNS domain name is used as the identity, and
the identity type is FQDN.
For VPN connections to remote networks, the remote identity is
expected to be the contents of the “Remote VPN gateway” setting,
i.e. either the IP address of the remote VPN gateway or its host
and domain name.
All ID settings can be selected manually.
IKE Phase 2 is aimed at negotiating the SAs for securing user data. The
SAs resulting from Phase 2 mainly specify:
whether data is encrypted over the link (using Encapsulated Security Payload) and which encryption algorithm is used.
whether a hash digest of the entire packet (Authentication Header) is added, and which hash algorithm is used.
whether payload data is compressed (IPComp) and which compression method is used.
AVM Access Server – 6 AVM Access Server for Experts 109
VPN and the IPsec Protocol
IDs are used in Phase 2 as well. For remote users, the AVM Access
Server’s identity is always the address of the uppermost access rule.
For remote networks, the identities can be configured as desired.
When the Phase 2 identity is set to “Automatic”, it is derived from the
uppermost access rule.
Security policies are proposed SAs. The security policies are named
according to the structure described below.
Phase 1: Diffie-Hellman Group / Encryption Methods / Hash Algorithm
These three parameters can take the following values:
Diffie-Hellman Group:
def
Diffie-Hellman Group 1 (default)
alt
Diffie-Hellman Group 2 (alternate)
Encryption methods:
aes
Advanced Encryption Standard (128 - 256 bit key length)
3des
Triple Digital Encryption Standard (Triple-DES; 168 bit key length)
des
Digital Encryption Standard (56 bit key length)
all
The 3DES and DES encryption methods are proposed to the
remote system in that order
Hash algorithm:
sha
Secure Hash Algorithm 1 (SHA-1)
md5
Message Digest 5 (MD5)
all
The SHA-1 and MD5 hash algorithms are proposed to the remote
system in that order
Phase 2: ESP Encryption Algorithm-hash Algorithm / AH Hash
Algorithm / Compression / Perfect Forward Secrecy
Encryption algorithms:
aes
Advanced Encryption Standard (128 - 256 bit key length)
3des
Triple Digital Encryption Standard (Triple-DES, 168 bit key length)
des
Digital Encryption Standard (56 bit key length)
all
The AES, 3DES and DES encryption methods are proposed to the
remote system in that order
no
Do not use ESP
110 AVM Access Server – 6 AVM Access Server for Experts
Interoperability
Hash algorithms:
sha
Secure Hash Algorithm 1 (SHA-1)
md5
Message Digest 5 (MD5)
all
The SHA-1 and MD5 hash algorithms are proposed to the remote
system in that order
Compression techniques:
lzjh
LZJH (RFC 2395)
deflate
Deflate (RFC 2394)
lzs
LZS (RFC 3051)
no
Do not use payload compression
Perfect forward secrecy:
pfs
Require perfect forward secrecy
no-pfs
Do not require perfect forward secrecy
6.8 Interoperability
Because it supports the interoperability standard PPP over ISDN and
numerous other standards in the PPP suite–specified in RFCs (Requests for Comments)–the ISDN Access Server can connect to all
systems that conform to these standards.
In addition to the RFCs, the AVM Access Server also implements new
draft PPP standards that have not yet been adopted by the IETF. Such
advanced features include a number of spoofing techniques developed by AVM, which are implemented in the AVM Access Server based
on the PSCP draft. The AVM Access Server supports the following RFCs
and RFC drafts:
PPP over ISDN
RFC 1144
Compressing TCP/IP Headers for Low-Speed Serial Links
RFC 1332
The PPP Internet Protocol Control Protocol (IPCP)
RFC 1334
PPP Authentication Protocols (PAP)
RFC 1570
PPP LCP Extensions
RFC 1618
PPP over ISDN
RFC 1631
The IP Network Address Translator (NAT)
RFC 1661
The Point-to-Point Protocol (PPP)
AVM Access Server – 6 AVM Access Server for Experts 111
Interoperability
PPP over ISDN
RFC 1662
PPP in HDLC-like Framing
RFC 1962
The PPP Compression Control Protocol (CCP)
RFC 1968
PPP Encryption Control Protocol (ECP)
RFC 1974
PPP Stac LZS Compression Protocol
RFC 1989
PPP Link Quality Monitoring
RFC 1990
The PPP Multilink Protocol (MP)
RFC 1994
PPP Challenge Handshake Authentication Protocol (CHAP)
RFC 2118
Microsoft Point-to-Point Compression (MPPC) Protocol
RFC 2125
The PPP Bandwidth Allocation Protocol (BAP) / The PPP
Bandwidth Allocation Control Protocol (BACP)
RFC 2284
PPP Extensible Authentication Protocol (EAP)
RFC 2516
A Method for Transmitting PPP Over Ethernet (PPPoE)
RFC 2663
IP Network Address Translator (NAT) Terminology and
Considerations
RFC 3022
Traditional IP Network Address Translator (Traditional NAT)
RFC 3027
Protocol Complications with the IP Network Address
Translator
Draft
PPP Callback Control Protocol
Draft
PPP Protocol Spoofing Control Protocol (PSCP)
IPsec
RFC 1829
The ESP DES-CBC Transform
RFC 1851
The ESP Triple DES Transform
RFC 2104
HMAC: Keyed-Hashing for Message Authentication
RFC 2394
IP Payload Compression Using DEFLATE
RFC 2395
IP Payload Compression Using LZS
RFC 2401
Security Architecture for the Internet Protocol
RFC 2402
IP Authentication Header (AH)
RFC 2403
The Use of HMAC-MD5-96 within ESP and AH
RFC 2404
The Use of HMAC-SHA-1-96 within ESP and AH
RFC 2405
The ESP DES-CBC Cipher Algorithm with Explicit IV
RFC 2406
IP Encapsulating Security Payload (ESP)
RFC 2407
The Internet IP Security Domain of Interpretation for ISAKMP
112 AVM Access Server – 6 AVM Access Server for Experts
Interoperability
IPsec
RFC 2408
Internet Security Association and Key Management Protocol
(ISAKMP)
RFC 2409
The Internet Key Exchange (IKE)
RFC 2410
The NULL Encryption Algorithm and Its Use with IPsec
RFC 2412
The OAKLEY Key Determination Protocol
RFC 2451
The ESP CBC-Mode Cipher Algorithms
RFC 2709
Security Model with Tunnel-mode IPsec for NAT Domains
RFC 3051
IP Payload Compression Using ITU-T V.44 Packet Method
RFC 3173
IP Payload Compression Protocol (IPComp)
RFC 3268
Advanced Encryption Standard (AES) Ciphersuites for
Transport Layer Security (TLS)
Draft
Extended Authentication Within ISAKMP/OAKLEY (XAuth)
Draft
The ISAKMP Configuration Method (“mode-config”)
AVM Access Server – 6 AVM Access Server for Experts 113
Updates, Registration and Support
7 Updates, Registration and
Support
We’re always here to help you when you have questions or problems.
Whether you need manuals, software updates, registration or support:
all the service information you need is available.
7.1 Sources of Information
To make the most of all the AVM Access Server’s functions and
features, refer to the following sources of information:
Documentation
The AVM Access Server includes comprehensive documentation in a
variety of formats:
From the AVM Access Server window itself you can open the detailed Online Help. The Help includes detailed explanations of all
settings, monitoring functions and statistics.
The Readme file on the AVM Access Server contains important information and installation instructions that were not yet available
at the time the manual was printed. You should read the Readme
file before beginning with the installation. A link to it is provided
in the CD-ROM’s self-launching Help document, INTRO.HLP.
The present manual is included in PDF format in the AVM Access
Server installation directory.
The manual contains detailed information on the design and uses
of the AVM Access Server, including installation requirements and
the installation instructions. It provides background information
on the AVM Access Server’s capabilities and on routing over ISDN
and ADSL in general.
If you do not have the Adobe Acrobat Reader to view PDF
documents, you can install it from the directory UTILS\ACROBAT\
ENGLISH on the CD.
For detailed information on Windows XP and 2000, refer to the
Windows documentation.
114 AVM Access Server – 7 Updates, Registration and Support
Internet
Internet
AVM also provides you with detailed information and free software
updates over the Internet. Visit us at:
www.avm.de/en/
Click “Products” for the latest information about all AVM products, as
well as announcements of new products and product versions.
Further Reading
For information on the configuration of WAN-linked Microsoft
networks, see:
Active Directory Branch Office Planning Guide
www.microsoft.com/windows2000/techinfo/planning
/activedirectory/branchoffice/default.asp
For more information on TCP/IP and IP firewalls, see:
D. B. Chapman and E. D. Zwicky: Building Internet Firewalls,
O’Reilly & Associates, 1995
W. R. Cheswick and S. M. Bellovin: Firewalls and Internet Security,
Addison-Wesley, Reading, Massachusetts, 1994
M. Hein and M. C. Billo (eds.): TCP/IP light, FOSSIL-Verlag GmbH,
Cologne 1997
For information on internetworking in general, see:
L. A. Chappell and R. L. Spicer: Novell’s Guide to Multiprotocol Internetworking, Novell Press, 1994
7.2 Updates
The latest software updates for your AVM Access Server and for
NetWAYS/ISDN are available free of charge from AVM’s web site, or
from the AVM Data Call Center.
Internet
To download updates over the Internet, please visit:
www.avm.de/en/download
AVM Access Server – 7 Updates, Registration and Support 115
AVM Data Call Center (ADC)
You can also download software updates from AVM’s FTP server. Click
the “FTP server” link in the download area, or see:
www.avm.de/ftp
AVM Data Call Center (ADC)
The AVM Data Call Center (ADC) provides all of the same programs and
drivers that are available from the AVM web site. You can connect to
the ADC in the following way:
Through AVM’s ISDN Server
You can dial the ADC using the ISDN file transfer programs Connect or
Connect32 (IDtrans protocol), included with all AVM ISDN-Controllers,
or using FRITZ!data (IDtrans or FTP). The ISDN number of the ADC is:
+49-(0)30-39 98 43 00
For further information, please refer to the AVM ISDN-Controller’s
Readme file. For faster file transfer, activate the options “2-channel
transfer” and “data compression”.
7.3 AVM Support
Please take advantage of the information sources described above
before you contact AVM Support.
AVM’s Support team is at your service with direct help in case of
trouble and during the installation and the initial configuration of the
AVM Access Server.
You can send your request to AVM Support by e-mail or telefax. AVM
Support will then get in touch with you by fax or e-mail to assist you in
solving your problem.
Before You Contact AVM Support
Before you get in touch with AVM’s support technicians, please make
sure you have the following information ready so that we can assist you
quickly:
1.
A detailed description of the problem and a sketch of your WAN
with the IP addresses of all the components involved.
2.
The exact error message you receive.
116 AVM Access Server – 7 Updates, Registration and Support
Support by E-mail
3.
The Access Server has a built-in function to generate a file
containing all the information about your configuration that may
be relevant to your support request.
– In the “Configuration” View of the AVM Access Server, select
the “Administration” folder and open the “Service and
Support” dialog page.
– In the “Support data” area, click the “Generate Support
Data...” button. The support data is saved in the file
SUPPORT.ZIP in the Access Server installation folder.
– You can send this file to AVM Support by e-mail.
4.
In case of interoperability problems with third-party routers,
perform a packet trace of the PPP negotiation. See the section
“Packet Trace” from page 41 for instructions.
If you have trouble connecting to remote systems, start by setting up a
test connection to the AVM Data Call Center before you contact
Support.
Are you able to dial up a test connection to the AVM Data Call Center (ADC) with the ISDN-Controller?
At what point in the installation procedure or in the program does
an error message occur?
What is the exact wording of the message?
If you are unable to connect to the ADC on the first attempt, try
again. All lines may be busy at peak hours.
Support by E-mail
You can send a Support query to AVM by e-mail. To do so, please use
the Support form on the AVM web site:
http://www.avm.de/en/service/support
Fill in the form and click the “Send” button to send the e-mail to AVM
Support.
Support by Fax
If you do not have Internet access, you can also contact Support by
telefax at the following number:
+49-(0)30-39 97 62 66
AVM Access Server – 7 Updates, Registration and Support 117
Support by Fax
Your fax should contain the following information:
An e-mail address or fax number where you can be reached.
Your name and address.
The Product Identification Code, found on your CD.
The AVM Access Server version you are using. The version number
can be found in the Readme file.
The number of the Microsoft Service Pack installed.
The operating system used on the computer on which you have installed the AVM Access Server (Windows XP, 2000 or NT).
The network protocols you are using.
The ISDN-Controller model installed in the AVM Access
Servercomputer. The version and build numbers of the ISDN-Controller drivers.
The driver version and build numbers can be found in the “Readme” file in the driver installation directory of the AVM ISDN-Controller. If you have installed FRITZ! on the AVM Access Server computer, then the driver version can also be found in the FRITZ!version window: select “Start / Programs / FRITZ! / FRITZ!version”. In
the “FRITZ!version” window, click the “System Information” button.
Note whether your ISDN-Controller is connected to a PBX extension line.
When you have gathered this information, you are ready to contact
AVM Support. We are confident that the Support team will be able to
help you find a satisfactory solution to your problem.
118 AVM Access Server – 7 Updates, Registration and Support
Glossary
ADSL (Asymmetric Digital Subscriber Line)
ADSL is a communication technology that permits Internet access with
high bandwidth over ordinary telephone cables. Data communication
takes place at up to 6 Mbit/s downstream (that is, from the Internet to the
user) and up to 640 kbit/s upstream. Other telecommunication services
and dial-up connections to other subscribers are not possible over ADSL.
ISDN and ADSL can be carried over the same telephone cable using different frequency bands.
AH (Authentication Header)
A data security protocol in the IPsec suite. AH ensures the authenticity
of a packet’s source and the integrity of its contents. AH does not provide encryption of the data payload, however.
AOCD (Advice of Charge During Call)
AOCD, or Advice of Charge During Call, is an ISDN feature. When this
feature has been activated for the ISDN line, charge information is
transmitted over the D channel as charges are incurred during a connection. For more information about AOCD, consult your ISDN provider.
ARP (Address Resolution Protocol)
The Address Resolution Protocol, or ARP, is part of the TCP/IP protocol
suite. ARP is used dynamically to obtain the Ethernet hardware address
(called the MAC address) of the interface that corresponds to a given IP
address. This takes place automatically, and is normally transparent to
applications and users.
In order for TCP/IP network communication to take place, the transmitting station must obtain the hardware address corresponding to the IP
destination address. To obtain the hardware address, the transmitting
station sends an ARP request packet containing the IP address of the
desired destination. This packet is broadcast to all ARP-capable stations on the network, and the one with the IP address requested responds to it with an ARP reply packet. The sender then stores the IP address–hardware address association it its ARP cache.
AVM Access Server – Glossary 119
Authentication
Authentication refers to identifying a remote system by verifying its login
information (name and password) on establishing incoming and outgoing connections. In the AVM Access Server, authentication is performed
not only to prevent unauthorized access, but also to identify the remote
user if incoming call assignment by CLI number is not activated. The authentication protocols used for PPP connections are PAP and CHAP. In
the AVM Access Server, you can specify for each remote site individually
whether authentication is required of the remote site, and by which
method. For each authentication protocol, a name and password must
be configured and communicated to the remote site. If the remote system also requests authentication, you can enter the necessary name and
password in the settings for the remote user group or network. Obtain
this information from the administrator of the remote site.
B channel
An ISDN BRI line comprises two B channels and one D channel. An
ISDN PRI line has 30 B channels and a D channel. The B channels are
used to transport user data. Each B channel provides data throughput
of 64 kbit/s. To increase throughput, the AVM Access Server can bundle up to 30 B channels in one network connection.
CAPI: see “Common ISDN API (CAPI)” on page 121
CHAP (Challenge Handshake Authentication Protocol)
One of the two authentication protocols in the PPP suite. A name and
password for the remote system must be configured on the system that
requests authentication. The remote system must be configured to
present the same name and password. In CHAP, the system that requests authentication uses a pre-defined algorithm to form a message,
called the challenge, from the name and a random number. This challenge is sent to the remote system. The remote system produces a new
message out of the first message and the password, also using a preset algorithm, and sends this value back. The first site performs the
same operation and compares its results with the message received
from the remote system. If they match, the remote system is authentic
and the connection can be set up. The advantage of this method is that
the password itself is never transmitted between the two systems. For
this reason CHAP is considered a secure protocol. CHAP is described in
RFC 1334 and RFC 1994.
120 AVM Access Server – Glossary
Charge profile
A charge profile contains information about the duration of a connection charge interval for each time of day and for local and long-distance
dialing zones. Each profile consists of two lists of charge rates over a
24 hour period: one list applies on weekdays (Monday–Friday), the
other on weekends and (optionally) holidays.
The AVM Access Server uses charge profiles to control the inactivity
timeout for the physical ISDN connection. If a charge profile is selected
in the remote user’s or network’s inactivity timeout settings, the connection is cleared down three seconds before the end of the charge interval, if at that time no data has been transported for three seconds.
This ensures that optimum use is made of the charge interval. The selected charge profile is also used to estimate the connection charges
incurred. The AVM Access Server then compares the charges calculated
on this basis with the user-specific and global budgets. This avoids unexpectedly high ISDN costs.
Client
A client is a computer in a network that requests services from another
system, such as access to files or information from databases.
CLIP (Calling Line Identification Presentation)
ISDN terminal devices can transmit their line’s number over the D channel
with outgoing calls. CLIP is an ISDN feature used by the AVM Access Server
to identify incoming calls and to guard against unauthorized access. This
feature must be activated for the caller’s line by the ISDN provider. CLIP
can generally be requested when ordering an ISDN line.
Common ISDN API (CAPI)
CAPI, currently in Version 2.0, is a standardized, manufacturer-independent interface between PC ISDN adapters and ISDN applications.
The driver software for AVM ISDN-Controllers provides the CAPI interface throughout the system. Current CAPI drivers can be downloaded
free of charge from AVM’s FTP server (ftp://ftp.avm.de). The AVM
Access Server builds on the CAPI 2.0 applications interface.
D channel
The D channel is used to carry control information in ISDN, such as the
type of communication service requested and the numbers of the parties communicating. The throughput of the D channel is 16 kbit/s for
AVM Access Server – Glossary 121
BRI lines and 64 kbit/s for PRI lines. D channel information is used for
ISDN features such as charge information (AOCD) and caller ID (CLIP).
In Germany, the CLIP and AOCD services must be specially requested
on ordering an ISDN line.
DNS (Domain Name System)
DNS is the address resolution service in IP networks such as the Internet, providing other systems with a mapping between human-readable
names and IP addresses. In other words, the DNS converts computers’
domain names into numeric addresses.
Because numeric addresses are difficult for humans to remember and
type, computers and networks are addressed by names in plain text,
such as “www.avm.de”. IP packets are only addressed in numerical
form, however. Thus the computer needs to know the numerical IP address that corresponds to a human-readable name such as
“www.avm.de”. The mapping between names and numbers is provided by name servers, also called DNS servers. A computer in the Internet that only knows a domain name for a server or other destination
can obtain the corresponding IP address from the DNS by sending a
query to the nearest name server.
Domain
In Windows networks, a domain is a logical group of network servers
and other computers that share common security attributes and user
account information. Administrators assign each user a single account
in the domain. Users can then log on to the domain itself rather than to
each server in the domain.
The domain is not necessarily limited to a certain location or type of
network configuration. Rather, computers in a domain can be located
in physical proximity to one another, as in a local-area network (LAN),
or far apart, even across the globe from one another. The computers in
the domain may communicate over any kind of medium, including dialup lines, ISDN, ADSL, fiber optic cable, Ethernet, Token Ring, Frame Relay, satellite links and leased lines (see Microsoft Corporation, “Microsoft Windows NT Server Version 4 – Network”; see also “Further
Reading” on page 115).
122 AVM Access Server – Glossary
Domain controller
In Windows networks, servers that are to share user account information
can be grouped together in one or more domains. One server in the domain, the Domain controller or DC, stores all account information.
The advantage of organizing servers in domains is that users can access all resources with a single user name and password. User account
maintenance is simplified because all changes are entered only on the
domain controller.
DSS1
Standard European ISDN D-channel protocol. All recent ISDN lines in
Germany use DSS1.
Dynamic DNS
Dynamic DNS is an Internet service offered by both commercial and
free providers. Dynamic DNS allows a server to remain accessible in
the Internet under a constant domain name even if its IP address
changes frequently. In order to use this service, you must register with
a dynamic DNS provider and specify a domain name. The dynamic DNS
provider then supplies you with your access information. Each time the
Internet connection is dialed up, the current IP address is sent to the
dynamic DNS provider, where it is mapped to the domain name in the
DNS. In this way your server can always be accessed by its domain
name.
If you want to use VPN connections with the AVM Access Server and
your Internet Service Provider assigns IP addresses dynamically, then
you must use dynamic DNS.
ESP (Encapsulating Security Payload)
A security protocol in the IPsec suite. ESP provides authentication of
the source of a data packet, as well as encryption to ensure the privacy
and integrity of user data.
Filter profiles
Filter profiles are used to restrict the kinds of IP packets that can enter
or leave the AVM Access Server. Specific packets can be filtered out of
the data stream and discarded or rejected rather than transported. Filter profiles can reduce connection costs and increase security in the
network:
AVM Access Server – Glossary 123
Packet types that are constantly exchanged by certain
applications in networks, and that would otherwise cause
frequent unnecessary calls in an ISDN WAN, can be filtered out.
Packet types whose destination address is in a subnetwork of the
LAN that should not be accessible from outside can be filtered out.
A filter profile consists of one or more filter rules and a default action.
Each filter rule contains several conditions and an action. If an IP packet fulfills all of a rule’s conditions, then the rule is said to match the
packet. In this case, the rule’s action is applied to the packet. If no rule
in the filter profile matches the IP packet, then the default action of the
filter profile is applied to the packet.
The AVM Access Server comes with several pre-defined filter profiles,
and also allows you to define your own filter profiles.
These filtering options are not negotiated with the remote station, but
configured statically in the AVM Access Server. For details about the
pre-defined filters in the AVM Access Server, see the section “Filters”
on page 58.
Firewall
The AVM Access Server’s firewall filters are used to protect the network
against intrusion, and to select the data and services that are accessible from outside.
Firewalls are implemented using a number of different mechanisms. In
the AVM Access Server, the firewall is implemented using a multi-stage
packet filter and network address translation (NAT). The AVM Access
Server examines whether each incoming and outgoing data packet
conforms to the security rule set. Filter criteria can include the packet’s
source and destination addresses (by network address and subnet
mask), the higher-layer protocol (TCP, UDP, GRE, ESP, AH, ICMP) and the
service (FTP, DNS). These security rules are stored in global and connection-specific IP filter profiles. The rules determine which action is
performed on each packet: accept, silently discard, or reject with an error message.
See also “IP masquerading” on page 129.
Forwarding
Forwarding profiles are used to allow access from the Internet or other
remote networks to specific servers in the local-area network, such as
web, e-mail or FTP servers, even though access from outside the LAN is
124 AVM Access Server – Glossary
otherwise prohibited by IP masquerading. A forwarding profile consists
of a set of forwarding rules. These forwarding rules determine which IP
packets are forwarded to which servers in the local-area network.
The AVM Access Server always uses IP masquerading on Internet connections. If you want to allow access from the Internet to specific servers in your LAN, you must use a forwarding profile.
See also “NAT (Network Address Translation)” on page 131.
FTP (File Transfer Protocol)
FTP is a platform-independent protocol—that is, one used by all kinds
of computers and operating systems—for file management and transfer to and from remote computers. FTP builds immediately on TCP, the
OSI Layer 4 (Transport Layer) protocol. The File Transfer Protocol is documented in RFC 959.
Hash algorithm
A hash function is an algorithm that yields a short value that is practically unique to a given input. The value of the hash is also called a “digest” of the input. One-way hash algorithms are used in cryptography
to create digital signatures for authentication.
One-way hash algorithms
– The input data can be of any length.
– The output is generally of a fixed length.
– The input data cannot be reconstituted from the output.
– The algorithm must be sufficiently free of collisions: in other
words, the probability of two different input values yielding
the same output must be very small.
Keyed-hash functions
Keyed-hash functions are one-way hash algorithms that use a key
in addition to the variable input data. Keyed-hash functions are
used to generate message authentication codes (MAC). Only
those who hold the same key can generate the same MAC from a
given message. This makes the hash algorithm still safer against
collisions.
AVM Access Server – Glossary 125
HDLC (High-level Data Link Control)
A communications protocol standardized by ISO for data packets over
serial lines. HDLC is actually a structured set of standards which define
the means by which dissimilar devices can communicate over data networks. HDLC is a bit-oriented and hence code-independent data link protocol for point-to-point and point-to-multipoint connections. HDLC is also standardized by ITU-T (ITU = International Telecommunication Union;
ITU-T = ITU Telecommunication Standardization Sector). HDLC defines
frames in which the data blocks from the network layer are encapsulated
for transport over the physical link. According to DIN 66221, an HDLC
frame consists of the start-of-frame flag, the address field, the control
field, the data field, the frame check sequence (FCS), and the end-offrame flag. HDLC is used in full-duplex mode, and provides for the acknowledgment of several frames at a time (usually eight). The number of
frames transmitted before acknowledgment is called the window size.
Header
Data packets are generally transmitted beginning with a header which
contains the source and destination addresses and identifies the protocol used to interpret the packet. Header information is often repetitive
and thus can be compressed over some links, such as ISDN lines, to increase the speed of data communication and so save time and costs.
HMAC (Keyed-Hash Message Authentication Code)
A message authentication code (MAC) generated using a keyed hash
function. Any hash algorithm can be used. HMAC signatures are used
in all IPsec authentication functions.
ICMP (Internet Control Message Protocol)
ICMP is part of the IP (Internet Protocol) suite. It is situated at Layer 3
(the Network Layer) of the OSI reference model, alongside IP itself.
ICMP uses the IP packet structure in a similar way to higher-layer protocols, however.
ICMP is a component of every IP implementation, and transports only
error and diagnostic information for IP. A well-known service based on
ICMP is the program “ping”.
IKE (Internet Key Exchange)
A protocol in the IPsec suite used to negotiate secure connection parameters. IKE is described in RFC 2490.
126 AVM Access Server – Glossary
IP (Internet Protocol)
IP is the Network Layer protocol responsible for addressing and routing
in the TCP/IP protocol family. In general terms, its purpose is to provide
data communication between various networks. IP provides:
data packet transmission
fragmentation of data
selection of communication parameters
addressing
routing between networks
identification of higher-order protocols
IP does not provide assured transmission: the sender receives no verification that the packet was delivered. End-to-end transmission control
is left to the higher-layer protocols. Lost or rejected packets are not retransmitted. IP also makes no provision for sequence integrity of the
packets: they may arrive at the receiver in any order. Sequence integrity is likewise left to the OSI model Layer 4, the Transport Layer.
IP builds directly on OSI Layer 2, the Data Link Layer. The Internet Protocol is described in RFC 791.
IP address
Addressing is one of the main functions of the Internet Protocol (IP). Addresses in IP version 4 are 32-bit numbers, which can be written as four
bytes in decimal, octal or hexadecimal notation. In the AVM Access Server
configuration, “dotted-decimal” notation is used: the four bytes of an IP
address are represented by decimal numbers separated by dots. The full
set of IP addresses, called the address space, is grouped into address
classes designated as A, B, C, D and E. Only the first three address classes
are actually used. These classes can be described as follows:
Class
Characteristics
First byte of network
address (decimal)
Class A addresses Few networks with many nodes 0-127
Class B
addresses
Medium number of networks 128-191
and medium number of nodes
Class C addresses Many networks with few
nodes
192-223
IP address classes
AVM Access Server – Glossary 127
Every IP address contains two components: the network address and
the host address. The sizes of the network address and the host address are variable, and determined by the first four bits (of the first
byte) of the IP address.
Class A addresses consist of a one-byte network address and a
three-byte host address:
X._._._
Network address
Host address
Class A addresses
Example: 88.120.5.120 (88 is the network address, 120.5.120 is
the host address).
Class B addresses consist of a two-byte network address and a
two-byte host address:
X.X._._
Network address
Host address
Class B addresses
Example: 130.6.2.130 (130.6 is the network address, 2.130 is the
host address).
Class C addresses consist of a three-byte network address and a
one-byte host address:
X.X.X._
Host address
Network address
Class C addresses
Example: 195.15.15.1 (195.15.15 is the network address, 1 is the
host address).
128 AVM Access Server – Glossary
RFC 1918 (Address Allocation for Private Internets) reserves the
following parts of the IP address space for use in private networks:
10.0.0.0 – 10.255.255.255 (the 10/8 prefix)
172.16.0.0 – 172.31.255.255 (the 172.16/12 prefix)
192.168.0.0 – 192.168.255.255 (the 192.168/16 prefix)
IP mask: see “Subnet mask” on page 135
IP masquerading
Also known as Network Address Translation, or NAT. A whole network
can communicate with the Internet using just one IP address: A computer situated between the private LAN and the public Internet, with
just one public, “official” Internet address, can forward all LAN computers’ communications to computers in the Internet using its own IP
number as the source address, as if all the connections came from it.
The responses arriving from the Internet are then forwarded to whichever LAN computer actually requested the data. In this way the AVM
Access Server substitutes addresses in TCP, UDP and ICMP packets
coming from the LAN so that on the Internet only one IP address appears in all traffic from the local network. This means that the actual,
internal LAN IP addresses never appear in the Internet, and so do not
have to be “official” addresses. This also protects the local network
against unauthorized access from the Internet: the IP masquerading
gateway is significantly more difficult to break through than a good
packet filter firewall.
See also “NAT (Network Address Translation)” on page 131.
IPsec (IP Security Architecture)
A suite of standards for secure network-layer Internet communication.
IPsec is well suited for VPN connections and remote LAN access over
public telecommunication networks. IPsec uses the two security protocols Authentication Header (AH) and Encapsulating Security Payload
(ESP). AH provides source authentication; ESP provides both authentication and encryption. Information specific to the security protocols is
transported in a packet header appended to the IP header.
Keep-alive packets
Keep-alive packets are sent periodically throughout the network to verify whether a client is still active. If the sending station receives no response, it clears down the logical connection.
AVM Access Server – Glossary 129
LAN (Local-Area Network)
A computer network limited to a given location, such as a company site
or a government agency’s office building. Remote computers can use
appropriate software (such as the AVM Access Server) to join a LAN
over ISDN, ADSL, GSM or VPN connections.
Logical ISDN connection
A logical ISDN connection refers to the situation in which two computers consider an ISDN connection between them, which can be dialed
up in one or two seconds, to be virtually continuous. An actual B-channel connection need not be continuously active during the logical ISDN
connection. Throughout the entire duration of the logical ISDN connection the AVM Access Server maintains all the connection parameters
that were negotiated when the physical connection was first dialed up.
These parameters include the network protocols used, the authentication requirements, spoofing mechanisms and channel bundling. If data
is queued for transmission when no B-channel connection is active,
the B channel can be dialed up immediately.
Logical ISDN connections to the Internet are not supported by Internet
Service Providers.
Logical network connection
A logical network connection refers to a network-layer connection between two LANs, or between a LAN and a remote client. As long as the
logical network connection exists, each site maintains a route to the
other in its routing table.
Metric
The metric is an abstract value assigned to a route to give different relative priorities to different routes. If several routes are available to a
given destination, the AVM Access Server chooses the route with the
lowest metric as the “best” route.
MSN (Multiple Subscriber Number)
In Euro-ISDN (the D-channel protocol DSS1), point-to-multipoint ISDN
lines are assigned multiple subscriber numbers, which can be used to
distinguish between several end systems on the same S0 bus, or between several CAPI applications on the same computer. In Germany,
Deutsche Telekom AG assigns standard ISDN lines three MSNs.
130 AVM Access Server – Glossary
NAT (Network Address Translation)
NAT is a technique in which a router replaces addresses and port numbers in IP, UDP and TCP packet headers with other values. The AVM
Access Server performs NAT using a table to map the original IP address and port numbers to new values. For incoming connections handled by a forwarding profile, this table is static. Outgoing connections
are handled dynamically by IP masquerading.
IP masquerading and forwarding profiles are special uses of NAT.
In IP masquerading, the source IP addresses in outgoing TCP, UDP and ICMP packets are replaced with the AVM Access Server’s current public IP
address. Conversely, the destination address in replies to these packets
arriving from the Internet is replaced with the IP address of the requesting client in the LAN. In this way the LAN appears in the Internet only as a
single public IP address. IP masquerading is also called source NAT.
Forwarding profiles are used to replace the destination address in request packets arriving from the Internet—that is, AVM Access Server’s
public IP address—with the internal address of an appropriate server in
the LAN. In this way the AVM Access Server can forward incoming e-mail,
for example, to a specific SMTP server in the private LAN, even if the connection to the Internet uses a single dynamically assigned IP address.
This form of NAT is also called destination NAT or port forwarding.
NetBIOS
A standard for network communication that is independent of underlying transport protocols. NetBIOS is the standard network interface in
Microsoft networks, and can be transported over both IP and IPX. NetBIOS uses numerous broadcasts, which can be intercepted by the AVM
Access Server’s special filter to reduce connection costs.
Network address: see “IP address” on page 127
Outside dialing prefix
The outside dialing prefix is the digit that must be dialed on a PBX extension line before dialing a number on the public telephone network.
In modern PBX systems this is usually “0”. In the AVM Access Server,
the outside dialing prefix can be specified for each ISDN-Controller individually (on the “General” dialog page in the folder “Administration /
Interfaces”). The Access Server then uses the outside dialing prefix automatically where appropriate.
AVM Access Server – Glossary 131
PAP (Password Authentication Protocol)
One of the two authentication protocols in the PPP suite. A name and
password for the remote system must be configured on the system that
requests authentication. The remote system must be configured to
present the same name and password. In PAP authentication, the
name and password are sent unencrypted, and the authenticating system simply compares them with its settings. If they match, the remote
system is authentic and the connection can be set up. Because PAP
transmits the password in the clear, PAP should only be used on media
that are safe from eavesdropping, and only if the more secure CHAP is
not supported by the remote site.
Physical ISDN connection
The physical ISDN connection refers to an active B-channel connection
(or several bundled B channels). When the physical connection exists,
ISDN connection charges are incurred. The physical ISDN connection is
always based on a logical ISDN connection: the connection is controlled by the negotiated connection parameters.
Ping (Packet InterNet Grouper)
A program that tests whether an IP host is reachable. The program
sends an ICMP echo request packet to an IP host and waits for a reply.
The command line option “-w” causes the Windows implementation of
“ping” to wait a specified number of milliseconds for a reply. To allow a
few seconds for ISDN dial-up and PPP negotiation, you should use the
command “ping -w 5000” to specify a timeout of five seconds when
testing an ISDN connection.
Port
TCP and UDP packet headers provide port numbers for source and destination, in addition to the IP addresses. Because computers run many
networking applications with many simultaneous connections, the IP
address is not sufficient to address data to a specific application and a
specific communication process. For outgoing requests and replies,
the operating system assigns an application a unique TCP or UDP port
number, choosing one sequentially or randomly. In the AVM Access
Server’s IP masquerading module, source port numbers are mapped to
connections.
132 AVM Access Server – Glossary
“Well-known ports” are destination port numbers that are reserved for
common network services and applications by IANA, the Internet Assigned
Numbers Authority. Well-known ports are in the range from 1 to 1023.
PPP over ISDN (Point-to-Point Protocol)
A communication protocol for circuit-switched networks such as ISDN
that provide protocol-independent communication on ISO OSI Layer 2.
PPP over ISDN incorporates a collection of subordinate standards and
protocols. These describe the structure of data transport for a variety of
networks. These standards are primarily intended to provide interoperability, ensuring that different manufacturers’ devices with different
sets of features can communicate by a uniform method. PPP over ISDN
is specified in RFC 1618.
Proxy ARP
Proxy ARP is not a protocol, but rather an extension of the AVM Access
Server that responds to ARP requests for remote hosts on the basis of
the current routing table. The AVM Access Server answers ARP requests
in place of the host actually addressed by the IP number, if that host is
connected over ISDN. This allows the remote users and networks connected to the LAN over ISDN to share the same IP address range as the
AVM Access Server’s LAN subnet. The result is a simpler network configuration.
RADIUS (Remote Authentication Dial-In User Service)
A standard IP-based service for authentication and accounting (i.e., recording of cost and use data) for dial-in users. When a remote user dials
in, the AVM Access Server forwards a query with the user’s name and
password to the RADIUS server. This server performs the authentication
check and returns confirmation, along with a number of configuration
parameters for the user's connection, such as an IP address. The RADIUS
protocol is defined in RFC 2058, and RADIUS accounting in RFC 2139.
RIP (Routing Information Protocol)
The Routing Information Protocol (RIP) is used by routers to exchange
network configuration information (for IP and IPX). A RIP router is a
computer or other hardware component that forwards IP packets between connected networks, and shares its routing information, such as
network addresses. RIP allows the router to exchange route information with other routers in the network environment. When a router detects any change in the structure of the internetwork (such as another
AVM Access Server – Glossary 133
router becoming unavailable, for example), it forwards this information
to the surrounding routers. Furthermore, a RIP router sends broadcasts
at regular intervals to publish its entire database of routing information. These broadcasts ensure that all routers in the internetwork are
synchronized.
Route
A route is the path traveled by a data packet through the network from
its source to its destination. A return route is also necessary in order for
the receiver to send a response.
Short-Hold Mode
Short-Hold Mode refers to the physical interruption of idle ISDN connections after a specified delay. The ISDN link incurs connection charges whenever a B channel is connected, regardless of whether data is
actually being transported or not. Because an ISDN connection can be
dialed up very quickly (in 1 to 2 seconds), it makes sense to clear down
the physical ISDN connection temporarily when no data is sent for a
certain time. The logical ISDN connection is maintained in accordance
with the configuration settings. As soon as new data is queued for
transmission, the physical connection is dialed up again in the background. This mechanism is transparent to the network user.
SMTP (Simple Mail Transfer Protocol)
SMTP is a standard protocol for exchanging e-mail between computers.
SMTP implementations listen on TCP port 25. The protocol structure is
simple, supporting only e-mail transmission over a data network. SMTP
is defined in RFC 821.
Spoofing
“Spoofing” in data communication means to send data with a false
source address, pretending to be from a different system.
Several network applications are known to exchange data packets that
can cause frequent, unnecessary physical connections when operated
over ISDN WAN links. Some packet types, in particular those used by
Windows file and printer sharing, require acknowledgement from the remote system. The AVM Access Server cannot simply filter such packets
out of the data stream going over the ISDN link, since without the response the server would consider the client application to be inactive.
134 AVM Access Server – Glossary
The responses are therefore “spoofed”, or generated at the local end
using the remote client’s source address. If the ISDN connection is
physically active, the packets can be sent over the ISDN line. As soon
as the physical connection is interrupted by the inactivity timeout, and
as long as the logical ISDN connection persists, the remote access software answers the packets locally, simulating the existence of a physical connection to the remote site. Once the physical ISDN connection
has been dialed up again due to user data, spoofing stops and the
overhead packets are transported over ISDN again.
The spoofing mechanisms to be used are negotiated with the remote
client on connection set-up in accordance with the PSCP Draft. If the remote client does not support spoofing, the function is not activated.
Subnet mask
Subnet masks are used in “classless inter-domain routing” (CIDR) to
define a non-standard boundary between the host address and network address components of an IP address. The network address is the
part of the address that is the same for all nodes in a network. The subnet mask is composed of ones in the positions of all network address
bits and zeroes in the positions of all host address bits. Subnet masks
are written either in dotted-decimal notation, like the IP address itself
(example: 192.168.10.1/255.255.255.0), or simply as the number of
one-bits in the mask (192.168.10.1/24). For example, a Class A Internet
address, which has a standard network address component of eight
bits (i.e., the subnet mask 255.0.0.0), can be used with a subnet mask
of 16 bits (255.255.0.0) as a quasi-Class B address, or with a 24-bit
AVM Access Server – Glossary 135
subnet mask (255.255.255.0) as a quasi-Class C address. An individual
IP host address can also be considered as a network address with a 32bit subnet mask.
The table below shows the number of host addresses in a subnetwork
for subnet masks used by the Access Server.
Host addresses Addresses in subnet Mask (one-bits) Mask (dotteddecimal)
000-255
256
24
255.255.255.0
000-127
128-255
128
25
255.255.255.128
000-063
064-127
128-191
192-255
64
26
255.255.255.192
000-031
032-063
064-095
096-127
128-159
160-191
192-223
224-255
32
27
255.255.255.224
000-015
016-031
032-047
048-063
064-079
080-095
096-111
112-127
128-143
144-159
160-175
176-191
192-207
208-223
224-239
240-255
16
28
255.255.255.240
136 AVM Access Server – Glossary
Host addresses Addresses in subnet Mask (one-bits) Mask (dotteddecimal)
000-007
008-015
016-023
024-031
032-039
040-047
048-055
056-063
064-071
072-079
080-087
088-095
096-103
104-111
112-119
120-127
128-135
136-143
144-151
152-159
160-167
168-175
176-183
184-191
192-199
200-207
208-215
216-223
224-231
232-239
240-247
248-255
8
29
255.255.255.248
Subnet masks in the AVM Access Server
TCP (Transmission Control Protocol)
TCP is a connection-oriented protocol for use over packet-oriented networks. TCP builds directly on the Internet Protocol (IP) and provides virtual connection services for assured, sequenced transport of user data. TCP provides a reliable connection between two systems. TCP is
specified in RFC 793.
AVM Access Server – Glossary 137
TCP/IP address: see “IP address” on page 127
Tunneling
Tunneling is a technique in which the packets of a given protocol are
transparently transported in those of another protocol. The resulting
transparent connection between the endpoints of the transport is
called a tunnel. The data packets of the transported protocol are encapsulated for transport in those of the second protocol. At the other
end of the tunnel, the encapsulated packets are extracted again.
VPN (Virtual Private Network)
Generic name for secure logical networks based on virtual connections.
A virtual private network is a wide-area network accessible only to
members of a given company or organization, but transported over the
existing infrastructure of a publicly available network.
Virtual private networks use tunneling, a technique in which the packets of a given protocol transparently transported in those of another
protocol. See also “Tunneling” on page 138.
UDP (User Datagram Protocol)
This protocol, situated in Layer 4 (the Transport Layer) of the OSI reference model, provides applications with a transaction-oriented packet
transport service. UDP includes only minimal protocol mechanisms for
communication between systems. Unlike TCP, UDP does not provide
end-to-end transmission monitoring: the sender has no assurance that
the addressee has received a given packet, nor is the sequence of
packets preserved. UDP is defined in RFC 768.
138 AVM Access Server – Glossary
Index
A
F
active IP routes 39
ADSL 8
AVM Access Server
uses 7
AVM Support 114
AVM support
sources of information 114
support by e-mail 117
support by fax 117
filters 58
destination-specific input filters 59
destination-specific output filters 59
firewall 58
forwarding filter 59
global input filter 59
global output filter 59
IP filter profiles 62
IP filters 58
firewall 58
forwarding profiles 75
B
B-channel reservations
78
C
CAPI 2.0 applications 13
certificates 91
channel bundling 9
compression techniques 94
configuration view 34
connect 37
connect and disconnect 37
connection control 36, 37
COSO (Charge One Site Only): see Cost assignment
cost assignment (COSO, Charge One Site
Only) 80
G
glossary 119
GSM 9
H
header compression
9
I
data compression 9
database management 43
databases 43
DDI (direct dial-in): see extension number (DDI)
disconnect 37
dynamic DNS 95
dynamic routing 78
installation and initial configuration
interoperability 111
IP filter profiles 62
IP filters 58
IP masquerading 74
forwarding profiles 75
IP routes 39
IPsec 83
transport protocols 87
ISDN
logical connection 10
physical connection 10
point-to-multipoint BRI 9
point-to-point BRI 9
utilization 8
E
L
D
events 40
extension number (DDI)
13
literature 115
logical ISDN connection
15
10
AVM Access Server – Index 139
M
S
menus 31
monitoring functions 36
events 40
ISDN B channels 39
packet trace 43
routing table 39
use statistics 40
monitoring view 36
monitoring: see monitoring functions
MSN: see multiple subscriber number
Multiple Subscriber Number 13
schedules 79
static routing 78
statistics functions
status 37
support 114
T
toolbar 33
transport protocols
tunnel 81, 82
87
U
N
negotiation 89
network protocols
Ntr.mdb 43
Ntrlog.mdb 43
13
use statistics
77
P
packet trace 43
physical ISDN connection 10
point-to-multipoint BRI 9
point-to-point BRI 9
PPP over ISDN 111
priority 79
product variants 14
product version 37
R
remote networks
B-channel reservations 78
remote users and networks
cost assignment (COSO) 80
priority 79
schedules 79
removing 29
RFCs, supported 111
routing
dynamic 78
static 78
routing table 77
140 AVM Access Server – Index
40
V
Virtual Private Network (VPN) 81
certificates 91
compression techniques 94
IPsec 83
negotiation 89
protocols 83
security 83
transport protocols 87
tunnel 81, 82
VPN: see Virtual Private Network (VPN)
W
window 30
configuration view 34
menus 31
monitoring view 36
toolbar 33