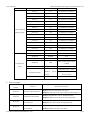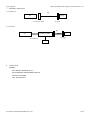
1
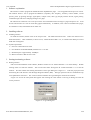
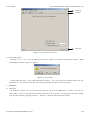
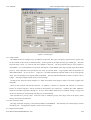
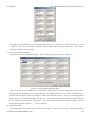
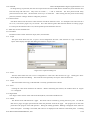
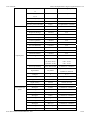
User’s Manual
TITAN III Alphanumeric Pager Program Software v.3.2
TITAN III FLEX Alphanumeric
Pager Program Software v.3.2
User’s Manual
2004. 5.
SUN TELECOM INTERNATIONAL, INC.
1/18
User’s Manual
TITAN III Alphanumeric Pager Program Software v.3.2
Contents
1
Software explanation
2
Installing software
3
4
2.1
Installing software
2.2
System requirements
Starting/terminating software
3.1
Starting software
3.2
Terminating software
Functions
4.1
Main panel
4.1.1 Address frame
4.1.2 PLL Frequency frame
4.1.3 Pager Password frame
4.1.4 Serial Number (SN)
4.1.5 Inventory Control Number
4.2
Option panel
4.2.1 Options frame
4.2.2 Error Message Indicator frame
4.2.3 Private Time frame
4.2.4 Power Up Greeting frame
4.2.5 Signal Phase frame
4.2.6 Collapse frame
4.2.7 Mail Type frame
4.2.8 Display Timeout frame
4.2.9 Signal Polarity frame
4.3
Messages panel
4.3.1 Canned Message panel
4.3.2 Source Stamping Message panel
4.4
Configuration panel
4.4.1 Parallel Port frame
4.4.2 Serial Port frame
4.4.3 Log In Password frame
4.4.4 Interval frame
4.4.5 Read Data Format frame
4.5
Menu bar, Tool bar and Status bar
4.5.1 File menu
4.5.1.1 Open
4.5.1.2 Save
4.5.1.3 Print
4.5.1.4 Exit
SUN TELECOM INTERNATIONAL, INC.
2/18
User’s Manual
4.5.2 Pager menu
TITAN III Alphanumeric Pager Program Software v.3.2
4.5.2.1 Read
4.5.2.2 Write
4.5.2.3 Auto Write
4.5.2.4 Write Info
4.5.3 Setting menu
4.5.3.1 Option
4.5.3.2 Message Box
4.5.3.3 Configuration
4.5.4 Help menu
4.5.4.1 About Titan III FLEX
4.5.5 Tool bar
4.5.6 Status bar
5
Default values of parameters and their allowed ranges
6
Error messages
7
Hardware connection
8
7.1
Parallel Port
7.2
Serial Port
Contact Info
SUN TELECOM INTERNATIONAL, INC.
3/18
User’s Manual
TITAN III Alphanumeric Pager Program Software v.3.2
1. Software explanation
This software is used to program the TITAN III FLEX Alphanumeric pager. It is an upgrade from the previous version.
The software allows a user to program the addresses (Capcodes), PLL frequency, Inventory control number, various
options, power up greeting message, signal phase, collapse value, mail type, display timeout interval, signal polarity,
canned messages and source stamping messages of a pager.
The software has a function to let a user preview the write information before writing to a pager and print it out. It has
an auto write function so a user can write many pagers automatically. In addition, a user is able to read data from a pager,
save the data to a file, and load the file for future use.
2. Installing software
2.1 Installing software
To install the software, double click on the setup.exe file. The Install Wizard will start. Follow the instructions to
install the software. After installation, a short-cut icon, ‘TITAN III FLEX PPS v.3.2’, is created on the desktop as well as
under Start
Programs.
2.2 System requirements
Processor: Intel Pentium or better
OS: Windows 95/98/2000/XP/ME, Windows NT 3.1 or later
Hard disk space: Approximately 10 MBytes
Monitor resolution: Best at 1024 x 768
3. Starting/terminating software
3.1 Starting software
After successful installation of the software, Windows creates an icon ‘TITAN III FLEX v.3.2’ on the desktop. Double
clicking of the icon starts the software. You can also select Start
Programs
‘TITAN III FLEX v.3.2 ’ to start the
software. The first window after starting the software is the Log In dialog box <Figure 3.1>. Enter the proper password
and clicking the “OK” button to start the Pager Program Software (PPS). The login password can be a combination of up
to 10 alphanumeric characters. The “Cancel” button terminates the Log In dialog box and exits the software.
<Figure 3.2> shows the main panel that appears after clicking the “OK” button on the Log In dialog box with the
correct password.
<Figure 3.1> Log In dialog box
SUN TELECOM INTERNATIONAL, INC.
4/18
User’s Manual
TITAN III Alphanumeric Pager Program Software v.3.2
Menu bar
Tool bar
Status bar
<Figure 3.2> Main PPS start-up screen
3.2 Terminating software
Selecting “Alt + X”, the ‘X’ on the right top corner of the window, or File Exit terminates the software. When
terminating the software, <Figure 3.3> appears.
<Figure 3.3> Exit window
Clicking either the “Yes” or “No” button terminates the software. The “Yes” button saves the data, whereas the “No”
button does not. The “Cancel” button does not terminate the software and go back to the main panel.
4.
Functions
4.1 Main panel
As displayed in <Figure 3.2>, the user must read a pager or open a saved configuration to continue. Once the user
reads a pager or opens a saved configuration the main panel shows all the options. The main panel controls the address
(Capcode), PLL frequency and pager password. <Figure 4.1> shows the main panel of the software.
SUN TELECOM INTERNATIONAL, INC.
5/18
User’s Manual
TITAN III Alphanumeric Pager Program Software v.3.2
<Figure 4.1> Main panel
4.1.1 Address frame
The address frame can configure up to 16 addresses (Capcodes), their types, and priority option (Priority options may
not be available on all versions of Titan III FLEX). Each Capcode can be either Personal type or Mail type. The short
Capcode range is from 1 to 1933312 and from 1998849 to 2031614. The long Capcode range is from 2101249 to
4291000000. It is recommended not to use from 3223326721 to 4291000000 on the long Capcode range due to FLEX
protocol. Short Capcodes can be specified in any of the 16 Capcode fields. Long Capcodes must be specified in an
odd numbered field. As you can see in <Figure 4.1>, the third and fifteenth Capcode fields are in the long Capcode
range. The Corresponding even Capcode fields are disabled. The first Capcode field must be used to be able to write to
a pager. Entering an illegal Capcode causes an error message.
Clicking on the “Personal” button changes it to “Mail” and another click changes it back to “Personal” (toggles back
and forth).
There are auto increase and decrease functions. If ‘Address 1’ check box is checked, and ‘Increase’ or ‘Decrease’
buttons are clicked, Capcode 1 will be increased or decreased by one, respectively. Checking the ‘Other Addresses’
check box will affect Capcodes 2 through 16. If one or both of these check boxes are checked, writing to a pager will
increase or decrease the corresponding Capcode(s) by one automatically.
Each Capcode has a priority option. If the user wants to enable the priority, then simply click on the priority check
mark in front of the Capcode field.
4.1.2 PLL Frequency frame
The range of the PLL frequency is from 929.0125 MHz to 932.0000MHz. The fractional part of the frequency must be
divisible by 125. An illegal PLL frequency causes an error message.
4.1.3 Pager Password frame
SUN TELECOM INTERNATIONAL, INC.
6/18
User’s Manual
TITAN III Alphanumeric Pager Program Software v.3.2
To be able to write or read to/from a pager, the correct pager password must be specified. The pager password must
consist of 6 alphanumeric characters. Current PW field must have the correct pager password to write or read to/form a
pager. If the pager password needs to be changed, check the “Replace PW” check box. The edit box is enabled to allow a
new pager password to be entered. If you enter ‘/’, ‘:’ or ‘$’ characters, an error message is displayed.
4.1.4 Serial Number (SN)
The Serial Number field cannot be edited. It only displays the serial number of the pager that was read. When writing
a pager the serial number is ignored.
4.1.5 Inventory Control Number
The Inventory Control Number field can have up to twelve alphanumeric characters. Entering ‘/’, ‘:’ or ‘$’ characters
causes an error message.
4.2 Option panel
The Option panel controls all the available options for the TITAN III FLEX pager. The Option panel consists of
frames for different types of options. To save changes and exit, click the “OK” button. The “Cancel” button exits
without saving any changes. The available options are defined below. Depending on the version of TITAN III FLEX
pager you are programming, the available options will vary.
4.2.1 Options frame
Personal Slot Number: If checked, will show the slot number a personal message is received on. (default: checked)
Mail Slot Number: If checked, will show the slot number a mail drop message is received on. (default: unchecked)
Duplicate Message: If checked and a duplicate message is received, the duplicate icon is displayed for the message.
(default: checked)
Power Up Screen: If checked, the Power Up Greeting message is displayed when the pager is turned on. (default:
checked)
Out of Range Antenna: If checked, an antenna icon is displayed for out of service area. If unchecked, an antenna
icon is displayed for in service area. (default: unchecked)
Low Cell Reminder: If checked, an alert sounds every two hours to indicate a low battery condition. (default:
checked)
Smart Unread: If checked and there are unread messages, there is no reminder alert from 10:00 PM to 08:00 AM of
the next day. If unchecked, reminder alerts sound regardless of the current time. (default: checked)
New Mail Indication: If checked and a pager has a new message, the power on icon blinks in stand by mode. If
unchecked, the power on icon does not blink even if there are new messages. (default: unchecked)
Reminder Default: If checked, the reminder alert is enabled. If unchecked, the reminder alert is disabled. (default:
checked)
Show Source: Displays the address a message was received on at the end of the message. The sources can be
edited in the Source Stamping Message panel. (default: unchecked)
Canned Message: If checked, Canned Messages are enabled. They can be edited in the Canned Message panel.
(default: unchecked)
Note that both of Show Source and Canned Message cannot be enabled at the same time.
Error Message: If checked, the pager displays an ‘E’ indicator in front of the message when the message contains
errors.
SUN TELECOM INTERNATIONAL, INC.
7/18
User’s Manual
4.2.2 Error Message Indicator frame
TITAN III Alphanumeric Pager Program Software v.3.2
The user can select either Underscore or ‘E’ indicator for error message indicator. If the user selects underscore, then
the erred characters will be displayed with the underscore; The ‘E’ indicator simply displays an ‘E’ mark in front of the
message.
4.2.3 Private Time frame
The user can enable or disable the private time option by clicking the check mark on the frame. The user can also set
the Private Time ‘ON’ and ‘OFF’ values.
4.2.4 Power Up Greeting frame
Sets the greeting message when the pager is turned on. It can have up to 16 characters. To change the power up
greeting message, click the “Edit” button. If you enter ‘/’, ‘:’, or ‘$’, an error message is displayed. (default: SUN
TELECOM)
4.2.5 Signal Phase frame
Sets the signal phase of the pager. There are five options: Any Phase, Phase A, Phase B, Phase C and Phase D. It is
recommended not to change this value because the pager may not operate properly with a different setting. (default: Any
Phase)
4.2.6 Collapse frame
Sets the collapse value. This value is related to the battery life. The range of the value is from zero to seven. (default:
four)
4.2.7 Mail Type frame
If set to ‘Update’, each Mail type Capcode will store the most recent message. If set to ‘History’ each Mail type
Capcode will store up to the last 8 messages received. Clicking the button toggles from Update to History to Update.
4.2.8 Display Timeout frame
Sets the time interval before going back to the initial screen of the pager after the user stops pressing buttons. It has
two options: 8 seconds and 12 seconds. Clicking the button toggles from 8 seconds to 12 seconds to 8 seconds. (default:
8 seconds)
4.2.9 Signal Polarity frame
Sets the signal polarity. It can be either Normal or Inverted. It is recommended not to change this value because the
pager may not operate properly with a different setting. (default: Normal)
4.3 Messages panel
There are two panels for messages: Canned Message panel and Source Stamping Message panel.
4.3.1 Canned Message panel
Canned Message panel is displayed when Canned Message is selected from the Option panel. The screen shot of the
panel is shown in <Figure 4.3>.
SUN TELECOM INTERNATIONAL, INC.
8/18
User’s Manual
TITAN III Alphanumeric Pager Program Software v.3.2
<Figure 4.3> Canned Message panel
The number of canned message is ten, and each message can have up to 11 characters. It must not contain ‘$’, ‘/’ and
‘:’ characters. If so, an error message is displayed. To save changes and exit, click the “OK” button. The “Cancel”
button exits without saving any changes.
4.3.2 Source Stamping Message panel
This panel sets the source stamping messages. The screen shot of the panel is shown in <Figure 4.4>.
<Figure 4.4> Source Stamping Messages panel
There are 16 sources corresponded with the 16 Capcodes. If Show Source is selected on the Option panel, the source
stamping message is appended to a new incoming message. For example if Source 1 is set to “Boss” and the message is
received on the first Capcode, then a pager displays “Boss” at the end of the message. Source 2 is connected to second
Capcode, Source 3 is connected to third Capcode, and so on. Each source stamping message can have up to 10 characters.
To save changes and exit, click the “OK” button. The “Cancel” button exits without saving any changes. Source
stamping messages must not contain ‘:’, ‘/’, and ‘$’ characters.
4.4 Configuration panel
The Configuration panel controls the environment of the software. <Figure 4.5> shows the configuration panel. To
SUN TELECOM INTERNATIONAL, INC.
9/18
User’s Manual
TITAN III Alphanumeric Pager Program Software v.3.2
save changes and exit, click the “OK” button. The “Cancel” button exits without saving any changes.
<Figure 4.5> Configuration panel
4.4.1 Parallel Port frame
To use the parallel port for the connection between a pager and a PC, select Parallel Port. LPT is enabled and can be
set to LPT1 or LPT2. When the parallel port is selected, “Check LPT Speed” checks for the fastest communication
speed with a pager. Clicking the ‘Check LPT Speed’ button displays the message box shown in <Figure 4.6>.
<Figure 4.6> Check LPT Speed
Click “Yes” to proceed. While checking the LPT speed a user must not change anything in the software until one of
following two message boxes, shown in <Figure 4.7> and <Figure 4.8>, are displayed.
<Figure 4.7> Fail to check LPT Speed
<Figure 4.8> Success to check LPT speed
4.4.2 Serial Port frame
Select Serial Port to use the serial port to communicate with a pager. To use the serial port, the COM Port and Baud
Rate must be set properly. The COM port can be defined as COM1 through COM20. The Baud Rate can be defined as
9600, 19200, 38400, 57600 or 128000. Because the current version of the serial port buffer supports only a Baud Rate
of 9600, The Baud Rate settings must be 9600. The serial port can be closed and opened manually with the “Open” and
“Close” buttons.
4.4.3 Log In Password frame
SUN TELECOM INTERNATIONAL, INC.
10/18
User’s Manual
TITAN III Alphanumeric Pager Program Software v.3.2
To change the log in password, enter the current password in the Current PW edit box and the new password in the New
PW and Verify PW edit boxes. They must not contain ‘:’, ‘/’ and ‘$’ characters. The New password and Verify
password must be the same. The Password can be up to 10 characters. After entering the New password and Verify
password, click the “Change” button to change the password.
4.4.4 Interval frame
Auto Write Interval sets the interval value when the Auto Write function is used. For example if auto write interval is
set to 10, it will write a pager every 10 seconds. This value must be greater than the time duration of writing a pager.
For serial port the minimum value is 10; and for parallel port the minimum value is 3.
4.5 Menu bar, Tool bar and Status bar
4.5.1 File Menu
File Menu consists of four sub-menus: Open, Save, Print and Exit.
4.5.1.1 Open
The Open menu allows the user to open a saved configuration file with a file extension of *.pgr. Clicking the
“Open” menu displays the Open File Dialog box shown in <Figure 4.10>.
<Figure 4.10> Open File Dialog box
4.5.1.2 Save
The Save menu allows the user to save a configuration to a file with a file extension of *.pgr. Clicking the “Save”
menu displays the Save File Dialog. The saved file can be opened by the “Open” menu for future use.
4.5.1.3 Print
This menu makes a hard copy of the data that is currently specified in the software.
4.5.1.4 Exit
Clicking the “Exit menu terminates the software. Before terminating the software, the window shown in <Figure
3.3> is displayed.
4.5.2 Pager Menu
The “Pager” menu consists of four sub-menus: Read, Write, Auto Write and Write Info.
4.5.2.1 Read
The “Read” menu reads data from a pager. This menu can be executed by pressing the F5 key also. To read the
data from a pager, the pager password must match the password stored in the pager. The progress bar on the main
panel shows the progress of the read operation. During the reading procedure ‘Reading’ is displayed on the status bar
of the main panel. If reading is successful, then ‘Success’ is displayed on the status bar of the main panel. If reading
SUN TELECOM INTERNATIONAL, INC.
11/18
User’s Manual
TITAN III Alphanumeric Pager Program Software v.3.2
fails, ‘Fail’ is displayed on the status bar of the main panel and a separate error message window is displayed. After
successful reading, all fields are updated with the newly read data.
4.5.2.2 Write
The “Write” menu writes data to a pager. This menu can be executed by pressing the F6 key or space bar also.
Before writing the data to a pager, the software checks if there are any invalid values in the Address, PLL Frequency,
and Pager Password frames. The progress bar on the main panel shows the progress of the write operation. During
the writing procedure, ‘Writing’ is displayed on the status bar of the main panel. If writing is successful, ‘Success’ is
displayed on the status bar of the main panel. If writing fails, ‘Fail’ is displayed on the status bar of the main panel and
a separate error message window is displayed.
4.5.2.3 Auto Write
The “Auto Write” menu writes a pager automatically every few seconds as specified by the “Auto Write Interval” on
the Configuration panel. The “Auto Write” menu can be executed by pressing the F7 key also. Clicking the “Auto
Write” menu one more time stops the auto write procedure. Disconnecting the pager from a PC stops the auto write
procedure also. While writing a pager, the progress bar on the main panel shows the progress of the write operation
and the status bar displays ‘Writing’. When the write is complete, ‘Success’ is displayed on the status bar of the main
panel. If writing fails, “Fail” is displayed on the status bar of the main panel and a separate error window is displayed.
When “Success” is displayed on the status bar of the main panel, place another pager in the cradle to write the next
pager.
4.5.2.4 Write Info
The “Write Info” menu displays the data to be written to a pager in the info box shown in <Figure 4.11>. As shown
in <Figure 4.11>, there are two buttons: “Print” and “Close”. Clicking the “Print” button makes a hard copy via a
printer. “Close” button closes the box.
<Figure 4.11> Write Information box
4.5.3 Setting Menu
The “Setting” menu consists of three sub-menus: Option, Message Box and Configuration.
SUN TELECOM INTERNATIONAL, INC.
12/18
User’s Manual
4.5.3.1 Option
TITAN III Alphanumeric Pager Program Software v.3.2
The “Option” menu displays the Option panel shown in <Figure 4.2>.
4.5.3.2 Message Box
The “Message Box” menu displays either the Canned Message panel shown in <Figure 4.3> or the Source Stamping
Message panel shown in <Figure 4.4> depending on the selection of Canned Message or Source Stamping Message in
Option panel.. If neither is selected, the Canned Message panel is displayed.
4.5.3.3 Configuration
The “Configuration” menu displays the Configuration panel shown in <Figure 4.5>.
4.5.4 Help
The “Help” menu consists of only one sub-menu: About Titan III FLEX
4.5.4.1 About Titan III FLEX
The “About Titan III FLEX” menu displays the software about box shown in <Figure 4.12>.
<Figure 4.12> About Titan III FLEX
4.5.5 Tool bar
The Tool bar has nine icons as shown in <Figure 4.13>. From the left they are ‘Open’, ‘Save’, ‘Print’, ‘Read’, ‘Write’,
‘Write Info’, ‘Option’, ‘Message Box’ and ‘Configuration’. This tool bar allows a user to select one of nine listed
menus in a quick manner.
<Figure 4.13> Tool bar
4.5.6 Status bar
The Status bar displays current information. It is located on the bottom of the main panel (see Figure 3.2). The
Progress bar is located on the status bar. The Progress bar shows the progress of reading or writing from/to a pager.
There are two text panes on the right side of the progress bar.
The first one displays ‘Writing’, ‘Reading’, ‘Success’, ‘Fail’ and ‘Timeout’. ‘Writing’ is displayed during a write
procedure, and ‘Reading’ for a read procedure. ‘Success’ and ‘Fail’ shows the result of the writing or reading procedures.
‘Timeout’ is only displayed when the COM port is used to communicate with a pager. ‘Timeout’ is another type of
failure when writing or reading.
The second one displays ‘COM’ when the COM port is selected from the Configuration panel. The software checks
the connection between the PC and serial port buffer every second. If a connection is made, ‘Connect’ is displayed on
the text pane. ‘Disconnect’ is displayed when there is no connection between them. If LPT is selected from the
Configuration panel, then ‘LPT’ is displayed on the text pane.
5. Default value of parameters and their allowed ranges
Panel
Fields
Default
Range
Main panel
Address 1
1234567
Short & Long Capcode
SUN TELECOM INTERNATIONAL, INC.
13/18
User’s Manual
TITAN III Alphanumeric Pager Program Software v.3.2
Address 3, 5, 7, 9, 11, 13,
None
Short & Long Capcode
None
Short Capcode
PLL Frequency
931.0125
929.0125 ~ 932.0000
Pager Password
None
6 characters or numbers
Inventory Control Number
Empty
12 alphanumeric characters
Personal Slot Number
Checked
N/A
Mail Slot Number
Unchecked
N/A
Duplicate Message
Checked
N/A
Show Source
Unchecked
N/A
Canned Message
Unchecked
N/A
Power Up Screen
Checked
N/A
Out of Range Antenna
Unchecked
N/A
Low Cell Reminder
Checked
N/A
Smart Unread
Checked
N/A
New Mail Indication
Unchecked
N/A
Reminder Default
Checked
N/A
Error Message Indicator
‘E’ indicator
‘E’ indicator or underscore
Private Time
Enable
Enable / Disable
On Time: 22:00
0:00 ~ 23:59
Off Time: 07:00
0:00 ~ 23:59
Power Up Greeting
SUN TELECOM
16 characters or numbers
Signal Phase
Any Phase
Collapse
4
0~7
Mail Type
Update
Update, History
Display Timeout
8 seconds
8 seconds, 12 seconds
Signal Polarity
Normal
Normal, Inverted
Message 1
Honey
11 characters or numbers
Canned Message
Message 2
Friend
11 characters or numbers
panel
Message 3
Love you
11 characters or numbers
Message 4
Home
11 characters or numbers
Message 5
Office
11 characters or numbers
Message 6
Congrats
11 characters or numbers
Message 7
Urgent
11 characters or numbers
Message 8
Miss you
11 characters or numbers
Message 9
Good Night
11 characters or numbers
Message 10
Hello
11 characters or numbers
15
Address 2, 4, 6, 8, 10, 12,
14, 16
Option panel
SUN TELECOM INTERNATIONAL, INC.
Any Phase, Phase A, Phase
B, Phase C, Phase D
14/18
User’s Manual
TITAN III Alphanumeric Pager Program Software v.3.2
Source 1
<1>
10 characters or numbers
Source 2
<2>
10 characters or numbers
Source 3
<3>
10 characters or numbers
Source 4
<4>
10 characters or numbers
Source 5
<5>
10 characters or numbers
Source 6
<6>
10 characters or numbers
Source 7
<7>
10 characters or numbers
Source 8
<8>
10 characters or numbers
Source Stamping
Source 9
<9>
10 characters or numbers
Message panel
Source 10
<10>
10 characters or numbers
Source 11
<11>
10 characters or numbers
Source 12
<12>
10 characters or numbers
Source 13
<13>
10 characters or numbers
Source 14
<14>
10 characters or numbers
Source 15
<15>
10 characters or numbers
Source 16
<16>
10 characters or numbers
Parallel Port
Disabled
N/A
LPT
LPT1
LPT1, LPT2
Serial Port
Enabled
N/A
COM Port
COM1
COM1 ~ COM20
Baud Rate
9600
Interval
10
Configuration
panel
9600, 19200, 38400, 57600,
128000
Parallel Port: 3sec ~ 99sec
Serial Port: 10sec ~ 99sec
Read Data Format
Window
Format
Screen
Text File Format, Window
Screen Format
6. Error messages
Error Message
Number
Error 101
Contents
Incorrect Login password.
Reason and Response
Reason: Incorrect login password is given
Response: Enter the correct login password (case-sensitive)
Error 102
Load file has been failed.
Reason: Specified file is not for TITAN III FLEX
Response: Make sure the file is for TITAN III FLEX
Error 103
Error 104
Pager password must consist
Reason: Pager password is not given, or it is not 6 characters.
of 6 characters.
Response: Give the 6-character pager password.
New and Verify passwords
Reason: New and verify passwords are different.
do not match.
Response: Make sure they are the same.
SUN TELECOM INTERNATIONAL, INC.
15/18
User’s Manual
Error 105
Error 106
Error 107
Error 108
Error 109
TITAN III Alphanumeric Pager Program Software v.3.2
You have entered an illegal
Reason: Illegal characters are entered where prohibited.
character.
Response: Delete illegal characters.
You have entered an illegal
Reason: Illegal Capcode is entered.
Capcode.
Response: Check the Capcode range.
You have entered an illegal
Reason: Illegal PLL frequency is entered.
PLL frequency.
Response: Check the PLL frequency
Error while creating
Reason: Error for using serial port.
ThreadWatchComm.
Response: Terminate software and start again.
Queue is full.
Reason: Error for using serial port.
Response: Terminate software and start again.
Error 111
First Capcode must be used.
Reason: Writing to a pager with empty first Capcode.
Response: Use the first Capcode.
Reason: Error for using serial port.
Error 112
Fail to initialize COM port.
Response: Open COM port manually from Configuration
panel.
Reason: Trying to open another COM port while one of the
Error 113
Port is already opened.
COM port is opened.
Response: Close the COM port first, and open it.
Reason: The serial buffer does not respond to PC
Error 114
Timeout.
Response: Check if Serial Port is selected on Configuration
panel. Check if the serial buffer is turned on and connected
to PC.
Reason: While writing/reading a pager via serial port, data is
Error 115
Data is corrupted during the
corrupted.
transmission.
Response: Check the connection between a PC and the serial
buffer.
Reason: Trying to write or read a pager while COM port is
Error 116
COM port is not opened.
not opened.
Response: Open the COM port from Configuration panel.
Minimum auto write interval
Error 117
for COM port is 10 seconds.
Minimum auto write interval
for LPT is 3 seconds.
Error 118
EEPROM is empty.
Reason: Entered the number less than minimum allowed
interval value.
Response: Change the interval value.
Reason: There is no data on EEPROM for a pager.
Response: The pager must be replaced.
Reason: Given pager password does not match with the
Error 119
You entered wrong pager
password that pager has.
password.
Response: Check the pager password and enter the correct
password.
SUN TELECOM INTERNATIONAL, INC.
16/18
User’s Manual
Error 121
Error 122
TITAN III Alphanumeric Pager Program Software v.3.2
Error during initialization of
Reason: Error for using parallel port.
parallel port.
Response: Terminate software and run again.
Failure during writing
procedure via LPT
Reason: Error during writing procedure via LPT.
Response: Check the connection and try again. Or, do the
Check LPT Speed on Configuration panel.
Reason: This software only writes/reads to/from TITAN III
Error 123
Titan version is different.
FLEX pager.
Response: Check the pager model name and make sure it is
TITAN III FLEX.
Error 125
Failure during reading
procedure
Reason: Bad connection while reading a pager
Response: Check the connection between a PC and a pager
and try again.
Inventory Control Number
Error 127
must consist of 12
alphanumeric characters
Error 128
Pager is not connected.
Check the cable connection
Reason: 12 characters are not specified on this field
Response: Either leave the field blank or enter 12 characters
Reason: The cable (jig) is not firmly connected to pager
Response: Check the cable connection and hold down the jig
to the pager firmly
Reason: The EEPROM data has been corrupted.
Error 129
Pager Firmware version
Response: Insert battery into the pager and wait until the
does not match
pager starts up. Then try to read the pager again via the
PPS. If it does not work, then the pager must be replaced.
Pager F/W version
Error 130
mismatches. Please read
the pager again.
SUN TELECOM INTERNATIONAL, INC.
Reason: The version of the pager you try to write
mismatches that of PPS has.
Response: Read the pager again so that the PPS updates the
pager version information.
17/18
User’s Manual
TITAN III Alphanumeric Pager Program Software v.3.2
7. Hardware connection
7.1 Parallel Port
jig
PC
Pager
To LPT1 or LPT2
To pager
7.2 Serial Port
jig
PC
Serial Port buffer
Pager
To pager
To COM port
Power
8. Contact Info
Company
Sun Telecom International, Inc.
5875 Peachtree Industrial Blvd Suite 160
Norcross, GA 30092
TEL: 678 720 0303
SUN TELECOM INTERNATIONAL, INC.
18/18