1
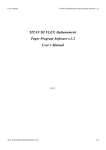
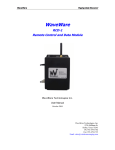
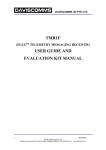
I.
II.
PAGER DIAGRAM
A.
“Up” key
B.
“Down” key
C.
“Function” key
D.
“Read/Confirm” key
E.
Display Screen
Symbols Illustration
Battery Full Indication
Receiving Range Display
Low Battery Indication
1
Sound Alert Display
Mute Display
Vibration Alert Display
Beep + Vibrate Display
CHARGING
and
animated
icons
displayed when the pager is charging.
2
(bars):
CHARGING COMPLETED and three bars on
display when battery is fully charged.
CANNOT CHARGE and no icons: no battery,
wrong battery type or fault.
3
EXTERNAL POWER FAIL and no icons: when
power has been removed from the nightstand.
III.
Operation
1) Insert an AA type battery (1.2V NiMh
rechargeable or 1.5V alkaline) into the
battery compartment, observing the polarity
diagram provided in the base of the
compartment. Replace the battery cover and
fit the locking screw. Note: the pager will
emit two short beeps when the battery is first
inserted. The pager is NOT yet switched on.
4
2) To switch the pager On, press the
Read/Confirm key briefly. After two seconds
the
pager
“Welcome”
screen
will
be
displayed and the pager will beep for the set
duration. The pager is now ready to receive
calls.
Note:
if
the
pager
has
been
programmed in “battery save” mode, the
display will blank after a short while. The
pager is still able to receive calls in this mode
and the display can be re-activated simply by
pressing any key.
Use the [FUNCTION] key to cycle through the
four main menus:
5
(1) the Welcome menu which appears upon
power up. The top line shows the preprogrammed Welcome message, whilst the
bottom line shows the current time and date.
(2) & (3) the public message menus. These list
the active public message folders (these menus
are only visible when the pager is set for wide
area paging, they will be omitted when pager is
set for Scope paging).
(4) the utilities menu. This allows access to the
following functions:
6
Time/Date, Capcodes On/Off, Alarm, Display
Contrast, Zoom, Alerts, Pager Off (see
Section IV for full details).
3) Reading Private Messages
3.1 Reading Messages
Press the [READ] key whilst at the Welcome
menu.
The highlighted number means the message is
unread.
7
Press [READ] again to read the whole message
and other earlier messages.
You may also use the [UP] and [DOWN] key to
navigate through the messages. At the end of
8
every message, the receiving time and date are
appended alongside the call tone (‘A’, ‘B’, ‘C’,
or ‘D’) whose use is assigned by the paging
service provider. To save memory, messages
with the same content but with different call
tone will be stored as one message with a
reminder tag appended. (i.e. repeated/duplicated
call, the setting depends on how the pager has
been programmed).
3.2 Protecting Or Deleting Messages
Private messages can be deleted to free up
memory space. Important messages can be
protected to avoid accidental deletion. Use the
[READ] / [UP] / [DOWN] key to locate the
message to be protected /deleted and then press
the [FUNCTION] key.
9
Three options are available:
(1) to protect (
(2)to delete (
(3)to delete all (
)the message;
) the message;
) messages.
Use the [UP] / [DOWN] key to choose an
option and then the [READ] key to confirm or
the [FUNCTION] key to exit without choosing
any option.
Note: the pager can be pre-programmed (by
your sales distributor) to present the “Delete
All” icon first on the screen. This allows you to
10
delete all the messages with fewer button
presses. The pager may also be pre-programmed
to inhibit any message deletion. In this mode the
message management menu is omitted.
When a message is protected, it will be placed
at the end of the message queue for ease of
searching, and it may be unprotected (
)
by first locating the message and then pressing
the [FUNCTION] and [READ] key.
11
3.3 High Visibility Backlight
The pager provides a backlight for reading
messages in poor light. At any screen when the
pager is on, holding the [FUNCTION] key for
two seconds will turn the backlight on. The
backlight will remain on until a key is pressed
and held. The user may turn off the backlight
explicitly by holding the [FUNCTION] key for
another two seconds. The pager can also be preprogrammed
by
your
distributor
to
automatically switch the backlight on when a
message is received or when any key is pressed.
It should be noted that whilst convenient, this
feature will reduce battery life.
3.4 New And Unread Messages
A message is regarded as unread if the user does
not press any key when it is first received. The
message number for unread messages will be
12
marked in reverse video mode (do not confuse
with message content received with error which
is also marked in reverse video.) When a
message first arrives, it is displayed and the
pager will give an alert tone. The alert can be
stopped by pressing any key. If it is not stopped
during the alert period (the alert time is preprogrammed by your distributor), the message is
treated as an unread message. Note: when a new
message arrives and the memory is full, the last
unprotected message will be deleted to make
room for the new one.
3.5 Power Management
To save power, the LCD screen will go back to
the Opening Screen if there is no key activity
for 8 seconds (the time is pre-programmed by
your distributor). If the pager still does not
detect any key activity for another 4 seconds
13
(again, preprogrammed by your distributor), the
LCD screen will be powered off. In this power
saving mode the pager is still able to receive
messages as usual. If a new message arrives, the
screen will be turned on automatically and the
message will be displayed. The user may also
turn on the screen explicitly by pressing any key.
4) Reading Public Messages
This feature is only available where the pager
has been pre-programmed to receive wide area
(public) messages. It is not applicable to Scope
paging systems, which are private (on-site)
messaging systems.
Press the [FUNCTION] key whilst at the
Welcome menu to go to the public message
menu and then use the [UP] / [DOWN] key to
choose the expected item, then press the [READ]
key.
14
The highlighted number means the message is
unread. Press [READ] again to read the whole
message and other messages down.
The user may also use the [UP] and [DOWN]
key to navigate through the messages. At the
15
end of every message, the receiving time and
date are appended. Public messages may not be
protected or deleted. Note that the paging
service provider may or may not broadcast
public messages and the number of public
messages depends on the service provider.
IV.
Utilities Menu Operation
1) Adjusting The Real-Time Clock
Use the [FUNCTION] key to go to the
utilities menu and then choose the clock
option (
) using the [UP] / [DOWN] and
then the [READ] key.
16
The user may change the time and date. Note
that time format (AM/PM or 24hr) and date
order
(DD/MM
or
MM/DD)
are
pre-
programmed by your distributor.
Use the [DOWN] key to increase the fields and
the [UP] key to decrease. Use the [READ] key
to sequence through the various Fields and save
the changes and exit. To exit without changing,
press the [FUNCTION] key.
2) Switching Cap codes On or Off
Press the [FUNCTION] key to go to the utilities
menu and then choose the capcodes option
(
) with the [READ] key. This allows the
user to disable/enable capcodes (addresses).
Position the cursor against the address number
you wish to change and press the Read key. Use
the UP and DOWN keys to toggle between Tick
17
(ON) or X (OFF). Press Read key to store the
new setting. Press Function key to exit. Note: if
a lock symbol appears to the right of the
capcode, this indicates that the capcode setting
is protected and the user cannot alter the setting.
18
3) Setting The Alarm
Use the [FUNCTION] key to go to the utilities
menu and then choose the alarm option (
)
using the [UP] / [DOWN] and then the [READ]
key.
The user may change the alarm on / off, hour,
minute and time format (AM or PM). Use the
[DOWN] key to increase the field and the [UP]
key to decrease. [READ] key to sequence
through the various fields, then save the changes
and exit. To exit without change, press the
[FUNCTION] key. When the alarm is activated,
19
a bell icon (
) will appear at the bottom right
corner of the screen.
4) Adjusting The LCD Contrast
Use the [FUNCTION] key to go to the utilities
menu and then choose the contrast option
(
) using the [UP] / [DOWN] and then the
[READ] key.
Adjust to the desired contrast using the [UP] /
[DOWN] key and complete by pressing
20
[READ]. Exit without change by pressing the
[FUNCTION] key.
5) Zoom Function
Use the [FUNCTION] key to go to the utilities
menu and then choose the enlarging fonts option
(
) using the [UP] / [DOWN] key and then
confirm by pressing the [READ] key. The fonts
displayed on screen will be enlarged as below:
21
6) Choosing Audio, Vibration Or Mute Alert
Use the [FUNCTION] key to go to the utilities
menu and then choose the alert option using
[UP] / [DOWN] and then [READ] to toggle
between the audio high (
(
) audio low (
audio +vibrate (
), audio mid
), vibration (
) and mute (
22
),
) mode.
7) Switching the Pager Off
Use the [FUNCTION] key to go to the utilities
menu and then choose the power-off option
(
) using the [UP] / [DOWN] key and then
confirm by pressing the [READ] key. Unlike
the power-saving mode, the pager will not
receive any message when it is switched off this
way. Press the [READ] key for one second to
turn on the pager again.
V. Changing Battery/Battery Charge
When the battery icon (
) is shown and the
“LOW BATTERY” notice appears on the
screen, the battery is nearly exhausted and
should be changed (for alkaline) or charged (for
NiMh) as soon as possible (within 4-8 hours).
23
Change the battery by switching off the pager,
removing the battery door screw, opening the
battery door and removing the old battery.
Replacement is a reversal of the above
procedure. The messages will be kept for
minimum 15 minutes when the battery is
removed.
Battery Charging: if a NiMh AA Battery is
fitted, when the battery icon (
) is shown and
the “LOW BATTERY” notice is displayed,
place
the
pager
in
the
Charger
until
“CHARGING COMPLETED” is shown on the
screen (usually about 2 hours).
24
VI. Specifications
Display small fonts: 21 characters, 8 Lines
Display large fonts: 17 characters, 4 lines
Storage:
Battery:
20,000 English characters
1 x AA NiMH rechargeable or AA
alkaline battery
Weight:
100g with battery
Private messages: 60 (30 can be protected)
Public messages: 100 maximum
Typical battery life:
>30 days (based on 8
messages received per day)
Dimensions: 79 x 54 x 25 mm
25
VII.
Precautions
1. Avoid humidity. Never let water or other
liquids gets into the unit.
2. Keep away from sources of heat.
3. Remove the battery if the unit is not in use for
periods of greater than one month. Use only
proprietary
brand
alkaline
or
NiMH
(rechargeable) batteries.
4. Do not subject the unit to undue shock, stress
or strong impact.
5. To clean the unit, use only a soft dry cloth.
Do not use strong cleaning agents or other
liquid detergents.
6. Do not touch the screen with sharp objects.
7. Do not attempt to repair the unit yourself.
All upgrade editions are subject to change
without further notice. Due to our policy of
continuous improvement there may be some
minor differences between the contents stated in
26
this User Manual and the actual operation of the
product. E & OE.
CE Declaration of Conformity for Pager
84ZAA
The Manufacturer hereby declares that the
equipment identified above and to which this
Declaration relates conforms with the protection
requirements of Council Directive 89 / 336 /
EEC on the approximation of the laws of the
Member States relating to electromagnetic
compatibility.
Changes
or
modifications
not
expressly
approved by the Manufacturer could void the
user’s authority to operate the equipment and
invalidate any warranty.
27
FCC Statement: Class ‘B’ Digital Device
This device complies with Part 15, of the
FCC Rules. Operation is subject to the
following two conditions: (1) this device
may not cause harmful interference, and (2)
this device must accept any interference
received including interference that may
cause undesired operation.
Changes or modifications not expressly
approved by the Manufacturer could void
the user’s authority to operate the
equipment.
28