1
P
r
i
n
t
P
A
D
P r i n t
P A D
© 2002 SYMBOL TECHNOLOGIES, INC. All rights reserved.
Symbol reserves the right to make changes to any product to improve reliability,
function, or design.
Symbol does not assume any product liability arising out of, or in connection with, the
application or use of any product, circuit, or application described herein.
No license is granted, either expressly or by implication, estoppel, or otherwise under
any patent right or patent, covering or relating to any combination, system,
apparatus, machine, material, method, or process in which Symbol products might
be used. An implied license exists only for equipment, circuits, and subsystems
contained in Symbol products.
Symbol and the Symbol logo are registered trademarks of Symbol Technologies, Inc.
Other product names mentioned in this manual may be trademarks or registered
trademarks of their respective companies and are hereby acknowledged.
Symbol Technologies, Inc.
One Symbol Plaza
Holtsville, N.Y. 11742-1300
http://www.symbol.com
Q u i c k
R e f e r e n c e
Introduction
The PrintPAD provides portable printing in the most rugged
environments with Symbol portable terminals (SPT 1700/1800,
PPT 2700/2800, PDT 8000 and PDT 8100). Portable printing
enables the production of hard copy back-ups of digital information
and signature printing, as well as the generation of receipts or
tickets for your mobile computing applications.
About This Guide
This guide describes how to set up and use the printer. Specific
topics covered include:
•
•
•
•
•
•
•
•
•
Parts of the Printer on page 2
Charging the Batteries on page 3
Inserting the Terminal on page 4
Installing Paper on page 4
Charge LED Indications on page 6
Replacing Batteries on page 7
Supplies on page 7
Regulatory Information on page 8
Service Information on backcover.
For detailed information on portable terminals, see the Quick
Reference Guide or Product Reference Guide for the terminal.
1
P r i n t P A D
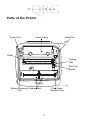
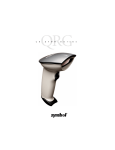
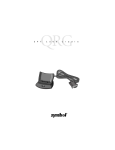
Parts of the Printer
Power Port
Paper Cavity
Data Port
Roller
Charge
LED
Self Test
Button
Battery Retaining Battery Well
Clip
Print Head
Release Level
2
Q u i c k
R e f e r e n c e
Preparing the Batteries for Operation
Caution:
Remove the battery insulation label before operating
the printer.
The PrintPAD ships with two batteries installed. Prior to operation,
remove the two red isolator labels.
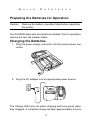
Charging the Batteries
1. Plug the power supply connector into the printer power connector.
2. Plug the AC adapter into an appropriate power source.
The Charge LED turns red when charging and turns green when
fully charged. A complete charge will take approximately 6 hours.
3
P r i n t P A D
You can determine the relative battery capacity by printing a selftest, see “Printing a Self-Test” on page 6. On the printout, “Battery
Volt” will vary between 6.8 volts and 8.4 volts.
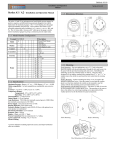
Inserting the Terminal
There are three PrintPAD
configurations that accepts the
following terminals:
•
PPT 2700, PPT 2800,
SPT 1700 and SPT 1800
Series terminals
• PDT 8100 Series terminals
• PDT 8000 Series terminals.
Insert the terminal into the
cavity and press down until the
terminal is firmly seated.
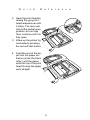
Installing Paper
End of Roll
1. Press a new roll of paper into the paper cavity. Ensure the end of
the roll exits from the
bottom of the paper
cavity.
4
Q u i c k
R e f e r e n c e
2. Open the print head by
raising the grey print
head release lever until
it stops. The lever will
click at the partial open
position, do not stop
here, continue until it is
fully open.
3. Wake up the printer by
momentarily pressing
the red self-test button.
4. Feed the end of the paper into the paper entrance (under the black
roller) until the paper
exits the top of the print
head. Ensure the paper
exits straight.
5
P r i n t P A D
5. Lower the grey print
head release lever.
6. Feed the paper end
through the printer cover.
7. Close and latch cover.
Printing a Self-Test
Open the printer cover and
press the red self-test button
until the printer starts to print.
Once printing starts release
the self-test button.
Charge LED Indications
Charge LED
State of Charge
Action
Solid Red
Charge in progress.
Green
Charge completed.
None
Red flash – slow
Battery is too cold.
Battery is disconnected.
Change environment.
Connect battery.
Red flash – fast
High temperature.
Change environment.
Red/orange – slow
Battery voltage very low.
Wait for solid red. Restart
charge.
Red/orange – fast
Battery not connected.
Connect Battery.
Orange flash – slow
Charge Timeout.
Restart Charge.
6
Wait for green LED
Q u i c k
R e f e r e n c e
Replacing Batteries
1. Open the printer by unsnapping the latch on the front of the
case.
2. Remove the batteries by pressing the retainer clip outward
with thumb. While pressing the retainer clip, lift the outside
end of the battery past the retainer clip.
3. Remove the red insulation label from each new battery.
4. Insert new batteries. Ensure the battery contacts are facing
down and are on the outside edge of the printer.
Supplies
Use only supplies certified by the Original Equipment
Manufacturer (OEM). For OEM supplies, please contact O’Neil
Printer Supplies Group at 949-458-6400 or Symbol Customer
Support Center.
7
P r i n t P A D
Regulatory Information
All Symbol devices are designed to be compliant with rules and regulations in
locations they are sold and will be labeled as required.
Any changes or modifications to Symbol Technologies equipment, not expressly
approved by Symbol Technologies, could void the user’s authority to operate the
equipment.
Radio Frequency Interference Requirements
Note: This equipment has been tested and found to
comply with the limits for a Class B digital device,
Tested to comply
pursuant to Part 15 of the FCC rules. These limits are
with FCC Standards
designed to provide reasonable protection against
FOR HOME OR OFFICE USE
harmful interference in a residential installation. This
equipment generates, uses, and can radiate radio
frequency energy and, if not installed and used in accordance with the instructions,
may cause harmful interference to radio communications. However there is no
guarantee that interference will not occur in a particular installation. If this equipment
does cause harmful interference to radio or television reception, which can be
determined by turning the equipment off and on, the user is encouraged to try to
correct the interference by one or more of the following measures:
• Reorient or relocate the receiving antenna
• Increase the separation between the equipment and receiver
• Connect the equipment into an outlet on a circuit different from that to which the
receiver is connected
• Consult the dealer or an experienced radio/TV technician for help.
Radio Frequency Interference Requirements - Canada
This Class B digital apparatus complies with Canadian ICES-003.
Cet appareil numérique de la classe B est conforme à la norme NMB-003 du Canada.
Marking and European Economic Area (EEA)
Statement of Compliance
Symbol Technologies, Inc., hereby declares that this device is in compliance with all
the applicable Directives, 89/336/EEC, 73/23/EEC. A Declaration of Conformity may
be obtained from http://www2.symbol.com/doc/.
8
Q u i c k
R e f e r e n c e
Warranty
(A) Seller's hardware Products are warranted against defects in workmanship and
materials for a period of twelve (12) months from the date of shipment, provided the
Product remains unmodified and is operated under normal and proper conditions.
Warranty provisions and durations on software, integrated installed systems, Product
modified or designed to meet specific customer specifications ("Custom Products"),
remanufactured products, and reconditioned or upgraded products, shall be as
provided in the applicable Product specification in effect at the time of purchase or in
the accompanying software license. (B) Products may be serviced or manufactured
with parts, components, or subassemblies that originate from returned products and
that have been tested as meeting applicable specifications for equivalent new
material and Products. The sole obligation of Seller for defective hardware Products
is limited to repair or replacement (at Seller's option) on a "return to service depot"
basis with prior Seller authorization. Shipment to and from Seller will be at Seller's
expense, unless no defect is found. No charge will be made to Buyer for replacement
parts for warranty repairs. Seller is not responsible for any damage to or loss of any
software programs, data or removable data storage media, or the restoration or
reinstallation of any software programs or data other than the software, if any,
installed by Seller during manufacture of the Product. The aforementioned provisions
do not extend the original warranty period of any Product that had either been
repaired or replaced by Seller. (C) The above warranty provisions shall not apply to
any Product (i) which has been repaired, tampered with, altered or modified, except
by Seller's authorized service personnel; (ii) in which the defects or damage to the
Product result from normal wear and tear, misuse, negligence, improper storage,
water or other liquids, battery leakage or failure to perform operator handling and
scheduled maintenance instructions supplied by Seller; (iii) which has been subjected
to unusual physical or electrical stress, abuse, or accident, or forces or exposure
beyond normal use within the specified operational and environmental parameters
set forth in the applicable Product specification; nor shall the above warranty
provisions apply to any expendable or consumable items, such as batteries, supplied
with the Product. EXCEPT FOR THE WARRANTY OF TITLE AND THE EXPRESS
WARRANTIES STATED ABOVE, SELLER DISCLAIMS ALL WARRANTIES ON
PRODUCTS FURNISHED HERUNDER INCLUDING ALL IMPLIED WARRANTIES
OF MERCHANTABLILTY AND FITNESS FOR A PARTICULAR USE. ANY IMPLIED
WARRANTIES THAT MAY BE IMPOSED BY LAW ARE LIMITED IN DURATION TO
THE LIMITED WARRANTY PERIOD. SOME STATES OR COUNTRIES DO NOT
ALLOW A LIMITATION ON HOW LONG AN IMPLIED WARRANTY LASTS OR THE
EXCLUSION OR LIMITATION OF INCIDENTAL OR CONSEQUENTIAL DAMAGES
FOR CONSUMER PRODUCTS. IN SUCH STATES OR COUNTIRES, FOR SUCH
PRODUCTS, SOME EXCLUSIONS OR LIMITATIONS OF THIS LIMITED
WARRANTY MAY NOT APPLY. The stated express warranties are in lieu of all
obligations or liabilities on the part of Seller for damages, including but not limited to,
special, indirect or consequential damages arising out of or in connection with the use
or performance of the Product or service. Seller's liability for damages to Buyer or
others resulting from the use of any Product or service furnished hereunder shall in
no way exceed the purchase price of said Product or the fair market value of said
service, except in instances of injury to persons or property.
9
Service Information
Before you use the unit, it must be configured to operate in your facility’s network and
run your applications.
If you have a problem running your unit or using your equipment, contact your facility’s
Technical or Systems Support. If there is a problem with the equipment, they will
contact the Symbol Support Center:
United States1
1-800-653-5350
1-631-738-2400
Canada
905-629-7226
United Kingdom
0800 328 2424
Asia/Pacific
+65-6796-9600
Australia
1-800-672-906
Austria/Österreich
1-505-5794-0
Denmark/Danmark
7020-1718
Finland/Suomi
9 5407 580
France
01-40-96-52-21
Germany/Deutchland
6074-49020
Italy/Italia
2-484441
Mexico/México
5-520-1835
Netherlands/Nederland
315-271700
Norway/Norge
South Africa
11-8095311
Spain/España
Sweden/Sverige
84452900
Latin America
Sales Support
1-800-347-0178 Inside US
+1-561-483-1275 Outside US
Europe/Mid-East
Distributor Operations
Contact local distributor or call
+44 118 945 7360
1
+47 2232 4375
91 324 40 00
Inside Spain
+34 91 324 40 00
Outside Spain
Customer support is available 24 hours a day, 7 days a week.
For the latest version of this guide go to: http://www.symbol.com/manuals.
72-58261-01
Revision A— October 2002
Symbol Technologies, Inc. One Symbol Plaza, Holtsville, N.Y. 11742-1300