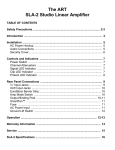
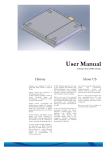
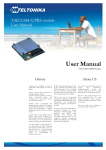
1
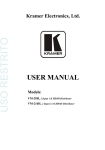
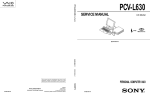
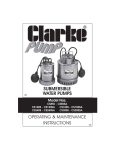
VM11T-DRV
VM11S-DRV
VM8-DRV
VM series Box Type Powered Mixer
OWNER'S MANUAL
ENGLISH
VM11T-DRV
VM11T-DRV
50~350
(msc)
350
~1000(msc)
0
10
DRV DL
0~45
(%)
45~
90(%)
0
DRV FB
10
0.5~3.5
(sec)
3.5~10
(sec)
0
PEAK
DRV RB
REV
DRV MIX
10
DLY
VM-11T DRV
VM-11S DRV
VM-8 DRV
VM series Box Type Powered Mixer
Table Of Contents
1.
2.
3.
4.
5.
6.
7.
8.
9.
Introduction .....................................................................................................
Important Safety Instructions ........................................................................
Warranty Information ....................................................................................
Panel Description ............................................................................................
Connecting Your System ................................................................................
Operating Your System ..................................................................................
System Hookup Diagram ................................................................................
Block Diagrams ...............................................................................................
Specifications ...................................................................................................
2
3
4
5-13
14-15
16-17
18-20
21-23
24-27
Ⅰ Introduction
The new VM-11T DRV, VM-11S DRV and VM-8DRV mixers offer solid, feature-packed performance in a
compact, economical format. The VM-11T DRV, VM-11S DRV features 11 independent channels, while the VM-8
DRV features 8 channels. Each channel incorporates a low impedance, XLR input and a high impedance quarter
inch phone jack input. Separate pre-monitor sends, active high, mid and low equalization, and post DSP/effect
sends are also provided for each channel on the VM versions.
The master section for the VM-DRV versions provides controls for main, monitor, effect send, effect return.
The VM-DRV mixer features seven band equalization. Each models graphic EQ sections offer +/-12 cut/boost
capability.
Each VM-11T DRV, VM-11S DRV features a footswitchable, Digital Effect, while theVM-11T DRV, VM-11S
DRV and VM-8DRV offer linear control Digital Signal Processing (D.S.P.).
The VM-11T DRV, VM-11S DRV and VM8-DRV offer portability, versatility, and dependability.
2
Ⅱ Important Safety Instructions
1. Read Instructions- All the safety and operating instructions should be read before the appliance is
operated.
2. Retain Instructions- The safety and operating instructions should be retained for future reference.
3. Heed Warnings- All warnings on this appliance and in the operating instructions should be adhered to.
4. Follow Instructions- All instructions should be followed.
5. Water and Moisture- This appliance should not be used near water- for example, near a bathtub, sink,
laundry tub, in a wet basement, near a swimming pool, etc.
6. Heat- This appliance should be situated away from heat sources such as radiators, heat registers,
stoves, or other appliances (including amplifiers) that produce heat.
7. Power Sources- This appliance should be connected to a power supply only of the type described in
the operating instructions or as marked on the appliance. if you are not sure of the type of power
supply to your home, consult your appliance dealer or local power company. For appliances intended to
operate from battery power, or other sources, refer to the operating instructions.
8. Polarization- If the appliance is equipped with a polarized alternating-current line plug (a plug having
one blade wider than the other), this plug will fit into the power outlet only one way. This is a safety
feature. if you are unable to insert the plug fully into the outlet, try reversing the plug. if the plug should
still fail to fit, contact your electrician to replace your obsolete outlet. Do not defeat the safety purpose of
the polarized plug.
9. Grounding- If the appliance is equipped with a 3-wire grounding-type plug, a plug having a third
(grounding) pin, this plug will only fit into a grounding-type power outlet.
This is safety feature. if you are unable to insert the plug into the outlet, contact your electrician to
replace your obsolete outlet. Do not defeat the safety purpose of the grounding-type plug.
10. Power Cord Protection- Power supply cords should be routed so that they are not likely to be walked
on or pinched by items placed upon or against them, paying particular attention to cords at plugs,
convenience receptacles, and the point where they exit from the appliance.
11. Damage Requiring Service- Unplug this appliance from the wall outlet and refer servicing to qualified
service personnel under the following conditions:
a. When the power-supply cord or plug is damaged.
b. If liquid has been spilled, or objects have fallen into the appliance.
c. If the appliance has been exposed to rain or water.
d. If the appliance does not operate normally by following the operating Instructions.
Adjust only those controls that are covered by the operating instructions as an improper
adjustment of other controls may result in damage and will often require extensive work
by a qualified technician to restore the appliance to its normal operation.
e. If the appliance has been dropped or the cabinet has been damaged.
f. When the appliance exhibits a distinct change in performance-this indicates a need for service.
12. Servicing- Do not attempt to service this appliance yourself as opening or removing covers may expose
you to dangerous voltage or other hazards.
Refer all servicing to qualified service personnel.
3
Ⅲ Warranty Information
UNPACKING
As a part of our system of quality control,
every STK product is carefully inspected before
leaving the factory to insure flawless appearance.
After unpacking, please inspect for any physical
damage. Save the shipping carton and all packing
materials, as they were carefully designed to
reduce the possibility of transportation damage
should the unit again require packing and shipping.
In the event that damage has occurred,
immediately notify our dealer so that a written
claim to cover the damage can be initiated with
the carrier. The right to any claim against a public
carrier can be forfeited if the carrier is not
promptly notified and if the shipping carton and
packing materials are not available for inspection
by the carrier. Save all packing materials until the
claim has been settled.
STK Customer Service Department
250, ANAJI-RO, GYEYANG-GU
INCHEON, KOREA.
TEL : +82-32-525-1788~1790
FAX : +82-32-525-1784
E-mail : [email protected]
www.stkpro.com
STK LIMITED 1 YEAR WARRANTY
STK electronics are warranted to be free from defects
in materials and workmanship under normal use for a
period of 1 year from date of original purchase.
During that period, STK will at its option, repair or
replace materials at no charge if product has been
delivered to STK by an STK dealer or STK Service
Center together with the original sales receipt or other
proof of purchase. Warranty excludes fuses, exterior
finish, normal wear, failure due to abuse, or operation
outside of specified ratings. Warranty applies to original
purchaser only. This warranty gives you specifically
rights which vary from state to state.
For more information about warranty repair,
please contact: Customer Service Dept.,
The STK Professional Audio.
FOR YOUR RECORDS
All of us at STK thank you for your expression of
confidence in STK products.
The unit you have purchased is protected by a limited
1 year warranty. To establish the warranty, be sure to
fill out and mail the warranty card attached to your
product.
For you own protection, fill out the information below for you own records.
Model Number
Serial Number
Dealer
Date Of Purchase
Salesman
Phone
Other Information
4
Ⅳ Panel Descriptions
VM-11TDRV
Note: The operation of the VM11T-DRV Triple powered
mixer is nearly identical. This manual will help you
understand and get the most out of all VM mixers.
10. PAD
This switch attenuates the input signal by 10dB when
connecting a line level device to channels 1-7, or if the mic
input is distorted turn-this switch on (the pressed-in position)
MONO INPUT CHANNELS
STEREO INPUT CHANNELS
In addition to the standard seven mono input channels, the
VM11T-DRV features two stereo input channels. Each of
these stereo channels has two 1/4” line level inputs. The
signal from the left 1/4″line level input is routed to the left
output and the signal from right 1/4″line level input is routed
the right output. The balance between these two inputs is
controlled by the pan control.
1. Mic In
This input accepts a standard XLR microphone connector and
low impedance microphone.
2. Line In
This input accepts a 1/4inch two conductor plug and is
suitable for unbalanced line level sources.
3. Level
The channel level control provides continuously variable
adjustment of the channel output level to the main mixing
buss
1a. Mic In
This input accepts a standard XLR microphone connector and
low impedance microphone.
4. EFX(DSP)
2a, 2b. Line In
The channel EFX(DSP) control varies the amount of channel
signal sent to the D.S.P, as well as to the effects send circuitry
These channels may be used as monaural inputs by simply
using the "Each L channel" input(8 or 10), in which case the
mono signal you put into the L channel is fed to both odd and
even stereo inputs.
5. MON
This control varies the amount of signal sent to the monitor
send circuitry.
3a. Level
6. High
The channel level control provides continuously variable
adjustment of the stereo channel's output level to the main
output.
The high frequency shelf control is set at 8kHz. You can
increase or attenuate frequencies 8kHz(and above)up to 15dB.
There is a detente in the 0 position indicating a flat response.
4a. EFX(DSP)
7. Mid
The channel EFX(DSP) control varies the amount of channel
signal sent to the D.S.P, as well as to the effects send
circuitry.
The mid frequency is centered at 2.5 kHz. You can increase or
attenuate the midrange frequencies by as much 12dB. A
detente is provided in the 0 position indicating a flat response.
5a. MON
8. Low
This controls the amount of signal sent from an individual
channel to both the Mon master control. In addition, this
control also feeds the monitor send. This aux send is a pre
channel level control and pre EQ. This means that the level
sent from an individual input will not be affected by
adjustment of the main channel level control or EQ settings
and allows a completely separate mix for stage monitors.
The low frequency shelf control is set at 80Hz. You can
increase or attenuate frequencies 80Hz(and below) up to 15dB.
A detente is provided in the 0 position indicating a flat
response.
9. PAN
This control varies the amount of channel signal sent to either
the left of right channel of the stereo mixer.
5
Ⅳ Panel Descriptions
VM-11TDRV
6a. High
16. EFX Out
The high frequency shelf control is set at 8kHz. You can
increase or attenuate frequencies 8kHz(and above)up to 15dB.
There is a detente in the 0 position indicating a flat response .
The input of an external effect such as a delay or echo can be
connected to this jack. The signal adjusted by the EFFECT
control of each channel will be sent to the EFFECT bus, its
level adjusted by the EFFECT OUT control , and output from
this jack.
7a. Mid
The mid frequency is centered at 2.5 kHz. You can increase or
attenuate the midrange frequencies by as much 12dB. A
detente is provided in the 0 position indicating a flat response.
17. Footswitch
The DSP Footswitch jack is a standard 1/4" size
accommodating a monaural ON/OFF Footswitch that enables/
disable the internal digital effects.
8a. Low
The low frequency shelf control is set at 80Hz. You can
increase or attenuate frequencies 80Hz(and below) up to 15dB.
A detente is provided in the 0 position indicating a flat
response.
18. Mono/Subwoofer
This line level subwoofer output allows you to conveniently
add supplemental buss to your system. The signal is derived
from summed left+right master output or the master output and
is routed through a 125Hz low pass filter.
9a. Bal
This control varies the amount of channel signal sent to either
the left or right channel of the stereo mixer.
19. Aux In /Tape In Control
This control varies the amount of the signal from the Tape In
and Aux In mixed back to the main buss.
FRONT PANEL MASTER SECTION
20. Aux / Tape to Mon Control
The Aux/Tape to Mon Control provides continuously variable
adjustment of the signal derived from the tape in jacks located
on the connector panel and sends that signal to the monitor
master control .
21. Main Amp Assign (L+R/Bridge, Stereo)
This slide switch select a main amp signal route depending on
the speakers connected to the speaker Left&Right or L+R
bridge jacks on the rear panel.
22. Master Monitor Control
This controls the overall signal level at the Monitor Line Out.
This setting is output to both the front and rear panel monitor
jacks and appears in the monitor bus signal.
23. DSP Switch
This push control activates/deactivates the DSP effects.
24. EFX to Mon
This master DSP EFX level control sent to MON bus varies
the amount of overall combined signal of the independent
channels.
25. EFX To Main
This master DSP EFX level control sent to Main bus varies
the amount of overall combined signal of the independent
channels.
11. Aux In
Connect these jacks to he output jacks of an external effects
processor. If the effects processor has a stereo output, connect
it to the AUX IN L(MONO) and R jacks. If it has monaural
output, use the AUX IN L(MONO) jack. Signal input to these
jacks is sent to the ST bus .
26. Master Control
12. Tape In
This Control adjusts the ST bus signal output level. This
setting is output to the SPEAKERS L/R/L+R, Bridge jacks
and the MAIN (STEREO) jack on the rear panel and appears
in the ST bus signal.
Use these jacks to connect a stereo device, such as a cassette
player or a CD player. The signals input to these jacks is sent
to the ST bus .
7 band graphic equalizers are provided on the front panel and
may be used for stereo section Left signal of VM-11T DRV.
27. Graphic Equalizer(Left)
28. Graphic Equalizer(Right)
13. Rec Out
7 band graphic equalizers are provided on the front panel and
may be used for stereo section Right signal of VM-11T DRV.
The ST bus signal before it has passed through the MASTER
control and graphic equalizer.
29. Graphic Equalizer(Monitor)
14. Monitor Out
7 band graphic equalizers are provided on the front panel and
may be used for master Monitor signal of VM-11T DRV.
The MONI bus signal which has passed through the MASTER
control and graphic equalizer.
30. Phantom Power Switch
15. Main L/R Out
This push button control provides 48V of DC power to the
independent channel XLR inputs for the use of condenser
microphone without external battery.
The ST bus signal which has passed through the main
MASTER control and graphic equalizer .
6
Ⅳ Panel Descriptions
VM-11TDRV
FRONT PANEL MASTER SECTION
Digital Signal Processor Function and Features
The STK digital reverbs gives the power to create original
sounds with a wide range of effects. Effect patch(effect
setting) can be stored in the internal memory, calling up any
patch is quick and easy by linear potentiometer.
FEATURES
* Stereo-Effect preset available divided by potentiometer.
* Easy program selection methods.
* Automatic input audio signal "overshooting" indication
circuit on-board.
* Usage of a 1M byte SRAM for superior quality stereo
reverb and delay sound.
* Usage of the famous ASAHIKASEI 24bit DSP with built
in 20 bit AD/DA stereo converter.
* 20bit delta sigma 64 x oversampling AD converter.
* 20bit delta sigma 128 x oversampling AD converter.
* 64 x oversampling ADC digital filter.
* 128 x oversampling DAC digital filter.
* CD-quality professional sound reality.
APPLICATIONS
31. Delay Time Adjust
* Long time delay and repeat for moslem church.
* Fantastic Karaoke sound system for Asian.
* Very clean and bright echo feedback and delay
for european karaoke vocal sound.
* Keyboard, guitar and combos.
This control adjusts the delay time .
32. Delay Time Range Select
This push control select delay time range from 50~350(msec)
or 350~1000(msec).
33. Delay Feedback Adjust
This control adjusts the delay feedback.
34. Delay Feedback Range Select
This push control select delay feedback range from "0~45(%)"
or "45~90(%)"
35. Reverb Time Adjust
This control adjusts the reverb time.
36. Reverb Time Range Select
This push control select reverb time range from "0.5~3.5(sec)"
or "3.5~10(sec)"
37. Reverb and Delay Mix Balance Adjust
This control adjust the reverb or delay mixing level.
38. DSP Peak Indicator
7
Ⅳ Panel Descriptions
VM-11SDRV
Note: The operation of the VM11S-DRV Stereo powered mixer
10. PAD
is nearly identical. This manual will help you understand and
get the most out of all VM mixers.
This switch attenuates the input signal by 10dB when connecting a line
level device to channels 1-7, or if the mic input is distorted turn-this
switch on (the pressed-in position)
MONO INPUT CHANNELS
1. Mic In
STEREO INPUT CHANNELS
This input accepts a standard XLR microphone connector and
low impedance microphone.
In addition to the standard six mono input channels, the
VM-11S DRV features two stereo input channels. Each of
these stereo channels has two 1/4″line level inputs. The signal
from the left 1/4″line level input is routed to the left output
and the signal from right 1/4″line level input is routed the
right output. The balance between these two inputs is
controlled by the pan control.
2. Line In
This input accepts a 1/4inch two conductor plug and is
suitable for unbalanced line level sources.
3. Level
The channel level control provides continuously variable
adjustment of the channel output level to the main mixing buss.
4. EFX(DSP)
1a. Mic In
The channel Reverb/Effects control varies the amount of
channel signal sent to the reverb or D.S.P, as well as to the
effects send circuitry
This input accepts a standard XLR microphone connector and
low impedance microphone.
5. MON
These channels may be used as monaural inputs by simply
using the "odd channel" input(8 or 9), in which case the mono
signal you put into the odd channel is fed to both odd and
even stereo inputs.
2a, 2b. Line In
This control varies the amount of signal sent to the monitor
send circuitry.
6. High
3a. Level
The high frequency shelf control is set at 8kHz. You can
increase or attenuate frequencies 8kHz(and above)up to 15dB.
There is a detente in the 0 position indicating a flat response.
7. Mid
The channel level control provides continuously variable
adjustment of the stereo channel's output level to the main
output.
The mid frequency is centered at 2.5 kHz. You can increase or
attenuate the midrange frequencies by as much 12 dB. A
detente is provided in the 0 position indicating a flat response.
4a. EFX(DSP)
The channel EFX(DSP) control varies the amount of channel
signal sent to the D.S.P, as well as to the effects send circuitry.
8. Low
5a. MON
The low frequency shelf control is set at 80Hz. You can
increase or attenuate frequencies 80Hz(and below) up to 15dB.
A detente is provided in the 0 position indicating a flat
response.
This controls the amount of signal sent from an individual
channel to both the Mon master control. In addition, this
control also feeds the monitor send. This aux send is a pre
channel level control and pre EQ. This means that the level
sent from an individual input will not be affected by
adjustment of the main channel level control or EQ settings
and allows a completely separate mix for stage monitors.
9. PAN
This control varies the amount of channel signal sent to either
the left of right channel of the stereo mixer.
8
Ⅳ Panel Descriptions
VM-11SDRV
15. Left/Main, Right/Mon Out
6a. High
The Left/Main and Right/Mon output 1/4" connectors are the
final output for the master stereo mix and controlled by the
master left and Right level volume pots.
The high frequency shelf control is set at 8kHz. You can
increase or attenuate frequencies 8kHz(and above)up to 15dB.
There is a detente in the 0 position indicating a flat response.
16. EFX Out
7a. Mid
The input of an external effect such as a delay or echo can be
connected to this jack. The signal adjusted by the EFFECT
control of each channel will be sent to the EFFECT bus, its
level adjusted by the EFFECT OUT control, and output from
this jack.
The mid frequency is centered at 2.5 kHz. You can increase or
attenuate the midrange frequencies by as much 12dB. A
detente is provided in the 0 position indicating a flat response.
8a. Low
The low frequency shelf control is set at 80Hz. You can
increase or attenuate frequencies 80Hz(and below) up to 15dB.
A detente is provided in the 0 position indicating a flat
response.
17. Footswitch
The DSP Footswitch jack is a standard 1/4" size
accommodating a monaural ON/OFF Footswitch that
enables/disable the internal digital effects.
9a. Bal
18. Mono/Subwoofer
This control varies the amount of channel signal sent to either
the left or right channel of the stereo mixer.
This line level subwoofer output allows you to conveniently add
supplemental buss to your system. The signal is derived from summed
left+right master output or the master output and is routed through a
125Hz low pass filter.
FRONT PANEL MASTER SECTION
19. Aux In /Tape In Control
This control varies the amount of the signal from the Tape In
and Aux In mixed back to the main buss.
20. Aux / Tape to Mon Control
The Aux/Tape to Mon Control provides continuously variable
adjustment of the signal derived from the tape in jacks located
on the connector panel and sends that signal to the monitor
master control.
21. Main Amp Assign (L+R/Bridge, Stereo)
This slide switch select a main amp signal route depending on
the speakers connected to the speaker Left&Right or L+R
bridge jacks on the rear panel.
22. Master Monitor Control
This controls the overall signal level at the Monitor Line Out.
This setting is output to both the front and rear panel monitor
jacks and appears in the monitor bus signal.
23. Master Left/Main Bridge(Mono)
This control provides adjustment of signal to the left main
output connector, and serves as a volume control for the left
internal amplifier : In Left+Right mode.
24. Master Right/Monitor
This control provides adjustment of signal to the right main
output connector, and serves as a volume control for the right
internal amplifier : In Monitor mode.
11. Aux In
25. DSP Switch
Connect these jacks to the output jacks of an external effects
processor. If the effects processor has a stereo output, connect
it to the AUX IN L(MONO) and R jacks. If it has monaural
output, use the AUX IN L(MONO) jack. Signal input to these
jacks is sent to the ST bus.
This push control activates/deactivates the DSP effects.
26. EFX To Mon
This master DSP EFX level control sent to Mon bus varies the
amount of overall combined signal of the independent
channels.
12. Tape In
27. EFX To Main
Use these jacks to connect a stereo device, such as a cassette
player or a CD player. The signals input to these jacks is sent
to the ST bus.
This master DSP EFX level control sent to main bus varies the
amount of overall combined signal of the independent
channels.
13. Rec Out
The ST bus signal before it has passed through the MASTER
control and graphic equalizer.
14. Monitor Out
The MONI bus signal which has passed through the MASTER
control and graphic equalizer.
9
Ⅳ Panel Descriptions
VM-11SDRV
FRONT PANEL MASTER SECTION
Digital Signal Processor Function and Features
The STK digital reverbs gives the power to create original
sounds with a wide range of effects. Effect patch(effect
setting) can be stored in the internal memory, calling up any
patch is quick and easy by linear potentiometer.
FEATURES
* Stereo-Effect preset available divided by potentiometer.
* Easy program selection methods.
* Automatic input audio signal "overshooting" indication
circuit on-board.
* Usage of a 1M byte SRAM for superior quality stereo
reverb and delay sound.
* Usage of the famous ASAHIKASEI 24bit DSP with built
in 20 bit AD/DA stereo converter.
* 20bit delta sigma 64 x oversampling AD converter.
* 20bit delta sigma 128 x oversampling AD converter.
* 64 x oversampling ADC digital filter.
* 128 x oversampling DAC digital filter.
* CD-quality professional sound reality.
APPLICATIONS
* Long time delay and repeat for moslem church.
* Fantastic Karaoke sound system for Asian.
* Very clean and bright echo feedback and delay
for european karaoke vocal sound.
* Keyboard, guitar and combos.
28. Main/Monitor, Stereo Switch
This push button control routes either the main outputs Left &
Right, through the Left and Right graphic EQ section or sends
the main mono signal through the left graphic EQ section and
a monitor mono signal through the right graphic EQ sections.
29. Graphic Equalizer(Left/Main)
7 band graphic equalizers are provided on the front panel and
may be used for stereo Left or Main(L+R) of VM-11S DRV.
30. Graphic Equalizer(Right/Monitor)
7 band graphic equalizers are provided on the front panel and
may be used for stereo Right or Monitor of VM-11S DRV .
31. Phantom Power Switch
This push button control provides 48V of DC power to the
independent channel XLR inputs for the use of condenser
microphone without external battery.
32. Delay Time Adjust
This control adjusts the delay time.
33. Delay Time Range Select
This push control select delay time range from 50~350(msec)
or 350~1000(msec).
34. Delay Feedback Adjust
This control adjusts the delay feedback.
35. Delay Feedback Range Select
This push control select delay feedback range from "0~45(%)"
or " 45~90(%).
36. Reverb Time Adjust
This control adjusts the reverb time.
37. Reverb Time Range Select
This push control select reverb time range from "0.5~3.5(sec) "
or "3.5~10(sec) ".
38. Reverb and Delay Mix Balance Adjust
This control adjust the reverb or delay mixing level.
39. DSP Peak Indicator
10
Ⅳ Panel Descriptions
VM-8DRV
FRONT PANEL MASTER SECTION
Note: The operation of the VM8-DRV/VRM8-DRV Mono powered
mixer is nearly identical. This manual will help you
understand and get the most out of all VM mixers.
9. Aux In - Input to Aux Jack
The Aux In - Input to Aux phone jack is used to feed signals
from an external source to the main bus and can be connected
to the output of an external effects processor.
MONO INPUT CHANNELS
10. Tape In - Input to Main Jacks
1. Mic In
The Tape In - Input to main phone jacks are used to feed
signals from an external source to the main bus and can be
connected to the stereo outputs of a cassette, DAT, or MD
deck.
This input accepts a standard XLR microphone connector and
low impedance microphone.
2. Line In
This input accepts a 1/4inch two conductor plug and is
suitable for unbalanced line level sources.
11. Rec Out - Output Jacks
The Rec Out - Output RCA jacks output the main bus signal
prior to the 7-band graphic equalizer and master level control,
and can be connected to the stereo inputs of a cassette, DAT
or MD deck for recording.
3. Level
The channel level control provides continuously variable
adjustment of the channel output level to the main mixing
buss.
12. Monitor Out
4. EFX(DSP)
The monitor output phone jack outputs the monitor bus signal after the
monitor master control, and can be connected to the input of a powered
monitor speaker.
The channel Reverb/Effects control varies the amount of
channel signal sent to the reverb or D.S.P, as well as to the
effects send circuitry.
13. Main Out
5. MON
The main output jack out the main bus signal after the 7-band graphic
equalizer and master level control, and can be connected to the input of
a larger mixer, or a more powerful amplifier.
This control varies the amount of signal sent to the monitor
send circuitry.
6. High
The high frequency shelf control is set at 10kHz. You can
increase or attenuate frequencies 10kHz(and above)up to 15dB.
There is a detente in the 0 position indicating a flat response.
7. Low
The low frequency shelf control is set at 100Hz. You can
increase or attenuate frequencies 100Hz(and below) up to
15dB. A detente is provided in the 0n position indicating a
flat response.
14. EFX Out
The input of an external effect such as a delay or echo can be
connected to this jack. The signal adjusted by the EFFECT
control of each channel. will be sent to the EFFECT bus, and
output from this jack.
15. Footswitch
The DSP Footswitch jack is a standard 1/4" size accommodating
a monaural ON/OFF Footswitch that enables/disable the
internal digital effects.
8. PAD
This switch attenuates the input signal by 10dB when connecting a line
level device to channels 1-7, or if the mic input is distorted turn-this
switch on (the pressed-in position)
11
Ⅳ Panel Descriptions
VM-8DRV
16. EFX to Mon
FRONT PANEL MASTER SECTION
This master DSP EFX level control sent to Mon bus varies the
amount of overall combined signal of the independent
channels.
17. EFX to Main
This master DSP EFX level control sent to main bus varies the
amount of overall combined signal of the independent
channels.
18. Aux In /Tape In Control
This control varies the amount of the signal from the Tape In
and Aux In mixed back to the main buss.
19. Monitor Control
This controls the overall signal level at the Monitor Line Out.
The control ranges from off through unity on up to +12dBu of
extra gain.
20. DSP Switch
This push control activates/deactivates the DSP effects.
21. Master Control
This Control adjusts the main bus signal for post 7 band EQ.
And this setting is output to master jack output and main
speaker output.
22. Graphic Equalizer(Main)
7 band graphic equalizers are provided on the front panel and
may be used for stereo Main of VM8-DRV.
23. Phantom Power Switch
This push button control provides 48V of DC power to the
independent channel XLR inputs for the use of condenser
microphone without external battery.
24. DSP Peak Indicator
25. Delay Time Adjust
This control adjusts the delay time.
26. Delay Time Range Select
This push control select delay time range from 50~350(msec)
or 350~1000(msec).
27. Delay Feedback Adjust
This control adjusts the delay feedback.
28. Delay Feedback Range Select
This push control select delay feedback range from "0~45(%)"
or " 45~90(%).
29. Reverb Time Adjust
This control adjusts the reverb time.
30. Reverb Time Range Select
This push control select reverb time range from "0.5~3.5(sec)"
or "3.5~10(sec)".
31. Reverb and Delay Mix Balance Adjust
This control adjust the reverb or delay mixing level.
12
Ⅳ Panel Descriptions
Rear Panel
5. Right Out
These two parallel speaker output jacks accept standard 1/4"
two-conductor phone plugs, providing 300 watts of power at 4
ohms, or 200 watts at 8 ohms.
(VM-11S DRVH:450watts/4ohms, 280watts/8ohms)
Load impedances less than 4 ohms will not draw additional
power and may cause the unit to go into protect mode.
6. L+R Bridge
This speaker output jacks accept standard 1/4"two-conductor
phone plugs, providing 600 watts of power at 8 ohms.
(VM-11S DRVH:900watts/8ohms)
Load impedances less than 8 ohms will not draw additional
power and may cause the unit to go into protect mode.
1. Power Switch
This switch controls the AC mains power to your powered
mixer. Power is on when the switch is in the on(up) position
and is confirmed when the power LED indicator is
illuminated.
Note : Before turning on or off the mixer. It is a good idea to
turn down the main master and monitor master controls.
7. Left Out
These two parallel speaker output jacks accept standard
1/4"two-conductor phone plugs, providing 300 watts of
power at 4 ohms, or 200 watts at 8 ohms. Load impedances
less than 4 ohms will not draw additional power and may
cause the unit to go into protect mode.
(VM-11S DRVH:450watts/4ohms, 280watts/8ohms)
2. FUSE
The fuse is located in the fuse holder. (See Section Ⅷ
Specifications for the correct values.)
8. VM8-DRV Power Amp output
3. IEC Socket
These two parallel speaker output jacks accept standard
1/4"two-conductor phone plugs, providing 300 watts of
power at 4 ohms, or 200 watts at 8 ohms. Load impedances
less than 4 ohms will not draw additional power and may
cause the unit to go into protect mode .
This is where you connect the supplied AC line cord to
provide AC power to the all VM series powered mixer. Plug
the line cord into an AC socket properly configured for your
particular model.
■ When the Stereo/Bridge select switch is set
to STEREO (2-Channel connection)
L/R channel signals are routed from the ST(L,R) bus to the
SPEAKER L/R jacks. The SPEAKERS L A/B jacks are
internally wired in parallel and output the same signals. You
can connect a pair of speakers with an impedance of 4-8ohm
to either or both the A or B pair of the SPEAKER L/R
jacks(total of two speakers). You can connect two pairs of
speakers with an impedance of 8-16ohm to both A and B pair
or the SPEAKER L/R jacks(total of four speakers).
This connection provides a maximum output of 300W +
300W.(VM-11S DRVH:450W+450W)
Note: Do not connect anything to the SPEAKERS L+R
BRIDGE jack when you are using this 2-channel connection.
■ When the Stereo/Bridge select switch is set
to L+R BRIDGE (BRIDGE connection)
4. Monitor Out
L/R channel signals are mixed in the ST bus and routed to the
SPEAKERS L+R BRIDGE jack as a monaural signal. You can
connect only one speaker with an impedance of 8-16 ohm to
the SPEAKERS L+R BRIDGE jack. This connection provides
the maximum output of 600W.(VM-11S DRVH:900W/8ohms)
Note: Do not connect anything to the SPEAKERS L/R jacks
if you use this BRIDGE connection.
These two parallel speaker output jacks accept standard
1/4"two-conductor phone plugs, providing 300 watts of
power at 4 ohms, or 200 watts at 8 ohms. Load impedances
less than 2 ohms will not
draw additional power and may cause the unit to go into
protect mode. The SPEAKERS MONITOR A and B jacks are
internally connected in parallel, and output the same signals.
You can connect speakers with an impedance of 4-8 ohm to
either or both the A or B jacks. You can connect speakers with
an impedance of 8-16 ohm to both pairs.
Note : Do not connect any devices other than speakers to
these jacks. Do not confuse these jacks with the MONITOR
jacks on the I/O panel.
13
Ⅴ Connecting Your System
A. CONNECTORS
B. SYSTEM HOOKUPS
Your powered mixers uses several types of input and output
connectors.
Before you begin your connections, you must decide how you
will configure your sound system, mono or stereo. Below are
system variations that can be used with your powered mixer.
Carefully consider all of them to decide which system you
will use.
NOTE : The VM Mixers feature flexible patching options
which make possible more variations of setup than are
presented here. Once familiarized with the unit's capabilities,
you should be able to achieve practically any setup you desire.
1. XLR Input jacks
Electronically balanced inputs accept a standard XLR male
connector. Pin1=ground, pin2=hot or positive(+) and
pin3=cold or negative (-) (see Figure 1). These connectors
should be utilized for low impedance microphones. If you are
using a high impedances microphone, it will likely have a
cord with a 1/4 connector on it. In this case, it would be
appropriate to plug such microphones into a line input,
however performance, and gain may be lessened. for best
performance. We recommend you invest in one of the many
higher quality, law impedance mics available on the market,
or alternatively, purchase an impedance matching transformer
from your dealer.
■ Connecting monitoring speakers
You can connect one or two speakers to the SPEAKERS
MONITOR jacks. Speaker impedance varies with the
number of speakers that are connected. Be sure to
maintain speaker impedance at the specified value or
higher. Refer to the figure below.
2. 1/4″Phone Input Jacks
Connecting two Speakers:
These tip / sleeve jacks accept an unbalanced line level signal
using a normal male phone plug.
(See Figure 1.)
3. Speaker Output Jacks
The speaker output jacks are 1/4″two conductor jacks. Their
power output and function are dependent upon the particular
unit that you are using.
4. RCA Phone Jacks
The RCA jacks accept unbalanced male pin connectors.
Figure-1
a. Female Three Pin Connector
Connecting one Speaker:
1. GROUND
(shield)
2. HOT +
2
1
3. COLD -
3
b. Unbalanced 1/4'' Connector
Tip POSITIVE(+)
Sleeve GROUND(shield)
14
Ⅴ Connecting Your System
■ Connecting main speaker
If you select the two channel connection, the speaker connect to the SPEAKER L/R jacks. And select the BRIDGE connection,
The speaker connect to SPEAKERS L+R BRIDGE jacks. Defend on the number of connected speakers. And the type of
connection, speaker impedance requirements vary. Be sure maintain speaker impedance value or higher. Refer to the below.
Powered Stereo: Two-Channel Connection
Powered Mono: Bridge Connection
The basic stereo setup: One or more input devices such as a
microphone, keyboard, CD player, or tape deck: An optional
external effects processor: One or more parallel speaker
systems connected to each of the left and right sides of the
output operating in stereo : Addition of an externally
powered monitor system.
The most basic setup: one or more input devices such as a
microphone keyboard, CD player, or Tape deck, an optional
external effects, processor one of more speaker systems
connected in parallel to the main output jack; Addition of an
externally powered monitor system.
15
Ⅵ Operating Your System
connect the tape out jack of your mixer to the input jacks of
the tape recorder.
Powered Mono
Now that you have decided which mode and type of system
operation you will use, You are ready to make your system
connections and settings on your VM Mixer.
6. Connect the external effects device.
If you are utilizing an external effects device, using standard
1/4″shielded cables, connect the Aux send jack of your mixer
to the input jack of the effects device and connect the output
jack of the effects device to the Aux Return jack of your
mixer.
1. Switch everything to OFF.
This includes your VM mixer and all devices in the system.
2. Set the EQ Assign switch to the out position.
7. Connect the speakers.
This makes the equalizer affect the master output.
Using heavy gauge unshielded 1/4″speaker cables, connect
your Left main speaker systems to the two parallel left/main
speaker output jacks on the rear panel of your powered
mixer; Connect your right main speaker systems to the two
parallel right/monitor speaker output jacks on the rear panel
of your powered mixer. The total speaker impedance load of
your speaker systems connected to each side of your mixer
must be 4 ohms or greater.
If you are not certain of your total speaker impedance load,
contact your dealer for assistance.
3. Connect the input devices into the six or more
input channels.
Group your microphone channels and instrument channels to
make mixing easier.
4. Connect the tape and/or CD player.
If you are feeding a signal from a tape or CD player into your
mixer, using a stereo RCA cable, Connect the output jacks of
the tape or CD player to the tape in jacks of your mixer.
If you wish to record the output of your mixer, Using a stereo
RCA cable, Connect the tape out jack of your mixer to the
input jacks of the tape player.
WARNING: Operating your VM powered mixer at an
output impedance less than 4 ohms/side can
damage your unit and void your warranty!
5. Connect the external effects device.
If you are utilizing an external effects device, using standard
1/4″shielded cables, Connect the Aux send jack of your mixer
to the input jack of the effects device and connect the output
jack of the effects device to the Aux Return jack of your
mixer.
8. Connect the external Monitor Equalizer.
If you are utilizing an external graphic equalizer for the
monitors, using a standard 1/4″shielded cable, Connect the
monitor out jack on your mixer to the input jack of your
external monitor equalizer.
6.Connect the speakers.
Using heavy gauge unshielded 1/4″speaker cables, connect
your main speaker systems to the parallel speaker output
jacks on the rear panel of your powered mixer. The total
speaker impedance load of your speaker systems must be 4
ohms or greater.
If you are not certain of your total speaker impedance load,
contact your dealer for assistance.
WARNING: Operating your VM power mixer at an output
impedance less than 4 ohms can damage your unit and void
your warranty!
9. Connect your external Monitor Power Amp.
If you are utilizing an external equalizer for the monitors
(No.8) using a standard 1/4″shielded cable, connect the
output jack of your monitor equalizer to the input jack of
your monitor power amp.
If you are not using an external monitor equalizer, connect the
monitor out jack on your mixer directly to the input jack of your
monitor power amplifier.
10. Connect the Monitor speakers.
Using heavy gauge unshielded 1/4″speaker cables, connect
your monitor speakers to the output jacks of the monitor
power amplifier. make sure that the total impedance load of
your monitor speakers is not less than the recommended
minimum impedance that your monitor power amp can safely
handle.
Powered Stereo
1. Switch everything to OFF.
This includes your VM mixer and all devices to be
connected.
2. Set the AMP/EQ Assign Switch to the stereo(out)
position.
3. Connect the input devices into the six or more
input channels.
A. MONITOR OPERATION
The idea behind a monitor system is to provide a completely
independent mix of your input signals to your monitor
speakers so that the performers can hear what they are doing
and perform their best.
Because of speaker placement, program material, and several
other factors, it is rare that the monitor mix will be the same
as the main mix.
Group your microphone channels and instrument channels to
make mixing easier .
4. Connect the input devices into the two Stereo input
channels:
Using standard 1/4″shielded cables, connect the desired
devices into the stereo input channels: Keyboards, drum
machines, tape programs etc.
1. Set the Master Level Control to Zero.
Since the monitor mix is completely separate from the main
mix, all of the monitor settings will be initially made with
the master level control set to the zero position.
5. Connect the tape and/of CD player.
If you are feeding a signal from a tape or CD player into your
mixer, using a stereo RCA cable, Connect the output jacks of
the player to the tape in jacks of your mixer. If you wish to
record the output of your mixer, using a stereo RCA cable,
2. Set the Monitor Level Control to Zero.
16
Ⅵ Operating Your System
are too strong and boost others that are too weak, or, in other
words, to "Equalize" the seven different bands in their
relationship to each other.
3. Set the input Level of the External Monitor
Equalizer(if applicable).
If you are using a separately powered monitor system, set the
input level control of the equalizer to about 60%. you will
need to check this setting later to be sure there is no clipping
or distortion.
C. PROTECTION CIRCUIT
The protect LED indicates that there is a problem either in
the amplifier's external connections, load or temperature
conditions or its internal functions. If one of these situations
occurs, the amplifier senses the problem and automatically
switches into its "Protect Mode". The LED will light to warn
you of the trouble and the amplifier will stop working. If the
LED lights and stays on, switch the unit off. If you feel that
you have been able to correct the fault condition that caused
the unit to go into the protect mode, switch the mixer on
again. If you have successfully removed the fault condition,
the amplifier will run normally.
CAUTION : If the protect LED remains lit when
attempting to resume operation, DO NOT USE THE
UNIT. Take your VM Mix to an authorized service
facility or contact your dealer for help .
4. Set External Monitor Amplifier(if applicable).
If you are using a separately powered monitor system, set the
input level control of the external amplifier to about 60%.
You will need to check this setting later to be sure there is no
clipping or distortion.
5. Set the master Monitor Level Control.
Set the monitor level control to 4. you will likely have to
re-adjust this later, but for now, this setting will allow you to
hear your monitor system and decide what further
adjustments are necessary.
6. Set the channel Monitor Controls.
Decide which channels you want to include in the monitor
mix. set a nominal level on each of these channels using the
channel monitor control. Slowly raise the level on each
individual channel until the optimum volume is achieved or,
in the case of a microphone channel until you begin to hear
feedback.
If you start to hear feedback, quickly reduce the monitor
control of that channel back to 0 or until the feedback stops.
Carefully raise the control again, stopping before the point at
which you experienced feedback.
D. CARE AND MAINTENANCE
Your VM Mix is built to provide years of dependable service
under demanding circumstances. It requires no internal
maintenance but a common sense approach to its use will
help you enjoy long and reliable operation. Here are some
tips:
7. Adjust the Monitor Equalizer.
Make any adjustments necessary in the monitor equalizer. If
you are using a separately powered monitor system, you will
adjust the external monitor equalizer. If you are using the
VM-11S DRV in the Main+Monitor Mode, the lower
equalizer on the mixer controls the monitors
1. Power Requirements
Your powered mixer is capable of 110-120V AC or 220-240V
AC operation allowing world-wide usage. It is pre-wired at
the factory for the correct voltage in your country. It is
possible to change the mains voltage but it is an internal
operation that can only be performed by an experienced
technician. Contact your dealer or service center for more
information .
8. Make final adjustments to the monitor system.
After you have properly set the graphic equalizer, Make any
further adjustments to the monitor system that are necessary.
When you have completed all adjustments to the monitor
system, you can raise the level of the master control for the
main system.
2. Periodic Cleaning
Keep the unit clean by wiping frequently with a damp, soft
cloth. Use a mild detergent cleaner if necessary, Applied to
the cloth, but not directly to the mixer. Do not use solvents
or the other chemicals to clean the unit. A large (dry) paint
brush is useful to remove cumulated dust from between the
many control knobs on the mixer. If you accidentally spill
liquid onto or into the unit, disconnect the power cord and
allow the unit to dry thoroughly before attempting to use it.
B. GRAPHIC EQUALIZER USE
The VM-8DRV is equipped with a single 7-band equalizer
that can be configured to affect master output and main
speaker output.
The VM-11SDRV is equipped with two 7-band equalizers
that can be configured to affect either left/main outputs or
right/monitor outputs.
The VM-11TDRV is equipped with three 7-band equalizers
that can be configured to affect either left outputs or right
outputs or monitor outputs.
3. Connecting Cables
Use only high quality connecting cables with your VM mixer.
Faulty or suspicious cables should be replaced to avoid
possible deterioration of your sound quality.
4. Connections
Check cable connections frequently, if you move your
equipment often, check input and output jack condition to be
sure they have not sustained any transportation damage, in
temporary installations, such as live performances, check all
cable connections before each performance In permanent
installations, verify the operation of all cables and
connections often. It is much easier to dead with a poor cable
or connection before a performance or recording session than
during it.
You should think of the graphic equalizer as an extended
"Tone Control." the built-in graphic equalizer(s) divide the
audio spectrum into 7 segments or bands. You can raise or
lower the level of each individual band by adjusting the
slider on that band. Any environment has its own set of
acoustics, even outdoors. Some environments will reflect or
absorb certain frequencies more than others. a graphic
equalizer allows you to attenuate ranges of frequencies that
17
Ⅶ System Hookup Diagram
VM-11TDRV
As a band with VM-11TDRV
Here is an example of using the VM-11TDRV as a compact system for a band.
FROM MONITOR SPEAKER OUT
18
Ⅶ System Hookup Diagram
VM-11SDRV
As a band with VM-11SDRV
Here is an example of using the VM-11SDRV as a compact system for a band.
19
Ⅶ System Hookup Diagram
As a band with VM-8DRV
Here is an example of using the VM-8DRV as a compact system for a band.
20
VM-8DRV
Ⅷ Block Diagram
VM-11TDRV
21
Ⅷ Block Diagram
VM-8DRV
ACE DRV
23
Ⅸ Specifications
VM-11TDRV&VM-11SDRV
■ General Specifications
MODEL
Power Output Level(EIA)
RL 4
RL 8
VM-11SDRV(H)
VM-11TDRV
2 x 330 (2 x 440 )
2 x 220 (2 x 300 )
3 x 300
3 x 200
Total Harmonic Distortion
f=1 , Rated output RL 4
Rated output RL 8
Main output +4
/600
0.05%
0.05%
0.08%
Frequency Response
20
20 , 8 , 1 watt
CH In to Main Out +4
+1, -1.5
+1, -1.5
Hum and Noise
20
20 , Rs=1500
Cross Talk
Equalization
± 15 shelving
± 12 peaking
± 15 shelving
Graphic Equalization
-110 Equivalent input noise
Residual output noise (SP OUT)
Residual output noise (MAIN OUT)
-70
-97
60
at 1 , adjacent channel inputs.
60 at 1 , Input to Output.
Stereo
Triple
High : 12kHz
Mid : 2.5kHz
Low : 80Hz
High : 12kHz
Mid : 2.5kHz
Low : 80Hz
±12
Protection circuit
maximum boost or cut in each of seven bands.
125, 250, 500, 1k, 2k, 4k, 8k
Short circuit current limit
DC protection at speaker output
Power ON/OFF transient
AC line fuse
Indicators
Power (Green)
Dsp
(Yellow)
Phantom (Amber)
DC offset voltage
Dimension (W×D×H)
Weight(Net)
Power Consumption
Connector
DC10
440x200x250 mm
16.04
440x200x250 mm
17.5
1200
FUSE 100V ~ 120V.........13A
220V 240V....T6.3A
1350
FUSE 100V ~ 120V..........13A
220V 240V....T6.3A
Bal XLR input
Unbal 1/4" input
Unbal 1/4" output
Bal XLR input
Unbal 1/4" input
Unbal 1/4" output
NOTE: (1) Sensitivity is the lowest level that will produce a full power output , or the nominal output level when
the unit is set to maximum gain.
(2) XLR connectors are balanced. Phone jacks are unbalanced.
24
Ⅸ Specifications
VM-11TDRV&VM-11SDRV
♪Input specifications.
Input terminals
MIC IN (1-9)
LOW IMPEDANCE
LINE IN (1-7)
LOW IMPEDANCE
Actual Load
Impedance
4 kohms
4 kohms
Input level
For use with
nominal
Sensitivity
Nominal
(limit)
Max. before
clip(Main Out)
600
ohms mic
-50 dBu
(2.45 mV)
±1 dB
-34 dBu
(15.5 mV)
600
-20 dBu
ohms lines
(24.5 mV)
±1 dB
Connector in mixer
XLR Jack
-14 dBu
Phone Jack
(154 mV)
LINE IN (8-11)
LOW IMPEDANCE
4 kohms
600
ohms lines
-10 dBu
(245.0 mV)
±1 dB
-14 dBu
(154 mV)
Phone Jack
AUX IN
10 kohms
600
ohms lines
-10 dBu
(245.0 mV)
±1 dB
6 dBm
(1.5 V)
Phone Jack
TAPE IN
10 kohms
600
-10 dBu
ohms lines
(245.0 V)
±1 dB
6 dBm
RCA Jack
(1.5 V)
NOTE: (1) Sensitivity is the lowest level that will produce a full power output, or the nominal
output level when the unit is set to maximum gain.
(2) XLR connectors are balanced. Phone jacks are unbalanced.
♪ Output specifications.
Output terminals
Actual Load
Impedance
SPEAKER OUT
4 ohm
Output level(H)
For use with
nominal
Nominal
Max. before clip
4 ohms SP
300 W (430 W)
330 W (440 W)
Phone Jack
8 ohms SP
200 W (290 W)
220 W (300 W)
Phone Jack
+4dBu
(1.2 V)
+20 dBu
(8.3 V)
Phone Jack
+4dB
+20 dBu
(1.2 V)
(8.3 V)
+4dBu
(1.2 V)
+20 dBu
(8.3 V)
-10dBu
+12 dBu
(245 mV)
(3.07 V)
MAIN OUT
600 ohm
10k ohms lines
MONITOR OUT
600 ohm
10k ohms lines
EFX OUT
600 ohm
10k ohms lines
TAPE OUT
600 ohm
10k ohms lines
NOTE: (1) All connectors are unbalanced.
25
Connector in mixer
Phone Jack
Phone Jack
RCA Jack
Ⅸ Specifications
■ General Specifications
MODEL
VM-8DRV
Power Output Level(EIA)
RL 4
RL 8
300W
200W
Total Harmonic Distortion
f=1 , Rated output RL 4
Rated output RL 8
Main output +4
/600
0.05%
0.05%
0.08%
Frequency Response
20 , 8 , 1 watt(Speaker Out)
20
CH IN to Main OUT +4
+1, -1.5
+1, -1.5
Hum and Noise
20
20 , Rs=1500
(With 20Hz~20kHz BPF)
-70
-97
Cross Talk
60
INPUT CHANNEL
Equalization
± 15 shelving
± 15 shelving
Graphic Equalization
at 1 , adjacent channel inputs.
60 at 1 , Input to Output.
High : 10
Low : 100
±12
maximum boost or cut in each of seven bands.
125, 250, 500, 1K , 2K , 4K , 8K
Protection circuit
Indicators
-110 Equivalent input noise
Residual output noise (SP OUT)
Residual output noise (MAIN OUT)
Short circuit current limit
DC protection at speaker output
Power ON/OFF transient
AC line fuse.
Power(Green)
Phantom(Amber)
DSP(Yellow)
5 Points LED Meter (-10, -5, 0, +3, +6dB) Main Out
DC offset voltage
DC10
Dimension (W×D×H)
413×256×222 mm
Weight(Net)
23.77 Ibs/ 10.78kg
Power Consumption
500
FUSE 100V ~ 120V................6.3A
220V 240V...T.3.15A
Connector
Bal XLR input
Unbal 1/4" input
Unbal 1/4" output
NOTE: (1) Sensitivity is the lowest level that will produce a full power output, or the nominal output level when
the unit is set to maximum gain.
(2) XLR connectors are balanced. Phone jacks are unbalanced.
26
Ⅸ Specifications
♪Input specifications.
Input terminals
MIC IN (1-8)
LOW IMPEDANCE
LINE IN (1-8)
LOW IMPEDANCE
Actual Load
Impedance
4 kohms
4 kohms
Input level
For use with
nominal
Sensitivity
Nominal
(LIMIT)
Max. before
clip(Main Out)
600
ohms mic
-50 dBu
(2.45 mV)
±1 dB
-34 dBu
(15.5 mV)
600
-20 dBu
ohms mic
(109.5 mV)
±1 dB
5 dBu
(1.3 V)
Connector in mixer
XLR Jack
Phone Jack
AUX IN
10 kohms
600
ohms lines
-10 dBu
(245.0 mV)
±1 dB
6 dBu
(1.5 V)
Phone Jack
TAPE IN
10 kohms
600
ohms lines
-10 dBu
(245.0 mV)
±1 dB
6 dBu
(1.5 V)
RCA Jack
NOTE: (1) Sensitivity is the lowest level that will produce a full power output, or the nominal
output level when the unit is set to maximum gain.
(2) XLR connectors are balanced. Phone jacks are unbalanced.
♪ Output specifications.
Output terminals
Actual Load
Impedance
SPEAKER OUT
4 ohm
For use with
nominal
Output level
Max. before
Nominal
clip
4 ohms SP
300 W
330 W
Phone Jack
8 ohms SP
200 W
220 W
Phone Jack
Connector in mixer
MAIN OUT
600 ohm
10k ohms lines
+4dBu
(1.2 V)
+20 dBu
(8.3 V)
Phone Jack
MONITOR
OUT
600 ohm
10k ohms lines
+4dBu
(1.2 V)
+20 dBu
(8.3 V)
Phone Jack
EFX OUT
600 ohm
10k ohms lines
+4dBu
(1.2 V)
+20 dBu
(8.3 V)
Phone Jack
TAPE OUT
600 ohm
10k ohms lines
-10dBu
(245 mV)
+12 dBu
(3.07 V)
RCA Jack
NOTE: (1) All connectors are unbalanced.
27
Owner's Manual For The STK VM Series Powered Mixer.
Printed In Korea
STK Professional Audio
28
DEC.2009