1
4-170-417-12(1)
SON~
LCD
Digital Color TV
Introducing Your New BRAVIA@
Getting Started
Operating the 1V
Operating Instructions
Using Features
Using the Menus
Other Information
Sony Customer Support
U.S.A.: www.sony.com/tvsupport
Canada: www.sony.calsupport
United States
1.800.222.S0NY
BRAVIA
Canada
1.877.899.S0NY
Please Do Not Return
the Product to the Store
KDL-60EX500 / 55EX500 / 55EX501 / 46EX400 /46EX401 / 46EX500 / 46EX501
KDL-40EX400 / 40EX401 / 40EX500 / 40EX501 /32EX301 / 32EX400 / 32EX500
KDL-32FA600
Owner's Record
The model and 'erial nunlher, ;lrL' loc;iled ;11 the ,ide and rear 01'
!he TV, RL'L'prd tllL"L' IlUlllhl'r, ill thc ,pal'e, prm ided hL'IIl\\',
Rl'kr to lhelli \\ hCllc\ cr you l'all uppn your SIlIl) dealer
rl'~arding Ihi, TV
Model Name
Serial No,
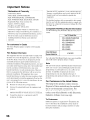
)'Ilur BR,-\ \1.'\ '1\ :' E\,[RG)' STAR l' qualiried
illthl' "l-!'lllle" 111(\,k II nlL'Ch ,[riel enL'l'~\
dricil'llc\ guidL'IIIlI" 'Cl hy thc L,S,
EIl\ iroll mCJll;d Pr"IL'etilln r\~ellL'Y :Hld
Dcpartlllcnt PI' Ellerg\',
la~14;nrJiM;1
E\' ERG Y ST.-\ R I' ;1 ;uint program .,1' lhe'l'
gm crllllll'nt agcnciL", desigl1cd 10 pn1nltJIC cllcrg)
l'llicicllt prllduI'h alld practicc" Challgc, III n:rl;tlll kalun:s,
,ctling" alld rUIKlltlllalitics Ill' this TV I i,c, PiuureiSouml. Pm\L'I'
Savi ngs) L',lIl illcre;ISI' "I' L'hange thc pm\ L'I' consulllpt illl1. Dcpclldingupon sueh I'hangcd 'Cllil1g"the pm\l'l'n'n,ulllptiol1ma) L','\CCCJ thc
lilllilS rl'Ljuircd 1'''1' the E\'ERGY STAR Ljualil'icatiol1 ill IIll' "Ho!llc"
Illodc,
III
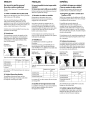
Cleaning
CAUTION
Tu pren:nl electric ~h(lck and hlade expo,ure, do nOl u~e
Ihis polarized AC plug wilh an C\tension cnrcl. receptacle or
other outlet unless the blades can be fully inserted,
::J
:J
Operate the TV only on I I ()-2.+() V AC.
Avoid operating the TV at temperatures below .+ I 'OF
(5°C),
Licensing Information
\1aeinlosh is a trademark PI' Apple Inc" n:giqered inlhe L,S, alld
olher L'ouillries,
HDi'dl. Ihe HDMI logo alld High-Del'illilipll Mullimcdia Inlerl'ace
arc IraciL'marb or registered trademarb or HDMI Licen,illg, LLC.
Fergasoll Patelll Properties, LLC:
l'.S Patellt No,S, 717 ,-I~~
liS Palent No, 6,X 16,1-11
\1allufaclured under lil'L'n'L' rrom Dolhy Laboratories, Dolby, Pro
Logic, and the douolc-D symool arc trademark, PI' Dolo)'
Lao"ratorie"
Blu-ra) Disc i' a tradelll:lrk,
"BRA VIA" and BRAVIA. MOliollf1ow, BRAVIA Sync. and
arl' trademarks or registered marb or Sony Corpuration,
1!9
"PlayStation" is a registered trademark and "PST' i, a trademark or
SOllY C\,mputcr EntertainlllCl11 lnl',
(KDL-32FA600 only)
lIlDOLBY
HIGH-OEF!NITION TELEVISION
DIGITAL I
PRO lOGIC II I
[I] DOLBY
DIGITAL I
2
When cleaning, be sure to unplug the power cord to avoid
any chance of electril' shock.
o Wipe the LCD screen gently with a soft cloth,
o Stubborn stains Illay be removed with a cloth slightly
Illoistened with a solution of mild soap and warm water,
o If using a chemically pretreated cloth. please follow the
instruction provided on the package.
o Never use strong solvents such as a thinner. alcohol or
benzine for cleaning,
o See the supplied Safety Booklet for additional
information,
Contents
Introducing Your New BRA VIA@
Using Features
Welcome to the World of BRAVIA@
4
Experiencing Stunning HD with Your
BRAVIA
4
The Four Steps to a Stunning HD
Experience
5
TV Feature Highlights
5
Getting Started
Setting Up Your TV
7
Locating Inputs and Outputs
8
Adjusting the viewing angle of the TV
10
Connecting the TV
10
Connecting Other Equipment
14
When Installing the TV Against a Wall or
Enclosed Area
15
Securing the TV
16
Running Initial Setup
18
Operating the TV
Using the Remote Control.
19
Remote Control Button Description
20
TV Controls and Indicators
24
Customer Support
United States
http://www.sony.com/tvsupport
Canada
http://www.sony.ca/support
BRAVIA@ Sync™
with Control for HDMI
25
Using PIP Feature
26
Favorites
27
Wide Mode
27
Wide Mode with PC
28
Inputs
28
Playing back Photo/MusicNideo via USB
29
Using the Menus
Navigating through TV Menus
30
Using the Picture Settings
31
Using the Sound Settings
33
Using the Screen Settings
35
Using the Channel Settings
37
Using the Parental Lock Settings
38
Using the Setup Settings
41
Using the Eco Settings
45
Other Information
PC Input Signal Reference Chart for
PC and HDMIIN 1/2/3/4
46
Using a Wall-Mount Bracket
47
Installing the Wall-Mount Bracket
47
Troubleshooting
52
Important Notices
56
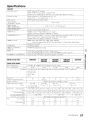
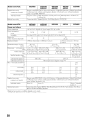
Specifications
57
Index
59
On-line Registration
United States
http://productregistration.sony.com
Canada
http://www.SonyStyle.ca/registration
3
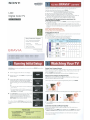
Introducing Your New BRAVIA@
Welcome to the World of BRAVIA@
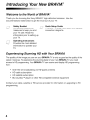
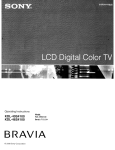
Thank you for choosing this Sony BRAVIA® high-definition television. Use the
documentations listed below to get the most out of your TV.
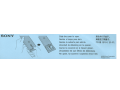
CJ
Safety Booklet
Contains precautionary
measures to keep you and
your TV safe. Read this
information prior to setting up
your TV.
r.7J./
Operating Instructions
Provides the most detailed
information to operate your
TV.
UJ
0 ,'
'y
Quick Setup Guide
Provides TV setup information with sample
connection diagrams.
Experiencing Stunning HD with Your BRAVIA
The quality of the image you see on your BRAVIA TV is only as good as the quality of the
signal it receives. To experience the stunning detail of your new BRAVIA TV, you need
access to HD programming. Your BRAVIA TV can receive and display HD programming
from:
•
•
•
•
Over-the-air broadcasting via HD-quality antenna
HD cable subscription
HD satellite subscription
Blu-ray Disc™ player or other HD compatible external equipment
Contact your cable, satellite or HD service provider for information on upgrading to HD
programming.
4
The Four Steps to a Stunning HD Experience
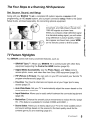
Set, Source, Sound, and Setup
Along with your BRAVIA TV set, a complete HD system requires a source of HD
programming, an HD sound system, and a proper connection setup. Refer to the Quick
Setup Guide, enclosed separately, for connecting optional equipment.
You can enjoy crisp, clear images, smooth
movement, and high-impact visuals from
1080 HD signals as shown here.
When you compare a high-definition signal
to a standard analog signal, you will notice
a big difference in picture quality. If black
bars appear as shown here, press WIDE
on the remote control to fill the screen.
TV Feature Highlights
Your BRAVIA comes with many convenient features, such as:
~ BRAVIA@ Sync™: Allows your BRAVIA TV to communicate with other Sony
equipment supporting the Control for HDMI function (page 25).
~
Digital Media Accessibility: Use the Photo, Music, and Video icons to
access photo, music, and video files from Sony USB equipment (page 29).
~
PIP (Picture in Picture): You can work on your PC and watch your favorite TV
program simultaneously (page 26).
~
Favorites: Your favorite channels and inputs are at your finger tips for easy
access (page 27).
~
Auto Wide Mode: Set your TV to automatically adjust the screen based on the
signal resolution (page 27).
~
Input Selection: Allows you to easily switch between the connected equipment
(page 28).
~
Motionflow: Enhance the smooth picture movements to reduce the blur (page
31). (This feature is available for models: EX500 and EX501.)
~
Scene Select: Allows you to easily adjust your TV to the most suitable picture
and sound settings based on the scenes for the best quality result for the
contents genre you are watching (page 21).
(Continued)
5
>- Ambient Sensor: Automatically optimizes the picture settings according to the
ambient light in the room. The sensor detects ambient light levels to adjust the
brightness and color temperature of the picture. With this feature you can have
the best picture quality under your room's lighting conditions (page 32).
6
Getting Started
.•'d.-
Setting Up Your TV
Some TV models are packaged with a detached Table-Top Stand so you can mount your TV to a
wall right away. If you are not mounting the TV to a wall, you will need to attach the Table-Top
Stand. You will need a Phillips screwdriver and the supplied screws to complete the task. Look for
the attachment instructions provided with the TV.
Be sure to consider the following while setting up your TV:
• Disconnect all cables when carrying the TV.
• Carry the TV with the adequate number of people; larger size TVs require two or more people.
• Correct hand placement while carrying the TV is very important for safety and to avoid
damage.
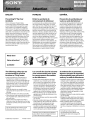
Except KDL-32FA600 model
KDL-32FA600 model only
/\
• Place your palm directly underneath but do
not squeeze the panel's speaker grill area.
• Ensure your TV has adequate ventilation, see page 15.
• For best picture quality, do not expose the screen to direct illumination or sunlight.
• Avoid installing the TV in a room with reflective wall and floor materials.
• Avoid moving the TV from a cold area to a warm area. Sudden room temperature changes may
cause moisture condensation. This may cause the TV to show poor picture and/or poor color.
Should this occur, allow moisture to evaporate completely before powering the TV on.
7
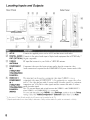
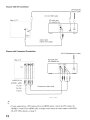
Locating Inputs and Outputs
Rear Panel
Side Panel
o
g
o
ACIN
.p='~!~.
, =~
I
~1IlIIID
00
I~~
" J
[j] AC IN
[2] DIGITAL AUDIO
Connect the supplied power cord to AC IN and the nearest wall outlet.
~
CABLE/
ANTENNA
RF input that connects to your Cable or VHFfUHF antenna.
[4l
COMPONENT
Component video provides better picture quality than the composite video.
Audio connection is required for the COMPONENT IN ports, connect audio (L/R).
IN2
(1 080p/1 080i/
720p/480p/480i)/
R-AUDIO-L
LID
VIDEO IN 1/
COMPONENT
IN 1
(1080p/1080i/
720p/480p/480i)/
R-AUDIO-L
(MONO)
Connects to the optical audio input of digital audio equipment that is PCMID0Iby",2
OUT (OPTICAL) Digital compatible.
.
This input port can be used as a composite video input (VIDEO I) or as a
component video input (COMPONENT I ). For composite use. connect the yellow
jack to Y for video and use audio L (mono) and R for audio signal. For component
connec~ion, use ~. PB, PR for video signals and also connect the audio L (mono)
and R for audlO sIgnal.
This TV can auto detect and switch between the VIDEO I and COMPONENT I
when VIDEO I or COMPONENT I is connected.
To set to auto detection, press MENU. select Settings, and then select the Setup
settings. Select the Video/Component 1 Selection option then set to Auto .
In the case o( 32 and .+0 inch models. the AC power cord is attached to the TV
,~ Manufactured under license frolll Dolby Lahoratories. Dolby and the double-D symbol arc tradcl1larb of DoJb:L.ah( lratories.
J
8
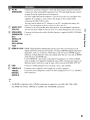
Item
[§] PC IN
(RGB/AUDIO)
Description
Connects to a personal computer's video and audio output connector. Can also be
connected to other analog RGB equipment. See "PC Input Signal Reference Chart"
on page 46 for the signals that can be displayed.
For some Apple Macintosh computers, it may be necessary to use an adapter (not
supplied). If an adapter is used, connect the adapter to the computer before
connecting lhe HOI5-HOI5 cable.
You may need to adjust the TV settings or your PC's resolution and timing. See
page 13 for information on how to setup your PC to this TV.
[I]
AU 010 OUT
(FIX) R/L
Connects to the left and right audio input jacks of your analog audio equipment.
You can use these outputs to listen to your TV's audio through your stereo system.
[ID
SPEAKERS
SUBWOOFER
(8Q)
SATELLITE
(8Q)R/L
(KDL-32FA600
only)
Connects the Subwoofer and the Satellite Speakers (supplied with KDL-32FA600)
to the TV.
[[] HOMI IN 1/213/4 HDMI (High-Definition Multimedia Interface) provides an uncompressed, alldigital audio/video interface between this TV and any HDMI-equipped audio/video
equipment, such as a set-top box, DVO player, and A/V receiver. HDMI supports
enhanced, or high-definition video, plus digital audio. Be sure to use only an HDMI
cable that bears the HOMI logo.
Use the HDMI IN I port when connecting OVI equipment. Use a DVI-to-HDMI
cable or adapter (not supplied). Equipment using a DVI connection also requires an
additional audio connection using an audio cable connected to AUDIO of PC IN.
[Q] USB
[j] VIDEO IN 2
VIDEO/L
(MONO)AUDlO-R
Connects to USB equipment to access photo, music, and video files.
Connects to the composite video output jack of video equipment.
If you have mono equipment, connect its audio output port to the TV's L (MONO)
audio input port.
• An HDMI or Component video (YPBPR) connection is required to view 480i, 480p, 720p, I080i
and 1080p video formats. 1080/24p is available only with HDMI connection.
9
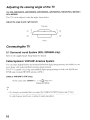
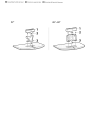
Adjusting the viewing angle of the TV
For KDL-55EX500/KDL-46EX500/KDL-40EX500/KDL-32EX500/KDL-55EX501/KDL-46EX501/
KDL-40EX501
This TV can he adjusted within the angle shown belmv.
Adjust the angle left and right (swivel)
Top view
:::
~L""'·---....LZ... -•. •
~·~-
---""::='"-···;;-·
••-....-...
.;
,
:::
Front
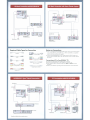
Connecting the TV
5.1 Surround Sound System (KDL-32FA600 only)
Refer to the supplied Quick Setup Guide for details.
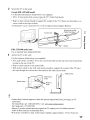
Cable System or VHF/UHF Antenna System
You can enjoy high-definition and standard-definition digital programming (if available in your
area) along with standard-definition analog programming.
This TV is capable of receiving unscrambled digital programming for both cable (QAM and
8VSB) and external VHF/UHF antenna (ATSC).
Cable or VHF/UHF (or VHF only)
75-ohm coaxial cable
--~~ -~ Rear of TV
CABLE/ANTENNA
• It is strongly recommended that you connect the CABLE/ANTENNA input using a 75-ohm
coaxial cable to receive optimum picture quality. A 300-ohm twin lead cable can easily be affected
by radio frequency interference. resulting in signal degradation.
10
Cable System and VHF/UHF Antenna System
Use an optional A-B RF switch (not supplied) to switch between the cable and over-the-air antenna
programming, as indicated below.
AlB RF Switch
cable~"I·
~
.~ ..~ Rear of TV
Antenna
-=Q..
Ii)
CABLE/ANTENNA
• Be sure to set the Signal Type setting to Cable or Antenna found under the Channel settings
for your input signal (see page 37).
H0 Cable BoxlH 0 Satell ite Box
You can enjoy high-definition programming by subscribing to a high-definition cable service or a
high-definition satellite service. For the best possible picture, make sure you connect this equipment
to your TV via the HDMI or component video (with audio) input located on the back of your TV.
Shown with HOMI Connection
CATV/Satell ite antenna cable
Rear of TV
HD cable box/
HD satellite box
Y.· .
H_DM_1_ca_b_le
____
(Continued)
11
Shown with DVI Connection
CATV/Satellite
antenna cable
DVI-to-HDMI cable
Rear of TV
HD cable box/
HD satellite box
Audio cable
(stereo mini plugs)
Shown with Component Connection
CATV/Satellite antenna cable
Rear of TV
HD cable box/
HD satellite box
AUDIO-R (red)
AUDIO-L (white)
PR (red)
Component video cable
P s (blue)
Y (green)
Audio cable
• If your equipment has a DVI output and not an HDMI output, connect the DVI output to the
HDMI IN 1 (with DVI-to-HDMI cable or adapter) and connect the audio output to the AUDIO
IN of PC IN. For details, see page 9.
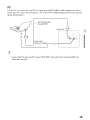
12
PC
Use the TV as a monitor for your PC by connecting an HD 15-HD 15 cable connection as shown
below. This TV can also be connected to a PC with a DVI or HDMI output. (Refer to the separate
Quick Setup Guide.)
-
HD15-HD15 cable
(analog RGB)
Rear of TV
Audio cable
(stereo mini plugs) __--c:=:tJ=>oo!------dF
-----1
J
• Connect the PC IN jack to the PC using an HDI5-HDI5 cable with ferrite core (analog RGB) and
audio cable (see page 9).
13
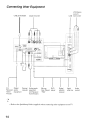
Connecting Other Equipment
CABLE/ANTENNA
VCR/Game
system/
USB Camcorder
Digital recorder
_ _---.JI -
I
CABLE!
I ANTENNA
IQO
f-
I
'L
ff~~
~
I cg~:o~;~"'N
,.
~
'720pJ''''pJ480'1
l
RGB
_
~C<i'J',o.f'c) _~C:
OAUDIO
DIGITAL
oooGGO
'-d-,
\j
PClHoMI1
I AUDIO OUT
.F
AUDIO IN
iOPTICAL) I 1------.jiiiiii\ii~~iiiiiiiiiJ-c====:::.,
r
-oJ
!
L.
AUDIO
(FIX)
T
A."~O·~
V \::sJ P"'!'-'
'1= 1. t-+-----
A/V
Digital
Personal
Receiver/ audio
computer
Home
equipment
Theater
)~
Analog audio
equipment
(AiV Receiver/
HomeTheater)
Blu-ray
DVD
Disc Player/ player
"PS3"
Digital
satellite
receiver
Digital
cable box
• Refer to the Quick Setup Guide (supplied) when connecting other equipment to your TV.
14
Audio
system
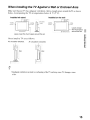
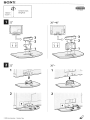
When Installing the TV Against a Wall or Enclosed Area
Make sure that your TV has adequate ventilation. Allow enough space around the TV as shown
below. Avoid operating the TV at temperatures below 41°F (5 °C).
Installed on the wall
Installed with stand
"""""""", I' """""""",
11
"""""""'1'1';' 7i~inche~'
(30cm)
: 2 3 / 8 inches
(6cm)
7/ 8 inches :
(30cm)
:
'!!!Jc:hf')?
(10Cm)":::-'
Leave at least this much space around the set.
Never install the TV set as follows:
Air circulation is blocked.
Air circulation is blocked.
• Inadequate ventilation can lead to overheating of the TV and may cause TV damage or cause
a fire.
15
Securing the TV
Ii\
ill
Sony strongly recommends taking measures to prevent the TV from toppling over.
Unsecured TVs may topple and result in propeI1y damage. serious bodily injury or even
death.
Preventing the TV from Toppling
:J
-.J
'...J
.:J
CI
-.J
Secure the TV to a wall and/or stand.
Do not allow children to play or climb on furniture and TV sets.
Avoid placing or hanging items on the TV.
N~ver install the TV on:
• slippery, unstable and/or uneven surfaces.
• furniture that can easily be used as steps. such as a chest of drawers.
Install the TV where it cannot be pulled, pushed. or knocked over.
Route all AC power cords and connecting cables so that they are not accessible to curious children.
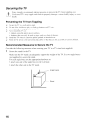
Recommended Measures to Secure the TV
Consider the following measures when securing your TV to a TV stand (not supplied).
1
Secure the stand for the TV.
Make sure the TV stand can adequately support the weight of the TV. Use two angle braces
(not supplied) to secure the stand.
For each angle brace use the appropriate hardware to:
• attach one side of the angle brace to the wall stud.
• attach the other side to the TV stand.
Angle braces
Stand
16
2
Secure the TV to the stand.
Except KDL-32FA600 model
Use the optional hardware listed below (not supplied):
• M4 x 16 mm anchor bolt (screwed into the TV's Table-Top Stand).
• A screw or similar (attach it to the TV stand).
• Rope or chain (strong enough to support the weight of the TV). Make sure that there is no
excess slack in the rope or chain.
An alternative way to secure the TV is with an optional Sony Support Belt Kit.
Anchor bolt --.....,_
KDL-32FA600 model only
Use an optional Sony Support Belt Kit.
3
Anchor the TV to the wall.
Use the hardware listed below (not supplied).
• Two anchor bolts, size M6 x 10-12 mm. Screw the bolts into the top-most wall-mount holes
located on the rear of the TV.
• Rope or chain (attach to one anchor bolt).
• Wall-anchor (attach to the wall stud) strong enough to support the weight of the TV (pass
the rope through the wall-anchor, then attach to the other anchor bolt).
Wall-anchor
Anchor bolts
----1~--+-_...l...o.-.-.,,/-!""-
nn-;;:~
Rope or
chain
• Contact Sony Customer Support to obtain the optional Support Belt Kit by providing your TV
model name.
For United States call: 1-800-488-7669 or visit: www.sony.com/accessories
For Canada call: 1-877-899-7669
• Measure 2 provides minimal protection against the TV toppling over. For further protection,
follow all three measures recommended above.
• If an electric screwdriver is used, set the torque to tighten at approximately 1.5 N·m {15 kgf.cm}.
17
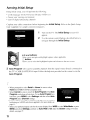
Running Initial Setup
During initial setup. you will perform the following:
• Set the language for the On Screen Display (OSD) text
• Choose your viewing environment
• Scan for digital and analog channels
Complete your cable connections before beginning the Initial Setup. Refer to the Quick Setup
Guide (supplied) for sample connection diagrams.
100tlsi Setup
1
Turn on the TV. The Initial Setup screen \vill
appear.
2
Use the remote control buttons described below to
navigate through the Initial Setup.
+1+1.1. buttons:
Allow you to navigate and highlight options where applicable.
o button:
Allows you to select the highlighted option and advance to the next screen.
3
Auto Program will scan for available channels from the signal source directly connected to
the TV's CABLEI ANTENNA input. Follow the help text provided on the screen to run the
Auto Program.
• When prompted to select Retail or Home, be sure to select
Home for ENERGY STAR compliant mode.
• Select Cancelto stop or cancel the Auto Program. The Auto
Program can be done at later time. To run Auto Program at a
later time, press MENU, select Settings, and then select Auto
Program under Channel settings.
• Connect either your cable or antenna to the TV (you can connect
both using an A-B RF switch (not supplied»; for more details see
page II.
• Select your preferred aspect ratio for the screen display. Press WIDE to select Wide Mode, or press
MENU and select Settings, and then set Auto Wide to On under the Screen settings. For more
details, see page 27.
Irutlal5elup
18
Operating the TV
Using the Remote Control
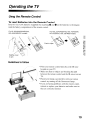
To Insert Batteries into the Remote Control
Insert two size AAA batteries (supplied) by matching
inside the battery compartment of the remote control.
For KDL -32/40/46/55/60EX500,
KDL-40/46/55EX501 models
0
and
0
on the batteries to the diagram
For KDL-32/40/46EX400, KDL-40/46EX401,
KDL-32EX301, KDL-32FA600 models
Guidelines to follow
---..,
.
-4,
~')'~
""".,.~'\
_,fIIIIIiJ,
I
!
,
,
"" ',~,
..,. .....
~,.
.. "*'
• Point your remote control directly at the IR sensor
located on your TV.
• Make sure that no objects are blocking the path
between the remote control and the IR sensor on your
TV.
• Fluorescent lamps can interfere with your remote
control; try turning off the fluorescent lamps.
• If you are having problems with the remote control,
reinsert or replace your batteries and make sure that
they are correctly inserted.
19
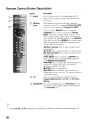
Remote Control Button Description
Button
--------
Description
TD -INPUT~----P-re-s·s
--
[gJ
TV-----
to displa)~h~-list of External Inputs and
mode. Press repeatedly to toggle through the inputs.
See page 28.
-- - - - - - - - - ---_ ..
__ .,-_._--_._-------------------------BRAVIA
These buttons are used to control the equipment
connected to the TV by using the Control for HOMI
Sync
function (not available on all Control for HOMI
equipment). Some other buttons on the remote control
may also operate BRAVIA@ SyncT\-1 equipment.
THEATER: Press to turn on and off the Theater
Mode. The picture settings will be set for a cinemalike experience and the audio will be switched to the
audio output of the attached speakers of your BRAVIA
Sync audio system. Your BRAVIA Sync audio system
must be connected by an HDMI connection to your
TV (see page 25 for details) .
_--~--~
..
---~
.... (fast reverse): Press to playa program in fast
-I]]
--CC-------
rewind mode.
~ PLAY: Press to playa program at a normal speed.
~ (fast forward): Press to playa program in fast
forward mode.
SYNC MENU: Press to display the BRAVIA Sync
Menu and then select connected HDMI equipment
from HOMI Device Selection.
~ PREV: Press to replay the current program from
the previous chapter mark (if any) or from the
beginning of the live TV cache.
• STOP: Press to stop playback.
~ NEXT: Press to advance forward to the next
chapter mark (if any) or to live TV when playing back
a recorded program.
Press to cycle through the available setting-~'-t~~-;:------
Closed Captions (CC) : On. Off. and On when
Muting.
@] FAVORITES
Press once to display the stored Favorites list. You
can store up to 10 channels and/or external inputs in
your Favorites list.
• The 5, PLAY and CH + buttons have a tactile dot. Use them as a reference when operating the TV.
20
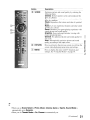
Button
Description
ffiJ
Optimizes picture and sound quality by selecting the
following items.
Cinema: Delivers picture scenes and sound just like
those in a theater.
Sports: Presents realistic pictures and sound just like
those in a stadium.
Photo: Reproduces the texture and color of a printed
photo.
Music: Lets you experience dynamic and clear sound
just like at a concert.
Game: Broadens your game-playing experience with
superb picture and sound quality.
Graphics: Eases prolonged monitor viewing with
clearer detailed pictures.
General: No optimized picture and sound quality for
any scene.
Auto: Automatically optimizes picture and sound
quality according to the input source.
lID
SCENE
RETURN
---==c--
[l] MENU
~
~
Press to go back to the previous screen or exit from the ~
s_c_re_e_n_w_he_n_dl_·s_p_la_y_in._g_m_e_n_u_it_e_m_s_a_n_d_s_e_tt_in_g_s_._ _
Press to display the menu with TV functions and
S
settings. See "Using the Menus" on page 30.
(1)
;g
""i
'-=::::
• When you set Scene Select to Photo, Music, Cinema, Game or Sports, Sound Mode is
automatically set to Dynamic.
• When you set Theater Mode to On, Cinema is automatically set.
(Continued)
21
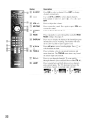
Button
Description
[ID 0-9 ENT
Press 0-9 to select a channel. Press ENT to change
channels immediately.
Use with 0-9 and ENT to select digital channels.
For example. to enter ~.I. press [2]. S . o:::J and
ENT.
VOL +1-
Press to adjust the volume .
__ .
_
..._
.
Press to mute the sound. Press again or press VOL + to
restore the sound.
...
MUTING
[j1] POWER
.
.
. _....
.
•....•...
-
....•....•
Press to turn on and off the TV
I/C)
··~··wTDE
M
-
_...__.. _-_.-._---'
DISPLAY
-
--_._-------------------------_._-----------_._--~--_.--_
..
_~-
.-
.~_._---
Press repeatedly to cycle through the available Wide
Mode settings. See page 27.
-'-"
-------
.'_.,--'-'-- - - - - - - - - - - - . ' - ' - - - ' - - - - - - - - - - - - - - - - - - - - - - -
Press once to display the banner with channel/program
information you are watching. The banner will time
out in a few seconds or press again to exit.
----
Press ./+/+/+ to move focus/highlight. Press () to
select/confirm an item.
[11J CH
+1-
[j]] JUMP
22
.-
Rear of Remote Control
Button
Description
lrn
Press to turn on and off the TV.
Available models: KDL-60EX500/KDL-55EX500/
KDL-46EX500/KDL-40EX500/KDL-32EX500/
KDL-55EX50 1/KDL-46EX50 IIKDL-40EX50 I
I/C)
(Power)
23
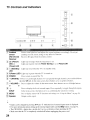
TV Controls and Indicators
POWER
;
[t--LfSl
CHANNEL
!
:.t=t+-;{ill
+ .!
1.:
--
~
__ VOULUME
---~·l.
"
It
!
'M
f----<··----«---·-L.---<~-«<<<--·-----,---,----,-,-,<<-,<'--««'-''<''j
l~m
[]
000
~
r~
~
-r~
~
i!
i:
_-t
+ +
[Z]
I
lT,G-J-@
INPUT
j
.~~
Item
[I] Ambient
sensor
(IR) Infrared
Receiver
Description
Senses room light level and adjusts the screen brightness accordingly. Do not put
anything over the sensor, doing so may affect its function.
Receives IR signal from the remote control.
[gJ l8I (Picture
Lights up in orange when the sleep timer is set.
Lights up in green when the Power Saving is set to Picture Off.
Off)/0
(Timer) LED
~ ~ (Standby)
LED
Lights up in red when the TV is in standby mode.
@] I (Power) LED Lights up in green when the TV is turned on,
[§] POWER
I]J - CHANNEL +
Press to scan through channels, To scan quickly through channels. press and hold down
.. either CH -/+. In the menu screen, these buttons serve as up/down butrons.
..
ITJ - VOLUME +
..
ffiJ
Press to turn on and off the TV.
Press to adjust the volume. In the menu screen. these buttons serve as left/right buttons.
+
-~INPUT
[IDMENU
Press to display menu with TV functions and settings (see "Using the Menus" on page 30).
[Q] Speaker
Outputs audio signal.
I
•
•
•
•
24
Press to display the list of external inputs. Press repeatedly to toggle through the inputs.
In the menu screen. this button serves as confirming the selection or setting.
-+-
while the list of external inputs menu is displayed.
Inputs can be changed by pressing +/+ and
For more information about setting up the external inputs labels and the Skip feature, see page 42.
The CHANNEL + button has a tactile dot. Use it as a reference when operating the TV.
Make sure that the TV is completely switched off before unplugging the power cord.
Using Features
BRAVIA@ Sync™ with
Control for HDMI
With the Control for HOMI function,
BRAVIA Sync helps to communicate with
BRAVIA Sync-compatible equipment using
HDMI CEC (Consumer Electronics Control).
Use the following settings and tips to help
unify control of your connected equipment.
1
Press MENU and select Settings, then
select the Setup settings.
2
Select the HOMI Settings, then highlight
Control for HOMI, and set to On.
Controlling BRAVIA Sync-Compatible
Equipment
To control the equipment by using the remote
control, press SYNC MENU and select the
desired equipment from HOMI Device
Selection.
HI'~~ Sync Menu
~
HOMI1
AV Amplifier
• Automatically turns the connected AV
amplifier on and switches the sound output
from the TV speaker to the audio system
when you turn the TV on. This function is
only available if you have previously used the
AV amplifier to output TV sound.
• Automatically switches the sound output to
the AV amplifier by turning the AV amplifier
on when the TV is turned on.
• Automatically turns the connected AV
amplifier off when you switch the TV to
~
standby mode.
• AdJ'usts the volume (VOL +1-) and mutes the _.
,~
sound (MUTING) of the connected AV
amplifier through the TV's remote control.
i'
2'
faCI)
Video Camera
• Automatically turns the TV on and switches
the input to the connected video camera when
the connected video camera is turned on.
• Automatically turns the connected video
camera off when you switch the TV to
standby mode.
• Control for HOMI (BRAVIA Sync) is
BD/DVO Player
• Automatically turns the BRAVIA Synccompatible equipment on and switches the
input to that equipment when you select it
from the Sync Menu.
• Automatically turns the TV on and switches
the input to the connected equipment when
the equipment starts to play.
• Automatically turns the connected equipment
off when you switch the TV to standby mode.
only available for the connected Sony
equipment that has the BRAVIA Sync
or is compatible with Control for
HOMI.
• The Control for HOMI settings must
be set on both the TV and connected
equipment. For settings on the
connected equipment, refer to their
instruction manuals.
• When specific Sony equipment
compatible with Control for HOMI
(BRAVIA Sync) is connected, BRAVIA
sync is automatically activated on the
equipment.
25
Using PIP Feature
To Swap Audio
PIP (picture in picture) displays a picture from
a connected PC in full screen, and a TV
program or other external input (see helow "To
Enter PIP" table) in an inset window. (Closed
Captions (CC) is not available with PIP
mode.)
You can swap audio between the main and sub
window.
1 Press TOOLS.
2 Press +1+ to highlight Audio Swap and
press O.
3 Press +1+ to highlight the window to be
audible, then press O.
Sub Window
(Location of the
Sub Window
can be moved
by pressing
Main
Window
(PC)
+/+/+/+.)
To Enter PIP
PIP Supporte(Noputs
[_'"main
window~~-,--'n_sub window
PC
TV channel
(CABLE/ANTENNA),
VIDEO IN 1/2, HDMI
IN 1/2/3/4 (video
timing)
HDMI IN 1/2/3/4
(PC timing)
TV channel
(CABLE/ANTENNA).
VIDEO IN 112,
COMPONENT IN 1/2
-=--~~~
1
2
Press TOOLS while in the PC mode.
Select PIP from the TOOLS menu.
3
The sub window will appear.
To Change Channels
You can change the channel of the sub window
by pressing CH +/- or entering the channel
number using the 0-9 numeric buttons.
To Exit from PIP
1
2
26
Press TOOLS.
Press +1+ to highlight Exit PIP and press
to exit to full PC screen.
o
Favorites
Wide Mode
Your favorite channels and external inputs can
be easily accessed by pressing the
FAVORITES button once they are added to
the list.
The Wide Mode feature allows you to select
the screen display of your preference. Based
on the original signal source, you may see
black bars around the picture or just on the
both sides of the screen. Sometimes you will
see the picture fill the full screen. This is due to
the signals your TV receives.
Favorites
Add to Favorites
--
---
Cable
-
Antenna
461
-
12
-------BBCNEWS
Component 3
DVD
Af'1lenna
BSO
24.6
--
ABC
- -------- --
Cable
34
ESPN HD
Cable
361
STAR Ch
HDMI1
SO
HDMI3
Recorder
Antenna
52.5
NHKHi
Cable
886
NHK BS2
o Set
Adding to Favorites
While tuned to the channel you want to watch
or viewing connected equipment, press
FAVORITES to display the list. Highlight
Add to Favorites, then press (). Your newly
added item will be listed at the top of the list.
When you continue to add items beyond the
10th item, the item listed at the bottom of the
list will be automatically removed from the
list.
You can manually select available Wide
Mode settings as you watch your TV by
pressing the WIDE button on your remote
control or you can set your TV to Auto Wide.
To set Auto Wide
Press MENU and select Settings, then select
the Screen settings.
Select Auto Wide and set to On.
To change the Wide Screen Mode
Press WIDE repeatedly to cycle through the
available modes.
Standarddefinition source
High-definition source
Wide Zoom
Wide Zoom
~
~ ~
Normal
rn:m
Normal
This mode is not available.
Full
Full
~
Ir2I B08-----1
I
Zoom
Zoom
~
~ L]
I
I
Normal is available with 480i or 480p sources
only.
• Your Favorites list will be cleared each
time you run the Auto Program.
27
Wide Mode with PC
Inputs
Wide Mode is also available for the PC
Press INPUT to display the Input menu and
toggle through the external inputs to select
your video signal for viewing including the TV
mode. The inputs list consists of TV mode and
other equipment connected to the TV.
You can label your external inputs to identify
them easily.
settings. When a PC is connected to the TV
and PC input is selected, you can change the
PC Screen settings.
Screen
PC
To Label an Input
1
Press MENU and select Settings, then
select the Setup settings. Select the
Label Video Inputs option. Press +1+
to highlight the video input (HDMI 1-4,
Video 1-2, Component
1-2, PC) to which you want to assign a
To change the Wide Screen Mode for
PC Timing
Press WIDE repeatedly to cycle through the
label; press
choice.
.~~
bOd
.
I
800 x 600
• Use the Auto Adjustment to adjust
the display position and phase of the
picture when the TV receives an input
signal from the connected Pc.
28
to select the input of your
2
Press +1+ to highlight one of the
displayed labels that corresponds to your
connected equipment, then press O.
3
If you have an open input where no
equipment is connected, you can label it as
Skip. When you assign Skip, your TV
will skip over this input when you press
the INPUT button. The Skip labeled input
is grayed out in the input list.
available modes while in the PC input mode.
JncoWig,g PC signal i
0
Playing back
Photo/MusicNideo via USB
You can enjoy photo/music/video files stored
in a Sony digital still camera or camcorder
through a USB cable or USB storage device on
your TV.
1
Connect a supported USB device to the
TV.
2
3
Press MENU.
4
Press +/+ to select Photo, Music, or
Video, then press ().
The file or folder list appears.
Press +/+/+/+ to select a file or folder,
then press ().
When you select a folder, select a file,
then press ().
Playback starts.
Picture Frame: Allows you to display a
photograph on the screen for a selected
period of time. After that period, the TV
automatically switches itself into standby
mode.
Playback Options: Allows you to make
adjustments for photo, music and video
settings.
Photo Playback Auto Start
The TV automatically displays the thumbnail
view screen when the TV is turned on and a
digital still camera or other device storing
photo files is connected to the USB port then
turned on (page 41).
Notes when playing back files
• While the TV is accessing the data on the
USB device, observe the following:
- Do not turn off the TV or connected USB
device.
- Do not disconnect the USB cable.
- Do not remove the USB device.
The data on the USB device may be
damaged.
• Sony will not be held liable for any damage
to, or loss of, data on the recording media due
to a malfunction of any connected devices or
the TV.
• Playback does not start automatically if the
TV is turned on after connecting the digital
still camera or other device to the USB port.
• USB playback is supported for the following
photo file formats:
- lPEG (JPEG format files with the
extension ".jpg" and conforming to DCF
2.0 or Exif 2.21)
• USB playback is supported for the following
music file format:
- MP3 (files with the extension ".mp3" that
have not been copyrighted)
• USB playback is supported for the following
video file format:
- MPEG 1, MPEG2 (files with the extension
".mpg")
• Photo Playback Auto Start works only for
photo files in the newest digital still camera
folder (DCF-compliant, highest-numbered
"DCIM" folder).
• Playback may not start automatically when
some digital still cameras (such as cameras
with internal memory) are connected.
• The file name and folder name support only
English.
• When you connect a Sony digital still
camera, set the camera's USB connection
mode to "Auto" or "Mass Storage." For more
information about USB connection mode,
refer to the instructions supplied with your
digital camera.
• Use a USB storage device that is compliant
with USB Mass Storage Class standards.
29
~
~.
~
Q)
2'
~
CIl
Using the Menus
The MENU button allows you to access a variety of TV settings and LSB media files.
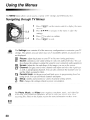
Navigating through TV Menus
...-
S ettings
1
Press ~ on the remote control to display the mellu
options.
2,3
2
Press +1+1+1+ to Il<.l\igate on the menu or adjust the
settings.
Press () to select or confirm.
1,4
3
4
Press ~ to exit.
The Settings icon contains all of the necessary configurations to customize your TV
settings. The options you can select may vary. Unavailable options are grayed out or
not displayed.
m
.. I)
I±I
d
C6
§
~)
Picture: adjust the picture on your TV to fit your viewing preference .
Sound: customize your sound settings to suit your audio preference. You can
also change the settings to output the sound to your connected audio equipment.
Screen: adjust the size and shape of the images you see on the screen.
Channel: navigate your favorite channels and inputs and select the signal type.
as well as autoprogram channels. You can also customize the channels you see
and the labels assigned to them.
Parental Lock: set the password and limit access to programming based 011
rating levels. You can also block channels and inputs.
Setup: modify and customize a variety of general setting options.
Eco: changes the settings related to power consumption.
~
Photo
n
M usic
l:D
Video
30
The Photo. Music. and Video icons organize your photo. music. and video files
from Sony USB connected equipment. Be sure to select the correct icon when
accessing files. Refer to the feature section for more information Oil these icons.
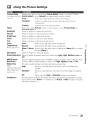
[I] Using the Picture Settings
Option
_
Picture Mode
CuslOlni-::.ed J>iclllre
DescrIption
.
Displays the options selected in the Scene Select settings (see page 21 L Whcn
Scene Select is set to General. the options belmv can be selected.
Vivid
Select for enhanced picture contrast and sharpnes:->.
Standard
Select for standard picture settings. Recommcnded for home
entertai nmen I.
Custom
Select to store your preferred settings.
Reset
Resets the current Picture settings to their defaults. except Picture Mode and
Ambient Sensor.
Backlight
Picture
Brightness
Color
Hue
Color
Temperature
White adjustmen!
Adjust to brighten or darh:en the bach:light.
Adjust to increase or decrease picture contrast.
Adjust to brighten or darh:en the picture.
Adjust to increase or decrease color intensity.
Adjust to increase or decrease the green tones.
Cool
Neutral
Warm 1/Warm
2
Select to give the white colors a bluish tint.
Select to give the white colors a neutral tint.
Select to 2:ive the white colors a reddish tint. Warm 2 2:ives a redder
tint than Warm 1.
~
~
Adjust to sharpen or soften the picture.
Sharpness
Noise Reduction Select to reduce the picture noise level. Select from Auto. High. Medium. Low and
Off.
Select to reduce the picture noise in MPEG-compressed videos. This is eflective when
MPEG Noise
Reduction
viewing a DVD or digital broadcast. Select from High. Medium. Low and Off.
Provides smoother picture movement and reduces picture blur.
Motionflow
(KDL.
High
Select for smoother picture movement such as for film-based
32NO/~6/55/60EX5()().
KDL--IO/46/55EX5()}
//Iodels onlY)
CineMotion
contents.
Standard
Select for smooth picture movement. Use this setting for standard
use.
Off
Select when the High or Standard settings result in noise.
Provides improved picture movement and reduces picture blur and graininess for filmbased contenl. Select Auto 1 for standard use. or Auto 2 or Auto to represent original
film-based content as is.
(Col1fillued)
31
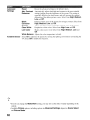
Option
Advanced
Settings
Description
Reset
Adv. Contrast
Enhancer
Resets the advanced settings to the default values.
Automatically adjusts backlight and contrast to the most suitable
settings judging from the brightness of the screen. This setting is
especially effective for dark scenes, and will increase the contrast
distinction of the darker picture scenes. Select from High, Medium,
Low and Off.
Enhances black areas of the picture for stronger contrast. Select from
Black
High, Medium, Low and Off.
Corrector
Adjusts the balance between bright and dark areas of the picture.
Gamma
Clear White
Emphasizes white colors. Select from High, Low and Off.
Makes colors more vivid. Select from High, Medium, Low and
Live Color
Off.
White Balance Adjusts the color temperature in detail.
Ambient Sensor Select On to optimize the picture by sensing the lighting environment surrounding the
TV. Select Off to disable this function.
• Even if you change the Motionflow setting, you may not see the effect visually depending on the
content.
• Available Picture options, including options in Advanced Settings depend on Scene Select
and Picture Mode.
32
-4»
Using the Sound Settings
Option
Sound Mode
Customi-:,ed
sound listening
Description
Sets a sound mode. Sound Mode includes options best suited for video and
photographs, respectively. The available options depend on the scene select settings.
Dynamic
Enhances treble and bass.
Standard
Standard sound optimized for home use.
Clear Voice
Suitable for spoken dialog.
Custom
Select to store your prefen'ed settings.
Reset
Resets the current Sound Mode settings to the default values.
Treble
Adjust to increase or decrease higher-pitched sounds.
Bass
Adjust to increase or decrease lower-pitched sounds.
Equalizer
Adjust allows you to select your frequency response curve. Select Reset to reset the
Equalizer settings to the default values. (Available when Sound Mode is set to
Custom.)
Balance
Adjust to emphasize left or right speaker balance.
Dolby Pro Logic
For Mono/Stereo Input
II
Movie
Select for a movie theater like sound.
(KDL-32FA600
Music
For steady music signals; gives natural sound to music and a concert
like environment.
Matrix
Simulate multi-channel sound; great for mono programs.
Virtual
Creates a virtual surround sound. using the Dolby Pro Logic II
system. On this mode we recommend to place the Satellite Speakers
next to the TV (see more details in Quick Setup Guide).
Off
Tum off the Dolby Pro Logic II surround sound.
only)
For Multi-channel Input
Movie
Music
Matrix
Virtual
Output multi-channel surround directly preserving input source
regardless of mode setting.
Off
Output 2ch downmix sound from front left and right speakers.
(COl1finlled)
33
Option
Surround
(Except KDL32FA600)
Test Tone
(KDL-32 FA 600
only)
Volume Offset
Steady Sound
Description
Allows you to select the suitable surround effects depending on the genre of TV
program (movie, sport, music, etc.) or video game. The available options depend on the
scene select settings.
On/Off
Select On to optimize the sound quality to enjoy the effects of the
Surround option and to create a virtual surround sound using the 2ch
speaker.
Cinema/Off
Provides surround effects just like the high-grade audio systems
found in movie theaters.
Music/Off
Provides surround effects that make you feel like you are surrounded
by sound as in a music hall.
Sports/Off
Provides surround effects that make you feci like you are watching a
live sports contest.
Game/Off
Provides surround effects that enhance game sound.
Used to confirm and adjust speaker position and level.
Adjust the volume level of the current input relative to other inputs.
Select On to stabilize the volume across all programs and commercials.
Select Off to disable this function.
Stereo
MTS Audio
Enjoy stereo,
bilingual and mono Auto SAP
programs
Mono
Select for stereo reception when viewing a program broadcast in
stereo.
Select to automatically switch the TV to second audio programs
when a signal is received. If no SAP signal is present, the TV
remains in Stereo mode.
Select for mono reception. Use to reduce noise during weak stereo
broadcasts.
Alternate Audio Select among the available options to switch among the alternate audio streams. The
Digital channels only program you are tuned to may be broadcasted in a different language in the alternate
audio streams.
Speakers
TV Speakers
Select to use the TV speakers.
Audio System Select to use an external audio system for the TV sound. By
selecting this option you are disabling the TV speakers.
• MTS Audio is only available for analog programs.
• Alternate Audio is only available if the program is broadcast with alternate audio streams.
• You can also access Sound Mode, MTS Audio and Alternate Audio by using the TOOLS
button on the remote control.
34
1+1
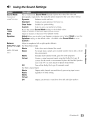
Using the Screen Settings
Wide Mode
Wide Zoom Fills the screen with minimum distortion.
Select to display 4:3 picture in original size when the original source is 4:3.
Normal
Full
Select to enlarge the picture horizontally to till the screen when the
uriginal source is 4:3 (Standard definition SOUl\:ei. When the original
source is 16:9 (High-de1inition source). select this mode to display the
16:9 picture in its original size.
Select to enlarge the original picture without distorting the aspect ratio.
Zoom
Select On to automatically change Wide Mode setting hased on the
Auto Wide
On
content.
If frequent screen changes are disturbing to you, select Off. Choose one
Off
of the Wide Mode options when this function is set to Off.
Wide Zoom Enlarges the 4:3 picture to fill the 16:9 screen, displaying as much of the
4:3 Default
original image as possible.
Select the default
Screen Mode to lt.'ie Normal
Select to display the 4:3 picture in its original size.
for 4:3 SOl/rces
Select to enlarge the 4:3 picture horizontally only. to fill the display area.
Full
Select to enlarge the picture horizontally and vertically to an equal aspect
Zoom
ratio that fills the wide screen.
Select to continue using the current Wide Mode setting when the
Off
channel or input is changed.
Displays pictures in their original size when parts of the picture are cut otf
Full Pixel
Display Area
(available depending on the TV model).
+1
Displays pictures in their original size.
Normal
Displays pictures in their recommended size.
-1
Enlarges the picture so that the edges are outside the visible display area.
Allmvs you to move the position of the picture left and right. (Available in Wide Zoom
Horizontal
and Zoom.)
Center
Allows you to move the position of the picture up and down. (Available in Wide
Vertical Center
Zoom and Zoom.)
• Normal is not available when you are watching a nop, 1080i or 1080p source.
• If 4:3 Default is set to anything but Off, the Wide Mode setting changes only for the current
channel. When you change channels (or inputs), Wide Mode is automatically replaced with the
4:3 Default setting for 4:3 sources. To retain the current Wide Mode setting as channels and
inputs are changed, set 4:3 Default to Off.
• 4:3 Default is not available if Auto Wide is set to Off.
(Col/til/ued)
35
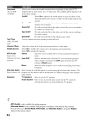
Option
PC Settings
Description
When a PC is connected to the TV and the PC input is selected, the PC settings screen
appears instead of the Screen settings.
You can also select the PIP feature which allows you to view two pictures
simultaneously from TOOLS button (see page 26).
Wide Mode Normal
Full 1
Select to display in the original image size.
Select to enlarge the picture to fill the display area,
keeping its original aspect ratio.
Full 2
Select to enlarge the picture to fill the display area.
Auto
Select to automatically adjust the display position and phase of the
Adjustment picture when the TV receives an input signal from the connected Pc.
Note that Auto Adjustment may not work well with certain input
signals. In such cases, manually adjust the options below.
Adjust after Pitch to fine tune overall sharpness.
Phase
Pitch
Adjust uneven sharpness on screen.
Horizontal
Center
Allows you to move the position of the picture left and right.
Vertical
Center
Allows you to move the position of the picture up and down.
• For the PC Input Signal Reference Chart, see page 46.
• Auto Adjustment, Phase and Pitch are not available with PC signal connected to HDMI input.
36
d
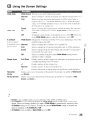
Using the Channel Settings
.Option
Description
Favorites
Select favorite channels and external inputs (see page 27).
Signal Type
Cable
Select if you are receiving cable channels via Cable TV provider.
Antenna
Select if you are using an antenna.
Auto Program
Add Digital
Channels
Show/Hide
Channels
Label Channels
Analog Fine
Tune
•
•
•
•
Automatically sets up the channel list on the TV for all receivable channels.
1
Select Auto Program.
2
Select OK to start Auto Program.
1
Select Add Digital Channels.
2
Select OK to add digital channels.
Allows you to show or hide channels that appear when you use the CH +/- buttons.
1
Press +1+ to scroll through the channels until you find the channel you want to
show or hide. Then press
to select it.
2
Press +1+ to determine if the channel will be shown or hidden. Then press
select it.
0
0
to
Allows you to assign labels (such as station call letters) to channel numbers.
1
Press +1+ to scroll through the channel numbers. Then press ( ) to select the
channel number that you want to assign a label.
2
Press +1+ to scroll through the label characters (A-Z, 0-9, etc.). Press + to move
to the next character. Repeat the previous steps to add up to seven characters to the
label. When finished, press ().
Allows you to fine-tune the selected analog channel manually if you feel that a slight
tuning adjustment may improve picture quality. Select Auto to adjust to the most
appropriate analog channel.
You should run Auto Program after changing the Signal Type setting.
Running Auto Program will clear the Favorites list.
Channels that you set to be hidden can be accessed by the 0-9 and G:J buttons.
You can set channels to be hidden that are automatically set in Auto Program.
37
C6
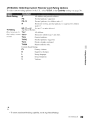
Using the Parental Lock Settings
Option
Enter Password
Description
The Parental Lock settings allow you ta set up the TV to block programs according to
their content and rating levels. Use 0-9 on the remote control to enter a faur-digit
password. The first time you create a password, confirm the password by entering it again.
Change Password Select to change your password.
U.S.A.
Select ta use U.S.A. ratings (see page 39).
Country
Canada
Select to use Canadian ratings (see page 40).
Off
Tum
Parental Lock off. No programs are blocked from viewing.
Rating
Child
Maximum ratings permitted are:
U.S.: TV- Y, TV-G, G
Canada: C, G, TV- Y
Youth
Maximum ratings permitted are:
U.S.: TV-PG, PG
Canada: C8+, PG, 8 ans+, TV-PG
Young Adult
Maximum ratings permitted are:
U.S.: TV-14, PG-13
Canada: 14+, 13ans+, TV-14
Select ta set ratings manually.
Custom
U.S.: See page 39 for details.
Canada: See page 40 for details.
Tum Downloadable U.S. Rating off. No programs that contain
Downloadable Off
U.S. Rating
downloadable ratings are blocked from viewing.
(Available only
Select ta black programs based on downloadable ratings.
Custom
in U.S.A.
Clear All
Select to clear the entire downloadable rating system.
where advanced
ratings exist)
Allows programs and movies that are broadcasted without a rating.
Allow
Unrated
(A vailable only
Blocks all programs and movies that are broadcasted without a rating.
Block
when Country is
set to U.S.A.)
Channel Block Allows you to block channels regardless of program ratings.
To View a Blocked Channel
Press ENT when tuned to the blocked channel then enter the password.
External Input Allaws you to block external inputs regardless of program ratings.
Block
To View a Blocked External Input
Press ENT when tuned to the blocked input then enter the password.
• You need your password for any future access into the Parental Lock settings. If you lose your
passward, see "Lost password" on page 55.
• Selecting Clear All will delete the current Downloadable U.S. Rating menu and the menu will
no longer be available until the TV is tuned ta a channel that contains downloadable ratings.
• If you block unrated TV programs, be aware that the following types of programs may be blocked:
programs broadcasted from another country, emergency broadcasts, political programs, sports,
news, public service announcements, religious programs and weather.
38
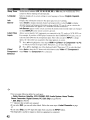
US Models: Selecting Custom Parental Lock Rating Options
To select custom rating options for the U.S., select U.S.A. in the Country setting (see page 38).
O/IItit>n
Description
Movie Rating
G
PG
PG-13
All children and genera] audience.
Parental guidance suggested.
Parental guidance for children under 13.
R
Restricted viewing, parental guidance is suggested for children
under 17.
NC-17 and X
No one 17 or under allowed.
Age-Based Ratings
TV-Y
All children.
TV Rating
Block prograllls by
their rating, content TV-Y7
Directed to children age 7 and older.
or both
TV-G
General audience.
TV-PG
Parental guidance suggested.
TV-14
Parents strongly cautioned.
TV-MA
Mature audience only.
Content-Based Ratings
FV
Fantasy violence.
o
Suggestive dialogue.
L
Strong language.
S
Sexual situations.
V
Violence.
• To ensure maximum blocking capability, set the Age-Based Ratings.
(Continued)
39
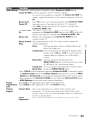
Canadian Models: Selecting Custom Parental Lock Rating Options
To select custom rating options for Canada, select Canada in the Country setting (see page 38).
Option
English Rating
French Rating
U.S.A. Rating
DescriPtion
C
C8+
G
PG
14+
18+
G
8 ans+
13 ans+
16 ans+
18 ans+
See "US Models"
All children.
Children 8 years and older.
General programming.
Parental guidance.
Viewers 14 and older.
Adult programming.
General programming.
Not recommended for young children.
Not recommended for ages under 13.
Not recommended for ages under 16.
Programming restricted to adults.
on page 39 for details.
Viewing Blocked Programs
You can view blocked programs by entering your password. Press ENT when tuned to a blocked
program, then enter the password. This temporarily deactivates the parental control feature. To
reactivate the Parental Lock settings, turn off the TV. When the TV is turned on again, your
Parental Lock settings are reactivated.
40
(3
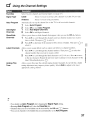
Using the Setup Settings
Option
USB Auto
Start
Closed
Captions
(CC)
Description'
.
Select On to start photo playback automatically when the TV is turned on and a digital still
camera or other device containing photo files is connected to the USB port then turned on.
Allows you to select from several closed caption modes (for programs that are broadcast
with closed captioning).
On
Closed Captions (CC) is turned on.
CC Display
Off
Closed Captions (CC) is turned off.
On when
Closed Captions (CC) is turned on when the TV is
Muting
muted.
Allo\\/s you to select basic analog (EIA-608) closed caption options.
Analog CC
CC1, CC2,
CC3, CC4
Text1, Text2,
Text3, Text4
Digital CC
Displays a printed version of the dialogue or sound effects
of a program. (Should be set to CC1 for most programs.)
Displays network/station information presented using
either half or the whole screen (if available).
When the digital closed caption service is available, select from the
Service 1-6 or CC1-4.
Digital CC
Options
Allows you to make additional settings for digital closed caption
options. Select As Broadcast or Custom. The Custom option is
available on the Digital CC setting.
Custom
Allows you to customize the following settings:
Character
Small, Standard. Large
Size
Character
Style
Character
Color
Character
Opacity
Edge Type
Edge Color
Background
Color
Background
Opacity
Style 1-7
Color 1-8
Solid. Translucent
None. Raised. Depressed, Outline.
Left Shadow, Right Shadow
Color 1-8
Color 1-8
Solid. Translucent
• You can tum on Closed Captions (CC) options (On, Off or On when Muting) by directly
pressing the CC button on the remote control.
(Continued)
41
Option
Sleep Timer
Language
Description
Set the time in minutes (Off, 15, 30, 45, 60, 90, or 120) that you would like the TV to
remain on before shutting off automatically.
Select to display all on-screen settings in your language of choice: English, Espanol,
Franc;ais.
Info
Banner
Label Video
Inputs
Displays the information related to the input signal you are watching.
Select Small to display minimal channel and program title or select Large to display
detailed channel and program information along with the TV icon if you are viewing the
TV. This information will appear if it is available from the broadcaster.
Info Banner appears on the screen each time the channel and external inputs are changed
or when DISPLAY on the remote control is pressed.
Allows you to identify NY equipment you connected to the TV, such as a VCR, DVD, etc.
For example, if you have a DVD player connected to the COMPONENT IN jack, you can
select the label DVD for the Component input. Then when you press INPUT to change
inputs, the video label you assigned to that input appears on screen.
1
Press +1+ to highlight the video input (HDMI1-4, Video 1-2, Component 1-2, PC)
to which you want to assign a label. Then press
to select the input.
2 Press +1+ to highlight one of the displayed labels. Then pressOto select the label.
Videol
Select Auto to have the TV detect and switch between the Video 1 or Component 1
Component 1 when Video 1 or Component 1 is connected.
G
Selection
• You can assign following labels for each input:
-, Cable, Receiver, Satellite, VCR, DVD/BD, DVR, Audio System, Home Theater,
Game, Camcorder, Digital Camera, PC, Edit, Skip (except PC IN)
-, Edit, Skip (for PC IN)
• "-" indicates that no labels are assigned.
• If you select Edit, you can edit video labels. Follow the same steps of Label Channels on page
37.
• If you select Skip, your TV skips this input when you press the INPUT button.
• The Skip label is useful for inputs to which no equipment is connected.
42
Option
Description
.
HDMI Settings Communicates with equipment compatible with the Control for HDMI function.
Control for HOMI Links the operations of the TV and the equipment.
For specillc Sony equipment L'ompatiblc with Control for HOM!. thi"
setting is applied automatically to the connected equipment when set to
On.
Select On to have your connected equipment with Control for HDMI
function to power off automatically when the TV is turned off.
Select Off to disable this function. This feawre is mailable when
Control for HOMI is On.
TV Auto Power Select On to control your TV's power on from your connected
On
equipment with Control for HOMI function. Select Off to disable this
function. This feature is available when Control for HOMI is On.
Displays a list of equipment with Control for HDMI function
Device List
connected to the TV.
Device Control Select button functions of the TV's remote control to operate the
connected equipment.
Keys
None
For basic operations, such as navigation buttons (up,
down. left or right. etc).
Tuning Keys For basic operations and operation of channel-related
buttons. such as CH +/- or 0-9. etc. Useful when you
control a tuner or set-top box, etc: via the remote
control.
Menu Keys For basic operations and operation of the
MENUITOOLS buttons. Useful when you select menus
of a SO player, etc: via the remote control.
Tuning and For basic operations and operation of channel-related
Menu Keys buttons and MENUITOOLS buttons.
• Press TOOLS while the equipment supporting Control for HDMI is connected to display
the Device Control options. The Device Control option provides access to the Menu.
Options and Content List of your connected equipment with your TV remote control.
• Some equipment with Control for HDMI does not support the Device Control feature.
• HDMI Settings must be made on the connected equipment.
Select Lock so no adjustment can be made to items grayed out.
Select Unlock to allow adjustment to any of the Picture settings.
Device Auto
Power Off
Picture
Adjustments
Lock
Product
Support
Contact Sony
Signal
Diagnostics
Sony contact information is available on this screen for your
convenience. TV specific information such as Model Name. Serial
Number. Software Version and downloadable ratings (if available from
the TV) are displayed here.
Press to display the diagnostics information for the current signal.
(Conrillllcd)
43
~
5'
ea
s:
(I)
~
~
~
Option
Initial Setup
Description
If you missed the Initial Setup when you first connected the TV or if you want to scan all
receivable channels, select Initial Setup. Follow the instructions on the screen. Some
settings such as Picture, Sound, and Parental Lock will not be affected by this Initial
Setup. If you wish to return your TV to factory settings, please see the Troubleshooting
section on page 55.
• Favorite channel list will be cleared each time you run the Initial Setup.
44
'!)
Using the Eco Settings
Option
Descrlpflon
Power Saving Select from Off. Low. High. Picture Off to adjust your TV's power consumption. By
selecting the High option, you will reduce the power consumption more than the other
available settinlrs.
While Picture~Off is set, pressing VOL +/- or MUTING buttons will not disable this
function. Press other buttons to disahle it.
Idle TV
Select to automatically power off the TV after 1h. 2h. or 4h when no buttons are pressed on the
Standby
remote control or the TV. Select Off to disable this function.
Auto Shut Off Select On to automatically power off the TV when no input signal is detected for a certain
period of time. Select Off to disable this function.
45
Other Information
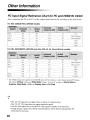
PC Input Signal Reference Chart for PC and HDMIIN 1/2/3/4
After connecting the PC to the TV, set the output signal from the PC according to the chart below.
For KDL-32EX301/KDL-32FA600 models
VGA
x
31.5
60
VGA
SVGA
x
37.9
60
VESA Guidelines
XGA
x
48.4
60
VESA Guidelines
WXGA
x
47.4
60
VESA
1,280
x
47.8
60
VESA
1.360
x
47.7
60
VESA
._---
For KDL-32EX500/KDL-32EX400 and other KDL-40, 46, 55 and 60 inch models
VGA
640
x
480
31.5
60
VGA
SVGA
800
x
600
37.9
60
VESA Guidelines
1,024
x
768
48.4
60
VESA Guidelines
XGA
1,280
x
768
47.4
60
VESA
1.280
x
768
47.8
60
VESA
1,360
x
768
47.7
60
VESA
SXGA
1,280
x
1.024
64.0
60
VESA
HDTV*
1.920
x
1.080
67.5
60
CEA-861 *
WXGA
*
The 1080p timing when applied to the HDMI input will be treated as a video timing and not PC timing.
This affects Picture settings and Wide Mode settings. To view PC content set Scene Select to
Graphics, Wide Mode to Full, and Display Area to Full Pixel.
• This TV's PC input does not support Sync on Green or Composite Sync.
• This TV's PC VGA input does not support interlaced signals.
• Your PC must support one of the above PC input signals to display on the television.
• In plug and play, signals with a 60 Hz vertical frequency will be detected automatically. (PC
reboot may be necessary.)
46
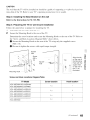
Using a Wall-Mount Bracket
Your TV can be mounted on a wall using a Wall-Mount Bracket (not supplied) out of the box as
packaged. Some larger size TV may require removing the Table-Top Stand: refer to the
instructions provided with the TV.
Prepare the TV for the Wall-Mount Bracket before making cable connections.
For product protection and safety reasons, Sony strongly recommends that you use the WallMount Bracket designed for your TV and the installation should be performed by a Sony
dealer or licensed contractor.
• Follow the instruction guide provided with the Wall-Mount Bracket for your model. Sufficient
expertise is required in installing this TV. especially to determine the strength of the wall for
withstanding the TV's weight.
• Be sure to use the screws supplied with the Wall-Mount Bracket when attaching the mounting
hooks to the TV set. (Do not use the screws that are intended for the Table-Top Stand
attachment.)
The supplied screws are designed so that they are g mm to 12 mm in length when measured from
the attaching surface of the mounting hook.
Use of screws other than those supplied with the bracket may result in internal damage to the TV
set or cause it to fall, etc.
8-12 mm
~
I
~~--,,_..
Screw (supplied with the Wall-Mount Bracket)
Mounting Hook
Rear of the TV set
• Be sure to store the unused screws and Table-Top Stand in a safe place until you are ready to
attach the Table-Top Stand. Keep the screws away from small children.
• Read the supplied Safety Booklet for additional safety information.
Installing the Wall-Mount Bracket
To Customers
Your TV can be wall-mounted using SU-WL500 Wall-Mount Bracket (sold separately).
Please provide this installation information as well as the instruction supplied with SlJ-WL500
Wall-Mount Bracket to your installer.
To Sony Dealers and Licensed Contractors
To avoid injury and property damage. read these instructions carefully. Periodic inspection and
maintenance is highly recommended to ensure that TV is securely mounted.
(Col/tilll/ed)
47
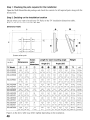
Step 1: Checking the parts required for the installation
Open the Wall-Mount Bracket package and check the contents for all required parts along with the
Instructions.
Step 2: Deciding on the installation location
Decide where you want to install your TV. Refer to the TV installation dimensions table.
Refer to the Instructions for SU-WL500.
Dimension Table
®
1-----------=-------·1
I
I
®
/
Screen center point
Unit: mm
(inches)
TV Model
TV
Dimensions
®
®
Screen
Length for each mounting angle
center
Angle (0°)
Angle (20°)
dimensions
©
0
G
iii
[i]
CI
Weight
TV
x4
KDL·32EX301
KDL·32EX400
800
497
(31 112) (19 5/8)
172
(6 7/ 8)
426
(16 7/8)
157
(6 1/4 )
303
(12)
461
9.5 kg
470
(18 5/8) (18 1/4 ) (21.0 lb.)
3S.0 kg
(S3.7 lb.)
KDL-32EX500
800
497
(31 112) (19 5/8)
172
(6 7/ 8)
426
(16 7/ 8)
156
(6 1/4)
303
( 12)
470
461
9.9 kg
(18 5/8) (18 1/4 ) (21.9 lb.)
39.6 kg
(S7.3 lb.)
KDL-32FA600
802
(31 5/8)
172
(6 7/8)
462
(18'/4)
157
(6 1/4)
303
(12)
514
495
(20 1/4) (19 1/2)
40.4 kg
(S9.0 lb.)
KDL-40EX400
KDL-40EX401
992
598
(39 1/8) (23 5/8)
122
(4 7/8)
425
(16 3/ 4)
160
(6 3/8)
341
567
463
(13 112) (22 3/8) (1S 1/4 )
13.9 kg
55.6 kg
(122.5
lb.)
(30.7 lb.)
KDL-40EX500
KDL·40EX501
992
599
(39 1/8) (23 5/8)
122
(4 7/8)
426
(16 7/8)
159
(6 3/ 8)
341
567
463
(\3'12) (22 3/ 8) (18 1/4)
(31.3 lb.) (125.2 lb.)
KDL-46EX400
KDL-46EX401
1,127
674
(44 3/ 8) (26 5/8)
84
(3 3/ 8)
424
(16 3/4)
162
(6 112)
464
369
640
( 14 5/ 8) (25 1/4) (18 3/8)
IS.l kg
72.4 kg
(39.9 lb.) (159.5 lb.)
KDL-46EX500
KDL-46EX501
676
1,127
(44 3/ 8) (26 5/8)
84
(3 3/ 8)
426
(16 7/ 8)
161
(6 3/8)
369
640
463
(14 5/8) (25 1/4 ) (18 1/4 )
IS.7 kg
74.S kg
(41.2 lb.) (lM.Slb.)
KDL-55EX500
KDL-55EX501
1,324
795
(31
3/ S)
(52 '/4)
25
(I)
428
( 16 7/ 8)
165
(6 '12)
26.7 kg
413
752
466
106.S kg
3
(29
5/
(18
3/
)
)
(l6 /S)
8
8 (5S.9 lb.) (235.3 lb.)
KDL-60EX500
1,455
873
(57 3/8) (34 3/8)
-14
C9/16)
430
( 17)
(7 1/4)
533
(21 )
181
453
822
473
( I 7 7/8) (32 3/8) (18 5/8)
Figures in the above table may differ slightly depending on the installation.
48
10.1 kg
(22.3 lb.)
14.2 kg
56.8 kg
36.5 kg
146.0 kg
(80.4 lb.) (321.6 lb.)
CAUTION
The wall that the TV will be installed on should be capable of supporting a weight of at least four
times that of the TV Refer to your TV's operating instructions for its weight.
Step 3: Installing the Base Bracket on the wall
Refer to the Instructions for SU-WL500.
Step 4: Preparing the TV for wall mount installation
Follow the steps below to prepare for installing the TV
1
2
Disconnect all the cables from the TV
Secure the Mounting Hook to the rear of the TV
Determine the screw locations and secure the Mounting Hooks to the rear of the TV Refer to
the "Screw and Hook Locations Diagram/Table" shown below.
Secure the Mounting Hooks to the rear of the TV using only the supplied screws
(M6 x 16).
Be sure to tighten the screws with equal torque strength.
o
e
Square
hole
0
Align the tab
on the rear of
the Mounting
Hook with the
square hole
on the rear of
the TV as
illustrated.
Tab
j
~
f
~
Mounting Hook
Screw and Hook Locations DiagramlTable
Screw location
Hook location
KDL-32EX301/KDL-32EX400/
KDL-32EX500/KDL-32FA600
e. g
c
KDL-40EX400/KDL-40EX401 /
KDL-40EX500/KDL-40EX501
d.g
b
KDL-46EX400/KDL-46EX401/
KDL-46EX500/KDL-46EX501
d.g
b
KDL -55EX500/KDL-55EX501 /
KDL-60EX500
d.g
TV Model
I
a
I
~
~
(Col1tinued)
49
:it
(1)
..,
5'
0-
§
-.
~
0
:J
Screw location
Hook location
When installing the Mounting Hooks on the TV
When installing the TV onto Base Bracket.
d
3
b
c
Adjust the angle of the Mounting Hook.
Refer to the Instructions for SU·WL500.
4
Remove the screws guided by the an-ow marks
+ of the TV
Do not remove any other screws from the TV
.~
:-~.--~~:t-~~~,
"---.......::~------~~
~
~~
50
5
Lift the TV off the Table-Top Stand. Make sure that you carry Ollt this task with at least two or
three people (see page 7 for details).
Do not attempt to lift the TV by yourself.
.~
~-'d'
..
•...
Step 5: Installing the TV on the wall
Refer to the Instructions for SU-WLSOO.
~
• When you put the TV back on the Table-Top Stand. reverse the above steps.
• When moving the TV. do not squeeze the bottom of the front panel too tight.
• Remove the screws or install the Mounting Hook on a stable and level surface.
51
Troubleshooting
Many of the poor pictures and poor sound conditions are related to improper connection of the cables; refer to
the Quick Setup Guide provided for connections.
If you have questions, service needs, or require technical assistance related to the use of your Sony TV even
after you read this operating instructions manual, contact the following:
For US Support:
http://www.sony.com/tvsupport or call 1-800-222-S0NY (7669)
For Canadian Support:
http://www.sony.ca/support or call 1-877-899-S0NY (7669)
Things to consider
• Check the input selection by pressing the INPUT button. You may be watching the wrong input.
• If you cannot hear sound from the TV, you may have accidentally pressed the MUTING button on your
remote control; press the MUTING button again or press VOL + to deactivate muting.
• If the remote control is not functioning properly, the batteries may be installed incorrectly or may be low or
an object or light may be interfering with the remote control.
• To reset the TV to factory default settings:
1 Turn on the TV
2 Press and hold down the. button on the remote, press the POWER button on the TV set. (The TV
will turn itself off, then back on again.)
3 Release the. button when the TV is turn on.
IMPORTANT: The factory reset will clear all of your customized settings including the Parental Lock
setting.
When the Password is lost or cannot remember, enter the master password: 4357. This password clears your
previous password and allows you to enter a new password.
Condition
Explanation/Solution
No picture
• Check the Power Saving settings (see page 45).
• Make sure the power cord is connected securely.
• Turn on the power of the TV
• Check cable/antenna connections.
• Make sure the Signal Type setting is correct for your TV signal source.
TV is locked to one channel • Perform Auto Program to add receivable channels that are not present
in the TV's memory (see pages 18 and 37).
Cannot receive or select
• Perform Auto Program to add receivable channels that are not present
in the TV's memory (see pages 18 and 37).
channels
• To receive or select cable channels, make sure that Signal Type in the
Channel settings is set to Cable (see page 37). To receive or select
UHF channels over an antenna, make sure Signal Type is set to
Antenna.
The TV turns off
• Check if Sleep Timer is activated (see page 42).
automatically
• Check Idle TV Standby in the Eco settings.
No picture from some video • Check the connection between the optional video equipment and the TV
sources
• Press INPUT on the remote control (see page 28).
No picture
Cannot receive any
channels
-----------------
52
Condition
Explanation/Solution
..
~ - - ~ ~~-~--~.~~---~~_.
Poor picture
Picture quality not as good
as viewed at the store
Broadcast HD formats have
poor quality
• Picture quality depends on the signal content. See Quick Setup Guide
(supplied) to display the best possible picture for that signal.
• Content and signal quality are regulated by the signal provider. Many HD
channels and content are actually upscaled versions of standarddefinition broadcasts. The picture is affected by the quality of the signal
received. which varies between channel and program.
---_
Double images or ghosts
• Check cable/antenna connections.
• Check the antenna location and direction.
Only snow and noise appear • Check if the antenna is broken or bent.
on the screen
• Check if the antenna has reached the end of its serviceable life. i3-.'i years
in normal use. 1-2 years at the seaside.)
..
---_.___ ..
Dotted lines or stripes
• Keep the TV away from noise sources such as cars, motorcycles. or hairdryers.
• If using 300 ohm twin lead. move the excess lead away from the TV or
try using 75-ohm coaxial cable instead.
---,....
...,_.__
No color / Dark picture /
• Adjust the Picture Mode options in the Picture settings (see page 31).
Color is not correct / The
• If you set the Power Saving mode to Low or High, it will enhance the
picture is too bright
black level.
Noisy picture
• Make sure that the antenna is connected using a 75-ohm coaxial cable
(not supplied).
• Keep the antenna cable away from other connecting cords.
• To avoid TV interference, make sure to use an undamaged antenna cable.
--...
Blurry picture / Poor color • Transporting the TV from a cold to a warm location or a sudden change
in room temperature may cause moisture condensation. resulting in a
blurry picture or poor color. Turn off your TV and wait a few hours
before powering on again.
-
.. _,-._._-----------------------
--
..•
-_._-----~--_
--~--._--------_._-------
_-~-_."
-
_._._-------_._.
-
_..
_-~.~----_._._-_
- - - - - --
----------
.. _ - - - - - - - - - - - - - - -
-------
-
-----------
- -------------------------_ .. _ - - - - - - - - - - - - - - - - - - - - - - - - - - - - -
._~------,-,_._-~~
-_._--------------------------------_._._----------~~--------~._--------_._--~~--_._-~-----------_._----_
----~----~---~---~-~-.~--~---~~---~----.~.~----.--
.. ---_._-----_._------------
~----~------~---~~~----------
• Check the volume control.
• Press MUTING or VOL + so that "Muting" disappears from the screen (page
22).
• Set Speakers to TV Speakers in the Sound settings (see page 34). If
it is set to Audio System, sound is not output from the TV's speakers
regardless of the TV's volume control.
• When using HDMI input "vith Super Audio CD or DVD-Audio.
DIGITAL AUDIO OUT (OPTICAL) may not provide an audio signal.
• When tuned to a digital channel with Alternate Audio, the broadcaster
may not be broadcasting your preferred Alternate Audio language.
Press TOOLS, highlight and select Alternate Audio. and change the
Alternate Audio language (see page..• 34).
• Make sure that the antenna is connected using a 7.'i-ohm coaxial cable
(not supplied).
• Keep the antenna cable away from other connecting cords.
• To avoid TV interference. make sure to use an undamaged antenna cable.
• Press THEATER for BRAVIA Sync activated Theater System (see page
-
/'\ ud io noi se
- ------
No audio or low audio with
Home Theater System
---- -------.------.-
~
- -_._-----_._ -._._-_._--- •.... _--
-"
-
--
------_.-
25).
• Set Speakers to Audio System in the Sound settings (see page 34).
..
_._-----_._-----_._--_.-._--_._-_...
• Verify that the Video/Component 1 Selection (page 42) is set to the
current input type in use. We suggest leaving this setting to Auto.
--_._--_._--- ---
No color / Irregular picture
s:
(l)
..,
5"
0~
;;;I
....
c'
Q)
No sound / Noisy sound
No sound but good picture
0
---~_."-_
_-~-~_.
-----~-_
..
_._--~~------
-
- -
--
- -----_._---_._ ... _-----------
-
-----.._---_._--_
(COl1f;l1lfed)
..
_-
53
~
Explanation/Solution
Condition
BRAVIA Sync
Cannot find connected
BRAVIA Sync HOM I
device
• Make sure that the Control for HDMI is set up on both the TV and the
optional device compatible with BRAVIA Sync (see page 25).
Second AN receiver is not
listed on the Device List
• Only one A/V receiver may be used with the BRAVIA Sync and
Control for HDMI functions at one time (see page 43).
PC Input
No picture I No signal
Poor Picture
General
TV screen feels warm
• Due to the thin profile of this television, the heat generated by the LCD
panel backlight and supporting electronics will be more noticeable. This
is normal operation and not a cause for concern.
Wide Mode changes
• The current Wide Mode setting is automatically replaced with the 4:3
Default setting when you change the channel or video input, if 4:3
Default in the Screen settings is set to other than Off. If you want to
lock in Wide Mode selected with WIDE on the remote control, set 4:3
Default to Off in the Screen settings (see page 35).
• Check the Auto Wide option in the Screen settings (see page 35).
automatically
---
Suddenly the picture gets
smaller
• The picture gets smaller during the commercials due to the method in
which the provider broadcasts their content. When HO content channels
switch to SO content (commercials), the picture may be small with a
black border.
• Auto Wide will not expand the picture during these content changes since the
content information is regulated by the channel signal provider. You can
manually change the Wide Mode if you prefer (see page 27). This setting
will remain in effect until you change the channel or input or manually change
the Wide Mode again.
"Black box" on screen
• You have selected a text option and no text is available (see page 41). To
turn off this feature, set the CC Display option to Off. If you were
trying to select closed captioning, select CC1 instead of Text1-4.
-----
54
Condition
--
----
--_._._-- -------_.
Explanation/Solution
----- -- - .__ . -- - - -_.. _-.-_.. __ ._-- ... _._-_ ..
.... • Some \\' ide screen program~ arc ri Imcd in a:-.pecl ratios that arc greater
than 16:9 (this is especially l'ommon \\'ith theatrical releases), Your TV
will show these programs with black bands at the top and bottom of the
screen. For more details. check the documentation that came \\'jth vour
DVD/Blu-ray (or contact your program provider).
• Programs in 4:::1 aspect ratio will have bands on left and right sides of the
screen.
• Programs broadcast in HD formats (720p and 1080i) with -J.:3 content
will commonly have black bands on the left and right sides or the screen
\\hich are added by the broadcaster (see image on left).
• Auto Wide will not expand the picture \vhen the black bands on the
sides of the screen are added by the broadcaster. You can manually
change the Wide Mode to Wide Zoom. or Zoom to till the screen.
which will remain in aflect until you change the channel or input or
manually change the Wide Mode again.
__._, __.._-_ ..__ .. _ ---_._--- ---_._----------.-_..-----_ _- ._._-_._---_._._-, _._..__ _--_
- - ---• This is due to the digital compression of the source content used by
certain digital broadcasts and DVDs which may cause your TV's screen
to display less detail than usual. or cause artifacts (small blocks or dots.
pixelations) to appear on your screen. These signal compressions are
more visible and are dependent on the clarity and resolution of the TV
----
-~--'_.'-"'-'
Black bands appear at the
edges of the screen
--,-",- ., ..•.._._---_._ ..
--~._._-------
--
-_..
----_._----
Certain programs on DVD
or other digital sources
display a loss of detail,
especially during fastmotion or dark scenes
"
.•.
------_. __ ....----- - _ . - - ._-
Remote control does not
operate
- ------_
..
.•..
-------------~--------_.~~--_._
~._-_.,
.. _------_._- ----- ------
--
• To determine if the problem is with the remote control or not, press a
button on the TV
• Check the polarity of the batteries or replace the batteries.
• Point the remote control at the remote control sensor located at the front of
the TV
• Keep the remote control sensor area clear from obstacles.
• Fluorescent lamps can interfere with your remote control operation: try
turning otf the tluorescent lamps.
5'
0-
--.. -- -------- - ------ ---- .-- --------- -------------------- ---.---.--- ----------.-------------- S
Some digital cable channels
are not being displayed
• Certain cable companies have limitations on the broadcast of digital
cable channels. Check \vith your cable company for more information.
• The digital cable channel may be set to Hidden in the Show/Hide
Channels setting (see page 37).
---_.
Some photo. music. or
video files are not
displaying from my USB
equipment
_._- --- --- ---------
Photo images appear small
in the screen
- _._---- -
--
__._.__
__._--------_.
._.. __ .
__
._---_._------_. ..._---~
-
-
--_
..•
_._---
..._._--_ .. _---_ ... _....
-_._--------
~
-_.. _- --------
• The accessible file or folder limit in a directory is 1.000 for USB
connected equipment. This limit includes non-supported tiles or just
folders. Files or folders are populated based on their time stamps. Photo.
music tiles or folders exceeding the limit will not be displayed.
--._-----_._---
_._----~---
-
--- - '
....._---_._----------
-
-
_.
-- ._-----------,
• Set display size to expanded.
• Whether or not photo images can or cannot be displayed in full-screen
depends on the resolution or aspect ratio of the tile.
-----_._----
- - - - - - _ .. _-------_._------------ ---_._.
-------_._-_
..
_-----.-_._----_._-------.
Photo images or folders
take time to display
• Depending on the image dimension. file size. and number of tiles in a
folder. some photo images or folders take time to display,
• The first time a camera is connected to the TV via USB cable. it mav take
up to a couple of minutes ror the photos to display.
Lost password
• Select the Password settings on the Parental Lock settings. then enter
[he follov.'ing master password: -J.357. This password clears your pre\'ious
password and allows you to enter a ne\\' password (sec page 38).
How to reset the TV to
factory settings
• Turn on the TV While holding down. on the remote control. press
POWER on the TV (The TV will turn itself off. then back on again.)
Release •.
IMPORTANT: The reset will clear all of your customized settings
including the Parental Lock setting.
-_. __ . -
-.-
--
_
.•.
_--
.-
-
---_. __ .
--
- _.- -
-
55
~
~
....
o'
:::)
Important Notices
Declaration of Conformity
Trade Name: SONY
Model: KDL-32/40/46/55/60EX500/
KDL-40/46/55EX50 I/KDL- 32/40/46EX400/
KDL-40/46EX40 l/KDL-32EX30 I/KDL-32FA600
Responsible Party: Sony Electronics Inc.
Address: 16530 Via Esprillo.
San Diego. CA 92127 U.S.A.
Telephone Number: 858-942-2230
This device complies with part 15 of the FCC rules.
Operation is subject to the following two conditions: (I)
This device may not cause harmful interference, and (2)
this device must accept any interference received.
including interference that may cause undesired
operation.
I Pursuant to FCC regulations, you are cautioned that any
changes or modifications not expressly approved in this
manual could void your authority to operate this
equipment.
The shielded interface cable recommended in this manual
must be used with this equipment in order to comply with
the limits for a digital device pursuant to Subpart B of Part
15 of FCC Rules.
Compatible Wall-Mount Bracket Information
Use the following Sony Wall-Mount Bracket with your TV
model.
Sony TV Model No.
KDL-32/40/46/55/60EX500
KDL -40/46/55EX501
KDL-32/40/46EX400
KDL -40/46EX401
KDL-32EX301
KDL-32FA600
For customers in Canada
This Class B digital apparatus complies with Canadian
ICES-003.
FCC Related Information
This equipment has been tested and found to comply with
the limits for a Class B digital device, pursuant to Part 15
of the FCC Rules. These limits are designed to provide
reasonable protection against harmful interference in a
residential installation. This equipment generates, uses and
can radiate radio frequency energy and, if not installed and
used in accordance with the instructions. may cause
harmful interference to radio communications. However.
there is no guarantee that interference will not occur in a
particular installation. If this equipment does cause
harmful interference to radio or television reception. which
can be determined by turning the equipment off and on, the
user is encouraged to try to correct the interference by one
or more of the following measures:
o
o
o
o
Reorient or relocate the receiving antenna.
Increase the separation between the equipment and
receiver.
Connect the equipment into an outlet on a circuit
different from that to which the receiver is connected.
Consult the dealer or an experienced radio/TV
technician for help.
Sony Wall-Mount
Bracket Model No.
SU-WL500
Use with other Wall-Mount Brackets may cause instability
and could result in property damages or injury.
Note
This television includes a QAM demodulator which should
allow you to receive unscrambled digital cable television
programming via subscription service to a cable service
provider. Availability of digital cable television
programming in your area depends on the type of
programming and signal provided by your cable service
provider.
For Customers in the United States
The lamp in this product contains mercury.
Disposal of these materials may be regulated
due to environmental considerations. For
disposal or recycling information, please
contact your local authorities or the Electronic
Industries Alliance (www.eiae.org).
To Customers
Sufficient expertise is required for TV installations. Be
sure to subcontract the installation to a Sony dealer or
licensed contractor and pay adequate attention to safety
during the installation.
56
Specifications
System
Tclel'ision system
NTSC: American TV standard
ATSC (XVSB tcnestrial): ATSC compliant XVSB
QAM on cahk: A:sJSI/SCTE 07 2000 (Doc, not include CahkC\RD funl'lionalityi
Analog terrestrial: 2 - 69/ Digital terrestrial: 2 - 6Y
Analog Cahk: I - 135/ Digital Cable: I - 1,'\5
LCD (Liquid Crystal Display) Panel
Channel coverage
Panel system
Speaker output
(except KDL-32FA600J
Speaker output
(KDL-32FA600 only)
--
I
-----
IOW+ lOW
50 W (10 W x 5) + 30 W Suhwookr
Input/Output jacks
CABLE/ANTENNA
VIDEO IN 1/2
75-ohm external terminal for RF inputs
VIDEO: I Vp-p. 75 ohms unbalanced. sync negalile
AUDIO: 500 mVrms (Typical) / Impedance: 47 kilohms
YPBPR (Component Video): Y: 1,0 Vp-p. 75 ohms un hal anced. sync negalive / PB: 0,7 Vp-p. 75 ohms
PR: 0.7 Vp-p. 75 ohms / Signal format: 480i. 480p. nop. lO80i. I080p
AUDIO: 500 mVrms (Typical) / Impedance: -n kilohms
HDM!: Video: 480i. 480p. nop. I080i. I080p. I080/24p
Audio: Two channel linear PCM 32. 44.1 and 48 kHz. 16. 20 and 24hits. Dolby Digital
PC Input (see page 46)
500 mVrms (typical)
PCM/Dolby Digital optical signal
COMPONENT IN In
HDMI IN 1/2/J/4
AUDIO OUT
DIGITAL AUDIO OUT
(OPTICAl)
PC IN
PC/HOM I IN 1 AUDIO INPUT
Model name KDL-
D-sub 15-pin. analog RGB. 0_7 Vp-p. 75 ohms. positive
See the PC Input Signal Reference Chart for PC and HDM I IN In/J/4 on page 46.
Slereo mini jack. 500 mVrms. (Typical J / Impedance: 47 kilohms
60EX500
55EX500
55EX501
46EX500
46EX501
40EX500
40EX501
32EX500
Power and others
Power requirement
Power con sum pt ion
in use
in standby
Screen size
(inches measured diagonally I
Display resolUlion
Speaker/Full range (2) (mm)
(inches)
Dimensions
-
with stand (mm)
(inches)
without stand (mm)
(inches)
wall-moulll hole pattern (n1l11 1
Ilall-1l10UIlI snell Sill' (m111)
\lass
II ilh stand (k!!)
(II; )
IlithoUI stand (kg)
(ih. )
110-240 V AC. 50/60 HI (U.S.A./Canada 120 V AC. 60 Hz)
425 W
315W
255 W
180W
140W
Less than 0.23 W Less than 0.23 W with 120 V AC and with 240 V AC less than 0.4 W
with 120 V AC
and with 240 V
AC less than
0.6W
,I 1.5
54.6
40
60
46
132 clas,,)
155 class)
1,920 dOIS (horilOntal) x 1,080 lines (vertical)
45 x 120
45 x 200
45 x 145
45 x UO
( I 1'/16x4'/4)
(I 1'/16x7 7 /8)
( I 1'/16 x 5 "/4)
( I 1'116 x 5 1/ 8 )
with speaker box
1.455 x 910 x 386 1.,\2-+ x 832 x ,ISO 1.127 x 71J x 281
992 x 636 x 260
800 x 534 x 250
57 'IS x.\5 liS x 15 1/4 52 114 x.12 liS x 1.\ 'is 44 'IS x 28 18 x II liS .N liS x 25 I IS x 10 114 .' I 112 x 21 118 x 9 1/8
1,455 x 873 x I 19 1..\24 x 795 x 105 1. I27 x 676 x 101
992 x 5Y9 x Y9
800 x 497 x 96
57 'IX x .,4 'IX x 4 ' /_f 52 1/4 x .' I 'IX x 4 I/X 44'/X x 26 "'IX x 4 39 I/ X x 23 "'/1', x 4 .'1 1/2 x 19 "'/8 x.1 '/8
400 x 300
200 x 200
300 x 300
\16 (length: refer W diagram on page 47)
11.9
43.0
307
21.6
16.4
94.X
67.7
47.6
36.2
26.3
14.2
36.5
9.9
26.7
1X.7
XO,4
589
41.2
21.9
J 1.3
1
(Comillued)
57
Model name KDLSupplied accessories
common to all models
individual models
Optional accessories
Model name KDL-
60EX500
I
55EX500
55EX501
I
46EX500
46EX501
I
Screen size
(inches measured diagonally)
I
46EX400
46EX401
40EX400
40EX401
32EX400
I
245 W
170W
135 W
46
Satellite Speakers (mm)
(inches)
without stand (kg)
(lb.)
Satellite Speakers (kg)
(lb.)
Supplied accessories
comlllon to all models
individual models
Optional accessories
11.366 dots (horizontal) x 768 lines
(vertical)
45 x 130
40 x 100
(I 5/8 x 4)
( I 13 /16 x 5 I/X)
800 x 532 x 220
802 x 570 x 251
31 SIX x 22 1/2 x 10
31'l2x21 x8 314
800 x 497 x 97
802 x 533 x 97
3 1 518 x 2 I x 3 7/8
31 '/2 x 19 5/8 x3 7/8
150 x 570 x 150
6 x 22 1/2 x 6
-
300 x 300
200 x 200
M6 (length: refer to diagram on page 47)
13.9
30.7
-
] 1.8
26.0
]0.1
22.3
1.0
2.2
Remote control RM- YD035 (I )/Size AAA hatteries (2l/0perating Instructions (I )/Quick Setup Guide
(] )/Warranty Card (] )/Safcty and Regulatory Booklet (I )/Sortware License (] )/Stand installation
guide (I )/Tahle-Top Stand (I set)
Screw (4)
Screw (7)
Screw (7)/Speaker
cahle (3)
Connecting cahles I Support Belt Kit I Wall-Mount Bracket: SU-WL500 I Satellite Speakers Wall-Mount
Bracket: WS-WVIOD (KDL-32FA600)
20.4
45.0
18.1
39.9
]5.9
35.1
13.9
30.7
• Optional accessories availability depends on its stock .
• Design and specifications are subject to change without notice.
58
145W
31.5
(32 class)
40
45 x ]45
(1 13 /16x5 314)
I. I27 x 7 I I x 294 992 x 635 x 250
44 3/ 8 x 28 x I J 5/8 39 1 /8x25x9 7/8
1.127x674x 102 992 x 598 x 100
4-1 3/8 x 26 518 x 4 1/8 39 1/8 x 23 5/8 x 4
wall-mount hole pattern (mm)
wall-mount screw size (mill)
Mass with stand and Suhwoofer
(kg)
(Ih. )
with stand (kg)
(Ih. )
32FA600
Less than 0.23 W with 120 V AC and with 240 V AC less than 0.4 W
SpeakerlFuli range (2) (mm)
(inches)
without stand (mm)
(inches)
32EX301
110-240 V AC. 50/60 Hz (U.S.A./Canada 120 V AC. 60 Hz)
1.920 dots (horizontal) x 1.080 lines (vertical)
with stand (mm)
(inches)
I
I
Display resolution
Dimensions
32EX500
Remote control RM- YD034 (I )/Size AAA batteries (2)/Operating Instructions (I )/Quick Setup Guide
(I )/WarralliY Card (I )/Safety and Regulatory Booklet (I )/Software License (I )/Sland installation
guide (I except KDL-60EX500)
AC power cord (I) Table-Top Stand (I set)/AC power cord Tahle-Top Stand (I set )/Screw (X)
(I )/Screw (4)
Connecting cables I Support Belt Kit I Wall-Mount Bracket: SU-WL500
Power and others
Power requirement
Power consumption
in use
in standby
40EX500
40EX501
11.0
24.3
9.5
21.0
Index
0-9 hullnns 22
HDMI Sellin!!s 43
Horizontal C~ntcr 35. 36
Hue 31
AC IN 8
Add Di!.!ital Channds 37
Ad\anc~d Sellin!.!s 32
Alternate Audio 34
Ambient Sensor 24. 32
Allain!.! Fine Tune 37
AUDIC) OUT jack. descrihed 9
Auto Adjustm~nt 36
Auto Pro!.!ram 18. 37
Auto Shut orf 45
Auto Wide 35
I
-u Default 35
A
B
Backldlt 31
Balanc~ 33
Bass 33
BRA VIA Sync buttons 20
Brightness 31
c
CABLE/ANTENNA input. described
8
CC bullon 20
CH +/- button 22, 24
Chan!2e Password 38
Chan;el Block 38
CineMotion 31
Closed Captions (CC) 41
Color 31
Color Temperature 31
COMPONENT IN ( IOSOp/ I080i/
720p/480p/480i) 8
Country 38
D
DIGITAL AUDIO OUT (OPTICAl)
8
Display Area 35
DISPLA Y bUllon 22
Dolby Pro LO!2ic JI 33
Dow;,loadabl~u.s. Rating 38
E
En!!lish Ralin!! 40
E -T bUllon 22
Enter Password 38
Equali/cr 33
E\ll'rnal Input Billd 38
F
hl\oritcs 37
FA VORITES button 20
French Rating 40
H
HDM! IN jack. described 9
Idle TV Standby 45
Info Banner 42
Infrared Receiver tlR) 24
Initial Setup 44
INPUT button 20. 24
Installing thc TV on a \\all 47
J
JUMP bUllon 22
L
Label Channels 37
Label Videll Inputs 42
Language 42
M
MENU button 21. 24
Motionflow 31
Movie Rating 39
MPEG Nois; Reduction 31
MTS Audio 34
Music 29
MUTING bullon 22
N
Noise Reduction 31
P
PC IN 9
PC Settings 36
Phase 36
Photo 29
Picture 31
Picture Adjustments Lock 43
Picture Frame 29
Picture Mode 31
Picture OtT ( l8r ) LED 24
PIP 26
Pitch 36
POWER (I/c0) bUllon 22. 23
POWER (I) LED 24
POWER bullon 24
Power Savin!.! 45
Product Sup,;ort 43
Eco 45
Parental Lock 38
Picturc 31
Screen 35
Setup 41
Sound 33
Sharpness 31
Show/Hide Channels 37
Signal Type 37
Sleep Timer 42
Sound Mode 33
Speaker 24
Speakers 34
Standby (c0) LED 24
Steady Sound 34
SUBWOOFER jack 9
Surround 34
T
Test Tone 34
Timer (0) LED 24
TOOLS 22
Treble 33
Troubleshootin!:'. 52-55
TV Rating 39 ~
U
U.S.A. Rating 40
Unrated 38
USB 9
USB Auto Start 41
V
Vertical Center 35. 36
Video 29
VIDEO/AUDIO (LlR) jacks.
described 8. 9
Video/Component 1 Selection 42
Viewin!2 Blocked Programs 40
VOL +7- button 22. 24
Volume Offset 34
W
WIDE button 22
Wide Mode 35, 36
R
Ratin!! 38
Resel~31. 33, 55
RETUR:--J hUllnn 21
S
SATELLITE jack 9
SCENE butto;, 21
Settings
CI{annel37
59
For Your Convenience
Online
Registration:
Be sure to register your TV.
United States
Canada
http://productregistration.sony.com
http://www.SonyStyle.ca/registration
J;;S
FSC
Mixed Sources
Prodl.l{tgrol.lpfromwl'lI·managed
foresls,(ontrolledsoUfCE'Sand
recycled wood orfibrl'
CerIno sw cac 004136
wwwhcorg
rc1996 Foresl Stewardship Council
4-170-417-12(1)
http://www.sony.net!
1I1II11111111111111111111111111111111111111111111111111I11111111111111
© 2010 Sony Corporation Printed in China
46.71501.002
SON~
4-170-418-11 (1)
I111I111111111111111111111111111111111111111111111I11111I1I11111111111
46.71804.001
(I
Your New
BRAVIA® LCDHDTV
Congratulations! Your new BRAVIA TV opens the door to the "Stunning HD Experience':
This guide will explain how to get the most from your new High Definition TV
II)
Please take these steps before you power up your BRAVIA:
• Register online at: http://productregistration.sony.com (from U.S.A.)
http://www.SonyStyle.ca/registration (from Canada)
.• Make sure you've removed all accessory contents from packaging.
• Install 2 AAA batteries (supplied separately) in your remote control.
• Determine whether you will mount your TV on a wall or place it on the Table-Top
Stand. Sony wall-mounting brackets are designed to provide the best fit.
• Give your TV 2 3/8 inches (6 cm) of space behind it to properly ventilate.
LCD
Digital Color TV
You must get HO programming to experience the
stunning detail of HOTV.
Quick Setup Guide
• The quality of the image you see on your BRAVIA can only be as high as the quality of
the signal it is receiving.
• Contact your cable, satellite or HD Service prOVider to upgrade your service to HD.
Receive over-the-air HD broadcasts with an HD-quality antenna (www.antennaweb.org)
and discover the wealth of entertainment now available on super-high-resolution Bluray Disc™.
II
'
"
",
..
,
Sony Customer Support
To learn more about HDTV, visit:
U.S.A.: http://www.sony.com/HDTV
Canada: http://www.SonyStyle.ca/hd
Connecting to Your TV
Your BRAVIA TV must be properly connected to components such as sound system and
cable or satellite box.
• Turn off and unplug all components before making connections.
• Do not turn on the TV until connection setup is completed.
• See reverse side of this poster for sample connection diagrams.
AUDIO
U.S.A.: www.sony.com/tvsupport
Canada: www.sony.ca/support
High or Standard Definition Quality
1080/
24p
1080p
1080i
nop
480p
480i
HDMI cable carries both
United States
1.800.222.S0NY
Canada
1.877.899.S0NY
Please Do Not Return
the Product to the Store
BRAVIA
video and audio signals.
('When HDMI is connected to
DVlwithanadapter,aseparate
•
•
•
•
•
Printed in China
•
Running Initial Setup
Initial Setup instructions are displayed on the screen when your BRAVIA is powered on
for the first time.
1
•
• • • • •
© 2010 Sony Corporation
KDL-60EX500 I 55EX500 I 55EX501 I 46EX400 I 46EX401 1 46EX500
KDL-46EX501 I 40EX400 I 40EX401 I 40EX500 I 40EX501 1 32EX301
KDL-32EX400 I 32EX500
·f£
•
audio UR is necessary.)
_I liM
Select the language for the OSD (on screen display).
PI"... u~"I""';1 JOU,ld' yu_y ..
o Watching Your TV
Select Your Content Source
Whether you are watching cable, satellite or broadcast TV; playing a VCR, DVD or BIu-ray
Disc; or connecting to your PC or USB (Photo, Music, Video), you need to choose the
correct input using your remote control:
• Press the INPUT button repeatedly until your selection is highlighted on-screen.
~
2
Adjust Screen Shape and Aspect Ratio
Select the type of use. (Select Home for compliance with
ENERGY STAR.)
High Definition and Standard Definition signals are transmitted with different aspect
ratios (the width-to-height ratio of the image).
@Confirm
3
Connect either cable or antenna to your TV You can
connect both using an A-B RF switch (not supplied). If
you connect cable, the TV will scan cable channels.
After this scanning, you can search antenna channels as
welL
PllHuesele(llh<llypeofuseforlhsTV
R..,laloplmleSlhep(lureforsloredsplay
Homeoplm,leSlheplclurefornorm"thome
~
UConf.m
• If you have both cable and antenna connections available, please
connect cable first.
CiIiDBack
FIrst please connect cable or antenna
Allow 50+ mlnutes for completion
• If you are not using the CABLE/ANTENNA connection to TV
(for example, if using a cable or satellite box), you can cancel the
Auto Program by selecting Cancel.
4
The 16:9 aspect ratio (common to most HD signals) looks perfect on your BRAVIA.
Start auto program now'
~c.n,"1
The boxy 4:3 aspect ratio (common to most SD signals) must be adjusted to fill the screen.
Eijfi!M
If the Initial Setup programming found cable channels,
you will be able to scan antenna channels as well.
Connect the antenna (using an A-B RF switch, not
supplied) and change the switch to antenna, then start
Auto Program to search antenna channels.
If you did not follow the Initial Setup screen the first time
you turned on your TV, refer to your Operating Instructions
ManuaL
Analog Channels Found
106
Digital Chen nels Found
24
Searchmg
Please walt Allow 50+ minutes for completion
PressOtocancel
If you want to usealr signals
please connect antenna
Allow 50+ mlnutes for completion
• Press the WIDE button on your remote control to display the Wide Mode setting of
your preference.
Start auto program now'
~Ic.n,.'
To Do List
When the Initial Setup is completed, consider carrying out these items:
Set Closed Captions (CC)
Label Video Inputs
Set Parental Lock
Set Speaker
Show/Hide Channels
For details, refer to your BRAVIA Operating Instructions Manual.
Customize Sound and Picture Quality
You can choose optimum sound and picture settings to match the content you are
displaying on your TV:
• Press the remote control's MENU button, highlight and select Settings, then select the
Picture and Sound settings to adjust the picture and sound quality of your content.
Refer to your Operating Instructions Manual for more information on adjusting or
customizing your settings.
HD Basic Connection with A/V Receiver
HD Basic Connection with Home Theater System
:
,
,',
Blu-ray Disc/DVD
If~mrn<=~
Rear of TV
_------1
Rear of TV
Blu-ray Disc/DVD
! ~. l1,r;e [II]
~~
SplitterL;!
~rQ ~~ol
_:0
....... •
t
I
~
I
Cable/Antenna
1
~~
or
Cable/SAT (dish)
HD Cable Box or
HD Satellite Receiver
AN Receiver
SAT
(dish)
~
fl
~--I[IJ-·
SD Cable Box or
SD Satellite Receiver
[[ltJ------:-coaxla
~I
~omponen~
=CC)--
Home Theater System
Notes on Connection:
Required Cable Types for Connection
HD15
•
4-#:"' ..
-e=P=
Mini-Pin Audio
~~
• Your TV is equipped with multiple HDMI inputs; connect your incoming signal
source (HD Cable Box, HD Satellite Box, or DVD) with HDMI or component
video for the best possible picture quality.
• If your connecting equipment has DVI output instead of HDMI output, you
must use DVI-to-HDMI cable for the video and also connect an audio cable for
the sound.
Connecting a PC to Your BRAVIA® TV
• Connect PC's audio output when using an HD 15 connection.
• Press PC's FUNCTION Key + Select Output to transmit to TV.
• When using an HD 15 connection, adjust TV's Pitch and Phase to correct
sharpness.
• Refer to your BRAVIA Operating Instructions Manual for more information.
II>
Digital Optical Audio
HO BRAVIA® Sync™ Basic Connection
PC Connection with SO VCR/OVO
Notebook PC
Rear of TV
fP""'====""'i =~~~=====~*Blu-ray
Disc
VCR/DVD Combo
*Signifies a BRAVIA Sync capable device.
"------
PC
SONY:
Ciiil
'r~
1.5 N·m/1 ,5 N'm
5;nches(12 cm-)
D
{15 kgf·cm}
..
22"
~~:~O
.~- - !=:d-= - - '
_O==_9T'l,I
:
3
J
b~2
,
x
[]
f
i
,
E!
I
'Q
:
0
:
I
_I
I
!)
......_
0
I
I
--.L__
1
•
I
I
1---1-"'"
II
,
I
---
II--I
~
1--1
II
22"
26",.....,
1
1
2
2
.
© 2009 Sony Corporation
p'
nn t ed in China
22"
26""'40"
tJ:2r/t:f:-J--2l
~' ,
,
f ' 1,, )
ra
L~,
:---3
:
.. .- ,,
~
,'- -, -,,I
,
-I
1
.
-.!
'
... .
,
:
D
:'' - - ,:-t ,
I
;
$
:
=
~
:/" · °.l'L
0
,
,'"'--~-''~
I
~
"
!
~~:V?C
3
SONY:
CAUTION
If you use a Wall-mount bracket other than
Sony, follow the instruction below,
otherwise the product may be damaged.
Be sure to use the screws supplied with the Wall-mount bracket when attaching the mounting hooks
to the TV set. The supplied screws are designed so that they are 8 mm to 12 mm in length when
measured from the attaching surface of the mounting hook. The diameter and length of the screws
differ depending on the Wall-mount bracket model. Use of screws other than those supplied may
result in internal damage to the TV set or cause it to fall, etc.
8mm~12mm
Screw (supplied with the Wall-mount bracket)
' - - - - Mounting Hook
' - - - - - Hook attachment on rear of TV set
Use the Sony Wall-Mount Bracket (SU-WL1OO/WLSOO/WLSOB/WL700)
'll
~
Screw
~~II~~,G
Square hole
~
I~
-,
o
Mounting Hook
0
~
The image above may be different from your TV set, it is only for your reference.
1I1I11111111111111111111111111111111111111111111111111111I1111I1111111
© 2010
Sony Corporation Printed in Mexico
46.71523.011
4-191-209-11 (1)
SONY
Slide the cover to open.
mi";fJ#tT1f~To
Deslize a tampa para abrir.
~m1J:M£:nrm§-T 0
Deslice la cubierta para abrirla.
711:11 ~ ~ Oi Ai ~ '-I cL
Verschuif de afdekking om te openen.
Ouvrez Ie couvercle en Ie faisant glisser.
Verschieben Sie zum Offnen die Abdeckung.
Per aprire, far scorrere il coperchio verso I'alto.
© 2009 Sony Corporation
Printed in China
ENGLISH
FRAN<;AIS
ESPANOL
Preventing TV Tip-Over
Accidents
Eviter les accidents de
renversement de televiseur
Prevencion de accidentes por
vuelco y caida del televisor
The U.s. Consumer Product Safety
Commission (CPSC) estimates that in 2005
at least 3,000 children younger than age 5
were treated in U.s. hospitals emergency
rooms because of injuries associated with
TV tip-overs. In addition, from 2000 through
2005, CP5C received reports of 36 TV tip-over
deaths. More than 80 percent of all these
deaths involved young children. The injuries
and deaths frequently take place when kids
climb onto, fall against or pull themselves
up on shelves, bookcases, dressers, desks,
chests and television stands. In some cases,
televisions placed on top of furniture tip over
and cause a child to suffer a traumatic and
sometimes fatal injury.
La commission de surveillance des produits
de consommation (CSPC) des E.-U. estime
qu'en 2005 au moins 3 000 enfants de moins
de cinq ans ont ete traites dans les salles
d'urgence des h6pitaux etats-uniens pour des
blessures associees it des renversements de
televiseurs. De plus, de 2000 it 2005, la CSPC a
rec;u des rapports de 36 deces causes par un
renversement de televiseur. Plus de 80 pour
cent de ces deces impliquaient de jeunes
enfants. Les blessures et les deces ont souvent
lieu lorsque les enfants tombent contre,
grimpent ou se hissent sur des tablettes, des
bibliotheques, des commodes, des bureaux,
des armoires et des supports de televiseur.
Dans certains cas, les televiseurs places sur
des meubles se renversent et causent une
blessure grave et parfois fatale it I'enfant.
La Comision de Seguridad de Productos de
EE.UU. (CPSC) calcula que en el 2005 por
10 menos 3,000 ninos menores de 5 anos
recibieron tratamiento de emergencia en
hospitales de Estados Unidos debido a las
lesiones recibidas al volcarse un televisor.
Asimismo, entre los anos 2000 y 2005, la CPSC
recibio informes de 36 muertes causadas
por volcarse un televisor. Mas del 80% de
las muertes fueron de ninos pequenos. Con
frecuencia, las lesiones y muertes suceden
cuando un nino se trepa a un televisor, cae
sobre el 0 trata de subirse en repisas, roperos,
escritorios 0 bases de televisor. En algunos
casos, cuando se coloca un televisor encima
de un mueble, este puede volcarse y caer
causando trauma fisico y hasta la muerte en
ninos.
Les conseils de securite suivants
sont recommandes pour eviter
les renversements de meubles
ou de televiseurs :
A continuacion se presentan
algunos consejos de seguridad
recomendados para prevenir el
vuelco y la caida de televisores:
• Assurez-vous que Ie televiseur est place
seulement sur un meuble qui est stable
par lui-meme. Pour augmenter la securite,
il est recommande de fixer au mur ou au
sol toutes les unites de divertissement, les
supports de televiseur, les bibliotheques,
les tablettes et les bureaux au moyen de
la quincaillerie appropriee, com me des
supports, des vis ou des boulons it ailettes.
• Placez Ie televiseur sur un meuble robuste
approprie pour la taille du televiseur ou sur
une base basse.
• Poussez Ie televiseur aussi loin que possible
vers I'arriere.
• Placez les cordons electriques et les cables
audio/video hors de la portee des enfants et
montrez-Ieur de ne pas jouer avec eux.
• Retirez du dessus du televiseur et des
meubles les objets qui pourraient inciter les
enfants it grimper sur ou pres du televiseur,
comme des jouets ou des telecommandes.
• Asegurese de que el televisor sola mente este
colocado sobre muebles que sean estables
en sf. Para mayor seguridad, se recomienda
que todas las unidades de entretenimiento,
bases para televisor, libreros, repisas 0 buros
se sujeten a la pared 0 al piso usando las
mensulas, tornillos 0 abrazaderas adecuadas.
• Coloque el televisor en un mueble solido
adecuado al tamano del aparato 0 en una
base que no sea alta.
• Coloque el televisor 10 mas atras del mueble
que sea posible.
• Coloque los cables electricos y del sistema
audiovisual fuera del alcance de los ninos y
enseneles a que no deben jugar con cables.
• Retire cualquier objeto como juguetes
o controles remoto que este encima del
televisor 0 del mueble y que pudiera incitar a
los ninos a treparse en el televisor 0 cerca de
Watch Out!
Faites attention!
jCuidado!
The following safety tips are
recommended to prevent
furniture or TV tip-overs:
• Verify that television is placed only on
furniture that is stable on its own. For
added security it is recommended that you
attach to the wall or anchor to the floor all
entertainment units, TV stands, bookcases,
shelving, and bureaus using appropriate
hardware, such as brackets, screws, or
toggles.
• Place the television on sturdy furniture
appropriate for the size of the TV or on a lowrise base.
• Push the television as far back as possible.
• Place electrical cords and audio/visual cables
out of a child's reach, and teach kids not to
play with them.
• Remove items that might tempt kids to
climb on or near the television, such as toys
and remote controls, from top of the TV and
furniture.
See the operating instruction for more
information on how to secure the TV.
Reportez-vous aux directives d'utilisation
pour obtenir d'autres renseignements sur
la fac;on de securiser Ie televiseur.
© 2009 Sony Corporation
Printed in China
eL
Consulte las instrucciones de
funcionamiento para obtener mas
informacion sobre como asegurar el
televisor.
ENGLISH
FRAN<;AIS
ESPANOL
Does your picture quality seem poor?
Do you have acable or satellite box?
Est-ce que la qualite de votre image semble
mauvaise?
Est-ce que vous avez Ie cable ou un satellite?
iLa calidad de la imagen no es optima?
iTiene un receptor de cable 0 satelite?
Factors other than yourTV can affect picture
quality.
1) Cable or Satellite Set-Top Box (STB)
Request an HD STB from your service provider
and review your STB settings.
You may need to adjust your STB audio
and picture settings, otherwise you may
experience issues such as: Poor picture quality,
black bars on the top or sides of the screen, no
audio, empty black boxes on the screen.
Contact your service provider if you have any
questions on STB usage.
2) Broadcaster
The broadcaster controls the quality of the
program. Some programs are broadcast in
High Definition (HD), while other programs
are broadcast in Standard Definition (SD),
even on HD stations.
HD broadcast
Crisp, clear picture
SD broadcast
Fuzzy picture, often with
black bars
Facteurs autres que votre te>IE'viseur pouvant
affecter la qualite de I'image.
1) Decodeur de cable ou satellite
a
Existen factores aparte del televisor que
pueden afectar la calidad de la imagen.
1) Receptores de cable 0 satelite (SetTop Box 0 STB)
Demandez un decodeur HD votre
fournisseur de service et examinez les
reglages de votre decodeur.
Solicite un receptor de alta definici6n (HD) de
la compania que Ie ofrece el servicio y cheque
la configuraci6n del receptor.
Vous devrez ajuster les reglages de son
et d'image de votre decodeur, sinon vous
pourriez constater les problemes suivants :
mauvaise qualite d'image. barres noires dans
Ie haut ou les cotes de I'ecran, pas de son,
boites noires vides aI'ecran.
Es posible que necesite ajustar la
configuraci6n de audio e imagen de su
receptor, de no ser asi, pod ria observar 10
siguiente: mala calidad de la imagen, barras
negras en la parte superior 0 en los costados
de la pantalla, falta de audio, recuadros negros
vados en la pantalla.
Communiquez avec votre fournisseur de
service si vous avez des questions au sujet de
I'utilisation du decodeur.
2) Teh~diffuseur
Le telediffuseur contrale la qua lite de
I'emission.
Certaines emissions sont telediffusees en
haute definition (HD), tandis que d'autres
sont telediffusees en definition standard (SD),
meme sur des postes HD.
TelE~diffusion
HD
Image claire, precise
Telediffusion SD
Image tloue, souvent avec
des barres noires
Comuniquese con la compania proveedora de
servicio si tiene alguna pregunta sobre el uso
de su receptor.
2) Cadenas transmisoras
La cadena transmisora controla la calidad del
programa. Algunos programas se transmiten
en alta definici6n (HD), mientras que otros se
transmite en definici6n estandar (SD) 0 hasta
en estaciones de alta definici6n.
Transmision en Alta
Definicion (HD)
Imagen clara y nitida
Type of content stations can broadcast:
SD Content
SD Station
HD Station
X
X
X
HD Content
Both HD& SD
content
X
Transmision en Definicion
Estandar (SD)
Imagen borrosa, con
frecuencia aparecen barras
negras
Type de contenu que les stations peuvent
diffuser:
Stations SD Stations
HD
SD content on HD channels does not create an
HD picture!
Contenu SD
X
3) Original Recording Quality
Contenu HD
X
X
The quality of the picture you see also
depends on the type of camera used when
the original recording was made.
Contenu HD et SD
X
Le contenu SD sur des canaux HD ne cree pas
une image HD!
3) Qualite de I'enregistrement initial
La qualite de I'image que vous voyez depend
aussi du type de camera utilise lors de
I'enregistrement initial.
Tipo de contenido que las estaciones pueden
transmitir:
Estaci6n SD Estaci6n
HD
Contenido SD
X
Contenido HD
Contenido tanto HD
comoSD
X
X
X
iEI contenido SD en canales HD no crea una
imagen en alta definici6n!
3) Calidad original de la filmaci6n
La calidad de la imagen que ve tambien
depende del tipo de camara que se us6
cuando se hizo la filmaci6n original.
SONY;
Important Safety Instructions
Safety and Regulatory Booklet
1)
Read these instructions.
2)
Keep these instructions.
3)
Heed all warnings.
4)
Follow all instructions.
5)
Do not use this apparatus
near water.
Read and understand the contents of this booklet before
operating your new TV.
Feuillet de consignes d'utilisation
et de securite
Veuillez lire et vous assurer de comprendre Ie contenu de ce
feuillet avant d'utiliser votre nouveau tdeviseur.
~
!$j1""
6)
Clean only with dry cloth.
7)
Do not block any
ventilation openings. Install
in accordance with the
manufacturer's instructions.
8)
Lea y entienda el contenido de este folleto antes de operar su
nuevo televisor.
9)
4-140-223-12(1)
I IIIWlllllllm 1III
© 2009 Sony Corporation
12) Use only with the cart,
Do not install near any heat
sources such as radiators,
heat registers, stoves, or
other apparatus (including
amplifiers) that produce
heat.
Do not defeat the safety
purpose of the polarized or
grounding-type plug. A
polarized plug has two
blades with one wider than
the other. A grounding type
plug has two blades and a
third grounding prong.
The wide blade or the
third prong are provided
for your safety. If the
provided plug does not fit
into your outlet, consult an
electrician for replacement
of the obsolete outlet.
stand, tripod, bracket, or
table specified by the
manufacturer, or sold with
the apparatus. When a cart
is used, use caution when
moving the cart/apparatus
combination to avoid
injury from tip-over.
~i
13) Unplug this apparatus
during lightning storms or
when unused for long
periods of time.
~
,
e
f.
~e
Folleto de instrucciones de
seguridad
;Q
11) Only use attachments!
accessories specified by the
manufacturer.
~~,
-'"2l
~
'8lE
10) Protect the power cord
from being walked on or
pinched particularly at
plugs, convenience
receptacles, and the point
where they exit from the
apparatus.
~
14) Refer all servicing to
qualified service personnel.
Servicing is required when
the apparatus has been
damaged in any way, such
as power-supply cord or
plug is damaged, liquid has
been spilled or objects have
fallen into the apparatus,
the apparatus has been
exposed to rain or
moisture, does not operate
normally, or has been
dropped.
;~g~.
"
111
~
~
Please observe the Additional Safety DOs and
DON'Ts to avoid electrical shock, short-circuit,
fire, bodily injury or property damage.
46.71117.002
Printed in China
WARNING
Additi
To reduce the risk of fire or electric shock, do
not expose this TV to rain or moisture.
The TV must never be exposed to dripping,
splashing, or spilling liquids of any kind.
MOISTURE
o Do not place liquid filled objects such as a
vase or potted plant on the TV. r,..-v-~-~-..,
o Do not use a power line
~'~
operated TV set near water;
...=~
for example, near a bathtub, ="-'.
washbowl, kitchen sink,
/'~
laundry tub. wet basement or pW~
near a swimming pool, etc. ~;..~"
ATTENTION
RISQUe DE CHOC ELECTAIQUE,
NE PAS OUVRIR
PRECAUCION
RIESGO DE CHOQUE ELECTRICO
NOABRIR
This symbol is intended to alert
the user to the presence of
un insulated "dangerous voltage"
within the TV's enclosure that
may be of sufficient magnitude
to constitute a risk of electric
shock to persons.
Lt.
o~
This symbol is intended to alert
the user to the presence of
important operating and
maintenance (servicing)
instructions in the literature
accompanying the TV.
Outdoor Antenna Grounding
CLEANING
When cleaning, be sure to unplug the power
cord to avoid any chance of electric shock.
Clean the cabinet of the TV
drr=':i1\\.
with a dry soft cloth.
~
Wipe the LCD screen gently with a soft
cloth.
Stubborn stains may be removed with a
cloth slightly moistened with a solution of
mild soap and warm water.
D Do not spray water or detergent directly
on the TV set. It may drip to the bottom
of the screen or exterior parts, and may
cause a malfunction.
D If using a chemically pretreated cloth,
please follow the instruction provided on
the package.
D Never use strong solvents such as a
thinner, alcohol or benzine for cleaning.
Periodic vacuuming of the ventilation
openings is recommended to ensure
proper ventilation.
o
o
o
o
VENTILATION
The ventilation openings in the TV are
Antenna discharge
necessary to ensure reliable operation of the
unit
(NEC Se<tion 81Q.20) TV and to protect it from overheating.
.";'~'
f>
Grounding conductors D Do not block or cover the
ventilation openings with
'<..
I
\
(NEC section 810·21)
cloth or other materials.
Ground clamps
Never place the TV on a bed•.~ '
__ Power service grounding
sofa, rug or other similar
,
.'.
electrode system
(NEe Art 250 Part HI
surface where ventilation
,.~
openings may be blocked.
D Unless proper ventilation is provided, the
TV may accumulate dust and cause
damage.
o
D Never allow liquid or solid
objects to fall into the ventilation openings.
~b"'
"Q'
o If any liquid or solid object falls inside the
Prevent the TV from toppling over
TV, unplug the TV immediately and have it
checked by qualified service personnel before
operating it further.
D Never push objects of any kind into the TV
through the ventilation openings as they may
come in contact with dangerous voltage
points or short out parts that could result in a
fire or an electric shock.
Take measures to prevent the TV from
toppling over and causing injury or
\.-d
damage to the TV and property.
'
o Secure the TV to a wall and/or stand.
Never install the TV on unstable and/or
uneven surfaces.
D Do not allow children to climb on or play
with furniture and TV sets.
D Do not install the TV on furniture that can
easily be used as steps, such as a chest of
drawers.
o Care should be taken to install the TV where
it cannot be pushed, pulled over, or knocked
down.
o Care should be taken to route all AC power
cords and connecting cables so that they
cannot be pulled or grabbed by curious
children.
Allow adequate space around the TV set to
ensure proper air circulation.
Never place the TV in a confined
space, such as a bookcase or
~IID
built-in cabinet, unless proper
i5
ventilation is provided.
o There should be a clearance of at least II 7/8
inches (30 cm) above the TV set and 4 inches
(10 em) on each side. If mounted on the wall,
allow at least 4 inches (10 em) of clearance at
the bottom of the screen. (See additional
information provided in the Operating
Instructions manual.)
o
-
Q.":'~':'
INSTALLATION
The TV should be installed near an easily
accessible AC power outlet.
D Do not install the TV face up or down,
upside down or on its side.
D Do not install the TV in hot, oily, humid, or
excessively dusty places.
_"'()~_
D Do not install the TV in places
subject to extreme temperature, ~~
such as in direct sunlight, near a
_
.
radiator or a heating vent. The
::r- - :
TV may overheat in such condi- ""\. ,,_\.1 J I '~/~
tions which can cause deformation'"
2:::
of the enclosure and/or TV
malfunction.
o Do not install the TV in a place ~~~
exposed to direct air condition- >1 ::.< , ~
ing; moisture may condense
inside and may cause TV malfunction.
o Do not install the TV where it may be
exposed to mechanical vibration.
D Do not install the TV where insects may enter.
D Do not install the TV in a location where it
may protrude, such as on or behind a pillar,
or any place you might bump your head or
receive bodily injury.
D To prevent fire keep flammable objects or
open flame (e.g. candles) away from the TV.
D Do not place optional equipment on top of
the TV.
."!\"j
6
o
Medical institutions
Do not place this TV in a place
where medical equipment is in use.
It may cause a medical equipment
malfunction.
0
m~
~~
Outdoor use
Do not install this TV outdoors. The TV should
not be exposed to rain or direct sunlight in
order to avoid damage and possible fire or
electric shock.
Do not install this TV in a vehicle, ship
or other vessel
o Excessive bumping motion of a
moving vehicle or continuous
swaying motion on a boat may
cause the TV to fall down and
cause injury.
D Exposing the TV to seawater
may cause a fire, electric shock
or damage to your TV.
Magnetic influence
D This TV contains a strong magnet in the
speaker unit that generates a magnetic field.
Keep any items susceptible to magnetic fields
away from the speaker.
o Electro-magnetic radiation emitted from
optional equipment installed too close to the
TV may cause picture distortion and/or noisy
sound.
Consignes de securite importantes Instrucciones importantes de seguridad
I)
Lisez les directives suivantes.
2)
Conservez ces directives.
3)
Observez et respectez tOllS les
avertissements.
4)
Suivez toutes les directives.
5)
N'utilisez pas eet appareil
pres de reau.
~
~§J
6)
ettoyez eet appareil
uniquement avec un
chiffon sec.
7)
Ne bouchez pas les fentes de
ventilation. Respectez les
directives du fabricant pour
I'installation de l'appareiL
8)
~""
~
~J13'
I)
Lea estas instrucciones.
2)
Guarde estas instrucciones.
3)
Respete todas las advertencias.
4)
Siga todas las instrucciones.
5)
o utilice este aparato
cerca del agua.
11) Utilisez uniquement les
elements de raccordement et
les accessoires recommandes
par Ie fabricant.
N'installez pas I'appareil a
proximite d'une source de
chaleur telle qu'un radiateur,
line bouche d'air chaud, une
cuisiniere Oll tout autre
appareil (y compris des
amplificateurs) emettant de
12) Utilisez I'appareil uniquement
avec Ie chariot, Ie trepied, Ie
support ou la table
recommandes par Ie fabricant
ou achetes avec I'appareil.
Lorsque vous utilisez un
chariot, prenez des
precautions en deplayant Ie
chariot et I'appareil afin de ne
pas les renverser, ce qui
pourrait entrainer des
blessures.
14) Pour toute reparation,
adressez-vous a un reparateur
qualifie. Faites rcparer
~~
I'appareil s'il a ete endommage
de quelque maniere que ce
soit, par exemple si Ie cordon
d'alimentation ou sa fiche
sont endommages, si du
Iiquide au tout autre corps
etranger a penetre dans
I'appareil, si l'appareil a ete
expose a la pluie ou a
!'humidite, s'i1 ne fonctionne
pas normalement ou s'il est
tombe.
~~,
6)
Limpielo unicamente
con un pano seco.
7)
No bloquee los orificios de
ventilacion. Instale el
aparato segun las
instrucciones del fabricante. ~
8)
n
Ne desactivez pas Ie
dispositif de securite
applique a la fiche
polarisee ou Ii la fiche
avec mise a Ja terre. Une
fiche polarisee est equipee de
deux lames dont rune est
plus large que I'autre. Une
fiche avec mise a la terre
est equipee de deux lames
et une broche destinee a la
mise a la terre. La lame la
plus large et la troisieme
broche sont des dispositifs de
securite. Si vous ne reussissez
pas a brancher la fiche
fournie dans la prise de courant, consultez
un electricien et faites remplacer la prise
par une neuve.
~
~ii
~:;-. ...
13) Debranchez cet appareil en
cas dorage ou lorsque vous
ne I'utilisez pas pendant de
longues peri odes.
fa chaleur.
9)
10) Ne placez pas Ie cordon
d'alimentation dans des
endroits passants et assurezvous qu'i! ne peut pas etre
pince, surtout au niveau des
fiches, de la prise de courant
et a J'endroit ou iI sort de
!'appareil.
9)
VeujlJez respecter les consignes de securite
supplimentaires pour eviter les risques
d'ilectrocution, de court-circuit, d'illcendie, de
blessure et de dommages a In propriite.
Reportez-vous au verso
our Ius d'information.
0'·.
10) Para proteger eI cable de
alimentacion, alejelo de
lugares de paso a donde
pueda ser aplastado.
especialmente en la punta de
los enchufes. los
tomacorrientes 0 el punto
donde eI cable sale del aparato.
11) Utilice unicamente los
~
comp~fiemedntos aClcesorios~·
•
0
espeCl Ica os por e
fabricante.
12) Utilicelo unicamente can eI
carro, pedestal, tripode,
abrazadera 0 mesa
especificados por el
fabricante 0 vendidos con eI
aparato. Si utiliza un carro,
tenga cuidado al moverlo
junto con eI aparato para
evitar lesiones en eI caso de
una caida.
@
•
13) Desenchufe el aparato
durante tormentas
~
electricas 0 cuando no se ]
.
utilice durante periodos
~
de tiempo prolongados.
No 10 instale cerca de
Fuentes de calor como
radiadores, calefactores,
homos u otros aparatos
(incluidos los
amplificadores) que generen
calor.
Respete la finalidad de
seguridad del enchufe
~
.
polarizado 0 de tipo
~
conexi6n a tierra. Un
enchufe polarizado presenta
dos contaclos, uno mas
ancho que el otro. Un
enchufe de tipo conexion a
tierra dispone de dos
contactos y una tercera
clavija de conex.ion a tierra.
EI contacto ancho a la
~
terc~r~ clavija se
~
sumJnlstra para su
seguridad. Si el enchufe
suministrado no encaja en la
toma de corriente. pongase
en contacto can un
electricista para el reemplazo
del tomacorriente que quedo
obsoleto.
14) Soliciteserviciotecnico
~
unicamente a personal de
y~
servicio tecnico especializado.
Sed. necesario solicitar servicio
tecnico si el aparato ha sufrido
danos como, par ejemplo, si el
cable de alimentaci6n 0 el
enchufe estan danados, se ha
vertido Iiquido a se ha caido
algun objeto dentro del aparato,
o bien si dicho aparato ha sido
expuesto a la Iluvia 0 a
humedad, no funciona
correctamente a se ha caido.
Tellga ell cuellta las advertellcias de
seguridad adicionales para evitar descargas
electricas, cortocircuitos, incelldios, lesiones
corporales 0 danos materiales.
Consulte el reverso para
obtener mas informacion.
Inal Safety DOs and DON'Ts
Wall-mount use
o Wall-mount installation
requires the use of a
Wall-Mount Bracket. When
installing or removing the TV and the
Wall-Mount Bracket. be sure to use qualified
contractors. If not properly secured during
installation or removal from the Wall-Mount
Bracket, the TV may fall and cause serious
injury.
o Be sure to follow the installation guide
supplied with the Wall-Mount Bracket when
installing the TV.
Be sure to attach the brackets with the
specified parts supplied with the Wall Mount
Bracket.
o Do not hang the TV from the ceiling. It may
fall and cause serious injury.
Do not hang anything on the TV.
o Do not allow children to climb on
the TV.
,,0
o
4
o
j
AC POWER CORD
o Do not touch the AC power cord
o
o
~~ff"
....~
and its plug with wet hands as it
13'0
,
may cause electric shock.
~
When disconnecting the AC
~
power cord, grasp the plug and
.... ,"" v:_
disconnect from the wall outlet
~
first. Do not pull by the cord.
Keep the power cord away from heat sources.
A TV set with a three-wire grounding type AC
power cord plug must be connected to an AC
power outlet with a protective earthing
connection.
o Do not convert or damage the AC power
cord.
Consult your electrician to have the outlet
changed to suit your TV.
o
Subjecting the AC power cord to wear and/or
abuse can damage the AC power cord and your
TV.
Do not place the TV where the power cord
can be easily pinched. bent, twisted. or catch
o
You;:~\
~
o Do not allow anything to rest on or roll over
the cord.
o Before connecting cables. be sure to unplug
the AC power cord for your safety.
o Do not move the TV with the AC power cord
BATTERIES
(or other cables such as audio and video)
connected.
Use only an original Sony AC power cord
with your TV; no brand substitution is
allowed.
o Do not use AC power cord supplied with the
TV with any other equipment.
D Never use a damaged AC power ~ ~
cord. A damaged AC power cord ~
can cause a short-circuit, which
'"
...
may result in a fire or electric
...~ />
,
shock.
~
Your remote control batteries are consumables.
To preserve our environment, dispose of
used batteries according to your local laws
or regulations.
Do not dispose of batteries in a fire.
D Do not short-circuit, disassemble or
overheat the batteries.
Replace only with the same or equivalent
type of batteries. Using incorrect replacement batteries can lead to an explosion.
Do not place the remote in a location near
a heat source, a place subject to direct
sunlight. or a damp room.
o
~
~ p
Do not use a damaged or poorly
fitting AC power outlet as your TV's
power source.
o Insert the plug fully into the outlet.
If it is loose, it may cause arcing and
result in a fire.
Do not overload the same AC
power outlet.
I
•P
~
~
~
C3
I'
o
Unplugging the AC power cord from the wall
outlet will completely remove power from the
TV.
During lightning storms or
~.
when the TV is left unattended'
.
and unused for extended
D
}\
periods of time, the AC power
cord should be unplugged
~
from the wall outlet. This will
s
avoid possible damage to your
TV. Also unplug the antenna
to prevent damage to the TV.
For energy conservation and safety reasons,
practice unplugging the AC power cord from
the AC power outlet.
o
o
Clean the AC power plug
Unplug the AC power plug and ~
clean it occasionally to avoid
dust from accumulating. While
cleaning, look for signs of damage. A damaged
AC power cord should never be used.
ACCESSORIES
Keep small accessories out of children's reach.
Use only the specified accessories with this TV.
Volume Adjustment
D When using headphones, adjust
q P..,.
the volume to avoid excessive
~"~
;I"
audio levels from causing
~;. "" {.(
possible hearing loss.
Broken screen panel
o
o
o
o
LCD SCREEN
o Although the LCD screen is made with
high-precision technology and has
effective pixels of99.99% or more, black
dots or bright points of light (red, blue, or
green) may appear constantly on the LCD
screen. This is a structural property of the
LCD panel and is not a malfunction.
The LCD screen is made with high precision technology and to achieve a high level
of performance and picture quality, this
TV's backlight setting is set to optimize the
brightness of the TV. However, uneven
brightness may be observed when the LCD
TV is viewed in a dark ambient without an
input source or with a blank screen. This
condition is normal and not a malfunction
of the TV. Changing the Picture mode,
Backlight setting, or turning on the Power
Management will improve this condition.
To avoid damaging the LCD panel. do not
expose the LCD screen to direct sunlight.
o Do not push or scratch the LCD screen, or
place objects on top of the TV. The images
may be uneven or the LCD panel may be
damaged.
If the TV is used in a cold place. the
picture may smear or become dark. This
does not indicate a failure. These phenomena improve as the temperature rises.
D Ghosting may occur when still pictures are
displayed continuously. It should disappear
after a few moments.
D The LCD screen and enclosure get warm
when the TV is in use. This is not a
malfunction.
Avoid spraying insect repellent with
volatile material on the LCD screen.
o Avoid prolonged contact with rubber or
plastic material to the LCD screen.
o
4
Do not throw anything at the rr=~
TV as the impact can cause 1t:-:-:--:-r--1jI1
-~~~
the LCD screen glass to
crack. break or scatter.
/.::::.
D If damage occurs to the
LCD panel, small traces of liquid crystal
sandwiched between the glass may be
found on scattered broken glass.
D Do not touch the broken glass with bare
hands. As with any broken glass pieces,
avoid skin contact and exposure to your
eyes or mouth. Avoid direct contact with
liquid or damp surfaces of the glass as
these may have an adverse effect on some
people. The contacted area should be
rinsed thoroughly with water. If conditions
persist, see your doctor.
If the surface of the TV cracks. do not
touch the TV until you have unplugged the
AC power cord. Otherwise electric shock
may result.
uJ:-@
o
SERVICING
Do not use the TV if you
suspect the TV is damaged or
o
o
o
Safety check
o Upon completion of any TV
servicing or repair, ask the
service technician to perform
routine safety checks as
specified by Sony and to
certify that the TV is safe to operate. Have
a qualified service technician dispose of
the TV if it is not safe to operate.
4-175-279-11 (1)
SONY:
END USER LICENSE AGREEMENT
FOR CERTAIN SOFTWARE TO BE USED WITH YOUR SONY TELEVISION
IMPORTANT - READ THIS AGREEMENT BEFORE USING YOUR
SONY TELEVISION. USING YOUR TELEVISION INDICATES YOUR
ACCEPTANCE OF THIS AGREEMENT.
This End User License Agreement ("EULA") is a legal agreement
between you and Sony Electronics Inc. ("Sony"), the licensor of the
software (other than the software which is governed by other licenses
as indicated below, the "Excluded Software") included in this Sony
Television and related materials which shall be referred to as the Sony
Software. This EULA covers the Sony Software and that of Sony's third
party licensors ("Third Party Licensors") and accompanying printed or
online documentation. The Sony Software includes software in your
Sony Television, other software, including updates or modified software,
provided to you by Sony, whether stored on media, or downloaded to
the Sony Television via any method. By using your Sony Television, you
agree to be bound by the terms of this EULA. If you do not agree to
the terms of this EULA, Sony is unwilling to license the Sony Software
to you, and you should promptly contact Sony for instructions on the
return of the entire Sony Television and included Sony Software for a
refund of the purchase price of the Sony Television.
SOFTWARE LICENSE
The Sony Software is licensed, not sold. Sony and its Third Party
Licensors grant you a limited license to use the Sony Software only on
the Sony Television. You agree notto modify, reverse engineer, decompile
or disassemble the Sony Software in whole or in part or to use the Sony
Software in whole or in part for any purpose other than allowed under
this EULA. In addition, you may transfer all of your rights under this
EULA only as part of a sale or transfer of the Sony Television provided
you retain no copies, transfer all of the Sony Software (including all
copies, component parts, any media, printed materials, all versions and
any upgrades of the Sony Software, and this EULA), and the recipient
agrees to the terms of this EULA. Sony and its Third Party Licensors
retain all rights that this EULA does not expressly grant to you.
COPYRIGHT
The Sony Software is protected by copyright laws and international
copyright treaties, as well as other intellectual property laws and treaties.
All title and copyright in and to the Sony Software, and all copies of the
Sony Software, are owned by Sony or its Third Party Licensors.
EXCLUSION OF WARRANTY
THE SONY SOFTWARE AND ACCOMPANYING DOCUMENTATION ARE
FURNISHED TO YOU "AS IS" AND WITHOUT WARRANTY OF ANY KIND.
SONY AND ITS THIRD PARTY LICENSORS EXPRESSLY DISCLAIM
ALL WARRANTIES AND CONDITIONS, EXPRESS OR IMPLIED,
INCLUDNG BUT NOT LIMITED TO THE IMPLIED WARRANTIES OF
NON-INFRINGEMENT, MERCHANTABILITY, AND FITNESS FOR A
PARTICULAR PURPOSE. SONY AND ITS THIRD PARTY LICENSORS DO
NOT WARRANT THAT THE SONY SOFTWARE OR THE ACCOMPANYING
DOCUMENTATION WILL MEET YOUR REQUIREMENTS OR THAT THE
OPERATION OF THE SONY SOFTWARE WILL BE UNINTERRUPTED
OR ERROR FREE. FURTHERMORE, SONY AND ITS THIRD PARTY
LICENSORS DO NOT WARRANT OR MAKE ANY REPRESENTATIONS
REGARDING THE USE OR THE RESULTS OF THE USE OF THE SONY
SOFTWARE IN TERMS OF ITS CORRECTNESS, ACCURACY, RELIABILITY
OR OTHERWISE. NO ORAL OR WRITTEN INFORMATION OR ADVICE
GIVEN BY SONY OR A SONY AUTHORIZED REPRESENTATIVE SHALL
CREATE A WARRANTY OR IN ANY WAY CHANGE THIS EXCLUSION OF
WARRANTY.
LIMITATION OF LIABILITY
IN NO EVENT WILL SONY OR ITS THIRD-PARTY LICENSORS BE
LIABLE TO YOU FOR ANY SPECIAL, INDIRECT, INCIDENTAL, PUNITIVE
OR CONSEQUENTIAL DAMAGES OF ANY KIND, INCLUDING, BUT NOT
LIMITED TO, COMPENSATION, REIMBURSEMENT OR DAMAGES ON
ACCOUNT OF THE LOSS OF USE OF THE SONY TELEVISION, DOWN
TIME AND YOUR TIME, LOSS OF PRESENT OR PROSPECTIVE PROFITS,
LOSS OF DATA, OR FOR ANY OTHER REASON WHATSOEVER, EVEN
IF SONY OR ITS THIRD PARTY LICENSORS HAVE BEEN ADVISED OF
THE POSSIBILITY OF SUCH DAMAGES. THE SONY SOFTWARE AND
ACCOMPANYING DOCUMENTATION ARE FURNISHED TO YOU FOR
USE AT YOUR OWN RISK. SONY AND ITS THIRD PARTY LICENSORS
WILL NOT BE LIABLE FOR DAMAGES FOR BREACH OF ANY EXPRESS
OR IMPLIED WARRANTY, BREACH OF CONTRACT, NEGLIGENCE,
STRICT LIABILITY OR ANY OTHER LEGAL THEORY RELATED TO THE
SONY SOFTWARE.
Some jurisdictions may not allow exclusions or limitations of incidental
or consequential damages, or allow limitations on how long an implied
warranty lasts, so the above limitations or exclusions may not apply to
you.
LIMITED WARRANTY ON MEDIA
In situations where the Sony Software or any part thereof is furnished
on media, Sony warrants that for a period of ninety (90) days from the
date of its delivery to you, the media on which the Sony Software is
furnished to you will be free from defects in materials and workmanship
under normal use. This limited warranty extends only to you as the
original licensee. Sony's entire liability and your exclusive remedy will
be replacement of the media not meeting Sony's limited warranty. ANY
IMPLIED WARRANTIES OR CONDITIONS ON THE MEDIA, INCLUDING
THE IMPLIED WARRANTIES AND CONDITIONS OF MERCHANTABILITY
AND/OR FITNESS FOR A PARTICULAR PURPOSE, ARE LIMITED IN
DURATION TO NINETY (90) DAYS FROM THE DATE OF DELIVERY.
SOME JURISDICTIONS DO NOT ALLOW LIMITATIONS ON HOW
LONG AN IMPLIED WARRANTY OR CONDITION LASTS, SO THESE
LIMITATIONS MAY NOT APPLY TO YOU. THIS WARRANTY GIVES YOU
SPECIFIC LEGAL RIGHTS, AND YOU MAY ALSO HAVE OTHER RIGHTS
WHICH VARY FROM JURISDICTION TO JURISDICTION.
AUTOMATIC UPDATE FEATURE
From time to time, Sony or third parties may automatically update
or otherwise modify the Sony Software, for example, but not limited
to, for purposes of error correction, improvement of features, and
enhancement of security features. Such updates or modifications may
change or delete the nature of features or other aspects of the Sony
Software, including features you may rely upon. You hereby agree that
such activities may occur at Sony's sole discretion and that Sony may
condition continued use of the Sony Software upon your complete
installation or acceptance of such update or modifications.
Illrll'III:III:: 1I I tIJI[ltl l~lIt~JI ~I 'l fl l l
46.71511.001
SOFTWARE DATA COLLECTION AND MONITORING
The Sony Software contains features which may allow Sony and/or third
parties to collect data from, control and/or monitor the Sony Television
and other devices running or interacting with the Sony Software. You
hereby consent to such activities. Sony's current privacy policy is located
at http://products.sel.sony.com/SEUlegal/privacy.pdf. Please contact
applicable third parties for privacy policies related to their software and
services.
HIGH RISK ACTIVITIES
The Sony Software is not fault-tolerant and is not designed, manufactured
or intended for use or resale as on-line control equipment in hazardous
environments requiring fail-safe performance, such as in the operation
of nuclear facilities, aircraft navigation or communication systems, air
traffic control, direct life support machines, or weapons systems, in
which the failure of the Sony Software could lead to death, personal
injury, or severe physical or environmental damage ("High Risk
Activities"). SONY, each of the THIRD PARTY LICENSORS AND EACH
OF THEIR RESPECTIVE AFFILIATES specifically disclaim any express or
implied warranty or condition of fitness for HIGH RISK ACTIVITIES.
RESTRICTIONS ON EXPORT OF ENCRYPTION TECHNOLOGY
The Sony Software may contain encryption technology. You
acknowledge that any export of Sony Software containing encryption
technology from the United States or subsequent re-export of such
software by a person located outside of the United States requires a
license or other authorization from the U.S. Department of Commerce's
Bureau of Industry and Security. You further acknowledge that the Sony
Software containing encryption technology and acquired from Sony is
not intended for use by a foreign government end user. By accepting
this license agreement, you agree to abide by all relevant U.S. export
laws and regulations in the purchase and use of the Sony product being
acquired. including, but not limited to those regulations relating to the
export control of cryptographic items and not to transfer, or authorize
the transfer, of the Sony Software to a prohibited country or otherwise
in violation of any such restrictions or regulations.
US GOVERNMENT RESTRICTED RIGHTS
The Sony Software is provided with RESTRICTED RIGHTS. Use,
duplication or disclosure by the United States Government is subject
to restrictions as set forth in subparagraphs (c)(1) and (c)(2) of
the Commercial Computer Software clause at FAR 52.227 19, and
subparagraph (c)(i)(ii) of the Rights in Technical Data and Computer
Software clause at DOD FAR 252.227-7013 and any comparable federal,
state or local law or regulation. Manufacturer is Sony Electronics Inc.,
16530 Via Esprillo, San Diego, CA 92127.
GOVERNING LAW, VENUE, JURY TRIAL WAIVER
This EULA will be governed by the laws of the State of California, United
States of America, without regards to its conflicts of laws provision. Any
dispute arising out of this EULA shall be subject to the exclusive venue
of the state and federal courts of San Diego County, California, and the
parties hereby consent to the venue and jurisdiction of such courts.
THE PARTIES HERETO WAIVE TRIAL BY JURY WITH RESPECT TO ANY
MATTERS ARISING UNDER OR RELATING TO THIS EULA.
SEVERABILITY
If any part of this EULA is held invalid or unenforceable, the other parts
will remain valid.
THIRD PARTY BENEFICIARIES
Each Third Party Licensor is an express intended third-party beneficiary
of, and shall have the right to enforce, each provision of this EULA with
respect to the software of such party.
EXCLUDED SOFTWARE
Excluded Software included in the Sony Television is not subject to this
EULA. Please refer to the paragraph titled "Notices and Licenses for
Excluded Software Used in this Television" for a list of the applicable
software and terms and conditions governing the use of such Excluded
Software.
TERM
This EULA is effective until terminated. Sony may terminate this EULA
immediately if you fail to comply with its terms by giving you notice. In
such event, you must destroy the Sony Software and accompanying
documentation, and all copies you have made of them. In addition, upon
termination you will have no recourse against Sony or its licensors
for your inability to use the Sony Software or the accompanying
documentation.
NOTICES AND LICENSES FOR EXCLUDED SOFTWARE USED IN THIS
TELEVISION
FREETYPE2 SOFTWARE
Portions of this software are copyrighted © 1996-2002, 2006 The
FreeType Product (www.freetype.org). All rights reserved.
THE FREETYPE PROJECT IS PROVIDED "AS IS" WITHOUT WARRANTY
OF ANY KIND, EITHER EXPRESS OR IMPLIED, INCLUDING, BUT NOT
LIMITED TO, WARRANTIES OF MERCHANTABILITY AND FITNESS FOR
A PARTICULAR PURPOSE. IN NO EVENT WILL ANY OF THE AUTHORS
OR COPYRIGHT HOLDERS BE LIABLE FOR ANY DAMAGES CAUSED
BY THE USE OR THE INABILITY TO USE, OF THE FREETYPE PROJECT.
ZLiB SOFTWARE
Copyright © 1995-2005 Jean-Ioup Gailly and Mark Adler.
THIS SOFTWARE IS PROVIDED "AS-IS" WITHOUT ANY EXPRESS
OR IMPLIED WARRANTY. IN NO EVENT WILL THE AUTHORS BE
HELD LIABLE FOR ANY DAMAGES ARISING FROM THE USE OF THIS
SOFTWARE.
UNICODE SOFTWARE
Copyright © 1995-2009 International Business Machines Corporation
and others. All rights reserved.
THE SOFTWARE IS PROVIDED "AS IS", WITHOUT WARRANTY OF ANY
KIND, EXPRESS OR IMPLIED, INCLUDING BUT NOT LIMITED TO THE
WARRANTIES OF MERCHANTABILITY, FITNESS FOR A PARTICULAR
PURPOSE AND NONINFRINGEMENT OF THIRD PARTY RIGHTS. IN NO
EVENT SHALL THE COPYRIGHT HOLDER OR HOLDERS INCLUDED IN
THIS NOTICE BE LIABLE FOR ANY CLAIM, OR ANY SPECIAL INDIRECT
OR CONSEQUENTIAL DAMAGES, OR ANY DAMAGES WHATSOEVER
RESULTING FROM LOSS OF USE, DATA OR PROFITS, WHETHER
IN AN ACTION OF CONTRACT, NEGLIGENCE OR OTHER TORTIOUS
ACTION, ARISING OUT OF OR IN CONNECTION WITH THE USE OR
PERFORMANCE OF THIS SOFTWARE.
INDEPENDENT JPEG GROUP SOFTWARE
The module, libjpeg is the work of the Independent JPEG Group.
© copyright 1991-1998, Thomas G. Lane. All rights reserved.
© 2009 Sony Corporation
Printed in China
4-144-386-01(2)
LCD Television 12M
LIMITED WARRANTY(U.S. ONLY)
SONY ELECTRONICS INC. (“SONY”) warrants this product against defects in material or workmanship
for the original and any subsequent end user owner(s) (“You” or “Your”) for the time periods and as set
forth below. Under this Limited Warranty, SONY will, at its option, (i) repair the product using new or
refurbished parts or (ii) replace the product with a new or refurbished product. “Refurbished” means
a product or part that has been returned to its original specifications. These are Your exclusive
remedies. SONY does not warrant that the operation of the product will be uninterrupted or error-free.
Term: One (1) year from the original date of purchase of the product (or ninety (90) days from original
date of purchase for commercial use). This Limited Warranty is transferable. However, any transfer of this
product does not extend the term. A copy of the dated receipt or bill of sale from the original
end user purchase is required to determine coverage. Online auction confirmations are
not accepted for warranty verification.
Product Coverage: Only the hardware components packaged with the Product are covered. Technical
assistance for hardware or software usage and any software products are not covered. Any software
is provided “AS IS” unless expressly provided for in any enclosed software Limited Warranty. When
a product or part is exchanged, the original item becomes SONY’s property. Any replacement product
provided under this limited warranty may vary in the color and/or cosmetic design from the original
product and may not include any original engraving or similar customization.
Instructions: You must contact SONY or an authorized servicer prior to returning any product for warranty
service. SONY will not reimburse You for service performed by others. Unless otherwise instructed by
SONY or an authorized servicer, You must deliver the product, freight prepaid, in either its original
packaging or packaging affording an equal degree of protection to the facility specified by SONY.
For specific instructions on obtaining warranty service for your product,
Visit SONY’s Web Site: www.sony.com/support
Or call the Sony Customer Information Service Center
1-800-222-SONY (7669)
For an accessory or part not available from Your authorized dealer, call:
1-800-488-SONY (7669)
If You purchased an extended service plan, please refer to the service plan for the coverage, duration and
terms of service as they are not governed by this Limited Warranty.
Repair/Replacement Warranty: This Limited Warranty shall apply to any repair, replacement part or
replacement product for the remainder of the original Limited Warranty period or for ninety (90) days,
whichever is longer.
(See reverse for additional terms and conditions.)
Printed in U.S.A.
Limitations: This Limited Warranty only covers product issues caused by defects in material or
workmanship during ordinary consumer use; it does not cover product issues caused by any other reason,
including but not limited to, (i) product issues due to acts of God or nature; (ii) misuse; (iii) accidental
damage, including contact with liquid, extreme heat or foreign material; (iv) customer installation, set up
adjustments or signal reception issues; (v) limitations of technology; (vi) modification of or to any part
of the SONY product, including the antenna; (vii) cosmetic damage; (viii) use or installation inconsistent
with the owner’s manual and other SONY instruction; (ix) use of parts or peripherals not recommended
by SONY; damage caused by servicing not authorized by SONY or third-party calibration; or (x) damage
caused by computer or internet viruses, bugs, worms or Trojan Horses. This Limited Warranty does not
cover up to .01% pixel outages (small dot picture elements that are dark or incorrectly illuminated). A
Display contains hundreds of thousands of individual pixels. Displays typically contain a small number
of pixels that do not function normally.
This Limited Warranty does not cover SONY products sold “AS IS”, “Open Box”, “WITH ALL FAULTS”
or similar notations and does not cover consumables (such as fuses or disposable batteries). SONY will
not replace missing components from any package purchased “AS IS”, “Open Box” or through an online
auction. This Limited Warranty is invalid if the factory-applied serial number has been altered or removed
from the product. This Limited Warranty is valid only on products purchased and located in the United
States (excluding territories) or United States military facilities.
SONY specifically does not represent that it will be able to repair any product under this warranty or make
a product exchange without risk to or loss of programs or data.
LIMITATION ON DAMAGES: SONY SHALL NOT BE LIABLE FOR ANY INCIDENTAL OR CONSEQUENTIAL
DAMAGES FOR BREACH OF ANY EXPRESS OR IMPLIED WARRANTY ON THIS PRODUCT NOR SHALL
RECOVERY OF ANY KIND AGAINST SONY BE GREATER THAN THE PURCHASE PRICE OF THE
PRODUCT.
DURATION OF IMPLIED WARRANTIES: EXCEPT TO THE EXTENT PROHIBITED BY APPLICABLE LAW,
ANY IMPLIED WARRANTY OF MERCHANTABILITY OR FITNESS FOR A PARTICULAR PURPOSE ON
THIS PRODUCT IS LIMITED IN DURATION TO THE DURATION OF THIS WARRANTY. WITH RESPECT TO
COMMERCIAL PURCHASERS, ALL IMPLIED WARRANTIES, INCLUDING THE IMPLIED WARRANTIES
OF MERCHANTABILITY AND FITNESS FOR A PARTICULAR PURPOSE, ARE EXCLUDED AND
DISCLAIMED.
Some states do not allow the exclusion or limitation of incidental or consequential damages, or allow
limitations on how long an implied warranty lasts, so the above limitations or exclusions may not apply
to You. This Limited Warranty gives You specific legal rights and You may have other rights which vary
from state to state.
No Sony reseller, agent or employee is authorized to make any modification, extension or addition to
this warranty.