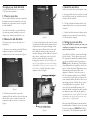
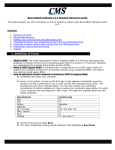
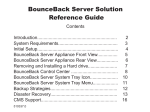
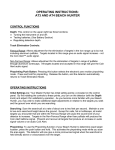
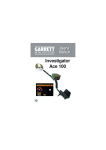
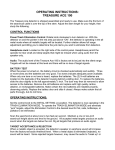
1
Installation & Set-Up Guide
partition and copy the system files to it making it a
bootable drive. If you have an extended partition,
type FORMAT D: (or FORMAT E:) followed by the
Return key to format the D/E drive. Remove the
floppy disk, and when you restart your system, it
will boot from your new C drive.
6. Problems?
Note: If your original hard drive only had a single
partition (you only had a C: drive) and your new
drive has multiple partitions, your CD-ROM may
have been moved to the next available drive letter
after your new hard drive partitions. If you have CDROM based applications installed (those that require
the CD-ROM to run), these applications may be
expecting to find your CD-ROM drive at D:, which
may have changed. If you have problems running
these applications, verify the drive letter of your CDROM, and reinstall the CD-ROM applications if the
CD-ROM drive is at a new drive letter.
There is a known issue with some computers and
their PCMCIA card slots. The EasyBundle interface
card may not be recognized by your system when
you plug the card into the slot. If this is the case,
move the card to the other slot and try again.
Remember, perform this step of making partitions
and formatting them only if you didn’t use
EasyMove in Step 1, above.
Having problems? Review the steps for removal or
installation, then call our Technical Support
Department at 1(714) 424-5520. Online support is
available at [email protected] and
www.cmsproducts.com.
7. Bootable Floppy Disks
To be able to boot (start) your computer without a
hard disk, you’ll need a floppy disk with certain
files and applications on it to boot from. A bootable
floppy disk does not come with your computer,
and you have to make your own before you
remove your hard disk. From the Settings menu,
open the control panel window, then open the
Add/Remove Programs icon. Select the Start-Up
Disk tab, then click the Create Disk button.
5. Review
• Use EasyMove (if available) to transfer your data
or
• If you don’t use EasyMove, back up your data.
• Remove the screw on the bottom.
• Open the latch and remove the drive cover.
• Slide and lift the drive from the computer.
• Reinstall the drive.
• Replace the drive cover.
• Replace the screw on the bottom.
• If you didn’t use EasyMove, partition and format
the disk, then restore your operating system and
data from your backup.
Hard Disk
Installation
& Set-Up
Guide
Copyright © 1999 by CMS Peripherals, Inc. All rights reserved. No part
of this document may be reproduced in any form without prior written
consent from CMS. The information and specifications in this document
are subject to change without notice.
CMS, CMS Peripherals, and the CMS logo are registered trademarks of
CMS Peripherals, Inc. Compaq is a trademark of Compaq Computer, Inc.
All other trademarks or registered trademarks used herein are the
property of their respective owners.
072715.3
June, 1999
For Compaq® Armada 1700 Series
& Prosignia 120, 140, & 160 Series
Personal Computers
To replace your hard disk with
3. Install the new drive
your new CMS hard disk drive for your Armada
1700, follow these instructions.
Install your new disk drive by following these steps:
A. Set the new drive into place in the drive bay with
the black CMS logo facing up, and slide it to the left
to mate it with the connector.
1. Preserve your data
If you’ve used the EasyMove software to transfer the
data from the notebook’s original drive to the new
StrataDrive, the original drive can now be replaced
with the StrataDrive.
B. Tuck the pull-tab down between the drive and
computer. Replace drive cover previously removed
in Step 2B.
If you don’t have EasyMove, you should back-up
your data using whatever method is best for you
(floppies, tape, network, removable drive, etc.).
2. Remove the old disk drive
Follow these steps to remove and replace your
original drive.
A. Make sure your computer is turned Off. Turn the
computer over and use a small flat-bladed
screwdriver to remove the screw shown in Figure 1.
Figure 2
C. Grasp the black fabric pull-tab (it may be tucked
in between the disk drive and the computer chassis)
and pull the drive to the right to disengage it from
the mating connector. Because of the way the pulltab is attached to the drive, pulling it may not be
enough to disengage the drive from the connector. If
this is the case, carefully push on the silver end of
the drive’s bracket and slide it to the right to
disengage the connectors. Caution: Pushing on the
top cover of the disk drive can cause serious damage
to the disk drive. Do not push on the top cover of
the disk drive. Carefully lift the drive from the
computer as shown in Figure 3.
Figure 1
B. Slide the latch towards the center of the
computer and lift the small door. Grasp the door and
slide the drive cover away from the center of the
computer, then lift it to remove it, all as shown in
Figure 2.
Figure 3
C. Push the latch back down until it latches in place
and replace the screw previously removed in Step
2A. The installation is complete.
4. Setting up your new drive
If you used EasyMove to transfer your data, your
installation is complete. Turn on your computer
and you’re back to work.
If you didn’t use EasyMove, insert a bootable floppy
disk (See Section 7, below) and turn the power on.
The computer will automatically determine the drive
type for your new disk. From the A: prompt, type
FDISK followed by the Return key. Choose option 1
(Create DOS partition or logical drive), then choose
option 1, (Create the primary DOS partition), accept
the maximum size and activate it. Due to the
limitations of Windows 3.1 and early versions of
Win’95, the maximum partition size is 2,048 MB. If
your new disk is larger than this, you’ll then need to
create extended partitions (D and/or E drives) to use
the remaining capacity of the disk. Choose option 1
(Create DOS partition or logical drive). Choose
option 2 (Create extended DOS partition), then
accept the defaults for partition size and logical drive
size. Repeat this step to utilize the full capacity of
your new disk. Newer versions of Win’95 do not have
this limitation and can fully utilize your new large
capacity drive as a single partition.
When the primary DOS partition is created (and any
extended partitions, if required), reboot your system.
From the A: prompt, type FORMAT C:/S followed
by the Enter key. This will format the primary DOS