1
CS 406-Basic Linux System Administration
DNS/BIND Server
----Jingjing Wang
1 Overview
For the final project on CS 406, my task is to do installation and configuration about bind
which is a software used for DNS server, also I am required to explain some security
issues on it. I used my personal laptop to finish my project including installation,
configurations and use one computer in my office to test it. The following is my
environment.
IP address:
My laptop: 131.230.133.198
My office computer: 131.230.133.197
The organization of the paper is as follows: First, the conception of DNS and BIND is
presented and defined in Section 2 .Then, the installation and the configuration will be
introduced in section 3 and section 4. In section 5, it focus on the security issues of the
BIND. And finally, the way on starting and testing BIND will be described.
2 Background
In this chapter, I will discuss some background of DNS server and BIND software, I will
focus on how does DNS server work in our internet and describe some important features
of the latest version of BIND software.
The DNS is also called Domain Name System, which is a hierarchical naming system for
computers, services, or any resource participating in the Internet. The function of DNS is
to translate the domain names into IP address. Since in our internet, the communication
between the different computers is based on the IP addresses. So if you type the hostname
rather than IP address, it requires one thing that can map it. This is the responsibility that
DNS provides. So why it is useful? Due to the DNS, it is easier for people to remember
the hostname/domain name rather than the IP addresses.
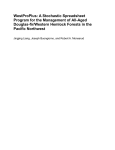
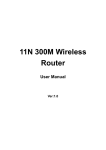
The figure 1 shows how does the DNS work in our internet. There are five steps in the
figure 1 .Step1: it is first to determine which primary name server(master) contains your
Domain Name Records by contacting the root level internic name server maintained by
InterNIC. Step2: the root level internic name server returns the IP address of the primary
name server responsible for requesting the domain . Step 3 and 4: your computer
communicate with the the primary name sever which contains the IP address of the
domain name. Step 5 : the hosting server can return to the web browser with the IP
address.
Figure 1 : the work of the DNS
Now I will introduce some information of the BIND software.
BIND, called Berkeley Internet Name Domain, is the most commonly used DNS server
on the Internet, especially on Unix-like systems, where it is a de facto standard.
A new version of BIND (BIND 9) was written from scratch in part to address the
architectural difficulties with auditing the earlier BIND code bases, and also to support
DNSSEC (DNS Security Extensions). Other important features of BIND 9 include: TSIG,
DNS notify, nsupdate, IPv6, rndc flush (remote name daemon control), views,
multiprocessor support, and an improved portability architecture.
3 Installation
Before installing BIND, we need to first install a package bind9-utils, this package is
very useful which includes the utilities host,dig and nsllokup, these commands are used
to test and query DNS.
We can download this package from
http://packages.debian.org/lenny/amd64/libisc45/download/ ,because of the dependence
problem, we need to first install libcap2_2.11-2_amd64.deb, libisc45_9.5.1.dfsg.P11_amd64.deb and libdns45_9.5.1.dfsg.P1-1_amd64.deb.
After installing bind9-utils, we can download the latest version of the BIND source code
from ftp://ftp.isc.org/isc/bind9/, in my project, the version is 9.6.0-P1.To install BIND ,
we can follow the steps as described below:
Extract:
tar -zxvf bind-9.6.0-P1.tar.gz
Then cd to /opt/bind-9.6.0-P1, and we need to set up a program for a particular
application :
./configure --prefix=/usr/local/named
The prefix option means which directory you want to install your software to.
After that, we need to use “make”, and “make install” commands to recompile and install
the software.
make
make install
4 BIND Configuration
The complete configuration has config file, the root name server hints file, and for
master servers, the zone data files that records the mapping for each host. Since I install
BIND from the source code, we need to create these files manually.
4.1 named.conf
named’s configuration file, named.conf, gives the information on the roles (master,
slave,stub or caching-only) of this host and the manner in which it should obtain its copy
of the data for each zone it serves. It’s also to specify the options—both global options
related to the overall operation of named and server –or zone –specific options that apply
to only a portion of the DNS traffic.
To create named.config file ,we need to create a directory called etc in /usr/local/named,
and then store the config file inside it:
mkdir etc
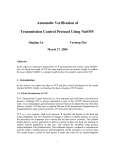
The figure2 is the contents of the named.conf:
Figure2 named.conf
We can see there are a lot of different statements inside it, I will focus on several
important ones. [i]
include: it is used to interpolates a file, for example, you can include a key file in your
config file.
options : sets global name server configuration options and defaults, it specifies global
options, some of which may be later overwritten by a particular zones or servers.
controls: this is to define channels used to control the name server with rndc (rndc allows
you to administer the named daemon, locally or remotely, with command line statements )
directory: causes named to cd to the specified directory. For example, if there is the path
of file is recorded as the relative one in config file, then the absolute path of this file is
firstly cd to the directory.
acl: defines access control lists.
zone: defines a zone of resource records.
logging: specifies logging categories and their destinations. In this statement, the channel
means a place which message can go to. And category means the kind of message that
named can create.
The most important statement is the zone statement, because it is to tell named about the
authoritative zones. The format configuring the master server for a zone is :
zone “domain_name”{
type master;
file “path”;
}
The “domain name” is the name of the domain that you build up (in my project, I create a
domain called “seker.com”) . And master specifies the roles of the DNS server, the path
tells where we can find the corresponding zone data files.
There are two types of zone: forward zone and reverse zone. The forward zone maps
hostnames to IP address while the reverse one maps IP address to hostnames. Also, in the
zone statement, three important clauses should be considered:
allow-query {address_match_list};
allow-transfer{address_match_list};
allow-update{address_match_list};
allow-query and allow-transfer specifies which host can query the name server and
request the copy of DNS records. allow-update should be present with an address match
list that limits the hosts from which updates can happen.
4.2 named.root
named.root is the root name server hint file which contains the names and address of
root DNS servers in the internet. It also includes the response we would get if we queried
a root server for the name server records in the root domain .It is very useful when your
network is connected to the internet in that this files contains the records for the root DNS
servers on the Internet. So in other words, without this file, named would only know
about the information of the domains it serves and their subdomain.
In my project, I store this file into this directory called /var/named, and then use the
following command to create it:
dig > named.root
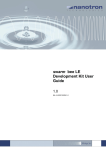
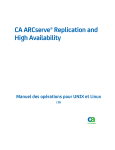
The figure 3 is what the hits file looks like, we can see the left part is the hostnames of
the root servers on the internet, and the right part is the relative IP addresses.
Figure3 the hints file
4.3 Zone file
The zone file is a file that describes a part of DNS called a DNS zone. In the zone file, it
contains the information that defines mappings between domain names and IP addresses
and other resources. Each zone should have a forward zone file and reverse zone file.
Without forward zone file (reverse zone file), it will not make the forward mapping
(reverse mapping) succeed. In my DNS server, there are two different zones: localhost
zone and seker.com zone. These files should also be stored in/var/named. Since the
configuration of these two zones are similar, I will talk about how to configure seker.com
zone.
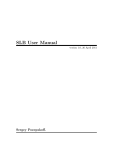
The forward zone file is used to map the hostnames to IP address. Figure 4 shows the
forward zone file of seker.com:
Figure 4 forward zone file
From this file ,we can see there are a lot of records inside it. [i]“NS” record is to
specifies the servers which are authoritative for a zone. In this case, jeff.seker.com is a
nameserver of the zone seker.com. “SOA” record is to specify the domain or zone, the
authoritative name server for the zone and the email address of the technical contact for
the zone (e.g.root.jeff.seker.com is a email address) .“A” record ,which is a symbol of the
forward zone file is to map the hostnames to IP addresses. “@” is the shorthand for the
name of the current zone.
From this file, we can see in my DNS zone data record, there are three computers:
jeff.seker.com(131.230.133.198), pc1.seker.com(131.230.133.197) and
pc2.seker.com(131.230.133.196).
Figure 5 shows the reverse zone file of seker.com, “PTR” record is to perform the
reverse mapping from IP address to hostnames. And the “TTL control statement”
means when a caching (recursive) nameserver queries the authoritative nameserver for a
resource record, it will cache that record for the time (in seconds) specified by the TTL.
Figure 5 reverse zone file
5 Security issue
From the former chapters, we can see DNS server plays a very important role in our
internet, this is why some hackers prefer to attack it. So in this chapter , I would consider
three basic security issue of DNS/BIND server.
5.1 chroot jail
First of all ,we need to configure the BIND so that it resides in a “chroot jail”. So what
does it mean? It means it can not see or access files outside its own little directory tree.
The purpose of this is to limit the amount of access that individual could get by exploiting
vulnerabilities in BIND. Also ,we need to configure it to run as a non-root user. In my
project, I defined a group ”named” that can start BIND, and add a user “jeff” in this
group. The following is the detailed steps that create the directory structure:
mkdir -p /chroot/named
cd /chroot/named
mkdir dev
mkdir etc
mkdir logs // to store log files
mkdir conf // to store some configure files
mkdir -p var/run
After building up the chroot directory, when running DNS, it need some resource stored
in some important directory such as /dev, so in order to make DNS run properly, we need
to copy these files under /chroot/named/. In default, the system is to use /dev files.
However, we need to limit DNS to a directory, so to make it can work, we need to copy
the used files from /dev to our created directory. The following is the steps that we do:
ls -lL /dev/zero /dev/null /dev/random
mknod dev/null c 1 3
mknod dev/zero c 1 5
mknod dev/random c 1 8
The command “mknod” is used to make block or character special files.
Copy time files to our created directory, this file is used to make BIND logs things with
the right time.
cp /etc/localtime etc/
Then we also need to copy the config files and the zone data files in our chroot directory.
Copy “named.conf” under the directory /usr/local/named/etc/ to /chroot/named/etc
cp /usr/local/named/etc/named.conf etc/named.conf
Copy localhost.zone, named.local, named.root, seker.local, seker.zone from /var/named/
to /chroot/named/conf/, and then create a link between /chroot/named/etc/named.conf to
/etc/named.conf.
ln -s /chroot/named/etc/named.conf /etc/named.conf
5.2 Setup the rights
We need to try our best to minimize the rights for users that can run DNS. In addition, we
also should consider how to allocate the rights that can make DNS run properly. So in the
following, I will give the details on how to setup the rights.
Since our goal is to let the users who belong to named group execute the bind application,
so they need to have read permission rather than write permission. Also, for the
configuration files, only root can be allowed to modify . To satisfy this, we need to run
the following commands:
cd /chroot/named
chown –R root.named ./
After that, we need to consider how to give permissions for each file. Obviously, root
should have all of the permissions for these files. The group named needs the read
permission for the files and read, execute permissions for the directories. Base on this ,we
do the following actions:
Give root read and write permission for the files and group named only read permission:
find . -type f -print | xargs chmod u=rw,og=r
Give root read,write and execute permissions for the directories and group named
read,execute permissions.
find . -type d -print | xargs chmod u=rwx,og=rx
For the configuration files, we should not allow others to read:
chmod o= etc/*.conf
Then we need to setup the rights for ./var/, because here named.pid will be created
described in named.conf:
chown root.root
./var/
chmod u=rwx,og=x var/
The reason why we make chroot DNS is that we do not hope the group named have the
rights to access the real /var. Since we allow the group named to write to named.pid and
logs that are stored in our chroot directory, so we need to use the following commands to
realize it:
chown root.named var/run/
chmod ug=rwx,o=rx var/run/
chown root.named logs/
chmod ug=rwx,o=rx logs/
5.3 DNSSEC
DNSSEC is a set of the DNS extensions which is used to authenticate the origin of the
zone data and verify its integrity by the use of the public key cryptography. That means
when using DNSSEC, the DNS client will check whether the data really come from the
zone’s owner.
In the DNSSEC system, every zone has its own public and private keys. The private key
is used to digitally sign a zone and the public key is to verify the signatures and should be
included in the zone’s data. To create the key, we can use the command “dnssec-keygen” ,
the following is the details:
Create /usr/local/etc/rndc.conf, and then copy it to /chroot/named/etc/rndc.conf, this is the
config file of rndc.
vim /usr/local/etc/rndc.conf
And then add the following contents:
options {
default-server localhost;
default-key "rndckey";
};
server localhost{
key "rndckey";
};
include "/chroot/named/etc/rndc.key";
we also need to add the following lines in /chroot/named/etc/named.conf:
controls {
inet 127.0.0.1 allow { localhost; } keys { rndckey; };
};
include "/etc/rndc.key";
Then we need to create /chroot/named/etc/rndc.key, we use “dnssec-keygen” command:
dnssec-keygen -a HMAC-MD5 -b 256 -n HOST rndc
-a option: the algorithm that we use
-b option: specify the number of bits in the key
-n option: specify the owner type of the key
If sucessful, we can get the return value, and two files “Krndc.+157+30481.key”
and ”Krndc.+157+30481.private”,we need to copy the key:
cat Krndc.+157+30481.private
And get the following information:
Private-key-format: v1.2
Algorithm: 157 (HMAC_MD5)
Key: 6q44jDo2WMwB8+RZg/2tBvNk4MOu4AzUI5W+VGcxrNg=
Bits: AAA=
Then we create our key files:
vim /chroot/named/etc/rndc.key
key "rndckey"{
algorithm "hmac-md5";
secret "6q44jDo2WMwB8+RZg/2tBvNk4MOu4AzUI5W+VGcxrNg=";
};
After that, we need to create two links:
ln -s /chroot/named/etc/rndc.conf /usr/local/named/etc/rndc.conf
ln -s /chroot/named/etc/rndc.conf /etc/rndc.conf
Finally, we need to test whether it can properly work, we type the following command
(To do this, the requirement is that the bind9 should run ):
/usr/local/named/sbin/rndc status
If we get the following information, the setup is correct:
version: 9.6.0-P1
CPUs found: 2
worker threads: 2
number of zones: 16
debug level: 0
xfers running: 0
xfers deferred: 0
soa queries in progress: 0
query logging is OFF
recursive clients: 0/0/1000
tcp clients: 0/100
server is up and running
5.4 allow-query and allow-transfer
The third securty issuse is that we may need to limit some users that can use the
commands “host”, “nslookup” and “ping” to do query and also limit the users can copy
the data of the zones , this configuration is very simple, just add “allow-query” and
“allow-transfer” into “named.conf” file.
6 Start and test BIND
Before starting the BIND, we should modify /etc/resolv.conf, this file is used to specify
the nameserver. We need to add the following contents inside it:
domain: domain name
nameserver: nameserver IP address
Then we use the following command to start BIND:
/usr/local/named/sbin/named -t /chroot/named -u jeff -c
/etc/named.conf
-t option: specify the chroot directory
-u option: the user who start the BIND
-c option: tells the path of the config file
Then use the command “ps -aux | grep named”, if you see the following, the bind9 is
correctly configured
jeff 9866 0.5 0.2 57536 10216 ? Ssl 21:01 0:00 /usr/local/name
If you do not see the information above, it means the DNS fails to run, so if you want to
check what is the problem, what you need to do is just to add the option g in the above
command like this :
/usr/local/named/sbin/named -t /chroot/named -u jeff -gc
/etc/named.conf
To do testing, we can use DNS lookup utility commands: host, dig and nslookup .The
format looks like this:
host [IP/hostname]
nslookup [IP/hostname]
dig [hostname].
The figure 6 is a simple demo:
Figure 6 the simple demo
7 Conclusions
Since DNS/BIND server is very important for the internet. As a student in CS department,
it is very beneficial to be familiar with the installation and configuration of the BIND
which I contribute to in my final project and paper. Also , some knowledge on how to
build up a more secure DNS/BIND server should be understood.
i
nd
i
Linux System Administration, 2 Ed, by Nemeth, Snyder, and Hein (Prentice Hall 2006)