1
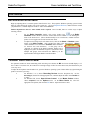
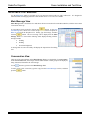
CTI Products RadioPro™ Dispatch Demo Installation and Test Drive Document # R2-61570-710 For Version 7 Software RadioPro Dispatch Demo Installation and Test Drive Contact Us Support, replacement part ordering, and service may be arranged by contacting our Cincinnati office. Parts for service can be returned following request of a Return Material Authorization. CTI Products, Inc. 1211 W Sharon Rd Cincinnati, OH 45240 513-595-5900 [email protected] Disclaimer Information in this document is provided with best efforts for completeness and accuracy. However, no guarantee is expressed or implied, and details may change without notice. 2 RadioPro Dispatch Demo Installation and Test Drive INTRODUCTION A RadioPro™ system provides remote access to 2-way radios via IP Networks. These types of systems are referred to as Dispatch over IP (DoIP). RadioPro is optimized for Motorola MOTOTRBO™ and Kenwood NEXEDGE® conventional and trunked radio systems. PC-based software allows voice communications between PC users and 2-way radio subscribers. After installing the RadioPro Dispatch client on your PC using the instructions that follow, you will be able to connect with our demo radio system in Cincinnati. This full version of the software will allow you have voice conversations with others using the system, send and receive text messages, and track some of our mobile radio users using the GPS Map tabs. All features and functions are available; however, without a license key, connections can be made only to our demo radio system. Full customization of the Radio Controller windows is allowed when the “Edit” mode is entered, and will be discussed below. DEMO RADIO SYSTEM IN CINCINNATI The following diagram illustrates the general architecture of the Demo Radio System. 3 RadioPro Dispatch Demo Installation and Test Drive The following channels are available for communications using the above demo radio system. Radio Name Channel Type IP Address Function Public 1 Motorola MOTOTRBO Digital Conventional 198.144.49.99 Public 2 Motorola MOTOTRBO Analog Conventional Motorola MOTOTRBO Connect Plus Kenwood NEXEDGE Digital Conventional 198.144.49.100 This is the primary communications channel for demos. We listen to this channel with Dispatch Client Software and also portable radios. Use this channel to communicate with us and others. This listen‐only analog channel can be used to listen to live radio traffic in the Cincinnati area. Public 3 Public 4 198.144.49.101 This talk group allows conversations over our Connect Plus radio system in Cincinnati. 198.144.49.101 This talk group allows conversations over our NEXEDGE system. WHAT YOU WILL NEED PC for Dispatch Client The PC that will be used to run the RadioPro Dispatch client software must have the following: Windows XP, Vista, 7, or 8 Operating System 4 GBytes Memory 1st Hard Disk, for Operating System 2nd Hard Disk, only if History Logging will be enabled This may be a second partition on the 1st Hard Disk, a second hard drive, or an external hard disk connected via USB or eSATA. IP Network Interface, 10Mbps or faster. .Net version 4.0. During installation of the Dispatch Client software, allow this update to occur. Audio In/Out Devices A microphone and speaker (or headset) is required if you wish to converse with others using our demo radio system. These devices can be connected to your PC or notebook via USB ports or analog audio connectors. 4 RadioPro Dispatch Demo Installation and Test Drive SOFTWARE INSTALLATION AND STARTUP INSTALLATION To install RadioPro Dispatch, use the following steps: 1. 2. Before downloading the installation file in Step 2, use Windows Update to ensure that the host PC has been updated with the following: a. All “Important Updates” b. Any “Optional Updates” pertaining to Microsoft .Net. Download and install the setup file from our web site: http://www.ctiproducts.com/SoftwareDownloads/RadioPro/RadioPro_Dispatch_Setup_v708.exe 3. The installer program will verify that certain programs are installed and up-to-date. If prompted, allow installation of Microsoft .NET Framework. 4. Some configuration functions may require the program to have “Administrator Privileges”. Modify the way that this program runs by the using the following steps: a. Right-click on the RadioPro Dispatch icon located on your desktop to display the menu at right, then click on Properties. b. In the Compatibility tab, check the box for “Run this program as an administrator”. STARTUP To start RadioPro Dispatch, use the following steps: 1. Double-click the RadioPro Dispatch icon on the PC desktop (since a USB License Key is not inserted, the window shown at right will be displayed), and then click Start demo without key. 2. On the Demo confirmation window, click the Yes button to continue the demo. 3. On the Choose a demo window, click on All Features. 5 RadioPro Dispatch 4. Demo Installation and Test Drive If you chose All Features or Voice in Step 3, the following Main window with Voice options will be displayed. Main Toolbar Subscribers tab Text Messaging & Missed Calls tabs Recent History & Geo-fence Alerts tabs Radio Controllers The Radio Controllers (channels) shown in the above layout are located in our Cincinnati office headquarters. This radio system is used only for demo purposes, and may or may not have radio voice traffic. In addition, one or more of these Radio Controllers may be offline (indicated when grayed-out), depending on the tests that we are currently performing. If radio traffic is needed, please call our main number (513-595-5900) and ask for Sales Support. The Voice ‐ Expanded tab shown above indicates four Radio Controllers with most of the features enabled. Besides a PTT button and radio status, other enabled features are radio display, radio menu buttons, history, channel steering, and ‘P’ buttons. Radio Controllers may be configured to provide less functionality, and can be seen by clicking the Voice – Simple tab. As shown below, only the PPT button and radio status are provided for each controller on this tab to simplify the display. As we are performing tests, a Radio Controller may be may be offline and indicated as shown above when the background is grayed-out. 6 RadioPro Dispatch Demo Installation and Test Drive TEST DRIVE RECEIVE AUDIO ADJUSTMENT Begin by adjusting the PC’s external speaker control knob to 50%. Then open the Windows operating system Volume Mixer by right-clicking the speaker icon in the system tray. Click on Playback Devices, double-click the needed “playback device”, and then adjust the sliders to 100% on the Levels tab. Further adjustment to Receive Audio should not be required. But if needed, there are various ways to adjust incoming volume: For any Radio Controller window, click on the speaker icon in the Radio Controller window header to show the volume slider for this Channel. Click and drag the slider to the desired level. (These should normally be set to maximum.) Double-click the speaker icon to toggle between mute and un-mute states. To adjust Selected and Unselected volume levels, click on the Select or Unselect volume sliders on the Main Toolbar. Click and drag the slider to the desired level. (Select volume should be set to maximum. Unselect volume should be set between 50% and maximum.) A talk group can be “Selected” by clicking on the Radio Controller header area to highlight it in yellow as indicated at right. If it is desired to select multiple talk groups, then hold down the Ctrl key on the keyboard while clicking the Radio Controller headers. TRANSMIT AUDIO ADJUSTMENT For optimum sound level while transmitting while activating a PTT button, the Mic level meter should display 1 to 5 bars. If there is less than 1 bar, the sound level is not high enough. If there are more than 5 bars, then distortion in your voice may occur. To adjust the microphone transmit audio level, open the Windows operating system Volume Mixer by right-clicking the speaker icon in the system tray. For Windows 7 or 8, choose Recording Devices from the drop-down list. On the Recording tab, double-click the appropriate mic, and then adjust the slider on the Levels tab to 100%. For Windows XP, choose Open Volume Control. In the Master Volume window, choose Properties from the Options menu. In the Mixer Device list, select the appropriate microphone, then click the OK button. Adjust the slider to 100%. 7 RadioPro Dispatch Demo Installation and Test Drive INITIATING A VOICE CALL There are various ways to initiate a Voice Call: Group Calls using the Radio Controller PTT Use the PC’s mouse to click and hold the PPT button on the “Public 1” Radio Controller. Wait for the “go-ahead” tone and the PTT button to change to a red background (see example at right), and then speak into the mic. (This action can also be initiated with a touch-screen, or a PTT button on a desk mic or footswitch if available.) Group or Private Calls using the Subscriber Tab To initiate a group or private voice call using the Subscribers tab, click a Group or Private subscriber in the Subscribers tab, and then click and hold the PTT button at the bottom of this tab while speaking into a mic. (This action can also be initiated with a touch-screen, or a PTT button on a desk mic or footswitch.) 8 RadioPro Dispatch Demo Installation and Test Drive INITIATING A TEXT MESSAGE Use the Messages panel to send and receive text messages between this PC and a radio users. It is designed to function similar to messaging found on a smart mobile device. Two views are available. Main Message View Main Message View is the default view and shows the last conversation for each radio subscriber, with the most current conversation at the top. A conversation can be started by clicking the button. In the New Text Message box, choose one or more recipients, and choose an option for When to send from the drop-down list. Finally, type the message, and then click the button. The new message will be displayed in the Main Message View as a conversation. Message status displayed along with the message include: Sending Pending No acknowledgement A message that was sent successfully will display the elapsed time from being sent. Conversation View Click one of the conversations on the Main Message View to see the details of a Conversation. In the Conversation View, all messages with the selected radio or radio group will be displayed, along with status information for each message. Use the button to go back to the Main Message View. To add a reply to this conversion, type the reply into the Enter Message text box, and then press the button. 9 RadioPro Dispatch Demo Installation and Test Drive SUBSCRIBERS TAB - TOOLS AND TIPS Click the Sort Button Click the down arrow next to the Sort Button to toggle sorting of subscribers by ID and by alias name. To find a subscriber in a long list, click the Search icon , and then start typing the first characters of the Radio ID or Alias Name. Those Radio IDs or Alias Names containing those characters will be displayed. to toggle between lowest-to-highest and highest-to-lowest. RECENT HISTORY TAB - TOOLS AND TIPS The Recent History tab includes the previous 50 events of the radio system, including voice, text, and other events such as Emergency and Call Alerts. A configuration option allows a maximum of 500 events to be displayed in this tab. Saving of the voice files is not activated in this demo version of the software, and therefore they cannot be replayed. To configure the software for recording and playback, see section “History Logging Sub-folder” in the “Dispatch Client Software Installation Guide – R2-61785”. GPS MAP TAB(S) - TOOLS AND TIPS GPS map tabs are configured during installation and occupy a space on the desktop determined by the Site Administrator. They can be configured to be docked to the Main Window using tabs (as this demo shows) or can be configured to be un-docked in separate windows. The demo is configured to show two maps docked to the Main window as follows: Map 1 uses Google Map view to show streets in the Cincinnati area. Map 2 uses Bing Satellite view to show a similar area. An optional map may also be viewed by clicking the Quick Map button on the Main Toolbar. Several differences exist between the Main Window Maps and the Quick Map as indicated in the table below. Main Window Quick Map(s) Map Quantity Center feature Visibility feature Multiple Yes Yes 1 No No To show the most versatility, click on the Map 1 tab to display the Google Map view of Cincinnati. Then try some of the following features: Subscriber Details: 1. Select a subscriber, either by clicking on an icon on the map or a subscriber in the Subscribers tab. Note that the current position of the selected subscriber is a green circle to indicate movement, and a red stop sign to indicate stopped. 2. Notice that Trail Crumbs are shown for this selected subscriber for the last 30 minutes. (This time is configurable.) Hover over any grey circle to show date, time, and speed for this subscriber at this point. 3. View detailed information for this subscriber in the Subscriber Status Bar located at the bottom of the map. Information will include street address, rate of travel (or stopped time), and time since last GPS update. 4. Click the this location. icon to open Google Street View to see the features that a subscriber could see at 10 RadioPro Dispatch 5. Demo Installation and Test Drive Click the icon to copy the information in this Subscriber Status Bar to the Windows Clipboard. This information may then be pasted into other applications, such as email, text messaging, and Microsoft Office. Subsriber Actions: 1. Select a subscriber, either by clicking on an icon on the map or a subscriber in the Subscribers tab. 2. Use the PTT button at the bottom of the Subscribers tab to make a private call to this subscriber. 3. While a subscriber is selected, the Text tab can be used to send a private text message to this selected subscriber. Toolbar buttons: 1. Visibility button: Click this button to select which subscribers should be visible on the selected map. A window will be displayed that looks very similar to the Subscribers tab. However, the Visible Subscribers tab adds control for visibility. Visibility may be toggled on and off individually by clicking a subscriber’s visibility icon as shown at right, or as a group by clicking the icon for that group. Three versions of this symbol will indicate visiblity as indicated below: Symbol Groups Subscribers All members are visible Some members are visible No members are visible Subscriber is visible Subscriber is not visible 2. Center button: Click this button to zoom and reposition the map in order to show all visible subscribers on the selected map. 3. Follow map. 4. Map Presets button: Click the top portion of this button to return the selected map to the indicated preset as configured by the Site Administrator. button: Click this button to keep the selected subscriber centered in the selected Click the arrow on the lower portion of this button to list other presets that have been configured by the Site Administrator. Click on one of the items in the list to switch the selected map to a new preset. 5. Map Type button: Click the arrow on the lower portion of this button to list Map Types that have been enabled by the Site Administrator. 11 RadioPro Dispatch Demo Installation and Test Drive ARCHIVED HISTORY WINDOW - TOOLS AND TIPS Voice and event logging can only occur if Logging is enabled. A storage location for logging audio and radio events must be chosen that is a different disk partition than the one used for the Operating System of the PC. Usually, this is a second internal or external hard disk. To configure the software for recording and playback, see section “History Logging Sub-folder” in “Dispatch Client Software Installation Guide – R2-61785”. 12