1
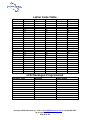
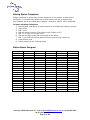
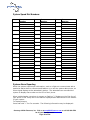
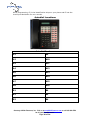
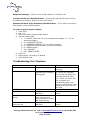
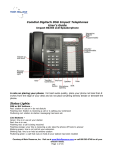
Comdial Digital Telephone System
LCD Speakerphone
System Reference Guide
Applies to Impression LCD speakerphone models 2022S-xx Using the following
software cartridges on a digital telephone system:
I0408
I0816
I1632
S0408
S0816
S1632
Rev. 18A and Later
Rev. 18A and Later
Rev. 18A and Later
Rev. 18A and Later
Rev. 18A and Later
Rev. 18A and Later
Contents:
• Using Speakerphone Capability
• Program Attendant Features
• Answering Calls
• Making Calls
• Subdued Off-Hook Voice Announcement (SOHVA)
• Holding Calls
• Transferring and Conference Calls
• Other Telephone Features
• Text Messaging
• Programming Your Telephone
• Troubleshooting Your Telephone
• Quick Reference Guide
• Glossary
Courtesy of Main Resource, Inc. Visit us at www.MainResource.com or call 800 362-6740
for all your Comdial needs.
Page 1 of 34
Using Speakerphone Capability
A note on placing your speakerphone: For best audio quality, place your phone
at least eight inches away from the edge of your desk, do not use speakerphone in a
high traffic area with an excess of background noise and do not place anything
directly beside or beneath your speakerphone.
A note on using your speakerphone: Speak directly into the microphone, remain
within a radius of three feet from your phone and keep in mind that the voiceactivated microphone will cause the conversation to become garbled if both parties
speak at the same time.
The speakerphone feature of our phone allows you to place a call or answer a callannounce while on hook. During a conversation, switch from speakerphone to
handset for privacy by lifting the handset and talking. To return to speakerphone,
press SPKR and hang up.
Place a call using speakerphone:
• Press the line or ITCM button
• Dial
To use autodial with speakerphone, press the programmed button.
Answer a call using speakerphone:
• Press the line button with the flashing red or orange light
End a call using speakerphone:
• Press SPKR
Status Lights
Direct Station Select and Busy Lamp Field Buttons:
Steady red – station is in use or Do Not Disturb
Flashing red – station is receiving a call or station is calling you
Rapidly flashing red – station-to-station messaging has been set.
Line Buttons:
Steady green – line is in use at your station
Steady red – line is in use at another station
Flashing red – a call is coming in on this line
Flashing orange – your line is ringing and will be answered when you take the
telephone off hook
Winking green – line is on hold at your station
Winking red – line is on hold at another station
Rapidly flashing green – line has recalled from hold at your station
Rapidly flashing red – line has recalled from hold at another station
Next to a fixed or programmable feature button:
Steady red – feature is on
Steady off – the feature is off
Courtesy of Main Resource, Inc. Visit us at www.MainResource.com or call 800 362-6740
for all your Comdial needs.
Page 2 of 34
Next to the ITCM button:
Steady red with a quick flash – you are using your intercom
Rapidly flashing red – auto redial is in use or system is in night mode
Winking red – an LCD message is set on your phone for others to receive when they
call you
Flashing red – another station is calling you
Next to the HOLD button:
Flashing red – a message is available for pick up
Rapidly flashing red – automatic station relocation has been set
Next to the SPKR button:
On steady with telephone on hook and busy – speakerphone mode active
On steady with telephone on hook and idle – background music is on
On steady with telephone off hook and busy – group listen is active
Next to the MUTE button:
On – called party cannot hear your conversation.
LCD Abbreviations
LCD Screen
ADIAL
ALL
ANS
ARDL
BKSP
BLOCK
CAMP
CFWD
CLBK
CLEAR
CWAIT
DARK
DIAL
DISP
DND
DSS
EXIT
EXT
FEAT
FWD
G (followed by last number)
HOLD
HVHLD
INT
L (followed by last number)
Last No Saved
LIGHT
MUSIC
MSG
Feature
Automatic Dial
All
Answer
Automatic Redial
Back Space
Block
Camp
Call Forward
Call Back
Clear
Call Waiting
Dark (Contrast)
Dial
Display (Contrast0
Do Not Disturb
Direct Station Select
Exit
External
Feature
Forward
Group
Hold
Have Hold
Internal
Line
Last Number Saved
Light (Contrast)
Background Music
Message
Courtesy of Main Resource, Inc. Visit us at www.MainResource.com or call 800 362-6740
for all your Comdial needs.
Page 3 of 34
NEXT
OVER
LCD Screen
P (followed by last number)
PERS
PREV
RECALL
RECON
RING
S (followed by last number)
SAVE
SDIAL
SEND
SET
SOHVA
TIMER
TKMSG
VAB
Next Display
Override
Feature
Port
Personal
Previous Display
Recall
Reconnect
Ring Tone
Station
Save Number
Speed Dial
Send Transfer
Set
Subdued Off Hook Voice Announce
Timer
Take Message
Voice Announce Block
Rings
Two short rings – intercom call
Single longer ring – outside call
One short ring burst – voice announce
Three short ring bursts – ringback from a hall on hold or in queue.
Choose from six rings to identify calls ringing to your phone.
Program Attendant Features
Creating LCD Response Message
Your phone system provides two default messages, “Back at…” and “Call…”. You
may add eight additional messages or choose not to use the default messages and
create 10 customized messages.
To Store LCD Messages:
1. Write your messages (up to 16 characters) on the chart below.
2. Use the letter code table below to assign a number to each letter
3. Write these numbers on the line beside the message letters
4. Press ITCM
5. Dial “*#05”
6. Dial a message location number (0-9)
7. Dial “#” to clear the current message
8. Compose messages by dialing the two digit codes related to the letters
9. Dial “*” to save
10. Dial the next location number
11. Dial “#” to clear, compose messages with two-digit codes and press “*” to
save
12. Repeat as needed
Courtesy of Main Resource, Inc. Visit us at www.MainResource.com or call 800 362-6740
for all your Comdial needs.
Page 4 of 34
13. Press “SPKR to end.
Example: Create a message that will read as “GONE HOME” and program it to
message location number 3.
1. Press ITCM
2. Dial “*#05”
3. Dial “3#”
4. Dial:
G o n e
H o m e
41 66 65 35 42 66 64 35
5. Dial “*” and press SPKR to end.
6. When you have finished creating messages, fill in the list on the page below
and give a copy to each station user.
Courtesy of Main Resource, Inc. Visit us at www.MainResource.com or call 800 362-6740
for all your Comdial needs.
Page 5 of 34
Letter Code Table
Character
A
B
C
D
E
F
G
H
I
J
K
L
M
N
O
P
Q
R
S
T
U
V
W
X
Y
Z
Code
21
22
23
31
32
33
41
42
43
51
52
53
61
62
63
71
11
72
73
81
82
83
91
92
93
13
Character
a
b
c
d
e
f
g
h
i
j
k
l
m
n
o
p
q
r
s
t
u
v
w
x
y
z
Code
24
25
26
34
35
36
44
45
46
54
55
56
64
65
66
74
14
75
76
84
85
86
94
95
96
16
Character
SPACE
;
/
“
.
,
:
1
2
3
4
5
6
7
8
9
0
Code
12
17
18
19
27
28
29
01
02
03
04
05
06
07
08
09
00
LCD Messages Programmed
Location Code
1
2
3
4
5
6
7
8
9
0
Message
Back at
Call
Letter Codes
System Message
System Message
Courtesy of Main Resource, Inc. Visit us at www.MainResource.com or call 800 362-6740
for all your Comdial needs.
Page 6 of 34
Naming System Telephones
Assign a personal or group name to each telephone on the system to know who is
calling you. The name may contain up to seven letters and will be show on the
user’s display and in the called party’s display. Examples: SALES, TECH, K BROWN.
To Name a System Telephone:
1. Use the letter code above to create names for all telephones requiring a name
2. Press ITCM
3. Dial “*#06”
4. Dial the station number of the phone to be named (10-57)
5. Dial “#” to clear the current name
6. Dial the two-digit codes that correspond to the letters
7. Dial “*” to continue entering stations names (start at step number 4)
8. Press SPKR to end
9. Record names on the following pages
Station Names Assigned
Ext.
Name
Ext.
Name
Ext.
Name
Courtesy of Main Resource, Inc. Visit us at www.MainResource.com or call 800 362-6740
for all your Comdial needs.
Page 7 of 34
Music on Hold
To set music on hold:
1. Press ITCM
2. Dial “*#04”
3. Press “1” to enable or “2” to disable.
The Light at button A1 (top left programmable button) will be illuminated when
music on hold is enabled.
Setting the Night Transfer for Ringing Mode
Normal ringing assignments of incoming lines may be transferred to a station or
stations for off-hour or special answering. Stations may also be assigned to answer
any ringing outside line.
Set the night transfer mode from the attendant’s station:
1. Press ITCM
2. Dial “*#03”
3. Dial “1” to enable or “2” to disable.
4. Press SPKR to end.
Setting a night Transfer Button
To program a Night Transfer Button:
1. Press ITCM
2. Dial “**1”
3. Press one of the programmable buttons
4. Press ITCM
5. Dial “*#03”
6. Press SPKR to end.
Setting the System Clock
The time and date appear on the LCD speakerphone display. To set:
1. Press ITCM
2. Dial “*#01”
3. Dial two digits for year (00-99)
4. Dial two digits for month (01-12)
5. Dial two digits for day (01-31)
6. Dial two digits for hour (00-23)
7. Dial two digits for minutes (00-59)
8. Press SPKR to end
Print Station Message Detail Accounting Records (SMDA)
If your system is connect dot a printer, you can command the system to print
several different types of reports and to delete all stored SMDA records.
To Print:
1. Press ITCM
Courtesy of Main Resource, Inc. Visit us at www.MainResource.com or call 800 362-6740
for all your Comdial needs.
Page 8 of 34
2. Dial “*#07”
3. Choose a report:
• 1# – station report
• 1 (port number # - single station report
• 2# - line report
• 3# - SMDA department report
• 4# - account codes
• 5# - automatic reports
• 6# - print all records
• 7# - to delete SMDA records
• 0# - Departmental Call Distribution
• 8 – view (on LCD) the number of free records remaining in the system
• 9 – to cancel printing
Press SPKR to end.
Storing System Speed Dial Numbers:
Store up to 99 speed dial numbers at the attendant telephone. All users will be able
to access these from their individual stations. Distribute the list of stored numbers
to all users for their reference.
To program:
1. Press ITCM
2. Dial “*#02”
3. Dial 01-99 to choose storage location
4. Dial “#” to clear the current entry
5. Choose the line that is to be used:
a. Dial 01-24 for lines 1 through 24
b. Dial 91-94 for line groups 1 through 4
c. Press ITCM for intercom
6. Dial the number to be stored. Press HOLD to insert a pause. Press TAP to
store flash.
7. Press T/C
8. To program a name, enter the digits from the letter code chart above (up to
16 characters). Press T/C again to leave the name blank
9. Press T/C to save
10. Repeat steps 3-9 to store the next number
11. Press SPKR to end.
Courtesy of Main Resource, Inc. Visit us at www.MainResource.com or call 800 362-6740
for all your Comdial needs.
Page 9 of 34
System Speed Dial Numbers:
Loc.
Name
Number
Loc.
Name
Number
Loc.
Name
Number
System Alarm Reporting
When the system experiences a disruption, such as a failure to communicate with a
particular station due to a disconnected station or an off-line system data printer, an
alarm signal displays at the attendant’s station. The attendant can command the
system to display alarm codes on the LCD of their phone.
When enabled and a new alarm is present, a flashing “*” displays on the first line of
your phone’s LCD. Keep note of the alarms displayed and relate these to the installer
of your system.
To Display Alarms:
Press and hold “*” for five seconds. The following information may be displayed:
Courtesy of Main Resource, Inc. Visit us at www.MainResource.com or call 800 362-6740
for all your Comdial needs.
Page 10 of 34
“Station disconnected from station port for more than five minutes. Month, day,
station port number and station extension number are shown. Example: ‘Mo/Da Pxx
xxxx A’”
“Communications difficulty between a station and the common equipment. The
number of parity errors, up to 256 and the affected station port are shown.
Example: ‘xxx PARITY Pxx’”
“Data printer off-line. Example: ‘PRINTER OFF LINE’”.
Press “0” to cancel report displays. After alarm messages have been displayed the
“*” is cleared from the LCD until another alarm occurs.
Transferring Calls To The Voice Mail System
Program a Transfer to Voice Mail button on your telephone:
1. Press ITCM
2. Dial “**1”
3. Press the empty programmable button to assign
4. Dial “6”
5. Dial the extension number of the voice mail station port
6. Press SPKR to end. Label the programmed button.
Transfer calls to voice mail:
1. While on a call, press the programmed button.
2. Press the DSS or the party to receive the voice mail message, or
3. Dial the extension number of the party to receive the message and dial “2”.
4. Press SPKR to end.
Transfer Calls to a Secondary Attendant Telephone:
The installer of your system can arrange for station 12 to serve as a secondary
attendant location. When enabled, incoming calls ring at the primary attendant’s
phone. Recalls from unanswered transfers or timed hold recalls will ring at both
attendant stations.
Digital Voice Announce (DVA)
Digital voice announce plays up to two minutes of up to four pre-recorded
announcements (voice prompts and dialing instructions) and messages during an inprogress call.
Store DVA messages by delivering them from the telephone handset at station 10 or
12 or by playing the contents of a tape recording (see your installer for detailed
instructions).
To store DVA messages:
1. Press ITCM and “*#08”
2. Choose the message style
a. “1” for DISD (Direct Inward Station Dialing – for callers who bypass
attendant) message style
Courtesy of Main Resource, Inc. Visit us at www.MainResource.com or call 800 362-6740
for all your Comdial needs.
Page 11 of 34
b. “2” for DCD (Departmental Call Distribution) style
3. Select DVA station port 10-57 and pres “#” to end the station selection
4. Press “0” to erase all the messages
5. Dial the code for the message type you wish to record
a. “5” to record day answer message
b. “6” to record night answer message
c. “7” to record recall message
d. “8” to record drop message
e. “9” to stop recording.
6. Read the message into the telephone handset mouthpiece or start the audio
tape recorder to play the message.
7. Press “9” to stop.
8. Dial the code for the next message, record the message and press “9” to
stop. Repeat this step for each message.
Listen to stored messages:
Dial the code to listen to your recorded messages:
• “1” to play day answer message
• “2” to play night answer message
• “3” to play recall message
• “4” to play drop message
• “9” to stop playback
To erase messages, press “0”. To change DVA messages, repeat the storage
procedure and make different selections.
To exit the DVA session, press SPKR.
Example Messages:
• Day Answer messages
o For DCD callers, “Welcome to Main Resource’s sales department. All of
our agents are busy. Please stay on the line and an agent will answer
your call as soon as possible.”
o For DISD callers, “Welcome to Main Resource. If you know your
party’s extension, please dial it now. To reach the operator, remain on
the line.
• Night answer messages
o For DCD callers, “Welcome to Main Resource’s sales department. Our
hours are eight to five Monday through Friday. Please call again
during those hours.”
o For DISD callers, “Welcome to Main Resource’s sales department. Our
hours are eight to five Monday through Friday. Please call again
during those hours.”
• Recall messages
o For DCD callers, “Please hold; an agent will be with you as soon as
possible.”
o For DISD callers, “The party you have called is not available. Please
dial a new extension number.”
o For DISD callers (when your system has the tracker paging system
installed), “The party you have called is not available. Please dial a
new extension number or dial ‘#’ plus your call-back number followed
by another ‘#’ to page your party.”
• Drop message
Courtesy of Main Resource, Inc. Visit us at www.MainResource.com or call 800 362-6740
for all your Comdial needs.
Page 12 of 34
o
“Thank you for calling Main Resource, good bye.”
Direct Inward Station Dialing
Direct inward station dialing (DISD) allows an external party to call an intercom
station directly, with no assistance from the attendant. The attendant must provide
callers with the following information.
Give the caller a DISD line number the extension number associated with the station
desired. When a caller makes a DISD call from an outside line, the system will
answer with a continuous dial tone. At this point the caller should enter the
extension number.
If the station is idle, the called station rings. If another station user answers the call,
the caller may ask to be transferred to the desired station. If ringing stops and the
dial tone sounds again, the caller may dial another extension. If the called station is
busy, the call is placed on hold and camped-on at the busy station. If the call is not
answered within a specified time frame, the busy tone is given, followed by a DISD
dial tone. The caller may be returned to the DISD dial tone a total of three times
and then the line is dropped.
If the called station is busy and is part of a hunt group, the caller is routed to an idle
station in the hunt group when available. If an invalid extension number is dialed,
an error tone sounds and the DISD dial tone is returned. If the extension number is
not dialed within the programmed dial time limit, the call is routed to the DISD assist
station if available. Otherwise, the line is dropped.
Answering Calls
Answering Outside Calls
When the phone sounds long single ring bursts and one of the line button lights is
flashing, press the button of the ringing line if the flashing light is red and lift the
handset. If the flashing light is orange, you have ringing line preference enabled and
may simply lift the handset to answer the call.
Answering Intercom Calls
Intercom calls are made from one system telephone to another. The call may come
directly through your speaker or your telephone will ring with two short ring bursts.
You can block voice calls if you like. See the “Blocking Voice Announce Calls” section
for instructions.
When you hear a short tone burst and then the caller’s voice, speak toward the
telephone to answer or lift handset for privacy.
When you hear two short bursts, press ITCM to respond using the speakerphone or
lift the handset for privacy.
Courtesy of Main Resource, Inc. Visit us at www.MainResource.com or call 800 362-6740
for all your Comdial needs.
Page 13 of 34
Subdued Off-Hook Voice Announcement (SOHVA)
When enabled by your system installer, SOHVA allows an intercom caller to break
into your call if you are using the handset. If you are on a speakerphone, you will
hear a ring burst and may go off-hook to receive the SOHVA call. The party you
were originally conversing with will not hear the SOHVA announcement.
Respond to a SOHVA call verbally by pressing and holding MUTE and speaking into
the handset or headset mouthpiece. The original party will not hear the response.
Release the MUTE button to return to the distant party.
Respond with a non-verbal message to a party with an LCD speakerphone by
pressing MSG and one of the following HVHLD (have them hold), TKMSG (take a
message) or CLBK (I will call back) to send the appropriate message.
If you attempt to respond using a non-verbal message to a party with a non-LCD
phone, the station is immediately disconnected from the call.
Block SOHVA calls by pressing BLOCK when the SOHVA is initiated.
Call Pick-Up
Your system installer may have arranged several telephones together in a user
group. At a station arranged as part of a group, you can answer calls ringing at
other stations within your group. You may also answer a call ringing at any
telephone in the system if you know the telephone’s extension number.
To answer a call ringing in your group, press ITCM and dial “#4”.
To answer a call ringing at any telephone, press ITCM, dial “#4” and dial the
extension number of the ringing telephone.
Caller ID
When enabled, the number calling parties will display on your LCD. Caller ID can be
used at a station with lines that audibly ring, calls you answer with call pick up from
a station with audible ring or with lines transferred to your station.
Night Transfer
When the system is in night mode, answer incoming calls by pressing ITCM and
dialing “80”.
Station Monitoring
If enabled, station monitoring allows you to see the status (idle, ringing or busy) of
other stations. A BLF light will flash when a DSS station is ringing. Answer a call at
a ringing DSS station by pressing the DSS button.
Courtesy of Main Resource, Inc. Visit us at www.MainResource.com or call 800 362-6740
for all your Comdial needs.
Page 14 of 34
Making Calls
Placing Outside Calls
To place an outside call, press the line button or line group button (if prime line is
not assigned to your phone), at the tone dial the number, or press the preprogrammed button of the number you wish to dial.
Making Intercom Calls
Place an intercom call by dialing the extension number on they keypad or by using a
programmed DSS button. See the “Dial By Name” feature for more information.
When you make an intercom call, either your voice will sound over the receiving
party’s speakerphone or your call will causes the telephone to ring. Default set up
has ringing alert method set up. If the called party sets a voice announce block at
their telephone, all voice announce calls will be prevented.
To cause the called party’s phone to ring, press a programmed DSS button, or pres
ITCM and the extension number.
To place an intercom voice call, press a programmed DSS button and speak, or press
ITCM and dial the extension number.
Executive Override - Breaking in to a busy station or a station in DND
When enabled, you can break in to a conversation at a busy station or a station in
Do Not Disturb.
To break in to a busy station, press NEXT when you hear the busy signal, then press
OVER and join the call in progress. When you press OVER, several short tone bursts
will be heard by all parties.
To break in to a station in Do Not Disturb, press OVER and speak your
announcement unless the ring-back tone sounds, in which case, wait for the party to
respond.
Automatic Callback
If the extension you call in tone announce mode is busy, in Do not Disturb mode or
rings with no answer, use automatic callback to ring your phone when the line is
available. When you reach a station that is busy or does not answer, press CAMP.
When the phone you wish to reach becomes idle, your phone will ring with five short
tones. Press ITCM to cause the other phone to ring. To cancel the callback, press
ITCM and dial “#6”.
If the extension you call in voice announce mode is not answered, press ITCM before
pressing CAMP.
Courtesy of Main Resource, Inc. Visit us at www.MainResource.com or call 800 362-6740
for all your Comdial needs.
Page 15 of 34
Call Waiting
If the extension you are trying to reach is busy, you can send a call waiting tone and
wait for an answer. Press NEXT and then CWAIT and remain on the line. The called
party will hear a short tone burst and may place the original call on hold or hang up.
Autodialing
To automatically dial, press the programmed button. Line selection is usually a part
of the stored autodial. If the stored number is as a second choice at the button,
press HOLD and then the button.
Speed Dial Calling
Station speed dial numbers are exclusive to your phone. System speed dial numbers
are set by the administrator and may be access from every station.
If you manually choose a line for dialing, press HOLD before using a speed dial. If
you place a call on hold before using the speed dial, pause before you press the
speed dial button or the system will automatically choose the line that you have on
hold to place your speed dial call.
To use station speed dials, while on hook dial the keypad number you have
programmed into your phone. To use station speed dials while off-hook and on a
line, press HOLD and the keypad number programmed into your phone.
To use system speed dials while on-hook, press “*” and dial the location number
(01-99) that was programmed into the system. To use system speed dials while offhook and on a line, press HOLD and dial “*” and the memory location digits (01-99).
Automatic Redial
When the number you dial is busy or not answering, you can redial it once, initiate a
repeated redialing or save it for later redialing using a programmed saved number
redial button.
To redial the last dialed number one time, press SPKR or hang up to disconnect.
Press “#”. To redial one a minute for 10 minutes, press the ARDL button. When the
tone is heard over the speaker, answer the call. Cancel an automatic redial request,
lift and replace handset or use the phone to make another call.
Select a Line Group
If your system utilizes line groups, access your line group by pressing ITCM and dial
the line group access code 9,81,82 or 83 for groups 1-4. Listen for outside dial tone
and dial the number.
Display Call Time or Cost
If you installer programs your LCD phone to display call costing, press the COST
button to show the cost of the current call. Otherwise, the pressing the TIMER
button will show and display the current call duration.
Courtesy of Main Resource, Inc. Visit us at www.MainResource.com or call 800 362-6740
for all your Comdial needs.
Page 16 of 34
After ending a call, to view call time or cost for the last call made, press HOLD or
HOLD twice, respectively.
Line Queuing
If all the lines in a group are busy, you can put your telephone in queue to await an
idle line. To queue, press ITCM and dial the group access code (9, 81, 82, 83). At
the busy tone, dial “*8” and hang up. When the line group is free, your phone will
sound several short ring bursts. Lift the handset and make your call.
To cancel line group queuing, press ITCM, dial “#8” and hang up.
To queue for a particular line, press HOLD and the line button of the busy line.
When the line is free, the phone will sound five short ring bursts. Lift handset to
answer or ignore to cancel.
Subdued Off-Hook Voice Announcement (SOHVA)
Voice Announcing to a Busy Station
If enabled, you can make a voice announcement to an off-hook or busy station by
using the SOHVA button. When you reach a busy extension, you can hang up or, to
interrupt, press the SOHVA button. At the quick tone bursts, make an
announcement (unless you get a busy signal, which means the called party is on
speakerphone and SOHVA is blocked). Wait for a reply. The called party may
respond with a verbal message, non-verbal message, or they may disconnect your
call.
Dial By Name
Dial by name displays programmed intercom and system speed dial names and
allows you to use interactive buttons on you phone to select the desired party and
automatically call them.
To use, press OPTIONS and press INT for intercom calling or EXT for system speed
dial calling. Dial the first three letters of the name you are looking for. For example,
“Main Resource” would be “624”. If there is no matching entry, “No Match” will
appear in the display (at this point, press PREV or enter three new digits). When an
entry appears, press NEXT to show subsequent names in the list until you find the
one you need or press ALL to view the entire list. Press DIAL to call the displayed
name.
Holding Calls
There are several options for putting calls on hold.
• Regular hold – any user sharing the held line can pick up the call.
• Exclusive hold – your telephone is the only one that may pick up the call.
• Place a parked or transferred call on hold
Courtesy of Main Resource, Inc. Visit us at www.MainResource.com or call 800 362-6740
for all your Comdial needs.
Page 17 of 34
•
Place a call on hold at another telephone or on hold in the system where it is
available for pick up by all stations.
After a call has been on hold for a programmed period of time, the system will sound
three short ring bursts at your telephone and the flash rate of the line button
becomes faster. If the call is on exclusive hold, it will revert to manual hold after the
hold recall time period.
Placing a Call on Hold and Retrieving Held Calls
To place a call on hold, press HOLD. Press the line button of the held call (the line
will be flashing). To pick up a call that you answered and placed on hold but for
which you have no line appearance, press TAP.
Exclusive Hold
To place a call on exclusive hold, press HOLD twice. Press the line button of the held
call (light will be flashing) or press TAP if the station does not have line appearance.
Hold Recall
When a call recalls, press HOLD to restart timer or press ANS to retrieve the call.
Call Park
Parking a call in orbit means the call is placed on hold in the system, where it can be
answered from any phone in the system. While on the call, press ITCM and “*”. Dial
the code for the park location (91-99 for orbit 1-9) and remember the code you
chose for later use.
To retrieve a parked call, press ITCM “#” and the orbit number.
Parking a Call at a Station
To park a call on hold at another station, press ITCM and dial “*90” plus the
extension number of the telephone to receive the call.
To pick the call back up, press ITCM “*4” and dial the extension number of that
telephone.
To pick up a call that was placed on hold at your phone by another user, press ITCM
and dial “#90”.
Transferring and Conference Calls
Screened Transfer
To screen and transfer a call:
1. Answer the call
2. Press T/C to place the call on hold
Courtesy of Main Resource, Inc. Visit us at www.MainResource.com or call 800 362-6740
for all your Comdial needs.
Page 18 of 34
3. Dial the extension number of the telephone to receive the transfer or press
the DSS button for that extension.
4. When the called party answers, announce the call.
5. Press SPKR to disconnect or hang up to complete the transfer.
If the called party is busy you may (if enabled):
• Press RECON to return the caller to your line
• Press SOHVA to alert the party that a call is waiting
• Press CAMP to camp on to that station or
• Press OVER to join the party’s current conversation.
Unscreened Transfer
To transfer a call to another user on the system:
1. Answer a call
2. Press T/C to put the call on hold
3. Dial the extension number of the telephone to receive the call or press the
DSS for that extension
4. Press SPKR or hang up to complete the transfer.
Recalled Unscreened Transfers
If a transferred call is not answered, it returns to your telephone where you may:
• Press SEND to attempt the transfer again
• Press HOLD to place the call on hold at your telephone or,
• Press ANS to answer the phone.
Conferencing Calls
Conference calls may involve up to five parties total and may be made up of any
combination of outside lines and intercom parties. When setting up a conference call
between outside lines and internal extensions, call the outside lines first.
To set
1.
2.
3.
4.
5.
up a conference call:
Make the first call
Press T/C to place the call on hold
Make the next call
Press T/C to establish the conference
Repeat steps to add desired parties.
To continue the call with the last party after outside lines have left the
conference, press the line button of the remaining party.
To drop outside lines from the conference, press HOLD to put all lines on hold
before the caller hangs up.
To retrieve lines from hold back into the conference,
1. Press the line button,
2. Press T/C,
3. Press the line button,
4. Press T/C
Courtesy of Main Resource, Inc. Visit us at www.MainResource.com or call 800 362-6740
for all your Comdial needs.
Page 19 of 34
5. Repeat until desired lines are reintroduced to the conference.
Unsupervised Conference Calls
An unsupervised conference call occurs when you drop out of a conference call
between two outside lines, leaving them conferenced together.
To drop out of a conference call, dial “#” and hang up.
To rejoin the conference, press one of the lighted buttons where the conference is
taking place.
Other Telephone Features
Adjust Display Contrast:
1. Press OPTIONS
2. Press NEXT three times
3. Press DISP
4. Press LIGHT or DARK to change the contrast level.
5. Press SPKR to save the last level and end.
Blocking Voice Announce Calls:
1. Press OPTIONS
2. Press NEXT
3. Press VAB
4. Press ON
5. Press SPKR to end.
Un-Block Voice Announce Calls:
1. Press OPTIONS
2. Press NEXT
3. Press VAB
4. Press OFF
5. Press SPKR to end.
Block an SOHVA while on a call:
Press BLOCK.
Turn Background Music On:
1. Press OPTIONS
2. Press NEXT
3. Press MUSIC
4. Press ON
5. Press SPKR to end
6. Adjust volume with the speaker volume control.
Turn Background Music Off:
1. Press OPTIONS
2. Press NEXT
3. Press MUSIC
4. Press OFF
5. Press SPKR to end.
Courtesy of Main Resource, Inc. Visit us at www.MainResource.com or call 800 362-6740
for all your Comdial needs.
Page 20 of 34
Personal Ring Tones
Choose one of six ring tones to differentiate calls ringing in on your line from other
extension’s calls. To select:
1. Press OPTIONS
2. Press NEXT three times
3. Press RING
4. Press UP or DOWN to choose the ring tone
5. Press SPKR to end.
Display the Functions of your Station’s Buttons:
1. Press OPTIONS
2. Press NEXT six times
3. Press QUERY
4. Press any button to see its function in your speakerphone’s LCD.
5. Use the HOLD button to access autodial numbers stored under DSS buttons.
6. Press SPKR to end.
Enter an Account Code:
If your system is programmed for account code entry to enhance the SMDA reports,
you may have forced or voluntary code entry.
To enter an account code on an incoming call:
1. Press ITCM and dial “*04” or
2. Press the preprogrammed ACCOUNT CODE button and
3. Dial the account code.
To enter an account code on an outgoing call:
1. Press the line button
2. Press ITCM and “*04” or
3. Press the programmed ACCOUNT CODE button and
4. Dial the account code
Call Forwarding
Forward prime line and intercom calls or all your calls to ring at another telephone.
Every time an intercom call is forwarded your phone will sound a short ring burst.
To Forward:
1. Press OPTIONS
2. Press NEXT two times
3. Press CFWD
4. Press PERS for prime line and intercom calls or ALL for all calls
5. Press SET to enable call forwarding
6. Dial the extension number of the telephone to receive your forwarded calls
7. Press SPKR to end.
Cancel Call Forwarding:
1. Press OPTIONS
2. Press NEXT twice
3. Press CFWD
4. Press PERS for prime line and intercom calls or press ALL for all calls.
5. Press CLEAR to disable call forwarding
6. Press SPKR to end.
Courtesy of Main Resource, Inc. Visit us at www.MainResource.com or call 800 362-6740
for all your Comdial needs.
Page 21 of 34
Group Listening – Listening to a call over the speaker while using your handset or
headset. While on a call, press and hold SPKR for two seconds. To cancel, press
SPKR.
Making a Call Non-Private
Pressing a programmed PRIVACY button while on a call allows other telephones in
the line group to join the call.
Call Monitoring (when enabled)
Monitor a conversation at another phone while on or off-hook. You may also make a
SOHVA call to a station, enabling you to assist a station user while listening to the
distant party.
To Monitor an in-progress call:
1. Press ITCM
2. Dial #03
3. Dial the extension number of the telephone to be monitored
4. Press SPKR to end monitoring
To Initiate a SOHVA while monitoring a call at another station:
• Press the programmed SOHVA button
• Make an announcement (announcement will not be heard by distant party,
the station user can press MUTE to respond to your call).
Operating Your Telephone as a Departmental Station:
Use off-duty mode when you must leave your telephone for a period of time and you
want another telephone in your department to answer your calls.
Use wrap-up mode when you need time to finish paperwork after a call. Program a
Do Not Disturb button.
Use off-duty mode:
1. Press OPTIONS
2. Press NEXT twice
3. Press DND
4. Press ON
5. Press SPKR to end.
To cancel, repeat steps 1-5 above, but press OFF instead of ON in step four.
Use wrap-up mode:
• Press HOLD
• Press programmed DND feature button.
To cancel, repeat.
Courtesy of Main Resource, Inc. Visit us at www.MainResource.com or call 800 362-6740
for all your Comdial needs.
Page 22 of 34
Moving Your Telephone (when enabled)
When you move your telephone to another location, a display prompt will ask if you
would like to keep your previous programming or use the programming already set
at the new location.
To keep your old location’s programming features and extension number, connect
the telephone line cord to the new jack. Do nothing until the HOLD light stops
flashing. Your new location now assumes the features from the previous location.
To assume the new extension number and programming features from the new
location, connect the telephone line cord to the new jack and press “#” while the
HOLD light is flashing.
Paging
Check with your administrator to determine what type of paging your system uses
and how to access it.
External Paging Units
Access the external paging unit by pressing a line button or dialing a code. The
announcement will be transmitted over the external speaker unit.
To Use:
1. Lift handset
2. Press ITCM
3. Dial the extension number of the station equipped for paging or press the
paging button programmed by the installer or dial “89”.
4. Make announcement.
5. Hang up to end.
All-Call or Zone Paging
All-call paging sends the announcement through all the telephone speakers. Zone
paging sounds only over the telephones in a specific area.
To Use:
1. Lift handset.
2. Press ITCM
3. Dial 87 for all-call or 84, 85 or 86 for zones 1, 2 or 3
4. Make announcement
5. Stay on line if waiting for a reply (“meet-me” page) or hang up to end.
To Reply to a “Meet-Me” Page:
1. Lift the handset of any telephone
2. Press ITCM
3. Dial 88 to connect with the paging party.
Adjusting Volume Control
Your phone’s volume control sets volume for the ringer, speaker, handset, headset
and group listening.
Courtesy of Main Resource, Inc. Visit us at www.MainResource.com or call 800 362-6740
for all your Comdial needs.
Page 23 of 34
Ringer Volume
There are four ringer volume levels (ringer off may be installed as well). While your
phone is idle, press VOLUME UP or VOLUME DOWN to adjust.
Speaker Volume
There are eight speaker volume levels. Set them for the current call by pressing
VOLUME UP or VOLUME DOWN to adjust.
Handset Volume
There are either eight or 13 volume levels for handset volume (depending on
whether or not the installer sets the station for a hard of hearing user). To set level
for the current call, while on a call press VOLUME UP or VOLUME DOWN.
Headset Volume
There are 13 volume levels for headset volume. To set level for the current call,
while on a call press VOLUME UP or VOLUME DOWN.
Group Listening Volume
There are eight volume levels for group listening. While on a call, press VOLUME UP
or VOLUME DOWN to adjust.
Default volume settings for speaker, headset, handset and group listening may be
set by following these steps:
1. Press ITCM
2. Choose speaker, headset, handset or group listen mode to be affected
3. Press VOLUME UP or VOLUME DOWN to adjust
4. Dial “**5” to save the volume setting for future calls.
5. Repeat for each mode.
Setting a Do Not Disturb Condition (when programmed)
Prevent calls from ringing at your station and make your station appear busy to
intercom calls. To use:
1.
2.
3.
4.
5.
Press
Press
Press
Press
Press
OPTIONS
NEXT twice
DND
ON
SPKR to end.
To disable, repeat steps 1-5 above, pressing OFF instead of ON in step four.
Override Toll Restriction
Dial a programmed four-digit TRO code at another station to replace that station’s
toll restrictions, prime line or idle line preference with those of your home station
provided you place a call within 15 seconds. After completing one call, you have 15
seconds to make another call without re-entering the TRO code.
To Use TRO at a Station:
1. Press ITCM
2. Dial “**6”
Courtesy of Main Resource, Inc. Visit us at www.MainResource.com or call 800 362-6740
for all your Comdial needs.
Page 24 of 34
3.
4.
5.
6.
Dial your station’s extension number
Dial your TRO code number
Within 15 seconds, dial the outgoing line number
Hang up or press SPKR to end.
To Clear the TRO Code:
1. Press ITCM
2. Dial “**6”
3. Press SPKR.
Using the Optional Tracker Paging System
Send and receive messages on tracker pages assigned to extensions. The tracker
system will park calls for pickup by the paged party. If your station includes a
tracker pager, it must be enabled before use. Disable it when you do not wish to
receive paged messages and at the end of the day.
To enable, press ITCM and dial “*06”. To disable, press ITCM and dial “#06”.
To send a call back message to another station user’s Tracker Pager, press
ITCM, dial “#01”, dial the station extension number and hang up to end.
To park a call and have the Pager-Tracker alert someone to retrieve the call:
1. Answer the call and press T/C
2. Dial extension
3. Press TRACK (or dial #01)
4. Your display shows park orbit (91-99) and then returns to idle.
5. Hang up handset or press SPKR to end.
The Pager-Tracker system will transmit the orbit dialing code and caller ID
information (if available) to the called party’s Tracker Pager display.
To respond when your Tracker Pager displays a park orbit dialing code:
• From any system station, press ITCM
• Dial the displayed orbit code (#91-99)
• Retrieve call.
Optional Data Interface Unit (DIU)
The DIU connects and allows you to switch between your LCD speakerphone and an
industry-standard telephone device such as a non-system telephone; fax machine,
data modem or answering machine.
If you have a DIU assigned to your phone, your telephone will have a programmed
DATA button with an LED. The DATA button’s LED shows you the status of your DIU.
Off – system telephone selected
Green – IST device selected but idle
Red – IST device busy
Flashing Red – IST device ringing.
Courtesy of Main Resource, Inc. Visit us at www.MainResource.com or call 800 362-6740
for all your Comdial needs.
Page 25 of 34
To select the system LCD speakerphone, press DATA. If a call is in progress on
the IST device, it transfers to the LCD speakerphone if it is off-hook or in
speakerphone mode. If the speakerphone is on-hook the call disconnects.
To select the IST device, press the DATA button. If a call is in progress on the
speakerphone, it transfers to the IST device if that device is off-hook. If the IST
device is on-hook the call is disconnected.
Transfer calls to a distant party’s DIU by using the normal transfer procedure.
To transfer an active call to your IST device (to connect a call to the fax
machine, for example), transfer the call to yourself and press the DATA button.
To use a non-proprietary telephone as an IST device, operate it as a standard
IST, press the button on the LCD speakerphone to select a line, intercom or speed
dial.
Text Messaging
Message Waiting Light
If your station has been assigned as a central message desk or your phone has
message wait ability, you can turn on the message waiting light of any phone to alert
the user that you are holding a message for them.
To turn on message waiting light at a busy station, press NEXT at the busy
tone, press MSG and hang up.
To turn on message waiting light at a no-answer station, press MSG and hang
up.
To turn off message waiting, press ITCM, dial “#3” and dial the extension number
of the station that was alerted and hang up.
If your phone’s message waiting light is flashing, press ITCM, then HOLD.
Sending LCD Messages
The phone system attendant can program messages for use in displaying your
phone’s status when another user calls your station. Obtain the list from the
attendant (messages 1 and 2 default to “Back At” and “Call”, respectively).
To Turn the LCD Message on:
1. Press ITCM
2. Dial “*02”
3. Dial the code number from the list of messages. When using the “Back At”
message, dial the time in twelve-hour format using the “#” as a colon. When
using the “Call” message, dial the phone number where you can be reached.
4. Press SPKR.
To turn the LCD message off, press ITCM and dial “#02”.
Courtesy of Main Resource, Inc. Visit us at www.MainResource.com or call 800 362-6740
for all your Comdial needs.
Page 26 of 34
Leaving a Station-to-Station Message
When you call another phone and no one answers, you can turn on the BLF light at
the called phone to let them know you called. If your phone is stored as a DSS/BLF
button at the called phone, you can turn the BLF light on yourself. Otherwise, your
message goes to the central message. There the attendant will turn on the message
waiting light of the station you were trying to reach.
To turn on the message light, dial “*7” when you get no answer.
To turn off the message light, press ITCM and dial “#7” and dial the station
extension number.
To answer a message reminder when your BLF light is flashing rapidly, press the
DSS button associated with the lighted BLF light.
Sending an Assist Button Message
Use a Programmed ASSIST button to ask for your supervisor’s assistance while you
are on a call. Press the ASSIST button and the DSS button of the user from whom
you are requesting help. If the extension number was stored in the ASSIST button
programming, simply press the ASSIST button. If the called station is idle, a ring
burst sounds and a message appears in the display. If busy, the message appears
when it becomes idle.
Programming Your Telephone
Automatic Dialing
Autodial allows you to dial long sequences of numbers using just one or to buttons,
allows you to store frequently used feature codes and store station numbers of
frequently called telephones.
Autodial can be stored at any programmable button that is not assigned as a line
button or other feature, on a secondary level under a DSS button or at keypad keys
0-9.
When stored at programmable button locations, outside numbers and feature codes
are referred to as autodial numbers. When they are stored at keypad number
locations, they are referred to as direct station selection (DSS) numbers. The light
associated with the DSS button is the busy lamp field (BLF) light.
If you wish to program an emergency number and make a test call, the FCC
requires that you stay on the line and briefly explain to the dispatcher that you were
testing an autodial button. Please make your test call during off peak hours, early in
the morning or late in the evening.
Before programming, write down the intercom or outside line you will use as well as
the phone number, extension number or feature code you are using.
Courtesy of Main Resource, Inc. Visit us at www.MainResource.com or call 800 362-6740
for all your Comdial needs.
Page 27 of 34
While programming, fill in the identification strips on your phone and fill out the
charts provided below for your records.
Autodial Numbers
A1
A9
A2
A10
A3
A11
A4
A12
A5
A13
A6
A14
A7
A15
A8
A16
B1
B4
B2
B5
B3
B6
Courtesy of Main Resource, Inc. Visit us at www.MainResource.com or call 800 362-6740
for all your Comdial needs.
Page 28 of 34
Personal Speed Dial Numbers
(Keypad Buttons)
0
5
1
6
2
7
3
8
4
9
Storing Autodial and Speed Dial Numbers
1.
2.
3.
4.
5.
Press OPTIONS
Press NEXT four times
Press ADIAL or SDIAL for autodial or speed dial
Press the button to choose a storage location
Press the line button or ITCM unless your system has line groups. In that
case dial the line group number (1-4) or dial 0 to have a line chosen for you.
6. Dial any number up to 16 digits long. To insert a pause, press HOLD and
then continue dialing. To insert a hookflash, press TAP and then continue
dialing. Press DKSP to delete incorrect numbers.
7. Press SAVE to store
8. Press next location button and store another number
9. Repeat for more numbers
10. Press SPKR to end.
Store a System Feature Access Code Instead of an Outside Number
Follow the above steps, but do not select a line number. Instead, dial the access
code for the feature after selecting the button location. For example, for the group
call pick up button, press the button to program, press ITCM, dial “#4” and press
SAVE.
Store a DSS Number
To store a system extension number as a DSS number:
1. Press OPTIONS
2. Press NEXT five times
3. Press DSS
4. Press button to program
5. Dial extension number
6. Press the next programmable button to store another DSS number
7. Press SPKR to end.
Courtesy of Main Resource, Inc. Visit us at www.MainResource.com or call 800 362-6740
for all your Comdial needs.
Page 29 of 34
Do not program interactive buttons. If you accidentally program over them:
1. Press ITCM **1
2. Press the button you programmed over
3. Dial 91, 92 or 93 (buttons left to right)
4. Press SPKR to end.
Storing Feature Buttons
Options are as follows:
• Account Code Button – allows entering of account codes for call accounting
purposes
• Automatic Call-Back (Camp On) Button – arranges the system to ring your
phone and another extension on the system as soon as their phone becomes
idle
• Call Forward Button – one-button forwarding of all calls to another phone
• Call Park Orbit Button – places a call in system hold
• Do Not Disturb Button
• Page Button – one-button access to paging
• Privacy Button – releases privacy for the current call
• Redial Button – redials the saved last-dialed number
• Voice Announce Block Button – blocks voice announcements.
To create access buttons:
1. Press OPTIONS
2. Press NEXT five times
3. Press FEAT
4. Press NEXT until desired feature choice is displayed
5. Press one of the buttons below displayed selections
6. Respond to the menu prompts
7. Press programmable button for storage location
8. Press PREV or NEXT until the net feature choice is displayed
9. Repeat steps 7 and 8 until all feature buttons are programmed or press EXIT
to end.
To clear a feature access button, repeat the programming procedure, except,
press CLEAR before pressing the storage location button.
Special Purpose Feature Buttons
Assist - Sends a message to an LCD speakerphone that lets the user know (with a
tone and station message display) that you need assistance.
Automatic Redial – Causes the system to dial the last number you dialed once
every minute for 10 minutes, ringing for about 30 seconds each time.
Headset Button - Allows you to use your phone with a headset instead of using the
speakerphone. Connect the headset in place of the handset and press the headset
button.
Group Listen – Allows others in the room to hear a conversation over the speaker
while you use the handset or headset. The called party can only hear the
conversation transmitted through the handset or headset.
Courtesy of Main Resource, Inc. Visit us at www.MainResource.com or call 800 362-6740
for all your Comdial needs.
Page 30 of 34
Response Message – Returns a non-verbal response to a SOHVA call.
Transfer/Conference Autodial Button – Allows single-key transferring of calls to
a predetermined station, often the voice mail system.
Subdued Off-Hook Voice Announce (SOHVA) Button – If you wish to interrupt a
busy station, use the SOHVA button.
To select a special purpose button:
1. Press ITCM
2. Dial “**1”
3. Press the desired programmable button
4. Dial the feature code,
a. 7 = ASSIST (then dial 0-9 for a programmed message or “*” for an
assisted message)
b. # = AUTOMATIC REDIAL
c. 5 = RESPONSE MESSAGE (0-9 to select message)
d. 6 = TRNS/CNF autodial button (then dial extension)
e. 8 = SOHVA button
f. 94 = HEADSET
g. 98 = GROUP LISTEN
5. Press T/C
6. Repeat steps 3 through 5 as desired
7. Press SPKR to end.
Troubleshooting Your Telephone
Problem
ITCM light flashing
Possible Cause
Your messaging is set.
HOLD light flashing
Another phone has
activated your message
waiting light
MUTE light is on
SPKR light is on, steady
MUTE is activated
Background music is
activated
Incorrect buttons may
have been pressed
during autodial or speed
dial programming.
Voice announce block is
activated
Error Tone (three steady
tones)
You cannot receive a voice
announce call
Possible Solution
Dial ITCM and “#02” and
hang up
Press ITCM and press HOLD
to retrieve the message.
This will call the party who
was attempting to reach
you. When you return the
call, the party who
activated the light must
press the ITCM button while
talking with you to turn off
the light
Press MUTE to cancel
Dial ITCM, then “#1” to
cancel
Dial ITCM then “#2” to
cancel
Courtesy of Main Resource, Inc. Visit us at www.MainResource.com or call 800 362-6740
for all your Comdial needs.
Page 31 of 34
Quick Reference Guide
Feature
Account Code
Assist
Attendant
Automatic Callback
Background Music
Call Forward All Calls
Call Forward Personal Calls
Call Pickup Directed
Group
Call Park
Call Waiting
Directed Hold
Executive Override
Hookflash Code
LCD Messaging
Line Group 1
Line Group 2
Line Group 3
Line Group 4
Line Group Queue
Message Waiting
Night Answer
Zone 1 Paging
Zone 2 Paging
Zone 3 Paging
All-Call Paging
Meet-Me Paging
External Paging
Personal Ring Tones
Response Messaging
Service Observe
SOHVA Originate
Station to Station
Messaging
System Speed Dialing
Tracker Pager
Tracer Pager – Send
Tracker Page
Toll Restriction Override
Voice Announce Block
Enable
Programmed button or
ITCM “*04”
Programmed Button
ITCM 0
ITCM Ext. “*6”
ITCM “*1”
ITCM “*5”
ITCM “*05”
ITCM “*4” plus ringing
extension
ITCM “#4”
ITCM “*(91-99)
ITCM Ext. “*01”
ITCM “*90”, Ext.
ITCM Ext. “*03”
ITCM “#04”
ITCM “*02 (0-9), SPKR
ITCM 9
ITCM 81
ITCM 82
ITCM 83
ITCM (grp. Code)
ITCM “*3” Ext.
ITCM “80”
ITCM “84”
ITCM “85”
ITCM “86”
ITCM “87”
ITCM “88”
ITCM “89”
ITCM “**41” (tone 1)
ITCM “**42” (tone 2)
ITCM “**43” (tone 3)
ITCM “**44” (tone 4)
ITCM “**45” (tone 5)
ITCM “**46” (tone 6)
Programmable Button
ITCM “#03”
Programmable Button
ITCM Ext. “*7”
Cancel
ITCM
ITCM
ITCM
ITCM
“#6”
“#1”
“#5”
“#05”
ITCM “#91-#99 to retrieve
Hang Up
ITCM “#90”
ITCM “#02”
ITCM “#8”
ITCM “#3” Ext.
ITCM “#7” Ext.
*01-99
ITCM “*06”
ITCM “#01”
ITCM “#06”
ITCM “**6”
Programmed Button or
ITCM “*2”
ITCM “#2”
Courtesy of Main Resource, Inc. Visit us at www.MainResource.com or call 800 362-6740
for all your Comdial needs.
Page 32 of 34
Glossary
A
All-call paging – Page message sounds through all stations in the system
Assist button – Sends a message requesting assistance to the LCD of another
phone
Automatic callback – System will ring a calling telephone when the busy called
telephone becomes idle.
Automatic dialing (or Autodialing): Using programmable buttons to store
numbers for quick dialing
Automatic redialing – automatically redials the last number dialed once a minute
for 10 minutes
C
Call forward – Forwards your intercom calls to another user’s phone
Call park – Places an active call at a phone in system hold, to be retrieved by any
telephone
Call pickup – Answering a call that is ringing on another station
Call transfer – Transfers a call from one station to another
Central message desk – A station that controls message waiting lights and delivers
messages to other stations in the system.
Class of service programming – Customized programming by the system installer
establishing the operating parameters of the system and stations on the system.
D
Direct Inward Station Dialing (DISD) - Allows an outside party to call an
intercom station directly.
Dual Tone Multiple Frequency (DTMF) – Tones made by your phone when you
dial
E
Exclusive hold – The phone placing a call on hold is the only one that can retrieve
the call
Executive override – Interrupts a conversation at a busy station.
H
Hookflash – Needed for activating host system features. Activated by pressing the
TAP button.
I
ITCM (Intercom) – a number assigned to a station
K
Keypad – Buttons used for dialing - 0 through 9, also “*” and “#”
L
Last number redialing – Automatically dialing the last number dialed
Courtesy of Main Resource, Inc. Visit us at www.MainResource.com or call 800 362-6740
for all your Comdial needs.
Page 33 of 34
M
Messaging – Turns on the light at another user’s phone to let them know a message
is awaiting pickup and allows you to display a message on the LCD of another
telephone to give information about your station’s status
Mute: Keeps the distant party from hearing your conversation
N
Night Transfer – Transfers incoming calls to stations for off-hour answering
P
Personal ring tones – Six distinctive tones may be chosen
Prime line – A line designated to a particular telephone and automatically selected
when the handset is lifted
Programmable buttons – Buttons that can be used for programming autodial
numbers, feature codes or other special requirements.
Pulse/Tone switching – Changing from pulse/rotary dial signals to tone/DTMF
signals
R
Response messaging – Responding non-verbally to a calling station by pressing a
programmed button that sends a message to the calling station’s display
Ringing line preference – Automatic connection to an outside line ringing at the
station when the station handset is taken off-hook
S
Saved number redial – Save a last manually dialed number for autodialing
Subdued off-hook voice announce (SOHVA) – An announcement can be made to
a busy station user which will be heard over the handset, but not by the distant
party.
Speed dialing – Autodialing station or system speed dial numbers using keypad
buttons.
System alarm reporting – Allows you to view on your LCD the various system
alarms and the station associated with those alarms.
T
TAP – Gives you either a fresh dial tone or activates hookflash, depending on your
system’s programming.
Tone call - A ringing intercom call
Tracker - Send and receive messages to Tracker pagers assigned to station
extension numbers
T/C – A feature button that allows you to transfer outside calls and set up
conference calls
V
Voice call – Verbal intercom call
Voice announce blocking – Blocks voice calls sent to your station’s speaker
Z
Zone paging – Paging through only some of the stations or departments on the
system
Courtesy of Main Resource, Inc. Visit us at www.MainResource.com or call 800 362-6740
for all your Comdial needs.
Page 34 of 34