1
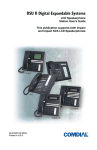
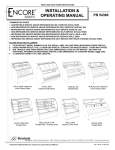
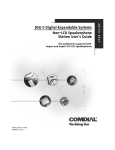
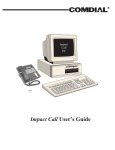
R
Digital Telephone System
LCD Speakerphone
Station User’s Guide
E
1
ABC
2
DEF
3
GHI
4
JKL
5
MNO
6
PRS
7
TUV
8
WXY
9
OPER
0
#
SPKR
T/C
MUTE
HOLD
TAP
ITCM
unisyn05.cdr
This user’s guide applies to the Impression model
2022S–✳✳ LCD speakerpohone (when used on Comdial
Gxxxx common equipment with Ixxxx or Sxxxx software
cartridge Revision 18A and later).
If you need more information, than this guide provides,
please consult your System User’s Guide
GCA70–328
LCD Speakerphone Station User's Guide
Introducing Your
Impression LCD Speakerphone
Congratulations and thank you for using an Impression LCD Speakerphone!
This manual serves as a helpful guide for using all of the various functions of
your new telephone and as a quick reference guide as well. If you should need
more information about a particular function or on a function that is not listed in
this guide, consult the System User’s Guide, GCA 70–332, (your system attendant or whomever runs your main telephone system should have several copies).
Using the Speakerphone
Since your telephone is a speakerphone, you can use it handsfree for any operation in which you might use the handset. To use the speakerphone, press the
ITCM or the line button instead of lifting the handset. You cannot use the
speakerphone mode to receive a SOHVA or to originate paging.
LCD Display
unisyn08.cdr
Interactive Buttons
Speaker
Mute Button
T/C Button
1
2
DEF
3
GHI
4
JKL
5
MNO
6
PRS
7
TUV
8
WXY
9
OPER
SPKR Button
Message
Waiting Light
ABC
0
Programmable
Buttons
#
SPKR
T/C
MUTE
HOLD
TAP
ITCM
Volume Control
Hold Button
TAP Button
Microphone Opening
ITCM Button
LCD Speakerphone Station User's Guide–3
LCD Speakerphone Station User's Guide
GCA70–328
Understanding What the Lights Mean
The lights on your telephone indicate the status of lines, features, and intercom.
—Next to a Direct Station Select (DSS)/
Busy Lamp Field (BLF) button:
Steady red = station is in use, or in Do Not Disturb.
Flashing red = station is receiving a call or station is
calling you.
Fluttering red = station-to-station messaging has been set.
—Next to a line button:
Steady green = line is in use at your station.
Steady red = line is in use at another station.
Flashing red = your line is ringing.
Flashing orange = your line is ringing and will be answered when you take
your telephone off hook.
Winking green = line is on hold at your station.
Winking red = line is on hold at another station
Fluttering green = line has recalled from hold at your station.
Fluttering red = line has recalled from hold at another station.
—Next to a fixed feature or programmable feature button:
Steady red = the feature is on.
Steady off = the feature is off.
—Next to the ITCM button:
Steady red with a quick flash = you are using your intercom.
Fluttering red = auto redial is in use, or system is in Night Mode
(at station 10).
Winking red = an LCD message is set on your telephone for
others to receive when calling.
Flashing red = another station is calling you.
4–LCD Speakerphone Station User's Guide
GCA70–328
LCD Speakerphone Station User's Guide
—Above the HOLD button:
Flashing red = message awaits pick up.
Fluttering red = automatic station relocation has been set.
—Above the SPKR button:
On steady (with telephone on hook and busy) = speakerphone
mode active.
On steady (with telephone on hook and idle) = background
music turned on.
On steady (with telephone off hook and busy) = group
listen is active.
—Above the MUTE button:
On steady = called party cannot hear your conversation.
unisyn12.cdr
Interactive Buttons
Mute Light
1
ABC
2
DEF
GHI
4
JKL
5
MNO
6
PRS
7
TUV
8
WXY
9
Speaker Light
Message
Waiting Light
OPER
0
3
Line Lights,
DSS/BLF Lights
(one for each button)
#
SPKR
T/C
MUTE
HOLD
TAP
ITCM
Hold Light
Intercom Light
LCD Speakerphone Station User's Guide–5
LCD Speakerphone Station User's Guide
GCA70–328
Using The LCD Abbreviations
The following chart identifies the abbreviations on your LCD screen and provides a brief definition of each feature. For more detailed information, see your
system manual, GCA70–332.
Abbreviation
Feature
Definition
ADIAL
Auto Dial
Allows you to program a number
as an autodial for one-button
dialing.
ALL
All Call Forward
Using Call Forward, you can
forward all calls or just personal
calls.
ANS
Answer
When an unanswered transfer
returns to your station, you can
press the ANS button to retrieve
the call.
ARDL
Auto Redial
Redials a busy call once a minute
for ten minutes.
BLOCK
SOHVA block
Blocks SOHVA calls
BKSP
Back Space
When you are programming an
autodial or speed dial, BKSP
allows you to erase an incorrect
digit.
CAMP
Camp
If you intercom-call a station that
is busy, does not answer, or is in
DND, CAMP causes the system to
ring your station when the called
station is available.
CFWD
Call Forward
You can forward calls that
normally ring at your station to
another station.
6–LCD Speakerphone Station User's Guide
GCA70–328
LCD Speakerphone Station User's Guide
CLBK
Call Back
One non-verbal response to a
SOHVA is CLBK, which means
the station receiving the SOHVA
will call back the originating party.
CLEAR
Clear
If your system is set for Call
Forward, the CLEAR button
cancels the call-forward condition.
CWAIT
Call Waiting
You can send a call-waiting tone
to a busy station and await a reply.
DARK
Dark
When adjusting the contrast on
your LCD, DARK makes the
background of the screen darker.
DIAL
Dial By Name
Dials a number corresponding to a
displayed name.
DISP
Display
You can adjust the contrast on
your LCD screen.
DND
Do Not Disturb
With DND enabled, your station
appears busy to calling stations.
DSS
Direct Station
Select
Allows you to store a number as a
DSS for one button dialing.
EXIT
Exit
Ends your current programming
function.
EXT
External
Chooses speed dial list for dial by
name feature.
FEAT
Feature
Accesses several miscellaneous
features, such as DND button or
Account Code button.
FWD
Forward
If you have set your telephone
with call forwarding, FWD
displays on your screen along with
the name or extension of the
station to which your calls will be
forwarded.
LCD Speakerphone Station User's Guide–7
LCD Speakerphone Station User's Guide
GCA70–328
G(followed
by number)
Group
Tells you which line group you are
currently using.
HOLD
Hold
Functions just as your fixed
HOLD button.
HVHLD
Have them hold
One non-verbal response to a
SOHVA, HVHLD tells the calling
station to “Have them hold.”
INT
Internal
Chooses intercom number list for
dial by name.
L (followed
by number)
Line
Tells you which line you are
currently using.
Last No.
Saved
Last Number
Saved
Displayed when SAVE button is
pressed and the last dialed number
is saved.
LIGHT
Light
When adjusting the contrast on
your LCD, LIGHT makes the
background of the screen lighter.
MUSIC
Music
You can turn on the background
music to play through your
speaker.
NEXT
Next
Moves you to the next LCD
programming display
OVER
Override
Overrides either a do-not-disturb
call or a busy call, depending upon
how your station is programmed.
P (followed
by number)
Port
Denotes port number of your
station.
PERS
Personal
Using Call Forwarding, you can
forward all calls or just personal
calls.
PREV
Previous
Returns you to the previous LCD
display.
RECALL
Recall
Recalls line from hold
8–LCD Speakerphone Station User's Guide
GCA70–328
LCD Speakerphone Station User's Guide
RECON
Reconnect
Lets you reconnect to a transferred
call if the station is busy.
RING
Ring
You can select a variety of ring
tones for your station.
S (followed
by number)
Station
denotes your station number.
SAVE
Save
Permanently saves the telephone
number of your current call.
SDIAL
Speed Dial
Allows you to program a number
as a speed dial for one-button
dialing.
SEND
Send
If a transferred call is not
answered and recalls to your
station, SEND re-transfers the call.
SET
Set
Enables Call Forwarding.
SOHVA
Subdued Off
Hook Voice
Announce
Sends a subdued message to a
busy station.
TIMER
Timer
Displays the running time of the
current call.
TKMSG
Take A Message
One non-verbal response to a
SOHVA, TKMSG tells the calling
station to “Take a message.”
VAB
Voice Announce
Block
Inhibits your station from
receiving a SOHVA or voice
announced intercom call.
LCD Speakerphone Station User's Guide–9
LCD Speakerphone Station User's Guide
GCA70–328
Answering Calls
• To answer a call that is ringing at your telephone,
1. if the light is flashing orange, lift handset;
2. if the light is red, press the flashing line and lift handset.
• To answer a call using the speakerphone,
press flashing line or ITCM button.
• To answer a call that is ringing at any telephone,
1. lift handset,
2. press ITCM and dial ✳ 4 plus extension number of ringing
telephone.
• To answer a call that is ringing at a particular
telephone in your group,
1. hear ringing
2. lift handset,
3. press ITCM and dial # 4 (ringing station must be programmed
in your call pickup group).
• To answer a call that is ringing the loud ringer
or night transfer station,
1.
2.
3.
4.
hear ringing ,
lift handset,
press ITCM and dial 80,
answer call.
10–LCD Speakerphone Station User's Guide
GCA70–328
LCD Speakerphone Station User's Guide
Answering Subdued-Off Hook
Voice Announcements (SOHVA) Calls
NOTE: Your telephone may be arranged to receive a subdued off-hook
voice announcement (SOHVA). If it is, an intercom caller
may break into your outside call and deliver a message to your
telephone receiver for you to hear. SOHVA works as follows:
while off-hook on an outside call, hear several quick tone
bursts followed by an announcement delivered to your ear
through the handset.
• To respond verbally,
1. press and hold MUTE,
2. speak into handset.
• To respond non-verbally,
1. press MSG,
2. press HVLD (have hold), TKMSG (Take Message), or
CLBK (Call Back) depending upon which message you want
to leave.
NOTE: Announcing station must have LCD speakerphone.
• To Block SOHVA,
press BLOCK when SOHVA is initiated.
LCD Speakerphone Station User's Guide–11
LCD Speakerphone Station User's Guide
GCA70–328
Making Calls
NOTE: If the installer has enabled your system with Specialized Route
Access (SRA), the system returns a special intercom tone when
you dial out (using ITCM 9, or a preprogrammed button).
After this SRA tone, you have ten (10) seconds to dial digits;
otherwise, the telephone automatically returns to its idle state.
Furthermore, you only have three seconds pause time between
digits before the system automatically dials your call.
• To make a call,
1. lift handset, select line (unless your telephone selects it for
you), or select ITCM, and listen for dial tone,
2. either dial number or press HOLD, then press autodial, use
speed dial feature, use redial feature, or press Direct Station
Select (DSS) if making an intercom call.
• To dial autodial number,
1. press preprogrammed button. If button is programmed at the
second level of a DSS button, press HOLD before pressing
autodial button,
2. when called party answers, lift handset.
• To dial personal or system speed dial number,
1. dial desired code:
1–0 = personal speed dial number,
✳01–✳99 = system speed dial number,
if you select a line, press HOLD then dial code,
2. when called party answers, lift handset.
• To redial the last number that you dialed at your telephone,
1. dial #,if you select a line, press HOLD then dial #,
2. when called party answers, lift handset.
• To access outside line using line group feature,
1. press ITCM, then dial line group access code:
9 = group 1,
81 = group 2,
82 = group 3,
83 = group 4,
2. listen for outside dial tone,
3. dial number, and lift handset when party answers.
12–LCD Speakerphone Station User's Guide
GCA70–328
LCD Speakerphone Station User's Guide
• To queue for a line group if all lines are busy,
1.
2.
3.
4.
press ITCM and dial line group access code (9, 81, 82, or 83),
hear busy tone and dial ✳ 8,
hang up and wait for queuing ring-back.
when called party answers, lift handset.
• To answer queuing ring-back,
lift handset and hear dial tone for line.
• To cancel queuing before it causes ring-back at your telephone,
1. lift handset,
2. press ITCM and dial # 8,
3. hang up handset.
• If you are required to enter an account code when making
outside calls,
1. select line,
2. press ITCM and dial ✳ 04,
3. dial your account, hear outside dial tone, and dial outside
number,
4. when called party has answered, lift handset.
• To use Toll Restriction Override at a station,
1.
2.
3.
4.
press ITCM,
dial ✴✴6,
dial your station extension number,
dial your TRO code number (TRO code is not displayed—
instead an ✴ is shown),
5. within 15 second timeout period, dial desired outgoing line
number.
6. hang up handset or press SPKR to end call. You will have 15
seconds in which you can make another call without
re-entering your TRO code.
• To clear the Toll Restriction Override code,
1. press ITCM,
2. dial ✴✴6,
3. press SPKR.
LCD Speakerphone Station User's Guide–13
LCD Speakerphone Station User's Guide
GCA70–328
Camping On At A Station
Waiting For A Call Back (Using Automatic Call-Back)
• To arrange for the system to call back when a busy station
becomes idle or rings with no answer,
1. make intercom call and hear busy signal or ring-back tone,
2. press CAMP,
3. hang up. (When called station becomes idle or is operated by
its user, your station will ring. Call-back is canceled if you do
not lift your handset when you hear this ringing).
• To answer call-back ring,
lift handset (called station will ring; call-back is canceled if
you do not lift your handset).
• To cancel automatic call back,
press ITCM and dial # 6.
Waiting for An Answer (Using Call Waiting)
• To activate call waiting,
1. make intercom call and hear busy signal,
2. press NEXT,
3. press CWAIT.
• To cancel call waiting,
hang up handset.
• To answer a call-waiting tone at your telephone,
1. hear short tone burst in handset receiver,
2. complete present call, and hang up (waiting call will begin
ringing),
3. lift handset to answer.
14–LCD Speakerphone Station User's Guide
GCA70–328
LCD Speakerphone Station User's Guide
Dialing By Name
• To use dial by name,
1. press OPTION to enter the dial by name menu,
2. from the dial by name menu,
–press INT button for intercom calling.,
or
–press EXT for speed dial calling,
3. dial three digits for the first three letters of the name that you
want to locate (for example, dial 266 for Comdial).
1 = QZ
2 = ABC
3 = DEF
4 = GHI
5 = JKL
6 = MNO
7 = PRS
8 = TUV
9 = WXY
The displays shows the first existing name match to the dialed
digits or shows a No Match message if the system can not find
a match.
4. repeatedly press NEXT to display the subsequent names in
the index until you reach the name you need,
5. press DIAL to call the displayed location,
6. if the display says No Match, press PREV or enter three new
digits to select a new name.
LCD Speakerphone Station User's Guide–15
LCD Speakerphone Station User's Guide
GCA70–328
Holding Calls
• To place a call on hold,
1. press HOLD,
2. hang up handset.
• To return to a call that is on hold,
lift handset and press line button with flashing green light.
• To place a call on exclusive hold,
press HOLD twice and hang up handset.
• To place a call on hold at another telephone,
1. while on line, press ITCM (system places call on hold),
2. dial ✴ 90, then dial extension number of telephone to receive
held call,
3. hang up handset.
• To answer a call at the extension receiving held call,
1. lift handset,
2. press ITCM and dial # 90.
• To cancel directed call hold and retrieve the call,
1. lift handset,
2. press ITCM, dial ✴ 4, then dial the extension number of the
telephone to which you directed the call, and retrieve the call.
• To answer a call that someone placed on hold at your telephone,
1. lift handset,
2. press ITCM, and dial # 90.
16–LCD Speakerphone Station User's Guide
GCA70–328
LCD Speakerphone Station User's Guide
• To park a call,
1. press ITCM,
2. dial ✴, then dial park orbit access code 91 through 99
(if chosen orbit is busy, dial alternative orbit number),
3. hang up handset,
4. use paging feature to announce call and park orbit access code
if necessary.
NOTE: If call is not retrieved within a programmable time limit, it
reverts to the parking station as a standard held call, and only
one call can be placed in an orbit at a time.
• To retrieve parked call,
1.
2.
3.
4.
5.
hear announcement,
lift handset,
press ITCM and dial #,
dial park orbit access code (91 through 99),
answer call.
LCD Speakerphone Station User's Guide–17
LCD Speakerphone Station User's Guide
GCA70–328
Transferring Outside Calls
• To announce a call before transferring it,
1.
2.
3.
4.
5.
answer outside call,
press T/C (call is placed on hold),
dial station number,
upon answer, announce the call,
hang up the handset (call is transferred).
• To transfer a call without first announcing it,
1.
2.
3.
4.
answer outside call,
press T/C (call is placed on hold),
dial station number,
hang up handset. Call will re-ring your telephone if it is not
answered within a preprogrammed time.
• If you hear a busy signal or receive no answer,
take appropriate action from the following list:
– press RECON to return to call,
– press SOHVA to tell intercom party that a call awaits,
– press CAMP to camp on at that station,
– press OVER to join intercom party’s
current conversation.
18–LCD Speakerphone Station User's Guide
GCA70–328
LCD Speakerphone Station User's Guide
Conferencing Stations Together
• To set up a conference call that includes both outside lines and
intercom parties, outside lines alone, or intercom
parties alone,
NOTE: When setting up a conference call with outside lines and
internal telephones, you must call the outside lines first.
1.
2.
3.
4.
5.
make first call,
press T/C (call is placed on hold automatically),
make next call,
press T/C to establish conference,
repeat steps 2–4 to add up to two more parties, establishing a
5-party conference (including yourself).
• To continue conversation with last conferee after outside lines
have dropped out of conference,
press the line button of the remaining party.
• To drop outside lines from the conference,
press HOLD to put all lines on hold before the caller hangs
up. Not doing this will result in a tone sounding in the handset
receiver, interrupting the remaining conferees.
• To retrieve lines from hold and bring them back into the
conference,
1.
2.
3.
4.
5.
NOTE:
press line button,
press T/C,
press line button,
press T/C,
repeat steps three and 4 until all desired lines are back in the
conference.
If all the conference circuits are busy, you will not be able to
add a party to the conference. The message Conference Full
will appear in your display.
LCD Speakerphone Station User's Guide–19
LCD Speakerphone Station User's Guide
GCA70–328
Choosing Between Pulse and Tone
• To convert to tone while dialing — If the local telephone service
is pulse (rotary),
press # at point in dialing sequence where conversion to tone
is required.
NOTE: Pulse/Tone switching can be programmed into memory keys
by pressing # during number storage.
Forwarding Calls
• To forward calls to another telephone,
1.
2.
3.
4.
5.
6.
press OPTIONS,
press NEXT two times,
press CFWD,
press PERS, for personal, or ALL, to forward all calls,
press SET,
dial extension number of station to which calls are to be
forwarded,
7. press SPEAKER to end.
• To cancel call forward,
1.
2.
3.
4.
5.
6.
press OPTIONS,
press NEXT two times,
press CFWD,
press PERS or ALL,
press CLEAR,
press SPKR to end.
NOTE: For each intercom call received during call forward, you will
hear a ring reminder (short tone burst) to remind you that calls
are being forwarded.
20–LCD Speakerphone Station User's Guide
GCA70–328
LCD Speakerphone Station User's Guide
RelocatingYourTelephone
(Engaging Automatic Set Relocation)
NOTE: If this feature has been enabled by your system programmer,
the message-waiting light will flash for several seconds when
you connect your telephone to another location. This means
that the system is waiting to automatically relocate your
extension number and other programmed features to the new
location.
If you do not want your telephone to have all of its old
programming after relocation, reject the automatic relocation.
• To accept automatic relocation,
do nothing and wait for the light to turn off on its own, or press
the HOLD button to immediately accept the relocation (light
immediately turns off).
• To reject the automatic relocation,
press the # button while the message waiting light is flashing.
LCD Speakerphone Station User's Guide–21
LCD Speakerphone Station User's Guide
GCA70–328
Sending A Paging Announcement
• To page through an external paging amplifier (if your system
provides this feature),
1. lift handset,
2. press paging line select button and dial page access code (see
your attendant for code)—if paging is connected to a
dedicated paging port, dial ITCM 89,
3. make announcement.
• To page through system telephones (all-call and zone paging),
1. lift handset,
2. press ITCM and dial all-call or zone number:
84, 85, or 86 = zones 1, 2, or 3
87 = all-call,
3. make announcement,
4. hang up handset or wait for an answer.
• To answer telephone paging from any station,
1. lift handset,
2. press ITCM, dial 88, and meet paging party on line.
• To enable the Tracker Pager at your station,
1. press ITCM,
2. dial ✴ 06.
• To disable the Tracker Pager at your station,
1. press ITCM,
2. dial # 06.
22–LCD Speakerphone Station User's Guide
GCA70–328
LCD Speakerphone Station User's Guide
• To send a call back message to someone’s Tracker Pager after
receiving a ring-no-answer,
1. make an intercom call to someone and receive no answer,
2. press preprogrammed TRACK button (or dial #01),
3. after your station returns to idle hang up handset or press
SPKR to end. The Tracker paging system will transmit your
station extension number to called party’s Tracker Pager
display. (Some models will also display your station name if
the system is programmed to include station names.)
• To respond when your Tracker Pager displays park orbit
dialing code,
1. from any system station, press ITCM,
2. dial displayed orbit code (# 91 through # 99),
3. retrieve call.
• To park a call and have Tracker Pager tell someone
to retrieve the call,
1. answer call and press T/C,
2. press TRACK (or dial # 01),
3. your display shows park orbit (91 through 99) and then
returns to idle,
4. hang up handset or press SPKR to end. The Tracker paging
system will transmit orbit dialing code and caller ID
information, if available, to called party’s Tracker Pager
display. (Alpha/numeric models display #91 through #99
while numeric-only models display -91 through -99.)
NOTE: If the Tracker paging system does not accept your actions, the
system sounds an error tone at your telephone.
LCD Speakerphone Station User's Guide–23
LCD Speakerphone Station User's Guide
GCA70–328
Sending And Receiving Non-Verbal Messages
NOTE: You can set system supplied messages to be displayed by a
calling LCD speakerphone.
• To turn LCD messaging on,
1.
2.
3.
4.
press ITCM,
dial ✴ 02,
dial message code number (0–9)
press SPKR.
• To turn LCD messaging off,
1. press ITCM,
2. dial # 2.
• To turn on the message waiting light at another telephone when
that station is busy,
1.
2.
3.
4.
hear the busy tone and remain on the line,
press NEXT,
press MSG,
hang up.The message waiting light of called station will
flash..
• To turn on the message waiting light at another telephone when
that station rings with no answer,
1. hear ringing,
2. press MSG,
3. hang up. The message waiting light of called station will flash.
24–LCD Speakerphone Station User's Guide
GCA70–328
LCD Speakerphone Station User's Guide
• To turn off the message waiting light at a busy or idle station
before its user gets the message,
1. press ITCM,
2. dial # 3,
3. dial extension number of station that was alerted. The
message waiting light of called station will turn off.
• To turn off the message waiting light during message-delivering
conversation,
press ITCM.
• To retrieve a message,
1. observe flashing message-waiting light, (the HOLD light
serves as the message waiting light),
2. lift handset,
3. press ITCM, then press HOLD; connection to message desk
is automatic.
• To activate station-to-station messaging (station must have BLF
appearance at called station),
1. make intercom call and hear ring-back tone,
2. dial ✴ 7; your station’s BLF light turns on at called station,
3. hang up handset.
• To cancel station-to-station messaging,
1. press ITCM and dial # 7,
2. dial extension number of station where you left the call-back
indication,
3. press SPKR.
LCD Speakerphone Station User's Guide–25
LCD Speakerphone Station User's Guide
GCA70–328
ProgrammingYourTelephone
• To store autodial or personal speed dial numbers,
1. press OPTIONS,
2. press NEXT four times,
3. press ADIAL or SDIAL to choose autodial or speed dial
programming,
4. press programmable button,
5. press line button, or dial 1, 2, 3, or 4, to select line groups
1– 4, or dial 0 for system to select line,
6. dial number to be stored (16 digits maximum) to store
hookflash in an autodial sequence, press TAP; press HOLD
to store pause (only if needed),
7. press SAVE, then press next programmable button, and dial
another number to be stored,
8. repeat previous step until finished then press SPKR.
NOTE: You can store an autodial number at a second
level at a DSS button if you wish.
• To store extension numbers at DSS buttons,
1.
2.
3.
4.
5.
6.
press OPTIONS,
press NEXT five times,
press DSS,
press programmable button,
dial extension number,
press next programmable button and dial another extension
number,
7. repeat previous step until finished then press SPKR to end.
26–LCD Speakerphone Station User's Guide
GCA70–328
LCD Speakerphone Station User's Guide
• To store special purpose feature buttons,
1.
2.
3.
4.
5.
3.
7.
press OPTIONS,
press NEXT five times,
press FEAT,
press NEXT until the feature you want is displayed,
press desired feature button,
press programmable button,
press NEXT to program another feature or EXIT to quit.
NOTE: The Federal Communications Commission (FCC) requires that when programming emergency numbers and making test calls to emergency numbers
you do the following: (1) Remain on the line and briefly explain to the
dispatcher the reason for the call; (2) always make such a test call during the
off-peak hours, such as early morning or late evening.
LCD Speakerphone Station User's Guide–27
LCD Speakerphone Station User's Guide
Index
Answering Calls ..................................................................................10
Answering SOHVA Calls ...................................................................11
Automatic Call-Back...........................................................................14
Automatic Set Relocation....................................................................21
Call Waiting.........................................................................................14
Camping On At A Station
Waiting For A Call Back.................................................................14
Waiting For An Answer ..................................................................14
Choosing Between Pulse and Tone .....................................................20
Conferencing Stations Together..........................................................19
Dialing By Name.................................................................................15
Forwarding Calls .................................................................................20
Holding Calls.......................................................................................16
Introducing Your Impression LCD Speakerphone................................3
LCD Abbreviations ...............................................................................6
Lights.....................................................................................................4
Making Calls .......................................................................................12
Messaging............................................................................................24
Paging ..................................................................................................22
Parking A Call .....................................................................................17
Programming Your Telephone ............................................................26
Pulse and Tone, Choosing Between ....................................................20
Relocating Your Telephone.................................................................21
Sending A Paging Announcement ......................................................22
Sending And Receiving Non-Verbal Messages ..................................24
SOHVA Calls, Answering ..................................................................11
Speakerphone, Using the .......................................................................3
Toll Restriction Override.....................................................................13
Tracker Pager.......................................................................................22
Transferring Outside Calls ..................................................................18
Understanding What the Lights Mean...................................................4
Using The LCD Abbreviations..............................................................6
Using the Speakerphone ........................................................................3
28–LCD Speakerphone Station User's Guide
GCA70–328
Personal Notes
Personal Notes
This manual has been developed by Comdial Corporation (the
“Company”) and is intended for the use of its customers and service
personnel. The information in this manual is subject to change without notice. While every effort has been made to eliminate errors,
the Company disclaims liability for any difficulties arising from the
interpretation of the information contained herein.
The information contained herein does not purport to cover all details or variations in equipment or to provide for every possible contingency to be met in connection with installation, operation, or
maintenance. Should further information be desired, or should particular problems arise which are not covered sufficiently for the purchaser’s purposes contact, Comdial, Inside Sales Department, P.O.
Box 7266, Charlottesville, Virginia 22906.
R
Charlottesville, Virginia 22901-2829
World Wide Web: http://www.comdial.com/
Printed in U.S.A.
GCA 70–328.03
9/97