1
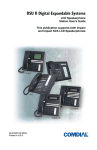
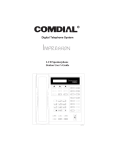
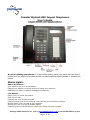
Comdial Digitech DSU Impact Telephones
User’s Guide
A note on placing your phone: For best audio quality, place your phone not less than 8
inches from the edge of your desk and do not place anything directly beside or beneath the
phone.
Status Lights:
DSS or BLF buttons –
Red: station in use or in do not disturb
Flashing red: Station is receiving a call or is calling your extension
Fluttering red: station to station messaging has been set.
Line Buttons –
Green: line is in use at your station
Red: line is in use
Flashing red: a call is being received
Flashing orange: your line is receiving a call, take the phone off hook to answer
Blinking green: line is on hold at your extension
Blinking red: line is on hold at another station
Fluttering green: a call that was on hold at your station has been recalled
Courtesy of Main Resource, Inc. Visit us at www.MainResource.com or call 800 362-6740 for all your
telecom needs.
Page 1 of 16
Fluttering red: a call on that line is being recalled from home at another station.
Fixed Feature or Programmable Feature Button Red: the feature is on
Off: the feature is off.
Intercom Button Steady red with quick flash: intercom is in use
Fluttering red: either the system is in night mode or auto redial is in use
Blinking red: others will receive an LCD message when calling your station
Flashing red: a call is incoming to your extension.
Hold Button Flashing red: message awaits pickup
Fluttering red: automatic station relocation has been set.
Speaker Button Lit steadily while phone is on hook and busy: speakerphone is on
Lit steadily with phone on hook but busy: background music is on
Lit steadily with phone off hook and busy: group listen is turned on.
Mute Button Lit steadily: mute is on.
Shift Button –
Lit steadily: shift mode is on (allows access to autodial numbers programmed under DSS buttons).
Answering Calls
Outside Calls –
Lift the handset if you have the line preference feature enabled. Otherwise, press the flashing red
line button and speak toward the speakerphone or lift the handset.
Intercom Calls –
A party on your phone system can call your extension through your speaker without causing your
phone to ring, (see the section on Blocking Voice Announced Calls to disable) or they may ring your
telephone.
If you hear the caller’s voice on your speaker, speak toward the phone or lift the handset. If your
phone rings in 2 short bursts, press the intercom button to talk or lift the handset.
Calls Ringing on Any Monitored Station –
If your phone offers the ability to monitor the status of other stations, a BLF light will flash when a
call is ringing on another station. You can answer a call ringing at any extension by pressing the
DSS button. If you later transfer the call, the BLF light goes out. You can retrieve the call by
pressing the TAP button.
Courtesy of Main Resource, Inc. Visit us at www.MainResource.com or call 800 362-6740 for all your
telecom needs.
Page 2 of 16
Calls Ringing at Another Station in your Group –
Your installer may configure the system so that stations are arranged in user groups. If this is the
case with your system, you can answer calls ringing at any station in your group. To answer:
1. Press Intercom
2. Dial “#4”
3. Either use the speakerphone or lift the handset.
Calls Ringing at Any Other Station To answer a call ringing at any other station:
1. Press Intercom
2. Dial “*4”
3. Dial the extension number where the call is ringing and answer the call as usual.
When an Intercom Caller Uses Subdued Off-Hook Voice Announcement (SOHVA) to Break
in to Your Call When on a handset call, the caller may speak over your handset receiver. If you are on a
speakerphone call, you will hear a ring burst and can go off-hook to receive the call. The caller you
were originally speaking to will not hear the SOHVA caller.
To respond:
1. Press and hold the mute button and speak into the handset. The original party will no hear
your response.
2. Release the button to return to the original caller. Or, if the caller using SOHVA has an LCD
on their phone, press the message key and then HVHLD to put them on hold, TKMSG to
take a message, or CLBK to let them know you will call back.
3. If the caller does not have an LCD, their station will be disconnected with you press the
message key and attempt to send a text message. These responses may be programmed
as autodial buttons.
To block SOHVA to your station, press BLOCK when the SOHVA is initiated. The call will be
disconnected.
Using Caller I.D. –
If your phone is enabled for Caller I.D. service, the phone number for the incoming call will be
displayed on your LCD.
Making Calls
Manual Dialing –
Press a line button to select a line (if your telephone has prime line or idle preference feature
enabled, skip this step). Dial the number when you hear the dial tone.
Automatic Dialing Using Station Speed Dial –
Press the preprogrammed button. There is usually no need to select a line button as line selection
is usually stored as part of the speed dial number. To choose the number stored as a second
choice on that button, press Shift and then the button.
Courtesy of Main Resource, Inc. Visit us at www.MainResource.com or call 800 362-6740 for all your
telecom needs.
Page 3 of 16
Automatic Dialing Using System Speed Dial –
Follow instructions for Station Speed Dial above, but press “*” before dialing the speed dial
number.
If you manually choose a line for dialing, press the hold button before pressing the speed dial
button. If you use speed dial dialing after placing a call on hold, pause for a few seconds before
you press the speed dial button. Otherwise, the system will choose the line that you have on hold.
Redial To redial the last dialed number, press speaker or hang up to disconnect the call, press “#”. If
you hear a busy tone again, press “speaker” to disconnect, otherwise, the phone will ring and you
can answer the call by picking up the handset.
To redial once a minute for 10 minutes, press the ARDL button. The intercom light will flash. The
Intercom light flashes and you will hear either a ringing or busy tone over the monitor speaker.
Pick up the handset within 30 seconds to connect.
To cancel the automatic redial, lift and replace the handset or use the phone for another function.
Call Cost/Timer –
If enabled, you can press the cost button to display the cost of the current call. If call cost is not
enabled, press the timer button will show up as timer and will display the running duration of the
current call. To display the call time for the last call, press HOLD while the phone is idle. To show
the cost, press HOLD twice.
Intercom Calls –
Manually call a station by pressing the intercom button and dialing the extension number.
Automatically call by pressing the DSS button. These methods will cause that extension to ring.
To voice call - Manually call a station by pressing the intercom button, dialing the extension
number and speaking your announcement. Automatically call by pressing the DSS button and
speak your announcement.
Using Automatic Callback –
For intercom calls only. If the station you ring is either busy or ringing with no answer, you can
prompt the system to ring your phone when the extension you called becomes idle (when it was
busy) or when there is any activity on the extension (for no answer calls). This can also be used to
prompt a user whose line is in do not disturb to call you back when they are no longer in do not
disturb.
To use, make the intercom call and press CAMP. Your phone will disconnect from the attempted
call. When the phone you rang is available, your phone will ring with five ring bursts. Press
intercom to ring the other phone.
To use with calls made in the voice-announce mode, press intercom before the camp button.
To cancel, press intercom and dial “#6”.
Using Call Waiting –
To send a call waiting tone to a busy line and wait for an answer, press NEXT, then CWAIT and
remain on the line.
Courtesy of Main Resource, Inc. Visit us at www.MainResource.com or call 800 362-6740 for all your
telecom needs.
Page 4 of 16
Overriding a call –
If the extension you call is busy or in do not disturb mode, you can break through using the
executive override function provided the feature has been enabled on your system.
To use, when you get a busy signal, press Next, then OVER. When you get a do not disturb signal,
press OVER to disable the mode on the called station and either speak your announcement (if your
phone is in voice-first mode) or wait for an answer (if your phone is in tone-first mode).
Using a Subdued Off-Hook Voice Announcement (SOHVA) to Interrupt a Call –
If this feature is enabled on your system, you can break in to a call in progress to speak with the
internal party.
To use, press the SOHVA button, wait for the tones and make the announcement. If you get a
busy tone, the called phone is in speakerphone and cannot be interrupted or that the called party
has blocked SOHVA.
Holding Calls
Note: When a call has been on hold for a specified period of time, you will hear 3 short ring busts on
your phone and the flash rate of the line button will increase. If the call was on exclusive hold, it will
be transferred to regular hold at the end of that specified time.
Place a Call on Hold –
Press HOLD.
Answer a Call Placed on Hold –
Press the flashing line button. If you do not see a flashing line button, press TAP.
Using Exclusive Hold Press HOLD twice.
Answer a Call Placed on Exclusive Hold –
Press the flashing line button. If you do not see the flashing line button, press TAP.
Place a Call on Hold at Another Extension (Directed Hold) –
While on the line, press INTERCOM, dial “*90” and dial the extension to which you wish to direct
the call.
Retrieve a Call Placed on Hold at Another Station –
Dial “*4” and the extension number of that telephone.
Answering a Call Placed on Hold at Your Station by a User at Another Station Press INTERCOM and dial “#90”.
Using Orbit to Place a Call in Hold Where it can be answered by Any User on the System
While on the line, press “INTERCOM *”. Dial the Orbit location destination (91-99). Announce the
destination number for pickup.
Courtesy of Main Resource, Inc. Visit us at www.MainResource.com or call 800 362-6740 for all your
telecom needs.
Page 5 of 16
Answer a Call Placed on Hold Using Orbit From any station, press “INTERCOM #”. Dial the Orbit location number (91-99).
Recalled Hold Calls –
Calls placed on hold (regular, exclusive, directed or orbit) will revert to manual hold after the time
period specified by system programming. At this time, you will hear 3 short rings on your phone.
Press HOLD to place the call on hold again, or press ANS to answer.
Transferring Calls
To Screen and Transfer a Call –
While on the line, press TRNS/CNF and dial the extension number of the party to receive the call
(or press the DSS button for the extension). Announce the call and press SPEAKER or hang up.
If the Party is Busy –
If enabled on your system you may press:
RECON – to retrieve the call
SOHVA – to break in to the call in progress and announce the call waiting
CAMP – to camp-on to that station
OVER – to join the conversation on the intercom call.
To Transfer a Call Without Screening –
1. Answer the call
2. Press TRNS/CNF
3. Dial the extension or
4. Use the DSS button for the extension
5. Press SPEAKER or hang up.
6. If the extension is busy, the call will camp-on to that extension and will be answered as
soon as the line is no longer in use.
If a transferred call is not answered in the specified period of time, it recalls to your phone. At this
time, you may press SEND to transfer it back to that extension, HOLD to place the call on hold at
your station or ANS to answer the call.
Conference Calls
Calls involving up to 5 parties total, in any combination of internal and external lines may be made
on your system. Always connect the outside lines before the internal lines.
To Use –
Make the first call, press TRNS/CNF, make the next call, press TRNS/CNF. Repeat until all parties
are included. Make sure to connect external parties first.
To Continue an Intercom call After Outside Lines Have Left the Conference –
Press the line button of the remaining party.
To Pick Up a Call on Hold and Return them to the Conference –
Press TRNS/CNF, then the line button and TRNS/CNF again.
Courtesy of Main Resource, Inc. Visit us at www.MainResource.com or call 800 362-6740 for all your
telecom needs.
Page 6 of 16
To Disconnect from a Call Between You and Two Outside Lines –
Dial “#” and hang up.
To Rejoin –
Press one of the lighted line buttons.
Other Features of Your Comdial Digitech or DSU Telephone
Display Contrast Adjustment –
1. Press OPTIONS,
2. Press NEXT twice
3. Press DISP
4. Press LIGHT or DARK until desired level is achieved.
5. Press SPEAKER to save and end.
Block
1.
2.
3.
4.
Voice Announce Calls –
Press OPTIONS
Press VAB
Press ON
Press SPEAKER.
Cancel Block on Voice Announce –
1. Press OPTIONS
2. Press VAB
3. Press OFF
4. Press SPEAKER to end.
Block SOHVA while you are on a Call –
Press BLOCK.
Display the Button Functions for Your Station –
1. Press OPTIONS 6 times
2. Press QUERY
3. Press any button and read the function on the LCD display
4. Use SHIFT to read autodial numbers stored under DSS buttons
5. Press SPEAKER to end.
Account Codes –
If code entry is enabled, you may either be forced to enter an account code before dialing or
answering a call, or you may choose to do so to enhance reporting data.
To Use Account Codes with and Incoming Call:
1. Press INTERCOM
2. Dial “*04” (call is automatically placed on hold)
3. Dial the account code number or the preprogrammed ACCOUNT CODE button (call is not
automatically placed on hold)
4. Dial the account code number.
Courtesy of Main Resource, Inc. Visit us at www.MainResource.com or call 800 362-6740 for all your
telecom needs.
Page 7 of 16
To Use Account Codes With an Outgoing Call 1. Press the line button
2. Press INTERCOM
3. Dial “*04” (call is automatically placed on hold)
4. Dial the account code then the outgoing call number
5. Alternately, press the preprogrammed ACCOUNT CODE button (call is not automatically
placed on hold), dial the account code and outgoing number.
Forward Calls
To Forward Calls to Another Extension:
1. Press OPTIONS
2. Then NEXT
3. And CFWD
4. Then PERS (for just prime line and intercom calls) or ALL (to forward all calls)
5. And SET
6. Dial the extension of the party to receive your calls
7. Press SPEAKER to end. When a call is forwarded from your extension, you will hear a short
ring burst to remind you that the call is being forwarded.
To Cancel Call Forwarding –
1. Press OPTIONS
2. Press NEXT
3. Press CFWD
4. Press PERS (if prime line and intercom calls were forwarded only) or ALL (for all calls)
5. Press CLEAR and SPEAKER to end.
Automatic Set Relocation –
If enabled, this feature allows you to move your telephone to another location and decide whether
Keep your previous programming or use the new location’s programming.
To Keep the Extension Number and Features From the Original Location –
Connect the phone and line cord to the jack in the new location. Press the flashing HOLD key or do
nothing until the HOLD light stops flashing. Your telephone in this new location will now use the
extension and features of the original location.
To Adopt the Extension Number and Programming of the New Location –
Connect the phone and line cord to the jack in the new location. Press the “#” button while the
HOLD light is still flashing.
Group Listening –
To Turn on the speaker while speaking over the handset (only the handset microphone remains
active) –
Press and hold SPEAKER for 2 seconds.
To Cancel Group Listening –
Press and release SPEAKER.
Monitoring Calls –
Courtesy of Main Resource, Inc. Visit us at www.MainResource.com or call 800 362-6740 for all your
telecom needs.
Page 8 of 16
If enabled, this feature allows a user to monitor a call in progress. You can also make a SOHVA
call to a station, allowing you to assist the station user on a call. For this option, the called station
must be “observable” as set up in programming and your telephone needs to have a preprogrammed SOHVA button.
To Use Call Monitoring on a Call In Progress:
1. Press INTERCOM
2. Dial “#03”
3. Dial the extension number of the phone to be monitored
4. Press SPEAKER to end.
To Use SOHVA on a Call Being Monitored –
Press the pre-programmed SOHVA button and speak. The external caller will not hear your
announcement. If the station you are observing is in using speakerphone mode, you may not be
able to use SOHVA calling.
Mute –
Press MUTE. Press MUTE again to cancel.
Do-Not-Disturb Mode –
When you leave your station for an extended period of time and want another extension to handle
your calls, use off-duty or do-not-disturb mode. To use:
1. Press OPTIONS
2. Press NEXT
3. Press DND
4. Press ON
5. Press SPEAKER.
To cancel, follow the first 3 of the preceding steps, then press OFF and SPEAKER. When a call
comes through to your phone while Do-Not-Disturb mode is on, the INTERCOM light will flash and
the station attempting to call will be displayed in on the LCD. Pick up the call if desired. If you do
answer, when you hang up the call, you will be in Do-Not-Disturb mode until you cancel it.
Wrap-Up Mode –
Wrap-Up Mode is useful when you need time to complete paperwork after making a call and would
like to have another extension receive your calls. To Use, Press HOLD and then the preprogrammed DND feature button (see programming instructions). To return to normal mode,
repeat.
Paging For Systems Equipped with an external paging unit:
1. Lift the handset
2. Press INTERCOM
3. Dial the extension number of the station programmed for paging (see programming
information) or press a preprogrammed paging button, or dial INTERCOM 89 for the special
paging port
4. Make your announcement and hang up.
Courtesy of Main Resource, Inc. Visit us at www.MainResource.com or call 800 362-6740 for all your
telecom needs.
Page 9 of 16
For Systems Equipped with all-call or zone paging (announcement is made over
telephone speakers) –
1. Lift the handset
2. Press INTERCOM
3. Dial “87” for all call or press INTERCOM and preprogrammed zone buttons or 84, 85 or 86
(zones 1-3) and make the announcement
4. Stay on the line if you are awaiting a reply (“meet-me” page)
5. Hang up to end.
Reply to a “Meet-Me” Page
Lift the handset on any phone, press ITCM, dial 99 to be connected to the paging caller.
Volume Control
Volume Control utilizes the multipurpose control, which sets the volume of the ringer, the speaker,
the handset and the group listening volume. Your LCD will show the new setting. Default levels
will resume after the call is disconnected. See “Set Default Volume Levels” below.
Ringer Volume –
While your extension is idle, press the VOLUME UP or DOWN button to adjust. There are 4 levels,
and depending on programming, there may be a ringer off level as well.
Speaker Volume –
While on a call using the speaker, press VOLUME UP or DOWN to adjust. There are 8 levels.
Handset Volume While on a call using the handset, press VOLUME UP or DOWN. There are 13 levels to choose from.
Headset Volume –
While on a call using a headset, press VOLUME UP or DOWN. There are 13 levels.
Group Listening Volume –
While on a call using group listening, press VOLUME UP or DOWN. There are 8 levels of volume
available.
Set Default Volume Levels –
Press INTERCOM, choose speaker, headset, handset or group listen mode, press VOLUME UP or
DOWN. Dial “**5” (or “**7”, depending on your phone system’s setup) to set.
Personal Ring Tones Choose a personal ring tone so you can easily distinguish the ringing of your phone from that of
others around you. To use:
1. Press OPTIONS
2. NEXT (twice)
3. RING
4. Then UP or DOWN to choose a ring tone
5. Press SPEAKER to set.
Background Music When programmed, you can choose to hear background music over your telephone speaker.
During calls, including voice announcements, background music is muted. To use:
Courtesy of Main Resource, Inc. Visit us at www.MainResource.com or call 800 362-6740 for all your
telecom needs.
Page 10 of 16
1.
2.
3.
4.
5.
6.
Press OPTIONS
MUSIC
ON
SPEAKER to end.
Adjust the volume with the speaker volume control.
To cancel, press OPTIONS, MUSIC, OFF and SPEAKER.
Toll Restriction Override –
Toll Restriction Override (TRO) replaces the restrictions of the station you are using with the
restrictions of your home station. To use:
1. Press INTERCOM
2. Dial “**6”
3. Dial your extension number
4. Dial your TRO code and dial.
5. To clear the code, press INTERCOM and dial “**6” and press SPEAKER.
Tracker Paging System If enabled on your system, the Tracker Paging System allows you to send alpha/numeric or
numeric-only messages (depending on the model in use) to extensions on your system. You can
also park calls in orbit for the paged party to retrieve. If Tracker Pager is available on your station,
you must enable it before use. When you do not wish to receive messages and when you leave for
the day, it is suggested that you disable Tracker Paging at your station.
To use, press INTERCOM and dial “*06”. To disable, press INTERCOM and dial “#06”.
Send a Call Back Message to a Station’s Tracker Pager after Receiving a Ring-No Answer
Response –
Dial “#01” or the preprogrammed TRACK button. When your station returns to idle, hang up or
press SPEAKER to end. Your extension number (and station name on some models) will be
displayed on the called party’s Tracker Pager display.
Send
1.
2.
3.
a Call Back Message to a Station’s Tracker Pager Without Calling Them First:
Press INTERCOM
Dial “#01”
Dial the extension number and hang up or press SPEAKER to end. Your extension number
(and station name on some models) will be displayed on the called party’s Tracker Pager
display.
Send
1.
2.
3.
4.
a Message to a Station’s Tracker Pager to Retrieve a Parked Call:
Answer the call and press TRNS/CNF
Enter the extension number
Dial “#01” or press the TRACK button
Hang up or press SPEAKER to end. The Pager Tracker system sends the orbit dialing code
and available caller I.D. information to the display.
Respond When Your Tracker Pager Displays a Park Orbit Dialing Code –
Press INTERCOM from any extension, dial the orbit number to retrieve the call.
Courtesy of Main Resource, Inc. Visit us at www.MainResource.com or call 800 362-6740 for all your
telecom needs.
Page 11 of 16
Auxiliary Jack on Model 80245 This jack allows for a headset, tape recorder, external pager or ringer to be connected to your
phone. One of your programmable buttons must be programmed to enable or disable each
auxiliary device that may be connected to your phone. Only one device may be enabled at a time
and the active device name will be displayed in your LCD.
Headset mode allows you to use the headset instead of the handset or speakerphone. Lifting the
handset will disable the headset for that call. Recorder mode records your call. External ringer
mode uses an external speaker to sound your ring tone. Pager mode sends all voice
announcements sent to your phone to the external paging device. All modes except headset mode
require an external power source.
Program the Enable/Disable Buttons:
1. Press INTERCOM and dial “**1”
2. Press the programmable button
3. Dial a feature code (Headset – 94, External Ringer – 95, Tape Recorder – 96, External Pager
– 97). Press TRNS/CNF
4. Repeat to program all four buttons if needed
5. Press SPEAKER to end.
To use an Auxiliary Mode –
Press the programmed button to enable. The display shows the feature enabled. Press the
corresponding programmed button again to disable.
Message Waiting Light
If your telephone is enabled as a central message desk or has message wait capability, you can
use this feature to illuminate the message waiting light of any phone on the system, alerting the
user that you have a message for them. When they respond, you will be connected to their station
and may relay the message verbally. This may be accomplished whether the station is idle, busy
or not answered.
Turn on Message Waiting Light at a Busy Station –
Remain on the line, press NEXT and MSG then hang up.
Turn on Message Waiting Light at a No-Answer Station –
Press MSG and hang up.
Turn on Message Waiting Light at an Idle Station –
Press INTERCOM, dial “*3” and the extension number of the station to be alerted.
Turn OFF the Message Waiting Light at a Busy or Idle Station –
Press INTERCOM, dial “#3” and the extension number of the station that was alerted.
Turn OFF the Message Waiting Light During Message-Delivering Conversation –
Press INTERCOM.
Courtesy of Main Resource, Inc. Visit us at www.MainResource.com or call 800 362-6740 for all your
telecom needs.
Page 12 of 16
Receive a Message at an Alerted Station –
When the message waiting light is flashing at your station, press INTERCOM and HOLD. You will be
connected to the station that initiated the message waiting notification.
LCD Messaging – Station Status
System-supplied messages (revealing the status of your station) can be programmed to display on
the LCD of the phone of a party trying to reach your extension. The attendant can provide a list of
available messages.
Turn Messages ON:
1. Press INTERCOM
2. Dial “*02”
3. Dial the desired code number or use default message 1 (“Back at”) or 2 (“Call”). When
using message one, enter the time in 12-hour format using the “#” as the colon. When
using default message 2, dial the telephone number where you may be reached.
4. Press SPEAKER to end. Your Intercom button will flash steadily.
Turn Messages Off –
Press INTERCOM and dial “#02”.
Assist Button
The preprogrammed ASSIST button will send a message to your supervisor, alerting them to your
need of assistance while on a call. To send a message, press ASSIST and the DSS of the user you
wish to ask for help. The desired extension number may be programmed in the ASSIST button for
ease of use. If the extension is busy, the message appears when the station becomes idle.
Station to Station Messaging
Use this feature to leave a reminder on a station that was busy or did not respond when you called.
Your telephone must be stored as a DSS/BLF button on the called telephone. Otherwise, your
messaging call is forwarded to the central message desk (usually the attendant). The attendant
will take your message and turn the message waiting light of the phone you wished to message.
To Use –
Make an intercom call. When you receive no answer, dial “*7”.
To Cancel –
Press INTERCOM and dial “#7”. Dial the extension number.
To Respond to a Message Reminder on your Telephone –
Press the lighted DSS button.
Programming Your Telephone
Program Automatic Dialing –
Automatic dialing allows you to store long numbers using one or two buttons, store feature codes
and intercom extension numbers.
Courtesy of Main Resource, Inc. Visit us at www.MainResource.com or call 800 362-6740 for all your
telecom needs.
Page 13 of 16
Automatic Dialing Numbers may be stored at any programmable button not already assigned by
the system administrator or installer as a line button or other feature, on a secondary level of the
DSS button or using keypad numbers 0-9.
Fill in the identification strips on your phone as you program the numbers.
NOTE: The telephone system allows only one autodial number at a programmable button;
however, you can store an autodial number or feature code at a second level of a location where a
DSS is already stored; just repeat the programming procedure.
Autodial and Speed Dial Numbers When storing a feature code as an autodial or speed dial number or an outside number as a feature
code:
1. Press OPTIONS
2. Press NEXT 3 times
3. Press ADIAL or SDIAL (autodial or speed dial)
4. Press the programmable button or keypad button to store
5. Press the line button you wish to dial out on, or press INTERCOM
6. Dial any number up to 16-digits long. Or, if your system has line groups programmed, dial
1-4 for the line group number or dial “0” to have the system choose a line for you. Dial any
number up to 16-digits long.
7. Press SAVE to store and SPEAKER to end.
To program a pause in the number sequence, press HOLD and continue with the number. If you
need to program a hookflash to access a feature, press TAP and continue dialing. To erase digits as
you enter, press BKSP once for each digit to be removed.
When storing a system feature, follow the above instructions, but do not make a line selection
before entering the number. Instead, dial the access code for the feature after you select the
button location.
Storing a DSS Number –
Only one DSS number may be stored at each programmable button location but you may store a
feature code or autodial number on the second level for a button location that already has the DSS
programmed.
To Store an Intercom Extension Number as a DSS Number:
1. Press OPTIONS
2. Press NEXT four times
3. Press DSS
4. Press the programmable button
5. Dial the extension number
6. Repeat as many times as desired.
7. Press SPEAKER to end.
NOTE: Do not program interactive buttons. If this occurs, you can retrieve functions by pressing
INTERCOM “**1” , the interactive button and dial 91, 92 or 93 (from left to right). Attempting to
program these buttons can cause features to be unavailable.
Courtesy of Main Resource, Inc. Visit us at www.MainResource.com or call 800 362-6740 for all your
telecom needs.
Page 14 of 16
Storing Feature Buttons Create access buttons to store commonly used miscellaneous features. Options available are:
• Account Code– enter an account code for call record purposes.
• Automatic Call-Back (Camp On) – The system will ring your phone and the phone of the
busy extension you had attempted to reach.
• Call Forward – One button forwarding of all calls to another extension.
• Call Park Orbit – Place the call in system hold for pick up by any station.
• Do Not Disturb – Blocks calls to your phone.
• Page – One button paging
• Privacy – Cancels privacy for the current call.
• Saved Number Redial – Redials saved last-dialed number.
• Voice Announce Block – Blocks voice announcements to your phone.
To Use:
1. Press OPTIONS
2. Press NEXT four times
3. Press FEAT
4. Press NEXT until the desired feature is displayed
5. Press one of the buttons below the display to choose the desired feature. Follow any menu
prompts.
6. Press the programmable button.
7. Press PREV or NEXT for more feature choices, or until EXIT is displayed.
8. Press EXIT to end.
To clear, repeat the instructions above, except press CLEAR before pressing the storage location
button.
Troubleshooting your Impact telephone
SYMPTOM
INTERCOM light flashing
HOLD light flashing
MUTE light is on
SPEAKER light steadily lit
Three steady tones (error tone)
Not able to receive voice announce calls
POSSIBLE CAUSE
Messaging is set. Dial INTERCOM and
“#02” and hang up.
Your message waiting light has been
activated. Press INTERCOM and HOLD to
call the party who activated your light.
The party who called you must press
INTERCOM to turn off the light while you
are connected.
Mute is on. To cancel, press MUTE.
The background music feature may be on
even if you do not have background
music provided. Dial INTERCOM and
“#1” and hang up to cancel.
Incorrect buttons may have been pressed
during autodial or speed dial
programming.
Voice announce block has been activated.
To cancel, dial INTERCOM and “#2”.
Courtesy of Main Resource, Inc. Visit us at www.MainResource.com or call 800 362-6740 for all your
telecom needs.
Page 15 of 16
Courtesy of Main Resource, Inc. Visit us at www.MainResource.com or call 800 362-6740 for all your
telecom needs.
Page 16 of 16