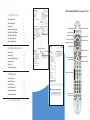
1
Atlantic Broadband Phone Service Quick Reference Guide
Calling Features
To Activate/Access
To Deactivate
Call Waiting
Automatically activated unless
deactivated prior to call.
*70
Call Forwarding
*72
*73
Selective
Call Forwarding
*63
*83
Speed Dial
*74 (digits 2-9)
*75 (digits 20-49)
*84 (digits 2-9)
*85 (digits 20-49)
Three-Way Calling
Press the switchhhook/flash
button. Dial 3rd participant.
Once answered, press the
switchhook/flash button
again.
Simply hang up to end
Three-Way Call. To just
disconnect 3rd participant,
press the switchhook/flash
button twice briefly.
Automatic Callback
*69
Do Not Disturb
*53
*54
Caller ID Blocking
*67
Automatically deactivated
at end of call.
Voicemail1
Simply dial *86 from your home to:
• Set up your Voicemail
• Create a personalized greeting
• Retrieve/save messages
• Suspend service to use personal answering machine
Digital Video
High-Speed Internet
Phone
You can also listen to your Voicemail messages online via our
Online Phone Manager.
Online Phone
Manager
Online Phone Manager lets you quickly and easily:
• Manage Voicemail settings
• Manage your calling features
• View your call history
Simply go to http://phonemanager.atlanticbb.net.
Enter username and password.
FPO
FSC Logo
WGDE0312
included with Unlimited Phone service, optional
for Local Phone Service.
PH N R EF0 3 1 2
1Voicemail
Customer Guide
1
Your Digital Video Service
Using Your Remote Control
4
Interactive Program Guide
5
Parental Controls
7
On Demand (in select markets only)
9
Digital Video Recording (DVR) Service
10
High-Definition Television (HDTV)
12
Connecting Your Components
13
Troubleshooting and Questions
17
Your High-Speed Internet Service
22
Home Networking
24
Your Atlantic Broadband Homepage
26
Managing Your Email
28
Online Security
30
Troubleshooting and Questions
32
3
All components ON/OFF
Individual component ON/OFF
Device select (five buttons)
Display main services menu
4
Access Interactive Program Guide
Display channel program info
Exit Guide, return to viewing
Navigate Interactive Program Guide
Multi-function buttons (A, B, C, D)
6
7
5
Displays main On Demand menu
(in select markets only)
Return to previous screen
Navigate to favorite channels
Dedicated DVR/On Demand buttons
Using Your Phone Service
36
Important Calling Features
38
Your Voicemail Service
48
Your Online Phone Manager
56
Understanding Your Equipment
57
Troubleshooting and Questions
58
How to Read Your Monthly Bill
2
Selects highlighted item
Getting Connected
Your Phone Service
Atlantic Broadband Digital Video Service Remote Control
8
Lights up remote buttons
(press again to turn off)
60
D VSR EF0 3 1 2
Welcome to Atlantic Broadband
Thank you for choosing Atlantic Broadband. Please take a few
moments to read this guide and learn about your new service(s).
You’ll find the more you know about the features and options
available, the more you’ll enjoy them. This guide will be your
resource for everything Atlantic Broadband has to offer. And
we’re here for you 24/7 with local customer and technical support.
So sit back, relax and start enjoying your new world of home
entertainment, information and communication services.
With Atlantic Broadband, everything just got better.
State-of-the-Art
Entertainment
Feel the Power of
Our Internet Connection
Better Phone Service
at a Better Price
With our Digital Video services
you’ll be enjoying TV in a way
you never dreamed possible! Our
endless entertainment options
include the best movies, sports,
news, science and nature, kids
and women’s programming and
CD-quality music channels plus
so much more!
Our High-Speed Internet service
offers you the fastest, most
reliable home connection to the
Internet available. And your
Atlantic Broadband Home Page
provides you with easy access
to all the news, sports, entertainment and information you want
on the Internet.
Enjoy maximum flexibility with
our Unlimited Phone service which
includes calling to anywhere in
the US, Puerto Rico & Canada plus
Voicemail at no additional charge.
Plus enjoy 15 FREE calling features
and access to our Online Phone
manager to help you manage your
service.
Digital Video service. There’s
something for everyone.
Check out your new homepage
at: www.atlanticbb.net
Atlantic Broadband Phone
service. Calling at your
fingertips.
3
Your Digital Video Service
With your new Atlantic Broadband Digital Video service there’s
something for everyone including news, sports, movies, nature,
music, kid’s shows and much more. You’ll enjoy state-of-the-art
entertainment with crisp, digital picture quality on every channel.
Using Your Remote Control
4
Interactive Program Guide
5
Parental Controls
7
On Demand (in select markets only)
9
Digital Video Recording (DVR) Service
10
High-Definition Television (HDTV)
12
Connecting Your Components
13
Troubleshooting and Questions
17
4
Your Digital Video Service
Using Your Remote Control
Your digital remote helps you navigate the spectrum of Atlantic Broadband services. Below is an
overview of your remote’s capabilities:
All components ON/OFF
Individual component ON/OFF
Device select (five buttons)
Display main services menu
Access Interactive Program Guide
Display channel program information
Exit Guide, return to viewing
Navigate Interactive Program Guide
Select highlighted item
Multi-function buttons (A, B, C, D)
Display main On Demand menu
(in select markets only)
Return to previous screen
Navigate to favorite channels
Dedicated DVR/On Demand buttons
Lights up remote buttons
(press again to turn off)
5
Your Digital Video Service
Programming Your Remote
Interactive Program Guide
There are 2 ways you can program your remote
to work with specific components (TV, DVD,
VCR, AUX). By following these steps, you should
be able to control your TV’s volume as well as
to turn your TV on/off.
Use the Interactive Program Guide to see what’s
on other channels without missing any of the
show you’re currently watching. Find TV listings,
program information, set reminders, order
movies/events and more!
1 Use auto search programming by following
To Find TV Listings
the steps below.
A Turn on your TV (or VCR, DVD or AUX).
B Press the TV (or VCR, DVD or AUX) button
and the OK/SEL button simultaneously.
Hold for 3 seconds or until the TV (or VCR,
DVD or AUX) button light is on.
C Continually press CHANNEL button until
TV (or VCR, DVD or AUX) turns off.
D Press TV (or VCR, DVD or AUX) button
again. The TV (or VCR, DVD or AUX) button
light must blink twice to indicate the component has been successfully programmed.
2 Follow Remote instructions in the brochure
delivered with your remote.
Use the on-screen guide to view the current
and upcoming programs by channel/time.
1 Press GUIDE (users in some markets may see
a mini guide and will need to press OK/SEL
to get to the full menu).
2 Use UP & DOWN arrows to scroll through
channels.
3 Use RIGHT & LEFT arrows to scroll through
times.
4 Press NEXT or PREV to view listings a page
at a time.
5 Press INFO to read program descriptions.
6 Press OK/SEL to go to the highlighted
channel.
To Get Current Program Information
Detailed program information is available at any
time including channel, title, actors and rating.
1 Press INFO.
2 Press INFO a second time for more detailed
program information.
3 Press EXIT to return to full-screen video.
To get channel
listings
Current program
description
Leave Guide
6
Your Digital Video Service
To Enjoy Additional Digital Services
Favorite TV Channels
With Atlantic Broadband, TV is truly on your
schedule. Watch what you want, whenever
you want at the touch of a button. Services
displayed vary based on availability in
your area.
This feature allows you to access only the
channels you watch most often.
1 Press MENU.
1 Press SETTINGS twice.
2 Scroll through the list of options to select
2 Use UP & DOWN arrows to select from the
menu of services.
To Set Up Favorites
TV Listings
On Demand / PPV
Digital Video Recording
HDTV
Digital Music
3 Press OK/SEL to make your selection.
To Exit From The Guide
You can easily return to watching your program
at any time.
1 Press EXIT to return to full-screen video.
Favorites (may be called “Viewer Favorites”)
in some areas.
3 Follow the on-screen instructions.
To Use Favorites While Watching TV
1 Press FAV.
2 Continue to press FAV to scroll through your
favorite channels.
To Customize Your TV to Receive
Spanish Audio (SAP).
You can enjoy your favorite programs in Spanish
if the broadcaster offers secondary audio
options. Not all programs will have this option.
1 Press SETTINGS (some systems may require
that you press SETTINGS twice).
2 Scroll to select ”Enable SAP”.
Personalize
your Guide
3 Follow the on-screen instructions.
Access your
favorite channels
7
Your Digital Video Service
Parental Controls
To Block Viewing by Channel or Rating
Atlantic Broadband offers a spectrum of
programming for you to enjoy, however some
content may not be appropriate for children.
We provide Parental Controls so that you can
decide what you want your children to watch.
You must set up “locks” to prevent
unauthorized viewing of a specific program,
title or entire channel while in the program
guide or while watching TV.
Parental Controls can be used to prevent
unauthorized purchases or to block specific
channels or programs. There are separate PINs
and actions that you must configure to activate
each of these Parental Control functions.
You will set up Parental Control features
differently based on where you live. Please
review the on-screen guide images below
and on page 8, then follow the instructions
for whichever screen you see on your TV.
1 Press MENU.
2 Select the LOCKS icon to access the locks
set up screen.
3 Enter your 4-digit PIN. If you are setting up a
lock for the first time, you will be prompted
to set a 4-digit security PIN.
4 From this screen you can block by title, TV or
Movie rating or by a complete channel. You
may also choose to replace adult titles with a
generic description.
5 A lock indicator will appear next to a locked
title in the TV listings to let you know that a
program is locked.
If your screen looks
like this, use the following instructions.
To Restore Parental Control Locks
If you have chosen to remove a lock in order
to watch a particular show or channel, you have
two options to restore this lock.
To Block Unauthorized Movie/Event
Purchases
1 Simply turn off your digital receiver and turn it
You can set up a 4-digit Purchase PIN to
restrict unauthorized ordering of On Demand/
Pay-Per-View movies & events. This Purchase
PIN will need to be entered before any movie
is purchased.
2 Press INFO twice to bring up the program
1 Press MENU.
2 Select the HOME icon.
3 Choose SET UP, then select PINS SET UP.
4 Follow on-screen instructions to set your
Purchase PIN.
back on. All cleared locks will be restored.
information screen.
3 Select the LOCK icon and enter your 4-digit
PIN. The program will now be locked again.
8
Your Digital Video Service
To Block Viewing by Channel or Rating
If your screen looks
like this, use the
following instructions.
You can require a special 4-digit block PIN
be entered before certain programming can
be viewed.
1 Press SETTINGS once.
To Block Unauthorized Movie/Event
Purchases
You can set up a 4-digit Purchase PIN to
restrict unauthorized ordering of On Demand/
Pay-Per-View movies & events. This Purchase
PIN will need to be entered before any movie
is purchased.
1 Press SETTINGS twice.
2 Press the UP arrow to highlight Purchase: PIN.
Press OK/SEL.
3 Press OK/SEL again. You will be prompted to
enter the current PIN. The default PIN is 0000.
4 Enter your new PIN. You will be asked to confirm your entry a second time.
5 Press EXIT to return to your current program.
2 Use the UP & DOWN arrows to highlight
“Turn On Parental Control”.
3 Press OK/SEL.
4 Enter your PIN to turn it on.
NOTE: The default block PIN is 0000.
Using Your PIN to Block by
Channel/Rating
1 Press SETTINGS twice.
2 Press the UP & DOWN arrows to highlight
BLOCK: CHANNEL (or BLOCK RATING).
3 Press OK/SEL.
4 Enter your Parental Control block PIN.
5 Press the UP & DOWN arrows to highlight the
channel (or rating) you wish to block.
6 Press OK/SEL. A lock will appear.
7 To unblock channel (or rating), press OK/SEL
again while on selected channel/rating.
8 You can block as many channels (or ratings)
as you wish.
9 Press A to accept.
10 Press EXIT to return to your current program.
To Restore Parental Controls
If you choose to deactivate your Parental Controls in order to make a purchase or to watch a blocked
channel, you will be disabling Parental Control for ALL channels. You MUST turn off your digital receiver
in order to restore Parental Controls for all channels.
9
Your Digital Video Service
On Demand
(In Select Markets Only)
Atlantic Broadband On Demand lets you choose
from thousands of movies and programs in our
library, many of them free. Use your remote to
pause, rewind or fast forward your program
just like with your VCR/DVR. You can watch
what you want, when you want. In addition,
customers who have HBO, Showtime, or
Cinemax will enjoy On Demand programming
from those channels as part of their service.
Using Parental Controls with On Demand
You can easily set a Purchase PIN in order to
prevent unauthorized users from buying any
content that must be purchased – such as
movies, adult movies or events. If you subscribe
to HBO or Cinemax, you may want to also block
access to these On Demand channels as they
also have mature programming. For more
information on Parental Controls, please go
to page 7 of this guide.
Using Atlantic Broadband On Demand
To access Atlantic Broadband On Demand, you
must have Digital service or a digital receiver.
1 Tune to Channel 1 or press ON DEMAND.
2 Scroll through the category options to select
Go to prior
On Demand
screen
your desired category.
3 Press OK/SEL to make your selection and
move to the next screen.
Go to main
On Demand
menu
4 While watching you can use your remote to
PAUSE, STOP, FF or REW.
5 Press STOP to exit currently playing program
and return to the On Demand menu.
6 Press LAST to return to prior On Demand
screen.
Movies, events and other programs are
typically available for 24 hours after rental.
Adult programs are available for 8 hours after
rental. You can watch a program as many
times as you like within this rental period. To
resume watching a previously rented program,
go to that program’s category and select the
“My Rentals” or “Saved Programs” option.
End program, return to On Demand menu
10
Your Digital Video Service
Digital Video Recording Service
Easily Record TV Programs
Our DVR service gives you the ability to easily
record hours of your favorite shows – whenever
they’re on. With DVR service, you can record
one show while watching another at the same
time. Or, record two shows and watch a third,
pre-recorded show simultaneously.
DVR service makes recording your favorite
programs simple. You can save programs
with the touch of a button or program your
DVR to record shows whenever they air.
While you watch live TV, our DVR service will
make a temporary recording so that you can
pause, rewind, fast forward, or even see replays
in slow motion.
1 Press REC.
2 Follow the on-screen instructions.
Pause, Fast Forward or Rewind Live TV
1 Press GUIDE.
1 To pause a program, press PAUSE. The pause
2 Press the arrow keys to highlight the program
status bar will appear.
You can pause a program for up to 45
minutes. When you’re ready, simply press
PLAY to resume watching the program.
2 To navigate within a program, you can press
REW or FF.
Pressing REW or FF multiple times will cycle
through the different speeds of rewind and
fast forward.
For programs currently in progress, you can
rewind up to the time that you tuned to the
current channel or for a maximum of 45
minutes.
You can only fast-forward up to the point of
a live broadcast – you cannot fast forward
ahead of live TV.
Record While You Are Watching
Record From TV Listings
you wish to record.
3 Press REC and follow the on-screen
instructions.
A red light on the front panel of your receiver
will be lit once recording has begun. The
program to be recorded will also be highlighted
on your on-screen guide.
If You Want to Record Two Programs at Once
1 Press GUIDE.
2 Highlight the program you want to record.
3 Press REC and follow the on-screen
instructions.
Instant Replay
View recorded
programs
Press INSTANT REPLAY to replay the last 10
seconds of a program. Pressing INSTANT REPLAY
a second time will jump back another 10 seconds.
Jump to current
time in program
Return to Live TV
Press LIVE to return to the current point in a
program.
Record a program
Instant Replay
11
Your Digital Video Service
Record a Series
With Atlantic Broadband DVR service, you can record multiple episodes of a TV program.
1 Press GUIDE.
2 Follow the instructions based on the screen you see on your TV:
1 Press REC.
2 Choose One Episode or All Episodes. Notice
the information in the fourth column changes,
based on your selection. Press A. If you selected All Episodes from the third column, the All
Episode Recording Options screen appears.
3 Choose one of the options on the screen.
In the All Episode Recording screen, choose
one of the following options:
First Run only on this channel – Note: This
option is subject to availability in your area.
On this channel at any time.
On this channel this day in this time slot.
On this channel any day in this time slot –
Note: This option records the program any
day that the program airs in this time slot.
1 Press GUIDE on your remote to view the TV
Listings.
2 Highlight the program you want to record.
Press OK/SEL on your remote and select
the Record icon from the Program
Information screen.
3 The Confirmation screen appears. Select the
Create a Series Recording icon.
4 Specify your recording options:
First Run Only, First Run and Repeats,
or All Episodes.
Save no more than 1-7, or All Episodes.
Save Recordings until “Space is Needed”
or “I Delete”.
5 Select the Confirm Series Recording icon to
confirm the recording.
4 Press OK/SEL to save your settings.
Watch Recorded Programs
1 Press LIST. If your remote does not have a LIST button, press MENU and navigate to the DVR section.
12
Your Digital Video Service
HDTV
HDTV Requirements
Our HDTV service delivers movie theater quality
to your living room with Dolby® Digital 5.1 surround sound and 1080i transmission for crystal
clear picture resolution. That’s 10 times sharper
than regular TV and a 33% larger wide-screen
image. Our HD service includes all your favorite
broadcast channels; ABC, NBC, CBS plus the
following top channels:
To enjoy HDTV, you must have both an HDTV
set and a specific HD receiver from Atlantic
Broadband. Simply plugging your HDTV set into
an active outlet will not deliver an HD signal
to your HDTV set. Not all Atlantic Broadband
receivers are HD. If you are not sure you have
the correct receiver, please contact Atlantic
Broadband.
Connecting Your HDTV
There are two types of cables that can be used
to connect your HD receiver to your HDTV set.
1 Component cable – Atlantic Broadband uses
this cable which has 5 RCA connectors.
2 HDMI cable – this cable combines all 5 ends
into one connector.
Both cables will produce quality results. Your
picture or sound will not improve by using an
HDMI cable.
HDTV Screen Dimensions
Specific HD channels are subject to availability.
Your HD channels are located on different channels than the standard definition equivalent.
Consult the channel line-up for your local HD
channel locations. Contact Atlantic Broadband
for HDTV service availability in your area.
Watching standard definition channels on
HDTV may result in different screen dimensions
and you may see bars on both sides of your
screen. Refer to your TV manual for instructions
on how to stretch your picture to fill the entire
screen. Stretching the picture can cause
distortion. This is not a result of your Atlantic
Broadband service.
13
Your Digital Video Service
Connecting Your Components
If you have an HD DVR receiver and an HDMI input on your TV, you can use a single HDMI cable
instead of a component cable. Both cables will produce the same quality results.
To Connect HD Using Component Cables
HD Receiver
back
IN
OUT
Video cables
Audio cables
Cable input
HDTV back
IN
To Connect HD Using an HDMI Cable
HD Receiver
back
OUT
IN
HDMI cable
Cable input
IN
HDTV back
14
Your Digital Video Service
To Connect an HD Receiver With Your Home Theater System
OUT
HD Receiver
back
IN
Audio cables
Cable input
Home Theater
Receiver back
Digital
Audio
cable
Video
Video
IN
IN
OUT
Audio cables
OUT
HD Video cables
If you have an HD
receiver and a TV with
HDMI input, you can use
a single HDMI cable
instead of a component
cable. Both cables will
produce the same
quality results.
Video
Video
Audio
(for VCR or
DVD playback)
VCR back
IN
OUT
IN
HDTV back
15
Your Digital Video Service
Connecting a DVD player
IN
OUT
OUT
Connecting a VCR
Digital
Receiver
back
Cable
Coaxial
IN
OUT
OUT
Digital
Receiver
back
Cable
OR
Audio & Video
Coaxial
IN
TV back
IN
IN# 1
IN# 2
OR
OUT
Coaxial
OR
Audio & Video
IN
OUT
VCR back
Audio & Video
Audio & Video
TV back
IN
DVD back
1 Connect the coaxial cable from the wall to
IN of the digital receiver.
2 Connect the coaxial cable from OUT on the
IN
IN
1 Connect the coaxial cable from the wall to
IN of the digital receiver.
2 Connect the coaxial cable OUT from the
digital receiver to IN of the TV or connect the
A/V cables from Audio OUT jacks on the
digital receiver to the Audio IN (#1) on the TV.
Connect the cables red to red, white to white,
and yellow to yellow.
digital receiver to IN of the VCR or connect
the A/V cables from the Audio OUT jacks on
the digital receiver to the Audio IN jacks on
the VCR. Connect the cables red to red, white
to white, and yellow to yellow.
3 Connect the A/V cables from Audio OUT jacks
3 Connect the coaxial cable OUT from the VCR
on the DVD to the Audio IN (#2) on the TV.
to IN of the TV or connect the A/V cables from
the Audio OUT jacks on the VCR to the Audio
IN jacks on the TV.
16
Your Digital Video Service
Connecting a Stereo
IN
OUT
Connecting a Game System
OUT
Digital
Receiver
back
Cable
Coaxial
IN
OUT
OUT
Digital
Receiver
back
Cable
OR
IN
Audio & Video
IN
OUT
OR
IN
VCR back
Audio & Video
IN
OUT
Coaxial
OUT
Coaxial
OR
Audio & Video
IN
OUT
VCR back
Audio & Video
Stereo
back
Audio & Video
TV back
IN
IN# 1
IN# 2
Audio & Video
TV back
IN
1 Connect the coaxial cable from the wall to
your digital receiver.
2 Connect the cable OUT from the digital
receiver to IN of the VCR or connect the
audio/video (A/V) cables from the Audio OUT
jacks on the digital receiver to the Audio IN
jacks on the VCR. Be sure to connect these
cables red to red, white to white and yellow
to yellow.
3 Connect the A/V cables from the Audio OUT
jack on the VCR to the Audio IN jacks on the
back of the stereo.
4 Connect the A/V cables from Audio OUT on
the stereo to the Audio IN jacks on the TV.
IN
Game back
1 Connect the coaxial cable from the wall to IN
of the digital receiver.
2 Connect the coaxial cable OUT from the
digital receiver to IN on the VCR or connect
the A/V cables from Audio OUT jacks on the
digital receiver to the Audio IN jacks on the
VCR. Connect the cables red to red, white to
white, and yellow to yellow.
3 Connect the coaxial cable OUT from the VCR
or connect the A/V cables from Audio OUT
jacks on VCR to the Audio IN (#1) on the TV.
4 Connect the A/V cables from Audio OUT jacks
on game system to the Audio IN (#2) on TV.
17
Your Digital Video Service
Basic Troubleshooting
Problem: No sound
Problem: Remote control doesn’t work
Possible Cause: MUTE is accidentally pressed on
your remote control.
Possible Cause: Dead batteries; obstruction
between the remote and the cable terminal; the
remote isn’t set in Cable TV mode.
Try This: Press MUTE on the remote control to
restore the volume level.
Problem: No picture
Possible Cause: Cable signal may not be reaching
your home.
Try This: Check the signal on all TVs in your home.
If all TVs are not working, please call Atlantic
Broadband Customer Care. If only one TV is
not working, check to make sure all cables are
connected properly and your TV is tuned to the
cable channel (3 or 4).
If you still aren’t receiving a cable signal, please
call Atlantic Broadband Customer Care.
Problem: Picture or sound is snowy
Possible Cause: Cable is disconnected or loose.
Try This: Reconnect the cable. Make sure digital
receiver is ON and your TV is on Channel 3.
Problem: No power
Try This: Change the batteries in your remote control.
OR Press CBL on your remote.
OR Make sure nothing is on the digital receiver or
blocking a clear line of sight between the receiver
and the remote.
Problem: Cannot find the secondary
language option
Possible Cause: The SAP (secondary audio
program) is located on your TV.
Try This: Please consult your television user guide
to find out if your TV has this feature. If it does, it
can be easily turned on or off on the TV itself.
Problem: The DVR does not respond
when pressing keys on remote
Possible Cause: DVR must be powered on and
your remote must be in cable mode.
Try This: To turn on the DVR, press CBL and
then POWER.
Possible Cause: The power cord is disconnected.
Problem: Error 221, 222 or 301 on
screen while using On Demand
Try This: Reconnect the power cord. Ensure that
the digital receiver is plugged into an electrical
outlet that cannot be turned off by a switch.
Possible Cause: This error means that your account
is past due or you have reached your credit limit.
Problem: REC is displayed on the front
led display on my digital receiver and I
cannot change any settings via my remote
Try This: Please contact Atlantic Broadband or use
our online bill payment tool to resolve this situation. You will be able to purchase On Demand
programs within minutes after making a payment.
Possible Cause: The record button was pressed on
the remote control but there is not a DVR or any
other recording device to activate the function.
Problem: On some of my local channels,
the audio does not match the program
being displayed
Try This: Press EXIT twice to remove REC. You
should now be able to use your remote.
Possible Cause: SAP is enabled.
Try This: Press SETTINGS once, highlight ‘disable
SAP’ and click OK/SEL.
18
Your Digital Video Service
Frequently Asked Questions
How do I block out channels I don’t
want to receive?
Will DVR extend recording if a sports
event goes into overtime?
You can block channels by using the Parental
Control feature. Parental Control lets you set a
PIN number (lock) and block programs by rating,
channel or title.
Not automatically. The DVR service records programs
for specified time periods. For sports events that
may go into overtime, you may wish to extend the
recording time by manually changing the Stop/End
Time from within your DVR recording screen.
How do I program my remote?
There are two ways to program your remote to work
with specific components (TV, DVD, VCR, AUX).
Please go to page 5 of this guide to learn more.
Can I watch a program while I’m recording?
Yes. You can watch another live program while
recording a different program.
Will my DVR still record scheduled
shows if it is turned off?
Can I record two shows that air at the
same time?
Yes. The DVR does not need to be on to record a
show, but it does need to be plugged in and have
power.
Yes. Your DVR has two tuners so you can record
two programs at once. Just highlight each program in your on-screen guide and press RECORD.
Will I lose my recordings if my DVR
loses power?
Sometimes a recording starts a minute or
two after a program has begun. Why?
No. Your recordings are saved to a hard disk until
they are erased. The only recordings that you may
miss are any that may be scheduled for recording
while the power is not on.
The DVR is synchronized with the TV Listings. If
a network starts a program a minute earlier than
the on-screen guide’s scheduled time, your DVR
will miss that first minute unless you program it
to start early.
If I have DVR, how far back can I rewind
live TV?
You can rewind up to the time that you tuned to
the current channel or a maximum of one hour.
For instance if you tuned to a program 20 minutes
ago, you will be able to rewind for 20 minutes.
Only part of my program recorded. Why?
If the beginning of a program didn’t record, you
may have tuned to it after the program began. If
the end didn’t record, you may have reached the
storage limit before the program ended or the
receiver may have lost power.
Is there a way to recover an erased
program with DVR service?
No. Erased programs are deleted permanently
from the DVR.
19
Your Digital Video Service
Do Parental Controls that I set in the
Interactive Program Guide carry over to
my DVR service?
Yes. If you block programs by Channels or Ratings
in the General Settings menu, those settings are
carried over to DVR recordings. Blocked programs
scheduled for recording will still be recorded,
but you will have to enter the proper PIN/PIP to
view them.
How do I access Atlantic Broadband
On Demand?
You must have an Atlantic Broadband digital
receiver and live in an area where On Demand
service is available. To access the main On
Demand menu, simply tune to Channel 1 or press
ON DEMAND on your remote. Navigate to your
selection using the arrow and select keys and
follow the onscreen instructions.
How long do I have to watch a selection?
Movies, events and other programs are typically
available for 24 hours after rental. Adult programs
are available for 8 hours after rental. You can
watch a program as many times as you like within
this rental period.
What if I stop watching a movie in the
middle?
You can restart your program from the same point
anytime within the rental period.
If I order a movie, can I watch it on a
second digital receiver?
Yes. You can watch a rented movie on any digital
receiver in your home during its rental period.
However, when you watch it on a different receiver,
the program will start from the beginning.
Can I record an On Demand program
with my DVR?
No, but you don’t really need to. On Demand
provides similar pause, rewind and fast forward
functions as your DVR – and like a DVR, its
available anytime you want to watch it.
Do I need an HDMI cable to connect my
HDTV?
You can use either a component cable or HDMI
cable to connect your HD receiver to your HDTV set.
Atlantic Broadband uses component cable. Both
cables produce quality results. Your picture and
sound will not improve by using an HDMI cable.
I thought I only needed an HDTV set to
enjoy HD channels?
To enjoy HDTV, you must have both an HDTV set
and a specific HD receiver from Atlantic Broadband.
Simply plugging your HDTV set into an active
outlet will not deliver an HD signal to your HDTV
set. Not all Atlantic Broadband receivers are
HD so please contact Atlantic Broadband if you
are unsure.
Why do some channels show up with
bars on either side when I try to watch
on my HDTV set?
Watching standard definition channels on HDTV
sets may result in different screen dimensions and
you may see bars on both sides of your screen.
Refer to your TV screen for instructions on how
to stretch your picture to fill the entire screen.
Stretching the picture may cause distortion which
is not a result of your Atlantic Broadband service.
21
Your High-Speed Internet Service
Atlantic Broadband High-Speed Internet service is the fastest,
most reliable home connection to the Internet available. Enjoy the
ease and speed of email and Web surfing. Get faster downloads
for family photos, your favorite music, streaming audio and video,
and more. It’s all there for you with your new Atlantic Broadband
High-Speed Internet service!
Getting Connected
22
Home Networking
24
Your Atlantic Broadband Homepage
26
Managing Your Email
28
Online Security
30
Troubleshooting and Questions
32
22
Your High-Speed Internet Service
Getting Connected
Connecting Your Equipment
There are 3 steps to getting connected. First, you
need to confirm your computer meets certain
hardware and software requirements. Next, you
need to connect your equipment, and lastly it is
necessary to run the Atlantic Broadband Install
Wizard before using your system.
To connect your equipment, use the diagrams
on the opposite page.
Confirm System Requirements
For a PC
Windows XP through Windows 7
512 Megabytes of available hard disk space
756 Megabytes of RAM (we recommend at
least 1 Gigabyte)
1.8 GHz processor or higher
1 Network Interface Card (NIC), Ethernet
Capable or Universal Port
To check your computer’s capabilities, go to
start menu, click on control panel and select
the System icon.
For a Mac
OS 9.2 through Mac OS X Lion
512 Megabytes of available hard disk space
756 Megabytes of RAM (we recommend at
least 1 Gigabyte)
1.8 GHz Processor or higher
To view your computer’s capabilities, click on
the Apple icon on your toolbar and choose
Apple System Profiler.
Understanding Your Modem
Power Light
DS (downstream) Light
US (upstream) Light
Online Light
Link Light
Lights 1-4 If your system is functioning
properly these lights will be solid green.
They will flash if your modem is reset or
if there is a problem.
Link Light This light will be solid green
when a device is connected. It will flash
if the device is in use.
If you have a Motorola modem with a Standby
button on the top and a Standby light on the front
this button disables your Internet connection. As
long as the Standby light is dark, do not press
this button unless instructed to do so by Atlantic
Broadband Customer Care. If this Standby light is
on, your Internet will not work. You should press the
Standby button on top of modem until light goes
off. This should restore your Internet connection.
Running Install Wizard at:
start.atlanticbb.net
As the last installation step, be sure to run the
Atlantic Broadband Install Wizard. This will
confirm your computer meets the minimum
requirements, confirm your Internet connectivity,
configure your email account and set your new
Home Page.
You may wish to run the Atlantic Broadband
Install Wizard on every computer in your home.
1 Go to: start.atlanticbb.net
2 Follow the on-screen instructions
23
Your High-Speed Internet Service
Equipment Set Up For Internet
Computer
Modem
IN
Cable Input
Power
(Surge protector
recommended)
Ethernet
Equipment Set Up For Internet and TV
Computer
Cable box/TV
Modem
Splitter
Cable
IN
Cable
Cable
Power
(Surge protector recommended)
Ethernet
24
Your High-Speed Internet Service
Home Networking
To configure a router with an Atlantic Broadband connection, follow the instructions below:
Computer
Modem
IN
CABLE
Router
Internet
1 Turn off your modem.
Unplug your cable modem. This will prepare
the modem to connect a new device.
Ethernet
2 Connect your modem, router and computer
together.
Once your modem is unplugged, connect
the modem to the router’s Internet (or WAN)
port and connect your computer to any
Ethernet port on the router.
25
Your High-Speed Internet Service
3 Configure your router for a broadband
connection.
A If your router requires a set up prior to
use, follow the instructions in the router’s
manual or installation CD.
B Choose “Automatic Configuration” or
“DHCP” for the connection type. Your
router will be configured to receive
connection information automatically
from Atlantic Broadband.
4 Power cycling your modem and router.
A Unplug the router’s power cable.
B Unplug the modem’s power cable and
wait for 30 seconds. If you have Atlantic
Broadband Phone service, you must reset
the phone modem. Use a paper clip to
reboot the EMTA recessed button on the
back of the modem.
C Plug in the modem’s power cable and
wait for its lights to stop flashing.
D Plug in the router’s power cable and wait
20 seconds.
If you need assistance setting up a secured
network, please refer to the router owner’s
manual or contact your router manufacturer.
Technical Support Hotlines:
Linksys
Belkin
D-Link
Gateway
Apple Airport
Dell
Netgear
1-800-326-7114
1-800-223-5546
1-877-453-5465
1-800-369-1409
1-800-275-2273
1-800-624-9896
1-888-638-4327
Protecting Your Home Networks
A broadband connection is ideal for sharing
across multiple computers in your home. If
you’re running a wireless network, we strongly
recommend that you enable the access control
settings that come with your wireless access
point. Otherwise, anyone in the vicinity can
easily detect and gain access to your home
network and you may be held liable for their
online actions or at risk for security breaches.
26
Your High-Speed Internet Service
Your Atlantic Broadband Home Page
www.atlanticbb.net
Logging in to Your Personal Atlantic
Broadband Home Page
Atlantic Broadband’s Home Page is your one
stop to check and send email, and to see all
the latest news, sports, entertainment and
information you want. You can even personalize
your Atlantic Broadband Home Page to your
specific interests – and with search powered by
Google™, you’re just a click away from anything you want to find.
Checking email or personalizing your Home
Page is easy with your login (your Atlantic
Broadband email address) and password.
If you do not have an email address or have
forgotten your password, please contact
Atlantic Broadband.
1 Select LOG IN in the upper right corner of
the Atlantic Broadband Home Page.
2 Enter your Atlantic Broadband email address
and password.
3 Click LOG IN.
After logging in once, you will be able to
personalize your Home Page to see exactly
what you want, without logging in again.
27
Your High-Speed Internet Service
Setting Your Home Page to Atlanticbb.net.
Using Atlantic Broadband Webmail
1 Once on the www.atlanticbb.net website,
The webmail feature lets you check your email and
manage your email settings from any computer
with a web browser at: www.atlanticbb.net.
click on the link at the top right corner that
says MAKE THIS MY HOME PAGE.
2 Follow the directions in the dialog box that
appears on your screen.
Customizing Your Home Page
Once you have logged in, you may personalize
your Home Page by shifting around elements
of the page, adjusting the quick links and
modifying the color scheme of the page.
1 Click on the PERSONALIZE link at the top
right hand side of the screen to expand the
PERSONALIZE YOUR HOMEPAGE menu.
2 Follow the on-screen instructions.
1 Click on EMAIL and you will be taken
automatically to your webmail inbox.
2 Click on any message to see the full message.
3 From your inbox, you can manage your email
settings by clicking the OPTIONS tab at the
top of the page. In the OPTIONS menu, you
may perform tasks such as creating an email
signature, setting a vacation message, autoforwarding email or changing your password.
4 If you change your password, you will be
required to re-login to the Home Page and
you must use your new password.
28
Your High-Speed Internet Service
Managing Your Email
Configuring Your Email
Your Atlantic Broadband service comes with
ability to have multiple email addresses based
on your service level. To set up your first email
address, you must call Atlantic Broadband.
There are 3 ways to configure your email.
To manage or create new secondary email
accounts go to: emailtools.atlanticbb.net.
You will use the online tool to manage email
account preferences and settings, create additional email accounts or change your password.
2 If you would like to use an email client
At Atlantic Broadband we provide unlimited
email storage. However, we reserve the right
to charge customers using in excess of 500 MB
storage.
1 The easiest way is to use webmail at:
www.atlanticbb.net. There is no
configuration required.
instead of webmail, Atlantic Broadband
recommends Outlook Express which comes
installed on most PC’s, Mac Mail or Microsoft
Entourage. If you have a PC you can use our
Install Wizard at: start.atlanticbb.net. To
automatically configure Outlook Express or
use the directions on the opposite page.
3 If you are an advanced user and would like
to configure your own email client, use the
following server addresses:
Incoming: pop.atlanticbb.net
Outgoing: smtp.atlanticbb.net
29
Your High-Speed Internet Service
For Windows XP through Windows 7
For Mac
1 Open Outlook Express or Windows Mail.
1 In the Mac Mail Top Toolbar click MAIL,
2 Click TOOLS, ACCOUNTS from the menu.
3 Click on the MAIL tab, then click on ADD
and select MAIL.
4 Fill in your name as you would like it to
appear in the “From” notation on emails you
send. Click NEXT.
5 Make sure that I ALREADY HAVE AN EMAIL
ADDRESS I’D LIKE TO USE is selected. Enter
your full email address and click NEXT.
6 Provide the email server names.
Choose POP3 for the server.
For Incoming Mail, type pop.atlanticbb.net.
For Outgoing Mail, type smtp.atlanticbb.net.
Select box next to “Password authentication for the outgoing server.” Click NEXT.
7 In the ACCOUNT NAME box, enter your
user name (all of the characters to the left of
the @ sign in your email address).
8 In the password box, enter your password.
You might want to check the REMEMBER
PASSWORD box so that you don’t have to
re-enter your password each time you use
your email. Click NEXT.
9 Check the LOGIN USING SECURE
PASSWORD AUTHENTICATION box.
10 Click FINISH.
then click PREFERENCES.
2 In the box that appears, click on ACCOUNTS,
then click on the + symbol that appears in
the lower left corner.
3 Type in your full name, email address and
password, then click CONTINUE.
4 In the Incoming Mail Server menu, type in
the following values:
For account type choose: POP
Description: pop.atlanticbb.net
Incoming Mail Server: pop.atlanticbb.net
User name: your email address without
the @atlanticbb.net. This is usually
automatically filled in if email address
was provided above.
Password: your email account password
5 Click CONTINUE.
6 In the Outgoing Mail server menu, please
type in the following values:
Description: smtp.atlanticbb.net
Outgoing Mail Server: smtp.atlanticbb.net
Check the “Use Authentication” box
7 Click CONTINUE.
8 In the Account Summary menu, review to
be sure all information is correct, then click
CREATE.
You have now setup your email to work with
Mac Mail!
30
Your High-Speed Internet Service
Online Security
Downloading the NetSafe Suite
We want you to have a secure, hassle-free
online experience. To help, Atlantic Broadband
offers our NetSafe Security Suite to all HighSpeed Internet customers for free. NetSafe is
an advanced, all-in-one Internet security tool
from a leading security software provider that
can help protect your computer from harmful
viruses, hackers and privacy threats.
The NetSafe Security Suite can be found at the
Atlantic Broadband homepage. To download
the suite, go to www.atlanticbb.net, look for
the My Atlantic Broadband section in the
directory section on the left hand side of the
page. Within the My Atlantic Broadband section,
click on NetSafe Security Suite and follow
the download instructions.
Atlantic Broadband NetSafe Security
Includes:
Protecting Yourself Against Online Fraud
Full anti-virus protection leveraging the
largest continuously updated library of virus
definitions keeps your PC safe.
A software firewall that monitors the
connections to your PC and ensures that only
allowed and safe data and traffic can be
passed between your computer and the world.
Spyware and pop-up blocking technology that
stops unwanted ads and potentially malicious
spyware dead in their tracks. Together, these
services act like an alarm system and police
squad to protect your PC.
Parental Controls blocks your children
from inappropriate websites, sets time limits
on their internet usage, monitors the sites
they visit and sends regular reports of their
browsing history via email.
Anti-phishing database watches for suspect
sites and alerts you when you hit a destination
that might be fraudulent. This live protection
protects you in a manner often overlooked by
conventional security solutions.
Online criminals attempt to impersonate
financial institutions, government agencies and
companies like Atlantic Broadband. Called
“Phishing”, it is an attempt to criminally and
fraudulently acquire sensitive information, such
as social security numbers, usernames, passwords and credit card details, by masquerading
as a trustworthy entity in an email.
Hallmark signs of “Phishers” include: Logos
that are not an exact match to the company’s
logo, spelling errors, percentage signs followed
by numbers or @ signs within the hyperlink,
random names or email addresses in the body
of the text, or even email headers which have
nothing to do with the company mentioned in
the email.
Atlantic Broadband will never request any
sensitive personal information via email. Please
report any suspicious email correspondence to:
[email protected].
Important
To ensure your whole family is protected, NetSafe can be
installed on up to 3 different computers for each account.
NetSafe will run on any Windows platform, but is not
Mac compatible.
31
Your High-Speed Internet Service
Installing the NetSafe Security Suite
You will need to enter your Atlantic Broadband
email address and password before you can
download the NetSafe Security Suite. If you do
not have an Atlantic Broadband email address
or have forgotten you password, contact
Atlantic Broadband.
Before installing NetSafe, it is critical that you
uninstall any other security software that may
have been installed on your PC. Popular programs that should be uninstalled or disabled
include Symantec’s Norton Internet Security,
McAfee Internet Security, Trend Micro,
ZoneAlarm, Kapersky Security and Windows
Defender. To remove these programs, go to the
Start Menu on your PC, click on Control Panel
and then Click on Add/Remove Programs.
Review the list that is displayed for the names
above or any other security programs and take
the appropriate action.
If you are running a Windows firewall, this
should be disabled as well. To do this, go to the
Start Menu on your PC, click on Control Panel
and then click on Network Connections.
Under the Network Tasks section in the upper
left, click Change Windows Firewall Settings.
Minimizing Spam
Our email servers use the latest technology to
identify and minimize unwanted commercial
email, also known as “spam.” Our spam control
system works in two ways:
1 We deny messages from known spammers
by using a common third party Internet
“blacklist”.
2 We filter all messages in an attempt to identify
spam based on a number of factors. These
messages are not deleted but are marked as
suspected spam. This ensures that a message
you may want to see is never deleted.
If you download mail using the POP protocol,
you need to create a rule in your email
program to automatically move spam emails
from your Inbox to a designated folder. For
information on how to set up rules, please go
to the Atlantic Broadband customer support
site at: www.atlanticbb.com.
If you use the IMAP protocol or check your
email using our Web interface, suspected spam
is automatically placed in a separate folder.
In either case, you’ll want to scan your
designated spam folder occasionally to be
sure that email has not been improperly
categorized as spam.
Important
Don’t ever open email from a suspicious address.
Use a secure password that mixes both letters and
numbers.
NEVER provide your account information (user name or
password) to anyone via email.
If you don’t have a firewall installed, be sure that file
and print sharing are disabled in your network settings.
Keep your operating system updated so you always
have the newest security. If you’re a Windows user, visit
http://www.windowsupdate. microsoft.com. If you’re a
Macintosh user, visit http://www.info.apple.com.
Always include a subject line in your emails.
32
Your High-Speed Internet Service
Basic Troubleshooting
Problem: The cable modem isn’t working.
Problem: I cannot login to my home page.
Try This: Your cable modem should operate
continuously without maintenance. You can leave
the power to the modem on even when your
computer is off. If your cable modem isn’t
working, try these troubleshooting measures:
Try This: Make sure you check another website to
ensure an Internet connection is available. Make
sure your user name and password have not
expired and you are using the correct characters.
1 Check your cable TV service. If there’s a cable
Problem: I’ve forgotten my password.
outage, neither your TV nor the Internet
connection will work.
2 Check all of your cable connections. If your
coaxial, Ethernet, or USB connections are loose,
you may not be able to send or receive data.
3 Reset the modem by unplugging the power to
the modem. Wait 30 seconds, plug it back in.
If you have a router, unplug the router, wait
30 seconds, plug it back in.
4 Make sure the modem is not in standby
which is indicated by an LED on the modem.
There maybe a standby button that has been
activated which will cause the modem to lose
connectivity.
5 Reboot your computer. Many computer problems are resolved by shutting down and
restarting your computer.
6 If you have a surge protector, make sure it is
plugged in and that it doesn’t need to be reset.
Try This: If you are trying to login to the Home
Page and you have forgotten your email password,
click on FORGOT PASSWORD in the login box
and follow the instructions. Please ensure that an
alternate email address is set up in your mailbox
under “Options”. Your current password will be
emailed to you. If you cannot currently access
email, contact Atlantic Broadband Customer Care
for assistance.
33
Your High-Speed Internet Service
Frequently Asked Questions
What browsers can I use?
We support most browsers, so you can use what
you prefer. Many of our customers use Microsoft
Internet Explorer (version 6.0 or later) or Firefox.
Can I fax through a cable modem without
a fax machine?
No. A fax requires an analog fax modem connected
to a phone line to operate. However, software is
available that lets you fax from your computer
through an Internet connection.
Why can’t I get to the Internet via my
router?
Check the cable modem and make sure all the
lights are lit except standby. If the lights are on,
you may need to power cycle your router. Also
check the Ethernet or wireless connection to the
computer. If you are unable to fix the router with a
power cycle, refer to the troubleshooting section
inside your owner’s manual or contact your router
manufacturer for more support.
Why can’t I connect some of my wireless
computers to the router?
Wireless signal is limited by obstructions such as
walls and floors, as well as distance. You may need
to move your router to acquire a stronger wireless
signal. This could also indicate a problem with the
computer trying to connect. If you are unable to
correct the problem, please contact your router
manufacturer for more support.
My wireless network says it’s not
secured. How do I secure my network?
Out of the box, all routers are configured with
unsecured wireless networks. If you need
assistance setting up a secured network, please
refer to the router owner’s manual or contact
your router manufacturer.
Can you help me find a wireless network?
I have a wireless router.
Some routers have the option to enable wireless
during the initial set up. Please refer to your
owner’s manual for instructions on how to enable
the wireless connection. If you need assistance
setting up the wireless connection, please contact
your router manufacturer.
Can I access my email from anywhere?
You can send and receive email anywhere, anytime from any computer that has Internet access.
Just go to www.atlanticbb.net to get your email.
35
Your Phone Service
With Atlantic Broadband, you’ll not only enjoy great Phone service
but a great value as well! Enjoy maximum flexibility with our
Unlimited Phone service which includes calling to anywhere in the
US, Puerto Rico & Canada plus Voicemail at no additional charge.
Plus enjoy 15 FREE calling features and access to our Online Phone
manager to help you manage your service.
Using Your Phone Service
36
Important Calling Features
38
Your Voicemail Service
48
Your Online Phone Manager
56
Understanding Your Equipment
57
Troubleshooting and Questions
58
36
Your Phone Service
Using Your Phone Service
To Call Someone in Canada:
Welcome to your new Phone service from
Atlantic Broadband. With so many features
available, please take a few moments to
familiarize yourself with what is included so
you can enjoy your service to the fullest.
1 Dial: 1 + the area code + the local phone
number
To Direct Dial Someone in a Country With an
International Access Code:
1 Enter: 011 (the international access code) +
Service Options
Unlimited Phone Service: includes all your
local, in-state and long distance calls to
anywhere in the US, Canada and Puerto Rico
at no extra charge so you can talk as long
as you want.
Local Phone Service: includes all your local
calls within your local calling area. It also
includes optional long distance available for
only 10¢ a minute.
Please note: Calls to 900 or 976 numbers dialed
from your home are not supported at this time.
International Calling
In addition to unlimited calling from your home
phone to anywhere in the U.S., Canada and
Puerto Rico, you will also enjoy amazingly low
international rates to over 260 countries at
no extra cost. To see a complete list of our
international rates go to
www.atlanticbb.com/intlrates.
the country code + the city code + the local
phone number
For example, if you are calling Paris, France,
dial 011 (the international access code), 33
(the country code for France), 1 (the city code
for Paris) and the local telephone number.
To see a complete list of our international country
codes go to www.atlanticbb.com/intlrates.
911 Emergency Calling
Atlantic Broadband Phone service provides 911
emergency calling access to police, fire and
medical services. Our 911 emergency calling will
automatically relay your phone number and
address in the event you are unable to do so,
provided your public safety system supports this
feature. In locations where this service is not
available, you will be asked for your phone
number and address.
As an added protection during a power outage,
we provide battery backup to your Atlantic
Broadband Phone Service. So even if you don’t
have power, you can still dial 911.
Please note: As with any phone service, a
wireless phone will not work in a power outage
so you should have a working non-cordless
phone in your home at all times.
Important
To assure access to 911 emergency calling is not
disrupted, do not move your phone modem without
notifying Atlantic Broadband.
37
Your Phone Service
Directory Assistance
Collect Calls
By dialing 411 you will gain access to any
listed number in the United States. Provide
the city and state, and we will find the desired
listing including the area code. Directory assistance calls are charged on a per-use basis.
You can place and receive collect calls with
Atlantic Broadband Phone service. To receive a
collect call, the caller must dial 1-877-790-0222
and follow the prompts. Calls are charged on a
per use basis.
Directory Listings
Call Trace
Atlantic Broadband offers primary and nonpublished directory listings within your local
white pages. Your phone number, or primary
directory listing, is provided at no charge in
the telephone directory published by the local
phone carrier within your local area.
Call Trace ensures the phone number of your
last incoming caller is traced to provide necessary information to law enforcement agencies.
Non-published directory listings are available
upon your request. Your name, address and
phone number will not be published in the
phone directory or street address directory and
will not be obtainable by the general public.
Operator Services
Atlantic Broadband Operators are available for
you at all times. Just dial 0 and you will connect
to an Operator that can help you place any of
the following calls:
To use Call Trace:
1 When you receive a harassing or offensive
call, hang up immediately.
2 Leave the phone on the hook for about 10
seconds to ensure the call terminates.
3 Lift the receiver and listen for the dial tone. If
you do not hear a dial tone, the call may not
yet be terminated and you will need to repeat
Step 2.
4 Dial *57.
5 Fill out the “Letter of Authorization for Call
Trace” form located at: www.atlanticbb.com.
6 Provide the form to your local law enforcement agency.
Person-to-Person Calls – The Operator will
connect you to a particular person.
Important
Operator assisted calls are charged on a per
use basis.
The information provided by Call Trace will not be
available to you directly. It will only be available to
law enforcement authorities possessing a valid
subpoena or other valid legal authorization. If the call
is life threatening, call your local law enforcement
authorities immediately.
Bill to Third-Party Calls – The Operator
contacts one phone number and requests that
the call be charged to another phone number.
38
Your Phone Service
Important Calling Features
Answer Call Waiting
The Atlantic Broadband Phone service includes
a powerful set of standard calling features at
no additional charge.
1 You will hear a special beeping tone letting
you know a second caller is waiting.
2 Quickly press and release the SWITCHHOOK
or FLASH button on your phone.
Call Waiting
Call Waiting lets you accept an incoming call
while you are talking to another caller. A special
beeping tone alerts you of a second caller.
You can either answer the second caller or
continue talking.
To answer, you will use the switchhook on a
non-cordless phone or the flash button on a
cordless phone (located on the keypad). The
switchhook is the button that disconnects your
call when you hang up. When you press the
switchhook, make sure you press it firmly and
then release it to activate the feature. Pressing
for too long may disconnect the call.
3 Your first caller will automatically be placed
on hold while you get connected to your
second caller.
4 If you need to alternate between the two
callers, simply press the SWITCHHOOK or
FLASH button.
5 While talking to each caller, the conversations
remain private.
6 To end either call, hang up. The phone will
ring, when you answer the remaining caller
will be on the line.
Cancel Call Waiting
1 Lift the phone & listen for dial tone.
2 Dial *70 and wait for confirmation tone.
3 Dial the number you want to call.
Call Waiting automatically turns back on when
you hang up. You must cancel Call Waiting for
each individual call you would like to make
without Call Waiting.
Important
Activating Call Forwarding All Calls will disable Call
Waiting. When you cancel Call Forwarding All Calls,
your Call Waiting will be reactivated.
You can use the Online Phone Manager to cancel Call
Waiting for all calls.
You must cancel Call Waiting for each individual call
you would like to make without Call Waiting.
39
Your Phone Service
Caller ID With Call Waiting
Call Forwarding All Calls
Caller ID lets you see the date, time and telephone number of the person calling before you
answer the call. You must have a phone with
Caller ID capabilities or an add-on Caller ID unit
in order to use this service.
You can forward your calls to another phone
number if you don't want to miss an important
call. Calls will stay forwarded until you cancel
the forwarding option.
Activate Call Forwarding All Calls
Caller ID Displays:
1 Lift the phone & listen for dial tone.
P, Private, Blocked, Anonymous or No Data
This means the caller’s number was blocked
by the caller from displaying or could not be
delivered by the network.
2 Dial *72 and wait for confirmation tone.
E or Error
The phone or Caller ID unit cannot identify
the caller’s number.
Out of Area
The call is coming from an area that does not
support Caller ID.
3 Enter the phone number where you want
calls forwarded.
4 Wait for confirmation tone and hang up.
Call Forwarding All Calls has been activated.
Cancel Call Forwarding All Calls
1 Lift your phone & listen for dial tone.
2 Dial *73.
Important
Caller ID can be used with most answering machines
as long as you set your machine to pick up after the
second ring.
3 When you hear the deactivation
announcement, Call Forwarding All Calls
has been cancelled.
40
Your Phone Service
Call Forwarding No Answer
Call Forwarding on Busy
Call Forwarding No Answer redirects calls to
another phone number when your phone is not
answered within the first 6 rings. Calls are redirected until you cancel the forwarding option.
Another way to never miss a phone call is
to redirect incoming calls to another phone
number when you are on your phone.
Without Call Forwarding on Busy, the caller
would receive a busy signal. If you aren’t
on your phone, calls will be directed to your
phone number as usual.
Activate Call Forwarding No Answer
1 Lift the phone & listen for dial tone.
2 Dial *42 and wait for confirmation tone.
Activate Call Forwarding on Busy
3 Enter the phone number where you want
1 Lift the phone & listen for dial tone.
your calls forwarded.
4 Wait for confirmation announcement and
hang up.
2 Dial *40 and wait for confirmation tone.
3 Enter the phone number where calls
should be forwarded.
Your Call Forwarding No Answer is now
activated.
4 Wait for confirmation announcement and
Cancel Call Forwarding No Answer
Call Forwarding on Busy is activated.
1 Lift the phone & listen for dial tone.
2 Dial *97.
3 When you hear the deactivation announcement, your Call Forwarding No Answer has
been cancelled.
If your answering machine is programmed
to pick up calls before 6 rings, it will override
this feature.
hang up.
Cancel Call Forwarding on Busy
1 Lift the phone & listen for dial tone.
2 Dial *98.
3 When you hear deactivation announcement,
Call Forwarding on Busy is cancelled.
Important
You can forward calls to a local or long distance phone
number. Any calls forwarded to an international number
will be billed as if you called that phone number directly.
You can continue to make outgoing calls when any of
the Call Forwarding features are activated.
You can also activate all Call Forwarding functions
from the Online Phone Manager.
41
Your Phone Service
Selective Call Forwarding
Removing Phone Numbers
Use Selective Call Forwarding to forward calls
from specific numbers on a forwarding list to
the phone number that you designate. All other
calls ring through to your phone.
1 Lift the phone & listen for dial tone.
You can place up to 12 phone numbers on your
Selective Call Forwarding list. You may forward
each incoming number to a different or same
destination number.
Adding Phone Numbers to The
Forwarding List
1 Lift the phone & listen for dial tone.
2 Dial *63 and wait for the stutter-dial tone.
3 Enter the number to be added to the forwarding list and wait for the stutter-dial tone.
4 Enter the number to where the call should be
forwarded.
5 Wait for the confirmation announcement and
hang up. The phone number is now a member
of the Selective Call Forwarding list.
6 Repeat Steps 1 through 5 for each number you
want forwarded.
Important
You must enter both numbers exactly as you would to
call them. If you have to dial a “1” first, you must
include it.
You can also activate all Call Forwarding functions from
the Online Phone Manager.
2 Dial *83 and wait for the stutter-dial tone.
3 Enter the incoming caller’s number to be
removed from the list.
4 Wait for the confirmation announcement and
hang up. The phone number is removed from
the forwarding list.
5 Repeat Steps 1 through 4 for each number
you want to remove from the list.
Important
You can dial outgoing calls to phone numbers on your
forwarding list.
You will receive a reminder ring on your phone when
incoming calls pass through. However, you will not be
able to answer the call from your phone.
Answering machines or fax machines connected to
the cable phone line should be set not to respond to
incoming calls on the first two rings.
42
Your Phone Service
Priority Ringing
With Priority Ringing, you can set up a list of
special callers so your phone will ring with a
special tone when they call.
Set Up Priority Ringing
1 Lift the phone & listen for dial tone.
2 Dial *61 and wait for confirmation tone.
3 Enter the phone number to be assigned a
priority ring and wait for another
confirmation tone.
4 Enter a number from 1 to 5 to assign one of
the following ring patterns:
1: Standard ring pattern when no priority
ring assigned.
2: Long ring, short pause, long ring, long
pause, sequence repeats.
3: Short ring, short pause, short ring,
short pause, short ring, long pause,
sequence repeats.
4: Short ring, short pause, medium ring,
short pause, short ring, long pause,
sequence repeats.
5: Short ring, long pause, sequence repeats.
5 Wait for another confirmation tone.
6 Enter a number from 1 to 4 to assign one of
the following Call Waiting beep tones:
1: Standard beep tone when no distinctive
ring assigned.
2: Two short beeps, ten second pause,
sequence repeats.
3: Three short beeps, ten second pause,
sequence repeats.
4: Two short beeps, one second pause,
short beep, ten second pause, sequence
repeats.
7 Wait for confirmation announcement and
hang up.
8 Make sure and set your answering machine
to pick up after at least four rings. If your
answering machine picks up before then,
some of the Priority Ringing patterns will not
complete.
Priority Ringing is activated.
To Remove a Phone Number from Your List
1 Press *81.
2 Follow the voice instructions to remove phone
numbers from your Priority Ringing list.
Important
A caller will not be aware that you have Priority Ringing.
The caller hears the regular, familiar ring.
Priority Ringing may not work with all phones.
43
Your Phone Service
Speed Dial
Cancel Speed Dial Keys
You can quickly dial up to 38 pre-programmed
phone numbers from any phone in your home.
1 Lift the phone & listen for dial tone.
Set Up Your Speed Dial Phone Numbers
1 Lift the phone & listen for dial tone.
2 Dial *74 to program digits 2-9 or *75 to
program digits 20-49 as your Speed Dial keys.
Wait for confirmation tone.
3 Enter the digit(s) you want to assign as the
Speed Dial key (e.g. 2-9, 20-49). Wait for dial
tone to return.
4 Dial the phone number you want to program
to the Speed Dial key.
5 Wait for confirmation announcement and
hang up. The Speed Dial key has been set up
to the phone number you just entered.
6 Write down the Speed Dial key you assigned
to each phone number.
7 Repeat steps 1 through 6 for each phone
number you want to assign a Speed Dial key.
Place a Speed Dial Call
1 Lift the phone & listen for dial tone.
2 Dial the Speed Dial key followed by the # key.
2 Dial *84 to cancel 2-9 or *85 to cancel 20-49.
Wait for confirmation tone.
3 Enter the Speed Dial key that you want to
cancel.
4 When you hear the deactivation announcement, the Speed Dial key has been cancelled.
5 Repeat steps 1 through 4 for each Speed Dial
key you want to cancel.
Important
You can program a total of 38 Speed Dial keys. The
telephone keys are 2-9 and 20-49.
You can set up Speed Dial to local or long distance
phone numbers. Make sure and include all digits you
regularly dial.
You can assign and manage your Speed Dial keys
through the Online Phone Manager.
44
Your Phone Service
Three-Way Calling
Disconnecting The Third Participant
With Three-Way Calling you can connect a third
participant to your phone call, regardless of
who initiated the call.
1 When you are ready to get back to a two-
To do this, you will use either the switchhook
on a non-cordless phone or the flash button on
a cordless phone (located on the keypad). The
switchhook is the button that disconnects your
call when you hang up. When you press the
switchhook, make sure you press it firmly and
then release it to activate the feature. Pressing
for too long may disconnect the call.
2 The third participant is disconnected and you
Connect With Three-Way Calling
1 Press the SWITCHHOOK briefly. The current
call is placed on hold and you will hear dial
tone. If your phone is equipped with a FLASH
button, pressing the FLASH button is the
same as pressing the SWITCHHOOK.
2 Dial the third participant and wait for them
to answer.
3 Once they have answered, press the
SWITCHHOOK or the FLASH button briefly
and connect all three parties.
4 If the third participant’s phone line is busy
or no one answers the phone, press the
SWITCHHOOK or the FLASH button briefly
to disconnect the call and return to the
original participant.
party call, press the SWITCHHOOK or the
FLASH button twice briefly.
remain connected to your original participant.
Important
Call participants can be local, long distance or
international. You will be charged for any international
calls you initiate.
Any of the three call participants can disconnect from
the call at any time. If you hang up, the call is
terminated between all participants.
45
Your Phone Service
Automatic Callback (*69)
Do Not Disturb
With Automatic Callback (*69), you can automatically dial back the most recent number that
called you.
When you activate Do Not Disturb, all incoming
calls are automatically sent to Voicemail so your
phone doesn’t even ring.
Using Automatic Callback
Activate Do Not Disturb
1 Lift the phone & listen for dial tone.
1 Lift the phone & listen for dial tone.
2 Dial *69.
2 Dial *53.
3 Listen for the automated message and follow
3 Wait for confirmation announcement and
instructions.
4 If the called phone number is busy or no one
answers the call, hang up the phone and
repeat steps 1 through 3.
hang up.
Do Not Disturb is activated.
Cancel Do Not Disturb
Important
1 Lift the phone & listen for dial tone.
Automatic Callback may not work if the original caller
used a phone number blocking feature.
2 Dial *54.
3 Wait for deactivation announcement and
hang up.
Do Not Disturb is cancelled.
Important
A ring signal is not sent to your phone while Do Not
Disturb is activated. Any answering machines or fax
machines connected to this phone line will not be able
to respond to incoming calls.
Do Not Disturb overrides all Call Forward settings.
You can also activate and deactivate Do Not Disturb
from the Online Phone Manager.
46
Your Phone Service
Selective Call Reject
Anonymous Call Reject
Selective Call Reject blocks incoming calls from
phone numbers you specify to be blocked. Your
phone does not ring when these calls arrive.
The caller is disconnected after hearing a short
message stating why the call has been rejected.
You can stop receiving unidentified calls with
Anonymous Call Reject. When incoming calls do
not have a caller’s name or phone number, your
phone will not ring and Anonymous Call Reject
will automatically route these calls to a short
message stating why the call has been rejected.
Adding Phone Numbers to The Rejection
List
Activate Anonymous Call Reject
1 Lift the phone & listen for dial tone.
1 Lift the phone & listen for dial tone.
2 Dial *60 and wait for the confirmation tone.
2 Dial *77 and listen for confirmation of
3 Enter the 10-digit number (area code +
number) to be blocked.
4 Wait for the confirmation announcement and
hang up. The phone number is now a member
of the rejection list.
5 Repeat Steps 1 through 4 for each 10-digit
number you want blocked.
successful activation.
3 Hang up the phone.
Anonymous Call Reject has been activated.
Deactivate Anonymous Call Reject
1 Lift the phone & listen for dial tone.
2 Dial *87 and listen for confirmation of
successful deactivation.
Removing Phone Numbers From The
Rejection List
3 Hang up the phone.
1 Lift the phone & listen for dial tone.
Anonymous Call Reject has been deactivated.
2 Dial *80 and wait for the confirmation tone.
3 Enter the 10-digit number (area code +
number) to be unblocked.
4 Wait for the confirmation announcement and
hang up. The phone number is removed from
the rejection list.
5 Repeat Steps 1 through 4 for each 10-digit
number you want unblocked.
Important
Up to 12 phone numbers can be placed on the
rejection list.
You can also activate Selective Call Reject from the
Online Phone Manager.
Important
Anonymous Call Reject specifically blocks calls from
phones that have made the caller’s phone number private.
This service does not apply to calls originating from
phones where Caller ID service is not offered.
You can also activate Anonymous Call Reject from the
Online Phone Manager.
47
Your Phone Service
Caller ID Blocking
Temporarily Unblocking Caller ID
Get the security you need by temporarily blocking your phone number from appearing on the
Caller ID unit of the number you call. You can
block your phone number on a call-by-call basis
or permanently.
If you have set your phone service to block
your caller ID permanently via our Online
Phone Manager or through Atlantic Broadband
Customer Care, you may temporarily unblock
your phone number on a call-by-call basis.
Temporarily Blocking Caller ID
1 Lift the phone & listen for dial tone.
2 Dial *67 and wait for confirmation tone.
3 Dial the phone number of the person you are
calling. Your phone number will not appear on
the Caller ID unit of the person you are calling.
4 When you hang up, Caller ID Blocking is
terminated.
Important
You can activate Temporarily Blocking Caller ID from the
Online Phone Manager
1 Lift the phone & listen for dial tone.
2 Dial *82 and wait for the confirmation tone.
3 Dial the number you wish to call.
Your number will appear on the Caller ID unit
of the number you call. When you hang up, this
function is cancelled. The next call you make
will be ‘Private’ unless you again unblock your
Caller ID.
48
Your Phone Service
Your Voicemail Service*
With Atlantic Broadband Voicemail service,
you’ll never miss an important call, whether
you’re out of town or on the other line. And
with our optional Multiple Mailboxes feature,
everyone in the family can have their own
individual Voicemail service.
Also, you can listen to your Voicemail through
any computer connected to the Internet at:
http://phonemanager.atlanticbb.net. To
learn more, see “Check Voicemail Online” on
page 56 of the Online Phone Manager section
of this guide.
Voicemail Service Features
Listen to messages at home, away from home
or online
Message playback controls (rewind/fast forward)
Send messages to other Atlantic Broadband users
Create multiple personal greetings
Activate and manage multiple mailboxes
Advanced mailbox management tools
Spanish language menu option
Types of Voicemail Messages
New – messages that have not yet been
reviewed, or that have been reviewed but not
deleted or saved.
Urgent – new messages marked as urgent are
the first to be played.
Private – messages marked as private by the
caller cannot be forwarded.
Skipped – new messages you skip are saved
in a special category.
Saved – messages that have been reviewed
and saved.
Deleted – messages that have been reviewed
and deleted. Messages may be undeleted until
you hang up or return to the Main Menu.
Message Notification
Your Voicemail service will notify you that
you have a new message. When you pick up
the phone to hear a dial tone, you will hear
a stutter-tone indicating you have a new
message. If your phone is equipped with
a message waiting light, it will also be lit.
Voicemail Storage/Time Rules
You can store up to 30 new and saved messages
in each individual mailbox at any one time.
Saved messages will be stored for a maximum
of 45 days and then deleted. When a mailbox
is full, no new messages can be recorded.
*Voicemail included with Unlimited Phone service,
optional for Local Phone Service.
49
Your Phone Service
Notification Via Email
Voicemail Main Menu Options
You can opt to get email notification of new
Voicemail messages. To set up this email
notification, you must use our Online Phone
Manager at: phonemanager.atlanticbb.net.
When you access Voicemail, you will start at
the Main Menu. There are 3 options:
Turning Email Notification On/Off
1 Dial *86.
2 Follow Prompts.
Using Our Online Phone Manager
You can also use our Online Phone Manager to
receive notification of new Voicemails or to get
copies of Voicemail messages via your email.
For more information, please go to Page 56.
Accessing Your Voicemail
From Home
1 Dial *86.
2 When prompted, enter your PIN, then press #.
MAIN MENU OPTION
Listen to Messages
Leave Message in Another Mailbox
Manage Mailbox Options
KEY
1
2
4
Important
When using the Voicemail system, you can enter a
menu choice at any time. You do not need to wait for
the announcement to finish playing.
Setting Up Your Voicemail
1 Dial *86 from home.
2 When prompted, enter your default PIN, which
is the last four digits of your phone number,
then press #.
3 Listen to the instructions for creating a new
PIN and enter your new 4 -10 digit PIN, then
press #.
4 When prompted, re-enter your new PIN, then
Away From Home
1 Dial your Atlantic Broadband phone number.
2 Press the # key anytime during your recorded
press #. Be sure to write down your PIN so
you do not forget it.
5 When prompted, choose your desired language for menu options: English or Spanish.
greeting.
3 When prompted, enter your PIN, then press #.
Important
If you have our optional Multiple Mailboxes feature,
see page 54 for instructions on activating extension
mailboxes.
50
Your Phone Service
Personalize The No Answer
Greeting
Activating The Extended Absence
Greeting
The No Answer Greeting cannot be turned off.
A standard system greeting will automatically
be played unless you create a personalized No
Answer Greeting.
If you will be away from the phone and wish
to play a different message during this time,
you may record an Extended Absence Greeting.
This will override both the Busy and No Answer
Greetings. The Extended Absence Greeting is
initially off. You must record an Extended
Absence Greeting to activate this feature.
1 Access your Voicemail (*86 from home).
2 Press 4 to reach the Mailbox Options menu.
3 Press 1 for Greeting Options.
4 Press 2 for No Answer.
5 Press 2 to replace current greeting.
6 Press 1 to record a new greeting.
7 When prompted, record your greeting and
press # when done.
8 If you are satisfied with the greeting, press 3
to save and activate it.
1 Access your Voicemail (*86 from home).
2 Press 4 to reach the Mailbox Options menu.
3 Press 1 for Greeting Options.
4 Press 3 for Extended Absence Greeting.
5 Press 1 to record a new greeting.
6 When prompted, record your greeting and
press # when done.
7 If you are satisfied with the greeting, press 3
Changing a Personalized No Answer
Greeting
1 Access your Voicemail (*86 from home).
2 Press 4 to reach the Mailbox Options menu.
3 Press 1 for Greeting Options.
4 Press 2 for No Answer.
5 Press 4 to record a new greeting.
6 When prompted, record your greeting and
press # when done.
7 If you are satisfied with the greeting, press 3
to save and activate it.
Important
Be sure to record your entire personal greeting and press
3 to save and activate your new greeting before hanging
up. If you hang up before you have activated your new
greeting, the prior greeting will remain active.
When you delete a personal greeting, the default greeting
is reinstated until you record a new personal greeting.
to save and activate it.
Important
To ensure you don’t accidentally leave an Extended
Absence Greeting on once you have returned, you will
be asked if you wish to disable the Extended Absence
Greeting whenever you access Voicemail. If you wish to
turn it off, simply follow the prompts.
51
Your Phone Service
Listening To Messages
Deleting Saved Messages
Retrieving Messages
To delete saved messages and free up
storage space:
1 Access your Voicemail (*86 from home).
2 Press 1. You will hear a recording about the
number of messages in the folder and the first
message will be played.
Navigating During Playback
The following navigation options are available
while the message is playing:
MESSAGE OPTION
Listen to Messages
Replay from start
Save message
Delete/undelete message
Rewind 10 seconds
Pause/continue
Fast forward 10 seconds
Skip to next message
Previous message
Get message date/time
Jump to a different folder
Mark as new
Previous menu
KEY
1
1
2
3
7
8
9
#
64
65
66
67
*
Important
Each message includes the date and time the message
was left. You may disable this feature by pressing 4-9-5-2
from the Main Menu.
New messages are played first, then Skipped messages,
then Saved messages. To jump to Skipped or Saved
messages, press 66 at any time.
When you have listened to all your messages, you will
be returned to the Main Menu.
You can check your Voicemail via your Online Phone
Manager where you can save it and send as an email
attachment.
1 Access your Voicemail (*86 from home).
2 Press 1 to hear any new messages.
3 Press 66 to jump to a different folder.
4 Press 3 to reach the saved messages folder.
5 Press 3 to delete each message as it plays.
Sending Messages
If you want to leave a message for another
Atlantic Broadband subscriber without calling
them directly, you can use the Send Messages
function and leave a message in their mailbox:
1 Access your Voicemail (*86 from home).
2 Press 2 and, when prompted, enter the area
code and phone number of the subscriber you
wish to contact, then press #.
3 Listen to the greeting and follow instructions
to leave a message.
4 Hang up.
52
Your Phone Service
Managing Your Voicemail Options
Changing Your PIN
Changing The Number of Rings
You can change your PIN as many times as
you want – just make sure to keep track of the
new PIN.
By default, callers will automatically be forwarded to your Voicemail when your phone is busy
or when you do not answer after four rings.
To change the number of rings before your
callers are routed to Voicemail:
1 Access your Voicemail (*86 from home).
2 Press 4 to reach the Mailbox Options menu.
3 Press 2 to reach the Change Rings menu.
4 Press 2 to change number of rings.
5 Press your desired number of rings, between
2 and 9.
To change your PIN:
1 Access your Voicemail (*86 from home).
2 Press 4 to reach the Mailbox Options menu.
3 Press 3 to reach the Change Password
Settings menu.
4 Press 1 to change your PIN.
5 Listen to the instructions for creating a new PIN.
6 Enter your new 4-10 digit PIN then press #.
7 Re-enter the new PIN then press #.
8 Press 3 to activate your new PIN.
Important
Callers dialing your phone number may hear one or two
rings more than the number you have selected.
If you have a fax machine on your phone line, make
sure you set the number of rings for your Voicemail
service high enough to ensure that the fax machine can
respond to fax calls first.
If you have Call Forward On Busy, Call Forward No
Answer, or Call Forward All Calls activated on your
phone, callers will NOT be forwarded to your Voicemail.
Once you cancel these features, callers will be forwarded to your Voicemail.
Important
Should you ever forget your PIN, don’t hesitate to
contact Atlantic Broadband Customer Care.
Bypassing Your PIN at Home
If you have only a single mailbox, you can
configure the Voicemail system to allow access
from home without using a PIN. PIN-less access
works only from your home phone. Accessing
Voicemail away from home will still require use
of a PIN.
To bypass PIN entry:
1 Access your Voicemail (*86 from home).
2 Press 4 to reach the Mailbox Options menu.
3 Press 3 to reach the Change Password Settings
menu.
4 After the prompt, press 2 to turn password off.
5 You will hear a confirmation message and be
returned to the Main Menu.
53
Your Phone Service
Once PIN Bypass has been configured, access
your Voicemail from home by dialing *86 then
# to reach the Main Menu.
Reactivating PIN Requirement
1 Access your Voicemail (*86 from home).
2 Press 4 to reach the Mailbox Options menu.
3 Press 3 to reach the Change Password
Settings menu.
4 After the prompt, press 3 to turn password
on again.
Disabling and Enabling The Message
Information
By default, the Voicemail system records the date,
time, message length and incoming phone number for each message. This is called the Message
Envelope and is automatically played before each
Voicemail message. If you wish, you can prevent
the system from playing this information.
1 Access your Voicemail (*86 from home).
2 Press 4 to reach the Mailbox Options menu.
3 Press 9 then 5 to reach the Mailbox Option.
menu.
Changing Your Language Option
1 Access your Voicemail (*86 from home).
2 Press 4 to reach the Mailbox Options menu.
3 Press 4 to reach the Language Settings menu.
4 Choose 1 for English or 2 for Spanish.
5 The change is effective immediately and you
will be returned to the Main Menu.
Changing The Message Order
The Voicemail system is configured to play the
most recent message first. You can reverse that
order to instead play the oldest message first.
1 Access your Voicemail (*86 from home).
2 Press 4 to reach the Mailbox Options menu.
4 Press 2 to toggle the current setting from On
to Off or from Off to On.
Suspending Your Voicemail
You can temporarily suspend your Voicemail
service from answering incoming calls. During
suspension, you can continue to access Saved
messages and manage your Voicemail box.
Voicemail service remains suspended until you
reactivate it.
1 Access your Voicemail (*86 from home).
2 Press 4 to reach the Mailbox Options menu.
3 Press 5 to reach the Suspend/Activate
Voicemail menu.
4 Press 2 to suspend.
3 Press 9 then 3 to reach the Change Message
Order menu.
4 Press 2 to reverse the current order.
Reactivating Your Voicemail
1 Access your Voicemail (*86 from home).
2 Press 4 to reach the Mailbox Options menu.
3 Press 5 to reach the Suspend/Activate
Voicemail menu.
4 Press 1 to activate.
54
Your Phone Service
Managing Multiple Mailboxes
Creating a Multi-Extension Greeting
The optional Multiple Mailboxes feature allows
each member of the family to have their own
private Voicemail box on the same phone number, for a total of 5 possible Voicemail boxes.
To create a multi-extension greeting when
none exist
The owner of the main mailbox controls activation and deactivation of extension mailboxes
and has access to all messages contained in
them provided they have the PIN number.
Each extension mailbox has the same functions
as the main mailbox and can be managed
independently by the main mailbox user or
extension user with the specific PIN number.
For instance, each mailbox can have its own
greetings, be put into a suspended state or
have personalized settings for options such
as message playback order.
Setting Up Multiple Mailboxes
To configure Multiple Mailboxes for the first
time, you must first create one or more extensions, then record an initial Multi-Extension
Greeting that identifies the possible extensions
for callers to choose.
1 Dial into your mailbox.
2 Press 4, 9 then 2 or follow the verbal prompts
to manage extensions.
3 Press 1 from the Extension Management
menu.
4 Press 1 to record a greeting.
5 When prompted, speak the multi-extension
greeting, followed by the # key.
You are presented with the following
Multi-extension Greeting menu:
MULTI-EXTENSION GREETING OPTION
Listen to greeting
Re-record greeting
Keep and activate greeting
Previous menu
KEY
1
2
3
*
6 Press the digit corresponding to your desired
choice.
Selecting 3 activates the greeting and extension
and returns you to the Main Menu.
Important
Important
Atlantic Broadband service comes with one Voicemail
box. For a fee, you can enjoy up to four additional
Voicemail boxes.
Here is an example of how to record a greeting for
multiple extensions in a residential setting.
“You have reached the Voicemail of the Simple family. To
leave a message for Joe press 1, for Karen press 2, for
Ron press 3 and for David press 4. Have a great day!”
55
Your Phone Service
Changing The Greeting After it Has
Been Activated
Deactivating a Mailbox Extension
To Review Your List of Recorded Greetings:
1 Dial into your mailbox.
2 Press 4, 9 then 2 or follow the verbal prompts
to manage extensions.
3 Press 1 from the Extension Management menu.
You are presented with the following
Multi-extension Greeting menu:
MULTI-EXTENSION GREETING OPTION
Listen to greeting
Re-record greeting
Keep and activate greeting
Previous menu
KEY
1
2
3
*
2 Press 4, 9 then 2 or follow the verbal prompts
to manage extensions.
3 Press 3.
4 When prompted, enter the extension number
to be deactivated.
5 When prompted to confirm, re-enter the
extension number.
You are presented with the following Review
Greeting options:
KEY
1
2
3
4
#
*
5 Press the digit corresponding to your desired
choice. Selecting # moves you forward to
listen to the next greeting. Selecting 1
activates the current played greeting and
returns you to the Main Menu.
To Deactivate an Extension:
1 Dial into your mailbox.
4 Press 2 and listen to the first greeting.
REVIEW GREETING OPTION
Use this greeting
Replay greeting
Re-record greeting
Delete greeting
Listen to next greeting
Previous menu
Deactivating a mailbox extension removes the
extension from the mailbox and permanently
erases all stored messages in that extension.
Upon deactivating an extension, you are
prompted to update the multi-extension greeting to reflect the change.
After a deactivation confirmation message,
you are presented with the following Multiextension Greeting menu:
MULTI-EXTENSION GREETING OPTION
Listen to greeting
Review stored greetings
Keep and activate greeting
Record a new greeting
KEY
1
2
3
4
6 Press the digit corresponding to your desired
choice and follow the prompts to complete
your choice.
Selecting 2 lets you locate the greeting and
re-record or delete it.
Selecting 4 lets you create a new greeting to
be used in place of the current greeting.
Important
Deactivating a Mailbox Extension immediately and
permanently erases all stored messages for that extension.
Use with caution!
Be sure to record a new Multi-Extension Greeting after
deactivating any extension.
56
Your Phone Service
Your Online Phone Manager
Managing Your Calling Features
Managing your account is just a click away
with our Online Phone Manager. You can listen
to messages, manage your calling features and
much more without ever picking up the phone!
Our Online Phone Manager makes it easy for
you to activate or deactivate all your favorite
phone features like Call Forwarding, Do Not
Disturb and Anonymous Call Reject.
The first time you access your Online Phone
Manager, you will be prompted to create a user
name and password.
Activating Call Forwarding Online
Review Call History
1 Go to: phonemanager.atlanticbb.net.
2 Enter your area code, then your ID and
password.
You can view a summary of your monthly
service charges, as well as details about
each call you have made, by going to:
phonemanager.atlanticbb.net.
3 Select the FEATURES tab from the toolbar.
Managing Voicemail
5 Click CHANGE SETTINGS.
Our Online Phone Manager lets you listen,
review and manage your Voicemail messages
from wherever you are.
Your Call Forwarding feature is now activated.
Check Voicemail Online
1 Go to: phonemanager.atlanticbb.net.
1 Go to: phonemanager.atlanticbb.net.
2 Enter your area code, then your ID and
2 Enter your area code, then your ID and
password.
3 Select the VOICEMAIL tab from the toolbar.
4 If you have multiple mailboxes, click on the
appropriate mailbox in the left-hand column.
5 To play a message, click on the arrow icon in
the right-hand column.
6 To delete a message, click on the X icon in the
right-hand column.
Save and Email a Voicemail
1 Right click the message you would like to save.
2 Click SAVE TARGET AS. Enter name you would
like to use to save this message. Click OK.
3 Attach this file to an email as you would any
other document.
4 Click on CALL FORWARD, select the Call
Forwarding feature you would like to activate,
and enter the phone number where you would
like your calls forwarded.
Deactivating Call Forwarding Online
password.
3 Select the FEATURES tab from the toolbar.
4 Click on CALL FORWARD and select the
DO NOT FORWARD button.
5 Click CHANGE SETTINGS.
Your Call Forwarding feature is now
deactivated.
57
Your Phone Service
Understanding Your Equipment
You will receive a phone modem with your
Atlantic Broadband Phone service. This is a
single device that connects our broadband network to your phones and home computer. Your
new phone modem is compatible with almost
all existing cordless and non-cordless phones.
The cable modem comes with battery backup
so if your power goes down, your Atlantic
Broadband Phone service will still be available.
Front View of Your Phone Modem
Power Light
DS (downstream) Light
US (upstream) Light
Lights 1-4 If your system is functioning
properly these lights will be solid green.
They will flash if your modem is reset or
if there is a problem.
Online Light
Link Light
Tel 1 Light
Tel 2 Light
Battery Light
Lights 5-7 These lights will be solid green when a device
is connected. They will flash if the device is in use. The Tel2
light will be dark if you only have one phone line.
The battery light will be on, showing power is present and
your battery is in good condition.
If you have a Motorola modem with a Standby
button on the top and a Standby light on the front
this button disables your Internet connection.
As long as the Standby light is dark, do not press
this button unless instructed to do so by Atlantic
Broadband Customer Care. If this Standby light is
on, your Internet will not work. You should press
the Standby button on top of modem until light
goes off. This should restore your Internet connection. If this light is on all other lights will be off,
except Power and Tel1/Tel2.
58
Your Phone Service
Basic Troubleshooting
Problem: No dial tone
Problem: Cannot receive calls
Try This: Check the lights on your phone modem
(the device connecting your cable to your phones).
Try This: Check all phones to be sure that the
ringers have not been turned off and to see which
phones are affected. You should also make sure
that you do not have the Call Forwarding or Do
Not Disturb features activated.
Power light should be solid. If not, verify that
the device is plugged directly into a working
power outlet. If the power cord is removed or
power is out the only lights active will be
Power and Tel1/Tel2.
Online light should be solid. If not, verify if
standby mode may be accidentally enabled.
The Standby light should be off. If it is on,
press the Standby button on top of the device.
Tel 1 or Tel 2 light – should be solid if the
phone is on the hook. A flashing light
indicates a phone is off the hook. Check to
make sure all phones are properly hung up.
If the light is off, you will need to power cycle
or reset the device. If the light is flashing very
slowly, please contact us.
Battery light – should be solid if the battery is
in good condtion and connected properly. Your
connection should not be affected by the status
of the battery light as long as you have power
to the phone modem. If the battery light is off,
make sure the battery is securely connected
to the modem. If the light is flashing, please
contact us.
Make sure that all phones are on the hook and
that cordless phone batteries are charged. Plug
the phone directly into the phone modem to
determine if the issue may be related to wiring
inside your home. Try to plug a working corded
phone into different jacks to find out if the issue
is isolated to one phone or jack.
If all phones are affected, please contact your local
Atlantic Broadband office.
Problem: Calls disconnecting or can’t
hear the other side of the conversation
Try This: Check all phones to see if only specific
phones are affected by this problem. If using a
cordless phone, test with a non-cordless phone
if possible. If only certain phones are susceptible,
check connections or replace the phone itself.
Verify the type of call the other party is making.
If they are using a cell phone, your conversation
could be affected by reception difficulties.
If the call is a local or long distance call from a standard phone line and you are still experiencing problems, contact your local Atlantic Broadband office.
Problem: I am getting short rings on my
phone and no one is there when I answer
Try This: If your phone is giving only one short
ring, you may have Call Forwarding activated on
your line.
Problem: One of my phone jacks is not
working
Try This: Try plugging another phone into the jack
to verify that the problem is not the phone itself.
Check every phone and make sure they are
securely plugged in. If you continue to experience
problems with the jack, dial 611 for assistance.
59
Your Phone Service
Frequently Asked Questions
Where can I view detailed call information?
Itemization of call history and additional charges
is available through our Online Phone manager
tool located at: phonemanager.atlanticbb.net.
Can I accept a collect call?
Yes. To receive a collect call, the caller must dial
1-877-790-0222 and follow the prompts.
Can I restrict international calling?
Yes. Contact Atlantic Broadband if you would like
to put a block on all international calls.
Can I use my existing telephone and
caller ID equipment?
The majority of cordless and non-cordless phones,
caller ID units, answering machines, fax machines,
alarms and teletype devices will work with
Atlantic Broadband Phone service. We suggest
that you test all your equipment once your
Atlantic Broadband Phone service is installed.
Can I watch cable TV and surf the
Internet while I’m on the phone?
Yes. With Atlantic Broadband Phone service, you
can use all three services at the same time, on the
same cable outlet.
Can I use my own answering machine?
Yes. You can disable your Voicemail if you prefer
to use your own answering machine. From your
home phone, enter *86 to access your Voicemail
and follow the prompts.
Will fax machines work with Atlantic
Broadband phone service?
Yes. Atlantic Broadband Phone service is compatible with most fax equipment brands. If you use a
fax machine regularly, we recommend you consider
a second phone line.
Will Atlantic Broadband phone service
work with my home alarm system?
The majority of alarm systems are compatible.
However, some alarm systems, particularly older
ones that do not support tone dialing, may not
work properly without changes. We suggest you
test your alarm system before and after installation of Atlantic Broadband Phone service.
If my cable TV goes out, will I still be
able to make phone calls?
In most cases an interruption in cable service
should not affect your phone. However, outages
that affect your High-Speed Internet service will
cause an interruption in your Phone service.
What is E911? Does Atlantic Broadband
offer E911 service?
Yes. You have 911 as well as E911 service. E911
(Enhanced 911) has the added benefit of automatically transmitting your telephone number and
location to the operator during the 911 call.
If for any reason you need to move the phone
modem or take it to another residence,
please contact Atlantic Broadband so your
E911 service is maintained.
How do I set up speed dial?
You can set up your Speed Dial by pressing *75.
Enter a digit from 20 to 49 to assign as the Speed
Dial key. Then enter the number you wish to store.
You can also set up Speed Dial through our Online
Phone Manager at: phonemanager.atlanticbb.net.
60
How to Read Your Monthly Bill
Your Monthly Bill From Atlantic Broadband
is Easy to Read
A quick summary of charges on the front page
gives you accurate fees at a glance.
Detailed charges of the back page allows you
to see all your current transactions.
Special announcements, customer service information and payment instructions are in special
sections that are easy to find and understand.
The enlarged format is clear, simple and
informative.
Understanding Your Monthly Bill
1 Atlantic Broadband Services Available
in Your Area
(e.g. Digital Video, High-Speed Internet, Phone)
2 Contact Us
Flexible options to help you reach us.
3 Quick Summary
Total charges, payments, credits and balance due.
4 Messaging Center
Important account information and Atlantic
Broadband messaging.
5 Flexible Payment Options
Choose the one that’s best for you!
Pay Your Bill Online
You can set up your e-bill account so you can
pay your bills online. Visit atlanticbb.com and
select the “Pay My Bill” link.
6 Payment Coupon
Simply tear it off and return with your
check/money order.
7 Account Details
Detailed information on all transactions during
this billing period.
8 Additional Messaging Center
We also offer monthly bills in Spanish. Please
call Atlantic Broadband for more details.
1
Your Digital Video Service
Using Your Remote Control
4
Interactive Program Guide
5
Parental Controls
7
On Demand (in select markets only)
9
Digital Video Recording (DVR) Service
10
High-Definition Television (HDTV)
12
Connecting Your Components
13
Troubleshooting and Questions
17
Your High-Speed Internet Service
22
Home Networking
24
Your Atlantic Broadband Homepage
26
Managing Your Email
28
Online Security
30
Troubleshooting and Questions
32
3
All components ON/OFF
Individual component ON/OFF
Device select (five buttons)
Display main services menu
4
Access Interactive Program Guide
Display channel program info
Exit Guide, return to viewing
Navigate Interactive Program Guide
Multi-function buttons (A, B, C, D)
6
7
5
Displays main On Demand menu
(in select markets only)
Return to previous screen
Navigate to favorite channels
Dedicated DVR/On Demand buttons
Using Your Phone Service
36
Important Calling Features
38
Your Voicemail Service
48
Your Online Phone Manager
56
Understanding Your Equipment
57
Troubleshooting and Questions
58
How to Read Your Monthly Bill
2
Selects highlighted item
Getting Connected
Your Phone Service
Atlantic Broadband Digital Video Service Remote Control
8
Lights up remote buttons
(press again to turn off)
60
D VSR EF0 3 1 2
Atlantic Broadband Phone Service Quick Reference Guide
Calling Features
To Activate/Access
To Deactivate
Call Waiting
Automatically activated unless
deactivated prior to call.
*70
Call Forwarding
*72
*73
Selective
Call Forwarding
*63
*83
Speed Dial
*74 (digits 2-9)
*75 (digits 20-49)
*84 (digits 2-9)
*85 (digits 20-49)
Three-Way Calling
Press the switchhhook/flash
button. Dial 3rd participant.
Once answered, press the
switchhook/flash button
again.
Simply hang up to end
Three-Way Call. To just
disconnect 3rd participant,
press the switchhook/flash
button twice briefly.
Automatic Callback
*69
Do Not Disturb
*53
*54
Caller ID Blocking
*67
Automatically deactivated
at end of call.
Voicemail1
Simply dial *86 from your home to:
• Set up your Voicemail
• Create a personalized greeting
• Retrieve/save messages
• Suspend service to use personal answering machine
Digital Video
High-Speed Internet
Phone
You can also listen to your Voicemail messages online via our
Online Phone Manager.
Online Phone
Manager
Online Phone Manager lets you quickly and easily:
• Manage Voicemail settings
• Manage your calling features
• View your call history
Simply go to http://phonemanager.atlanticbb.net.
Enter username and password.
FPO
FSC Logo
WGDE0312
included with Unlimited Phone service, optional
for Local Phone Service.
PH N R EF0 3 1 2
1Voicemail
Customer Guide