1
Atari800MacX Manual
Version 3.5
Atari800MacX Manual – Version 3.5
Page 1 of 95
Table of Contents
1. Getting Started .......................................................................................................................................4
Donationware ...............................................................................................................................................4
OS Roms .........................................................................................................................................................4
Starting the Emulator .................................................................................................................................4
What happens if the Emulated Atari crashes? ....................................................................................5
What's New in 3.4? ......................................................................................................................................6
2. Features .....................................................................................................................................................7
3. Keyboard ...................................................................................................................................................9
4. Media Status ...........................................................................................................................................11
5. Preferences .............................................................................................................................................15
5.1 Display Tab ......................................................................................................................................15
5.2 Atari System Tab ............................................................................................................................19
5.3 Printer Tab .......................................................................................................................................22
5.4 Hard Drives Tab .............................................................................................................................27
5.5 Boot Media Tab ...............................................................................................................................29
5.6 OS ROMS Tab ...................................................................................................................................30
5.7 Default Directories Tab ................................................................................................................31
5.8 Controllers Tab ...............................................................................................................................32
5.9 Gamepads Tab ................................................................................................................................35
6.0 Menus ....................................................................................................................................................37
6.1 Media Menu ......................................................................................................................................38
6.1.1 Drive Management Window .................................................................................................41
6.2 Display Menu ...................................................................................................................................43
6.3 Sound Menu .....................................................................................................................................45
Atari800MacX Manual – Version 3.5
Page 2 of 95
6.4 Control Menu ...................................................................................................................................46
6.5 Fullscreen User Interface .............................................................................................................48
7. Printer Emulation .................................................................................................................................49
8. Disk Image Editor .................................................................................................................................53
9. Sector Editor ..........................................................................................................................................56
10. Debug Monitor ....................................................................................................................................58
10.1 Monitor Control Commands .....................................................................................................60
10.2 Processor Related Commands ..................................................................................................60
10.3 Memory Commands ....................................................................................................................61
10.4 Tracing and Execution Control Commands .........................................................................62
10.5 Atari Hardware Register Commands ......................................................................................65
10.6 Assembler Commands ...............................................................................................................65
11. File Types .............................................................................................................................................66
12. Credits ...................................................................................................................................................77
13. Compatibility .......................................................................................................................................83
14. Known Bugs .........................................................................................................................................85
15. Release History ...................................................................................................................................86
Atari800MacX Manual – Version 3.5
Page 3 of 95
1. Getting Started
Welcome to Atari800MacX , the Atari 800/XL/XE/5200 emulator for Macintosh OSX. This
getting started section is intended to help those who are new to Atari Emulation get
started quickly. Experienced emulator users should also give this section a quick read to
help you get familiar with some of the special features of the Mac version.
Donation ware
The emulator is released under the GPL license, however many months / year s of work
have gone into it. If you use and appreciate the emulator, please donate to its
development. You can do this by clicking on the menu item Donation... under the
Atari800MacX menu.
OS Rom s
The emulator requires that you have ROM images for the Atari operating system and the
BASIC language ROM. These files are not provided with the emulator for legal reasons,
but they are widely available on the internet. The default names for the ROMS
are atariosa.rom, atariosb.rom, atarixl.rom, ataribas.rom, and a5200.rom. By default, the
emulator expects the ROM files to be found in the OSRoms folder in the Atari800MacX
folder. You can select files with different names or in different locations by using the
Roms Tab (section 5.6) of the Preferences window.
Starting the Emulator
Once the emulator is started, with the ROM files properly installed, you should see a Blue
Screen with white letters in the emulator with the Atari BASIC ready prom pt.
The first thing you will probably want to do is adjust the display to your liking. There are
many options for the Display characteristics some of which can be accessed from the
Display Menu (section 6.2), and others which are available from the Display Tab (section
5.1) of the Preferences window. While we are on the topic, please take time to read
through all of the document ation on the Preferences window (section 5). You can open
the Preferences window from the Preferences menu item in the Atari800MacX menu, or by
pressing the comman d and comma keys. There are many, many options available in this
emulator, and almost everything you can think of can be customized.
OK, now you have the emulator up and running, you probably would like to do something
besides seeing the BASIC READY prom pt, correct? The emulator is capable of supporting
Atari programs on cartridge, disk, and cassette image files. To use these files, you can
open them by the menu items in the Media Menu (section 6.1) , or through the controls in
the Media Status Window (section 4.). You can also drag and drop the files onto the main
emulator window, although if it is a disk image, it will always be put in drive 1. For a full
list of the file types and extensions supporte d by the emulator, please see File Types
(section 11.).
Finally, I suspect that you would like to simulate the controllers you used to play those
great Atari games. The emulator allows you to use the keyboard, mouse, and USB
gamepads / j oysticks to do this. To find out all of the details, please see the Controllers
and Gamepads Tabs (sections 5.8 and 5.9) in the Preferences window.
Atari800MacX Manual – Version 3.5
Page 4 of 95
What happen s if the Emulated Atari
crashe s?
If the emulated Atari crashes, due to an illegal instruction, etc., the emulator will display
an Unrecoverable Error dialog. This normally happens because of a corrupt disk or
cartridge image, or one that is used incorrectly. (It could happen if your OS ROM images
are bad also). Instead of locking up, the way a real Atari would, the emulator gives you a
choice or removing the media, performing a warm or cold reset, entering the debug
monitor, or simply quitting the emulator. The Unrecoverable Error Dialog is show below,
in both the Windowed and Fullscreen versions.
Atari800MacX Manual – Version 3.5
Page 5 of 95
What's Ne w in 3.4?
Features Added /C ha nged:
• Added support for the new SpartDos X 128K Cartridge.
•
Added menu to the Control Menu to allow the user to control the artifacting mode.
•
Allow gamepads with 3 joysticks of the same type to be used (Gravis Eliminator
Aftershock is an example).
Bugs Fixed:
• Fixed issue with "new" artifacting in certain games, such as SCRAM.
•
Fixed issue where Artifacting mode was not taking effect until program was
restarted (After being set in Media Status Window)..
Atari800MacX Manual – Version 3.5
Page 6 of 95
2. Features
The Atari800MacX inherits most all of the features of the Atari800 emulator, while adding
Mac specific enhancements and features.
Features Inherited from Atari800
•
Emulation of Atari 400, 800, 600 XL, 800XL, 130XE, 5200 Games System.
•
130XE compatible memory expansions: 320K, 576K, 1088K.
•
Optional 4K RAM between 0xc000 and 0xcfff in 400 /800 mode.
•
Cycle- exact 6502 emulation, all unofficial instructions.
•
Cycle- exact NMI interrupt s, scanline - based POKEY interrupt s.
•
Cycle- exact ANTIC emulation, all display modes, precise timing.
•
Player /Missile Graphics, exact priority control and collision detection.
•
Exact POKEY shift registers (sound and random number generator).
•
•
8 disk drives, emulated at computer - to- drive comm unication and fast patched
SIO levels.
ATR, XFD, DCM, ATR.GZ and XFD.GZ disk images.
•
Direct loading of Atari executable files.
•
42 cartridge types, raw and CART format.
•
Cassette player, raw and CAS images.
•
Files can be stored directly on your host computer via the H: device.
•
Current emulation state can be saved in a state file.
•
Sound support.
•
Stereo (two POKEYs) emulation.
•
Joystick controller using numeric keypad.
•
Real joystick support.
•
•
Paddles, Atari touch tablet, Koala pad, light pen, light gun, ST/Amiga mouse, Atari
trak - ball, joystick and Atari 5200 analog controller emulated using mouse.
R- Time 8 emulation using host computer clock.
•
Sound output may be written to WAV files
•
Printer support.
•
Atari palette read from a file or calculated basing on user - defined parameters.
The Enhancement s in Atari800MacX are
•
Ability to display the Atari Screen in 2x, 3x, and 4x and Fullscreen modes.
•
Fullscreen and Windowed modes.
•
Screen snapshots saved to TIFF files.
•
Support of Macintosh Joystick/Gamepa d devices.
•
Full Macintosh OS X Preferences support, including saving preferences for each
user.
Atari800MacX Manual – Version 3.5
Page 7 of 95
•
Full use of Macintosh Menus in Windowed mode.
•
Creating of Atari ATR disk images.
•
Media Status Window
•
Emulation of Atari 825, Atari 1020, and Epson FX- 80 Printers
•
ATR Disk Editor
•
Disk Image Conversion
•
Atari Function Key Window
•
Enhanced debug Monitor
•
Ability to run emulator at full speed (not limited to 50/60 frames per second).
•
Emulation of the full Atari 5200 controller, including both buttons and keypad.
•
Ability to use Mac joysticks as paddles, and true 5200 analog controllers.
Atari800MacX Manual – Version 3.5
Page 8 of 95
3. Keyboard
The image below shows the actual keyboard of an Atari XE model:
Differences among other models:
800 XL has same keys, but Help, Start, Select, Option and Reset are placed vertically on
the right side of other keys,
• 1200 XL additionally has F1, F2, F3 and F4 function keys,
•
•
800 has no F1- F4 nor Help key, the Inverse key (the one in the bottom - right
corner) is marked with the Atari logo, but has the same functionality,
5200 has no keyboard, however each joystick has its own keypad (see below).
The general philosophy in keyboard layout is to assign the functionality (not the location)
of the Atari key to the equivalent Macintosh keyboard key.
First, here are the definitions for the 5200 keypads:
Macintosh Key
F4
P
R
0- 9 (either keypad or
regular)
* (either keypad or
regular)
- (either keypad or
regular)
Shift
Joystick Fire
5200 Keypad Key
Start
Pause
Reset
0- 9
*
#
2nd Button
1st Button
Note: The same keys are used for all 5200 controllers, that is, pressing a key presses it on
all controllers simultaneously.
Atari800MacX Manual – Version 3.5
Page 9 of 95
Then the definitions for the Atari computer models:
Macintosh
Keystroke
Esc
F2
F3
F4
F5
Pause Break
F15 (non- Apple)
Backquote `
0- 9
Shift+2
Shift+6
Shift+7
Shift+8
Shift+’- ‘
=
Shift+’=’
Backspace
Tab
A- Z
[
]
Caps Lock
Shift+Caps
Lock
;
Shift+’;’
'
Shift+’”’
Enter
Shift+’<’
Shift+’>’
\
Shift+’\’
Insert
Shift+Insert
Home
Page Up
Delete
Shift+Delete
End
Page Down
Left Arrow
Right Arrow
Up Arrow
Down Arrow
Atari Keystroke
Esc
Option
Select
Start
Reset
Break
Break
Break
0- 9
Shift+8
Shift+’*’
Shift+6
*
Shift+’- ’
=
+
Backspace
Tab
A- Z
Shift+’,’
Shift+’.’
Caps
Shift+Caps
;
Shift+’;’
Shift+7
Shift+2
Return
<
>
Shift+’+’
Shift+’=’
Control +’>’
Shift+’>’
Shift+’<’
Shift+Caps
Control +Backspace
Shift+Backspace
Inverse (XL/XE)/
Atari key (800)
Help (XL/XE)
Control +’+’
Control +’*’
Control +’- ’
Control +’=’
Description
types
types
types
types
‘@’
‘^’
‘&’
‘*’
types ‘_’
types ‘+’
types ‘[‘
types ‘]’
types ‘:’
types '
types ”
types ‘<’
types ‘>’
types ‘\’
types ‘|’
inserts space
inserts line
clears screen
deletes char
deletes line
cursor
cursor
cursor
cursor
left
right
up
down
The Atari function keys Start, Select, Option, and Break may also be pressed through the
Function Key window. See the Control Menu (section 6.4) for information on how to open
this window.
Atari800MacX Manual – Version 3.5
Page 10 of 95
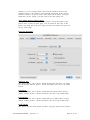
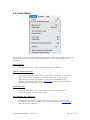
4. Media Status
The Media Status Window on the Atari800MacX emulator allows you to control all of the
aspects of digital media emulation from one graphical interface. Besides media
management, it allow you to control some often used aspects of the emulator as well. If it
is not displayed at the moment, you can display if by issuing the "Show Media Status
Window" command in the Media menu. The media status window looks like this:
The status window contains the following elements:
Disk Image pushbuttons:
This section of the window provides pushbutt on s allowing you to access
some of the common disk functions that are normally available in the
Media menu or the Disk Drive Management window. See the Media Menu
(section 6.1) for full explanations of the comman ds.
Displayed Drives selector:
This section of the window controls which disk drives are shown in the
Disk Drive Status display to the right of it. You may choose to display
either D1 through D4, or D5 through D8.
Atari800MacX Manual – Version 3.5
Page 11 of 95
Disk Drive Status Display /Buttons:
This section of the window allows you to control one of the emulated disk
drives on the Atari. The drive may be turned on/off with the on/off
button. If the drive is on, you may insert a disk image by pressing the
Insert button. You also can drag and drop a disk image file from the
finder to the drive picture to insert the disk. When an image is inserted,
you can write protect / u n p r o t ect with the Lock/Unlock button. When the
drive is write protected, a small lock icon will appear above the lock
button. Finally, you can drag disks from one drive to another as well.
Status may also be displayed by the drives. The on/off, insert / eject, and
lock/ u nlock buttons will light up / da rke n when disks are
inserted / r e m oved, etc. Also, there are two LED's on the drive. One
indicates power, and the second indicates read / write activity, red for write,
and green for read. In addition, the sector the drive is reading or writing
may be shown on the disk drive door. The activity LED's and sector status
displays may be turned on/ off on the Display Tab (section 5.1) of the
Preferences window.
Cassette Drive Display /Buttons:
This section of the window allows you to control the emulated cassette
drive on the Atari. You may insert or remove a cassette image with the
Insert /Eject button. When a cassette is inserted, the slider may be used to
change the tape position, and the counter will indicate where the tape is, in
block count. You can also drag a cassette image file from the finder and
drop it on the cassette picture. The New button will allow you to create a
blank cassette file (.cas). It will ask you for the name of the new image,
then create the file, and insert it into the cassette drive. The emulator
support s reading and writing from / t o cassette images. Once the cassette
is started by holding start during reboot, or by using the CLOAD/CSAVE
basic call, you must press the space bar to continue loading / s aving the file.
Atari800MacX Manual – Version 3.5
Page 12 of 95
Cartridge Display /Button:
This section of the window allows you to control the emulated cartridge
slot on the Atari. You may insert or remove the cartridge image using the
Insert /Eject button. You can also drag a cartridge image file from the
finder and drop it on the cartridge picture.
Printer Control Menu /Button:
This section of the window allows you to chose which printer emulation
you are using from the "Select" pulldown. You may choose the Text
Printer, Atari 825, Atari 1020, or Epson FX- 80. The picture of the selected
printer will be displayed in this section. The menu also has an option to
reset the printer, which is equivalent to turning the printer off and on. The
Preview button is used to view what the current printer output looks like.
It is active for every printer emulation except the Text Printer. For more
info on Printer Emulation, see the Printer Emulation (section 7.0). For
setting the printer options, see the Printer Tab (section 5.3) in Preferences.
Emulator Control pushbuttons:
This section of the window provides pushbutt on s allowing you to access
some of the common emulator control functions that are normally
available in the Control Menu. See the Control Menu (section 6.4) for full
explanations of the comman ds.
Atari800MacX Manual – Version 3.5
Page 13 of 95
Emulator Control pulldowns:
This section of the window provides five pulldowns which allow the user
to choose the type of machine that is emulated, along with aspects of how
it is displayed. You can choose the amount of window scaling, the width
of the window, type of window scaling, and TV artifacting type.
Atari800MacX Manual – Version 3.5
Page 14 of 95
5. Preference s
The Atari800MacX Preferences Windows is accessed through the Preferences menu item in
the application menu. It allows the user to select options that Atari800MacX starts up
with. It contains seven tabs, which control different aspects of the emulation. The
options on the last six tabs are controllable only through this interface. Most of the
options in the first tab are also controllable through the Display menu .(section 6.2)
Detailed descriptions of the options are the seven tabs are available through the following
sections.
5.1 Display Tab
The Display Tab is the heart of the graphics control of the emulator.
From here you can change the:
Display Size
Display Mode:
These radio buttons allow you to choose to display the emulator in a
standard Aqua window, or to use the entire screen for displaying the
emulator. When in full screen mode, normally you will want to check the
Fullscreen Always 640x480 item. This will lock the display to a fixed size.
If this item is unchecked, then the Scale Factor and Display Width
parameters below still apply. The emulator will attempt to find a suitable
mode. Note, not all modes will work with all display adapters. If the
Atari800MacX Manual – Version 3.5
Page 15 of 95
emulator suddenly quits when changing to full screen, the Scale Factor and
Scale Mode were not compatible with your graphics card and fullscreen.
You can also change the Display Mode setting from the Display
Menu. (section 6.2)
Renderer:
These radio buttons allow you to which renderer Atari800MacX uses to
display the screen. OpenGL requires a video card that support s OpenGL,
but will be much faster at scaling the screen to larger sizes than the
Software mode. However, OpenGL is slower at the Smooth scaling than the
Software renderer. OpenGL is also more efficient in OSX 10.4 and high,
where Apple has implemente d something called "coalesced updates". If
you are having speed or graphics problems on your particular machine,
you may want to try the other renderer from what you are currently using.
The default value in Atari800MacX 3.0 and higher is OpenGL.
Scale Factor:
These radio buttons allow you to choose between the standard Atari
Screen Size where one Atari pixel is mapped to one Macintosh pixel,
2xAtari Screen size (one Atari pixel is mapped to four, 2x2,Macintosh
pixels), 3x Atari Screen size (one Atari pixel is mapped to nine,
3x3,Macintosh pixels), or 4x Atari Screen size (one Atari pixel is mapped
to sixteen, 4x4,Macintosh pixels). You can also change this setting from
the Display Menu. (section 6.2) Note, on slower Macs, you may want to
change your video depth to Thousands of Colors to achieve full frame rate
when using more than 1x mode. (Don't change this while running the
emulator!!!).
Display Width:
These radio buttons allow you to choose between narrow, default, and full
widths of the Atari screen. These correspon d to 320x240, 336x240, and
384x240 respectively when in 1x Scale Factor mode. You can also change
this setting from the Display Menu. (section 6.2)
Fullscreen Monitor:
This check box allows you to select the Debug Monitor to run in Fullscreen.
Without this item checked, if the Debug Monitor runs (by pressing F8), or
the Emulated machine crashes, and the unrecoverable error dialog runs,
the emulator will leave Fullscreen and display the monitor or crash dialog
in a window. With this item checked, the monitor will appear in fullscreen.
You can also select the foreground and background colors for the monitor
text. Note, you can currently only use the Fullscreen if you also select the
Fullscreen Always 640x480 Item.
Show Frames Per Second In Window Title
This checkbox lets you choose to display the Frames Per Second (FPS) that
the emulator is running at the moment. This can be used to check that
your Macintosh is fast enough to run the Atari at full speed. It should
Atari800MacX Manual – Version 3.5
Page 16 of 95
indicate 50fps for PAL, and 60fps for NTSC. FPS Display is not available in
Fullscreen mode. However, since Fullscreen mode always runs in 256
colors, speed is usually not an issue. You can also change this setting from
the Display Menu. (section 6.2)
Brushed Metal Appearance
This checkbox lets you choose it the windows in the emulator use the
Standard Aqua appearance, or if they use the Brushed Metal appearance,
ala Safari or iTunes. The emulator must be restarted after a change in this
setting for it to take full effect. Note, you must be using OSX 10.3 or
higher to used the Brushed Metal Appearance.
TV Mode
These radio buttons allow you to choose to the refresh rate of the
emulator, either NTSC (60 frames per second) or PAL (50 frames per
second).
Refresh Ratio
This pull down allows you to choose how often to redraw the simulated
Atari screen. You can choose to do it every Atari frame, or every 2nd, 3rd,
or 4th one. On very slow Macs, this could be used to bring the frame rate
up to full speed (50 or 60 frames per second). The checkbox then lets you
determine if player / m is sile collisions are detected in the frames that are
skipped. By default, they are.
Artifacting Mode
This pull down allows you to choose how the emulator simulates
Artifacting, which occurred when the original Atari used a TV for
displaying its video. Some games depended on the colors these Artifacting
effects produced.
Use New Artifacting
This checkbox allows you to choose if the new Artifacting method released
in Atari800MacX 3.3 should be used. It produces much clearer text, and
correctly varies luminance and displays player missile graphics in
artifacted mode.
Color Palette
These options allow the user to customize the colors used by the
Macintosh to Emulate the Atari's color palette. 8- bit Atari machines have
256 colors, and the emulator can either generate a palette, or use a pre generated palette stored in a file. By default, it uses the real.act file stored
in the Palettes folder in the application directory.
Atari800MacX Manual – Version 3.5
Page 17 of 95
If the "Use Palette from File" checkbox is checked, then you can choose the
palette file with the Choose.. button. If you wish, you may then also check
the "Adjust File Palette" checkbox to adjust the Black Level, White Level,
and Intensity parameters described below. These adjust men t s do not
affect the file itself.
If the "Use Palette from File" checkbox is not checked, then the emulator
will generate a palette using the values you enter for the following 4
parameters:
•
•
Black level adjusts brightnes s of Atari colors 0, 16, 32, etc.
(darkest ones),
White level adjusts brightness of Atari colors 15, 31, 47, etc.
(lightest ones),
•
Intensity adjusts saturation of all colors,
•
Color shift adjusts hues to be used for Atari colors 16- 255 (0- 15
are always gray). A hue is used for colors 16- 31, next one for colors
32- 47, etc.
Each parameter must be an integer within range 0- 255.
Disk Leds
These options allow the user to chose if disk activity indicators are shown in the
Atari Emulator window (lower right corner) and in the Media Status Window
(Driver Status LED's and sector numbers on drive doors).
Atari800MacX Manual – Version 3.5
Page 18 of 95
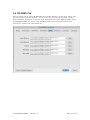
5.2 Atari System Tab
The Atari System Tab controls the type of Atari System that the emulator is emulating, as
well as allows some aspects of the Atari OS and emulation to be controlled.
Atari Type
This pulldown allows the user to chose the type of Atari machine
emulated, and it's RAM size.
Disable Basic
This checkbox determines if the Atari Basic cartridge is disabled when the
emulator boots or causes a Cold Reset.
Disable Basic on Warmstart if Disable Basic Selected
This checkbox determines if the Atari Basic cartridge is disabled when the
user causes a Warm Reset. Note, the simple Disable Basic checkbox must
also be selected for this to work. Also, note this is not how the Actual
Atari HW functions, but is provided as a user convienence.
Boot From Cassette
This checkbox determines if the emulated Atari will boot from the
emulated cassette when it is rebooted. After the boot, you must press the
space key to start the cassette (like pressing Play on the actual recorder).
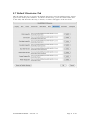
Atari800MacX Manual – Version 3.5
Page 19 of 95
Limit To Normal Atari Speed
This checkbox determines if the speed (in frames per second) of the
emulator is limited to 50 or 60 (PAL or NTSC), of if it can free run, allowing
it to run as fast as your Macintosh able. This feature can also be controlled
from the Control Menu. (section 6.4)
Ignore Header Write Protect Bit On ATR Disk Images
This checkbox should be checked to ignore the Header Write Protect Bit that is set
in some ATR disk images. It is unchecked by default, and should only be checked
if the user needs to be able to write to an ATR image that has the bit set. When
this box is checked, the user will be able to set the drive to either read - only or
read / write in the Drive Management (section 6.1) panel.
Use International Keyboard Translation
This checkbox should be checked to use keymapping specified for an
International keyboard in the International Input Menu in System Preferences.
Use this is you are using an non - US English keyboard and want key presses
properly translated to Atari keys.
Atari Computer Type Used For Auto Type Switching from 5200 mode
When the emulator is operating in 5200 mode, and the user inserts computer media
(cartridge, disk, executable file), the emulator will automatically switch to Computer
mode. It defaults to an 800XL with 64K, however, this pulldown allows you to choose
which computer type will be switched to automatically.
Emulation Speed
If the limit to normal Atari Speed is checked above, then this control will determine
the speed at which the emulator runs relative to a real Atari. It can be adjusted from
10% to 300%, with the default being 100%, or the same speed as a real Atari.
Enable SIO Patch
The SIO (Serial Input / O ut p u t) patch is meant for speeding up disk
operations. Originally, data between Atari computer and a disk drive is
sent using slow, serial transmission (19200 bits per second). The Atari800
core emulator fully emulates the disk drive, so unlike other emulators it
does not require the patch. However, it is much faster, if the emulator can
immediately transfer data between a disk image and the Atari’s memory,
skipping serial trans mission emulation. The patch is only a change in the
Atari OS, it does not disable real drive emulation.
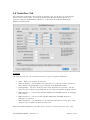
Enable H: Patch
This checkbox determines if the Hard Disk Drive Device patch is applied to
the OS. The H: ('Hard Disk') device gives access to every file on your
Macintosh to every Atari program. The device number specifies the base
directory to be used and if the text conversion is applied:
Atari800MacX Manual – Version 3.5
Page 20 of 95
•
H0: – program directory, no conversion
•
H1: - H4: – directories #1- #4, no conversion
•
H5: – program directory, text conversion applied
•
H6: - H9: – directories #1- #4, text conversion applied
Currently only ‘read file’ and ‘write file’ operations are supporte d by the H:
device (delete file, rename file etc. won’t work).
\
Enable P: Patch
This checkbox determines if the Printer Patch (P:) is applied to the
emulator. When the patch is enabled, the user may then select one of the
printer emulations from the Printer Preferences Tab, or from the Media
Status Window.
Enable R: Patch
This checkbox determines if the Serial Port Patch (R:) is applied to the
emulator. When the patch is enabled, the user may then specify the TCP
port number to use to "dial- in" to BBS software using telnet in place of the
original modem connection. Currently only dial- in capability is present.
"Dial- Out" will be added in a future release.
Enable Sound
This checkbox determines if the playback of Atari Sound is emulated. This
feature can also be controlled from the Sound Menu.
Use Hi- Fi Sound
This checkbox determines if the new Hi- Fi version of Sound Emulation is
used. The Hi- Fi sound will require more processing power, so you may not
want to use it on slower machines. Changing this option requires the
emulator to perform a coldboot, so you will loose what you are currently
running on the Atari. Also, some demo's may produce better sound in the
old sound emulation, so you should try both types and use the one you
prefer.
Enable Console Speaker Sound (Keyclicks)
This checkbox determines if the console speaker is emulated. This is produces
the keyclicks when typing on the Atari keyboard.
Enable SERIO Sound (Disk I/O)
This checkbox determines if the Serial IO sound is emulated. This is what
produces the sound when Disk or Cassette Input / O ut p u t occurs.
Atari800MacX Manual – Version 3.5
Page 21 of 95
5.3 Printer Tab
The Printer Tab controls the type of printer emulation that is used for outputting to the P:
device from the emulated Atari. Note, that the P: Patch must be enabled on the Atari
System Tab for this tab to be active.
The are four choices for printer emulation, Text Printer, Atari 825, Atari 1020, and Epson
FX- 80. The Text printer simply sends the printer output to a text file with optional script
processing, while the other three choices emulator a legacy printer, and allow the user to
save the printer output in a PDF file. More info on use of the printer can be found in the
Printer Emulation section, 7.0.
The sections below describe the options available for each of the printer types.
Text Printer
Print Command:
The only option for this printer type is the command used to print. Within
the command, %s is used to represent the file name of the temporary file
generated during printing. For example, if you wanted the printed text to
be opened in BBEdit, you would enter "bbedit %s" (without quotes) in the
box. By default, the OSX command "open %s" is used, which will open the
printed text in TextEdit by default, unless you have changed your file
associations. The temporary files used for printing are created in the
printer output directory, which you can choose on the Default Directories
Tab .(section 5.7) Also, if you have UNIX printing set up, you could directly
print using "lpr %s"
Atari800MacX Manual – Version 3.5
Page 22 of 95
Atari 825 Printer
Character Set:
This option allows you to choose which international character set will be
used with the printer. On the real Atari 825, this was set by a DIP switch.
Form Length:
This option sets the form length, in
Emulation. The real Atari 825 does
page length, but this setting is used
the PDF output file from the Printer
the Printer Emulation section, 7.
inches, for pages output by the Printer
not have a concept of form feeds or
to determine the length of a page in
Emulation. For more details, see
Auto Linefeed:
This option, which is set by default, will automatically add a linefeed
character to every carriage return sent from the emulated Atari to the
emulated Printer. This function was normally preforme d by the printer
hardware interface or driver on the Atari (Atari 850 or other). If you get
blank lines in your output, you may need to turn this option off.
Atari800MacX Manual – Version 3.5
Page 23 of 95
Atari 1020 Printer
Pen 1- 4 Color:
This option allows you to choose the color of each pen in the Atari 1020
printer. Clicking on the color box will bring up a standar d Mac color
selection dialog.
Print Width:
This original Atari1020 used 4" wide paper, and had a print width of 3.77
inches. You can use this original print width centered in normal width
modern paper, or you can specify double print width, in which case all of
the printer output will be scaled up by a factor of 2 (both height and
width), and the printer output will fill most of the width of modern paper.
Form Length:
This option sets the form length, in
Emulation. The real Atari 825 does
page length, but this setting is used
the PDF output file from the Printer
the Printer Emulation section, 7.
inches, for pages output by the Printer
not have a concept of form feeds or
to determine the length of a page in
Emulation. For more details, see
Auto Linefeed:
This option, which is set by default, will automatically add a linefeed
Atari800MacX Manual – Version 3.5
Page 24 of 95
character to every carriage return sent from the emulated Atari to the
emulated Printer. This function was normally performed by the printer
hardware interface or driver on the Atari (Atari 850 or other). If you get
blank lines in your output, you may need to turn this option off.
Auto Adjust Image to Start of Page:
This option automatically readjusts the paper, so that the output of the
printer starts at the top of the page. This is useful for the 1020, as the
printer may print above the start paper location, and would then print off
the top of the page.
Epson FX- 80 Printer
Character Set:
This option allows you to choose which international character set will be
used by default with the printer. On the real Epson, this was set by a DIP
switch.
Print Pitch:
This option allows you to choose which character pitch will be used by
default with the printer. On the real Epson, this was set by a DIP switch.
Print Weight:
This option allows you to choose which character weight will be used by
default with the printer. On the real Epson, this was set by a DIP switch.
Form Length:
This option sets the form length, in inches, for pages output by the Printer
Atari800MacX Manual – Version 3.5
Page 25 of 95
Emulation. On the Epson emulation, this sets both the internal page length
in the emulated printer, as well as determining the length of a page in the
PDF output file from the Printer Emulation. For more details, see
the Printer Emulation section, 7.
Auto Linefeed:
This option, which is set by default, will automatically add a linefeed
character to every carriage return sent from the emulated Atari to the
emulated Printer. This function was normally performed by the printer
hardware interface or driver on the Atari (Atari 850 or other). If you get
blank lines in your output, you may need to turn this option off.
Print Slashed Zero:
This option allows you to choose if zero characters are printed with a slash
by default with the printer. On the real Epson, this was set by a DIP switch.
Auto Skip Perforation:
This option, sets the printer to automatically skip 6 lines at the end of the
page. This is very useful for program listings and other non - page
formated output. On the real Epson, this was set by a DIP switch. Also, if
you choose this option, you may additionally choose to split the 6 lines
between the top and bottom of the page, giving a 3 line margin at the top,
and a 3 line margin at the bottom of the page. This additional option was
not available on the original printer.
Atari800MacX Manual – Version 3.5
Page 26 of 95
5.4 Hard Drives Tab
This tab allows you to set the directories used by the emulator for the Hard Disk Device
Emulator, H:
There are four directories, and they are mapped to devices as follows:
•
H0: – program directory, no conversion
•
H1: - H4: – directories #1- #4, no conversion
•
H5: – program directory, text conversion applied
•
H6: - H9: – directories #1- #4, text conversion applied
You use the checkbox at the bottom of the tab to make the H: devices read only, as
opposed to read / write.
Starting in version 1.1, Atari800MacX supports all normal DOS functions for the hard
drives, including Rename, Delete, Note, Point, and Open for modify (read /write). One
caveat is that all file names created from the Mac side should be lower case.
Starting in version 1.2, Atari800MacX supports subdirectories on the hard drives.
Note, the Delete function will not work on Hard Drives from the Atari DOS 2.x or MYDOS
menus, as they do not recognize Hx: as a drive. However, the XIO functions will work to
delete.
Atari800MacX Manual – Version 3.5
Page 27 of 95
All file and Directory functions are supported by SpartaDos or BWDos from the command
line, as well as from their XIO equivalents. Binary Load (with all options) will also work
with MYDOS and its XIO equivelents.
Also, there is a capability to specify a Command Path for use with SpartaDos and BW- DOS
when issuing comman d from the Hx: prompt. The normal path used with Dx: drives will
not work, as this is part of the driver for the Dx: devices in the DOS. The paths specified
here are separated by semicolons, and may include the normal directory seperator
character ('>''). The path defaults to "H1:>DOS;>DOS". This means that the "DOS"
directory on Hard Drive 1 will be searched for the command, then the "DOS" directory on
the current drive, then finally the current directory will be searched.
Atari800MacX Manual – Version 3.5
Page 28 of 95
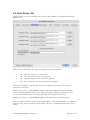
5.5 Boot Media Tab
This tab is used to set the content s of the Emulator's peripherals when it boots. Starting
with version 3.4 of the emulator, there are two options here. One is to start with the
media that was present when the emulator was exited the last time. This option is chosen
by checking the "Star Emulator With Media Present When Emulator Last Exited" checkbox.
When this is checked, the other controls on this tab are not enabled.
The other option is chosen by leaving the box unchecked. Then, you can specify up to
eight floppy disks, one cartridge, one cassette, and one directly executable file (in Atari
binary format), which will run when the emulator boots. This feature lets you specify the
favorite game cartridge, or program ming disk, and have it always be present in the
emulator at startup. To choose a disk, cartridge, etc, simply press the button for the
device, and browse to the file. It's name will appear in the middle text field. In addition,
you may enable or disable that particular piece of media with the Enabled checkbox to the
right of each field.
Atari800MacX Manual – Version 3.5
Page 29 of 95
5.6 OS ROMS Tab
This tab allows you to chose the ROM files used in the emulation of the Atari. These files
are not provided with the emulator. To select the file, press the select button, and the
chosen filename will appear in the text field. By default, files in the OSRoms folder in the
Atari800MacX folder are chosen, with standard names of atariosa.rom, atariosb.rom,
atarixl.rom, ataribas.rom, and a5200.rom.
Atari800MacX Manual – Version 3.5
Page 30 of 95
5.7 Default Directories Tab
This tab allows the user to specify the default directories used for loading / s aving various
types of file used by the emulator. To choose the directory, press the select button next
to the field, and when the directory is chosen, it's name will appear in the text field.
Atari800MacX Manual – Version 3.5
Page 31 of 95
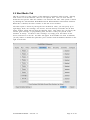
5.8 Controllers Tab
The Controllers Tab allows the selection of Joystick types for the up to 4 joysticks that
may be used with the Atari. The Atari 400/ 800 / 5 2 0 0 models support the use of 4
joysticks, while the XL/XE models allowed 2. (4 are allowed on the XL/XE with the
Multijoy4 modification).
Joysticks
For each joystick port, you can choose between 6 types of joystick emulation:
•
None - There is no joystick on this port.
•
Numeric Keypad - Use the numeric keypad keys as a joystick. The key layout for
this joystick is program m able by pressing the "Left Keyboard" button.
Left Keyboard - Use keys on the left side of the keyboard as a joystick. The key
layout for this joystick is program m able by pressing the "Numeric Keypad" button.
HID Controller 1 - Use the first attached Macintosh OS X HID Joystick or Gamepad
as a joystick.
HID Controller 2 - Use the second attached Macintosh OS X HID Joystick or
Gamepad as a joystick.
Mouse Emulation - Use the Mouse as an emulated Atari device on this port. Only
one port may use Mouse emulation at this time.
•
•
•
•
Other than Mouse Emulation, the same device can be set on more than one port. This
Atari800MacX Manual – Version 3.5
Page 32 of 95
way, if you only have one gamepad, it can be passed around to the four players, if you are
playing a game that doesn't require simultaneous use.
When using the HID Controllers, analog joysticks on the controllers will provide port
analog input as well, allowing the joystick to be used as a paddle for such games as Super
Breakout. In this case, the x- axis will be paddle 1, and the y- axis paddle 2, if the Use XAxis for both paddles is not checked. If it is, the x- axis will be both paddle 1 and paddle
2.
For each joystick port, you can also set autofire mode. When autofire is on, it can be on
only when the joystick button is pressed, or can be on continuously.
Enable Multijoy4 Joysticks for XL/XE Machines
This checkbox enables the emulation of the Multijoy hardware which allowed up to 4
joysticks to be used with custom designed games on the XL/XE series of machines.
Normally, XL/XE machines only have 2 joystick ports.
Mouse Emulation
Finally, if one of the joystick ports is set to Mouse Emulation, the Emulated Device
pulldown will become active in the Mouse Emulation section. Then, you can choose one of
the following Atari devices to emulate with the Mouse:
•
None – no device emulated,
•
•
Paddles – analog controllers. The paddles are simple potentiometers, attached two
to one Atari port. Each paddle has single button. Horizontal mouse position and
left button is mapped to the first paddle, vertical position and right button to the
second paddle. The paddles are used mostly in games (e.g. Arkanoid,
SuperBreakout, Kaboom). The checkbox at the bottom of the page lets you specify
that Horizontal mouse position is used for both the first and second paddles.
Atari touch tablet – a controller, which returns position of where it has been
touched. It has two buttons, which are mapped to your mouse buttons. The touch
tablet is used mostly in graphics editors,
Koala Pad – a device very similar to the touch tablet. The only difference is that it
has reverse up / d ow n orientation,
Light pen – it’s a pen, with which you can draw directly on the TV screen (its
button presses when you touch the screen). The mouse controls the position of
light pen. The left mouse button is the light pen’s button. The right mouse button
can be used to display mouse cursor, which is useful if an Atari program doesn't
display it,
Light gun – works similarly to the light pen. The difference is that button (trigger)
signal is inverted,
Amiga mouse – the standard mouse used with Commodore Amiga computers. This
device can be attached to an 8- bit Atari and is used by some software. As in the
real Atari, only the left mouse button can be used,
Atari ST mouse – the standard mouse used with 16- bit Atari ST computers. The
device is very similar to the Amiga mouse, and only left button can be used as
well,
Atari trak - ball – a track - ball device. Similar in operation to Atari ST mouse,
•
Joystick – the mouse emulating a joystick. This device can be used with all
•
•
•
•
•
•
Atari800MacX Manual – Version 3.5
Page 33 of 95
software using normal Atari joystick.
There are extra parameters available to adjust the function of some of the emulated
devices. They are:
Speed of Emulated Device
If the controller moves too slow or too fast, use the Speed of emulated
device option. Also, in Full Screen mode, libSDL on the Macintosh does not
allow the Mouse to be grabbed. This may cause the emulated device to not
be able to reach the full limits of the Atari Screen. To fix this, increase this
value. On my system, using Kensington Mouse Works with a fair amount
of acceleration, a value of 15 in this field works nicely for full screen.
Minimum and Maximum Values
For Paddles, the Atari touch tablet and the Koala Pad you can specify the
range of controller values.
Horizontal and Vertical Offset
You can calibrate the Light pen and the Light gun using Horz /Vert offsets.
You should change these values if the program you're using indicates the
pen / gun is in different location than the mouse pointer (right - click to
toggle displaying of mouse pointer).
Intertia of Emulated Joystick
The Inertia of emulated joystick option is available only for the emulated
Joystick. It indicates how far the pointer can move on a single mouse
movement. This is because the joystick is a digital device (moved in a
certain direction or not), while the mouse is analog and can move in a
direction faster or slower. This will set how far you have to move the
device to get a digital indication of movement in that direction.
Use X- Axis of Joystick /Mouse Emulation for Both Paddles in a Paddle Set
Checking this box allows X- Axis motion on an analog joystick or the
mouse emulation to be used for both Paddle 1 and Paddle 2. This
overcomes the unusual motion required for the second player to move the
joystick or mouse vertically to control a horizontal paddle in games such
as Super Breakout. In the unchecked mode, Horizontal (x- axis) motion is
tied to paddle 1, and Vertical (y- axis) motion is tied to paddle 2.
Atari800MacX Manual – Version 3.5
Page 34 of 95
5.9 Gamepads Tab
The Gamepads Tab allows the buttons on Joysticks or Gamepads to be assigned to Atari
Controller Buttons or keypresses. It also allows the user to specify if analog or digital
joysticks / h a t s on gamepads are used to emulate the Atari joysticks. Note, the emulator
only scans for Gamepads when starting up, so Gamepads plugged in during operation will
not be recognized. You must quit the emulator, and rerun it to have them recognized.
Button Assignment
These controls allows the user to assign Atari buttons or key presses to up
to 24 gamepad buttons. Use the Assignment pulldown to select the
gamepad button to assign. Then the user can assign a different Atari
control to that gamepad button for Computer (400/800) mode, and for
5200 mode. Once assignment s are made, configurations must be saved
using the Save or Save As item of the Configuration Pulldown. Saved
configurations are then assigned to specific gamepads in the Joystick
Preference section below.
One of the types of Atari controls that may be assigned to gamepad
buttons is joystick directions. This is used for gamepads such as the
iStick, which have a set of four buttons for use as directional buttons, but
these buttons do not identify themselves as a digital hat. You may assign
the joystick directions to buttons in this section, then select Gamepad
Buttons as the joystick type in the section below.
The user may also use the "Identify Gamepad ...." buttons to bring up a
Atari800MacX Manual – Version 3.5
Page 35 of 95
window which will allow them to determine which buttons are which on
the Gamepads. This window also gives the name of the gamepad, as well
as showing how many buttons, analog, and digital joysticks it has. If a
particular Gamepad is not plugged in, it's button will be greyed out.
Joystick Preference
These controls allow you to do things:
•
•
•
Specify which type of joystick is used on each Gamepad to simulate
the Atari joystick / pa d dle.
Specify which Analog joystick or Digital Hat to use, if your
gamepad has more than one.
Specify the Button Assignment configuration to assign to each
gamepad.
There are 3 types of Gamepad devices that may be used to simulate the
joystick. The first is an analog joystick. The second is a digital hat. And
the third, is a set of gamepad buttons assigned in a Button Assignment
Configuration above. The second of the two pulldowns for each gamepad
in this section chooses the type of joystick to use for that gamepad. If
Analog joysticks or Digital Hats are not present on your gamepad, their
menu items will be disabled, or greyed out. Digital Hats and Gamepad
Buttons are not useful for simulating paddles, as they only have 3
positions, far left, far right, and centered.
The second pulldown allows you to select from more than one joystick or
hat on your gamepad, if they are present.
The button assignment pulldown allows you to assign a button
configuration to each Gamepad. The Standard configuration assigns the
joystick trigger to each button. The other custom configurations may be
created in the Button Assignment section above.
Atari800MacX Manual – Version 3.5
Page 36 of 95
6.0 Menus
The Atari800MacX program provides control of the emulator through the familiar
Macintosh menu interface. It provides a standar d application menu, with Preferences and
Hide items, four program specific menus, as well as the standard Window and Help
menus.
In addition, since Macintosh style menus are not available in the Fullscren environment,
the traditional Atari- screen based user interface of the Atari800 emulator is provided by
Atari800MacX, so you don't have to switch back to windowed mode just to insert your
favorite cartridge or disk image.
Detailed descriptions of the options on the four menus are available through the
following sections:
Atari800MacX Manual – Version 3.5
Page 37 of 95
6.1 Media Menu
The Media menu on the Atari800MacX emulator allows you to insert and remove digital
media into the emulator, the same way you would on a real Atari. It has the following
menu selections:
Drive Management (cmd- D)
This menu item supplies access to a full Disk Drive Management window
which allows you to insert and remove disks in all 8 disk drives, as well as
manage the status of the emulated drives. Details on it's operation can be
found in section 6.1.1.
Atari800MacX Manual – Version 3.5
Page 38 of 95
Insert Floppy (cmd- 1 through cmd- 8)
This sub- menu allows you to insert an image file into any of the 8
emulated disk drives. A .atr, .dcm, or .xfd file may also be loaded into the
emulator by double - clicking it in the finder, or dragging it to the
Atari800MacX Icon.
Remove Floppy (ctrl- cmd- 1 through ctrl- cmd - 8, and ctrl- cmd - 0)
This sub- menu allows you to remove a image file from one of the
emulated disk drives, or you may empty all of the drives at once.
Rotate Floppies
This menu item rotates the current inserted floppies among the drives.
This may be useful for playing multiple disk games.
New Cassette Image
This item will create a new cassette file in the .cas format. You will be
prompte d for the name of the new file, and then it will be created and
inserted into the cassette player.
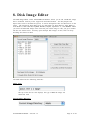
Edit an .atr Disk Image
This menu item allows you to edit a Atari floppy disk image in the .atr
format. For more details on the editor, see section 8.0, Disk Editor.
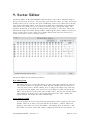
Sector Edit an .atr Disk Image
This menu item allows you to edit a Atari floppy disk image in the .atr
format. For more details on the editor, see section 9.0, Sector Editor.
Disk Image Conversions Submenu
This menu item allows you to convert between the various types of Atari
disk image formats. You may convert .atr images to .xfd, .dcm, or .scp
types. You may also convert .xfd, .dcm, and .scp images to .atr.
Insert Cartridge (cmd- C)
This menu item allows you to insert a cartridge into the emulator. If it is a
raw ROM dum p of the cartridge, you will need to select the cartridge type
from the displayed dialogue. If it is a .car file, then this step will not be
necessary. A .car, .rom, or .bin file may also be loaded into the emulator by
double - clicking it in the finder, or dragging it to the Atari800MacX Icon.
Atari800MacX Manual – Version 3.5
Page 39 of 95
Remove Cartridge (shift- cmd - C)
This menu item allows you to remove an inserted cartridge from the
emulator.
Create .car From ROM File
This menu item allows you to convert a .car Cartridge file into a raw ROM
dump, removing the cartridge type information.
Create ROM File from .car
This menu item allows you to convert a raw ROM dum p of a cartridge into
a .car format file, which contains the cartridge type information, which will
allow you to not have to specify this when you insert the cartridge.
Insert Cassette
This menu items allows you to insert a cassette image file (.cas) into the
emulator. The emulator supports reading and writing from / t o cassette
images. A .cas file may also be loaded into the emulator by double clicking it in the finder, or dragging it to the Atari800MacX Icon. Once the
cassette is started by holding start during reboot, or by using the
CLOAD/CSAVE basic call, you must press the space bar to continue
loading / s aving the file.
Remove Cassette
This menu item allows you to remove an inserted cassette from the
emulator.
Rewind Cassette
This menu item allows you to rewind the cassette inserted into the
emulator, moving the current read pointer back to the first block.
Load Executable File
This menu item allows you to directly load an Atari executable file into the
emulator, with using a DOS file system. This executable binary will exist as
a file in the Macintosh environment, not on a disk image. A .XEX file may
also be loaded into the emulator by double - clicking it in the finder, or
dragging it to the Atari800MacX Icon.
Select Printer
This sub- menu item allows you to allows you to chose which printer
emulation you are using. You may choose the Text Printer, Atari 825, Atari
1020, or Epson FX- 80. The sub - menu also has an option to reset the
printer, which is equivalent to turning the printer off and on. For more
info on Printer Emulation, see the Printer Emulation help page. For setting
the printer options, see the Printer Tab in Preferences.
Atari800MacX Manual – Version 3.5
Page 40 of 95
Preview Printer Output
This menu item is used to view what the current printer output looks like.
It is active for every printer emulation except the Text Printer.
Show Media Status Window
This menu item allows to display the Media Status Window if it has been
closed. For more information on this window, see the Media Status
Window help page.
6.1.1 Drive Management Window
The Drive Management window allows the user to easily see what floppy disk images are
in each drive. You may also select a new image by simply clicking on the button with the
drive number in it.
Drive Status
Each Disk drive can have one of four states:
•
Off - This disk drive has the power turned off.
•
Empty - The power is on to the drive, but it has no disk.
•
Read Only - A disk is inserted, but has write protect switch on, so
that you may only read from the disk.
R/W - A disk is inserted, and can be either read from or written to.
•
The Read Only and R/W status of the drive may be set after a disk is
inserted.
Eject All
This button allows the user to eject all 8 disks from the drive with one
action.
Save Disk Set Button
This button allows the user to save the names of the disk images that are
currently in the drives to a file, to be loaded later. The file that the set is
save in has an extension of ".set", and it is a human readable text file,
containing the paths of the image files, or "Empty" or "Off" for a drive that
has no disk.
Load Disk Set Button
This button allows the user to load a disk set saved earlier with the Save
Disk Set Button. The user is allowed to browse for the set file, displaying
files ending in ".set". The emulator then loads the disk images specified in
the file into the corresponding drives. If a drive in the set file is "Empty" or
"Off", no changes are made to the drive. This allows the user to load
multiple disk sets sequentially.
Atari800MacX Manual – Version 3.5
Page 41 of 95
Rotate Floppies Button
This button rotates the current inserted floppies among the drives. This
may be useful for playing multiple disk games.
New Disk Image Button
This button will display a new window which you may use to create a new
disk image. This new image will be saved in .atr format.
In the Create Disk Image window, you may choose a format of a disk. Note
that not all formats are supporte d by all Atari DOSes. There are three
standard formats:
•
•
•
Single density (40 tracks * 18 sectors / t r ack * 128 bytes / s ector = 90
KB)
Medium density (40 tracks * 26 sectors / t r ack * 128 bytes / s ector =
130 KB)
Double density (40 tracks * 18 sectors / t r ack * 256 bytes / s ector =
180 KB)
You can also select any other format, by clicking Custom and setting
Number of sectors and Bytes per sector. Please make sure your Atari DOS
support s this format, otherwise the image will be unusable.
If 256 bytes per sector are selected, you can choose between 128 and 256
Bytes in boot sectors. Physically, boot sectors (first three sectors on a disk)
are also 256 bytes long, but only 128 are trans mitted between the Atari
and a disk drive (upper halves of sectors are not used). There are disk
images with 128 bytes in boot sectors and disk images with 256 bytes in
boot sectors. The Atari800 emulator support s both, but other emulators
don't. Except some special cases, we recomme nd 128 for ATR images.
If the "Insert New Disk image into drive" checkbox is checked, the created
image will be mounted on the specified drive.
Atari800MacX Manual – Version 3.5
Page 42 of 95
6.2 Display Menu
The Display menu on the Atari800MacX emulator allows you to control the format of the
display, grab the mouse input for mouse emulation, and take screenshots of the Atari
screen. It has the following menu selections:
Display Scale Factor Submenu
This submenu allows you to chose the scale factor that is used to display
the emulated Atari screen in the window. You may chose the display to be
either 1x, 2x, 3x, or 4x the size of the Atari screen. This may also be set on
the Display Tab page of the Preferences Window.
Display Width Submenu
This submenu lets you set the width of the emulated Atari screen in the
window. You may choose between narrow, default, and full widths of the
Atari screen. These correspon d to 320x240, 336x240, and 384x240
respectively. This may also be set on the Display Tab page of the
Preferences Window.
Atari800MacX Manual – Version 3.5
Page 43 of 95
Scaling Mode Submenu
This Submenu lets chose the type of scaling to be applied to the screen.
Normal mode displays the screen without any smoothing or scanlines.
Scanline mode inserts scanlines as they might have appeared on old classic
monitors or TV displays. Smoothing mode applies a smoothing algorithm
to the scaline, resulting in rounding in the scaling. Note, however, that the
smoothing mode can consume large quantities of processing time, slowing
the emulation down. You may want to check if you are able to run at full
frame rate in this mode by using the "Show Frames Per Second" menu
item. This may also be set on the Display Tab page of the Preferences
Window.
Artifacting Mode Submenu
This submenu lets you set choose how the emulator simulates Artifacting,
which occurred when the original Atari used a TV for displaying its video.
Some games depende d on the colors these Artifacting effects produced.
This may also be set on the Display Tab page of the Preferences Window.
Toggle Fullscreen mode (cmd- F)
This menu item allows you to toggle the display between Fullscreen and
Windowed modes. More info on screen modes can be found on the Display
Tab page of the Preferences Window.
Toggle FPS Display on/ off (cmd - K)
This menu item allows you toggle on or off the display of the emulators
frames per second in the Window Title.
Grab Mouse mode on /off (F16)
This menu item toggles the emulators to control of the mouse for using it
as an emulated Atari controller. More information on Mouse emulation
can be found on the Controllers Tab of the Preferences Window.
Screenshot (F13)
This menu items allows you to take a screenshot of the Atari screen. It
will be stored as a .PCX format file in the same directory as the emulator
executable. Future versions of the emulator may use a more Macintosh
graphics format, but for now this is the format the graphics core uses. The
great Shareware program Graphic Converter may be used to read this
format.
Atari800MacX Manual – Version 3.5
Page 44 of 95
6.3 Sound Menu
The Sound menu on the Atari800MacX emulator allows to the sound aspects of the
emulator. It has the following menu selections:
Enable /Disable Sound
This menu item allows you to toggle the emulator sound on/off.
Stereo /Mono Sound
This menu item allows you to toggle the emulator sound between Stereo
and Mono. It defaults to Mono. This setting does not change how sound is
played on your Mac, in other words, sound always comes out both
speakers. Stereo is only used for demos and other applications that are
designed to run on modified Atari computers that have a second Pokey
chip added to them. It you set the sound to stereo for normal games,
sound will only come out of one speaker.
Start/Stop Sound Recording
This menu item allows you to stop or stop recording of the sound. It will
be stored as a AIFF format sound file in the same directory as the emulator
executable.
Atari800MacX Manual – Version 3.5
Page 45 of 95
6.4 Control Menu
The Control menu on the Atari800MacX emulator allows the user to pause, control the
speed, reset, and save/load the state of the emulator. It has the following menu
selections:
Pause (cmd- P)
This menu item allows you to toggle the Pausing of emulation.
Limit To Normal Speed (F7)
This menu item allows you to limit the speed of the emulator to the classic
Atari speed of 50 or 60 frames per second (depending on the TV mode,
NTSC or PAL), or allow the emulator to run as fast as the Macintosh is
capable. This setting is also on the Display Tab of the Preferences Window,
and defaults to limiting the speed of the emulator.
Warm Reset (F5)
This menu item allows you to do a warm reset on the emulator, the
equivalent of pressing reset on the Atari.
Atari Machine Type Submenu
This submenu item allows you to select the type of Atari computer which
is emulatod. The type of computer may also be chosen in the System Tab
of the Preferences Window.
Atari800MacX Manual – Version 3.5
Page 46 of 95
Disable Basic
This menu item allows you to disable Atari BASIC on Cold Restart's. Also,
if you want to disable Atari BASIC on Warm Restarts, there is an option
that allows you to do this as well in the System Tab of the Preferences
Window. Note, that the real Atari's didn't work this way, but it can be
much more convient.
Cold Reset (shift- F5)
This menu item allows you to do a warm reset on the emulator, the
equivalent of cycling power on the Atari
Save State (cmd- S)
This menu item allows you to save the state of the emulator, so that it may
be loaded later with the Load State command. Disk images and cartridges
inserted into the computer are stored in the state file. The state is stored
in a .a8s file that may also be double - clicked or dragged to the
Atari800MacX icon in the Finder, or to the main Atari800MacX window, to
load the state.
Load State (cmd - L)
This menu item allows you load a state file (.a8s) previous saved with the
Save State command. Note, the state file format was changed to fix a
serious error with saved cartridges and disk images, and the format in
version 1.4.0 and later is not compatible with 1.3.0 and earlier, so old state
files will not load into the new emulator and visa versa.
Enable Keyboard Joysticks (cmd- J)
This menu item is used to enable or disable keyboard joysticks. If any of
the controllers are set to keyboard joystick control, setting this to enable
will use the keys defined for them as joystick keys. Setting it to disabled
will allow the keys to be passed to the emulator as normal keystrokes.
This is enabled by default.
Monitor (F8)
This menu item invokes monitor console, to be used for debugging Atari
programs, viewing memory contents and other advanced actions. Type
help to display list of available monitor commands, type cont to close the
monitor console and continue emulation.
Atari800MacX Manual – Version 3.5
Page 47 of 95
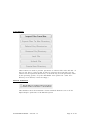
Show Function Key Window
This menu item makes the Function Key Window active. It provides a way
to press the select, start, and option Atari keys from the screen, as
opposed to using the keyboard. (F2- F4). The window that is displayed
looks like:
Show Message Window
This menu item shows the message window which will display
status / s t a r t u p information about the emulator, and any serious error
messages encountered during emulation will be displayed here. The
author may use this tool with you to debug difficult, or non - repeatable
issues
6.5 Fullscreen User Interface
While in Fullscreen mode, the Atari800MacX uses the user interface built into the
standard Atari800 emulator. It is a character based UI on the Atari screen itself. The
main menu is accessed by pressing F1. From there, the arrow keys may be used to
navigate the menus, and Esc will go back up a menu level. Keyboard shortcuts show on
the first screen (F1) are listed as pressing the Alt key. As this was designed for DOS
systems, substitute the Command keypress.
Although this interface is more primitive than the full featured Macintosh interface, it was
left in the Fullscreen mode, so that a user does not have to change back to Windowed
mode to make a simple change to the emulator. Note the keycodes for shortcuts in the
Windowed mode have been designed to duplicate the Fullscreen key shortcuts where
possible.
Atari800MacX Manual – Version 3.5
Page 48 of 95
7. Printer Emulation
Atari800MacX Manual – Version 3.5
Page 49 of 95
The Printer Tab controls the type of printer emulation that is used for outputting to the P:
device from the emulated Atari. Note, that the P: Patch must be enabled on the Atari
System Tab for this tab to be active.
The are four choices for printer emulation, Text Printer, Atari 825, Atari 1020, and Epson
FX- 80. The Text printer simply sends the printer output to a text file with optional script
processing, while the other three choices emulator a legacy printer, and allow the user to
save the printer output in a PDF file. For information on setting printer options, see the
Printer Tab (section 5.3) of the Preferences pane. The current printer can be selected, and
preview output opened, by either an entry in the Media Menu (section 6.1)or by using the
printer area in the Media Status Window . (section 4)
The legacy printer emulations allow the user to preview what has been printed to the
printer so far. This preview is presented as a pane which drops down from the main
emulator window, and is shown below. Besides previewing the output, there are controls
that allow the user to control the emulated printer and output
While the preview is open, the printer is offline, and the main emulator is paused. The
printer comes back online when the preview sheet is closed.
The preview shows the printed output on one or more pages of fanfold paper. The length
of one page can be chosen in the Printer tab of the Preferences panel, and is 11 inches by
Atari800MacX Manual – Version 3.5
Page 50 of 95
default. Two purple triangles, on the left and right hand side of the paper, indicate the
"current position"; this is where the next line of output will appear. Breaks between the
pages will appear as dotted lines, simulating the perforations in fanfold paper. These
dotted lines will not appear in the output.
At the bottom of the sheet are several buttons:
•
•
•
•
•
•
•
•
Leave in Printer: pressing this button closes the preview sheet without affecting
the output.
Tear Off and Save: this button saves the print output in a pdf file. It then clears
the print output from the preview and closes the sheet. So metaphorically this is
like tearing off the fanfold paper and storing the output in a safe place. After
saving the output to a pdf file you can use Apple's Preview program or Adobe
Acrobat Reader to view the output or print it on a real printer.
Tear Off and Delete: this clears the output without saving it and closes the sheet.
LF: Line Feed, This will cause the current position of the printer to advance by one
line.
Rev LF: Reverse Line Feed, This will cause the current position of the printer to go
back by one line.
FF: Form Feed, This will cause the current position of the printer to advance to the
top of the next page.
Pen Change: This is only active for the Atari 1020 printer, and will cause the
printer to use the next pen color. The current pen color in use is indicated by the
color of the text in the button.
Reset Printer: This is equivalent to power cycling the emulated printer, reseting
any control characters that may have been sent by the emulated computer. It will
also clear the print output, start at the top of a blank page, and close the preview
window.
Text Printer
The Text Printer is used to send output to a plain text file. The file will be stored in the
default print output directory, which is settable on the Directories Tab (section 5.7) of the
Preferences window. The file name will be automatically generated, and will be off the
form SPOOL_xxxxx, where xxxxx is a random character string picked by the program / OS.
The file may then be post - processed by a shell command, which is specified on the
Printer Tab (section 5.3) of the Preferences window. By default, the text file is opened in
TextEdit.
Epson FX- 80 Printer
The Epson FX- 80 was a very popular printer in the 1980's, and is therefore supporte d by
many Atari program s.
The emulation is intended to support all of the functions of the original printer, such as
different character pitches, bold, italic and underlined text, margins, tabs, and graphic
modes. It does not support user defined characters however. It does support
proportional printing well, as opposed to the Atari 825 emulation's proportional print
support, which is poor.
The technology used by the emulator for text rendering is very different from the
technology used in the original Epson. As a result, the characters are somewhat different,
but the size and looks of the characters are just like the real thing,
Atari800MacX Manual – Version 3.5
Page 51 of 95
Atari 1020 Printer/Plotter
The Atari 1020 was a unique printer / pl ot ter with color output, which was rare in the day.
The emulation is intended to support all of the functions of the original printer, and even
includes the additional ability to change the colors of the 4 pens in the plotter.
Atari 825 Printer
The Atari 825 was on of several standard Atari printers. It's emulation is included here
for use with early programs which might not have had printer driver support for the
Epson. The emulation is intended to support all of the functions of the original printer,
however, proportional output on the printer used a spacing which is not easily emulated
with modern fonts, so the output appearance is not optimal. It is strongly suggested to
use the Epson emulation for proportional text output instead.
Atari800MacX Manual – Version 3.5
Page 52 of 95
8. Disk Image Editor
The Disk Image Editor on the Atari800MacX emulator allows you to edit a ATR disk image
that is formated with any of the supporte d Atari DOS formats. You may Import and
Export files from / t o the Mac file system, as well as manipulate files and directories on the
image. The supported Atari DOS types are Atari DOS 1.0, Atari DOS 2.x, Atari DOS 3.0,
Atari DOS 4.0, Atari DOS XE, TopDOS, BiboDos, MyDos, SpartaDos 2+, and BWDOS. When
you select the Edit Disk Image menu item and pick a disk image to edit, you get a window
like the one shown below. You may open multiple disk images at once, and even drop
and drag files between them.
The Disk Editor has the following elements:
Image Type
The top of the file list view displays the type of DOS the image was
formatted with.
Current Image Directory
Atari800MacX Manual – Version 3.5
Page 53 of 95
This pulldown displays the current directory on the disk image. If the
image does not support disk directories, this will be MAIN. You may
navigate to a lower disk directory by double clicking on the directory name
in the file list. To navigate back up the directory tree, you may use this
pulldown to select the directory to move to.
File List
This area lists the files in the current directory, in a format similar to that used by
the DOS type for that image. Files may be dragged and droppe d to/from a Finder
window to import / ex port the files. Files may also be dragged and dropped
between disk editor windows. Dragging of Directories is not supporte d.
Free Space
This displays the amount of free space on the disk image in Kilobytes, not sectors
or blocks.
Header Write Protect Bit Set In Image
This checkbox displays the state of the Write Protect bit in the header of the ATR
image. You may change it by clicking on the checkbox. Normally, if this is set, it
will prevent the emulator and other programs from writing to the image.
However, don't confuse this with the permissions on the file image in the MacOSX
operating system, as they are separate.
Atari800MacX Manual – Version 3.5
Page 54 of 95
Action Buttons
These buttons are used to perform operations on selected files in the File List. If
they are not active, it may be that no files are selected, the wrong file types are
selected for the operation (directories), or the disk may be write protected, either
by the operating system, or by the ATR header write protect bit. (Note for a
directory to be deleted, it must be empty.)
Linefeed Translation
This checkbox turns the translation of Atari Linefeed characters on or off for
Import /Export operations to the Mac File system.
Atari800MacX Manual – Version 3.5
Page 55 of 95
9. Sector Editor
The Sector Editor on the Atari800MacX emulator allows you to edit a ATR disk image at
the byte level, sector by sector. You may only open one sector editor at a time, and it runs
modally when you do. You may not open a ATR image in the sector editor that is already
open by the Disk Image editor. You can open an image that is mounted in the emulator
drive, but be very careful if you do, as the two processes may corrupt the image. The
emualtor should not be accessing the image when you change it. The sector editor will
handle both single and double density images, displaying the proper number of bytes per
sector for each (128 or 256). Note even a double density desk only has 128 bytes per
sector for the first 3 sectors, the boot sectors.
The Sector Editor has the following elements:
Byte Editing Table
This table allows you to edit each hex byte in the sector that is displayed. The row
and column numbers are displayed in bold, and the editable bytes in normal text.
You may edit a byte by double clicking on it, as long as the image is not read only
or protected by the header write protect bit. (If an image is a read only file on the
Mac, it will be noted as such in the editor window title.) You can also edit the ASCII
representation of the hex bytes on the right hand side of the table. Editing one
representation will change the other automatically.
Sector Number to Edit
You can change the sector being edited by pressing the sector stepper by the sector
number either up or down, or by pressing the Go To Sector.... button, which will
display a sheet where you enter the number. The number must be between 1 and
the number of sectors in the disk, which is displayed between the two controls. If
Atari800MacX Manual – Version 3.5
Page 56 of 95
the sector you are currently editing has not been saved, it will prompt you if you
want to discard the changes and move to the new sector anyway.
Saving and Reverting
You can save your editing changes to a sector by pressing the Save button (or Cmd S). You can discard the changes and revert to the sector on disk by pressing the
Revert button. These buttons are only active when the sector data has been
changed.
Done with editing
You can exit the editor by pressing the done button. If the sector you are currently
editing has not been saved, it will prompt you if you want to discard the changes
and exit the editor anyway.
Header Write Protect Bit Set In Image
This checkbox displays the state of the Write Protect bit in the header of the ATR
image. You may change it by clicking on the checkbox. Normally, if this is set, it
will prevent the emulator and other programs from writing to the image. However,
don't confuse this with the permissions on the file image in the MacOSX operating
system, as they are separate.
Atari800MacX Manual – Version 3.5
Page 57 of 95
1 0. Debug Monitor
The Debug Monitor on the Atari800MacX emulator allows you to debug programs written
for the Atari800 on the emulator. With it you can single step programs, display memory,
set breakpoints, and much, much more. To access the debugger, simply press F8 while
the emulator is running. It will bring up the following window in windowed mode:
Atari800MacX Manual – Version 3.5
Page 58 of 95
or, if you are in Fullscreen mode, and Fullscreen Monitor is enabled in the Display Tab of
the Preferences, the following will be displayed:
Commands are typed in the input box at the bottom of the window, and are executed by
pressing return. There is also comman d history, so you can get to commands you have
entered before with the up an down arrows. To exit the monitor and continue your
program, use the command 'cont'. To get a list of all of the commands, and simple help
on them type 'help' or '?'. To quit the emulator from the monitor screen, type 'quit'.
Whenever the monitor stops, it prints out the processor's current status. In the above
example, the line is:
262
2 F2FD LDA $02FC ;CH
(00FF)
A=ff S=f5 X=80 Y=01 P=--*B--ZC
The meaning of the fields in this line are as follows:
262
Vertical scan position when processor was stopped
2
F2FD
LDA $02FC
;CH
Horizontal scan position when processor was stopped
Current value of the Program Counter
Disassembly of the instruction at the PC location
A symbol that is referenced by the instruction
($2FC in this case)
Atari800MacX Manual – Version 3.5
Page 59 of 95
(00FF)
Value at memory location referenced by instruction,
or in the case of a conditional branch, a Y or N
which indicates if the branch will be taken. In
this case $02FC contains 00FF.
A=ff S=f5 X=80 Y=01 Current value of the other processor registers
P=--*B--ZC
Current value of the processor flags.
The full set of comman ds and an explanation of their use follows. A parameter in
brackets [] means that it is optional:
10.1 Monitor Control Commands
HELP
?
Print a list of all comman ds plus a brief description of each.
CONT
Exits the monitor and continues emulation
QUIT
Quit the emulator.
COLDSTART,
Execute a coldstart on the emulator, and leave the monitor.
WARMSTART,
Execute a warmstart on the emulator, and leave the monitor.
10.2 Processor Related Commands
SHOW
Shows the current state of processor registers. (The display is similar to the line
displayed when the monitor is entered.
SETPC hexval
SETA hexval
SETS hexval
SETX hexval
SETY hexval
Set the processor register (PC, A, S, X, or Y) to the hexadecimal value specified by
hexval .
SETN
SETV
SETD
SETI
SETZ
SETC
Set the specified flag (N,V,D,I,Z, or C).
CLRN
CLRV
CLRD
CLRI
CLRZ
CLRC
Clear the specified flag (N,V,D,I,Z, or C).
Atari800MacX Manual – Version 3.5
Page 60 of 95
10.3 Memory Commands
C startaddr hexval...
Change memory starting at the hexadecimal address specified by startaddr with a
series of bytes specified by hexval . For example, the command "C 0 00 01 02"
would set the byte at address 0 to 0, address 1 to 1, and address 2 to 2.
D [startaddr]
Disassemble memory starting at hexadecimal address startaddr . If startaddr is
not specified, then disassem bly will continue from the last disassembled location.
F startaddr endaddr hexval
Fill memory starting at hexadecimal address startaddr and ending at address
endaddr with the hex byte value specified by hexval .
M [startaddr]
Display memory starting at startaddr location. If startaddr is not specified, then
memory dumping will continue from the last dumpe d location.
MM srcaddr destaddr bytecnt
Move bytecnt bytes of memory starting at address srcaddr to address destaddr .
Memory move will handle overlapping regions correctly, reversing the order of
copying as needed.
S startaddr endaddr hexval...
Search memory from startaddr to endaddr for a sequence of bytes specified by
the hexadecminal values that follow.
STACK
Show the current stack contents. Each JSR that has occurred will show it's calling
location and the called subroutine. Parameters that have been passed on the
stack are shown separately. The following is an example:
> stack
01F6 : 5E F2
F25C : JSR F2FD
01F8 : EE E6
E6EC : JSR E6F4
01FA : D2 E5
E5D0 : JSR E6EA
01FC : F6 BD
BDF4 : JSR BD0F
01FE : 70 A0
A06E : JSR BDED
ROM startaddr endaddr
Convert memory from address startaddr to address endaddr to be considered by
the emulator as ROM
RAM startaddr endaddr
Convert memory from address startaddr to address endaddr to be considered by
the emulator as RAM
HARDWARE startaddr endaddr
Convert memory from address startaddr to address endaddr to be considered by
the emulator as HARDWARE
BANK [banknum]
Switch current memory bank in use to banknu m. If the parameter is omitted,
then show the current bank number. (XE system s)
READ file startaddr nbytes
Read from the host file named file into memory starting at startaddr for nbytes
bytes
READSEC drive sector count addr
Read count disk sectors starting at sector number sector from drive number drive
into memory at address addr .
WRITE startaddr endaddr [file] [init>0] [run>0]
Write memory from startaddr to endaddr to a file. If the file parameter is
specified, it is used as the filename, otherwise "memdum p.dat" is used. The two
other optional parameters init and run specify the initialization and run address
Atari800MacX Manual – Version 3.5
Page 61 of 95
used for a Atari binary loadable file. If either of init or run is specified, the Atari
binary file header is written before the data.
WRITESEC drive# count addr
Write count disk sectors starting at sector number sector and drive number drive
from memory starting at address addr .
SUM startaddr endaddr
Add the bytes of memory from startaddr to endaddr and display the result as a
32 bit sum.
10.4 Tracing and Execution Control Commands
TRON file
Turn tracing of instructions to a file on. The instruction trace is saved in a file
named file. Each line of the file represents the log of execution of one
instructions, and is similar to the line displayed when the monitor is entered.
TROFF
Trace instruction tracing previously turned on with the TRON command off.
BREAK [addr]
Set a simple breakpoint at the address specified by addr . If addr is omitted, then
display the currently set breakpoint, if any. Specifying a value of zero for addr
will turn a previously enabled breakpoint off.
YBREAK [pos]
Set a scanline breakpoint at scanline pos . If pos is omitted, the current scanline
breakpoint setting will be displayed. If pos is - 1, the breakpoint will be disabled.
Specifying a value for pos of a scanline + 1000 will cause that scanline to flicker
when it is displayed. For example, ybreak 1100 will cause scanline 100 to flicker.
BRKHERE [on|off]
Sets BRK opcode behavior to stop in the monitor (on) or not (off).
MONHIST [on|off]
Turn monitor history keeping on/off. Keeping history will slow down the
emulation, so this allows the debugger to only keep the history when the
program m er needs it. See the HISTORY command next.
HISTORY
H
Display disassem bly of last 32 PC address executed if monitor history keeping
has been turned on with MONHIST. Display is the same format as displayed when
the monitor is entered.
JUMPS
List last 32 locations of JMP/JSR
G
Single step one instruction and return to the monitor.
O
Step over the instruction, which is used to step over subroutine jumps.
R
Execute until a return instruction is executed and return to monitor.
B
Complex Breakpoint Commands. Complex breakpoints function through a
breakpoint table made up of possibly many breakpoint conditions. The
breakpoint checking has been optimized to have as little impact on emulation
execution speed as possible, however all of the conditions may be checked each
emulated cycle, and the memory location conditions are especially processor
intensive. Each condition (entry) is explicitly anded with the next, so that a
breakpoint only fires if all of the entries are true. However, the exception to this
is the OR condition, which allows you to have several chains of anded conditions
ored together. An example follows at the end of the subcom m a n d descriptions. A
Atari800MacX Manual – Version 3.5
Page 62 of 95
description of each subcom m a n d follows:
B
Using the B command without a subcom m a n d will print out the current
breakpoint table.
B?
This will print out a brief help summ ary on the complex breakpoint
command s.
BC
This subcom m a n d will clear all breakpoints in the table.
B D num
This subcom m a n d deletes one entry in entry in the breakpoint table,
whose number is num . Breakpoint table entries are numbered starting at
0.
B ON
The on subcom ma n d with no parameters turns the entire breakpoint
table ON. Individual breakpoint table entries must also be on for them to
be active.
B ON num1 [num2 ...]
The on subcom ma n d followed by breakpoint table entry numbers turns
the entries associated with those numbers on. This allows the user to
enter breakpoint entries, and turn them on and off individually.
B OFF
The off subcom m a n d with no parameters turns the entire breakpoint
table OFF. This means that even if the individual breakpoint table entries
are on, no breakpoints will fire.
B OFF num1 [num2 ...]
The off subcom m a n d followed by breakpoint table entry numbers turns
the entries associated with those numbers off. This allows the user to
enter breakpoint entries, and turn them on and off individually.
B [num] cond1 [cond2 ... ]
This subcom m a n d is used to insert breakpoint table entries. If the
option num parameter is specified, the entries will be inserted at that
breakpoint number, and existing entries will be shifted to higher
numbers. If num is not specified, or is higher than the highest entry plus
one, the entry will be added at the end of the table. A condition (cond1 ,
cond2 ) is on of the following:
TYPE OPERATOR VALUE
This triplet of type operator value is entered with no spaces in
between the three component s.
Where TYPE is:
PC, A, X, Y, S, READ, WRITE, or ACCESS
Where OPERATOR is:
<, < = , = , == , > , > = , !=. or < >
And finally VALUE, in hex, is what TYPE is compared to.
For example:
PC=1000 Will break when the program counter is 1000
A<45
Will break when the accumulator is less than 45
X>=4
Will break when the x register is greater than or equal
to 4
Y!=2
Will break when the y register is not equal to 2
Atari800MacX Manual – Version 3.5
Page 63 of 95
S==1F6
Will break when the s register is equal to 1f6
READ<1000 Will break when a memory address less than 1000
is read
WRITE>2000 Will break when a memory address greater than
2000 is written.
ACCESS==200 Will break when memory address 200 is read or
written
MEM ADDR OPERATOR VALUE
Where MEM is a constant string 'MEM'.
Where ADDR is the memory address, in hex, whose contents is to
be compared.
Where OPERATOR is:
<, < = , = , == , > , > = , !=. or < >
And finally VALUE is what the contents of the memory, in hex, is
compared to.
For example:
MEM100=45 Will break when the program counter is 1000
MEM1000>78 Will break when the accumulator is less than 45
SETN
SETV
SETB
SETD
SETI
SETZ
SETC
The condition breaks when the processor flag specified is set.
CLRN
CLRV
CLRB
CLRD
CLRI
CLRZ
CLRC
The condition breaks when the processor flag specified is clear.
OR
The OR condition is a special case and indicates that the break
will fire when the conditions prior to it in the breakpoint table
occur or the conditions after it occur. There can be multiple
OR's in the breakpoint table.
Finally, here are some examples of the B command s:
B PC>=203f A<3a OR PC=3a7f X<>0
Creates a breakpoint table with 5 entries. Note that ands are implied
between conditions, so this table says the breakpoint will fire if
condition1 AND condition2 occur OR condition4 AND condition5 occur.
B 2 MEM1000=4a
Adds a new entry on position 2
BD 1
Atari800MacX Manual – Version 3.5
Page 64 of 95
Deletes entry on position 1
B OR SETD
Adds 2 new entries at the end of the table
10.5 Atari Hardware Register Commands
ANTIC
GTIA
PIA
POKEY
Display hardware registers for a specific chip.
DLIST [startaddr]
Show the Display List starting at address startaddr . If startaddr is not specified,
it will show the display list continuing from where it was last displayed.
DLIST CURR
Show the Display List from the currently in use location.
10.6 Assembler Commands
A [startaddr]
Start simple assembler, with assembled code being stored at startaddr . The
assembler is exited by entering a blank line.
LABELS file
Load labels from an assembler output file (xasm format)
Atari800MacX Manual – Version 3.5
Page 65 of 95
1 1. File Type s
The Atari800MacX emulator supports the file types listed below. Each of these file types
may be double clicked or dragged onto the Atari800MacX icon. If they are double clicked,
and the emulator is not running, it will be started.
If it is a disk image file, it will be loaded into the first disk drive, and the computer reset.
Cartridge files will be inserted into the Atari. Cassette images will be placed into the Atari
Cassette drive. Executable binary files will be loaded into the Atari and run. Saved State
files will restore the Atari to a known state. (Note: If you want to double click a state file
to start the emulator, you should have set the required Boot Media in the preferences
pane before quitting, and media are not saved in the state file by the Emulator Core at this
time.)
Disk Images:
The emulator supports ATR, DCM, and XFD images. The emulator only
creates ATR images. Valid extensions are .atr, .ATR, .dcm,.DCM, .xfd, .XFD,
.atz, .ATZ, .xfz, .XFZ . (The last four are zipped images).
Cassette Images:
The emulator supports CAS images. The file extension is .cas or .CAS.
State Files:
The emulator supports A8S state files. Note this format is not
guaranteed to not change between versions of the Atari 800 Emulation
core. Therefore, states saved with one version of the emulator may not be
loadable in another. The file extension is .a8s or .A8S.
Color Palette Files:
The emulator supports ACT color palette files. ACT files are standard
palette files of 256 RGB colors. Each color is defined by a byte of Red,
followed by a byte of Green, followed by a byte of Blue. An ACT file must
be 256*3=768 bytes long. The file extension is .act or .ACT.
Executable Binary Files:
The emulator supports XEX Atari executables state files. This is a
standard Atari binary, just renamed on the Macintosh disk to either a .xex
or .XEX extension.
Cartridge Images:
The emulator supports both raw ROM dum p images (ROM and BIN) and
the CART format. The CART format and types are explained below. The
valid file extensions are .rom, .ROM, .bin, .BIN, .car, and .CAR.
Atari800MacX Manual – Version 3.5
Page 66 of 95
The advantage of using CART files is that you don't have to select the
cartridge type, because it is stored inside the file.
The CART format has been introduced in Atari800 0.8.0, when there were
only 4 supported cartridge types. The format has not changed, only new
typeshave been added.
The format is:
first 4 bytes containing 'C' 'A' 'R' 'T'.
next 4 bytes containing cartridge type in MSB format (see the table below).
next 4 bytes containing cartridge checksum in MSB format (ROM only).
next 4 bytes are currently unused (zero).
followed immediately with the ROM data: 4, 8, 16, 32, 40, 64 or 128
kilobytes.
The recomme nde d file name extension for CART files is CAR.
Currently supported cartridge types:
+- - - +- - - - - - - - - - - +- - - - - +- - - - - - - - - - - - - - - - - - - - - - - - - - - - - - - - - - - - - - - - - - - - - - - - - - - - - - - - - - - - - --+
| Id | Machine | Size | Name
|
|- - - - - - - - - - - - - - - - - - - - - - +- - - - - - - - - - - - - - - - - - - - - - - - - - - - - - - - - - - - - - - - - - - - - - - - - - - - - - - - - - - - - -----+
| 1 | 800 /XL/XE | 8 | Standard 8 KB cartridge
|
| 2 | 800 /XL/XE | 16 | Standard 16 KB cartridge
|
| 3 | 800 /XL/XE | 16 | OSS '034M' 16 KB cartridge
|
| 4 | 5200
| 32 | Standard 32 KB 5200 cartridge
|
| 5 | 800 /XL/XE | 32 | DB 32 KB cartridge
|
| 6 | 5200
| 16 | Two chip 16 KB 5200 cartridge
|
| 7 | 5200
| 40 | Bounty Bob Strikes Back 40 KB 5200 cartridge |
| 8 | 800 /XL/XE | 64 | 64 KB Williams cartridge
|
| 9 | 800 /XL/XE | 64 | Express 64 KB cartridge
|
| 10 | 800/XL/XE | 64 | Diamond 64 KB cartridge
|
| 11 | 800/XL/XE | 64 | SpartaDos X 64 KB cartridge
|
| 12 | 800/XL/XE | 32 | XEGS 32 KB cartridge
|
| 13 | 800/XL/XE | 64 | XEGS 64 KB cartridge
|
| 14 | 800/XL/XE | 128 | XEGS 128 KB cartridge
|
| 15 | 800/XL/XE | 16 | OSS 'M091' 16 KB cartridge
|
| 16 | 5200
| 16 | One chip 16 KB 5200 cartridge
|
| 17 | 800/XL/XE | 128 | Atrax 128 KB cartridge
|
| 18 | 800/XL/XE | 40 | Bounty Bob Strikes Back 40 KB cartridge
|
| 19 | 5200
| 8 | Standard 8 KB 5200 cartridge
|
| 20 | 5200
| 4 | Standard 4 KB 5200 cartridge
|
| 21 | 800
| 8 | Right slot 8 KB cartridge
|
| 22 | 800/XL/XE | 32 | 32 KB Williams cartridge
|
| 23 | 800/XL/XE | 256 | XEGS 256 KB cartridge
|
| 24 | 800/XL/XE | 512 | XEGS 512 KB cartridge
|
| 25 | 800/XL/XE | 1024 | XEGS 1 MB cartridge
|
| 26 | 800/XL/XE | 16 | MegaCart 16 KB cartridge
|
| 27 | 800/XL/XE | 32 | MegaCart 32 KB cartridge
|
| 28 | 800/XL/XE | 64 | MegaCart 64 KB cartridge
|
| 29 | 800/XL/XE | 128 | MegaCart 128 KB cartridge
|
Atari800MacX Manual – Version 3.5
Page 67 of 95
| 30 | 800/XL/XE | 256 | MegaCart 256 KB cartridge
|
| 31 | 800/XL/XE | 512 | MegaCart 512 KB cartridge
|
| 32 | 800/XL/XE | 1024 | MegaCart 1 MB cartridge
|
| 33 | 800/XL/XE | 32 | Switchable XEGS 32 KB cartridge
|
| 34 | 800/XL/XE | 64 | Switchable XEGS 64 KB cartridge
|
| 35 | 800/XL/XE | 128 | Switchable XEGS 128 KB cartridge
|
| 36 | 800/XL/XE | 256 | Switchable XEGS 256 KB cartridge
|
| 37 | 800/XL/XE | 512 | Switchable XEGS 512 KB cartridge
|
| 38 | 800/XL/XE | 1024 | Switchable XEGS 1 MB cartridge
|
| 39 | 800/XL/XE | 8 | Phoenix 8 KB cartridge
|
| 40 | 800/XL/XE | 16 | Blizzard 16 KB cartridge
|
| 41 | 800/XL/XE | 128 | Atarimax 128 KB Flash cartridge
|
| 42 | 800/XL/XE | 1024 | Atarimax 1 MB Flash cartridge
|
+- - - +- - - - - - - - - - - - - - - +- - - - - +- - - - - - - - - - - - - - - - - - - - - - - - - - - - - - - - - - - - - - - - - - - - - - - - - - - - - - - - - - +
Id is the cartridge type code stored in the CART file.
Machine indicates if the cartridge is for Atari 8- bit Home Computers
(400/800 and XL/XE) or the Atari 5200 Game System.
Size is length of image in kilobytes.
Below are descriptions of all types. For bank - switched cartridges bank A
stands for the first bank in the image, bank B is the second, etc.
+- - - - - - - - - - - - - - - - - - - - - - - - - - - - - - - - - - - - - - - - - - - - - - - - - - - - - - - - - - - - - -------------+
| Type 1: Standard 8 KB cartridge
+- - - - - - - - - - - - - - - - - - - - - - - - - - - - - - - - - - - - - - - - - - - - - - - - - - - - - - - - - - - - - -------------+
Standard 8 KB cartridge, that occupies 8 KB of address space between
$A000 and $BFFF.
+- - - - - - - - - - - - - - - - - - - - - - - - - - - - - - - - - - - - - - - - - - - - - - - - - - - - - - - - - - - - - -------------+
| Type 2: Standard 16 KB cartridge
+- - - - - - - - - - - - - - - - - - - - - - - - - - - - - - - - - - - - - - - - - - - - - - - - - - - - - - - - - - - - - -------------+
Standard 16 KB cartridge, that occupies 16 KB of address space between
$8000 and $BFFF.
+- - - - - - - - - - - - - - - - - - - - - - - - - - - - - - - - - - - - - - - - - - - - - - - - - - - - - - - - - - - - - -------------+
| Type 3: OSS '034M' 16 KB cartridge
+- - - - - - - - - - - - - - - - - - - - - - - - - - - - - - - - - - - - - - - - - - - - - - - - - - - - - - - - - - - - - -------------+
There are two types of OSS cartridges. Both are 16 KB and occupy 8 KB of
address space between $A000 and $BFFF. The cartridge memory is divided
into 4 banks, 4 KB each. One bank ('main') is always mapped to $B000$BFFF. The other 3 banks are mapped to $A000 - $AFFF. The current bank
is selected by accessing a byte in $D500 - $D5FF. Only 4 lowest bits of
Atari800MacX Manual – Version 3.5
Page 68 of 95
address are significant.
The '034M' scheme is the more complicated one.
The main bank is D. An access to:
$D5x0 or $D5x1 selects bank A.
$D5x3 or $D5x7 selects bank B.
$D5x4 or $D5x5 selects bank C.
$D5x2 or $D5x6 is not useful. It disables ROM (there're $FF bytes in
$A000 - $AFFF).
$D5x8 - $D5xF disables whole cartridge (enables computer's memory in
address space between $A000 and $BFFF).
+- - - - - - - - - - - - - - - - - - - - - - - - - - - - - - - - - - - - - - - - - - - - - - - - - - - - - - - - - - - - - -------------+
| Type 4: Standard 32 KB 5200 cartridge
+- - - - - - - - - - - - - - - - - - - - - - - - - - - - - - - - - - - - - - - - - - - - - - - - - - - - - - - - - - - - - -------------+
Standard 32 KB cartridge for Atari 5200, that occupies 32 KB of address
space between $4000 and $BFFF.
+- - - - - - - - - - - - - - - - - - - - - - - - - - - - - - - - - - - - - - - - - - - - - - - - - - - - - - - - - - - - - -------------+
| Type 5: DB 32 KB cartridge
+- - - - - - - - - - - - - - - - - - - - - - - - - - - - - - - - - - - - - - - - - - - - - - - - - - - - - - - - - - - - - -------------+
A 32 KB bank - switched cartridge. There are 4 banks. Bank D is mapped to
$A000 - $BFFF. Bank in $8000 - $9FFF is selected by an access to $D500 $D5FF. Two lowest bits of address select bank A, B, C or D.
+- - - - - - - - - - - - - - - - - - - - - - - - - - - - - - - - - - - - - - - - - - - - - - - - - - - - - - - - - - - - - -------------+
| Type 6: Two chip 16 KB 5200 cartridge
+- - - - - - - - - - - - - - - - - - - - - - - - - - - - - - - - - - - - - - - - - - - - - - - - - - - - - - - - - - - - - -------------+
In Atari 5200 there's 32 KB of address space reserved for the cartridge
($4000 - $BFFF). A two chip 16 KB cartridge is mapped that way:
- First 8 KB are mapped into lower 16 KB. Since an address line is not
connected, $4000 - $5FFF and $6000 - $7FFF contain same data, which is
first half of the cartridge image.
- Similarly, second 8 KB are mapped into upper 16 KB.
+- - - - - - - - - - - - - - - - - - - - - - - - - - - - - - - - - - - - - - - - - - - - - - - - - - - - - - - - - - - - - -------------+
| Type 7: Bounty Bob Strikes Back 40 KB 5200 cartridge
+- - - - - - - - - - - - - - - - - - - - - - - - - - - - - - - - - - - - - - - - - - - - - - - - - - - - - - - - - - - - - -------------+
The cartridge with "Bounty Bob Strikes Back" game uses very strange
bank switching method:
- Four 4 KB banks (A,B,C,D) are mapped into $4000 - $4FFF. An access to
$4FF6 selects bank A, $4FF7 - bank B, $4FF8 - bank C, $4FF9 - bank D.
- Four 4 KB banks (E,F,G,H) are mapped into $5000 - $5FFF. An access to
Atari800MacX Manual – Version 3.5
Page 69 of 95
$5FF6 selects bank E, $5FF7 - bank F, $5FF8 - bank G, $5FF9 - bank H.
- The remaining 8 KB is mapped to upper 16 KB of cartridge address
space in Atari 5200. That is, $8000 - $9FFF and $A000 - $BFFF contain same
data.
+- - - - - - - - - - - - - - - - - - - - - - - - - - - - - - - - - - - - - - - - - - - - - - - - - - - - - - - - - - - - - -------------+
| Type 8: 64 KB Williams cartridge
+- - - - - - - - - - - - - - - - - - - - - - - - - - - - - - - - - - - - - - - - - - - - - - - - - - - - - - - - - - - - - -------------+
The cartridge has 8 banks mapped to $A000 - $BFFF. An access to $D500
selects bank A, $D501 - bank B, etc. An access to $D508 - $D50F disables
the cartridge.
+- - - - - - - - - - - - - - - - - - - - - - - - - - - - - - - - - - - - - - - - - - - - - - - - - - - - - - - - - - - - - -------------+
| Type 9: Express 64 KB cartridge
+- - - - - - - - - - - - - - - - - - - - - - - - - - - - - - - - - - - - - - - - - - - - - - - - - - - - - - - - - - - - - -------------+
The cartridge has 8 banks mapped to $A000 - $BFFF. An access to $D577
selects bank A, $D576 - bank B, etc. An access to $D578 - $D57F disables
the cartridge.
+- - - - - - - - - - - - - - - - - - - - - - - - - - - - - - - - - - - - - - - - - - - - - - - - - - - - - - - - - - - - - -------------+
| Type 10: Diamond 64 KB cartridge
+- - - - - - - - - - - - - - - - - - - - - - - - - - - - - - - - - - - - - - - - - - - - - - - - - - - - - - - - - - - - - -------------+
The cartidge has 8 banks mapped to $A000 - $BFFF. An access to $D5D7
selects bank A, $D5D6 - bank B, etc. An access to $D5D8- $D5DF disables
the cartridge.
+- - - - - - - - - - - - - - - - - - - - - - - - - - - - - - - - - - - - - - - - - - - - - - - - - - - - - - - - - - - - - -------------+
| Type 11: SpartaDOS X 64 KB cartridge
+- - - - - - - - - - - - - - - - - - - - - - - - - - - - - - - - - - - - - - - - - - - - - - - - - - - - - - - - - - - - - -------------+
The cartidge has 8 banks mapped to $A000 - $BFFF. An access to $D5E7
selects bank A, $D5E6 - bank B, etc. An access to $D5E8- $D5EF disables
the cartridge.
+- - - - - - - - - - - - - - - - - - - - - - - - - - - - - - - - - - - - - - - - - - - - - - - - - - - - - - - - - - - - - -------------+
| Type 12: XEGS 32 KB cartridge
+- - - - - - - - - - - - - - - - - - - - - - - - - - - - - - - - - - - - - - - - - - - - - - - - - - - - - - - - - - - - - -------------+
This bank - switched cartridge occupies 16 KB of address space between
$8000 and $BFFF. The cartridge memory is divided into 4 banks, 8 KB each.
Bank D (the last one) is always mapped to $A000- BFFF. Two lowest bits of
a byte written to $D500 - $D5FF select the bank mapped to $8000 - $BFFF.
Atari800MacX Manual – Version 3.5
Page 70 of 95
+- - - - - - - - - - - - - - - - - - - - - - - - - - - - - - - - - - - - - - - - - - - - - - - - - - - - - - - - - - - - - -------------+
| Type 13: XEGS 64 KB cartridge
+- - - - - - - - - - - - - - - - - - - - - - - - - - - - - - - - - - - - - - - - - - - - - - - - - - - - - - - - - - - - - -------------+
This bank - switched cartridge occupies 16 KB of address space between
$8000 and $BFFF. The cartridge memory is divided into 8 banks, 8 KB each.
Bank H (the last one) is always mapped to $A000 - BFFF. Three lowest bits
of a byte written to $D500 - $D5FF select the bank mapped to $8000 - $BFFF.
+- - - - - - - - - - - - - - - - - - - - - - - - - - - - - - - - - - - - - - - - - - - - - - - - - - - - - - - - - - - - - -------------+
| Type 14: XEGS 128 KB cartridge
+- - - - - - - - - - - - - - - - - - - - - - - - - - - - - - - - - - - - - - - - - - - - - - - - - - - - - - - - - - - - - -------------+
This bank - switched cartridge occupies 16 KB of address space between
$8000 and $BFFF. The cartridge memory is divided into 16 banks, 8 KB
each. Bank P (the last one) is always mapped to $A000 - BFFF. Four lowest
bits of a byte written to $D500 - $D5FF select the bank mapped to $8000 $BFFF.
+- - - - - - - - - - - - - - - - - - - - - - - - - - - - - - - - - - - - - - - - - - - - - - - - - - - - - - - - - - - - - -------------+
| Type 15: OSS 'M091' 16 KB cartridge
+- - - - - - - - - - - - - - - - - - - - - - - - - - - - - - - - - - - - - - - - - - - - - - - - - - - - - - - - - - - - - -------------+
This is the simpler one of OSS schemes. It uses only A0 and A3 address
lines:
A3=0, A0=0 - $A000 - $AFFF: bank B, $B000 - $BFFF: bank A
A3=0, A0=1 - $A000 - $AFFF: bank D, $B000- $BFFF: bank A
A3=1, A0=0 - disable cartridge
A3=1, A0=1 - $A000 - $AFFF: bank C, $B000- $BFFF: bank A
+- - - - - - - - - - - - - - - - - - - - - - - - - - - - - - - - - - - - - - - - - - - - - - - - - - - - - - - - - - - - - -------------+
| Type 16: One chip 16 KB 5200 cartridge
+- - - - - - - - - - - - - - - - - - - - - - - - - - - - - - - - - - - - - - - - - - - - - - - - - - - - - - - - - - - - - -------------+
16 KB cartridge for Atari 5200, that occupies 16 KB of address space
between $8000 and $BFFF.
+- - - - - - - - - - - - - - - - - - - - - - - - - - - - - - - - - - - - - - - - - - - - - - - - - - - - - - - - - - - - - -------------+
| Type 17: Atrax 128 KB cartridge
+- - - - - - - - - - - - - - - - - - - - - - - - - - - - - - - - - - - - - - - - - - - - - - - - - - - - - - - - - - - - - -------------+
This bank - switched cartridge occupies 8 KB of address space between
$A000 and $BFFF. The cartridge memory is divided into 16 banks, 8 KB
each. If a byte written to $D500 - $D5FF has highest bit set, the cartridge is
Atari800MacX Manual – Version 3.5
Page 71 of 95
disabled. Otherwise four lowest bits select the bank mapped to $A000$BFFF.
+- - - - - - - - - - - - - - - - - - - - - - - - - - - - - - - - - - - - - - - - - - - - - - - - - - - - - - - - - - - - - -------------+
| Type 18: Bounty Bob Strikes Back 40 KB cartridge
+- - - - - - - - - - - - - - - - - - - - - - - - - - - - - - - - - - - - - - - - - - - - - - - - - - - - - - - - - - - - - -------------+
The cartridge with "Bounty Bob Strikes Back" game uses very strange bank
switching method:
- Four 4 KB banks (A,B,C,D) are mapped into $8000 - $8FFF. An access to
$8FF6 selects bank A, $8FF7 - bank B, $8FF8 - bank C, $8FF9 - bank D.
- Four 4 KB banks (E,F,G,H) are mapped into $9000 - $9FFF. An access to
$9FF6 selects bank E, $9FF7 - bank F, $9FF8 - bank G, $9FF9 - bank H.
- The remaining 8 KB is mapped to $A000 - $BFFF.
+- - - - - - - - - - - - - - - - - - - - - - - - - - - - - - - - - - - - - - - - - - - - - - - - - - - - - - - - - - - - - -------------+
| Type 19: Standard 8 KB 5200 cartridge
+- - - - - - - - - - - - - - - - - - - - - - - - - - - - - - - - - - - - - - - - - - - - - - - - - - - - - - - - - - - - - -------------+
Standard 8 KB cartridge for Atari 5200, mapped into $8000 - $9FFF and
$A000 - $BFFF.
+- - - - - - - - - - - - - - - - - - - - - - - - - - - - - - - - - - - - - - - - - - - - - - - - - - - - - - - - - - - - - -------------+
| Type 20: Standard 4 KB 5200 cartridge
+- - - - - - - - - - - - - - - - - - - - - - - - - - - - - - - - - - - - - - - - - - - - - - - - - - - - - - - - - - - - - -------------+
Standard 4 KB cartridge for Atari 5200, mapped into $8000 - $8FFF,
$9000 - $9FFF, $A000 - $AFFF and $B000- $BFFF.
+- - - - - - - - - - - - - - - - - - - - - - - - - - - - - - - - - - - - - - - - - - - - - - - - - - - - - - - - - - - - - -------------+
| Type 21: Right slot 8 KB cartridge
+- - - - - - - - - - - - - - - - - - - - - - - - - - - - - - - - - - - - - - - - - - - - - - - - - - - - - - - - - - - - - -------------+
8 KB cartridge for Atari 800, mapped into $8000 - $9FFF. Atari 800 was the
only 8- bit Atari with a Right Cartridge slot, in addition to the Left
Cartridge slot as present on all 8- bit Ataris.
+- - - - - - - - - - - - - - - - - - - - - - - - - - - - - - - - - - - - - - - - - - - - - - - - - - - - - - - - - - - - - -------------+
| Type 22: 32 KB Williams cartridge
+- - - - - - - - - - - - - - - - - - - - - - - - - - - - - - - - - - - - - - - - - - - - - - - - - - - - - - - - - - - - - -------------+
The cartidge has 4 banks mapped to $A000 - $BFFF. An access to $D500
selects bank A, $D501 - bank B, etc. An access to $D508 - $D50F disables
the cartridge.
Atari800MacX Manual – Version 3.5
Page 72 of 95
+- - - - - - - - - - - - - - - - - - - - - - - - - - - - - - - - - - - - - - - - - - - - - - - - - - - - - - - - - - - - - -------------+
| Type 23: XEGS 256 KB cartridge
+- - - - - - - - - - - - - - - - - - - - - - - - - - - - - - - - - - - - - - - - - - - - - - - - - - - - - - - - - - - - - -------------+
This bank - switched cartridge occupies 16 KB of address space between
$8000 and $BFFF. The cartridge memory is divided into 32 banks, 8 KB
each. The last bank is always mapped to $A000 - BFFF. Five lowest bits of a
byte written to $D500 - $D5FF select the bank mapped to $8000 - $BFFF.
+- - - - - - - - - - - - - - - - - - - - - - - - - - - - - - - - - - - - - - - - - - - - - - - - - - - - - - - - - - - - - -------------+
| Type 24: XEGS 512 KB cartridge
+- - - - - - - - - - - - - - - - - - - - - - - - - - - - - - - - - - - - - - - - - - - - - - - - - - - - - - - - - - - - - -------------+
This bank - switched cartridge occupies 16 KB of address space between
$8000 and $BFFF. The cartridge memory is divided into 64 banks, 8 KB
each. The last bank is always mapped to $A000 - BFFF. Six lowest bits of a
byte written to $D500 - $D5FF select the bank mapped to $8000 - $BFFF.
+- - - - - - - - - - - - - - - - - - - - - - - - - - - - - - - - - - - - - - - - - - - - - - - - - - - - - - - - - - - - - -------------+
| Type 25: XEGS 1 MB cartridge
|
+- - - - - - - - - - - - - - - - - - - - - - - - - - - - - - - - - - - - - - - - - - - - - - - - - - - - - - - - - - - - - -------------+
This bank - switched cartridge occupies 16 KB of address space between
$8000 and $BFFF. The cartridge memory is divided into 128 banks, 8 KB
each. The last bank is always mapped to $A000 - BFFF. Seven lowest bits of
a byte written to $D500 - $D5FF select the bank mapped to $8000 - $BFFF.
+- - - - - - - - - - - - - - - - - - - - - - - - - - - - - - - - - - - - - - - - - - - - - - - - - - - - - - - - - - - - - -------------+
| Type 26: MegaCart 16 KB cartridge
|
+- - - - - - - - - - - - - - - - - - - - - - - - - - - - - - - - - - - - - - - - - - - - - - - - - - - - - - - - - - - - - -------------+
A 16 KB cartridge, that occupies 16 KB of address space between $8000
and $BFFF, and can be disabled by writing a byte with bit 7 set to $D500 $D5FF.
+- - - - - - - - - - - - - - - - - - - - - - - - - - - - - - - - - - - - - - - - - - - - - - - - - - - - - - - - - - - - - -------------+
| Type 27: MegaCart 32 KB cartridge
|
+- - - - - - - - - - - - - - - - - - - - - - - - - - - - - - - - - - - - - - - - - - - - - - - - - - - - - - - - - - - - - -------------+
A bank - switched cartridge that occupies 16 KB of address space between
$8000 and $BFFF. It is controlled by a byte written to $D500 - $D5FF. Bit 0
selects one of two available banks, bit 7 disables the cartridge.
+- - - - - - - - - - - - - - - - - - - - - - - - - - - - - - - - - - - - - - - - - - - - - - - - - - - - - - - - - - - - - -------------+
Atari800MacX Manual – Version 3.5
Page 73 of 95
| Type 28: MegaCart 64 KB cartridge
|
+- - - - - - - - - - - - - - - - - - - - - - - - - - - - - - - - - - - - - - - - - - - - - - - - - - - - - - - - - - - - - -------------+
A bank - switched cartridge that occupies 16 KB of address space between
$8000 and $BFFF. It is controlled by a byte written to $D500 - $D5FF. Bits 0
and 1 select one of four available banks, bit 7 disables the cartridge.
+- - - - - - - - - - - - - - - - - - - - - - - - - - - - - - - - - - - - - - - - - - - - - - - - - - - - - - - - - - - - - -------------+
| Type 29: MegaCart 128 KB cartridge
|
+- - - - - - - - - - - - - - - - - - - - - - - - - - - - - - - - - - - - - - - - - - - - - - - - - - - - - - - - - - - - - -------------+
A bank - switched cartridge that occupies 16 KB of address space between
$8000 and $BFFF. It is controlled by a byte written to $D500 - $D5FF. Bits
0,1,2 select one of 8 available banks, bit 7 disables the cartridge.
+- - - - - - - - - - - - - - - - - - - - - - - - - - - - - - - - - - - - - - - - - - - - - - - - - - - - - - - - - - - - - -------------+
| Type 30: MegaCart 256 KB cartridge
|
+- - - - - - - - - - - - - - - - - - - - - - - - - - - - - - - - - - - - - - - - - - - - - - - - - - - - - - - - - - - - - -------------+
A bank - switched cartridge that occupies 16 KB of address space between
$8000 and $BFFF. It is controlled by a byte written to $D500 - $D5FF. Four
lowest bits select one of 16 available banks, bit 7 disables the cartridge.
+- - - - - - - - - - - - - - - - - - - - - - - - - - - - - - - - - - - - - - - - - - - - - - - - - - - - - - - - - - - - - -------------+
| Type 31: MegaCart 512 KB cartridge
|
+- - - - - - - - - - - - - - - - - - - - - - - - - - - - - - - - - - - - - - - - - - - - - - - - - - - - - - - - - - - - - -------------+
A bank - switched cartridge that occupies 16 KB of address space between
$8000 and $BFFF. It is controlled by a byte written to $D500 - $D5FF. Five
lowest bits select one of 32 available banks, bit 7 disables the cartridge.
+- - - - - - - - - - - - - - - - - - - - - - - - - - - - - - - - - - - - - - - - - - - - - - - - - - - - - - - - - - - - - -------------+
| Type 32: MegaCart 1 MB cartridge
|
+- - - - - - - - - - - - - - - - - - - - - - - - - - - - - - - - - - - - - - - - - - - - - - - - - - - - - - - - - - - - - -------------+
A bank - switched cartridge that occupies 16 KB of address space between
$8000 and $BFFF. It is controlled by a byte written to $D500 - $D5FF. Six
lowest bits select one of 64 available banks, bit 7 disables the cartridge.
+- - - - - - - - - - - - - - - - - - - - - - - - - - - - - - - - - - - - - - - - - - - - - - - - - - - - - - - - - - - - - -------------+
| Type 33: Switchable XEGS 32 KB cartridge
|
+- - - - - - - - - - - - - - - - - - - - - - - - - - - - - - - - - - - - - - - - - - - - - - - - - - - - - - - - - - - - - -------------+
This bank - switched cartridge occupies 16 KB of address space between
Atari800MacX Manual – Version 3.5
Page 74 of 95
$8000 and $BFFF. The cartridge memory is divided into 4 banks, 8 KB each.
Bank D (the last one) is always mapped to $A000- BFFF. Two lowest bits of
a byte written to $D500 - $D5FF select the bank mapped to $8000 - $BFFF,
bit 7 disables the cartridge.
+- - - - - - - - - - - - - - - - - - - - - - - - - - - - - - - - - - - - - - - - - - - - - - - - - - - - - - - - - - - - - -------------+
| Type 34: Switchable XEGS 64 KB cartridge
|
+- - - - - - - - - - - - - - - - - - - - - - - - - - - - - - - - - - - - - - - - - - - - - - - - - - - - - - - - - - - - - -------------+
This bank - switched cartridge occupies 16 KB of address space between
$8000 and $BFFF. The cartridge memory is divided into 8 banks, 8 KB each.
Bank H (the last one) is always mapped to $A000 - BFFF. Three lowest bits
of a byte written to $D500 - $D5FF select the bank mapped to $8000 - $BFFF,
bit 7 disables the cartridge.
+- - - - - - - - - - - - - - - - - - - - - - - - - - - - - - - - - - - - - - - - - - - - - - - - - - - - - - - - - - - - - -------------+
| Type 35: Switchable XEGS 128 KB cartridge
|
+- - - - - - - - - - - - - - - - - - - - - - - - - - - - - - - - - - - - - - - - - - - - - - - - - - - - - - - - - - - - - -------------+
This bank - switched cartridge occupies 16 KB of address space between
$8000 and $BFFF. The cartridge memory is divided into 16 banks, 8 KB
each. Bank P (the last one) is always mapped to $A000 - BFFF. Four lowest
bits of a byte written to $D500 - $D5FF select the bank mapped to $8000 $BFFF, bit 7 disables the cartridge.
+- - - - - - - - - - - - - - - - - - - - - - - - - - - - - - - - - - - - - - - - - - - - - - - - - - - - - - - - - - - - - -------------+
| Type 36: Switchable XEGS 256 KB cartridge
|
+- - - - - - - - - - - - - - - - - - - - - - - - - - - - - - - - - - - - - - - - - - - - - - - - - - - - - - - - - - - - - -------------+
This bank - switched cartridge occupies 16 KB of address space between
$8000 and $BFFF. The cartridge memory is divided into 32 banks, 8 KB
each. The last bank is always mapped to $A000 - BFFF. Five lowest bits of a
byte written to $D500 - $D5FF select the bank mapped to $8000 - $BFFF, bit
7 disables the cartridge.
+- - - - - - - - - - - - - - - - - - - - - - - - - - - - - - - - - - - - - - - - - - - - - - - - - - - - - - - - - - - - - -------------+
| Type 37: Switchable XEGS 512 KB cartridge
|
+- - - - - - - - - - - - - - - - - - - - - - - - - - - - - - - - - - - - - - - - - - - - - - - - - - - - - - - - - - - - - -------------+
This bank - switched cartridge occupies 16 KB of address space between
$8000 and $BFFF. The cartridge memory is divided into 64 banks, 8 KB
each. The last bank is always mapped to $A000 - BFFF. Six lowest bits of a
byte written to $D500 - $D5FF select the bank mapped to $8000 - $BFFF, bit
7 disables the cartridge.
+- - - - - - - - - - - - - - - - - - - - - - - - - - - - - - - - - - - - - - - - - - - - - - - - - - - - - - - - - - - - - -------------+
Atari800MacX Manual – Version 3.5
Page 75 of 95
| Type 38: Switchable XEGS 1 MB cartridge
|
+- - - - - - - - - - - - - - - - - - - - - - - - - - - - - - - - - - - - - - - - - - - - - - - - - - - - - - - - - - - - - -------------+
This bank - switched cartridge occupies 16 KB of address space between
$8000 and $BFFF. The cartridge memory is divided into 128 banks, 8 KB
each. The last bank is always mapped to $A000- $BFFF. Seven lowest bits
of a byte written to $D500 - $D5FF select the bank mapped to $8000 $BFFF, bit 7 disables the cartridge.
+- - - - - - - - - - - - - - - - - - - - - - - - - - - - - - - - - - - - - - - - - - - - - - - - - - - - - - - - - - - - - -------------+
| Type 39: Phoenix 8 KB cartridge
|
+- - - - - - - - - - - - - - - - - - - - - - - - - - - - - - - - - - - - - - - - - - - - - - - - - - - - - - - - - - - - - -------------+
An 8 KB cartridge, that occupies 8 KB of address space between
$A000 and $BFFF, and can be disabled by an access to $D500 - $D5FF.
+- - - - - - - - - - - - - - - - - - - - - - - - - - - - - - - - - - - - - - - - - - - - - - - - - - - - - - - - - - - - - -------------+
| Type 40: Blizzard 16 KB cartridge
|
+- - - - - - - - - - - - - - - - - - - - - - - - - - - - - - - - - - - - - - - - - - - - - - - - - - - - - - - - - - - - - -------------+
A 16 KB cartridge, that occupies 16 KB of address space between
$8000 and $BFFF, and can be disabled by an access to $D500 - $D5FF.
+- - - - - - - - - - - - - - - - - - - - - - - - - - - - - - - - - - - - - - - - - - - - - - - - - - - - - - - - - - - - - -------------+
| Type 41: Atarimax 128 KB Flash cartridge
|
+- - - - - - - - - - - - - - - - - - - - - - - - - - - - - - - - - - - - - - - - - - - - - - - - - - - - - - - - - - - - - -------------+
This bank - switched cartridge occupies 8 KB of address space between
$A000 and $BFFF. The cartridge memory is divided into 16 banks, 8 KB
each. The 4 lowest bits of the address written to $D500 - $D50F select the
bank mapped to $A000 - $BFFF. Writing to $D510 - $D51F disables the
cartridge and any write to $D520 - $D5FF is ignored.
+- - - - - - - - - - - - - - - - - - - - - - - - - - - - - - - - - - - - - - - - - - - - - - - - - - - - - - - - - - - - - -------------+
| Type 42: Atarimax 1 MB Flash cartridge
|
+- - - - - - - - - - - - - - - - - - - - - - - - - - - - - - - - - - - - - - - - - - - - - - - - - - - - - - - - - - - - - -------------+
This bank - switched cartridge occupies 8 KB of address space between
$A000 and $BFFF. The cartridge memory is divided into 128 banks, 8 KB
each. The seven lowest bits of the address written to $D500 - $D57F select
the bank mapped to $A000 - $BFFF, bit 7 disables the cartridge.
Atari800MacX Manual – Version 3.5
Page 76 of 95
1 2. Credits
Testing, Feature Suggestion, and General Support of the Atari800MacX Development:
-------------------------------------------------------My Wife
My Daughter (For invaluable testing assitance :) )
Mark Collins (for mirroring the first and subsequent releases)
Daniel Noguerol (for the R: Driver)
Gerard Putter (for help with Printer Emulation Design)
Carsten Strotmann (for suggestions on Monitor improvement)
Jon Toubeaux
Blair Wilson
Wade Ripkowski
Dr Marcus Phillips
Thomas Dury
Jamal Bernhard
Micki Kaufman
Matt Carrell
Albert Yarusso
OE Salcedo
Nathan Hartwell
Ert
Carsten
Peter Payne
Current active members of the Atari800 core emulator development team:
-------------------------------------------------------Petr Stehlik
(maintainer)
Piotr Fusik
Jacek Poplawski (SDL)
Krzysztof Nikiel (Win32)
Mark Grebe
(Mac OSX)
Vasyl Tsvirkunov (Pocket PC)
All contributors to the Atari800 core emulator, past and present:
----------------------------------Michael Beck <[email protected] >
- SIO2PC ATR patch
- SIO Config patches (tested on real XF551)
- monitor continues last command
Dave Bennett <bennet [email protected] >
- Code enabling the use of OSS super cartridges
- Correction to display list jump instruction
- Tidied cartridge code up
Adam Bienias
Jakub Bogusz <qboos [email protected] >
Atari800MacX Manual – Version 3.5
Page 77 of 95
Michael Borisov <[email protected] - bremen.de >
- completely new, high quality Pokey emulation
Robert Brewer <[email protected] >
- Voxware sound driver updated for POKEY v2.4
Chris Chiesa <[email protected] >
- Added code allowing emulator to run under DEC Windows.
Ed Cogburn <[email protected] >
- major improvements of configure & make process
- added copyright headers to all source files
- miscellaneous cleanups and fixes
Matthew Conte <[email protected] >
- new SoundBlaster driver for DOS
Preston Crow <[email protected] m o ut h.edu >
- Corrected calculation of ATR sectror count
- UI enhancement (folders in disk management)
Nir Dary <[email protected] >
- detailed information about OSS, Williams, XEGS and MegaCart cartridges
Jason Duerstock <[email protected] >
- R- Time 8 cartridge support (real date and time from host machine)
- page based memory access
- PAGED_ATTRIB support
Maximum Entropy <[email protected] >
- Various corrections to MOTIF code.
- MOTIF callbacks for Insert Disk, Eject Disk and Insert ROM
- Bug Fixes in sio.c
- Bug Fix to devices.c allowing DOS 2.5 to get a directory of H:
- Bug Fix to monitor.c (EOF on INPUT + Blank Lines)
- Undocumented command s added to monitors HELP command.
- Implementation of Disable Drive menu item for Motif.
- Fixed scrolling problem for SGI and SPARC machines
- Added FPS Monitor to X11 and Motif versions.
- Changes to pattern matching for H: device.
- Motif fileselector retains state from one invocation to the next
- Fixed an unitialized pointer
- Tidied up declaration of various functions.
- Removed Warning messages when compiled with - Wall
- Configuration program detects if longwords need to be aligned.
- Modification to X11 Paddle Emulation.
- Removed annoying flicker present under some X11 platform s.
- Removed hardcoded paths in MOTIF code.
- Various fixes for curses mode.
David Firth <[email protected] mon.co.uk >
- Original author of Atari800
Atari800MacX Manual – Version 3.5
Page 78 of 95
Stephen Firth <stephe [email protected] on.co.uk >
- Graphical Support for Amiga
Friedrich Friedrichs <friedel@nomade n.org >
- RPM .spec file
Ron Fries
- Pokey Sound Emulation library
Rob Funk <[email protected] - state.edu >
- Tidied up emulator abort code.
- Case insensitive monitor command s.
Piotr Fusik <[email protected] >
- general rewrite of ANTIC and GTIA (accuracy and speed improvements)
- changed ANTIC/CPU synchronization
- corrected undocument e d 6502 opcodes
- corrected PCX screenshots and added interlaced screens hot s
- improved IRQ accuracy
- ATR write protection
- monitor improvement s
- loading of .act palette files
- improved disk LEDs
- rewritten executable loader
- UI enhancement s
- read - only mode for H: devices
- exact 17- bit and 9- bit polys for sound and RANDOM
- improved potentiometers emulation
- support for Express, Diamond, SpartaDOS X, XEGS, and other cartridges
- corrected disk formatting
- cassette recorder emulation
- emulation of paddles, Touch Tablet, & Koala Pad
- emulation of Light Pen/Gun & Amiga/ST mice
- util/act2ht ml
Robert Golias <[email protected] >
- UI enhancement s and DJGPP fixes
- Monitor enhancement s (esp. line assembler)
- fullscreen in DOS port - 320x240 and 320x480 interlaced graphics
- VESA2 support in DOS
- keyboard and joystick handling, joystick emulated on keyboard
Mark Grebe <[email protected] >
- initial Mac OSX support
- new complete H: device support (subdirectories added recently)
- Multiple Disk Set support
Christian Groessler <[email protected] >
- SVGAlib patch for joystick
- BRKHERE command
Nathan Hartwell <[email protected] >
- win32 fixes
- sethdr perl script
Atari800MacX Manual – Version 3.5
Page 79 of 95
Cameron Heide <[email protected] >
- 16,32 - bit X11 SHM support
Alex Hornby <[email protected] >
- Virtual 2600 Emulator from which I took /dev / d s p device code
Gerhard Janka <gerhar [email protected] >
- cpu_m68k.s corrections and improvement s
- double buffering of screen output
Ed Kaminski <[email protected] >
- Correction of Antic 4&5 Bug affecting Galactic Chase & Mr. Do
- Improved speed of DOS version by syncing with a high resolution timer
- PORTB duplicated special handling of PORTA.
Jari Karppinen <jakarp [email protected]>
- fixed some warnings and bugs (like e.g. void main() in joycfg ;- )
Kuba <[email protected]>
- vertical retrace control in DOS port
Jindrich Kubec <[email protected] >
- various corrections and refinement s (SIO)
- hours of testing on real Atari800XL
- research on real cartridges
Chris Lam <[email protected] >
- Lookup table containing RGB values for each Atari Colour
Rich Lawrence <[email protected] >
- Win32 port (using DirectX)
- DCM and ZLIB compressed files support
Cyrus Malek <[email protected] >
- Patch to make the X11 Backspace key work the same as the Delete key
Perry McFarlane <[email protected] o.on.ca >
- Antic fix in vertical scroll
- Complete Antic rewrite (DIRECT_VIDEO approach, but better)
- GTIA enhancement s (based on Thomas' code, but using DIRECT_VIDEO)
- Allegro library in DOS port
- Colour Artifacting
- 'digital sound' emulation in DOS port
- complete cycle- exact ANTIC/GTIA emulation
Petr Mojzisek <[email protected] >
- rawkey support for svgalib
Nathan Monson <nat ha [email protected] >
- Fix for handling 6502 V flag during ADC and SBC operations
Krzysztof Nikiel <[email protected] >
Atari800MacX Manual – Version 3.5
Page 80 of 95
-
SaveINT() fix in state save code
Linux improvement s (new svgalib keyboard input and screen output)
Sound improvement s (interpolation, configurable delay, 4 buffers)
autoconf stuff
Windows code clean up and DirectX version
Chris Palmer <[email protected] >
- Spotted incorrect declaration of atari_basic[8129] in "pia.c"
Ivo van Poorten <[email protected]>
- Added X11 window Expose Event
- Made hardware registers repeat within their page.
- Control Characters in CURSES version
- Makefile targets for freebsd systems
- Modification to Curses character attributes handling (for freebsd)
- Ported Emulator to DOS using DJGPP.
Jacek Poplawski <[email protected] >
- SDL port of Atari800
Thomas Richter <[email protected] - berlin.de >
- GTIA collisions and third colour of players
- new SIO code with formatting support
- POKEY timers
- ADC/SBC "V" bit bug found and fixed using Frodo 6502 emu source
Karel Rous <Empty Head>
- rewrote CPU.C to optimized MC68030 assembler
Neil Ship <[email protected] >
- Correction to new cartridge code introduced in 0.4.0
Ken Sider
- his binary loader has been used by Rich for developing our EXE LOADER
Petr
-
Stehlik <[email protected] >
Project coordinator / m a n a ger since v0.8.2 (spring of the 1998)
Added support for Atari Falcon (port itself, sound, kbd, joy)
Added sound, keyboard and joystick support for DOS version
Snailmeter
Various fixes in the SDL version
Atari800 project web pages at http:/ / a t a ri800.sourceforge.net /
RT- Config fixes (per- user and system wide config, Y/N questions)
Radek Sterba <[email protected] >
- Added all missing CPU 6502 instructions
- Implemented precise timing into Antic and CPU
- Fixed PMG registers and implemented PMG flickering
- Added full 256 opcodes support to dissasem bler
- Various DOS enhancement s
- Added emulation of 320 kB memory (Atari320XE)
Petr Sumbera <xsum [email protected] >
Atari800MacX Manual – Version 3.5
Page 81 of 95
- LPTjoy idea and design of the interface
Vasyl Tsvirkunov <[email protected] >
- WinCE port of Atari800
- refactored UI (introduced UI_BASIC)
Marek Zelem <[email protected] >
- little improvement s in SIO and main sync loop for Unix
- X11 keyboard
- X11 screen (background = > faster emulation)
- digital (volume only) sound
- console sound emulation
- disk drive sound emulation
- various fixes
Marcin Zukowski <[email protected]>
- fix in ANTIC, GTIA
- slight monitor improvement
Benjamin Schreiber <[email protected] >
and Alexander Martinez <kubus [email protected] >
- SDL keyboard joystick emulation stored in the Atari800 config file
Daniel Serpell <[email protected] >
- SDL keyboard based on Unicode values, more keys emulated correctly
Ken Zalewski <[email protected] >
- segfault fix in GetKeyCode of atari_x11
maddoxik <ma [email protected] >
- "Make Blank Boot Disk" option added to Disk Management UI
Atari800MacX Manual – Version 3.5
Page 82 of 95
1 3. Compatibility
Years of development of the Atari800 emulator by different people have it running almost
100% of Atari software. Take it into consideration before you complain ‘The program x
doesn’t work with the emulator’. Most of non - working program s we receive are corrupt.
They can’t be run on a real Atari computer, thus they don’t work with the emulator.
The emulator’s compatibility rate is growing continuously. You can help us by reporting
any non - working software. Please check this first. This is the list of all known bugs in the
emulation. Some others may have crept in during the development of the Macintosh
version, but are not known at this time.
A few keyboard - related bugs:
- e.g. pressing SHIFT+1 and then releasing SHIFT should still give '!' characters
The cycle - exact ANTIC/GTIA/CPU timing is not 100%.
This causes display bugs in following programs:
- Surf's up (game) (The horizon)
- Dimension X (game) (alignment problem? not tested on actual machine)
- Te.mod (demo) (small glitched pixel in the final credits on the bottom left)
- The break(demo) (bug may exist in the original, check)
- Our 5oft Unity Part (demo) (cycle- alignment, probably WSYNC)
- Isolation (demo) (vector animations)
Non- bugs:
- Mail Order Monsters (game)
(some colour changes do not align with text, occurs on a real Atari)
The following programs are improved by using the new cycle - exact code
- 8 Players Demo (demo)
- Bewesoft's Demo (demo)
- Bitter Reality (demo)
- Demonic Laughter (music collection)
- Extract (graphics collection)
- GED (graphics editor)
- Joyride (demo)
- Mail Order Monsters (game)
- Master of the Lamps (game)
- Orneta '95 invitro (demo)
- Our 5oft Unity Part (demo)
- Studio Dream (demo)
- Sweet Illusion (demo)
- Te.mod (demo)
- The Break (demo)
- Miner 2049'er (game) (rotating 5's)
- Dimension X (game) (title screen upper and lower bars)
- Graphics impossible (demo) (Antic magazine)
(not tested:)
- Power Graph (graphics editor)
- Darkness Warrior (picture)
POKEY interrupts are scanline - , not cycle - exact.
Atari800MacX Manual – Version 3.5
Page 83 of 95
This causes sound bugs in following programs:
- Joyride (demo) (white lines on title picture)
- Mirax Force (game)
- Saturday Demo (demo)
- The Last Guardian (game)
Sound emulation is not accurate enough
This causes sound bugs in following programs:
- Numen (demo)
Sound emulation uses VOL_ONLY_SOUND hack.
This causes sound bugs in following programs:
- Digital Trash (demo)
- Ghostbus ters (game)
- Overmind (demo)
Intensive 130xe - banks switching slows down emulation much.
This causes performa nce problems in following programs:
- Impossible but Real (demo)
- Sheol (demo)
- Total Daze (demo)
- Ultra (demo)
Atari800MacX Manual – Version 3.5
Page 84 of 95
1 4. Kno wn Bugs
The following are known bugs in this release:
•
•
Normal keyboard shortcuts for the Copy and Select All items in the Edit menu do
not work in the Messages window. However, the menu equivalents do work
Directories used for storing media and emulator files must not have non 7- bit
ASCII characters in their filenames. The emulator core uses standard UNIX file
handling routines, and does not handle international characters.
Atari800MacX Manual – Version 3.5
Page 85 of 95
1 5. Release History
Version 3.5.0 Release 10- 31- 2006
Features Added / Changed:
• Added support for the new SpartDos X 128K Cartridge.
•
Added menu to the Control Menu to allow the user to control the artifacting mode.
•
Allow gamepads with 3 joysticks of the same type to be used (Gravis Eliminator
Aftershock is an example).
Bugs Fixed:
• Fixed issue with "new" artifacting in certain games, such as SCRAM..
•
Fixed issue where Artifacting mode was not taking effect until program was
restarted (After being set in Media Status Window)..
Version 3.4.3 Release 10- 22- 2006
Bugs Fixed:
• Fixed issue with Gamepad Identification window, where Test and OK buttons did
not work.
Version 3.4.2 Release 09- 27- 2006
Bugs Fixed::
• Fixed bug where Mouse pointer was stuck in Emulator window when returning
from Full Screen mode to Windowed mode.
• Fixed issue with Screenshot capture on Intel Macs. (TIFF File was being stored in
little endian format)
Version 3.4.0 Release 09- 18- 2006
Features Added / Changed:
• Added pulldowns to the Media Status Window which allow the user to control
machine type, screen scaling, screen width, and artifacting from there in addition
to using the menus or keyboard.
• Added the ability for the emulator to remember what media was present (disks,
cassette, and / or cartridge) when it quit, and restore them the next time it starts
up. This is added as a checkbox to the Boot Media panel of the Preferences.
• Added the ability for the emulator to remember what media was present (disks,
cassette, and / or cartridge) when it quit, and restore them the next time it starts
up. This is added as a checkbox to the Boot Media panel of the Preferences.
• Added ability to control emulation speed from 10- 300%, as opposed to either
100% or Full Speed. There is now a slider on the Atari panel of the Preferences.
• Added the Break key to the Function Key window, for those with International
laptop keyboards which might not have had the other keys.
Bugs Fixed:
•
Fixed bug where Mouse Emulation modes were not working properly..
•
Fixed issue with International and Dvorak keyboards where Command key
combinations were not being released properly, and keys were missed, or
Atari800MacX Manual – Version 3.5
Page 86 of 95
keyboard joysticks did not work correctly.
Version 3.3.0 Release 06- 11- 2006
Features Added / Changed:
• Updated to the 1.2.10 release of libSDL, which includes official Universal Binary
support.
• Added new, realistic artifacting type. This produces much clearer text, and
correctly varies luminance and displays player missile graphics in artifacted mode.
Bugs Fixed:
•
•
Fixed bug which would not allow keys used for joystick emulation to be used to
type filenames in Fullscreen UI.
Fixed upside down printing of text in Epson and Atari825 Printer Emulators on OS
X 10.3 and 10.4. Note, this is now broken on OS X 10.2, but this was determined
to be a more acceptable solution than ending support for 10.2. 10.2 users may
continue to use version 3.2 or earlier with working Printer support.
Version 3.2.0 Release 03- 25- 2006
Features Added / Changed:
•
•
•
•
Application is now a Universal Binary, and should run natively on Intel based
Macs.
Added true Volume Only sound to "Hi- Fi" sound mode, so that games such as
Bezerk and Nexuss now have correct sound, removing "hiss" from that old sound
was causing in those games.
Added ability to go to/from fullscreen mode using Cmd- Return, as well as Cmd- F.
Most other emulators use that key sequence for full screen.
Updated code base to core emulator Atari800 2.0.1 release + CVS Changes.
Bugs Fixed:
•
Fixed improper screen redraw when exiting GUI in full screen mode.
•
Fixed fullscreen GUI from running too fast when Limit Speed feature was off.
•
Fixed issue with Sirus games by incorporating Atar800 CVS changes.
Version 3.1.0 Release 02- 23- 2006
Features Added / Changed:
•
Integrated new Warm Reset handling from Atari800 2.0.1
•
Integrated new Hard Disk emulation from Atari800 2.0.1
•
Added NTSC palette files.
•
Cleaned up autoswitching between computer and 5200 modes, so that switching
occurs from 5200 mode when user inserts computer media (catridge, disk,
executable file).
Added menu in preferences so that user could select which computer type is
•
Atari800MacX Manual – Version 3.5
Page 87 of 95
switched to when user inserts computer media (cartridge, disk, executable file),
when emulator is in 5200 mode.
Bugs Fixed:
•
Fixed slashed zeros in Epson Printer Emulation
•
Fixed Atari 1020 Printer Emulation issue of crashing when print with auto adjust
is on.
Fixed handling of Ctrl- Shift and certain key combinations, enabling such programs
as Paperclip and Extended DDT.
Fixed issue where machine was not reintialized when OS ROM was changed.
•
•
•
•
•
Fixed issue where window title bar was not updated when autochanging modes
between computer and 5200.
Fixed issue where machine type menu was not updated when autochanging modes
between computer and 5200.
Fixed issue where emulated screen was not cleared properly when autochanging
modes between computer and 5200.
Version 3.0.0 Release 09- 29- 2005
Features Added / Changed:
•
•
•
•
Added OpenGL rendering for improved performa nce and improved compatibility
with OSX 10.4 and above.
Added Printing to a choice of 3 simulated legacy printers, with output to PDF files.
o Epson FX- 80 - Text and Graphics dot matrix printer supporte d by most
later Atari software.
o Atari 1020 - Color printer / pl ot ter.
o Atari 825 - Early Atari dot matrix printer included for use with early Atari
software.
Added Function Key window to allow user to press Atari Start, Select, and Option
keys from floating palette.
Added enhancement s to the built - in debug monitor.
o Ability to run in Fullscreen.
o Command history
o Read/Write emulator memory from / t o Macintosh files.
o Read/Write emulator memory from / t o Atari disk image sectors.
o Memory Move
o Bank Switching (XE)
o Complex Breakpoints
o Instruction Tracing to Files
o Improvements to the History command
•
Added the ability to create blank Cassette images.
•
Added
o
o
o
the following features from Core Emulator version 1.3.6+
Loading of BASIC files from Loading executable file menu item
Added new Atarimax cartridge types
Bug fixes
Bugs Fixed:
Atari800MacX Manual – Version 3.5
Page 88 of 95
•
•
•
•
•
•
Added Fix for Sound issues on certain classes of machines. Sound should now be
much more stable.
Added Fix for Atari control key not working properly when using international
keyboard mapping.
Added Fix for some Preferences not getting saved when changed by emulator
menus.
Added Fix for bug where screenshot s taken in 16 bit colors would be all black.
Added Fix for garbage being displayed in emulator window after retuning from
Fullscreen.
Added Fix in Disk Editor for issue recognizing Atari Dos type on some enhanced
density disk images.
Version 2.1.0 Release 03- 07- 2005
Features Added / Changed:
•
•
•
Added the ability to insert and remove joysticks and gamepads while the emulator
is running, and it will recognize the change.
Added the ability to choose a brushed metal apperance for all the emulator
windows in the Display tab of the preferences. The emulator must be restarted
for a change in this setting to take full effect.
Added the ability to specify the directory in which Screenshots are stored.
Bugs Fixed:
•
•
•
Added Fix for Timeslip game from core emulator. Newcycleexact dmactl change
bug.
In full screen menuing system, fixed NULL pointer access in file dialog which
happene d if there were no files in the selected directory.
Fixed cartridge bank switching to switch back the main bank of switchable XEGS
cartridges.
Version 2.0.0 Release 05- 25- 2004
Features Added / Changed:
•
Added Media Window which provides a graphical representation of the status of
the following:
o Disk Drives
•
•
•
•
•
Shows the state of the disk drive, and the name of the image file
inserted, if any.
Allows the user to turn the drive on/ off, insert / eject disk images,
and write protect (lock) and unlock the disk images.
Allows the user to drag a disk image from the Finder onto the
drive, and have it automatically mounted.
Allows the user to drag a disk image from one drive to another,
unmounting it from the first, and mounting it on the second.
Displays LED's indicating drive accesses, and optionally, the sector
Atari800MacX Manual – Version 3.5
Page 89 of 95
number accessed.
o
Cassette
•
•
•
•
•
o
Allows the user to drag a cassette image from the Finder onto the
drive, and have it automatically mounted.
Provides a graphical representation of the cassette tape position.
Allows the user to change the tape position (i.e. rewind / fa st
forward).
Cartridge
•
•
•
•
Shows the state of the cassette drive, and the name of the image
file inserted, if any.
Allows the user to insert / eject a cassette image.
Shows the state of the cartridge (inserted or empty), and the name
of the image file inserted, if any.
Allows the user to insert / eject a cartridge.
Allows the user to drag a cartridge image from the Finder onto the
drive, and have it automatically mounted.
•
Added builtin Disk Image Editor. This editor allows you to edit ATR disk image
files on a file level, importing / exporting files to/from the Mac filesystem, as well
as deleting / r e na mi ng / l ocking / u nlocking files, and creating / re na ming / d eleting
directories on Atari DOS's which support them. Also, you can drag n' drop files
to/fro m the disk images and the Mac Finder. Supported Atari DOS types are Atari
DOS 1.0, Atari DOS 2.x, Atari DOS 3.0, Atari DOS 4.0, Atari DOS XE, TopDOS,
BiboDos, MyDos, SpartaDos 2+, and BWDOS.
Added Disk Image translations to Media Menu, under "Disk Image Utilities" menu
item. User is able to translate ATR< - >XFD and ATR< - >DCM images.
Added ability to drag 'n drop disk images, cartridge images, state files, and other
recognized file types from the Finder to the emulator main window and have them
loaded. This is in addition to the current ability to double click them, or drag
them to the dock icon.
Preferences which are also settable by menu options are now remem bered
between sessions, and change in the Preferences panel.
Window positions are remembered between sessions.
•
Sound capture format changed to AIFF from RAW for Mac compatibility.
•
Screen capture format changed to TIFF from PCX for Mac compatibility.
•
Added the ability to use the International key mapping setting in Mac OSX to
remap the keyboard for other countries. Note, this option defaults to off, and
must be set to on in the Atari System panel of the Preferences window.
Added Sector number display to Disk LED status in main window, and the ability
to turn both drive status and Sector number display off.
Reworked confusing display menu scheme, making the choices much clearer.
•
•
•
•
•
•
Added scanline option for scaling, where display simulates older monitors which
had visable lines.
Atari800MacX Manual – Version 3.5
Page 90 of 95
•
•
•
•
•
Added smooth option for scaling. This applies a smoothing algoritm when scaling
the screen. Note, this is highly CPU intensive, and may slow down the frame rate
the emulator is capable of.
Added the ability to display the frame rate while in Full Screen in the lower left
corner of the screen.
Added Console Sound (Keyclick) and Serio Sound (Disk read / write) to new "Hi- Fi"
Sound Emulation. Also, these sounds may now be turned on and off in the System
Tab of the Preferences.
Added option key override of keyboard joysticks, so that normal Atari keys that
are the same as joystick keys may be typed by holding down option and the key.
Added the following features from Core Emulator version 1.3.2:
o Casette handling greatly improved
o 2 New cartridge types - Phoenix and Blizzard.
•
Cleaned up Atari System Preferences window.
•
Uses current SDL library for graphics.
Bugs Fixed:
•
Fixed mouse emulation buttons. These were broken in version 1.6.
•
Fixed annoying audio clicks on starting and ending the emulator, as well as when
modal dialog boxes were displayed.
Fixed bug in SIO emulation which was preventing formating of Disk Images in
double density / e n ha nced density on some DOS types.
Added the following fixes from Core Emulator version 1.3.2:
o ANTIC and POKEY fixes for software compatibility
o Some rare buffer overflows fixed
•
•
Version 1.6.0 Release 10- 20- 2003
Features Added / Changed:
The major change in this version was bringing the Atari800MacX source base up to
the current release of the base Atari800 Emulator. This resulted in the following
features:
•
•
New Hi- Fi quality Sound Emulation. The old sound engine may still be used by
unchecking the "Use Hi- Fi Sound" option on the System Panel of the Preferences
Pane. Note the new sound engine does not yet implement the key click or
input / o u t p u t sounds. If you wish to have these sounds, the old sound engine
must be selected.
Updated Cycle- exact graphics emulation. Improved handling of DMACTL changes
in the middle of a scanline ("Decathlon", "Mail Order Monsters"). Emulation of a
DMACTL width change bug.
Added Multijoy 4 Emulation - Allows the use of 4 joysticks on XL/XE machines
with custom software.
Added new cartridge type: Switchable XEGS 1 MB.
•
Added Rotate Disk command to Media menu and Disk Management Dialog.
•
Added XF551 HighSpeed transfer Emulation.
•
Source code is now back in sync with Atari800 emulator.
•
•
Atari800MacX Manual – Version 3.5
Page 91 of 95
(http: / / a t a ri800.sourceforge.net)
Bugs Fixed:
•
Fixed Atari 5200 crash after pressing SHIFT and * in "Super Pacman".
•
Fixed crashing of emulator if disk or cartridge file specified in a Saved State file
could not be found.
Version 1.5.0 Release 08- 24- 2003
Features Added / Changed:
•
•
Added the ability to use a command key shortcut (Command - ,) to display the
Preferences panel.
Added the ability to ignore the Header Write Protect Bit in ATR images. If this bit
is set, the emulator is unable to write to the disk image. This prevented some
demos and games from working, since the user had no way to set the disk image
to read / write. (This feature was added under the Atari System Pane of the
Preferences.)
Bugs Fixed:
•
Fixed emulator sound mixing. This allows the emulator to be used with iTunes,
etc., and not cause distortion of the music audio.
Version 1.4.0 Release 05- 08- 2003
Features Added / Changed:
•
•
•
•
•
Changed the way gamepad button assignment is handled, so that different
assignment s can be given to different gamepads. This allows users who have
different types of gamepads to use them, and assign the buttons differently. This
change requires that any changes to the gamepad assignments be saved to a
named configuration before the Preferences window is closed, or the changes will
be lost. Then the named configuration must be selected for the gamepads on
which it is to be used.
Added the ability to use gamepad buttons as joystick directions, for gamepads
which do not report hats, such as the iShock. Note, this change can cause an
incompatability in the Preferences file with older versions of the program. If you
use this new version, and wish to go back to an older version, make sure and set
gamepad assignment s to other than joystick directions, and joystick types to other
than gamepad buttons before using the older version, or the Preferences file will
cause a crash when the Preferences panel is opened.
Increased the maximum number of gamepad buttons to 24 from 16, to handle
devices such as the iShock.
Added the ability to specify which joystick or hat to use for the controller on
gamepads which have multiple sticks or hats.
Cleaned up the Gamepad preferences panel, disabling menu items when they are
not applicable.
Bugs Fixed:
Atari800MacX Manual – Version 3.5
Page 92 of 95
•
•
Fixed state file saving /loading with cartridges larger than 8k. WARNING: To
implement this required a state file format change, so state files saved with earlier
versions will not load into 1.4.0.
Fixed gamepad button assignment, such that a button assigned to shift or control
can be used in conjunction with another button assigned to a character. Note, that
this will give the shifted equivelent on the Atari keyboard, not the Mac keyboard
(i.e. Shift - 8 will be ^, not *).
Fixed issue which was preventing Rtime8 time emulation from working. (Bug is
present in 1.2.0 and later).
Fixed SDL bug which was causing Digital Hats to not work properly on gamepads
(Up direction was flaky).
Fixed bug introduced in 1.3.0, causing Mouse based emulation to not work.
•
Fixed missing Atari key. Now able to type '|' character.
•
•
•
Version 1.3.0 Release 03- 13- 2003
Features Added / Changed:
•
•
Added ANTIC/GTIA Cycle Exact code from Atari800 core emulator. This adds
compatability with several games and demos. See Compatability page of program
help for more detail.
Added ability to save and load multiple Disk Sets from the Disk Management
window. (Also from the Fullscreen UI). See the Media page of the program help
for details.
Ability to handle 4 USB Gamepads. This change will require users of earlier
versions to respecify their joystick emulations.
Added x3 Scaling and x4 Scaling on Windowed Display, and added the ability to
lock Fullscreen display to 640x480 (on by default)
Added Cartridge and Disk state information to State files. Now when loading a
saved state, the cartridge and disks present when the state was saved will be
mounted. The state file format has not changed, but the disk/ cartridge info was
added to the end.
Added Backquote (`) as break key, in addition to Pause /F15.
•
Added Known Bugs page to Help pages.
•
Added Hot Key (F7) for "Limit to Normal Speed"
•
Added Emulator message window, which is used to display debug and
informational messages from the Emulator core. It can be found under the
Control menu.
•
•
•
•
Bugs Fixed:
•
Fixed Break key/Interru pt bug from Atari800 core emulator
•
Fixed bug where Gamepad Joystick would stick in one or two directions, unless
moved in the other direction. This bug would go away after a few mintues, but
was very annoying :). (But amazing easy to fix...."I love it when a plan comes
together" :)).
Fixed bug with Boot Disk Images where only one or two images could be specified
without crashing the program.
•
Atari800MacX Manual – Version 3.5
Page 93 of 95
•
•
•
Fixed bug where Atari Inverse, Clr- Tab, Set- Tab, Insert - Char, Insert - Line, Delete Char, and Delete - Line keys were not recognized by the emulator.
Moved Mouse Grab key(F12 to F11), as it conflicted with Optical Media Eject on
non - Apple keyboards.
Fixed BW/Color conversion bug in Pallette Formating code from core emulator.
Version 1.2.0 Release 01- 14- 2003
Features Added / Changed:
•
Added ability to program keys used for keyboard emulation of joysticks.
•
Completed subdirectory support for DOS functions for the hard drives. This
support works best with Spartdos and BWDos, as it works with the command line
in them, but will be supported by XIO functions with any DOS.
Added support for AlphaOmega Software's Extended Software Updater, to allow
user to find out about new versions of program.
Fixed Folder Icons in Application Folder (Thanks Matt :) ).
•
•
Bugs Fixed:
•
•
•
Fixed
Shift,
Fixed
panel
Fixed
issues with special key assignment s on gamepads (Select, Option, Reset,
Ctrl).
issue with "Boot From Casette" preference change not taking after Prefs
closed.
issue where if Boot Disk was not found, application would quit.
Version 1.1.0 Release 12- 03- 2002
Features Added / Changed:
•
•
•
•
•
•
Added full Gamepad control, alowing gamepad buttons to be assigned to Atari
buttons / k eypres s, and selection of joysticks on gamepads with both Analog and
Digital stcks.
Added the capability to use the X- axis of an analog joystick or mouse for both
paddles of a paddle set.
Added 13 Cartridge types from Atari800 Emulator Core.
Atari800MacX now supports all normal DOS functions for the hard drives,
including Rename, Delete, Note, Point, and Open for modify (read /w rite).
Subdirectories are not supported at this time, but may be in a future release.
Changed command key shortcut s to follow Macintosh standards.
5200 Emulator without a cartridge now displays a screen indicating user should
insert a cartrdige, instead of a blank screen.
Bugs Fixed:
•
5200 Emulator crashing after cartridge is removed.
•
Machine type switching bugs when cartridge is changed.
•
Bug fixes in libSDL graphics libarary.
Atari800MacX Manual – Version 3.5
Page 94 of 95
•
Bug fixes in Atari800 Emulator core.
Version 1.0.1 11- 1- 2002
First Non- Beta Release. Includes the following features and bug fixes:
Features Added / Changed:
•
•
•
•
•
•
•
•
Full Stereo sound capability added (actually fixed), as well as several sound bug
fixes. Sound is greatly improved.
Emulation of printing thru Atari P: device fully supporte d, which allows printing to
a text file opened by a program of your choice.
Ported the Atari800 R: device drivers to allow you to "dial- in" to BBS software
through telnet and a user specified port number. Many thanks to Daniel Noguerol
for his hard work on the original and ported versions of the driver.
Ability to load color palettes from external files, or generate your own custom
palettes. As a black and white palette is one of the included files, ability to change
to Black and White has been removed from the program.
Monitor panel added. This allows the user to display emulated memory, registers,
display lists, etc.
Full 5200 Controller support added, including 2nd button and keypad. See Help
Keyboard page for details.
Mac analog joysticks now provide paddle input as well (for Super Breakout, etc.).
They also provide true analog input for 5200 joysticks.
5200 emulation is now pasued until you insert a cartridge, since the real 5200 did
not run without a cartridge. Also, it was causing an anoying crash cycle without
the cartridge.
Bugs Fixed:
•
Incorrect Machine Type and RAM size in Window Title at program startup.
•
Many of theCartridge types were not being properly recognized.
•
System ROMs and Boot media loading were not defaulting to the proper
directories.
Mouse joystick emulation in 5200 mode was not working properly.
•
•
Changing the Disable Basic flag in preferences now perform s a coldstart,
implementing the change.
Version 0.2.1 10- 6- 2002
First full Macintosh version, including Preferences, Menus, Help, and other standard
features.
Version 0.1.2 9- 8- 2002
Initial SDL version without Macintosh Interface.
Atari800MacX Manual – Version 3.5
Page 95 of 95