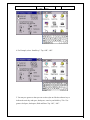
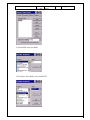
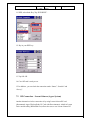
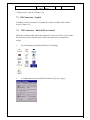
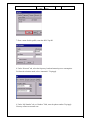
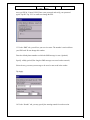
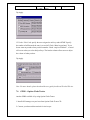
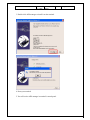
1
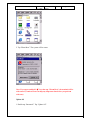
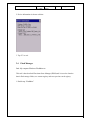
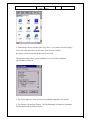
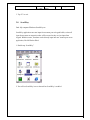
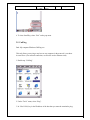
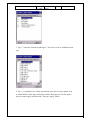
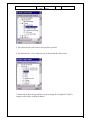
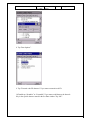
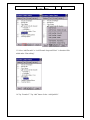
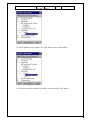
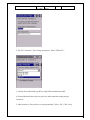
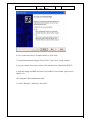
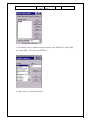
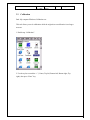
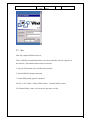
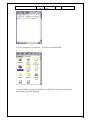
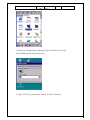
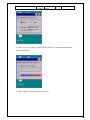
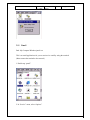
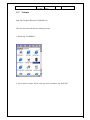
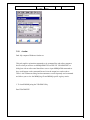
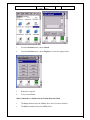
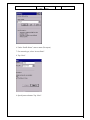
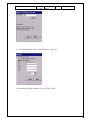
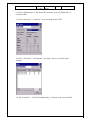
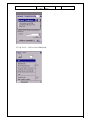
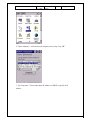
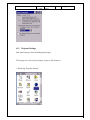
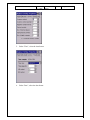
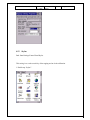
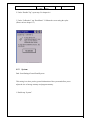
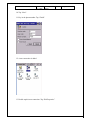
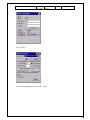
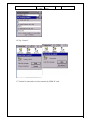
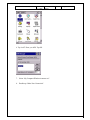
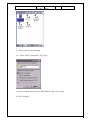
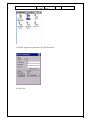
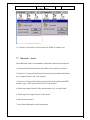
Unitech Electronics Co., Ltd
Created
by Yukiko
PA960 Operation
Manual
V2.3
Page 1 of 144
PA960 Operation Manual
Author: Yukiko Goh
Date Created: 10 November, 2003
Last Update: 29 June 2004
Unitech Electronics Co., Ltd
Created
by Yukiko
PA960 Operation
Manual
V2.3
Page 2 of 144
Table of Contents
Chapter 1 Introduction
5
Chapter 2 Unitech’s Application
2.1 Bootmode
2.2 Chatter
6
6
8
2.3
2.4
2.5
2.6
DeviceInfo
Flash Manager
GetVK
I/O Card Control
11
12
14
14
2.7
2.8
2.9
2.10
KeyTracARM
Scan2Key
UniPing
Scanner Settings
17
18
20
22
2.11 Virtual Keys
2.12 RegFuncKey
Chapter 3 Tools and Applications under “Windows”
3.1 ActiveNet
3.2 Aironet Client Utility
3.3 Calibration
3.4 MS DOS Prompt Command
3.5
3.6
3.7
3.8
Load New Firmware
MSTSC
Net
NICTT
36
38
41
41
45
48
49
51
52
54
56
3.9 NICUPDATE
3.10 Pegterm
3.11 pmail
3.12 pvbload
60
61
65
68
3.13
3.14
3.15
3.16
pword
rapisrv
rasdemo
repllog
68
68
69
69
3.17 Taskman
3.18 visadm
71
72
Unitech Electronics Co., Ltd
Created
by Yukiko
PA960 Operation
Manual
3.19 wceload
3.20 WMAGS46
Chapter 4 Control Panel
4.1 Communications
4.2 Date/Time
4.3 Display
4.4 Input Panel
V2.3
Page 3 of 144
74
74
83
83
86
87
89
4.5
4.6
4.7
4.8
Keyboard
Mouse
Network Configuration
Owner
92
94
95
97
4.9
4.10
4.11
4.12
Password
Power
Regional Settings
Stylus
99
100
102
105
4.13 System
4.14 Volume & Sounds
106
108
Chapter 5 Available Function Keys
5.1 Func + Esc
5.2 Func + Up Arrow
5.3 Func + Down Arrow
5.4 Func + TAB
5.5
5.6
5.7
5.8
Func + 6
Func + 7
Func + 8
Func + 9
111
111
112
112
112
113
113
114
115
Chapter 6 Other Applications
6.1 Remote Networking
116
116
Chapter 7
RF Connection, GPRS and Bluetooth
7.1 RF Connection – Cisco Aironet
7.2 RF Connection – Lucent Orinoco (Agere System)
7.3 RF Connection -- Symbol
121
121
124
126
7.4
7.5
RF Connection – Built in RF card model
GPRS – Sierra Wireless Aircard750
126
138
Unitech Electronics Co., Ltd
7.6
7.7
Created
by Yukiko
GPRS – Option Globe Trotter
Bluetooth -- Socket
PA960 Operation
Manual
V2.3
Page 4 of 144
132
139
Unitech Electronics Co., Ltd
Created
by Yukiko
PA960 Operation
Manual
V2.3
Page 5 of 144
Chapter 1 Introduction
This operation manual aims at instructions of using Unitech’s applications, some
useful application programs under “Windows” folder, setting application under
“Control Panels” and available function keys in WinCE 3.0 OS.
* Based on Firmware Version: V2.01.08
Unitech Electronics Co., Ltd
Created
by Yukiko
PA960 Operation
Manual
V2.3
Page 6 of 144
Chapter 2 Unitech’s Application
This chapter introduces some Unitech’s made applications which are embedded in the
firmware. These applications offer additional facilities and usage to the user besides
standard WinCE applications.
Unitech’s Made Applications
1. Bootmode
2. Chatter
3.
4.
5.
6.
DeviceInfo
Flash Manager
GetVK
I/O Card Control
7. KeyTracARM
8. Scan2Key
9. UniPing
10. Scanner Setting
11. Virtual Keys
12. RegFuncKey
2.1 Bootmode
Path: My computer/Windows/Bootmode.exe
This tool allows you to perform warm boot or update OS when it is necessary.
Warm Boot
1. Double tap “Bootmode”.
Unitech Electronics Co., Ltd
Created
by Yukiko
PA960 Operation
Manual
V2.3
Page 7 of 144
2. Tap “Warm Boot”. The system will be restart.
Note: If you press and hold “Å” key then tap “Warm Boot”, the terminal will be
cold started. (Caution: Please backup any important data before you perform
cold start)
Update OS
1. Double tap “Bootmode”. Tap “Update OS”.
Unitech Electronics Co., Ltd
Created
by Yukiko
PA960 Operation
Manual
V2.3
Page 8 of 144
2. Update OS window pops up. The registry will be restored to default. Proceed
anyway? Tap “Yes”.
3. System will be restarted and enter bootloader screen. Insert your CF card with OS
image file. Select “2” to update OS.
2.2
Chatter
Path: My computer/Windows/Chatter.exe
This tool allows you to capture and scan barcode automatically in a time interval and
at the same time, send the scanned data to your host by wireless network connection.
1. Insert the wireless network card into your terminal and make the setting.
2. Install Chat Server program in your PC/notebook. (You can get this program from
Unitech)
3. After install, double click the chat server in your PC/notebook. Set the channel.
(Default is 0), click “OK”.
Unitech Electronics Co., Ltd
Created
by Yukiko
PA960 Operation
Manual
V2.3
Page 9 of 144
4. Double tap “Chatter” on your terminal.
5. In Chatter Setup, under “Handle”, enter a name.
6. Under “Server”, enter the IP address of your host.
7. Under “Channel”, enter the channel (This channel must be the same as the chat
server’s channel)
8. Tap “OK”.
Unitech Electronics Co., Ltd
Created
by Yukiko
PA960 Operation
Manual
V2.3
Page 10 of 144
9. Scanner Enabled.
10. From “File” menu, select “AutoScan”.
11. Specify the time interval.
12. Laser window will emit laser in every time interval (Example: 3 seconds). Place
the laser window towards the barcodes and let the terminal scan the barcode
automatically.
13. The barcode will be read and displayed in chatter’s screen.
14. At the same time, these barcode will be displayed in the screen of the chat server
on your host.
Unitech Electronics Co., Ltd
Created
by Yukiko
PA960 Operation
Manual
V2.3
Page 11 of 144
15. On “File” menu, select “Exit”.
2.3
DeviceInfo
Path: My computer/Windows/DeviceInfo.exe
This tool displays the general information of the terminal such as platform, firmware
version, PCMCIA slot and compact slot.
1. Double tap “DeviceInfo”.
Unitech Electronics Co., Ltd
Created
by Yukiko
PA960 Operation
Manual
V2.3
Page 12 of 144
2. Device information is shown as below:
3. Tap “X” to exit.
2.4 Flash Manager
Path: My computer/Windows/FlashMan.exe
This tool is based on Intell Persistant Store Manager (IPSM) and it is used to clean the
data in flash storage folder, save current registry and erase previous saved registry.
1. Double tap “FlashMan”.
Unitech Electronics Co., Ltd
Created
by Yukiko
PA960 Operation
Manual
V2.3
Page 13 of 144
2. Flash manager shows current registry. Tap “Save” if you want to save this registry.
Every time warm start and even cold start., (Not on Power Off/On)
the registry will be restored to the last time it was saved.
This function helps to keep system information, even at cold start situation.
Like IP address and so on.
3. Tap “Erase” button to clean a previous saved Registry duplicate. (Be careful)
4. Tap “Storage” tab and tap “Format”. The Flash Manager will enable to format the
Flash Storage folder in order to clean it.
Unitech Electronics Co., Ltd
Created
by Yukiko
PA960 Operation
Manual
V2.3
Page 14 of 144
5. Tap “OK” to exit.
2.5
GetVK
Path: My computer/Windows/GetVK.exe
This tool is a keyboard driver that generate standard keyboard event. It is
automatically executed every time the terminal is power on. You may see the log of
the keyboard event in KeyTracARM. However, if you disable GetVK in Task
Manager, you will not see any effect in KeyTracArm. For more details about
KeyTracARM, please refer to Chapter 2.7
2.6
I/O Card Control
Path: My computer/Windows/IOCard.exe
This tool allows you enable or disable PCMCIA slot and compact slot whenever it is
necessary. Once you disable the slot, the card in that slot will not work until you
enable the slot again.
1. Double tap “IOCard”.
Unitech Electronics Co., Ltd
Created
by Yukiko
PA960 Operation
Manual
V2.3
Page 15 of 144
2. Tap “Disable” under PCMCIA slot. The PCMCIA interface will not work.
3. Tap “Disable” under compact slot. The compact interface will not work.
Unitech Electronics Co., Ltd
Created
by Yukiko
PA960 Operation
Manual
4. Tap “Hide” to hide I/O Card Control window.
5. Tap “Exit” to exit I/O card control.
V2.3
Page 16 of 144
Unitech Electronics Co., Ltd
2.7
Created
by Yukiko
PA960 Operation
Manual
V2.3
Page 17 of 144
KeyTracARM
Path: My computer/Windows/KeyTracARM.exe
This tool shows the standard keyboard events in Log format when you press the keys
on your terminal. (GetVK must be executed first).
1. Double tap “KeyTracARM”.
2. Press any key on the terminal’s keyboard. You will see the event log.
Unitech Electronics Co., Ltd
Created
by Yukiko
PA960 Operation
Manual
V2.3
Page 18 of 144
3. Tap “X” to exit.
2.8
Scan2Key
Path: My computer/Windows/Scan2Key.exe
Scan2Key application can route input from scanner port to keypad buffer, so that all
input from scanner or magnetic reader will be treated as they are just input from
keypad. With this router, scan data can be directly input into non- scanner port aware
application, like MS Pocket Word.
1. Double tap “Scan2Key”.
2. You will see Scan2Key icon on the task bar. Scan2Key is enabled.
Unitech Electronics Co., Ltd
Created
by Yukiko
PA960 Operation
Manual
V2.3
Page 19 of 144
3. Under “Start” > “Program”, select Microsoft Pocket Word.
4. Scan some barcodes. The barcode data will be displayed on MS Pocket Word.
5. To disable the Scan2Key, place the stylus on the Scan2Key icon on task bar, a
selection menu will pop up. Select “Disable”.
Unitech Electronics Co., Ltd
Created
by Yukiko
PA960 Operation
Manual
V2.3
Page 20 of 144
6. To close Scan2Key, select “Exit” on the pop menu.
2.9 UniPing
Path: My computer/Windows/UniPing.exe
This tool allows you to ping to any host or any computer in the network, it can show
its own IP too. (For network connection, use wireless card or Ethernet card)
1. Double tap “UniPing”.
2. Under “Tools” menu, select “Ping”.
3. In “Host” field, key in the IP address of the host that you want the terminal to ping.
Unitech Electronics Co., Ltd
Created
by Yukiko
PA960 Operation
Manual
V2.3
(Example: Ping to my computer)
4. Specify the timeout time.
5. Tick “Constant Ping”.
6. Select interval time. (Example: 1 seconds). Tap OK.
7. Terminal start to ping (to my computer) in every second.
8. Under “Tools” menu, select “Local IP”.
9. Local IP window pops up and shows the IP address of this terminal.
Page 21 of 144
Unitech Electronics Co., Ltd
Created
by Yukiko
PA960 Operation
Manual
V2.3
Page 22 of 144
10. Select “Exit” under “Tools” menu to close Uniping.
2.10 Scanner Settings
Path: Control Panel/Scanner Settings.exe
This tool allows you to make some settings on scanner such as barcode symbologies,
barcode IDs, data options, data editing, scanning options in order to change the
scanner behaviour. Besides, it allows a scanning test. Every time change the setting,
must click “Apply” button to get the effect.
1. Double tap “Scanner Settings”.
2. Under “Setting” tab, tap “Barcode Symbologies”.
Unitech Electronics Co., Ltd
Created
by Yukiko
PA960 Operation
Manual
V2.3
Page 23 of 144
3. Tap “+” in front of “Barcode Symbologies”. You will see a list of available barcode
type.
4. Tap “+” to expand the tree. Under each barcode type, there are more options such
as enable/disable, check digit verification, transmit check digit etc. Tick the options
that you want to apply on that barcode. Then, tap “Apply” button.
Unitech Electronics Co., Ltd
Created
by Yukiko
PA960 Operation
Manual
V2.3
Page 24 of 144
5. The scanner decoder will work as what you have specified.
6. Tap “Barcode IDs”. A list of barcode type is shown with their IDs in front.
7. Double tap the barcode type which you want to change ID. (Example: D: EAN13).
Change to other ID by scrolling the button.
Unitech Electronics Co., Ltd
Created
by Yukiko
PA960 Operation
Manual
V2.3
Page 25 of 144
8. Tap “Data Options”.
9. Tap “Transmit code ID character” if you want to transmit code ID.
10.Double tap “Preamble” or “Postamble” if you want to add them to the barcode.
Key in the special character stated in the Set Data window. Tap “OK”.
Unitech Electronics Co., Ltd
Created
by Yukiko
PA960 Operation
Manual
V2.3
Page 26 of 144
11. Double tap “Interblock delay”. Select the delay time from the drop down list.
12. Tap “Data Editing”. Tap “Add” at the bottom. A menu will pop up.
Unitech Electronics Co., Ltd
Created
by Yukiko
PA960 Operation
Manual
V2.3
Page 27 of 144
13. Select “Add Formula” or “Add Formula: Output All Data”. A formula will be
added under “Data editing”.
14. Tap “Formula 2”. Tap “Add” button. Select “Add Qualifier”.
Unitech Electronics Co., Ltd
Created
by Yukiko
PA960 Operation
Manual
V2.3
Page 28 of 144
15. Tap the qualifier you just added. Tap “Add” button. Select “Add modifier”.
16. To delete a formula or qualifier or modifier, just tap it and tap “Del” button.
Unitech Electronics Co., Ltd
Created
by Yukiko
PA960 Operation
Manual
V2.3
Page 29 of 144
17. To add additional formula , just tap “Data Editing”, tap “Add” and select “Add
Formula”.
18. Double tap “Magnetic Reading Options”. (The effect will only work for
PA960-MSR model).
19. Double tap the options below “Magnetic Reading Options” to make settings.
Unitech Electronics Co., Ltd
Created
by Yukiko
PA960 Operation
Manual
V2.3
Page 30 of 144
20. Tap “Scanning Options”. Double tap options below to make setting.
21. Under “Test” tab, tap “A-Scan” button at the bottom.
Unitech Electronics Co., Ltd
Created
by Yukiko
PA960 Operation
Manual
V2.3
Page 31 of 144
22. Set the interval time you want the laser to emit. (Ex: 3 seconds). Tap “Start”.
23. Laser emit every 3 seconds. Place the laser head towards to the barcodes. Barcode
will be read and shown on the screen.
Unitech Electronics Co., Ltd
Created
by Yukiko
PA960 Operation
Manual
24. Tap “Stop” button. This will stop to emit the laser.
25. Tap “Clear” button. The screen of “Test” will be cleared.
V2.3
Page 32 of 144
Unitech Electronics Co., Ltd
Created
by Yukiko
PA960 Operation
Manual
V2.3
Page 33 of 144
26. Under “To Kpd” tab, tick “Start Scan2key When Exit”. Then, tap “OK”.
Scan2Key icon will appear at the task bar. (For the use of Scan2Key, please refer to
chapter 2.8)
27. Tap “Version” tab, the screen will show the general information of Hamster
decoder.
Unitech Electronics Co., Ltd
Created
by Yukiko
PA960 Operation
Manual
V2.3
Page 34 of 144
28. Back to “Settings” tab. Tap “Menu” at the bottom. You will see a selection menu
pop up.
29. Select “Load Settings From File” or “Load Formulas Only From File”. Load the
existing scanner settings / formula file. (If you have saved a settings / formula file
before)
Unitech Electronics Co., Ltd
Created
by Yukiko
PA960 Operation
Manual
V2.3
Page 35 of 144
30. Select “Save Settings to File”. Save the current scanner setting as *.USI file.
31. Select “Set To Factory Default”. Tap “Yes”. The scanner setting will be reset to
the original setting.
Unitech Electronics Co., Ltd
Created
by Yukiko
PA960 Operation
Manual
V2.3
Page 36 of 144
32. Select “Verify Scanner At Next Start”. The scanner will be verified next time you
run “Scanner Settings”.
2.11
Virtual Keys
Path: Control Panel/Virtual Keys.exe
This tool allows you to enable/disable the alpha keys on the terminal keypad.
1. Tap “Virtual Keys”.
Unitech Electronics Co., Ltd
Created
by Yukiko
PA960 Operation
Manual
V2.3
Page 37 of 144
2. Uncheck “Enable Virtual Keys Applet”. Tap “OK”.
3. Open pocket word and test alpha keys. Press “alpha” key and press numeric key.
The characters output are non-alpha keys.
4. Back to step 2. Tick “Enable Virtual Keys Applet”. Tap “OK”. The alpha keys are
enabled again.
Unitech Electronics Co., Ltd
Created
by Yukiko
PA960 Operation
Manual
2.12 RegFuncKey
Path: My computer/Windows/RegFuncKey.exe
This tool allows you to re-define the function key.
For default value:
Func 6 = Task Manager
Func 7 = Scanner Setting
Func 8 = Power Management
Func 9 = Device Info
1. Double tap “REGFUNCKEY”.
2. Under “Edit”, select “FUNC 6”.
V2.3
Page 38 of 144
Unitech Electronics Co., Ltd
Created
by Yukiko
PA960 Operation
Manual
V2.3
Page 39 of 144
3. Tap “Browse”. Select the application you want to be executed by Func 6.
4. Tap “Set”.
5. Under “File”, tap “Exit”.
Unitech Electronics Co., Ltd
Created
by Yukiko
PA960 Operation
Manual
V2.3
Page 40 of 144
6. Press “Func” + “6”. You should see the “Bootmode” windows pop up, as step 2 in
chapter 2.1
7. You may repeat the above steps to re-define the Func 7, 8 and 9.
Unitech Electronics Co., Ltd
Created
by Yukiko
PA960 Operation
Manual
V2.3
Page 41 of 144
Chapter 3 Tools and Applications under
“Windows”
Tools and Applications under “My Computer/Windows”
1. ActiveNet
2.
3.
4.
5.
Aironet Client Utility
Calibration
MS DOS Prompt Command
Load New Firmware
6. MSTSC
7. Net
8. NICTT
9. NICUPDATE
10.
11.
12.
13.
pegterm
pmail
pvbload
pword
14.
15.
16.
17.
rapisrv
rasdemo
repllog
Taskman
18. visadm
19. wceload
20. WMAGS46
3.1 ActiveNet
Path: My computer/Windows/ActiveNet.exe
This tool provide files synchronization facility between the terminal and your host
(PC/notebook) via wireless network communication.
1. Under “Control panel” > “Communication” > Device Name, type a name for the
device. (Example: WinCE-2)
Unitech Electronics Co., Ltd
Created
by Yukiko
PA960 Operation
Manual
V2.3
Page 42 of 144
2. Tap “PC Connection”. Tap “Change connection”. Select “USB to PC”.
3. Connect the terminal with your PC by using USB communication cable.
4. Execute Microsoft Activesync on your host, make connection setting and get
connected.
5. After connected, “Do you like to set up a partnership?” Select “Yes”. Click “Next”.
Unitech Electronics Co., Ltd
Created
by Yukiko
PA960 Operation
Manual
V2.3
Page 43 of 144
6. Give a name to the device. Example: WinCE-2, click “Next”.
7. Select Synchronization Settings. Check “Files”. Click “Next”. Setup complete.
8. On your terminal, insert your wireless LAN card and select “Obtain IP by DHCP”.
9. Setup the settings and WEP of wireless LAN card(For Cisco Aironet, please refer to
Chapter 3.2)
10. Unplug the USB communication cable.
11. Under “Windows”, double tap “ActiveNet”.
Unitech Electronics Co., Ltd
Created
by Yukiko
PA960 Operation
Manual
V2.3
Page 44 of 144
12. Choose a method to connect to the selected desktop computer. Select “Network
Connection”. Connect to <the host>. Tap “Connect”.
13. Activenet will connect terminal to Activesync on your host via wireless network
and proceed the file synchronization.
14. To synchronize again, tap “Sync Now”.
15. Tap “Disconnect” to disconnect the communication.
Unitech Electronics Co., Ltd
Created
by Yukiko
PA960 Operation
Manual
V2.3
Page 45 of 144
3.2 Aironet Client Utility
Path: My computer/Windows/Aironet Client Utility.exe
Aironet Client Utility is a utility tool for you to specify the SSID, WEP, speed and
other setting while using Cisco Aironet wireless LAN card. This tool is not available
if Cisco Aironet wireless LAN card is not inserted in the terminal or the card is not
detected.
1. Insert Cisco Aironet wireless LAN card into the terminal.
2. System detected the card. Select “Obtain IP by DHCP”.
3. Double tap “Aironet Client Utility”.
4. Under profiles, you will see profile0. Tap Edit. (Or Tap “Add” to add new profile)
Unitech Electronics Co., Ltd
Created
by Yukiko
PA960 Operation
Manual
V2.3
Page 46 of 144
5. Select SSID, enter your SSID. Select power mode, enter “MAX PSP”. Select WEP,
tap “Static WEP “. Then, enter your WEP key.
6. Under “Survey”, check the link status.
Unitech Electronics Co., Ltd
Created
by Yukiko
PA960 Operation
Manual
V2.3
Page 47 of 144
7. Under “IP information”, check if IP is connected. You can link to network.
Unitech Electronics Co., Ltd
3.3
Created
by Yukiko
PA960 Operation
Manual
V2.3
Page 48 of 144
Calibration
Path: My computer/Windows/Calibration.exe
This tool allows you to do calibration while the original screen calibration is no longer
accurate.
1. Double tap “Calibration”.
2. Use the stylus to touch the “+” (Center, Top left, Bottom left, Bottom right, Top
right), then press “Enter” key.
Unitech Electronics Co., Ltd
Created
by Yukiko
PA960 Operation
Manual
3.4 MS DOS Prompt Command
Path: My computer/Windows/cmd.exe
This tool allows you to execute DOS command.
1. Double tap “cmd”.
V2.3
Page 49 of 144
Unitech Electronics Co., Ltd
Created
by Yukiko
PA960 Operation
Manual
2. On the DOS prompt, type some command (ex: dir)
3. On “File” menu, select “Close” to exit.
V2.3
Page 50 of 144
Unitech Electronics Co., Ltd
Created
by Yukiko
PA960 Operation
Manual
V2.3
Page 51 of 144
3.5 Load New Firmware
Path: My computer/Windows/Load New Firmware.exe
This tool allows you to update the latest version of Cisco driver whenever it is
necessary. (Must insert Cisco Aironet Wireless LAN card)
1. Double tap “Load New Firmware”.
Unitech Electronics Co., Ltd
Created
by Yukiko
PA960 Operation
Manual
V2.3
Page 52 of 144
2. Tap “Select Firmware”. Select the Cisco firmware. The driver will be updated.
3. Tap “OK” or “Cancel” to exit.
3.6 MSTSC
Path: My computer/Windows/mstsc.exe
This tool allows multi user to telnet and login to a RDP host server. (Your terminal
must connect to the network)
*Note: Must install RDP in the host first.
1. Double tap “mstsc”.
Unitech Electronics Co., Ltd
Created
by Yukiko
PA960 Operation
Manual
V2.3
Page 53 of 144
2. Key in the IP address of the RDP host in “Server” field. Tap “Connect”.
3. Terminal login to RDP host.
Unitech Electronics Co., Ltd
Created
by Yukiko
PA960 Operation
Manual
V2.3
Page 54 of 144
3.7 Net
Path: My computer/Windows/Net.exe
This is a MS Dos command that allows you to share data/files with any computer in
the network. (Your terminal must connect to network)
1. On your PC/notebook, share a folder to the network.
2. Execute MS DOS prompt command.
3. On the DOS prompt, type the command:
Net Use //<PC’s Name>/<Shared Folder Name> <Terminal folder’s name>
For Terminal folder’s name, you can specify any name you like.
Unitech Electronics Co., Ltd
Created
by Yukiko
PA960 Operation
Manual
V2.3
Page 55 of 144
4. In “My Computer”, tap “Network”. You will see a terminal folder.
5. Open the folder. You will see the files in the folder. The content is the same as the
shared folder in your PC/notebook.
Unitech Electronics Co., Ltd
Created
by Yukiko
PA960 Operation
Manual
V2.3
Page 56 of 144
3.8 NICTT
Path: My Computer/Windows/NICTT.exe
This tool is a setting application for Symbol wireless LAN card. Once you insert
Symbol wireless LAN card in your terminal, this application will allow you to set the
SSID, speed, WEP, infrastructure etc…
1. Insert Symbol wireless LAN card. You will see icon appear at task bar.
Unitech Electronics Co., Ltd
Created
by Yukiko
PA960 Operation
Manual
V2.3
Page 57 of 144
2. Tap the icon. Symbol Status window pops up. Under “Mode”, key in the
802.11ESSID. Specify the operating mode.
3. Under “IP Config”, specify either “DHCP” or “Static” IP address.
Unitech Electronics Co., Ltd
Created
by Yukiko
PA960 Operation
Manual
V2.3
Page 58 of 144
4. Under “Power” tab, specify “Radio Transmission Power” and “Automatic/Manual
Power Saving Mode”.
5. Under “Options”, tick the options as you want.
Unitech Electronics Co., Ltd
Created
by Yukiko
PA960 Operation
Manual
V2.3
Page 59 of 144
6. Under “Encryption”, key in the WEP key.
7. Under “Ping” tab, you can key in the IP address of the host you want to ping , tap
“Start Test”.
Unitech Electronics Co., Ltd
Created
by Yukiko
PA960 Operation
Manual
V2.3
Page 60 of 144
8. Under “APs”, Tap “Refresh”.
9. Warm start terminal.
10. Your terminal is connected to network by Symbol Wireless LAN card.
3.9 NICUPDATE
Path: My computer/Windows/NICUPDATE.exe
This tool allows you to update the Symbol wireless LAN card driver. (You must insert
Symbol Wireless LAN Card in the terminal)
1. Double tap “NICUPDATE”.
Unitech Electronics Co., Ltd
Created
by Yukiko
PA960 Operation
Manual
V2.3
Page 61 of 144
2. Under “Firmware Filename”, browse to retrieve the Symbol firmware file.
3. Tap “Update” button to update driver.
3.10 Pegterm
Path: My Computer/Windows/Pegterm.exe
Unitech Electronics Co., Ltd
Created
by Yukiko
PA960 Operation
Manual
V2.3
Page 62 of 144
This tool allows you to make a session when you access the network by using modem
card or when you want to dial to the phone by using GPRS card.
1. Insert the modem card or GPRS card.
2. Double tap “pegterm”.
3. Tap “Make New Session”.
Unitech Electronics Co., Ltd
Created
by Yukiko
PA960 Operation
Manual
V2.3
4. Under “Communication”, Session name: <Enter a name>
5. Select a modem: <Select the modem card you are using>
6. Telephone Number: <Enter the phone number>
7. Tap “Configure”. Set the baud rate, stop bits, parity and so on.
8. Tap “OK” and exit configure window.
Page 63 of 144
Unitech Electronics Co., Ltd
Created
by Yukiko
PA960 Operation
Manual
V2.3
9. Tap “Dialing property”. Tap “Edit”.
10. Specify the local calls, long distance calls etc. Tap “OK” to exit.
11. Tap “OK” to exit pegterm.
12. Start to connect.
Page 64 of 144
Unitech Electronics Co., Ltd
Created
by Yukiko
PA960 Operation
Manual
V2.3
Page 65 of 144
3.11 Pmail
Path: My Computer/Windows/pmail.exe
This is an email applications for you to sent/receive email by using the terminal.
(Must connect the terminal to the network)
1. Double tap “pmail”.
2. In “Service” menu, select “Options”.
Unitech Electronics Co., Ltd
Created
by Yukiko
3. Under “Service” tab, tap “Add”.
4. Select the service type. Tap “OK”.
PA960 Operation
Manual
V2.3
Page 66 of 144
Unitech Electronics Co., Ltd
Created
by Yukiko
PA960 Operation
Manual
V2.3
Page 67 of 144
5. For connection, select type of your connection. (If you are using wireless LAN card,
select “Network Connection”.)
6. Key in the Pop3 host.
7. Enter user ID and password.
8. Key in the SMTP host and return address. Tap “Next”.
Unitech Electronics Co., Ltd
Created
by Yukiko
PA960 Operation
Manual
V2.3
Page 68 of 144
9. Tap “Next”, “Next”. Tap “Finish”.
10. Pmail is ready to be used for email sending.
3.12 pvbload
Path: My Computer/Windows/pvbload.exe
This tool allows you to load a VB program in your terminal.
3.13 Pword
Path: My Computer/Windows/pword.exe
This tool allows you to do words editing, like MS word.
3.14 rapisrv
Path: My Computer/Windows/rapisrv.exe
This is an application that enables a host computer application to execute an
application programming interface on the terminal. You can use Rapisrv.exe with
Repllog.exe if your Windows CE configuration does not include Remnet.exe.
Unitech Electronics Co., Ltd
3.15
Created
by Yukiko
PA960 Operation
Manual
V2.3
Page 69 of 144
rasdemo
Path: My Computer/Windows/rasdemo.exe
This is a sample communications application, Rasdemo.exe, creates a phone-book
entry on the terminal and attempts to connect with the specified RAS server.
3.16 repllog
Path: My Computer/Windows/repllog.exe
Repllog is a tool to enable RS232/IrDA communication.
1. On your PC, open ActiveSync. Under “File” menu, select “Connection Settings”.
Allow Serial cable or infrared connection to this com port, select “Infrared Port”.
2. On the terminal, control panel/Communications/PC Connection/Change
Unitech Electronics Co., Ltd
Created
by Yukiko
PA960 Operation
Manual
V2.3
Page 70 of 144
Connection: IR to PC.
3. Open MS Activesync on your PC.
4. Place the IrDA port of the terminal towards the IrDA port of your PC.
5. On the terminal, double tap “repllog.exe”.
6. Terminal and PC are connected by IrDA.
Unitech Electronics Co., Ltd
Created
by Yukiko
PA960 Operation
Manual
V2.3
Page 71 of 144
3.17 Taskman
Path: My Computer/Windows/TASKMAN.exe
This tool shows the tasks that are running currently.
1. Double tap “TASKMAN”.
2. Active tasks are shown. Select a task you want to terminate, tap “End Task”.
Unitech Electronics Co., Ltd
Created
by Yukiko
PA960 Operation
Manual
V2.3
Page 72 of 144
3.18 visadm
Path: My computer/Windows/visadm.exe
This tool supplies registration commands on its command line and redirect output to
the file when you want to use MSMQADM.EXE on WIN CE. VISADM.EXE is a
dialog box with an edit control that allows users to input MSMQADM commands as
they would appear on the command line and view the output in a text box above.
There is also a Shortcuts dialog box that automates several frequently used commands
and allows you to view the MSMQ log file and MSMQ-specific registry entries.
1. To install MSMQ using the VISADM Utility
Run VISADM.EXE.
Unitech Electronics Co., Ltd
Created
by Yukiko
PA960 Operation
Manual
V2.3
Page 73 of 144
1.
From the Shortcuts menu, choose Install.
2.
From the Shortcuts menu, choose Register to create the registry entries.
3.
Reboot the computer.
4.
Test your installation.
Other Commands Available from the Visadm Shortcuts Menu
•
The Stop command stops the MSMQ driver after it has been installed.
•
The Start command restarts the MSMQ driver.
Unitech Electronics Co., Ltd
Created
by Yukiko
PA960 Operation
Manual
V2.3
Page 74 of 144
•
The Log command displays the contents of the MSMQ log file.
•
The Verify command interprets registry settings and produces readable
information about MSMQ installation.
You can customize your installation options by using direct MSMQADM commands
from the VISADM command prompt. Type the command in the edit box exactly as if
you were supplying command-line arguments to MSMQADM and press the Enter
key to execute. The output appears in the read-only dialog box that is displayed above
the edit box.
3.19 wceload
Path: My computer/Windows/wceload.exe
This tool is exist to execute *.cab file.
3.20 WMAGS46
Path: My Comnputer/Windows/WMAGS46.exe
This is the driver of Lucent Orinoco Wireless LAN card. It allows you to make the
setting for the wireless connection.
1. Insert Lucent Orinoco Wireless LAN card into the terminal.
2. Select “Obtain IP address via DHCP”.
3. An icon (Lucent driver) appear on the task bar. Tap the icon.
Unitech Electronics Co., Ltd
Created
by Yukiko
4. Double tap “Edit Wireless Profile”.
5. Tap “Add”.
PA960 Operation
Manual
V2.3
Page 75 of 144
Unitech Electronics Co., Ltd
Created
by Yukiko
PA960 Operation
Manual
6. Under “Profile Name”, enter a name. (Ex:mytest)
7. For network type, select “Access Point”.
8. Tap “Next”.
9. Specify network name. Tap “Next”.
V2.3
Page 76 of 144
Unitech Electronics Co., Ltd
Created
by Yukiko
PA960 Operation
Manual
V2.3
10. Tick “Enable Data Security”. Enter WEP key. Tap “Next”.
11. Determine to enable card power on or off. Tap “Finish”.
Page 77 of 144
Unitech Electronics Co., Ltd
Created
by Yukiko
PA960 Operation
Manual
12. Tap “OK”. Lucent Card is ready for wireless connection.
V2.3
Page 78 of 144
Unitech Electronics Co., Ltd
Created
by Yukiko
PA960 Operation
Manual
V2.3
Page 79 of 144
13. Tap “Tool” > “Version Info”, the information of the utility and driver is shown.
14. Select/deselect “Load/unload automatically”.
15. Select/Deselect “Suspend While Connected”. If select “Suspend While
Connected”, the terminal will be suspend according to the time set in suspend mode
even if the RF connection is on. If deselect “Suspend While Connected”, the terminal
will not be suspend while the RF connection is on.
Unitech Electronics Co., Ltd
Created
by Yukiko
PA960 Operation
Manual
V2.3
Page 80 of 144
16. Select “Disable Radio” to disconnect RF connection. (select “Enable Radio” to
connect the RF)
17. Select “Advanced” > “Link Test”, users can check the link of RF.
18. Select “Advanced” > “Site Monitor”, tap “Open”, the user can check signal
strength.
19. Tap “Advanced” > “Network Troubleshooting”. You may check your current IP.
Unitech Electronics Co., Ltd
Created
by Yukiko
PA960 Operation
Manual
V2.3
Page 81 of 144
20. Tap “Advanced” to check detail IP address or tap “Repair” to renew IP.
21. You may communicate with a remote computer by entering the name of that
computer , then tap “Contact”.
Unitech Electronics Co., Ltd
Created
by Yukiko
PA960 Operation
Manual
22. Tap “Tool” > “Exit” to close WMAGS46.
V2.3
Page 82 of 144
Unitech Electronics Co., Ltd
Chapter 4
Created
by Yukiko
PA960 Operation
Manual
V2.3
Page 83 of 144
Control Panel
Settings under “Control Panel”
1. Communications
2. Date/Time
3. Display
4. Input Panel
5. Keyboard
6. Mouse
7. Network Configuration
8. Password
9. Power
10. Regional Settings
11. Stylus
12. System
13. Volume & Sounds
4.1 Communications
Path: Start/Settings/Control Panel/Communications
This setting allows you to set the device name and specify which type of
communications you want to set for the device to communicate with the host.
Unitech Electronics Co., Ltd
Created
by Yukiko
PA960 Operation
Manual
V2.3
Page 84 of 144
1. Double tap “Communications”.
2. Under “Device Name” tab, specify device name and the description.
3. Under “PC Connection”, tick “Enable direct connections to the desktop computer”.
4. Tap “Change Connection”.
Unitech Electronics Co., Ltd
Created
by Yukiko
PA960 Operation
Manual
V2.3
Page 85 of 144
5. Select the type of communication that you connect the terminal to your host.
Example:
If you use RS232 cable, you may select “Desktop@57600” or “Desktop@38400” .
If you use USB cable, please select “USB to PC”.
If you connect by infra red, please select “IR to PC”.
Unitech Electronics Co., Ltd
4.2
Created
by Yukiko
PA960 Operation
Manual
V2.3
Page 86 of 144
Date/Time
Path: Start/Settings/Control Panel/ Date / Time
This is the system date and time. You may set the date and time for the system.
1. Double tap the date/time.
2. Set the date from the calendar and set the time. You may select the time zone too.
Then, click “Apply”.
Unitech Electronics Co., Ltd
Created
by Yukiko
PA960 Operation
Manual
V2.3
Page 87 of 144
4.3 Display
Path: Start/Settings/Control Panel/Display
This setting allows you to set the style of the windows background, the color and
pattern of windows and determine the backlight off time.
1. Double tap “Display”.
Unitech Electronics Co., Ltd
Created
by Yukiko
PA960 Operation
Manual
V2.3
Page 88 of 144
2. Under “Background” tab, for “Image”, select the background name from the drop
down list. You may tap “Browse” to retrieve any bitmap file for background. Tap
“OK”.
3. Under “Appearance”, for “scheme”, select the scheme from the drop down list.
4. For “Item”, select the item that you want to apply the scheme on.
5. Tap “Apply”.
6. You may also rename the scheme by tapping “Save” button.
7. To delete a scheme, tap “delete”.
Unitech Electronics Co., Ltd
Created
by Yukiko
PA960 Operation
Manual
V2.3
Page 89 of 144
8. Under “Backlight” tab, tick “Turn off backlight when using battery power and
device is idle for more than X minutes”. Specify the time.
This will turn off (suspend) backlight of the terminal after it has not been operated for
X minutes to save the battery power. (Provided that the terminal is used with the
battery).
9. Tick “Turn off backlight when using external power and device is idle for more
than X minutes”. Specify the time.
This will turn off (suspend) backlight of the terminal after it has not been operated for
X minutes to save the battery power. (Provided that the terminal is used with the
power adapter).
4.4 Input Panel
Path: Start/Settings/Control Panel/Input Panel
This setting is to specify the input method and the keyboard style of the software
keyboard.
1. Double tap “Input Panel”.
Unitech Electronics Co., Ltd
Created
by Yukiko
PA960 Operation
Manual
V2.3
Page 90 of 144
2. For “current input method”, select the input method you prefer. Tap “OK”.
3. Tap “Options”. You may specify the large keys or small keys. For Example, select
“Large keys”. Tap “OK”, “OK”.
Unitech Electronics Co., Ltd
Created
by Yukiko
PA960 Operation
Manual
V2.3
Page 91 of 144
4. For Example, select “Small keys”. Tap “OK”, “OK”.
5. You may use gesture so that you can use the stylus to slide the software key to
indicate the main key and space, backspace, enter key and shift key. Tick “Use
gestures for Space, backspace, Shift and Enter. Tap “OK”, “OK”.
Unitech Electronics Co., Ltd
Created
by Yukiko
PA960 Operation
Manual
V2.3
Page 92 of 144
6. Open pocket word. Tap the software keyboard. Tap a key and slide upwards.
You should see the “Shift” key value. For example, Tap “b” key and slide upwards
will return “B”. You may try to tap the key and slide downwards, to left side and right
side to see the effect.
4.5 Keyboard
Path: Start/Settings/Control Panel/Keyboard
This setting allows you to specify the behavior of the terminal keypad. (Hardware
keyboard).
Unitech Electronics Co., Ltd
Created
by Yukiko
PA960 Operation
Manual
V2.3
Page 93 of 144
1. Double tap “Keyboard”.
2.
Tick “Enable character repeat”.
3.
Adjust the repeat delay and repeat rate.
4.
Place the cursor in the field of “Tap here and hold down a key to test”.
5.
Press and hold a key on the keypad.
6.
You should see the character is repeated until you release the key.
Unitech Electronics Co., Ltd
4.6
Created
by Yukiko
PA960 Operation
Manual
Mouse
Path: Start/Settings/Control Panel/Mouse
This setting allows you to adjust the tapping sensitivity.
1. Double tap “Mouse”.
2. Double tap the grid. Then, double tap the icon to test.
V2.3
Page 94 of 144
Unitech Electronics Co., Ltd
Created
by Yukiko
PA960 Operation
Manual
V2.3
Page 95 of 144
4.7 Network Configuration
Path: Start/Settings/Control Panels/Network
This setting is to configure the network setting by specifying the network adapter,
network identification, IP address and server.
1. Double tap “Network”.
Unitech Electronics Co., Ltd
Created
by Yukiko
PA960 Operation
Manual
V2.3
Page 96 of 144
2. Under “Adapters”, select the network adapter you are using. Tap “OK”.
3. Tap “Properties”. Select either obtain IP address via DHCP or specify an IP
address.
Unitech Electronics Co., Ltd
Created
by Yukiko
PA960 Operation
Manual
V2.3
Page 97 of 144
4. Under “Identification”, key in the user name and password.
4.8 Owner
Path: /Start/Settings/Control Panel/Owner
This settings is to define the owner of this terminal, set the network ID etc.
Unitech Electronics Co., Ltd
Created
by Yukiko
PA960 Operation
Manual
V2.3
Page 98 of 144
1. Double tap “Owner”.
2. Key in the name of the owner, company and the address of the company. Check
“Display owner identification”.Tap “OK”. The system will display the owner
identification after suspend and power on.
3. Under “Notes”, Key any message and check “Display Owner Notes”.Tap “OK”.
System will display the notes after suspend.
Unitech Electronics Co., Ltd
Created
by Yukiko
PA960 Operation
Manual
V2.3
Page 99 of 144
4.9 Password
Path: Start/Settings/Control Panel/Password
This setting is to protect the terminal from other users to access the windows by
setting a unique password.
1. Double tap “Password”.
Unitech Electronics Co., Ltd
Created
by Yukiko
PA960 Operation
Manual
V2.3
Page 100 of 144
2. Key in your password twice. Tick “Enable password protection at power on”.
3. Warm start your terminal. Enter your password to login.
4.10 Power
Path: Start/Settings/Control Panel/Power
This setting is to show the power voltage of the batteries, besides allow you to
suspend the terminal after a time interval to save the power.
1. Double tap “Power”.
Unitech Electronics Co., Ltd
Created
by Yukiko
PA960 Operation
Manual
V2.3
Page 101 of 144
2. Under “Battery” tab, the screen show you the status and voltage of main battery and
backup battery.
3. Under “Power off”, for “On battery power, turn off device if idle for”, select the
time. The terminal will be power off after left idle for the interval time(When used
with battery)
Unitech Electronics Co., Ltd
Created
by Yukiko
PA960 Operation
Manual
V2.3
4.11 Regional Settings
Path: Start/Settings/Control Panel/Regional Settings
This setting is to set the regional settings, currency, date format etc.
1. Double tap “Regional Settings”.
Page 102 of 144
Unitech Electronics Co., Ltd
Created
by Yukiko
PA960 Operation
Manual
V2.3
2. Under “Region”, select the region you want to use.
3. Under “Number” tab, select the symbol and format you want.
4. Under “Currency”, select the symbol and format you want.
Page 103 of 144
Unitech Electronics Co., Ltd
Created
by Yukiko
5.
Under “Time”, select the time format.
6.
Under “Date”, select the date format.
PA960 Operation
Manual
V2.3
Page 104 of 144
Unitech Electronics Co., Ltd
Created
by Yukiko
PA960 Operation
Manual
V2.3
Page 105 of 144
4.12 Stylus
Path: Start/Settings/Control Panel/Stylus
This setting is to set the sensitivity of the tapping and to do the calibration.
1. Double tap “Stylus”.
Unitech Electronics Co., Ltd
Created
by Yukiko
PA960 Operation
Manual
V2.3
Page 106 of 144
2. Under “Double Tap”, repeat step 2 in chapter 4.6.
3. Under “Calibration”, tap “Recalibrate”. Calibrate the screen using the stylus.
(Please refer to chapter 3.3)
4.13 System
Path : Start/Settings/Control Panel/System
This setting is to show you the general information of the system and allow you to
adjust the size of storage memory and program memory.
1. Double tap “System”.
Unitech Electronics Co., Ltd
Created
by Yukiko
PA960 Operation
Manual
V2.3
Page 107 of 144
2. System shows the version of the Win CE and the hardware information of the
terminal.
3. Under “Memory”, adjust the size of the memory by using the slider.
Unitech Electronics Co., Ltd
Created
by Yukiko
PA960 Operation
Manual
V2.3
Page 108 of 144
4.14 Volume & Sounds
Path: Start/Settings/Control Panel/Volume & Sounds
This setting allows you adjust the volume of the tapping , key clicks, events,
notifications etc. Also, it allows the user to specify the type of sounds for a special
event and set a scheme for the sounds.
1. Double tap “Volume&Sounds”.
Unitech Electronics Co., Ltd
Created
by Yukiko
PA960 Operation
Manual
V2.3
Page 109 of 144
2. Adjust the volume and tick the options that you want the sound to apply on.
3. To build a new scheme, tap “Save As”.
4. Enter a name for the scheme.
5. Under “Events”, click any events. Select the sounds. Tap the Preview button to
listen to the sounds.
Unitech Electronics Co., Ltd
Created
by Yukiko
PA960 Operation
Manual
V2.3
Page 110 of 144
6. To delete an event from the scheme, tap “Delete”.
7. Tap “Save As” to overwrite when you make new change.
8. You have a new scheme for sounds. You may select any scheme you want at
anytime.
Unitech Electronics Co., Ltd
Created
by Yukiko
PA960 Operation
Manual
V2.3
Page 111 of 144
Chapter 5 Available Function Keys
1. Func + Esc (Calibration)
2. Func + Up Arrow (Screen Backlight)
3. Func + Down Arrow (Keypad Backlight)
4. Func + TAB (Keypad Backlight)
5. Func + 6 (Task Manager)
6. Func + 7 (Scanner Setting)
7. Func + 8 (Power Management)
8. Func + 9 (Device Information)
5.1 Func + Esc
Press Func key and Esc key. Calibration is ready to be executed. Calibrate the screen
by stylus. (Please refer to chapter 3.3)
Unitech Electronics Co., Ltd
Created
by Yukiko
PA960 Operation
Manual
V2.3
Page 112 of 144
5.2 Func + Up Arrow
Pressing Func key + Up Arrow key will toggle the screen backlight.
5.3 Func + Down Arrow
Pressing Func key and Down Arrow key will toggle keypad backlight.
5.4 Func + TAB
Pressing Func key and TAB key will toggle the keypad backlight.
Unitech Electronics Co., Ltd
Created
by Yukiko
PA960 Operation
Manual
V2.3
Page 113 of 144
5.5 Func + 6
Pressing Func key and numeric key “6” will execute Task Manager. (Please refer to
chapter 3.20)
5.6 Func + 7
Pressing Func key + numeric key “7” will execute scanner settings. (Please refer to
Chapter 2.10)
Unitech Electronics Co., Ltd
Created
by Yukiko
PA960 Operation
Manual
V2.3
Page 114 of 144
5.7 Func + 8
Pressing Func key and numeric key “8” will execute power management. (Please refer
to Chapter 4.9)
Unitech Electronics Co., Ltd
Created
by Yukiko
PA960 Operation
Manual
V2.3
Page 115 of 144
5.8 Func + 9
Pressing Func key and numeric key “9” will show the device information. (Please
refer to chapter 2.3)
Unitech Electronics Co., Ltd
Created
by Yukiko
PA960 Operation
Manual
V2.3
Page 116 of 144
Chapter 6 Other Applications
1. Remote Networking
6.1
Remote Networking
Path: Start/Program/Communication/Remote Networking
This application is to set up a new wireless connection while you connect the terminal
to wireless network by using GPRS PC card. (Insert the GPRS PC card and specify
the APN name)
1.
Select “Start > Program > Communication > Remote Networking”.
2.
Double tap “Make New Connection”.
3.
Enter a name for the connection.
4.
Select “Dial-Up Connection”. Tap “Next”.
Unitech Electronics Co., Ltd
Created
by Yukiko
PA960 Operation
Manual
V2.3
Page 117 of 144
5. Select a modem. Select the type of the GPRS PC card you are using.
6. Tap “Configure”.
7. Set the port settings.
8. Set the call options.
9. Tap “OK”.
Unitech Electronics Co., Ltd
Created
by Yukiko
PA960 Operation
Manual
10. Tap “Next”.
11. Key in the phone number. Tap “Finish”.
12. A new connection is added.
13. Double tap this new connection. Tap “Dial Properties”.
V2.3
Page 118 of 144
Unitech Electronics Co., Ltd
Created
by Yukiko
PA960 Operation
Manual
14. Tap “Edit”.
15. Edit the dialing patterns. Tap “OK”, “OK”.
V2.3
Page 119 of 144
Unitech Electronics Co., Ltd
Created
by Yukiko
PA960 Operation
Manual
V2.3
16. Tap “Connect”.
17. Terminal is connected to wireless network by GPRS PC card.
Page 120 of 144
Unitech Electronics Co., Ltd
Created
by Yukiko
PA960 Operation
Manual
V2.3
Page 121 of 144
Chapter 7 RF Connection, GPRS and
Bluetooth
1. RF Connection – Cisco Aironet
2. RF Connection – Lucent Orinoco (Agere System)
3. RF Connection – Symbol
4. RF Connection – Built in RF card model
5. GPRS – Sierra Wireless AirCard750
6. GPRS – Option Globe Trotter
7. Bluetooth – Socket
7.1 RF Connection – Cisco Aironet
PA960 come with Aironet Client Utility version 1.70. In order to use Cisco RF card in
PA960, it is essential to use Aironet Client Utility to set your SSID, WEP etc. Please
refer to Chapter 3.2. In addition, you may use tool such as Cisco Link Status, site
survey tool etc to check the Cisco connection.
However, please note that Aironet Client Utility version 1.70 only can work with
Cisco RF card with firmware version V4.XX.XX. If you are using Cisco RF card with
Firmware version V5.XX and above, you need to downgrade your Cisco card to
V4.XX.XX or you may install Aironet Client Utility version 2.3 and above.
Downgrade Cisco RF card firmware version
Please refer to chapter 3.7 to load firmware.
Or you may perform the action on your PC/notebook.
1. Install Aironet Client Utility on your PC/Notebook.
2. Insert your Cisco RF card into your PC/Notebook.
3. Run Aironet Client Utility on your PC/Notebook.
Unitech Electronics Co., Ltd
Created
by Yukiko
PA960 Operation
Manual
V2.3
Page 122 of 144
4. Click icon of “Load Firmware”.
5. Select the firmware from your local HDD (example: V4.25.30.img)
6. Your Cisco RF card will be loaded with new firmware.
7. You may double check the version by clicking “Status”.
Install Aironet Client Utility version 2.30 and above…
1. Download the utility from Cisco web site. Double click to install on your host.
2. Copy “CiscoHpc3SA_a.CAB” from /Program Files/Microsoft ActiveSync/Cisco
Aironet Wireless LAN Adapter/ to your terminal.
3. Double tap CiscoHpc3SA_a.CAB on your terminal to install.
4. Follow the screen instruction.
5. You will see “Aironet Client Utility” on your desktop or in /Start/Program.
6. Run “Aironet Client Utility”. Tap “Profile” Tab.
7. Insert your Cisco RF card in your terminal.
8. Under Manage Profiles, tap “Profile0”. Tap “Edit”.
Unitech Electronics Co., Ltd
Created
by Yukiko
PA960 Operation
Manual
9. Select SSID, enter your SSID.
10. For Power Save Mode, select “MAX PSP”.
V2.3
Page 123 of 144
Unitech Electronics Co., Ltd
Created
by Yukiko
PA960 Operation
Manual
V2.3
Page 124 of 144
11. WEP, select Static Key. Tap “WEP KEYS”.
12. Key in your WEP key.
13. Tap OK. OK.
14. Cisco RF card is ready to use.
15. In addition , you can check the connection under “Status”, “Statistic” and
“Survey”.
7.2 RF Connection – Lucent Orinoco (Agere System)
Another alternative wireless connection is by using Lucent Orinoco RF card.
(Recommend: Agere Wireless Ruby PC Card with Short Antenna). A built-in Lucent
Driver and the utility(WMAGS46.exe) allows the users to use Lucent Orinoco RF
Unitech Electronics Co., Ltd
Created
by Yukiko
PA960 Operation
Manual
V2.3
Page 125 of 144
card and make the connection setting.
1. Insert Lucent Orinoco RF card into the terminal. You will see a window pop up
asking you to select obtain IP via DHCP or specify an IP address. Select either one of
them. (If you select the later, do not forget to specify DNS under “Name Servers”.)
2. You will see Lucent Orinoco card is recognized and an icon appear on the taskbar.
Tap the icon. You will see the screen as below:
Unitech Electronics Co., Ltd
Created
by Yukiko
PA960 Operation
Manual
V2.3
Page 126 of 144
3. Repeat step 4 ~ step 22 in Chapter 3.24.
7.3 RF Connection – Symbol
In addition, wireless connection via symbol RF card also available. Please follow
steps in Chapter 3.10.
7.4
RF Connection – Built in RF card model
PA960 has a another model which come with built in wireless LAN CF card. To make
this card connect to the network, please follow the steps below to complete the
setting:
1.
Tap /Start/Settings/ControlPanel/Wireless LAN Setting.
2.
In configuration tab, specify SSID and Network Type, tap “Apply”.
Unitech Electronics Co., Ltd
Created
by Yukiko
PA960 Operation
Manual
V2.3
Page 127 of 144
3.
In security tab, enable WEP and specify your WEP key, tap “Apply”.
4.
Tap OK.
5.
Warm Start.
6.
Tap /Start/Program/Uniping, check your Local IP.
7.
Connect to network.
7.5 GPRS – Sierra Wireless AirCard750
Besides Option Globetrotter GPRS, users can use Sierra Wireless Aircard 750 for
GPRS connection.
1. Install Aircard driver into terminal by double tap “Aircard 7X0 for Handheld
PC2000.HPC2000_2577.cab”, follow the instruction and warm start your terminal.
2. Insert Aircard750 into the terminal.
3. From /Start/Program, tap “Aircard 750 watcher”.
Unitech Electronics Co., Ltd
Created
by Yukiko
PA960 Operation
Manual
V2.3
4. Firmware update. You may select “Update now” or “Update later”.
5. On the watcher, tap “Tools”> Options.
6. Under profile, tap “Add” to add a new profile.
Page 128 of 144
Unitech Electronics Co., Ltd
Created
by Yukiko
PA960 Operation
Manual
V2.3
Page 129 of 144
7. Enter a name for this profile, enter the APN. Tap OK.
8. Under “Network” tab, select the frequency band and transmit power consumption.
For Network selection mode, select “Automatic”. Tap Apply.
9. Under “My Number” tab, at “Number” field, enter the phone number. Tap Apply.
You may connect to network now.
Unitech Electronics Co., Ltd
Created
by Yukiko
PA960 Operation
Manual
V2.3
Page 130 of 144
10. In addition, you may set other setting in Display, Security, SMS, Sounds and
Voice tab.
11. For Display, you may check “Restore previous position on Startup” and
“Remember Compact View Position”.
If you want to launch browser automatically once Sierra wireless is running, check
“Enabled” under Auto Launch Browser and key in the URL of your home page.
If you want the warning message to pop up while connection is lost, check
“Connection Lost” under Warning Message.
Tap Apply.
12. Under “Security” tab, you can tap “Enable SIM security” to enter your PIN for
your SIM card security. (Caution: Please be careful to enter the correct pin , your SIM
card will be locked once a wrong PIN number is entered 3 times.)
To change your PIN number, enable SIM security first. Select PIN1 check box and
Unitech Electronics Co., Ltd
Created
by Yukiko
PA960 Operation
Manual
V2.3
Page 131 of 144
enter you PIN in “Current” field. Enter a new password and verify your password
again. Tap OK. Tap “Yes” to confirm to change the PIN.
13. Under “SMS” tab, you will see your service center. The number is retrieved from
your SIM card. Do not change this number.
Enter the default phone number to which the SMS message is sent. (Optional)
Specify validity period (How long the SMS messages are stored on the network).
Select the way you want your message to be saved or not saved in the outbox.
Tap Apply.
14. Under “Sounds” tab, you may specify the warning sounds for each occasion.
Unitech Electronics Co., Ltd
Created
by Yukiko
PA960 Operation
Manual
V2.3
Page 132 of 144
Tap Apply.
15. Under “Voice” tab, specify the tone assigned to each key under DTMF. Specify
the number of milliseconds the tone is on and off. Check “Mute keypad tone” if you
do not want any sounds when you dial a number. Check “earpiece feedback” , a sound
will occurs when you select dial pad keys. The headset volume allows users to adjust
the volume of what you hear.
Tap Apply.
Note: For more details, please download the user guide from Sierra Wireless Web site.
7.6 GPRS – Option Globe Trotter
Another GPRS available is by using Option Globe Trotter.
1. Install APN manager on your host from Option Globe Trotter CD.
2. Connect your host and the terminal via Activesync.
Unitech Electronics Co., Ltd
Created
by Yukiko
PA960 Operation
Manual
3. Double click APN manager to install it on the terminal.
4. Reset your terminal.
5. You will see the APN manager in terminal’s control panel.
V2.3
Page 133 of 144
Unitech Electronics Co., Ltd
Created
by Yukiko
PA960 Operation
Manual
6. Tap “Add”. Enter you APN. Tap OK.
7.
Select “My Computer/Windows/connmc.exe”.
8.
Double tap “Make New Connection”.
V2.3
Page 134 of 144
Unitech Electronics Co., Ltd
9.
Created
by Yukiko
PA960 Operation
Manual
V2.3
Page 135 of 144
Enter a name for the connection.
10. Select “Dial-Up Connection”. Tap “Next”.
11. Select a modem. Select the type of the GPRS PC card you are using.
12. Tap “Configure”.
Unitech Electronics Co., Ltd
Created
by Yukiko
PA960 Operation
Manual
13. Set the port settings.
14. Set the call options.
15. Tap “OK”.
16. Tap “Next”.
17. Key in the phone number. Tap “Finish”.
18. A new connection is added.
V2.3
Page 136 of 144
Unitech Electronics Co., Ltd
Created
by Yukiko
PA960 Operation
Manual
19. Double tap this new connection. Tap “Dial Properties”.
20. Tap “Edit”.
V2.3
Page 137 of 144
Unitech Electronics Co., Ltd
Created
by Yukiko
PA960 Operation
Manual
21. Edit the dialing patterns. Tap “OK”, “OK”.
22. Tap “Connect”.
V2.3
Page 138 of 144
Unitech Electronics Co., Ltd
Created
by Yukiko
PA960 Operation
Manual
V2.3
Page 139 of 144
13. Terminal is connected to wireless network by GPRS PC/modem card.
7.7 Bluetooth – Socket
Socket Bluetooth card is recommended for bluetooth communication on PA960.
1. Download socket bluetooth driver and double click to install on your host.
2. From host:/C:/Program Files/Microsoft ActiveSync/Socket Bluetooth Software,
copy “Output.GalArm.CAB” to the terminal.
3. From host:/C:/Program Files/Microsoft ActiveSync/Socket Bluetooth OBEX
Software, copy “Obex.Output.GalArm.CAB” to the terminal.
4. Double tap Output.GalArm.CAB to install and tap next , next until finish.
5. Double tap Obex.Output.GalArm.CAB to install.
6. Warm start the terminal.
7. Insert Socket Bluetooth card into the terminal.
Unitech Electronics Co., Ltd
Created
by Yukiko
PA960 Operation
Manual
V2.3
Page 140 of 144
8. Bluetooth icon will appear on the task bar.
9. Tap this icon and select “Transfer via Bluetooth” > “Browse Remote Device”.
10. Terminal will begin to search remote bluetooth devices.
Once a device is found, a communication between the devices can be started.
11. Other features of Socket bluetooth, please refer to the below:
12. Tap Bluetooth icon and select “Turn Transmitter OFF”. The bluetooth card radio
Unitech Electronics Co., Ltd
Created
by Yukiko
PA960 Operation
Manual
V2.3
Page 141 of 144
transmitter will shut off. To turn it on again, tap the icon and tap “Turn Transmitter
ON”.
13. If you want to use PA960 to communicate to a bluetooth mobile phone, select
“Get Connected!”. The wizard guides you thru a one-time setup process that prepares
the mobile phone and computer for Bluetooth to connect to. Tap “Next” and follow
the screen instruction.
Mobile phones supported: Ericsson, Nokia6210, NTT DoCoMo, Sony phones,
Motorola Timeport 270C, Nokia 3650/6310/7650/8910/8910i.
14. Tap icon , select “Advanced Features” > My bluetooth device. You may change
the name of your bluetooth device, assign your bluetooth com port , assign your
business card and specify your shared folder.
Unitech Electronics Co., Ltd
Created
by Yukiko
PA960 Operation
Manual
V2.3
Page 142 of 144
15. To find nearby bluetooth device and add it in your bluetooth devices folder, select
“Advanced features” > “Bluetooth Devices”. (The bluetooth device you want to
search must be in “Discoverable” mode). Besides, you can put your favorite
phone/Fax/Computer/Printer in your favorites.
16. Tap icon and select “ Bluetooth ActiveSync”, it will allow the users to ActiveSync
to a notebook or to a desktop computer. If there is no computers in your favorite
folder, a bluetooth device search will begin; if there is computer in your favorite
folder, your terminal will automatically connect to your favorite computer. A connect
to screen appear. After a successful connection is made, it will report “Connected”.
You are now ready to synchronize files.
Unitech Electronics Co., Ltd
Created
by Yukiko
PA960 Operation
Manual
V2.3
Page 143 of 144
17. Tap icon and select “Bluetooth LAN Access”, Socket bluetooth will start to
connect to the bluetooth-enabled LAN access point in your favorite folder or search
for a bluetooth-enabled LAN access point. You may select the access point you want
to use. Enter passkey if it is required. After connection is successful , you will see
“Connected”. Now you are ready to access your LAN for internet access, files etc.
18. To exchange your business card with other bluetooth device, assign your business
card first in Advanced Features > My Bluetooth Device > Object Sharing.
Tap icon and select “Transfer via Bluetooth” > “Exchange Business Card”. Socket
bluetooth search for bluetooth devices. Select the device that you want to exchange
the business card with. Your business card will be sent to that device and you will
receive the business card from that device as well.
Unitech Electronics Co., Ltd
Created
by Yukiko
PA960 Operation
Manual
V2.3
Page 144 of 144
19. To send a file, select “Send a File”. Socket bluetooth search for bluetooth devices.
Select the device that you want to send your files to .Select the folder and the file you
want to send. (Note: Must set up the destination device to receive a file by tapping
“Receive Contact or File”.)
20. Tap “Enable File Sharing”. Socket bluetooth search for bluetooth devices. Select
the device that you want to share your files with. File sharing is enabled until you tap
“Cancel”.
Note: For more details, please download the user manual of Socket Bluetooth form
the web site.