1
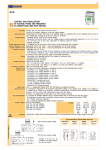
CARDO SYSTEMS, INC.
Cardo
User Guide
Gebrauchsanleitung
Guide d’Utilisation
Guida di Avvio
Guia de usario
When Technology Meets Design
english
6
Congratulations and thank you for choosing the Cardo S-800
Bluetooth® headset. This User Guide will help you learn about the
Cardo S-800’s many features, allowing you to make the best use of
your headset.
2
5
3
Cardo S-800 Overview
1
2
3
4
5
8
6 Control Button (CTRL)
Microphone
Multi-Function Wheel (MFW) 7 Speaker
8 Earloop
LED Status Indicator
Power and Hot Dial Button
Charging Jack
1
4
7
Getting Started
To use your Cardo S-800 (“the headset”), please follow these
initial steps:
• Charge your headset
• Pair your headset with a Bluetooth® -enabled mobile phone.
1. Charging your Headset
The headset comes with a built-in rechargeable battery. Prior to using
the headset, make sure to charge the headset for at least 4 hours.
Normally it takes approximately 2 hours to fully charge the headset.
1. Connect the charger to an AC wall outlet and the charger plug to
the headset’s Charging Jack. The headset’s LED status indicator
will be red during charging.
2. When the battery is fully charged, the red LED will turn off.
3. Disconnect the charger from AC wall outlet and the headset.
NOTE: Charging indication may be delayed for a few seconds if
the headset has not been used for a long time or the battery is
drained.
The fully charged battery offers up to 8 hours talk time and up to
one week standby time.
2. Pairing your Headset
Before you can use your headset you must pair it to your
Bluetooth-enabled mobile phone. If you do not have a Bluetoothenabled mobile phone, please visit http://www.cardosystems.com /BTA
for information on the Cardo BTA II Bluetooth Adapter.
english
english
1. Turn on your phone and turn ON its Bluetooth function.
2. Make sure the headset is turned OFF, then press and hold the
Power Button for approximately 8 seconds until the LED status
indicator begins alternating blue and red, indicating that the
headset is in Pairing Mode.
3. Set the phone to search for Bluetooth devices by following the
instructions in the phone’s user guide. This is usually found in the
phone’s Bluetooth menu and may be referred to as “discover” or
“add” a device.
4. After a few seconds, the phone will list the “Cardo S-800” as a
discovered device. Select it from the list and press “OK” or “Yes”.
5. When prompted, enter the passkey “0000” (4 zeros) and press
“OK” to complete the pairing.
6. When the pairing is complete, your phone will confirm that the
pairing was successful and the headset’s LED status indicator
will begin flashing slowly in blue.
You should now be able to make and receive calls using your
headset. To initially connect the headset to your phone, you may
need to tap the CTRL Button once on the headset.
IMPORTANT: If pairing is not completed within 2 minutes
while the Pairing Mode is activated, the headset will return to
Standby mode, flashing blue once every three seconds and
you must start the Pairing process again from Step 2 above.
NOTE: Your headset can pair with up to 8 phones, and will
automatically connect to the last phone connected to the headset.
To connect to a different paired phone, go to the Bluetooth menu
of the active phone and disconnect the headset. Then go to the
Bluetooth menu of the phone you wish to connect and connect the
headset by selecting it from the list of Paired Devices.
3. Wearing your Headset
The S-800 headset can be worn on either your left or right ear.
There are two ways in which you can wear the S-800 headset.
1. Without the earloop: Gently insert the headset without an
earloop into your ear, and it will hold itself in place securely.
2. With the earloop: Insert the straight section of the pin of the
earloop to a suitable depth so that the speaker fits snugly in your ear.
The earloop is flexible, and may be adjusted for maximum comfort.
The lanyard for the S-800 provides
an easy and convenient way of
carrying your headset while it is not
in use.
1. To attach the headset to the
lanyard, insert the speaker into the
upper loop of the lanyard. Then pull
the headset downwards into the
lower loop, until it is held securely
in place.
2. To release the headset from the
lanyard, simply pull the headset
forward at a downward angle.
english
Upper
loop
Lower
loop
4. Using your Headset – Basic Functions
english
Function
Turn ON/OFF the headset
Answer a call
End a call
Make a call from
your phone
Make a call using
Voice Dial
Increase the volume
Decrease the volume
Mute the microphone
Required Action
Press and hold the Power Button for at least 4 seconds
Tap the CTRL Button*
Tap the CTRL Button
Dial normally from your phone and the call will be transferred to
the headset (subject to phone settings).
During Standby, tap the CTRL Button, wait for the tone and say
the name of the person you wish to call. (Your mobile phone
must support the Voice Dial feature.)
Move the MFW up by steps. When you hear a beep, it is at maximum.
Move the MFW down by steps.When you hear a beep, it is at minimum.
During a call, tap the MFW inwards to turn on/off mute.
* Note: wait until you hear the incoming call on the headset (not only on the phone)
5. Using your Headset – Advanced Functions
1. Redial the last dialed number
During Standby, press the MFW inwards to redial the last dialed number.
2. Reject an incoming call
During an incoming call, press and hold the CTRL Button for 3
seconds.
3. Call waiting / Toggling between calls
During an incoming call and one call on hold or waiting, tap the
MFW inwards to answer the incoming call or toggle between calls.
4. Conference call
During an active call and one call on hold, press and hold the MFW
inwards for 3 seconds to combine both calls into a Conference call.
5. Transfer calls to/from headset
During a call, press and hold the CTRL Button for 3 seconds to
transfer the call between the headset and the mobile phone.
NOTE: On some phones, transferring a call to the headset requires
just a tap of the CTRL Button.
6. Hot Dial Function
The S-800 allows you to call any of three different phone numbers
at the press of a button.
In order to use the Hot Dial function, you must first configure
your mobile phone’s Speed Dial settings. Please refer to your
mobile phone’s user guide for instructions on saving Speed Dial
numbers.
To Hot Dial:
• Speed dial #2: • Speed dial #3: • Speed dial #4:
Tap the Hot Dial Button once.
Tap the Hot Dial Button twice rapidly.
Tap the Hot Dial Button three times rapidly.
english
7. SWAP (Swapping connection between two active mobile phones)
The S-800 allows you to swap, i.e. to alternately use one among
the last two phones to which it has been connected.
To SWAP between phones:
• While both phones are turned on and the headset is in Standby
mode, double-press the MFW inwards.
• The headset will switch to the second phone.
english
• Each time you double-press the MFW, the alternate phone
connects to the headset.
NOTE: This feature may only be used when the headset and both
phones are in Standby mode.
8. Battery Status Indicator
To check the status of the headset’s battery, press and hold the
CTRL Button for at least four seconds while the headset is in
Standby mode.
The LED Status Indicator will flash for two seconds as follows:
• Blue Full charge
• Red and Blue Medium charge
• Red Weak charge
9. Locating the Headset (Buzzer Function)
The S-800 allows you to locate the headset by activating an audible buzzer.
To activate the Buzzer:
• Dial a number with the mobile phone and press Send/Talk.
• While the call is in progress (or even while still ringing), turn the
mobile phone’s volume buttons up, then down, repeating the up/
down sequence five or more times.
• The headset will start buzzing.
10. Call back the last incoming caller (Callback Function)
The S-800 allows you to place a call to the phone number of the
last incoming, missed or rejected call.
To use the Callback function:
• While in Standby mode, rapidly move the MFW down twice and
release (double down-click).
NOTE: The Callback number memory will be cleared if:
1. The headset is disconnected from the current phone and
connected to a different phone.
2. The headset is turned off or has been charged.
3. The last incoming caller had a blocked or restricted number.
NOTE: This feature is not supported by some mobile phones.
11. Auto-Answer Function
The S-800 allows you to automatically answer all incoming calls
using the Auto-Answer function. Please note that once this feature
is activated you are subject to unintended eavesdropping. Use of
this feature is at your own risk!
Learn more at www.cardosystems.com/faq/s800/autoanswer
When Auto-Answer mode is enabled and there is an incoming
call, the headset will ring for a few seconds and then automatically
answer the call without the need to press the CTRL Button. AutoAnswer is disabled by default.
To enable/disable Auto-Answer:
• While in Standby mode, press and hold the MFW upwards for
seven seconds.
• When the Auto-Answer function is enabled, the blue Status
Indicator will begin flashing rapidly.
english
english
10
NOTE:
• Auto-Answer will not answer an incoming call if you are currently
on a call (Call Waiting).
• Turning off the headset will disable the Auto-Answer function.
• Auto-answer can be enabled again after turning on the headset
by following the instructions above.
13. Disabling / enabling the LED Status Indicator
The S-800 allows you to turn off the flashing LED Status Indicator. • While in Standby mode, move the MFW down and hold for at
least four seconds.
• The Status Indicator will stop/begin flashing, depending on
whether you are disabling/enabling the Status Indicator.
12. Button Lock
The S-800 allows you to lock its buttons, preventing the buttons
from being accidentally pressed.
To lock/unlock the buttons on the headset:
• While in Standby mode, simultaneously press the MFW and the
CTRL Button for at least four seconds.
14. Changing the Wheel orientation
The default configuration of the headset is designed for use on your right
ear. This means that clicking up on the MFW towards the small ‘+’ sign
on the headset increases the volume one step at a time, while clicking down
towards the ‘-’ sign on the headset decreases the volume one step at a time.
If you wear the headset on your left ear, the S-800 allows you to
change the MFW orientation from right to left ear, so that pressing
the MFW up still increases the volume, and pressing down
decreases the volume. Only volume orientation is affected.
To set the headset for left ear orientation:
• Make sure the headset is turned off.
• Now turn it on by pressing the CTRL Button and the Power Button
simultaneously for 4 seconds.
• Once you see 3 blue flashes followed by a single simultaneous
flash of the red and blue lights, the headset is powered on and
you may release the buttons.
NOTE: The headset will revert to its default right ear configuration once it
is turned off. In order to regularly use the headset in left ear configuration,
always turn on the headset using the CTRL + Power Button procedure above.
ADVANCED FUNCTIONS REFERENCE
Function
Required Action
Redial the last dialed number
During Standby, tap the MFW inwards (some phones
may require tapping twice).
During an incoming call, press and hold the CTRL
Button for 3 seconds.
During an incoming call and one call on hold or waiting,
tap the MFW inwards.
During an active call and one call on hold, press and
hold the MFW inwards for 3 seconds.
During a call, press and hold the CTRL Button for 3
seconds.
Tap the Hot Dial Button 1, 2, or 3 times rapidly to call
Speed Dial #2, #3, or #4 respectively.
During Standby, double-press the MFW inwards.
Reject an incoming call
Call waiting / Toggling
between calls
Conference Call
Transfer calls to / from
headset
Hot Dial
SWAP between active phones
english
11
english
Function
Required Action
Battery Status Indicator
Press and hold the CTRL Button for 4 seconds;
Blue=Full, Red/Blue=Medium, Red=Weak.
Dial a call, then press VolUp/VolDn on the phone 5 or
more times.
During Standby mode, rapidly move the MFW down
twice and release (double down-click).
Locating the headset
(Buzzer)
Call back the last incoming
caller (Callback)
Auto-Answer On/Off
Button Lock On/Off
12
Disabling / enabling the
LED Status Indicator
Changing the Wheel
orientation
During Standby mode, press and hold the MFW
upwards for 7 seconds.
During Standby mode, simultaneously press the MFW
and the CTRL Button for at least 4 seconds.
During Standby mode, move the MFW down and hold
for at least four seconds.
Turn on the headset by pressing and holding the CTRL Buttton and the Power Button simultaneously for 4 seconds.
6. Status Lights
Missed Call Indicator
Whenever a call is missed or rejected, the red and blue Status
Indicator will begin flashing simultaneously, notifying you of the
missed call.
To clear this Missed Call Indicator, press any button on the
headset.
NOTE: This feature is not supported by some mobile phones.
The headset uses the following Status Indicators to display its
status:
Status Light
Single blue flashing slowly (every 3 sec)
Auto-Answer
Disabled
Status
Standby mode
7. Audio Tones
Double blue flashing slowly (every 3 sec)
Red and blue simultaneously flashing slowly
Red flashing slowly (every 3 sec)
Single blue flashing rapidly
Double blue flashing rapidly
Disabled
Disabled
Disabled
Enabled
Enabled
During a call
Missed call
Low battery
Standby mode
During a call
With the exception of the actions described in the following table, all
actions are followed by a single tone to confirm that the headset has
accepted the action. A double tone means that the action has failed.
Red and blue simultaneously flashing rapidly
Red flashing rapidly
Alternating red/blue flashing
3 blue flashes
3 red flashes
None
Enabled
Enabled
Missed call
Low battery
Pairing mode
Power ON
Power OFF
Headset is off or Status
Indicator is disabled
Action
Tone
Mute
Volume up
On/off tone and mute reminder tone every 20 seconds
Tone on maximum volume
Volume down
Tone on minimum volume
Locate the headset
Buzzing
Call back list is empty
Two short beeps
english
13
8. Support
english
For additional information visit our website at
www.cardosystems.com or contact us at:
Email: [email protected]
FAQ: www.cardosystems.com/faq/s800/
10. Accessories
Accessories for your Cardo S-800™ headset may be ordered
online at www.cardosystems.com/S800/Accessories.
14
FCC Notice
This equipment complies with Part 15 of the FCC Rules. Operation is subject to
the following two conditions: (1) this device may not cause harmful interference,
and (2) this device must accept any interference received, including interference
that may cause undesired operation.
Warning: Changes or modifications to this unit not expressly approved by the
party responsible for compliance could void the user’s authority to operate the
equipment. Use only approved batteries and chargers. This equipment has been
tested and found to comply with Part 15 of the FCC rules. These limits are dessigned to provide reasonable protection against harmful interference in a residdential installation.
This equipment generates and can radiate radio frequency energy, and if not
installed and used in accordance with the instructions, may cause harmful
interference to radio communications. However, there is no guarantee that
interference will not occur in a particular installation. Your Cardo S-800 TM
headset is designed to operate at the maximum strength allowed by the FCC.
This means that your headset can communicate only over a certain distance
subject on the location of the cell phone, base unit and headset, your vehicle,
the construction and layout of your home or office. Weather conditions can
also affect performance.
Never open the headset as this may cause dAmage or injury
and will void warranty
NOTE: If this equipment causes harmful interference to radio or television recc
ception, which can be determined by turning the equipment off and on, the user
is encouraged to try to correct the interference by one or more of the following
measures:
• Reorient or relocate the receiving antenna.
• Increase the separation between equipment and receiver.
• Connect the equipment into an outlet on a circuit different from that to which the
receiver is connected.
• Consult the dealer or an experienced radio/ TV technician for help.
english
European CE Notice
The Cardo S-800 TM headset (the “Product”) is in conformity with the following esssential requirements of Council Directive 1999/5/EC (referred to as R&TTE Directtive): Articles 3.1a, 3.1.b and 3.2. The Product is manufactured in accordance with
Annex II of the above directive.
Declaration of Conformity (DOC)
The Cardo S-800 TM headset is compliant with and adopts the Bluetooth ® Specificattion 2.0 and has successfully passed all interoperability tests that are specified
in the Bluetooth ® specification. However, interoperability between the device and
other Bluetooth ® -enabled products is not guaranteed.
15
english
Copyright © 2007
16
The Cardo S-800™
is developed and
manufactured by
Cardo Systems, Inc.
All rights reserved.
The Bluetooth ®
word mark and
logos are owned
by the Bluetooth
SIG, Inc.