1
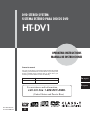
DVD STEREO SYSTEM
SISTEMA ESTÉREO PARA DISCOS DVD
HT-DV1
OPERATING INSTRUCTIONS
MANUAL DE INSTRUCCIONES
Owner’s record
For your convenience, record the model number and serial
number (you will find them on the bottom of your set) in the
space provided below. Please refer to them when you
contact your Aiwa dealer in case of difficulty.
Model No.
Serial No. (Lot No.)
En (English)
HT-DV1
E (Español)
For assistance and information,
call toll free 1-800-BUY-AIWA.
(United States and Puerto Rico)
8C-AV5-903-01
011217AMK-H9
U
ENGLISH
WARNING
TO REDUCE THE RISK OF FIRE OR
ELECTRIC SHOCK, DO NOT EXPOSE THIS
APPLIANCE TO RAIN OR MOISTURE.
Explanation of Graphical Symbols:
The lightning flash with arrowhead symbol,
within an equilateral triangle, is intended to
alert the user to the presence of uninsulated
"dangerous voltage" within the product’s enclosure that may be of sufficient magnitude to
constitute a risk of electric shock to persons.
The exclamation point within an equilateral
triangle is intended to alert the user to the
presence of important operating and maintenance (servicing) instructions in the literature
accompanying the appliance.
PRECAUTIONS
Read the Operating Instructions carefully and completely
before operating the system. Be sure to keep the Operating
Instructions for future reference. All warnings and cautions
in the Operating Instructions and on the system should be
strictly followed, as well as the safety suggestions below.
Important
This system is designed for the NTSC color systems only.
Installation
1 Water and moisture — Do not use this system near
water, such as near a bathtub, sink, swimming pool, or
the like.
2 Heat — Do not use this system near sources of heat,
including heating vents, stoves, or other appliances that
generate heat. This system should not be placed in
temperatures less than 5˚C (41˚F) or greater than 35˚C
(95˚F).
3 Mounting place — Place the system:
- on a flat , even surface
- away from strong magnetic fields
- at least one meter away from any radios or receivers
Do not place heavy objects on the system.
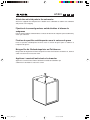
4 Ventilation — The system should be situated with
adequate space around it so that proper heat ventilation
is assured. Allow a clearance of 10 cm (4 in.) from the
rear and the top of the system, and 5 cm (2 in.) from
each side.
2 ENGLISH
- Do not place the system on a bed, rug, or similar
surface that may block the ventilation openings.
- Do not install the system in a bookcase, cabinet, or
airtight rack where ventilation may be impeded.
- To avoid internal heat build-up, do not cover the
ventilation openings on the rear panel.
5 Foreign objects and liquid — Be careful that foreign
objects or liquid do not enter the system through the
ventilation openings.
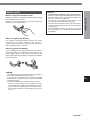
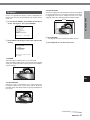
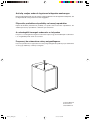
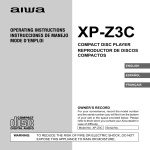
6 Carts and stands — The system should
be moved with care when placed or
mounted on a stand or cart.
Sudden stops, excessive force, or an
uneven surface may cause the system
or cart to fall over.
7 Condensation — Moisture may form on the pickup lens
when:
- This system is moved from a cold spot to a warm
spot
- A heating system has just been turned on
- The system is used in a very humid room
- The system is cooled by an air conditioner
When this system has condensation inside, it may not
function normally. Should this occur, leave the system
for a few hours, then try to operate again.
Electric power
1 Power sources — Connect this system only to power
sources specified in the Operating Instructions, and as
marked on the system.
2 AC power cord
- When disconnecting the AC power cord, pull it out by
the AC power plug. Do not pull the cord itself.
- Never handle the AC power plug with wet hands, as
this could result in fire or electrical shock.
- Power cords should be firmly secured to avoid being
severely bent, pinched, or walked upon. Pay particular
attention to the cord from the system to the power
socket.
- Avoid overloading AC power plugs and extension
cords beyond their capacity, as this could result in
fire or electrical shock.
3 When not in use — Unplug the AC power cord from
the AC outlet if the system will not be used for several
months or more. When the cord is plugged in, a small
electrical current continues to flow into the system, even
if the power is turned off.
4 In case of lightning — Immediately disconnect the AC
power cord from the AC outlet.
Maintenance
Clean the system only as recommended in the Operating
Instructions.
Damage requiring service
Have this system serviced by a qualified service technician
if:
- The AC power cord or plug has been damaged
- A foreign object or liquid has entered the system
- The system has been exposed to rain or water
- The system does not seem to operate normally
- The system exhibits a marked change in performance
- The system has been dropped, or the cabinet has been
damaged
DO NOT OPEN THE CABINET AND ATTEMPT TO
SERVICE THE SYSTEM YOURSELF.
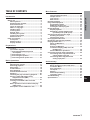
TABLE OF CONTENTS
Introduction
Precautions ............................................................... 2
Before use ................................................................. 4
About symbols .................................................. 4
Supported disc formats .................................... 4
Disc-related terms .............................................. 5
Types of video CDs ............................................ 5
Notes on copyright ............................................ 5
Handling discs .................................................... 6
Cleaning discs .................................................... 6
Storing discs ...................................................... 6
Handling the system ......................................... 6
Cleaning the system ......................................... 6
Remote control .................................................. 7
Parts and controls .................................................... 8
Front panel ......................................................... 8
Remote control .................................................. 9
Display window ............................................... 10
Preparations
Connections ........................................................... 11
Connection diagram ....................................... 11
1 Connecting the DVD player and
the amplifier ................................................ 12
2 Connecting to a TV ..................................... 12
3 Connecting the speakers ............................ 14
4 Connecting the AC power cord ................. 15
Basic Operations
Playback .................................................................
Adjusting the volume .....................................
Resuming playback ........................................
Still (pause) ......................................................
Frame advance ................................................
Slow playback ..................................................
Fast forward/fast reverse ...............................
Skipping ...........................................................
Checking the play time during playback ......
Playing a video CD without using
Playback Control (PBC) ...........................
Sound adjustment ...........................................
Creating a simulated audio surround
effect ..........................................................
Basic operation of the On-Screen Display
(OSD) menu ...............................................
Description of each OSD menu item ............
Search .....................................................................
Title search/track search ................................
Chapter search ................................................
Time search .....................................................
Mark search .....................................................
Random playback ..................................................
Programmed playback ..........................................
Programming tracks .......................................
Modifying the program ...................................
Clearing the entire program ...........................
Repeat playback ....................................................
Repeat playback ..............................................
Repeating a section between two
specified points (A-B repeat) ..................
Zooming and changing the angle ........................
Zooming the picture .......................................
Changing the angle .........................................
Changing the audio track .....................................
Displaying and changing subtitles ......................
Playing an MP3 disc ..............................................
Notes on MP3 discs ........................................
Glossary ...........................................................
Playing an MP3 disc .......................................
On-Screen Display (OSD) menu for
the MP3 disc ..............................................
Various MP3 disc operations .........................
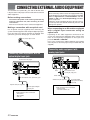
Connecting external audio equipment ...............
Connecting audio equipment with an
optical digital input jack ..........................
Connecting audio equipment with
analog input jacks ....................................
26
26
27
27
28
29
30
30
31
31
32
32
INTRODUCTION
More Features
33
34
34
34
35
36
37
37
37
38
39
39
40
40
40
As Necessary
16
17
18
18
18
19
19
20
20
20
21
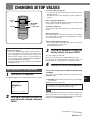
Changing setup values .........................................
Basic operations in the setup menu .............
On-Screen Menu ..............................................
Disc Languages ...............................................
TV Aspect .........................................................
Ratings .............................................................
Audio Output Setting ......................................
Language codes ..............................................
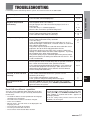
Troubleshooting ....................................................
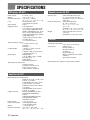
Specifications ........................................................
41
41
42
43
45
46
47
50
51
52
ENGLISH
3
22
23
24
En
BEFORE USE
Please read the following before operating the system.
About symbols
Supported disc formats
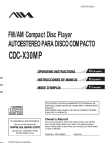
This system can play discs with the following marks.
Although this system can play DVDs, video CDs, audio CDs
and MP3 discs, some of the functions are restricted
depending on the type of disc.
The following symbols are used to make distinctions.
DVD
(8 cm disc/12 cm disc)
Video CD
(8 cm disc/12 cm disc)
No symbols: The function works for DVDs, video CDs and
audio CDs.
:
Indicates a function or display for DVDs only.
:
:
Indicates a function or display only for video
CDs version 2.0 equipped with PBC
(Playback Control).
Indicates a function or display only for video
CDs version 1.1 not equipped with PBC
(Playback Control).
:
Indicates a function or display for audio CDs
only.
:
Indicates a function or display for MP3 discs
only.
Playback of MP3 discs is different from that of other
kinds of discs. For information about playing MP3 discs,
see "PLAYING AN MP3 DISC" on page 37.
Audio CD
(8 cm disc/12 cm disc)
In addition, this system can play CD-R or CD-RW discs
that contain audio titles or MP3 files.
NOTES
• Depending on the condition of the recording equipment
or the CD-R/RW disc itself, some CD-R/RW discs cannot
be played on the system.
• The system cannot play CD-R/RW discs that contain no
data, or contain kinds of formatted data other than MP3.
For more information about MP3, see page 37.
• Do not attach any seal or label to either side (the labeled
side or the recorded side) of a disc.
• Do not use irregularly shaped CDs (e.g. heart-shaped
or octagonal). It may result in malfunctions.
Note on color system
This system is designed for the NTSC color system
only.
DVDs and video CDs are recorded in the PAL and NTSC
color systems.
Select DVDs and video CDs recorded in the NTSC color
system.
Notes on DVDs and video CDs
Some playback operations of DVDs and video CDs may
be intentionally fixed by software manufacturers. As this
system plays DVDs and video CDs according to disc
content designed by the software manufacturer, some
playback features of the system may not be available, or
other functions may be added.
Refer also to the instructions supplied with the DVDs and
video CDs.
Some DVDs made for business purposes may not be
playable on the system.
4 ENGLISH
Region code of the DVD player and DVDs
Types of video CDs
Note on DVDs recorded with a sampling
frequency of 96 kHz
When playing DVDs recorded with a sampling frequency
of 96 kHz, the system outputs signals converted to 48 kHz.
Note, however, that the system does not play dts audio
tracks recorded with a sampling frequency of 96 kHz.
Disc-related terms
Title
The longest section of a picture or a musical piece on a
DVD, a movie for a picture piece on video software, or an
album for a musical piece on audio software. Each title is
assigned a title number enabling you to locate the title you
want.
Chapter
Sections of a picture or a musical piece that are smaller
than titles.
A title is composed of several chapters. Each chapter is
assigned a chapter number, enabling you to locate the
chapter you want. Depending on the disc, no chapters may
be recorded.
Video CDs equipped with PBC (version 2.0)
The PBC (Playback Control) function allows you to interact
with the system via menus, search functions, or other typical
computer-like operations. Moreover, still pictures of high
resolution can be played if they are included in the disc.
Video CDs not equipped with PBC (version 1.1)
INTRODUCTION
There are two types of video CDs:
This system is designed and manufactured for playback of
region "1" encoded DVD software. The region code on the
labels of some DVDs indicates which type of player can
play those discs. This system can play only DVDs labeled
"1" or "ALL". If you try to play any other discs, the message
"REGIONAL CODE VIOLATION" will appear on the TV
screen. Some DVDs may not have a region code label even
though their playback is prohibited by area limits.
Operated in the same way as audio CDs, these discs allow
playback of video pictures as well as sound, but they are
not equipped with PBC.
Notes on copyright
It is forbidden by law to copy, broadcast, show, broadcast
via cable, play in public, or rent copyrighted material without
permission.
This product features the copy protection function
developed by Macrovision. Copy protection signals are
recorded on some discs. When recording and playing the
pictures of these discs on a VCR, picture noise will appear.
This product incorporates copyright protection technology
that is protected by method claims of certain U.S. patents
and other intellectual property rights owned by Macrovision
Corporation and other rights owners. Use of this copyright
protection technology must be authorized by Macrovision
Corporation, and is intended for home and other limited
viewing uses only unless otherwise authorized by
Macrovision Corporation. Reverse engineering or
disassembly is prohibited.
Track
Sections of a picture or a musical piece on a video CD or
an audio CD. Each track is assigned a track number,
enabling you to locate the track you want.
En
Scene
Moving pictures and still pictures are divided into sections
called "scenes". Each scene is displayed in the menu screen
and assigned a scene number, enabling you to locate the
scene you want.
A scene is composed of one or more tracks.
CONTINUE
ENGLISH
5
BEFORE USE (CONTINUED)
Handling discs
Do not touch the playback side of the disc.
Hold the disc by the edges so that fingerprints will not get
on the surface.
Do not stick paper or tape on the disc.
Cleaning discs
Fingerprints and dust on the disc can cause poor picture
quality and sound distortion. Before playing, clean the disc
with a clean cloth. Wipe the disc from the center out.
Handling the system
When shipping the system
The original shipping carton and packing materials come
in handy. For maximum protection, repack the system as it
was originally packed at the factory.
When installing the system
The picture and sound of a nearby TV, VCR, or radio may
be distorted during playback. In this case, position the
system away from the TV, VCR, or radio, or turn off the
system after removing the disc.
To keep the surface clean
Do not use volatile liquids, such as insecticide spray, near
the system. Do not leave rubber or plastic products in
contact with the system for a long period of time. They will
leave marks on the surface.
Cleaning the system
Do not use strong solvents such as alcohol, benzine,
thinner, commercially available cleaners, or anti-static spray
intended for analog records.
Storing discs
After playing, store the disc in its case.
Do not expose the disc to direct sunlight or sources of heat,
or leave it in a parked car exposed to direct sunlight, as
there may be a considerable temperature increase inside
the car.
6 ENGLISH
To clean the cabinet
Use a soft, dry cloth. If the surfaces are extremely dirty,
use a soft cloth lightly moistened with a mild detergent
solution. Do not use strong solvents, such as alcohol,
benzine, or thinner, as these might damage the surface of
the system.
To clean the pickup lens
Use a cotton swab slightly moistened with cleaning fluid.
Wipe gently from the center to the edge.
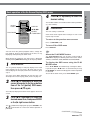
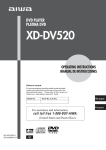
Before using the remote control
A battery (CR2025) is already installed in the remote control
when shipped from the factory.
Remove the insulating tape from the battery holder by
pulling its end as shown below.
CAUTION
• Lithium battery (CR2025) for the remote control
Replace the battery with Hitachi Maxell or Panasonic,
Part No. CR2025 only. Use of another battery may
present a risk of fire or explosion.
The battery may explode if mistreated. Do not
recharge, disassemble or dispose of in fire.
• Do not keep metallic objects such as rings, bracelets,
and keys near the battery. They may cause the battery
to short circuit.
• After removing the battery, be sure to keep it out of
reach of children. If it is swallowed, consult a doctor
immediately.
INTRODUCTION
Remote control
When to replace the battery
The maximum operating distance between the remote
control and the remote sensor of the system is
approximately 5 meters. If the operating range decreases,
replace the battery with a new one.
How to replace the battery
Insert a ballpoint pen or similar pointed tool in the notch of
the battery holder at the bottom, and then slide out the
battery holder. Place a new battery (CR2025) into the
battery holder with correct polarity. Finally, push the holder
back into position.
NOTES
• When operating with the remote control, point the top of
the remote control toward the DVD player.
• If the system is not going to be used for an extended
period of time, remove the battery to prevent possible
electrolyte leakage.
• The remote control may not operate correctly when:
- There is an intense light, such as sunlight, in the line
of sight between the remote control and the DVD player.
- There is fluorescent lighting near the remote sensor.
- Other remote controls are used nearby (those of a TV
set, etc.).
En
ENGLISH
7
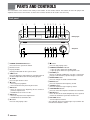
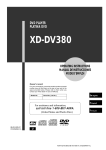
PARTS AND CONTROLS
The instructions in this manual refer mainly to the buttons on the remote control. The buttons on the DVD player and
amplifier that have the same names as those on the remote control can be used in the same way.
Front panel
q
w
e
r t y u i
o
!0
DVD player
Amplifier
!1 !2
q POWER 6STANDBY/ON button
Press to turn the system on and off.
w Remote sensor
e Display window
Displays information on the system status.
r TIME button
Press to display the elapsed time or remaining time of
the title/chapter/disc/track currently being played.
t z OPEN
Press to open the disc cover.
y a button
• Press to pause playback.
• Press to advance the picture by one frame.
u r button
• Press to return to the beginning of the current or
previous chapter/track.
• Hold down to fast reverse a disc.
i t button
• Press to skip to the next chapter/track.
• Hold down to fast forward a disc.
o c button
Press to start playing a disc.
8 ENGLISH
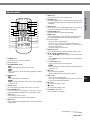
!3 !4 !5 !6 !7
!8
!0 s button
Press to stop playing a disc.
!1 POWER/6STANDBY indicator
• Lights up red in power-off standby mode.
• Lights up green when the system power is on.
!2 PHONES jack
Plug in an optical headphones set with a stereo mini
plug (3.5-mm diameter). Speaker output is canceled.
!3 SURROUND button*
Press to change the audio surround mode.
!4 BASS button*
Press to emphasize low frequency sound.
!5 TREBLE button*
Press to emphasize high frequency sound.
!6 TONE DEFEAT button*
Press to cancel the emphasis on both bass and treble.
!7 MUTE button*
Press to turn off the audio temporarily. Press again to
restore the audio to the previous volume level.
!8 VOLUME control
Turn to adjust the volume.
* The indicator above the button lights up red when the
function of the button is active.
Remote control
o t button
w
!2
!3
!4
e
r
t
!5
!6
!7
y
u
i
o
!8
!9
@0
@1
!0
!1
@2
q
Press to emphasize bass (low frequency) or treble (high
frequency) sound or cancel the emphasis on both bass
and treble.
!1 MUTE button
Press to turn off the audio temporarily. Press again to
restore the audio to the previous volume level.
!2 SURROUND button
INTRODUCTION
Press to skip to the next chapter/track.
!0 SOUND button
Press to select the audio surround mode.
!3 TIME button
Press to display the elapsed time or remaining time of
the title/chapter/disc/track currently being played.
!4 C (Clear) button
• Press to clear a marked point.
• Press to clear a track when programming tracks.
• Press to cancel an input number in the On-Screen
Display (OSD) menu.
• Press to center the zoom area.
!5 DISPLAY button
Press to display the On-Screen Display (OSD) menu.
!6 i, k, j, l and ENTER buttons
q POWER button
Press to turn the system on and off.
w Number buttons
e TOP MENU/PBC button
• Press to display the title menu of a DVD.
• Press to turn on or off the PBC (Playback Control)
function.
r MENU button
• Press to display menu programs.
• Press to return to the disc menu when PBC (Playback
Control) is on.
t SETUP button
Press to display the setup menu on the TV screen.
y PLAY MODE button
Press to enter title/chapter/track/time search,
programmed play, random play or repeat play mode.
• Press i/k/j/l to select an item or move the zoom
area.
• Press ENTER to execute or confirm the selected item
in a menu.
!7 v RETURN button
• Press to return to the previous menu.
• Press to return to the disc menu when PBC (Playback
Control) is on.
!8 a button
• Press to pause playback.
• Press to advance the picture by one frame.
!9 g button
• Press to fast forward a disc.
• Press to start slow playback during pause (still) and
raise the speed of slow playback.
@0 c button
Press to start playing a disc.
@1 s button
Press to stop playing a disc.
@2 VOLUME -/+ button
Press to adjust the volume.
u f button
• Press to fast reverse a disc.
• Press to lower the speed of slow playback.
i r button
Press to return to the beginning of the current or previous
chapter/track.
CONTINUE
ENGLISH
9
En
PARTS AND CONTROLS (CONTINUED)
Display window
The system shows on-screen display messages on the screen of the connected TV, as well as LCD indications on the
display window of the DVD player. They make operations simple and easy, especially when playing DVDs and video CDs.
The instructions in this manual refer mainly to the on-screen display messages on the TV screen.
q
t
y
u
i
q VOLUME indicator
w
e
r
o
o Time counter
Lights up while the volume is adjusted.
w MP3 indicator
Lights up when an MP3 disc is loaded.
e Disc indicator
• "VCD" lights up when a video CD is loaded.
• The elapsed time or remaining time of the current title/
chapter is displayed during playback.
• In stop mode
- The elapsed time or remaining time of the current
title/chapter is displayed when the resume function
is on.
- No indication when the resume function is off.
• "CD" lights up when an audio CD is loaded.
r DVD indicator
Lights up when a DVD is loaded.
t T (title/track) indicator
Lights up while the total number of titles/tracks or the
current title/track number is displayed.
y Title/track indication
• The current title/track number is displayed during
playback.
• In stop mode
- The current title/track number is displayed when the
resume function is on.
- The total number of titles/tracks is displayed when
the resume function is off.
• "PbC" is displayed instead of the track number when
PBC (Playback Control) is on.
u C (chapter) indicator
Lights up while the current chapter number is displayed.
i Volume/chapter number indication
• The volume level is displayed during volume
adjustment.
• The current chapter number is displayed during
playback.
• In stop mode
- The current chapter number is displayed when the
resume function is on.
- No indication when the resume function is off.
10 ENGLISH
• The elapsed time or remaining time of the current track
is displayed during playback.
• In stop mode
- The elapsed time or remaining time of the current
track is displayed when the resume function is on.
- No indication when the resume function is off.
• No indication when PBC (Playback Control) is on.
• The elapsed time or remaining time of the current track/
disc is displayed during playback.
• The total play time of the disc is displayed in stop mode.
• The elapsed time or remaining time of the current track
is displayed during playback.
• No indication in stop mode.
Before making connections
• Connect the AC cords of the system, TV and any
external equipment last, after all other connections
are finished.
• The picture may be distorted when the subwoofer is
placed near the TV set. In this case, place the subwoofer
apart from the TV set.
Insert the speaker cords firmly into the speaker
terminals.
Loose connection may cause the system's safety device
to be activated so that the power is turned off automatically
to prevent short circuit. If the power is turned off by activation
of the safety device, unplug the AC power cord and reinsert
the speaker cords firmly. Then, plug the AC power cord
again.
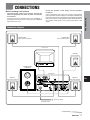
Connection diagram
PREPARATIONS
CONNECTIONS
SURROUND L
(left surround speaker)
SURROUND R
(right surround speaker)
The TV set
CENTER
(center speaker)
SUB WOOFER
(subwoofer)
DVD player
FRONT R
(right front speaker)
FRONT L
(left front speaker)
Amplifier
To the AC outlet
AC power cord
CONTINUE
ENGLISH
11
En
CONNECTIONS (CONTINUED)
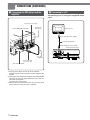
1 Connecting the DVD player and the
amplifier
2 Connecting to a TV
Connecting to a TV using the supplied video
cord
To the DC IN 6.3V jack
To the FROM AMP connector
Rear of the
DVD player
Rear of the TV
To the video input jack (yellow)
Video cord (supplied)
To the VIDEO OUT jack (yellow)
Rear of the DVD player
DC cord
(supplied)
To the DVD jack
(DC 6.3V 1.5A)
Rear of the amplifier
1 Place the DVD player on the top of the amplifier.
Alternatively, place the DVD player and the amplifier side
by side.
2 Connect the flat cable of the amplifier to the FROM AMP
connector on the DVD player holding the plug with the
cable side facing down.
The plug clicks into position.
3 Connect the DC cord to the DC IN 6.3V jack on the DVD
player and to the DVD jack on the amplifier.
12 ENGLISH
Set the setup menu correctly after connecting
a TV
For the best possible picture clarity, it is recommended that
an S (separate) video cord (not supplied) be used when
connecting the DVD player to a TV equipped with an Svideo input connector.
Set the "TV Aspect" of the setup menu according to the TV
connected to the system as follows (see "CHANGING
SETUP VALUES" on page 41 for details):
TV Aspect:
When the TV has a conventional 4:3 aspect ratio screen:
4:3 LETTER BOX or 4:3 PAN & SCAN
When the TV has a wide screen:
16:9 WIDE
Rear of the TV
PREPARATIONS
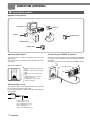
Connecting to a TV with an S-video input
connector
NOTE
If picture noise appears while copy-protected DVDs are
played, connect the system directly to a TV. Do not connect
through a VCR, TV/VCR or AV selector.
To the S-video input connector
S-video cord (not supplied)
To the S-VIDEO connector
Rear of the DVD player
En
CONTINUE
ENGLISH
13
CONNECTIONS (CONTINUED)
3 Connecting the speakers
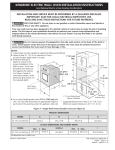
Speaker arrangement
CENTER
FRONT R
FRONT L
SURROUND R
SUB WOOFER
SURROUND L
About speaker labels
Connecting the FRONT R speaker
The five speakers except the subwoofer have the same
appearance.
You can identify each speaker by the colored label on the
rear panel.
Connect the right front speaker to the FRONT SPEAKERS
R terminals on the amplifier using the speaker cord with
red tapes.
The speaker cords with white stripes go to the 0 terminals.
Rear of the speaker
To the 0 terminal
FRONT R: right front speaker, red
label
FRONT L: left front speaker, white
label
CENTER: center speaker, green
label
SURROUND R: right surround
speaker, grey label
SURROUND L: left surround
speaker, blue label
Red
Red
Red
About speaker cords
The speaker cords can be distinguished from each other
by the color of the tapes at their ends.
Use the correct speaker cord with the tape color matching
each speaker.
Red: FRONT R (4 m)
White: FRONT L (4 m)
Grey: SURROUND R (10 m)
Blue: SURROUND L (10 m)
Green: CENTER (3 m)
Purple: SUB WOOFER (5 m)
14 ENGLISH
Connect the other speakers in the same way with the right
front speaker.
Use the correct speaker cord with the tape color matching
each speaker.
Make sure that the speaker cords with white stripes go to
the 0 terminals.
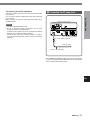
4 Connecting the AC power cord
PREPARATIONS
Connecting the other speakers
Rear of the DVD player
NOTES
• Use the supplied speakers only.
• As far as possible, install the speakers at the same
distance from the listening position.
• Install the center speaker as close as possible to midway
between the left and right front speakers.
• Install the left and right surround speakers no farther
than the left and right front speakers from the listening
position.
Rear of the amplifier
To the AC INPUT connector
To the AC outlet
AC power cord (supplied)
The POWER/6STANDBY indicator lights up red and the
system enters power-off standby mode, when the AC power
cord is connected to the AC outlet.
En
ENGLISH
15
PLAYBACK
POWER
6STANDBY/ON
2
zOPEN a
PHONES
MUTE
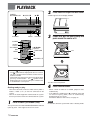
Press zOPEN to open the disc cover.
cs
"OPEN" appears on the display window.
VOLUME
3
Load a disc with the label side up and
push around the center of it.
POWER
Number
buttons
i/k/j/l
ENTER
TOP MENU/
PBC
MENU
VOLUME-/+
MUTE
About the
symbol display
• The
symbol will be displayed on the TV screen if
you press a button which cannot be used or enter an
incorrect number.
• Some DVDs may have places where they do not allow
pressing certain buttons. The
symbol will be
displayed on the TV screen if you press a button that
is not allowed in such a place.
Getting ready to play
• Turn on the television, and set its video source (Video 1,
Video 2, Video 3, etc.) to the one connected to the
system.
• Turn on the audio equipment connected to the system.
Set its input source to the one connected to the system.
1
Press POWER (6STANDBY/ON).
The system turns on and the POWER/6STANDBY indicator
lights up green. "aiwa" appears on the TV screen.
16 ENGLISH
Pivot
vRETURN
a
c
s
The disc clicks into position.
4
Close the disc cover.
• When a DVD or video CD is loaded, playback starts
automatically.
• If an audio CD is loaded, press c. Playback starts and
On-Screen Display (OSD) menu is automatically
displayed on the TV screen.
For details about the OSD menu, see page 23.
NOTE
Do not move or lift the system while a disc is rotating inside.
When the menu screen is displayed
Menu settings and the exact operating procedures for
using the menu differ depending on the disc. Follow
the instructions on each menu screen.
Use i/k/j/l or the number buttons to select the program
you want to view, then press ENTER or c to start playback.
Press TOP MENU/PBC or MENU to return to the menu
screen.
Adjusting the volume
Turn the VOLUME control on the amplifier or press
VOLUME -/+ on the remote control during playback. The
volume can be adjusted between 0 (minimum) and 40
(maximum).
During volume adjustment, the volume level is displayed
on the TV screen.
Example: When the volume level is 25
MASTER VOLUME
Use the number buttons and press ENTER to start playing
the program you want to view.
Press vRETURN or MENU to return to the menu screen.
When PBC is turned off, you can play the disc
continuously without returning to the menu screen. To
turn off PBC, see "Playing a video CD without using
Playback Control (PBC)" on page 20.
To stop playback
Press s.
To turn the power off
Press POWER (6STANDBY/ON).
The system enters power-off standby mode. "OFF" appears
on the display window.
If 20 minutes have elapsed without any operation
The system automatically enters power-off standby
mode.
BASIC OPERATIONS
The menu screen may be displayed first after loading a
DVD or video CD which contains a menu.
25
"25" is also displayed on the display window of the DVD
player.
The volume level setting is retained during power-off
standby. If the system is turned off with the volume level
set to 11 or more, it is automatically turned down to 10 the
next time the system is turned on.
To turn off the audio temporarily
Press MUTE on the amplifier or on the remote control.
The volume level becomes 0 and the MUTE indication and
the previous volume level are displayed on the TV screen.
MUTE
25
To restore the audio to the previous volume level, press
MUTE again.
Removing the disc
For private listening
1 Press s to stop play.
If a DVD or video CD without PBC has been played, press
s once again.
2 Press zOPEN to open the disc cover.
3 Wait until the rotating disc is completely stopped.
4 Pull out the disc while pressing the center pivot.
Do not touch the surface of the disc.
5 Close the disc cover.
Connect an optional headphones set with a stereo mini
plug (3.5-mm diameter) to the PHONES jack on the
amplifier.
The speaker output is turned off.
NOTE
Do not open the disc cover during playback.
CONTINUE
ENGLISH
17
En
PLAYBACK (CONTINUED)
Resuming playback
Frame advance
The system remembers the point where you stopped the
disc so that you can resume playback from that point.
Press a during pause.
Press c in stop mode.
Each time the button is pressed, the picture advances one
frame.
To clear the resume point
To return to normal playback
Press s again after you stop the disc.
"RESUME OFF" appears briefly on the TV screen and the
resume point is cleared.
Press c.
The resume point is also cleared when you open the disc
cover.
NOTES
• The disc is rotating even in stop mode while the resume
function is on.
• To resume playback from the point where you stopped,
turn off PBC first. See "Playing a video CD without using
Playback Control (PBC)" on page 20.
Still (pause)
Press a during playback.
The time counter on the display window flashes when
playing a DVD, audio CD or video CD without PBC.
To return to normal playback
Press c.
You can also press a to return to normal playback.
18 ENGLISH
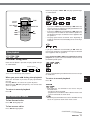
TIME
Number
buttons
TOP MENU/
PBC
ENTER
f
r
t
c
g
• If you press f while fast forwarding or g while fast
reversing a DVD or video CD, the play speed lowers one
step in the respective direction.
• If you press f while fast forwarding or g while fast
reversing a DVD or video CD at the lowest speed of ×2,
fast playback changes its direction to the opposite with
the speed ×2.
• The play speed returns to normal at the beginning or
end of the track when fast forwarding or fast reversing a
video CD.
BASIC OPERATIONS
Each time you press f or g, the play speed changes
as shown below.
If you press f while fast forwarding or g while fast
reversing an audio CD, fast playback changes its direction
to the opposite with the speed ×5.
Slow playback
Press g during pause.
If you hold down r or t on the DVD player during
playback, the system starts fast forward or fast reverse at
the following fixed speed.
Each time the button is pressed, the play speed changes
as shown below.
Normal speed
There is no audio during slow playback.
When you press f during slow playback
Each time the button is pressed, the play speed lowers
one step.
Pressing f at 1/30 causes the system to pause.
When pressing f during still (pause), fast reverse starts
at the ×2 speed.
To return to normal playback
Press c.
Fast forward/fast reverse
To fast forward a disc
There is no audio during fast forward or fast reverse except
for audio CDs.
En
To return to normal playback
Press c.
NOTES
• Slow playback, fast forward or fast reverse may be
canceled when:
- the title has been changed.
- playback has reached the end of a branch menu or the
system returned to the main menu.
• Performing fast forward or fast reverse with PBC on may
cause the system to return to the menu screen.
Press g during playback.
To fast reverse a disc
Press f during playback.
CONTINUE
ENGLISH
19
PLAYBACK (CONTINUED)
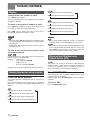
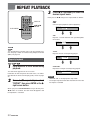
Skipping
To skip to the next chapter or track
Elapsed time of the track being played
Remaining time of the track being played
Press t during playback.
The disc position advances one chapter or track each time
the button is pressed.
Elapsed time of the track being played
To return to the previous chapter or track
Press r during playback to return to the beginning of
the chapter or track currently being played.
Press r twice in rapid succession to return to the
beginning of the previous chapter or track.
NOTES
• When you press r during playback with PBC on, you
are only returned to the beginning of the track currently
being played.
• Skipping with PBC on may cause the system to return to
the menu screen.
To skip to the desired track directly using
the number buttons
During playback or in stop mode, enter the desired track
number using the number buttons.
Example:
To play track 3,
press 3 and then ENTER.
To play track 20,
press 2, 0 and then ENTER.
Playback starts from the beginning of the selected track.
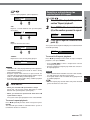
Checking the play time during playback
Press TIME during playback.
The current play time is displayed on the TV screen for 10
seconds.
Each time the button is pressed, the play time displayed
on the TV screen and on the display window changes as
follows:
Elapsed time of the title being played
Remaining time of the title being played
Elapsed time of the chapter being played
Remaining time of the chapter being played
20 ENGLISH
Remaining time of the track being played
Elapsed time of the disc being played
Remaining time of the disc being played
NOTES
• During programmed playback, "TOTAL" is displayed
instead of "DISC" in the TIME field on the TV screen.
• When PBC is turned on, "PbC" is displayed continuously
on the display window instead of play time even if you
press TIME. To turn off PBC, see "Playing a video CD
without using Playback Control (PBC)" below.
Playing a video CD without using
Playback Control (PBC)
The system can switch on and off the PBC (Playback
Control) function. When PBC is turned off, the video CD
version 2.0 is played the same as a video CD version 1.1
which does not have menu operation capabilities.
Press TOP MENU/PBC.
"PbC" disappears from the display window and the menu
playback feature is disabled.
Playback stops when TOP MENU/PBC is pressed during
playback.
To turn on PBC
Press TOP MENU/PBC again.
You can adjust sound to your taste by emphasizing low
frequencies and/or high frequencies.
1
BASS
TREBLE TONE DEFEAT
Press SOUND repeatedly.
Each time the button is pressed, the "BASS", "TREBLE" or
"TONE DEFEAT" level indication appears in turn on the TV
screen.
Select "BASS" to emphasize low frequencies or "TREBLE"
to emphasize high frequencies.
Alternatively, press BASS or TREBLE on the amplifier.
BASIC OPERATIONS
Sound adjustment
Example: "BASS" level indication
BASS
2
SOUND
VOLUME-/+
Within 4 seconds, press VOLUME
-/+.
Each time the button is pressed, the bass or treble level
increases or decreases by one step. The level can be
adjusted between 1 (no emphasis) and 7 (maximum
emphasis).
Alternatively, press BASS or TREBLE repeatedly on the
amplifier.
To cancel bass/treble emphasis temporarily
Press SOUND repeatedly to select "TONE DEFEAT", then
press VOLUME -/+ to select "ON".
Alternatively, press TONE DEFEAT on the amplifier to select
"ON".
TONE DEFEAT
ON
En
To restore the bass/treble emphasis to the previous levels,
select "TONE DEFEAT" again and "OFF" by pressing
SOUND and VOLUME -/+ on the remote control.
Alternatively, press TONE DEFEAT on the amplifier to select
"OFF".
CONTINUE
ENGLISH
21
PLAYBACK (CONTINUED)
Creating a simulated audio surround
effect
The system provides three audio surround modes that you
can select when listening to two-channel sources.
Press SURROUND repeatedly.
Each time the button is pressed, the audio surround mode
changes as follows:
HALL
STADIUM
SURROUND
LIVE
OFF
SURROUND
HALL: produces a surround effect as if you were in a concert
hall.
STADIUM: the reverberation time is much delayed to
produce an echo effect as if you were in a large stadium.
LIVE: the reverberation time is relatively short so that you
can feel as though you were in a small music hall.
OFF (no indication): turns off the audio surround effect.
NOTES
• The audio surround effect only functions when the
SURROUND L/R speakers are connected to the system.
• With some discs, the audio surround effect may not work
or may even produce an adverse acoustic effect on sound
reproduction. In this case, turn off the audio surround
effect.
22 ENGLISH
4
Number
buttons
The number buttons can also be used for entering numbers
(e.g. title number).
DISPLAY
i/k/j/l
ENTER
PLAY MODE
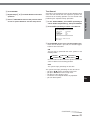
Press i/k repeatedly to select the
desired setting.
5
Press ENTER.
The new setting is confirmed.
BASIC OPERATIONS
Basic operation of the On-Screen Display (OSD) menu
vRETURN
Some menu items require further settings. In such a case
repeat steps 4 and 5.
To return to the previous menu screen
Press vRETURN or j.
To turn off the OSD menu
Press DISPLAY.
You can check the general playback status, change the
play mode or locate a desired point on the disc, etc. by
displaying and operating the OSD menu.
When playing an audio CD, the OSD menu is displayed
without pressing DISPLAY allowing you to skip step 1 below.
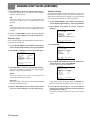
1
Press DISPLAY.
The 1st (partial) display or 2nd (full) display of the OSD
menu appears on the TV screen. b Go to step 2 if you
want to display the 2nd (full) OSD menu. Otherwise, go to
step 3.
Tip
About the PLAY MODE button
The PLAY MODE button can also be used instead of
DISPLAY to display the following OSD menu items: TITLE/
TRACK, CHAPTER, TIME, REPEAT and PROGRAM.
To display the OSD menu using the PLAY
MODE button
Press PLAY MODE, then follow steps 3 through 5 above.
If you do not press i/k within 10 seconds after pressing
PLAY MODE, the OSD menu disappears and the operation
is canceled.
To turn off the OSD menu, press PLAY MODE again.
The menu items differ depending on the disc type. See
"Example On-Screen Display (OSD) menu" on page 24.
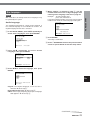
2
En
Press i/k repeatedly to move the
cursor (blue area) to the top or bottom
item of the 1st (partial) OSD menu,
then press i/k again.
The 2nd (full) display of the OSD menu appears on the TV
screen.
3
Press i/k repeatedly to select the
desired menu item, then press ENTER
or the l right cursor button.
The
symbol will be displayed if you press ENTER or the
l right cursor button at a menu item whose operation is
prohibited.
CONTINUE
ENGLISH
23
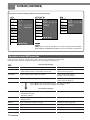
PLAYBACK (CONTINUED)
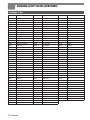
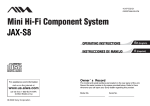
Example On-Screen Display (OSD) menu (fully displayed)
TITLE 01 / 10
CHAPTER 1 / 2
TIME TITLE 0 : 01 : 47
DolbyDigital
AUDIO 2 / 3
SUBTITLE
ANGLE
REPEAT OFF
ZOOM
MARK
TRACK 03 / 11
TIME TRACK 0 : 09 : 16
AUDIO STEREO
REPEAT OFF
PROGRAM OFF
ZOOM
MARK
TRACK 01 / 10
TIME TRACK 0 : 01 : 58
AUDIO STEREO
REPEAT OFF
PROGRAM OFF
NOTE
When playing a video CD with PBC on, the status/setting fields of the TRACK,
TIME, REPEAT, PROGRAM and MARK menu items are blank (no indication).
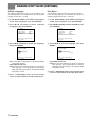
Description of each OSD menu item
Each menu item shows its current status/setting, which can be changed in the OSD menu.
For details of the functions or optional settings, refer to the pages in parentheses.
First (partial) display
Menu item
Status/setting
Function
TITLE
• Title number/total number of titles
• Total number of titles in stop mode (resume off)
Skip to the desired title.
(Title search on page 26)
CHAPTER
Chapter number/total number of chapters
Skip to the desired chapter.
(Chapter search on page 27)
TIME
Elapsed time or remaining time of title/chapter
Skip to the desired time point.
(Time search on page 27)
Press i when the cursor (blue area) is at the top item "TITLE".
Press k when the cursor is at the bottom item "TIME".
Second (full) display
AUDIO
• Audio track number/total number of audio tracks
• Soundtrack language
• Encoding method
Change the audio track. (page 35)
SUBTITLE
• Subtitle language
• Subtitle on/off
Change the settings. (page 36)
ANGLE
Angle number/total number of angles
Change the angle. (page 34)
REPEAT
Repeat play mode
Start repeat playback. (page 32)
ZOOM
—
Turn on/off the zoom function. (page 34)
MARK
Mark entry
Store/search mark points. (page 28)
24 ENGLISH
First (partial) display
Status/setting
Function
TRACK *
• Track number/total number of tracks
• Total number of tracks in stop mode (resume off)
Skip to the desired track.
(Track search on page 26)
TIME *
Elapsed time or remaining time of track
Skip to the desired time point within a
track. (Time search on page 27)
BASIC OPERATIONS
Menu item
Press i when the cursor (blue area) is at the top item "TRACK".
Press k when the cursor is at the bottom item "TIME".
Second (full) display
AUDIO
Audio channel number/total number of audio channels
Change the audio channel. (page 35)
REPEAT *
Repeat play mode
Start repeat playback. (page 32)
PROGRAM *
Program or random play mode
• Edit program.
• Start random or programmed playback.
(pages 29, 30)
ZOOM
—
Turn on/off the zoom function. (page 34)
MARK *
Mark entry
Store/search marked points. (page 28)
* No indication for the status/setting field and the function for the menu item is always disabled with video CDs version 2.0
with PBC on.
First (partial) display
Menu item
Status/setting
Function
TRACK
• Track number/total number of tracks
• Total number of tracks in stop mode
Skip to the desired track.
(Track search on page 26)
TIME
• Elapsed time or remaining time of disc/track
• Total play time of disc in stop mode
Skip to the desired time point.
(Time search on page 27)
Press i when the cursor (blue area) is at the top item "TRACK".
Press k when the cursor is at the bottom item "TIME".
Second (full) display
En
AUDIO
"STEREO" indication
—
REPEAT
Repeat play mode
Start repeat playback. (page 32)
PROGRAM
Program or random play mode
• Edit program.
• Start random or programmed playback.
(pages 29, 30)
ENGLISH
25
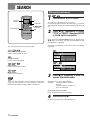
SEARCH
Title search/track search
Number
buttons
C
DISPLAY
PLAY MODE
i/k/j/l
ENTER
c
1
Press DISPLAY or PLAY MODE.
The OSD menu appears on the TV screen.
For details on how to operate the OSD menu, see "Basic
operation of the On-Screen Display (OSD) menu" on page
23.
2
Press i /k repeatedly to select
"TITLE" or "TRACK", then press ENTER
or the l right cursor button.
When you pressed PLAY MODE and if you do not press
i/k within 10 seconds, the OSD menu disappears and
the operation is canceled.
The system provides four search functions.
The cursor (yellow area) is now at the title/track number
input field.
Title search/Track search
TITLE 0 / 2
CHAPTER 1 / 8
TIME TITLE
Locates a desired title or track.
Chapter search
Locates a desired chapter.
0 : 03 : 39
TRACK 00 / 10
TIME TRACK 0 : 50 : 18
Time search
Locates a desired time point.
Mark search
Locates a marked point.
NOTE
The track, time and mark search functions do not work
unless you turn off PBC first. See "Playing a video CD
without using Playback Control (PBC)" on page 20.
3
Press i/k repeatedly to enter the
desired title/track number.
Alternatively, use the number buttons.
Example:
To enter title/track number 2,
press 2.
To enter title/track number 12,
press 1 and then 2.
If you enter a wrong number
Press C and enter the correct number.
4
Press ENTER or c.
Playback starts from the selected title/track.
26 ENGLISH
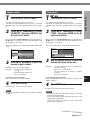
1
Press DISPLAY or PLAY MODE.
Time search
1
Press DISPLAY or PLAY MODE .
The OSD menu appears on the TV screen.
For details on how to operate the OSD menu, see "Basic
operation of the On-Screen Display (OSD) menu" on page
23.
The OSD menu appears on the TV screen.
For details on how to operate the OSD menu, see "Basic
operation of the On-Screen Display (OSD) menu" on page
23.
2
2
Press i /k repeatedly to select
"CHAPTER", then press ENTER or the
l right cursor button.
Press i /k repeatedly to select
"TIME", then press ENTER or the l
right cursor button.
When you pressed PLAY MODE and if you do not press
i/k within 10 seconds, the OSD menu disappears and
the operation is canceled.
When you pressed PLAY MODE and if you do not press
i/k within 10 seconds, the OSD menu disappears and
the operation is canceled.
The cursor (yellow area) is now at the chapter number input
field.
The cursor (yellow area) is now at the time input field.
TITLE 00 / 10
CHAPTER 1 / 2
TIME
0 : 00 : 00
TITLE 1 / 2
CHAPTER 00 / 16
TIME TITLE 0 : 28 : 15
3
Press i/k repeatedly to enter the
desired chapter number.
3
Use the number buttons to enter the
desired time point on the disc.
Example:
Alternatively, use the number buttons.
Example:
To enter chapter number 2,
press 2.
To enter chapter number 12,
press 1 and then 2.
If you enter a wrong number
Press C and enter the correct number.
4
Press ENTER or c.
Playback starts from the selected chapter.
To start playback at 1 hour, 17 minutes, 30
seconds (1:17:30),
press 1, 1, 7, 3 and then 0.
To start playback at 8 minutes 7 seconds
(0:08:07),
press 8, 0 and then 7.
If you entered wrong numbers
Press C repeatedly to cancel the numbers. Then enter the
correct numbers.
4
Press ENTER or c.
Playback starts from the specified time point.
NOTE
Chapter search does not work on DVDs with no chapters
recorded.
MORE FEATURES
Chapter search
NOTES
• Time search does not work if you specify a time longer
than the length of the disc.
• Time search may not work with some discs even if the
elapsed time is displayed.
• Time search works only within the same track while
playing back a video CD.
CONTINUE
ENGLISH
27
En
SEARCH (CONTINUED)
To start playback from a desired marked
point
Mark search
Up to five points can be stored as marked points for a disc
and you can specify a desired marked point to start
playback.
1
Press DISPLAY during playback.
The OSD menu appears on the TV screen.
For details on how to operate the OSD menu, see "Basic
operation of the On-Screen Display (OSD) menu" on page
23.
2
Press i /k repeatedly to select
"MARK", then press ENTER or the l
right cursor button.
The cursor (yellow area) is now at the first " " of the mark
entry field.
MARK
––––––
3
Press ENTER at a desired point.
Each time a point is marked, " " changes to a mark number
"1" to "5".
4
Press the l right cursor button.
The cursor (yellow area) moves to the next " ".
5
Repeat steps 3 and 4 to mark other
points.
MARK
1 2 3
TITLE1 TIME 0 : 02 : 35
28 ENGLISH
In the mark entry field, press j/l repeatedly or use the
number buttons (1 - 5) to select a desired marked point,
then press ENTER or c.
To clear a marked point
In the mark entry field, press j/l repeatedly or use the
number buttons (1 - 5) to select the marked point you want
to clear, then press C.
NOTES
• During programmed playback, the mark search function
does not work.
• With some discs, playback may not start from the
specified marked point.
RANDOM PLAYBACK
DISPLAY
i/k/j/l
ENTER
PLAY MODE
c
Press DISPLAY or PLAY MODE.
The OSD menu appears on the TV screen.
For details on how to operate the OSD menu, see "Basic
operation of the On-Screen Display (OSD) menu" on page
23.
2
Press i /k repeatedly to select
"PROGRAM", then press ENTER or the
l right cursor button.
MORE FEATURES
1
When you pressed PLAY MODE and if you do not press
i/k within 10 seconds, the OSD menu disappears and
the operation is canceled.
3
Press i /k repeatedly to select
"RANDOM", then press c or ENTER.
The system starts playing the tracks in random order.
To cancel random playback
In step 3, press i/k repeatedly to select "OFF", then press
ENTER.
NOTE
This function does not work unless you turn off PBC first.
See "Playing a video CD without using Playback Control
(PBC)" on page 20.
En
ENGLISH
29
PROGRAMMED PLAYBACK
i /k repeatedly to select
3 Press
"PROGRAM", then press ENTER.
Number
buttons
C
The program list menu appears on TV screen.
If there already exists a program, pressing ENTER starts
playback of the program.
DISPLAY
PLAY MODE
r
t
i/k/j/l
ENTER
c
Program Playback
SELECT TRACK Program List
q
i Next
000 / 010
k Prev
w
e
TRACK 0:00
-------------
TOTAL 00
ENTER : Memory
C : Clear
You can select up to 99 tracks from a disc and play them in
the programmed order.
The program is retained until the disc is removed or the
system is turned off.
NOTE
This function does not work unless you turn off PBC first.
See "Playing a video CD without using Playback Control
(PBC)" on page 20.
Programming tracks
1
Press DISPLAY or PLAY MODE in stop
mode.
The OSD menu appears on the TV screen.
For details on how to operate the OSD menu, see "Basic
operation of the On-Screen Display (OSD) menu" on page
23.
2
Press i /k repeatedly to select
"PROGRAM", then press ENTER or the
l right cursor button.
When you pressed PLAY MODE and if you do not press
i/k within 10 seconds, the OSD menu disappears and
the operation is canceled.
30 ENGLISH
-------------
1/1
-------------
-------------
-------------
TIME 0:00:00
l : PLAY
RETURN : EXIT
r
t
y
u
q Track number input field
w Total number of tracks on the disc
e Play time of the track
r Page number/total number of pages of the program list
t Program list area
y Total play time of the program
u Total number of tracks on the program list
4
Press i/k repeatedly to select a
desired track number.
Alternatively, use the number buttons.
Example:
To enter track number 2,
press 0 and then 2.
To enter track number 12,
press 1 and then 2.
5
Press ENTER.
The selected track number is entered in the program list.
Repeat steps 4 and 5 to program other
tracks.
The program list can contain a total of 99 tracks on 4 pages.
Press r/t to go to the previous or next page.
OSD on the TV screen
Display window of the system
q
w
Program Playback
SELECT TRACK Program List
i Next j 002
--012 / 015
--k Prev
------TRACK 3:12
012
-----------
TOTAL 32
ENTER : Memory
C : Clear
Modifying the program
1
Follow the procedure of steps 1 and 2
in "Programming tracks" on page 30.
2
Press i /k repeatedly to select
"EDIT", then press ENTER.
2/2
-------------
-------------
-------------
TIME 3:16:32
l : PLAY
RETURN : EXIT
The program list menu appears on the TV screen.
e
q Scroll mark indicating there is a previous page
w Total number of tracks on the program list
e Track number currently selected
3
Edit the program as required.
To add a track to the program list
You can repeat playing a track or all tracks in the program.
For details, see "Repeat playback" on page 32.
1 Press i/k repeatedly or use the number buttons to
select a desired track.
For how to enter a track number using the number
buttons, see step 4 in the previous page.
2 On the program list, press j/l to position the cursor
where you want to add the track.
3 Press ENTER.
The track is added to the program list. All the subsequent
tracks including the one at which you positioned the
cursor are shifted back by one position.
To cancel programmed playback
To delete a track from the program list
In step 3, press i/k repeatedly to select "OFF", then press
ENTER.
On the program list, press j/l repeatedly to select an
unwanted track, then press C.
The selected track is deleted. All the subsequent tracks
are shifted forward by one position.
7
Press c.
Playback starts in the programmed order.
MORE FEATURES
6
Clearing the entire program
1
Follow the procedure of steps 1 and 2
in "Programming tracks" on page 30.
2
Press i/k repeatedly to select "ALL
CLEAR", then press ENTER.
The program is cleared.
NOTE
"ALL CLEAR" is not displayed when there is no program.
ENGLISH
31
En
REPEAT PLAYBACK
3
Press i/k repeatedly to select the
desired repeat mode.
Each press of i/k changes the repeat mode as follows.
DISPLAY
i/k/j/l
ENTER
OFF:
Cancels repeat playback (normal playback).
REPEAT
PLAY MODE
OFF
A-B:
Repeats a section between two specified points
on the disc.
REPEAT
A–B
NOTE
This function does not work unless you turn off PBC first.
See "Playing a video CD without using Playback Control
(PBC)" on page 20.
TITLE:
Repeats the title currently being played.
REPEAT
TITLE
Repeat playback
1
Press DISPLAY or PLAY MODE during
playback.
The OSD menu appears on the TV screen.
For details on how to operate the OSD menu, see "Basic
operation of the On-Screen Display (OSD) menu" on page
23.
2
Press i /k repeatedly to select
"REPEAT", then press ENTER or the l
right cursor button.
When you pressed PLAY MODE and if you do not press
i/k within 10 seconds, the OSD menu disappears and
the operation is canceled.
32 ENGLISH
CHAPTER:
Repeats the chapter currently being played.
REPEAT
CHAPTER
NOTES
• "REPEAT A-B" is not displayed in stop mode.
• The chapter repeat function does not work on DVDs with
no chapters recorded.
REPEAT
OFF
A-B:
Repeats a section between two specified points
on the disc.
REPEAT
Repeating a section between two
specified points (A-B repeat)
1
Select "A-B" in step 3 of the previous
section "Repeat playback".
2
Press ENTER at the desired start point
(A) of the section you want to repeat.
A–B
REPEAT
DISC:
Repeats all tracks on the disc.
REPEAT
DISC
3
The system returns to point A and plays the section between
A and B repeatedly.
A–B
TRACK:
To cancel A-B repeat playback
Repeats the track currently being played.
Press i/k repeatedly to select "OFF" in step 3 of "Repeat
playback", then press ENTER.
TRACK
NOTES
• "REPEAT A-B" is only displayed during normal playback.
• "PROGRAM" is displayed instead of "DISC" during
programmed playback.
• Program repeat mode and track repeat mode are
selectable during programmed playback; and disc repeat
mode is selectable during random playback.
• Activating track repeat mode during random playback
turns off random play mode.
4
A–
Press ENTER again at the desired end
point (B).
REPEAT
REPEAT
MORE FEATURES
OFF:
Cancels repeat playback (normal playback).
Press ENTER.
• Pressing r/t to select a chapter/track cancels
A-B repeat playback.
• Entering random or program play mode also cancels AB repeat playback.
NOTES
• If the section between A and B is less than a few seconds,
the A-B repeat play function may not work.
• A-B repeat mode is not selectable during programmed
or random playback.
• The A-B repeat play function works only when A and B
points fall within the same track.
• When you selected A-B repeat mode in step 3
Go to step 2 of the next section "Repeating a section
between two specified points (A-B repeat)".
• When you selected a repeat mode other than A-B
repeat mode in step 3
The system starts repeat playback in the selected mode.
To cancel repeat playback
Press i/k repeatedly to select "OFF" in step 3, then press
ENTER.
The selected repeat mode is retained until the system is
turned off or the disc is removed.
ENGLISH
33
En
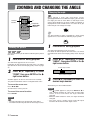
ZOOMING AND CHANGING THE ANGLE
Changing the angle
Number
buttons
C
DISPLAY
i/k/j/l
ENTER
When playing a DVD with multi-angle scenes
(photographed from several different angles), you can select
the angle you want to view. When a multi-angle scene
comes during playback, the angle symbol (see below) is
displayed for a few seconds on the TV screen to let you
know that you can change the angle.
Tip
The total number of angles recorded on a DVD usually
appears on its case within the following angle symbol.
3
Zooming the picture
1
Press DISPLAY during playback.
This function allows you to zoom in and enlarge the picture
to 4 times.
The OSD menu appears on the TV screen.
For details on how to operate the OSD menu, see "Basic
operation of the On-Screen Display (OSD) menu" on page
23.
1
2
Press DISPLAY during playback.
The OSD menu appears on the TV screen.
For details on how to operate the OSD menu, see "Basic
operation of the On-Screen Display (OSD) menu" on page
23.
2
Press i /k repeatedly to select
"ANGLE", then press ENTER or the l
right cursor button.
Current angle number
ANGLE
Press i /k repeatedly to select
"ZOOM", then press ENTER or the l
right cursor button.
2/3
Total number of angles
"ZOOM" appears on the TV screen for a few seconds.
The picture around the center is enlarged to four times.
3
To move the zoom area
Alternatively, use the number buttons.
Press i/k/j/l.
To return to the center, press C.
To cancel the zoom function
Press ENTER.
NOTES
• The zoom function may not work with some DVDs.
• The zoom function may not work on multi-angle scenes.
34 ENGLISH
Press i/k repeatedly to select the
desired angle number.
NOTES
• The
symbol appears if you press ENTER or l in
step 2 during playback of a disc with no multi-angle
scenes, or at a scene where the angle cannot be
changed.
• While the zoom function is active, the angle cannot be
changed.
• The mark search, chapter repeat and A-B repeat
functions do not work on multi-angle scenes.
channel.
Number
buttons
DISPLAY
You can also use the number buttons to select an audio
track number.
i/k/j/l
ENTER
Audio track number/total
number of audio tracks
AUDIO
DolbyDigital
2 / 2 JA
MORE FEATURES
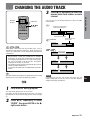
CHANGING THE AUDIO TRACK
i/k repeatedly to select the
3 Press
desired audio track number or audio
Soundtrack language
Recording format
or disc type
KARAOKE
Some discs have more than one audio track, such as
soundtracks with different languages. While playing such
a disc, the audio track can be changed to play different
soundtracks.
• When playing a DVD with soundtracks in multiple
languages, the audio will automatically be played in
the language designated in the setup menu (page
43). If that language is not on the disc, the original
language for the disc is selected.
• The audio track may only be changed with discs which
contain multiple audio tracks.
• The number of audio tracks available differs from disc
to disc.
AUDIO
1/3
AUDIO
STEREO
AUDIO
L
AUDIO
R
KARAOKE
Tip
The total number of soundtracks recorded on a DVD usually
appears on its case within the following symbol.
3
1
NOTE
Depending on the disc, the system may play only the
original language for the disc even if the disc contains
multiple-language soundtracks.
Press DISPLAY during playback.
The OSD menu appears on the TV screen.
For details on how to operate the OSD menu, see "Basic
operation of the On-Screen Display (OSD) menu" on page
23.
2
Press i /k repeatedly to select
"AUDIO", then press ENTER or the l
right cursor button.
ENGLISH
35
En
DISPLAYING AND CHANGING SUBTITLES
1 Press DISPLAY during playback.
Number
buttons
DISPLAY
i/k/j/l
ENTER
The OSD menu appears on the TV screen.
For details on how to operate the OSD menu, see "Basic
operation of the On-Screen Display (OSD) menu" on page
23.
2
Press i /k repeatedly to select
"SUBTITLE", then press ENTER or the
l right cursor button.
Subtitle number/total number of subtitle sets
SUBTITLE 1 / 2 JA OFF
Subtitle language
When playing DVDs which contain subtitles, you can turn
on and off the subtitle display on the TV screen and change
the subtitle language.
• The subtitle is displayed in the language designated
in the setup menu (page 44). If that language is not
on the disc, the original language for the disc is
selected.
• The subtitle language may only be changed with discs
which contain more than one set of subtitles.
• The number of subtitle languages differs depending
on the disc.
3
Press i/k repeatedly to select the
desired subtitle number.
Alternatively, use the number buttons.
4
5
Press the l right cursor button.
Press i /k to turn on or off the
subtitle display.
SUBTITLE 2 / 2 EN ON
Tip
The total number of subtitle languages recorded on a DVD
usually appears on its case within the following symbol.
2
36 ENGLISH
NOTE
Depending on the disc, the system may display only the
subtitles in the language designated for the disc even if the
disc contains more than one set of subtitles.
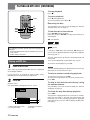
PLAYING AN MP3 DISC
Notes on MP3 discs
An MP3 file stores audio data compressed using MPEG
1/2, the audio layer-3 file-coding scheme.
In this manual, we refer to what, in PC terminology, are
called "folders" and "files" as "albums" and "tracks"
respectively.
Notes on playing MP3 discs
• An MP3 track must be recorded on a disc in the format
compliant with ISO 9660. Note however, that the system
may not play tracks in the order they were recorded.
• The maximum allowable number of tracks and/or albums
in a disc is 255, including the root albums (directory).
• The maximum allowable depth of a nested folder is 8,
including tracks. Note that since the maximum path length
is 128 characters long, the total number of characters
including slashes, hyphens and underscores from the
root album name to the track name must be less than
128.
• If a disc contains audio tracks and MP3 tracks, the system
can only play audio tracks.
• The system may not play multi-session discs correctly.
• The system can play only MP3 tracks which were
converted with a sampling frequency of 44.1 kHz and a
fixed or variable bit rate.
• The system may not play MP3 tracks recorded using a
packet writing utility.
• The system can play only MP3 tracks having the file
extension ".mp3".
• It may take 30 seconds or more before the system can
start playback of MP3 tracks, depending on the number
of recorded tracks and the complexity of the album tree.
• If you play a non-MP3 track that has the ".mp3" file
extension, you may hear some noise.
Notes on display indications during playback
• Up to 30 characters are displayed for the name of an
album and up to 30 characters for the name of track.
• Characters other than letters ("A" to "Z" and "a" to "z"),
numerals ("0" to "9"), hyphen (-) and underscore (_) may
not be displayed, or may be displayed as different
characters.
• The system does not support ID3TAG.
• The elapsed play time may not be displayed correctly for
MP3 tracks.
Notes on creating MP3 discs
• When converting audio data to MP3
Creating MP3 files with a sampling frequency of 44.1
kHz and a fixed bit rate of 128 kbps is recommended.
• When creating MP3 discs
Do not store more than 255 albums and/or tracks in a
disc.
• To play tracks in the order they were recorded
1. Use writing software capable of recording MP3 tracks
(files) in numerical and alphabetical order. For details,
refer to the operating instructions supplied with the
software.
2. Use only one album. (Do not create a sub-album within
an album.)
3. Include a two or three-digit number at the beginning
of each album or track name which complies with ISO
9660 Level 2 or the Windows JOLIET format so that
the albums and tracks are played in order.
<Example of recommended name structure>
01XXXXX.mp3
02XXXXX.mp3
03XXXXX.mp3
04XXXXX.mp3
05XXXXX.mp3
<Avoid using the following structure>
1XXXXX.mp3
5XXXXX.mp3
10XXXXX.mp3
15XXXXX.mp3
20XXXXX.mp3
(The beginning numbers determine the order, therefore
the tracks shown above will be played in the wrong
order, i.e., "1", "10", "15", "20", and "5".)
MORE FEATURES
The system can play MP3 audio recorded on CD-ROM,
CD-R or CD-RW discs.
Before playing an MP3 disc, read the following notes.
Glossary
File extension:
A 3-character string added to a file name under the
Windows or DOS environment is called a "file extension".
The file extension is used mainly to identify types of files.
The file extension for MP3 files is ".mp3".
En
ISO 9660:
ISO stands for the "International Organization for
Standardization". ISO 9660 determines the file structure
for the CD-ROMs. This system can play MP3 files recorded
in the format compliant with ISO 9660.
Nesting of folders (albums):
To organize data files stored in a PC, you can store related
files in a folder. A folder can contain other folders as well
as files. For example, folder A can contain folder B, and
folder B can contain folder C; this is called "nesting of
folders".
Session:
A session is one uninterrupted section of written data on a
disc.
A multi-session disc is a disc which has two or more
sessions.
CONTINUE
ENGLISH
37
PLAYING AN MP3 DISC (CONTINUED)
To stop playback
Press s.
To pause playback
TIME
Press a during playback.
To resume playback, press c or a.
Removing the disc
The procedure is the same as that for audio CDs. Refer to
"Removing the disc" on page 17.
a
g
c
s
f
r
t
To fast forward or fast reverse
Press f/g during playback.
Each time you press f/g, the play speed changes as
shown below.
g: fast forward
f: fast reverse
The following functions do not work when playing an
MP3 disc.
• Sound reproduction during fast forward or fast reverse
• Time search
• Audio channel selection
(fixed)
If you press f during fast forward or g during fast
reverse, the fast playback direction changes to the opposite
with the speed ×2.
The play speed returns to normal at the beginning or end
of the track.
There is no audio during fast forward or fast reverse.
Playing an MP3 disc
To return to normal playback, press c.
1
Load an MP3 disc.
NOTE
"MP3" lights up and the total number of tracks is displayed
on the display window.
It may take over 30 seconds to read the MP3 tracks
depending on the complexity of the album tree.
2
Press c.
The time displayed during fast forward or fast reverse may
differ from the actual time on the disc.
To skip to another track during playback
To skip to the next track, press t.
To return to the beginning of the current or previous track,
press r.
To skip to the desired track directly using
the number buttons
Playback starts.
Disc information is displayed on the TV screen.
The procedure is the same as that for audio CDs. Refer to
"Skipping" on page 20.
TRACK 001 / 160
TIME TRACK 0 : 00 : 10
To check the play time during playback
q
e
ALBUM ABCD_EFG
TRACK 001_ABC
Sampling Rate 44.1 kHz
Bit Rate 128 kbps
q Album (directory) name
w Track (file) name
38 ENGLISH
w
r
e Sampling frequency
r Bit rate
Press TIME.
The play time is displayed on the TV screen for 10 seconds.
Each time the button is pressed, the elapsed time and
remaining time of the track being played are displayed
alternately on the TV screen and the display window of the
DVD player.
You can check the general playback status, change the play mode or locate a desired track by displaying and operating the
OSD menu.
For details on how to operate the OSD menu, see "Basic operation of the On-Screen Display (OSD) menu" on page 23.
Description of each OSD menu item for the MP3 disc
First (partial) display
Menu item
Status/setting
Function
TRACK
• Track number/total number of tracks
• Total number of tracks in stop mode
Skip to the desired track.
TIME
Elapsed time or remaining time of track
—
MORE FEATURES
On-Screen Display (OSD) menu for the MP3 disc
Press i when the cursor (blue area) is at the top item "TRACK".
Press k when the cursor is at the bottom item "TIME".
Second (full) display
REPEAT
Repeat play mode
Start repeat playback.
PROGRAM
Program or random play mode
• Edit program.
• Start random or programmed playback.
Various MP3 disc operations
Track search
You can specify a desired track to start playback.
The procedure is the same as that for audio CDs. Refer to
"Title search/track search" on page 26.
Programmed playback
You can select up to 99 tracks from a disc and play them in
the programmed order.
For the procedure, refer to "PROGRAMMED PLAYBACK"
on page 30.
Random playback
The procedure is the same as that for audio CDs. Refer to
"RANDOM PLAYBACK" on page 29.
Repeat playback
The procedure is the same as that for audio CDs. Refer to
"Repeat playback" on page 32 and "Repeating a section
between two specified points (A-B repeat)" on page 33.
NOTE
The A-B repeat play function works only when A and B
points fall within the same track.
En
Note, however, that in step 4 when you use the number
buttons to select a track, input the track number as follows:
Example:
To enter track number 12,
press 0, 1 and 2.
To enter track number 156,
press 1, 5 and 6.
The directory (album) name and file (track) name are also
displayed in the program list menu.
NOTE
The total play time of the program displayed in the program
list menu may differ from the actual play time.
ENGLISH
39
CONNECTING EXTERNAL AUDIO EQUIPMENT
The DIGITAL OUT (OPTICAL) jack and the AUDIO OUT
L/R jacks on the DVD player can be used to connect external
audio equipment.
Before making connections
• Connect the AC power cords of the system and any
external equipment last, after finishing all other
connections.
• Refer to the instructions of the connected equipment.
Making a connection with an optical cord
Use an optical cord (not supplied) when connecting the
system to audio equipment with an optical digital input jack.
Insert the plug of the optical cord into the DIGITAL OUT
(OPTICAL) jack of the DVD player as shown below.
The shutter flips inside.
Connecting audio equipment with an
optical digital input jack
CAUTION
When connecting an AV receiver not equipped with Dolby
Digital decoder or DTS decoder using an optical cord, DO
NOT set "Digital Stream" to "DOLBY DIGITAL" and "dts
Output" to "ON" in the "Audio Output Setting" procedure
of the setup menu.
Otherwise, merely attempting to play a disc may cause a
screeching noise that could be harmful to your ears and
damage the speakers.
When connecting to an AV receiver equipped
with a digital input connector using an
optical cord
Depending on the audio equipment connected to the
system, the sound may be dropped or there may be some
noise at the beginning of playback or when you have
pressed f/g or r/t.
In this case, reconnect the audio equipment to the AUDIO
OUT L/R jacks of the DVD player using an audio cord (not
supplied).
Connecting audio equipment with
analog input jacks
Rear of the DVD player
Red
To the AUDIO OUT
L (white)/R (red) jacks
White
To the DIGITAL OUT (OPTICAL) jack
Audio cord (not supplied)
To analog audio
input jacks (left/white,
right/red)
Optical cord (not supplied)
To the optical digital
input jack
Audio equipment to be connected
• AV receiver
• MD recorder
• DAT, etc.
40 ENGLISH
Audio equipment to be connected
• Stereo system
• Cassette recorder, etc.
CHANGING SETUP VALUES
• Set whether the on-screen guide messages are to be
displayed or not.
• Set the on-screen menu language, English, Spanish or
French.
Number
buttons
SETUP
C
Disc Languages (page 43)
i/k/j/l
ENTER
Set the audio soundtrack language, subtitle language and
the language used in the menu screen.
vRETURN
TV Aspect (page 45)
Set the aspect ratio of the television set connected to the
system.
AS NECESSARY
On-Screen Menu (page 42)
Ratings (page 46)
When playing discs with preset restriction level encoding,
this setting allows the system to automatically cut scenes
of excessive violence, etc.
Audio Output Setting (page 47)
• Set audio output of the DVD player when an external
audio equipment is connected.
• Set individual speakers.
All the basic settings of the system are properly
preset at the factory.
• Check that "Audio Output Setting" and "TV Aspect"
in the setup menu are correctly set according to the
type of equipment connected to the system. For
details on the settings, refer to "2 Connecting to a
TV" on page 12 and "CONNECTING EXTERNAL
AUDIO EQUIPMENT" on page 40.
• Change any other settings according to your individual
setup preferences.
Basic operations in the setup menu
1
Press SETUP in stop mode.
The SETUP MENU screen is displayed on the TV screen.
SETUP MENU
Choose The Item ik
On-Screen Menu
Disc Languages
Audio Output Setting
TV Aspect
Ratings
ENTER : Choose item
2
SETUP : Completion
Press i/k repeatedly to select the
menu item to be changed, then press
ENTER.
3
Press i/k repeatedly to select the
desired setting, then press ENTER.
The new setting is confirmed.
Note that some menu items require additional steps.
For details of the setting options for each menu item, see
the procedure of each setting in the following sections.
4
Press SETUP to exit the setup menu.
To exit the setup menu without making any
changes
Press one of the following buttons instead of pressing
ENTER in step 3.
vRETURN: Returns to the previous menu screen without
any changes.
SETUP: Exits the setup menu.
If 10 minutes have elapsed without any operation, the
system exits the setup menu automatically.
NOTE
The settings of the setup menu are stored in memory when
the system’s power is turned off. Therefore, before you
unplug the AC power cord from the AC outlet, turn the power
off by pressing POWER (6STANDBY/ON).
CONTINUE
ENGLISH
41
En
CHANGING SETUP VALUES (CONTINUED)
Menu Language:
On-Screen Menu
Set the on-screen menu language, English, Spanish or
French.
Guide Message:
Set whether the on-screen guide messages at the upper
right side of the TV screen are to be displayed or not.
1 In the SETUP MENU, press i/k repeatedly to
select "On-Screen Menu", then press ENTER.
1 In the SETUP MENU, press i/k repeatedly to
select "On-Screen Menu", then press ENTER.
2 Press i /k repeatedly to select "Menu
Language", then press ENTER.
SETUP MENU
On-Screen Menu
Choose The Item ik
Choose The Item ik
On-Screen Menu
Disc Languages
Audio Output Setting
TV Aspect
Ratings
ENTER : Choose item
Guide Message
Menu Language
SETUP : Completion
2 Press i/k repeatedly to select "Guide Message".
On-Screen Menu
Choose The Item ik
ON
English
ENTER : Choose item RETURN : Previous menu
SETUP : Completion
3 Press i/k repeatedly to select the language,
then press ENTER.
Menu Language
Guide Message
Menu Language
ON
English
Choose The Item ik
English
Spanish
French
ENTER : Choose item RETURN : Previous menu
SETUP : Completion
3 Press ENTER to turn on/off the guide message.
Each time the button is pressed, the setting toggles
between "ON" and "OFF".
4 Press vRETURN to return to the previous menu
screen or press SETUP to exit the setup menu.
42 ENGLISH
ENTER : Choose item
SETUP : Completion
RETURN : Previous menu
4 Press vRETURN to return to the previous menu
screen or press SETUP to exit the setup menu.
4 When "Others" is selected in step 3, use the
number buttons to enter a 4-digit language code
referring to the language code list on page 50.
Disc Languages
NOTE
Audio Language:
To enter number 4357,
press 4, 3, 5 and then 7.
If you input a wrong number, press C to clear the 4-digit
number. Then enter the correct langage code again.
Audio Language
The soundtrack language on a DVD can be changed. If
the selected language is not available on the disc, the
original language for the disc is selected.
1 In the SETUP MENU, press i/k repeatedly to
select "Disc Languages", then press ENTER.
Choose The Item ik
Original
English
Spanish
French
Others
––––
AS NECESSARY
Example:
With some discs, the settings of the "Disc Languages" may
be ignored by the system.
Input Language Code
ENTER : Choose item RETURN : Previous menu
SETUP : Completion
SETUP MENU
Choose The Item ik
5 Press ENTER.
On-Screen Menu
Disc Languages
Audio Output Setting
TV Aspect
Ratings
ENTER : Choose item
Your entry is confirmed.
6 Press vRETURN to return to the previous menu
screen or press SETUP to exit the setup menu.
SETUP : Completion
2 Press i /k repeatedly to select "Audio
Language", then press ENTER.
Disc Languages
Choose The Item ik
Audio Language
Subtitle Language
Disc Menu
ENTER : Choose item
SETUP : Completion
Original
Auto
English
RETURN : Previous menu
3 Press i/k to select the language, then press
ENTER.
Audio Language
Choose The Item ik
Original
English
Spanish
French
Others
ENTER : Choose item
SETUP : Completion
En
RETURN : Previous menu
Original: The original language set for the disc is
selected. b Go to step 6.
English/Spanish/French: b Go to step 6.
Others: A message prompting you to input a language
code appears. b Go to step 4.
CONTINUE
ENGLISH
43
CHANGING SETUP VALUES (CONTINUED)
Subtitle Language:
Disc Menu:
The subtitle language on a DVD can be changed. If the
selected language is not available on the disc, the original
language for the disc is selected.
The language used in the DVD menu can be changed.
If the selected language is not available on the disc, the
original language for the disc is selected.
1 In the SETUP MENU, press i/k repeatedly to
select "Disc Languages", then press ENTER.
1 In the SETUP MENU, press i/k repeatedly to
select "Disc Languages", then press ENTER.
2 Press i /k repeatedly to select "Subtitle
Language", then press ENTER.
2 Press i/k repeatedly to select "Disc Menu", then
press ENTER.
Disc Languages
Disc Languages
Choose The Item ik
Audio Language
Subtitle Language
Disc Menu
ENTER : Choose item
SETUP : Completion
Choose The Item ik
Original
Auto
English
RETURN : Previous menu
3 Press i/k repeatedly to select the language,
then press ENTER.
Audio Language
Subtitle Language
Disc Menu
ENTER : Choose item
SETUP : Completion
RETURN : Previous menu
3 Press i/k to select the language, then press
ENTER.
Subtitle Language
Disc Menu
Choose The Item ik
Choose The Item ik
Auto
English
Spanish
French
Others
ENTER : Choose item
SETUP : Completion
English
Spanish
French
Others
RETURN : Previous menu
Auto: The subtitle is displayed in the original language
selected for the disc.
English/Spanish/French
Others: A message prompting you to input a language
code appears. For the procedure of entering a
language code, refer to steps 4 and 5 of the "Audio
Language" section.
4 Press v RETURN to return to the previous
screen or press SETUP to exit the setup menu.
44 ENGLISH
Original
Auto
English
4150 (EN)
ENTER : Choose item RETURN : Previous menu
SETUP : Completion
English/Spanish/French
Others: A message prompting you to input a language
code appears. For the procedure of entering a
language code, refer to steps 4 and 5 of the "Audio
Language" section.
4 Press vRETURN to return to the previous menu
screen or press SETUP to exit the setup menu.
Select the appropriate display format, depending on
whether you are using a conventional (4:3) or wide-screen
(16:9) TV.
Select this to play titles that include pan-and-scan encoding
on a conventional (4:3) TV: the picture of wide-screen titles
is displayed at full screen height with the left or right
cropped. Other titles will be played in letterbox mode.
Cut off
1 In the SETUP MENU, press i/k repeatedly to
select "TV Aspect", then press ENTER.
SETUP MENU
Choose The Item ik
On-Screen Menu
Disc Languages
Audio Output Setting
TV Aspect
Ratings
AS NECESSARY
4:3 PAN & SCAN
TV Aspect
4:3 Pan and scan
ENTER : Choose item
SETUP : Completion
3 Press ENTER.
The display returns to the SETUP MENU screen.
2 Press i/k repeatedly to select the appropriate
setting.
4 Press SETUP to exit the setup menu.
TV Aspect
Choose The Item ik
16 : 9 WIDE
4 : 3 LETTER BOX
4 : 3 PAN & SCAN
ENTER : Choose item
SETUP : Completion
RETURN : Previous menu
16:9 WIDE
Select this when a wide-screen TV is connected.
Titles recorded in wide-screen (16:9) format will be played
at full size. (Setting the wide-screen TV to full-size mode is
also necessary.)
En
16:9 Wide
4:3 LETTER BOX
Select this when a conventional TV is connected. Titles
recorded in wide-screen (16:9) format will be played in
letterbox mode, with black bands at the top and bottom of
the screen.
4:3 Letterbox
CONTINUE
ENGLISH
45
CHANGING SETUP VALUES (CONTINUED)
5 Enter a 4-digit password using the number
buttons.
Ratings
Some DVDs contain a restriction level which enables
parents to prevent children from viewing scenes of
excessive violence, etc. This system is equipped with a
password designed to prevent children from changing the
level.
6 Press ENTER.
Confirmation of Password
The Player is Locked
Remember the Password
PASSWORD
1 In the SETUP MENU, press i/k repeatedly to
select "Ratings", then press ENTER.
1234
Press ENTER button
SETUP MENU
Choose The Item ik
On-Screen Menu
Disc Languages
Audio Output Setting
TV Aspect
Ratings
ENTER : Choose item
Do not forget the password you set.
7 After confirming the password, press ENTER
again.
SETUP : Completion
2 Press i/k repeatedly to select the restriction
level, then press ENTER.
The smaller the number is, the higher the level of
restriction becomes. For instance, setting the rating level
to 1 will make it impossible to play any disc with a rating
level from 2 to 8.
8 Press SETUP to exit the setup menu.
If you forget the password
Initialize the DVD player of the system and make all settings
again including "Ratings" setting. See "How to initialize the
DVD player" on page 51.
To change the settings
Rating limit
Choose The Item ik
Level
Level
Level
Level
Level
Level
Level
Level
The password is saved.
1 In the SETUP MENU, press i/k repeatedly to
select "Ratings", then press ENTER.
8 (for Adult)
7
6
5
4
3
2
1 (for Family)
2 Input the password and press ENTER.
ENTER : Choose item RETURN : Previous menu
SETUP : Completion
3 Press i/k repeatedly to select the country.
Country Setting
Choose The Item ik
USA
Other Country
3 Press i/k repeatedly to select the item you want
to change, then press ENTER.
Unlock Player: Select this to cancel the restriction.
Change Password: Select this to cancel the password
and enter a new one.
Change Level: Select this to change the level of the
restriction.
Setting of the Country: Select this to change the
country setting.
Ratings
ENTER : Choose item RETURN : Previous menu
SETUP : Completion
Select "Other Country" if you use the system in an area
outside the United States.
Choose The Item ik
Unlock Player
Change Password
Change Level
Setting of the Country
ENTER : Choose item
SETUP : Completion
4 Press ENTER.
RETURN : Previous menu
A password entry screen is displayed.
4 Follow the instruction displayed on the
subsequent menu screen.
PASSWORD
Enter the Password
PASSWORD
––––
5 Press SETUP to exit the setup menu.
0 ~ 9 Code input
ENTER : Confirm
SETUP : Completion
46 ENGLISH
RETURN : Previous menu
Audio Output Setting
2 Press i/k repeatedly to select "Digital Stream".
Audio Output Setting
Digital Stream
dts Output
Downmix Type
Speaker Setting
Test Sound
DOLBY DIGITAL
OFF
Stereo
OFF
ENTER : Choose item RETURN : Previous menu
SETUP : Completion
3 Press ENTER to select the appropriate setting.
Each time the button is pressed, the setting toggles
between "Downmix PCM" and "DOLBY DIGITAL".
AS NECESSARY
Choose The Item ik
Set the audio output of the system according to the type of
other external audio equipment connected to the system.
• When connecting other external audio equipment to the
AUDIO OUT L/R jacks of the DVD player, you need to
set "Downmix Type" only.
• When connecting an external AV receiver not equipped
with Dolby Digital decoder or DTS decoder to the
DIGITAL OUT (OPTICAL) jack of the DVD player, you
need not make any settings.
• When playing DVDs with Dolby Digital or DTS Digital
Surround sound on an external AV receiver equipped
with Dolby Digital decoder and/or DTS decoder, set
"Digital Stream" or "dts Output" as follows:
- When playing DVDs with Dolby Digital sound
Digital Stream: DOLBY DIGITAL
- When playing DVDs with DTS Digital Surround sound
dts Output: ON
Downmix PCM
Select this option if the system is connected to an
external AV receiver which is not equipped with a Dolby
Digital decoder.
DOLBY DIGITAL
CAUTION
When connecting an external AV receiver not equipped
with Dolby Digital decoder or DTS decoder using an
optical cord, DO NOT set "Digital Stream" to "DOLBY
DIGITAL" or "dts Output" to "ON".
Otherwise, merely attempting to play a disc may cause
a screeching noise that could be harmful to your ears
and damage the speakers.
Select this option if the system is connected to an
external AV receiver which is equipped with a Dolby
Digital decoder.
4 Press vRETURN to return to the previous menu
screen or press SETUP to exit the setup menu.
dts Output:
Set the dts output according to whether the connected
external AV receiver is equipped with a DTS decoder or
not.
Digital Stream:
Select the digital audio signal to be output from the DIGITAL
OUT (OPTICAL) jack of the DVD player.
1 In the SETUP MENU, press i/k repeatedly to
select "Audio Output Setting", then press ENTER.
1 In the SETUP MENU, press i/k repeatedly to
select "Audio Output Setting", then press ENTER.
2 Press i/k repeatedly to select "dts Output".
Audio Output Setting
Choose The Item ik
SETUP MENU
Choose The Item ik
On-Screen Menu
Disc Languages
Audio Output Setting
TV Aspect
Ratings
ENTER : Choose item
SETUP : Completion
Digital Stream
dts Output
Downmix Type
Speaker Setting
Test Sound
Downmix PCM
ON
Stereo
OFF
En
ENTER : Choose item RETURN : Previous menu
SETUP : Completion
CONTINUE
ENGLISH
47
CHANGING SETUP VALUES (CONTINUED)
3 Press ENTER to select the appropriate setting.
Each time the button is pressed, the setting toggles
between "ON" and "OFF".
ON
Select this option if the system is connected to an
external AV receiver which is equipped with a DTS
decoder.
OFF
Select this option if the system is connected to an
external AV receiver which is not equipped with a DTS
decoder.
Speaker Setting:
Set the distance from the listening position to each speaker.
Based on the distance setting, the system calculates the
delay times of the respective speakers so that the sounds
from them are centered at the listening position.
1 In the SETUP MENU, press i/k repeatedly to
select "Audio Output Setting", then press ENTER.
2 Press i /k repeatedly to select "Speaker
Setting".
Audio Output Setting
Choose The Item ik
4 Press v RETURN to return to the previous
screen or press SETUP to exit the setup menu.
Digital Stream
dts Output
Downmix Type
Speaker Setting
Test Sound
DOLBY DIGITAL
ON
Stereo
OFF
Downmix Type:
Set the analog output to be output from the AUDIO OUT L/
R jacks of the DVD player.
1 In the SETUP MENU, press i/k repeatedly to
select "Audio Output Setting", then press ENTER.
2 Press i/k repeatedly to select "Downmix Type".
Audio Output Setting
Choose The Item ik
Digital Stream
dts Output
Downmix Type
Speaker Setting
Test Sound
DOLBY DIGITAL
ON
Stereo
ENTER : Choose item RETURN : Previous menu
SETUP : Completion
3 Press ENTER.
Speaker Setting
Choose The Item ik
Front
L
Front
R
Center
Surround L
Surround R
Reset of setting
5.0 m
5.0 m
5.0 m
5.0 m
5.0 m
ENTER : Choose item RETURN : Previous menu
SETUP : Completion
OFF
ENTER : Choose item RETURN : Previous menu
SETUP : Completion
4 Press i/k repeatedly to select the speaker to
set the distance, then press ENTER.
Example: When selecting "FRONT L"
3 Press ENTER to select the appropriate setting.
Each time the button is pressed, the setting toggles
between "Stereo" and "Surround".
Stereo
Select this option if the system is connected to a
conventional audio stereo system.
Speaker Setting
ik Number UP/DOWN
Front
L
Front
R
Center
Surround L
Surround R
Reset of setting
ENTER : Confirm
SETUP : Completion
5.0 m
5.0 m
5.0 m
5.0 m
5.0 m
RETURN : Previous menu
Surround
Select this option if the system is connected to a Dolby
Pro Logic Surround system.
If you select "Reset of setting" and press ENTER, the
distance settings for all speakers are reset to "5.0 m".
4 Press vRETURN to return to the previous menu
screen or press SETUP to exit the setup menu.
5 Press i /k repeatedly to set the distance
between the listening position and the speaker
you selected in step 4.
The distance can be set from 0.6 m to 10.0 m in units of
0.2 m.
48 ENGLISH
Test Sound:
7 Repeat steps 4 to 6 to set the distances for other
speakers.
A test tone is generated from each speaker allowing you to
check that the sounds from the respective speakers are
centered at the listening position. Use this function after
performing the "Speaker Setting" procedure.
8 Press vRETURN to return to the previous menu
screen or press SETUP to exit the setup menu.
1 In the SETUP MENU, press i/k repeatedly to
select "Audio Output Setting", then press ENTER.
2 Press i/k repeatedly to select "Test Sound".
Audio Output Setting
Choose The Item ik
Digital Stream
dts Output
Downmix Type
Speaker Setting
Test Sound
AS NECESSARY
6 Press ENTER.
DOLBY DIGITAL
ON
Stereo
OFF
ENTER : Choose item RETURN : Previous menu
SETUP : Completion
3 Press ENTER to turn on or off the speaker test.
Each time the button is pressed, the selection toggles
between "ON" and "OFF".
ON
The test tone is generated from each speaker in the
following order:
FRONT L
CENTER
SURROUND L
FRONT R
SURROUND R
Check that the test tone from each speaker sounds the
same in volume at the listening position.
OFF
The system stops generating the test tone.
The system also stops generating the test tone when:
• you press i/k to move to another menu item.
• you press SETUP to exit the setup menu.
• you open or close the disc cover.
• 10 minutes have elapsed without any operation.
• you turn off the power.
CONTINUE
ENGLISH
49
En
CHANGING SETUP VALUES (CONTINUED)
Language codes
Code
3737
3738
3742
3749
3754
3755
3760
3762
3837
3841
3843
3844
3850
3851
3854
3937
3951
3955
3961
4037
4041
4062
4148
4150
4151
4155
4156
4157
4237
4845
4246
4251
4254
4261
4337
4340
4348
4350
4357
4437
4445
4454
Language
Afar
Abkhazian
Afrikaans
Amharic
Arabic
Assamese
Aymara
Azerbaijani
Bashkir
Byelorussian
Bulgarian
Bihari
Bengali; Bangla
Tibetan
Breton
Catalan
Corsican
Czech
Welsh
Danish
German
Bhutani
Greek
English
Esperanto
Spanish
Estonian
Basque
Persian
Finnish
Fiji
Faroese
French
Frisian
Irish
Scots Gaelic
Galician
Guarani
Gujarati
Hausa
Hindi
Croatian
50 ENGLISH
Code
4457
4461
4537
4550
4555
4556
4559
4637
4645
4659
4737
4747
4748
4749
4750
4751
4755
4757
4761
4837
4850
4851
4856
4858
4943
4945
4947
4948
4950
4951
4954
4955
4956
4961
5037
5041
5048
5051
5154
5237
5237
5255
Language
Hungarian
Armenian
Interlingua
Indonesian
Icelandic
Italian
Hebrew
Japanese
Yiddish
Javanese
Georgian
Kazakh
Greenlandic
Cambodian
Kannada
Korean
Kashmiri
Kurdish
Kirghiz
Latin
Lingala
Laothian
Lithuanian
Latvian; Lettish
Malagasy
Maori
Macedonian
Malayalam
Mongolian
Moldavian
Marathi
Malay
Maltese
Burmese
Nauru
Nepali
Dutch
Norwegian
Oriya
Punjabi
Polish
Pashto; Pushto
Code
5256
5357
5449
5451
5457
5537
5540
5544
5545
5547
5548
5549
5550
5551
5553
5554
5557
5558
5559
5637
5641
5643
5644
5645
5647
5648
5651
5654
5656
5659
5747
5747
5762
5845
5851
5951
6044
6151
6244
6257
Language
Portuguese
Quechua
Rhaeto-Romance
Romanian
Russian
Sanskrit
Sindhi
Serbo-Croatian
Singhalese
Slovak
Slovenian
Samoan
Shona
Somali
Albanian
Serbian
Sundanese
Swedish
Swahili
Tamil
Telugu
Tajik
Thai
Tigrinya
Turkmen
Tagalog
Tonga
Turkish
Tatar
Twi
Ukrainian
Urdu
Uzbek
Vietnamese
Volapük
Wolof
Xhosa
Yoruba
Chinese
Zulu
TROUBLESHOOTING
If something seems to be wrong with the system, first check the items in the table below.
Check
See page
• Is the AC power cord plugged firmly into a live outlet?
• Is the DC cord connected properly?
The disc does not play.
Playback stops almost
immediately.
• Is there condensation inside the system? (Leave the system idle
with the power on for 1 to 2 hours.)
• Are you trying to use a disc that can’t be played, such as a
PHOTO CD?
• Is the disc dirty? Is it loaded properly?
• Does the disc exceed the specified rating level?
11, 15
11, 12
2
4
6, 16
46
No picture
• Is the system connected correctly?
• Are the video connections firmly attached?
• Is the television video mode set correctly?
11, 12, 13
11, 12, 13
16
The picture quality is poor.
• Is the system in a place subject to vibrations?
• Are the video connections firmly attached?
• Is the disc dirty?
• Is the system connected directly to the television set? Or is it
connected through a video deck, a selector switch, or a television
with a built-in video deck?
The picture may be bad when used with some television sets or
projectors, due to the DVD copy protection scheme.
The picture quality may also suffer if the system is connected
through a selector switch with other video equipment. Try turning
off the power to the other video equipment.
The picture quality may be somewhat poor when paused, when
doing frame advance, or during fast forward or fast reverse. This
is not a malfunction.
2
11, 12, 13
6
11
No sound
• Is the system connected correctly?
• Are the speaker cords inserted firmly into the speaker terminals?
Has a short circuit occurred at the speaker terminals?
• Is the connected audio equipment turned on? Is the volume of
the connected equipment set correctly? (Note that there is no
audio during slow playback, frame advance and fast forward/
reverse except with audio CDs.)
11, 14
11, 14
The remote control does
not work, or does not work
correctly.
No response from the
system
16, 17
• Is the remote control battery installed correctly?
• Is the remote control too far from the system? Is there
something in the way?
• Is the remote control battery getting weak?
• Is the system in sunlight or strong fluorescent light?
7
7
• Hold down TIME on the DVD player for more than 4 seconds.
After the power is turned off, press POWER (6STANDBY/ON)
again to restore the system.
—
Each DVD has different capabilities
The DVD's many capabilities differ depending on the disc.
The following situations may be caused by information on
the disc itself.
• The audio or subtitles are not reproduced in the language
specified in the setup menu.
• The audio track or subtitles cannot be changed.
• There are no subtitles.
• No DVD menu. The DVD menu is not displayed in the
language you want.
• The view angle cannot be changed.
• The rating restriction does not work.
• The resume or mark function does not work.
AS NECESSARY
Symptom
The power does not come
on.
7
7
En
How to initialize the DVD player
Turn off the power and open the disc cover. Then, while
holding down s, press POWER 6STANDBY/ON. The
initial condition is restored and "CLEAr" appears on
the display window.
As all the settings after purchase return to the initial
condition, set them again.
ENGLISH
51
SPECIFICATIONS
DVD player XD-DV1
Power supply
Weight
External dimensions
6.3 V DC, 1.5 A
770 g (1 lb 11 oz)
230 × 62.5 × 189 mm
(9 1/8 × 2 1/2 × 7 1/2 in.) (w × h × d)
Laser
Semiconductor laser,
wavelength: 650/780 nm
Signal format
NTSC
Supported discs
DVD video discs:
12-cm discs (single-sided single
layer, single-sided double layer,
double-sided double layer), 8-cm
discs (single-sided single layer,
single-sided double layer, doublesided double layer)
Compact discs (CD-DA, video
CD, MP3 discs):
12-cm and 8-cm discs
Video composite output
1.0 Vp-p (75 ohms, sync
negative)
RCA jack × 1
S-video output
Y output: 1.0 Vp-p (75 ohms,
sync negative)
C output: 0.286 Vp-p (75 ohms)
4-pin Mini DIN jack × 1
Audio output
Analog output:
130 mV RMS (1 kHz, –20 dB)
RCA jack (L/R) × 1
Digital output:
Fibre optic connector × 1
Audio output characteristics
Frequency range:
CD/VCD: 20 Hz to 20 kHz
DVD: 20 Hz to 22 kHz
(48-kHz/96-kHz sampling)
Amplifier XA-DV1
Maximum effective output power
FRONT L/R: 30 W + 30 W (1 kHz,
8 ohms, 10%) EIAJ
SURROUND L/R: 30 W + 30 W
(1 kHz, 8 ohms, 10%) EIAJ
CENTER: 30 W (1 kHz, 8 ohms,
10%) EIAJ
SUB WOOFER: 30 W (100 Hz,
8 ohms, 10%) EIAJ
Output terminals
FRONT SPEAKERS: 8 ohms
SURROUND SPEAKERS:
8 ohms
CENTER SPEAKER: 8 ohms
SUB WOOFER: 8 ohms
PHONES: 32 ohms
Power supply
120 V AC, 60 Hz
Power consumption
50 W (operation mode)
3.2 W (standby mode)
Weight
1.4 kg (3 lbs 1 oz)
External dimensions 230 × 62.5 × 210.6 mm
(9 1/8 × 2 1/2 × 8 3/8 in.) (w × h × d)
52 ENGLISH
Speaker system SX-DV1
Speaker type
External dimensions
Weight
Front/surround/center: 8-cm
(3 1/4 in.) full range cone type
Subwoofer: 13 cm (5 1/8 in.), bass
reflex type
Front/surround/center:
96 × 96.5 × 96.5 mm
(3 28/32 × 3 29/32 × 3 29/32 in.)
(w × h × d)
Subwoofer: 160 × 205 × 235 mm
(6 3/8 × 8 1/8 × 9 3/8 in.) (w × h × d)
Front/surround/center: 0.52 kg
(1 lb 2 oz)
Subwoofer: 3.0 kg (6 lbs 10 oz)
General
Operating temperatures
5˚C to 35˚C (41˚F to 95˚F)
Accessories
Video cord (1)
Remote control (1)
AC power cord (1)
DC cord (1)
Speaker cords (6)
Battery (installed in the remote
control) (1)
Operating instructions
Specifications are subject to change without notice.
NOTE
AS NECESSARY
This equipment has been tested and found to comply with
the limits for a Class B digital device, pursuant to Part 15
of the FCC Rules. These limits are designed to provide
reasonable protection against harmful interference in a
residential installation.
This equipment generates, uses, and can radiate radio
frequency energy and, if not installed and used in
accordance with the instructions, may cause harmful
interference to radio communi-cations. However, there is
no guarantee that interference will not occur in a particular
installation. If this equipment does cause harmful
interference to radio or television reception, which can be
determined by turning the equipment off and on, the user
is encouraged to try to correct the interference by one or
more of the following measures:
- Reorient or relocate the receiving antenna.
- Increase the separation between the equipment and
receiver.
- Connect the equipment into an outlet on circuit different
from that to which the receiver is connected.
- Consult the dealer or an experienced radio/TV
technician for help.
CAUTION
Modifications or adjustments to this product, which are not
expressly approved by the manufacturer, may void the
user’s right or authority to operate this product.
•
Manufactured under license from Dolby Laboratories.
"Dolby", "Pro Logic" and the double-D symbol are
trademarks of Dolby Laboratories. Confidential
unpublished works. ©1992-1997 Dolby Laboratories. All
rights reserved.
• Manufactured under license from Digital Theater
Systems, Inc. US Pat. No. 5,451,942 and other worldwide
patents issued and pending. "DTS" and "DTS Digital
Surround" are trademarks of Digital Theater Systems,
Inc. ©1996 Digital Theater Systems, Inc. All rights
reserved.
En
ENGLISH
53
For Assistance and Information,Call
Toll Free 1-800-BUY-AIWA (United States and Puerto Rico)
Printed in Malaysia
HT-DV1 [U] [K]
CORRECTIONS
dts Output:
Please read the incorrect descriptions in the Operating
Instructions as follows.
(U: pages 47 and 48, K: pages 49 and 50)
Note:
The page numbers in parentheses are different between
the two versions of the Operating Instructions.
U: page number of the U version for the customers in the
United States
K: page number of the K version for the customers in the
United Kingdom
CAUTION
(U: page 7)
CAUTION
• Lithium battery (CR2025) for the remote control
Replace the battery with Hitachi Maxell, Panasonic,
or Sony, Part No. CR2025 only. Use of another battery
may present a risk of fire or explosion.
The battery may explode if mistreated. Do not
recharge, disassemble or dispose of in fire.
• Do not keep metallic objects such as rings, bracelets,
and keys near the battery. They may cause the
battery to short circuit.
• After removing the battery, be sure to keep it out of
reach of children. If it is swallowed, consult a doctor
immediately.
CAUTION
Set whether PCM digital signals converted from DTS bitstream signals are output from the DIGITAL OUT
(OPTICAL) jack or not.
NOTE
The system cannot output DTS bit-stream signals directly
from the DIGITAL OUT (OPTICAL) jack when playing DTSencoded discs.
1 In the SETUP MENU, press i/k repeatedly to
select "Audio Output Setting", then press
ENTER.
2 Press i/k repeatedly to select "dts Output".
3 Press ENTER to select the appropriate setting.
Each time the button is pressed, the setting toggles
between "ON" and "OFF".
ON
PCM digital signals converted from DTS bit-stream
signals are output from the DIGITAL OUT (OPTICAL)
jack.
OFF
PCM digital signals converted from DTS bit-stream
signals are not output from the DIGITAL OUT
(OPTICAL) jack.
4 Press vRETURN to return to the previous
screen or press SETUP to exit the setup menu.
(U: page 40, K: page 42)
When connecting an AV receiver not equipped with Dolby
Digital decoder using an optical cord, DO NOT set "Digital
Stream" to "DOLBY DIGITAL" in the "Audio Output
Setting" procedure of the setup menu.
Otherwise, merely attempting to play a disc may cause a
screeching noise that could be harmful to your ears and
damage the speakers.
Audio Output Setting
Speaker Setting:
(U: page 48, K: page 50)
Set the audio balance among the speakers from the
listening position.
Based on the distance setting from the listening position,
the system calculates and adjusts the delay times of the
respective speakers so that the sounds from them are
centered at the listening position.
(U: page 47, K: page 49)
Test Sound:
Set the audio output of the system according to the type
of other external audio equipment connected to the system.
(U: page 49, K: page 51)
NOTE
The system outputs only PCM digital signals converted from
DTS bit-stream signals when playing DTS-encoded discs.
• When connecting other external audio equipment to the
AUDIO OUT L/R jacks of the DVD player, you need to
set "Downmix Type" only.
• When connecting an external AV receiver not equipped
with Dolby Digital decoder to the DIGITAL OUT
(OPTICAL) jack of the DVD player, you need not make
any settings.
• When playing DVDs with Dolby Digital sound on an
external AV receiver equipped with Dolby Digital
decoder, set "Digital Stream" to "DOLBY DIGITAL".
CAUTION
(U: page 47, K: page 49)
The same correction as for page 40 (U) or page 42 (K)
above.
A test tone is generated from each speaker allowing you
to check the audio balance among the speakers from the
listening position. If the volume levels of the speakers are
noticeably different from each other at the listening
position, adjust the position or direction of the speakers.
CORRECCIONES
Salida dts: (páginas 47 y 48)
Lea las descripciones incorrectas del manual de
instrucciones de la forma siguiente.
Seleccione si las señales PCM digitales, convertidas
desde las señales de secuencia de bits DTS, deben, o no
deben, emitirse por la toma DIGITAL OUT (OPTICAL).
PRECAUCIÓN (página 7)
PRECAUCIONES
• Pila de litio (CR2025) apara el mando a distancia
Sustituya las pilas por unas de Hitachi Maxell,
Panasonic o Sony, únicamente parte nº CR2025. El
uso de otras pilas puede presentar un riesgo de
incendio o explosión.
Las pilas pueden explotar si no se tratan con cuidado.
No las recargue, desmonte o tire al fuego.
• No coloque objetos metálicos, como anillos,
pulseras, o llaves cerca de la pila. Estos objetos
podrían cortocircuitar la pila.
• Después de haber extraído la pila, cerciórese de
guardarla fuera del alcance de niños. Si alguien
tragase la pila, póngase inmediatamente en contacto
con un médico.
PRECAUCIÓN (página 40)
Cuando conecte un receptor AV que no esté equipado
con descodificador Dolby Digital empleando un cable
óptico, NO AJUSTE "Digital Stream" en "DOLBY
DIGITAL" en el procedimiento de "Configuración salida
audio" del menú de configuración.
De lo contrario, al intentar simplemente la reproducción
de un disco podría producirse un ruido estridente capaz
de herirle los oídos y de causar daños en los altavoces.
Configuración salida audio (página 47)
Ajuste la salida de audio del sistema de acuerdo con el
tipo del otro equipo de audio externo que haya conectado
al sistema.
NOTA
Cuando el sistema reproduce discos con codificación DTS,
emite sólo las señales de secuencia de bits DTS
convertidas a señales PCM digitales.
• Cuando conecte otro equipo de audio externo a las
tomas AUDIO OUT L/R del reproductor DVD, sólo
necesitara ajustar el "Tipo de mezcla".
• Cuando conecte un receptor AV externo, que no esté
equipado con descodificador Dolby Digital, a la toma
DIGITAL OUT (OPTICAL) del reproductor DVD, no será
necesario que realice ningún ajuste.
• Ciando reproduzca discos DVD con sonido Dolby Digital
en un receptor AV externo equipado con descodificador
Dolby Digital, ajuste "Digital Stream" en "DOLBY
DIGITAL".
NOTA
El sistema no puede emitir las señales de secuencia de
bits DTS directamente por la toma DIGITAL OUT
(OPTICAL) cuando se reproducen discos con codificación
DTS.
1 En el MENÚ DE CONFIGURACIÓN, presione
repetidamente i /k para seleccionar
"Configuración salida audio", y después
presione ENTER.
2 Presione repetidamente i/k para seleccionar
"Salida dts".
3 Presione ENTER para seleccionar el ajuste
apropiado.
Cada vez que presione el botón, el ajuste cambiará
entre "ACTIVAR" y DESACTIVAR".
ACTIVAR
Las señales PCM digitales, convertidas desde las
señales de secuencia de bits DTS, se emiten por la
toma DIGITAL OUT (OPTICAL).
DESACTIVAR
Las señales PCM digitales, convertidas desde las
señales de secuencia de bits DTS, no se emiten por la
toma DIGITAL OUT (OPTICAL).
4 Para volver a la pantalla del menú anterior,
presione vRETURN, y para salir del menú de
configuración, presione SETUP.
Ajuste de los altavoces: (página 48)
Ajuste el balance del sonido entre los altavoces desde la
posición de audición.
El sistema calcula y ajusta los tiempos de retardo de los
altavoces respectivos, basándose en el ajuste de la
distancia desde la posición de audición, de modo que el
sonido que emite cada altavoz se centre en la posición de
audición.
Sonido de prueba: (página 49)
Se genera un tono de prueba desde cada altavoz para
permitirle comprobar el balance del sonido entre los
altavoces desde la posición de audición. Si los niveles de
volumen de los altavoces son apreciablemente distintos
entre sí en la posición de audición, ajuste la posición o la
dirección de los altavoces.
PRECAUCIÓN (página 47)
La misma corrección que la de la página 40 anterior.
Printed in Malaysia
8C-AV5-913-11
020523BMK-H-9
HT-DV1
U
K
EZ
Attach the anti-skid pads to the subwoofer
Attach the supplied anti-skid pads to the bottom of the subwoofer to stabilize the subwoofer
and prevent it from slipping.
Fijación de los amortiguadores antideslizables al altavoz de
subgraves
Fije los amortiguadores antideslizables a la base del altavoz de subgraves para estabilizarlo y
evitar que se deslice.
Fixation des pastilles antidérapantes sous le caisson de grave
Fixez les pastilles antidérapantes fournies sous le caisson de grave pour le stabiliser et
l'empêcher de glisser.
Bringen Sie die Gleitschutzpolster am Tieftöner an
Bringen Sie die mitgelieferten Gleitschutzpolster an der Unterseite des Tieftöners an, damit er
stabil steht und nicht verrutschen kann.
Applicare i cuscinetti antiscivolo al subwoofer
Applicare i cuscinetti antiscivolo in dotazione al fondo del subwoofer per
stabilizzare il subwoofer e evitare che scivoli.
HTDV1_UKEZ_pera
1
02.5.17, 4:55 PM
Anti-slip voetjes onder de lagetonen-luidspreker aanbrengen
Bevestig de bijgeleverde anti-slip voetjes aan de onderkant van de lagetonen-luidspreker, om
te zorgen dat die stevig staat en niet kan wegglijden.
Připevněte protiskluzové podložky na basový reproduktor
Připevněte dodané protiskluzové podložky na spodní stranu basového reproduktoru, tím
stabilizujete basový reproduktor a zabráníte jeho sklouznutí.
A csúszásgátló korongok subwoofer-re helyezése
Helyezze a csúszásgátló korongokat a subwoofer aljára, hogy azok stabilizálják a subwoofert, és megakadályozzák annak elcsúszását.
Przymocuj do subwoofera osłony antypoślizgowe.
Przymocuj dostarczane z wyposażeniem osłony antypoślizgowe do spodniej części subwoofera
w celu jego stabilizacji i uniknięcia ślizgania.
Printed in Malaysia
8C-AV5-914-01
020515AMK-H-D
HTDV1_UKEZ_pera
2
02.5.17, 4:55 PM