1
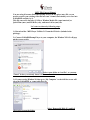
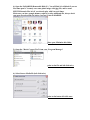
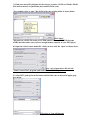
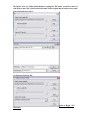
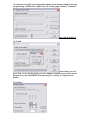
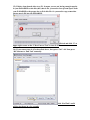
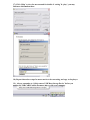
PARADISEmmp#5388---Quick Start Manual
To start charging:
1). Plug in both end of USB connector to your computer and the player. Make sure the
Mini USB connector is complete insert into the Top of Player without blocking by the
rubber cover or the String Ring base. When inserting mini USB plug into Player, make sure
the mini USB plug with “Triangle” mark ‘face up’.
2). Turn on “Power Switch”- locate at Right-hand Side Panel and turn it to ‘ON’.
3). The Player’s screen will pop out a sleeping icon:
4). This icon will idle all the time while it is charging.
5). Please leave Power Switch “ON” all the time.
6). Leave it there for 4.0 Hrs. at first full charging. It shall have 8Hrs Music play time or
2~4Hrs. Photo & Video play time. Then it only need 2 Hrs charging every time later.
7). Turn off Power Switch after full charge (if you are not going to play it for a while).
8). To play Paradise while charging, you need to do “safely remove Hardware”, click
at
lower right short cut bar of your computer screen, select Paradise’s Drive and click to close
the drive. Then press Paradise “MODE” button for 1~2 seconds, the Paradise screen will
pop to main page of Function Mode, you may select any function mode to play.
It will still take the power from the computer at the time you are playing, and it stops
mode to continue
charging while playing. You need to reconnect it and back to
charge.
*while charging, make sure the Player unit has steady connection with mini USB, it may
disconnect sometimes if you touch or remove it and will cause the rubber cover flip back to
increase the gap in between the plug and the player, that may stop charging.
If you ever encountered a problem that the icon is not showing at all, and you have checked
both USB plug are firmly inserted and still not working, then eMail to notify us, we will
send you a new USB connector. Send eMail to: [email protected] with your shipping
address & telephone number, provide with purchasing proof and serial number.
To Change Language Mode to English:
1). Turn Power on- locate at lower right-hand side panel and switch it to ‘ON’. Or press &
hold ON/OFF button (>|■ON/OFF) button at left side panel for 3 seconds to turn on the
screen.
2). The Screen will show a girl’s animation video in 3 seconds and stay at MP3 Mode, the
MP3 Mode icon is showed as a “melody symbol”:
Now you are under ‘MODE’ main directory, this MP3 mode icon will idle for 20 seconds
and shot off for time saving if you don’t make any move. You may press “ENTER” button
and getting into MP3 environment to play the MP3 music later.
But let’s bypass it now and select next mode to change language:
3). To select Language Mode:
*Find “backward (l<</V+) & forward (>>l/V-)” button at right hand side panel: which is
above and under the “ENTER” button.
*Short press “backward (1<</V+)” button once, the icon will move to next “TOOL” mode
(it showed as a BLUE GEAR symbol), press “ENTER” button to entering the Tool List.
*Select the 3rd list from top, by pressing “forward (>>l/V-)” button in order to move the
highlight down to the 3rd line, short press “ENTER” button to get into this selection
(language), you are now entering the language list, choose 2nd line that is ‘English’ by
pressing forward/backward button, short press “ENTER” button to confirm your selection
is done with English.
Turn the On/Off button to “Off”. When next time you open it, it is in English Mode!!!
To play Text File:
1). Turn Power on- locate at lower right-hand side panel and switch it to ‘ON’. Or press &
hold ON/OFF button (>|■ON/OFF) button at left side panel for 3 seconds to turn on the
screen.
2). The Screen will show a girl’s animation video in 3 seconds and stay at MP3 Mode, the
MP3 Mode icon is showed as a “melody symbol”:
Now you are under main mode directory, this MP3 mode icon will idle for 20 seconds and
shot off for time saving if you don’t make any move. You may press “ENTER” button and
getting into MP3 environment to play the MP3 music later.
But let’s bypass it now and select next mode to Text File Viewer:
3). To select Text File Viewer mode:
*Find “backward (l<</V+) & forward (>>l/V-)” button at right hand side panel: which is
above and under the “ENTER” button.
*Short press forward (>>l/V-) button 5 times, the icon will move to show “Text file” mode
(it showed as a Book), press “ENTER” button to enter into it.
5). To Play Text file:
*Enter “Text File” mode (the Book symbol): press +/- button to select the pre-stored text
files, press “ON/OFF” button once to PLAY it. Press once again to stop playing.
*You will find the pre-recorded ‘ROOT FILE’ Named (REC01), Paradise only comply
with (.txt) file “text document”.
4). To Store Text File: Simply drag & drop your text document into the player as you store
the MP3 music file, it will be saved in the text mode automatically.
To Make Voice Record:
1). Turn Power on- locate at lower right-hand side panel and switch it to ‘ON’. Or press &
hold ON/OFF button (>|■ON/OFF) button at left side panel for 3 seconds to turn on the
screen.
2). The Screen will show a girl’s animation video in 3 seconds and stay at MP3 Mode, the
MP3 Mode icon is showed as a “melody symbol”:
Now you are under ‘MODE’ main directory, this MP3 mode icon will idle for 20 seconds
and shot off for time saving if you don’t make any move. You may press “ENTER” button
and getting into MP3 environment to play the MP3 music later.
But let’s bypass it now and select next mode to Voice Record:
3). To select Voice Record mode:
*Find “backward (l<</V+) & forward (>>l/V-)” button at right hand side panel: which is
above and under the “ENTER” button.
*Short press forward (>>l/V-) button once, the icon will move to show “Voice Record”
mode (it showed as a Microphone), press “ENTER” button to enter into the Voice Record
manual.
4). To make Voice Recording:
*Press “ON/OFF” button to start Recording, and the time meter will pop and show the run
time, Press “ON/OFF” button again to time out the recording, Press “ON/OFF” again to
continue record.
*Press & hold 2 seconds at “MODE” button to stop & save this recording with a file
number. For example: ‘ROOT FILE’ Named (REC01) and up.
5). To Play Voice Record file:
*Find “Play Recording” mode: Turn the Power On, at first pop out screen under the main
directory, press +/- button to select the “Replay Symbol” icon (a Lip symbol), press the
“ENTER” button once to enter it.
*You will find the pre-recorded ‘ROOT FILE’ Named (REC01) and press “ON/OFF”
button once, it will start playing. Press +/- to select file.
*If you have many pre-recorded files stored inside, then press +/- button to find the file you
want, suggest you take note to always remember what program you have recorded at which
file number thus you wouldn’t waste time for searching it, otherwise you still can find it by
playing it in & out to find it, but it just take times, that’s all.
To Play FM:
1). Turn on the Power Switch at the lower right-hand side panel and insert Earphone.
2). The Screen will show a girl’s animation video in 3 seconds and stay at MP3 Mode, the
MP3 Mode icon is showed as a melody symbol as:
Now you are at ‘MODE’ main directory, this MP3 mode icon will idle for 20 seconds and
shot off for time saving if you don’t make any move. You may short press “ENTER”
button and getting into MP3 environment to play the MP3 music later.
But let’s bypass it now and select next mode to select FM MODE:
3). To select FM mode:
*Find “backward (l<</V+) & forward (>>l/V-)” button at right hand side panel: which is
above and under the “ENTER” button.
*Short press forward (>>l/V-) button 3 times, the icon will move 3 times to show “FM”
mode (it has a RADIO image with Antenna), press “ENTER” button to enter into the FM
manual.
*Press “backward (l<</V+) & forward (>>l/V-)” button to move and search your favorite
station. Make sure the station is playing with crispy sound with good signal without buzz
interruptions.
4). To Set & Save your favorite stations:
*Quick press ‘MODE’ button while you are playing any station, you will find a menu list
that you can do (Auto Search), short press “ENTER” and it will automatically search &
preset 20 available station around your area. Then you can press and hold “backward
(l<</V+) & forward (>>l/V-)” for 2 seconds each time you want to change station.
*or you can do menu “save”, just quick Press “MODE” button once and select “SAVE”
and your current playing station is saved manually.
*Repeat searching and saving your favorite station up to 20 stations manually.
5). To Play Quick Selection with your Preset favorites:
*While FM radio is playing, Press and hold “backward (l<</V+) & forward (>>l/V-)” for
2 seconds each time you want to change station. Repeating same activity, the station will
jump from one to the other.
6). To Record FM program:
*While FM radio is playing, find (A-B/REC.) button on the Left Side panel, press once and
you are on it; the icon will show a Record Time Meter and the File Name as REC01 with
number up at every other recording you make.
*And press (MODE) button once to Save & Stop recording.
7). To Play pre-recorded FM program:
*Find “Play Recording” mode: Turn the Power On, at first pop out screen under the main
directory, press +/- button to select the “Replay Symbol” icon (a Lip symbol), press the
“ENTER” button once to enter it.
*You will find the pre-recorded ‘ROOT FILE’ Named (REC01) and press “ON/OFF”
button once, it will start playing. Press +/- to select file.
*If you have many pre-recorded files stored inside, then press +/- button to find the file you
want, suggest you take note to always remember what program you have recorded at which
file number thus you wouldn’t waste time for searching it, otherwise you still can find it by
playing it in & out to find it, but it just take times, that’s all.
To Play MP3 music:
1). Turn on the Power Switch at the side panel and insert Earphone.
2). The Screen will show a girl’s animation video in 3 seconds and stay at MP3 Mode, the
MP3 Mode icon is showed as a melody symbol as:
Now you are at ‘MODE’ main directory, this MP3 mode icon will idle for 20 seconds and
shot off for time saving if you don’t make any move.
*Press “ENTER” button and getting into MP3 environment to select your pre-stored MP3
music files list.
*Find ‘up+& down-’ button at side panel: (l<</V+) or (>>l/V-) which is above and under
the “ENTER” button.
*Press (1<</V+) or (>>l/V-) button, the icon will move to next sound you have stored.
*Press “ON/OFF” button to start playing. Press it once again to Stop Playing.
*If you hold “ON/OFF” button over 2 seconds, you will turn off entire player.
*To TURN ON again, just press “ON/OFF” button again for 2 seconds.
*actual screen back ground is in gold color not black.*
***Important: this Paradise mmp Player only take MP3/WMA files.
3). To Adjust Volume:
While playing music, quick press “ENTER” then press ‘VOLUM up+ & down-’ button
(1<</V+) or (>>l/V-).
4). To Select more function:
*When you are under MP3 environment and get to select music files (standby), press
“MODE” once, you are into another mode to choose:
-Local Folder: to choose more file
-Delete: to delete some file
-and Exit: (back to music play standby).
*While playing music, press and hold “MODE” button, return to main directory manual to
select other function mode.
5). To Store MP3 music:
*Connect USB Cable to both your computer & player.
*Window XP/2000 will detect this player and pop out the screen, select ‘open file’ and
leave it on your table top with a small screen. Open your ‘My Music’ folder and point your
mouse to the music folder you want to copy to the player, left click mouse while pointing at
the music folder and hold the mouse, drag it to the Player’s icon blank area, release it to
drop there, now your file is stored in the player. Close all icon, do the “safely remove
hardware” then unplug USB cable, start playing.
*If you use Window 98, install driver by the CD included, open ‘My Computer’, you will
find this Player as an additional ‘removable disk’, it maybe showed as a ‘E’ or ‘F’ ‘G’ ‘H’
it can be any drive in there, left click it twice to open, then open your music folder in the
other hand, drag & drop your music file into this Player’s icon (the new removable drive
you just found), you are done. Unplug USB cable and start playing.
*** Important: this Paradise mmp Player only take MP3/WMA files.
To Play Photo Viewer:
1). Turn on the Power Switch at the side panel.
2). The Screen will show a girl’s animation video in 3 seconds and stay at MP3 Mode,
press “Up+/Down-“ button (1<</V+) or (>>l/V-) to select “PHOTO” mode (a symbol like
few picture in layers) then press “ENTER” button to entering the PHOTO mode.
3). Select desired picture file and press “ON/OFF’ button to view the photo.
4). Press “MODE” button to get out it and back to main directory for other function.
*You can not play photo and music simultaneously.
5). To Store Photo into Player:
*Connect USB Cable to both your computer & player.
*Window XP/2000 will detect this player and pop out the screen, select ‘open file’ and
leave it on your table top with a small screen. Open your ‘My Pictures’ directory at your
computer’s “My Document” and point your mouse to the Photo folder you want to copy to
the player, left click mouse while pointing at the Photo folder and hold the mouse, drag it to
the Paradise Player’s icon blank area, release it to drop there, now your file is stored in the
player. Close all icon, unplug USB cable, and start playing.
*If you use Window 98, install driver by the CD included, open ‘My Computer’, you will
find this Player as an additional ‘removable disk’, it maybe showed as a ‘E’ or ‘F’ ‘G’ ‘H’
it can be any drive in there, left click it twice to open it with a small icon on your table top,
then show your Photo files by opening your ‘My Pictures’ folder in the other hand, drag &
drop your Photo file into this Player’s icon (the new removable drive you just found), you
are done. Unplug USB cable and start playing.
***Important: this Paradise mmp Player only take (.jpg) JEPG file.
To Play MTV Video:
1). Turn on the Power Switch at the side panel and insert Earphone.
2). The Screen will show a girl’s animation video in 3 seconds and stay at MP3 Mode, the
MP3 Mode icon is showed as a melody symbol as:
Now you are at main function mode directory, this MP3 mode icon will idle for 20 seconds
and shot off for time saving if you don’t make any move.
*The MTV Video is stored in the MP3 mode and to be play as one of the music file.
*Press “ENTER” button and getting into MP3 environment to select your pre-stored MTV
Video files. (try to remember the file name you stored, so you wouldn’t miss it when you
looking for it among all the music file list).
*Find ‘up+ & down-’ button at side panel: (l<</V+) or (>>l/V-) which is above and under
the “MODE” button.
*Press “Up (1<</V+) or Down (>>l/V-), the icon will move to next file you have stored.
*Press “ON/OFF” button to start playing. Press it once again to Stop Playing.
*If you hold “ON/OFF” button over 2 seconds, you will turn off entire player.
*To Turn On again, just press “ON/OFF” button again for 2 seconds.
3). To Convert Video File into MTV file format: check below detail instruction and
install the software included in the CD.
MTV File Convert Manual
You are using it because PARADISE mmp PLAYER only plays (mtv) file, so you
need to convert your existing video file into ‘mtv’ format, thus enable you to save into
PARADISE and play by it.
This file converter can take AVI file or Window Media File (wmv/wma/asf) or
QuickTime (mov) and DVD file (vob), and turn it all to (mtv) file.
Let’s start as shown by following steps:
1). Down load the ‘MP3 Player Utilities 3.0’ from the CD drive (include in the
package).
2). Connect PARADISEmmp Player to your computer, the Window XP O/S will pop
up the screen as this:
Select ‘open folder to view files’, or you may
‘Cancel’ it since you already know it is been connected.
3). If you are using Window 98, then go to ‘My Computer’ to check if the screen will
show the PARADISE as ‘removable disk (E:)
Select ‘Removable Disk (E:) and left
click twice to open the folder.
4). Open the PARADISE (Removable Disk (E:) You will find it is all blank if you are
first time open it. You may save some photo image with (jpg) file, and/or some
MP3/WMA music files in it if you already play with it several times.
Make sure you have enough memory capacity to take additional file, always check
your new down load file size before you copy it into PARADISE.
after open, Minimize this folder.
5). Open the ‘Movie Convert Tool’ from your ‘Program Manager’
point to the file and left click twice.
6). Select Source Media file (left click twice)
point to the button left click once.
7). Find your movie file which need to be convert, it can be AVI file or Window Media
File (wmv/wma/asf) or QuickTime (mov) and DVD file (vob).
*For example, select a ‘wmv’ Movie file from your existing folder as shown below:
click ‘Open’.
*this movie is a WMV file at size of 1.27MB, when it convert to MTV file become
61MB; therefore make sure you have enough memory capacity at your MP3 player.
8). Input the ‘Select source media file’ while you have click the ‘Open’ as shown above.
now you’ve input source file into the
‘Video Convert Tool’ program, and need to select MTV file path next.
9). Select MTV path: point at the button and left click once as showed at upper page
here below:
This ‘Save as’ icon will pop out.
10). In the ‘Save As’ folder (showed under), typing the ‘file name’ you wish to show at
your Player (mtv) file, which can be the same as the original movie name or any name
you wish, then press ‘Save’.
11). Begin to Convert file:
point at ‘Begin’, left
click once.
12). Start processing file converting and the shadow in the bottom column is showing
the processing, a 61MB of the sample (mtv) file is taking approximately 7.5 minutes.
just wait! Be patience!
13). Finish
you are done! you can
press ‘Play’ to view the file playing on your computer and that means the file convert
has success in your PARADISE! You may also press ‘Setting’ to change the icon
quality.
14). Setting
15). If below icon showed after step (12), it means you are not having enough capacity
in your PARADISE to take this (mtv) movie file, you need to free up some space from
your PARADISE to the proper size to fit in this file. Or you need to copy some other
shorter movie file into the PARADISE.
click ok and click ‘X’ at
upper right corner on the ‘Video Convert Tool’ to turn it off.
16). If you can not turn it off as described above, then press ‘Ctrl’+Alt’ then press
‘Del’ buttons to ‘End Task’ manually.
click ‘End Task’ and it
will be shot down in a few seconds.
17). Click ‘Help’ to view the user manual for details of ‘setting’ & ‘play’, you may
find more information there.
18). Repeat these above steps for more movies to be converting and copy to the player.
19). Always remember to ‘Safely remove USB Mass Storage Device’ before you
unplug the USB CABLE while disconnect player with your computer.