1
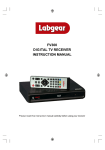
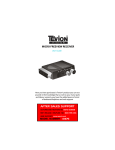
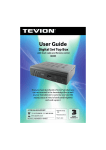
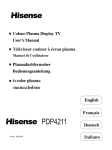
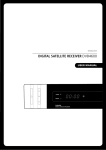
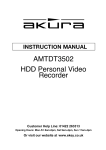
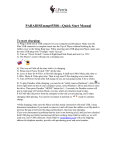
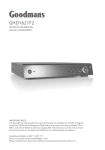
DIGITAL
TERRESTRIAL
RECEIVER
GSTB1701USB
The Gold Technical Support Line:1902 215 259
Personal Product Support
(Charges will apply at $2.95 per minute)
INTRODUCTION
Thank you for buying this Grundig product, which is designed to give you many years of
trouble-free service.
You may already be familiar with using a similar unit, but please take time to read these
instructions. They are designed to familiarize you with the unit's many features and to ensure
you get the very best from your purchase.
Safety is important
Your safety and the safety of others is important. Please therefore, ensure you read the "Safety
Instructions" before you operate this unit.
Warranty
In the unlikely event that your product fails to work normally, please call the below Grundig
warranty number for support.
Australia
Grundig Warranty: 1800 509 394
New Zealand
Grundig Warranty: 0800 450 259
1
21
SAFETY INSTRUCTIONS
· Always read the safety instructions carefully
· Keep this User's Manual for future reference
· Keep this equipment away from humidity
· Lay this equipment on a reliable flat surface before setting it up.
· Do not stand it on soft furnishings.
· If any of the following situation arises, get the equipment checked by a service technician:
- The equipment has been exposed to moisture.
- The equipment has been dropped and damaged.
- The equipment has obvious sign of breakage.
- The equipment has not been working well or you cannot get it work according to User's
Manual.
Warning
· To prevent the risk of electric shock, do not open the cover or the back of the receiver and
expose this apparatus to rain or colds.
· Do not block the ventilation holes of the device. Leave appropriate gap above and around
it to allow for adequate ventilation.
· Do not place the device in an unventilated cabinet or on top of a unit which emits heat.
Copyright Statement
No part of this publication may be reproduced in any form by any means without the
prior written permission. Other trademarks or brand names mentioned herein are trademarks
or registered trademarks of their respective companies.
Disclaimer
Information in this document is subject to change without notice. The manufacturer does not
make any representations or warranties (implied or otherwise) regarding the accuracy and
completeness of this document and shall in no event be liable for any loss of profit or any
commercial damage, including but not limited to special, incidental, consequential, or other
damage.
22
CONTENTS
1. INTRODUCTION........................................................................1
2. SAFETY INSTRUCTION.............................................................2
3. ABOUT THE SET TOP BOX.........................................................4
4. FRONT & REAR PANEL ILLUSTRATION......................................5
5. REMOTE CONTROL.................................................................. 6
6. SYSTEM CONNECTION.............................................................8
7. GETTING STARTED...................................................................9
8. OPERATION.............................................................................10
9. CHANNEL LIST.........................................................................12
10. SYSTEM SET-UP......................................................................13
11. FAVOURITE LIST......................................................................15
12. TROUBLE SHOOTING..............................................................16
13. SPECIFICATIONS....................................................................17
14. WARRANTY.............................................................................18
33
ABOUT THE SET TOP BOX
This DVB-T TV Receiver is a Free-To-Air digital terrestrial receiver, allowing you
to access free-to-air digital terrestrial TV channels and radio broadcasts on your
TV set. Its digital reception covers VHF & UHF band. Compared with the analog TV
programs, digital TV programs eliminate the noise and interference but offer high
quality video and audio. An on-screen initial installation guide is provided so that
you can easily start to enjoy watching the programs. In addition, a fully featured
remote control is included that offers you access to every feature with a simple
press of a button.
Main Features
- Full comply with Australia DVB-T standard
- Full MPEG2 ISO/IEC 13818 transport stream compliant audio/video decoding
- Bandwidth of 7MHz supported
- COFDM demodulator
- Automatic/manual channel search
- Channel lock, moving and deletion
- Parental lock control
- EPG (Electronic Program Guide) and teletext function (where available)
- USB port for upgrade software and playback of MP3 and JPG files
- Tuner RF in/loop through
- Component/ CVBS/ S-Video/Digital Audio via coaxial
- Full function al remote control
Package Contents
Before installation, please check the items of the package. The package should
contain the following items:
1. DVB-T receiver
x 1 pcs
2. Remote control
x 1 pcs
3. AAA size battery for the remote control x 1 pair
4. Instruction manual
x 1 pcs
5. AV cable(red/yellow/white)
x 1 pcs
4
21
FRONT & REAR PANEL ILLUSTRATION
Front panel
Remote sensor
Channel up
Standby button
Channel down
USB
USB slot
(For update the software
and playback of
MP3 and JPG files)
Power indicator
Rear panel
R F in
for an external TV aerial
Component Video
(Y Cb Cr)
AC Mains
Coaxial Digital Audio
AC 220-240V
~50/60Hz
Down Mix Audio
2 Channel L/R
RF Loop though
for an external device
Composite Video
S-Video
5
21
REMOTE CONTROL
1
1
Power On/Standby
(Switch the STB ON/STANDBY mode)
2
Numeric entry
(Enter numeric values and to select the
channel directly by entering it's number)
3
Menu
(Open up menu)
4
Red Button
(To assist the operation of teletext function)
5
Cursor/ Enter
(
to select sub-menu from the
main menu and channel +/-,
DTV/ VCR
2
MENU
3
11
4
5
VOL
VOL
+
OK
-
13
CHMUTE
MUTE
PAUSE
PAUSE
FAVORITE
FAVORITE
AUDIO
LANG
INFO
INFO
X
RECALL
RECALL
8
EPG
TV/RADIO
USB
AUDIO
14
16
17
19
10
Yellow Button
(To assist the operation of teletext function)
7
Mute
8
RECALL
(switch to previous channel)
9
EPG
(Open up Electronic Program Guide
menu)
10
TTX
(Open Teletext function)
11
EXIT
(Exit from menu)
12
Green Button
(To assist the operation of teletext function)
13
Blue Button
(To assist the operation of teletext function)
14
FAVOURITE
(Open up Favourite list)
15
PAUSE(To freeze the picture )
16
INFO
(To view the current channel information)
17
AUDIO
(Select audio mode: Left / Right /Stereo / Mono)
18
USB
(Select the USB device)
19
TV/RADIO
(Switch between TV and Radio)
20
SUBTITLE
(Switch On/Off Subtitle)
15
18
9
TTX
TTX
6
12
CH+
6
7
to select menu and sub-menu
from the menu and volume +/-,
Press to enter.)
EXIT
EXIT
SUBTITLE
SUBTITLE
20
6
REMOTE CONTROL
Installing the batteries
Remove the battery cover from the remote control and put two AAA size batteries
inside the compartment.
The diagram inside the battery compartment shows the correct way to install the
batteries.
Caution:
1. Keep batteries out of children's reach.
2. Don't attempt to recharge, short-circuit, disassemble, heat or throw the batteries
into the fire.
3. Always replace both batteries at the same time. Never mix new and old batteries or
batteries of a different type.
4. If you don't intend to use the remote control for an extended period, remove the
batteries to prevent possible leakage and corrosion.
5. Do not drop, apply shock or step on the remote control.
6. Do not spill water on the remote control.
NOTE
If the receiver does not operate when operating the remote control from a
close range, you need to replace the batteries.
Using the Remote Control
1. To use the remote control, point it towards the front of the digital set top box.
2. The remote control has a range of up to 7 metres from the set top box at an angle of
up to 60 degrees.
3. The remote control will not operate if its path is blocked.
NOTE
Sunlight or very bright light will decrease the sensitivity of the remote
control.
7
21
SYSTEM CONNECTION
General
There are many different types of TV/VCR and other equipment that you can connect to the STB.In this
manual you will see some of the most common ways to connect your equipment.
Connecting to the TV with AV/Y Cb Cr
/ S-Video cable
Green
Antenna
Y Cb Cr cable
Blue
Red
Yellow
White
Red
Blue
Green
RF cable
Red
Red
White
Yellow
AC 220-240V
~50/60Hz
AV cable
S-Video cable
Connecting to the video recorder
Antenna
Green
Y Cb Cr cable
Blue
Red
Red
Blue
Green
RF cable
Red
White
Yellow
AC 220-240V
~50/60Hz
Yellow
AV cable
VCR
White
Video Cassette Recorder
Red
Connecting to a Hi-Fi system
Hi-Fi amplifier
Coaxial cable
AC 220-240V
~50/60Hz
58
GETTING STARTED
Switching on
Turn on your TV set and select the corresponding AV input,then set the video system of your TV to PAL.
Connect the Set Top Box to mains power supply AC 220-240V 50/60Hz, the power indicator on the
front of the unit will turn red(Standby mode).Press the POWER button on unit or remote control to turn
on the unit,then the indicator will turn to green.
Automatic channel scan
MENU
1
Press the "MENU" button
and enter the pin code to access the
setup menu of the STB (the default pin code is 888888).
2
Press the "LEFT" or "RIGHT" cursor button to highlight
3
Press the "OK" Button to enter the sub-menu.
4
Highlight the "Scan Mode" and press the "LEFT" or "RIGHT" cursor
button to select "Auto scan".
5
Press the "UP" or "DOWN" cursor button to highlight the "Start Scan"
and then press the "OK" button to confirm.
6
Press the "EXIT"button
Scan
.
Channels
Favorites
Settings
Scan
Auto Scan
Scan Mode
Channel Number
Start Scan
EXIT
to quit.
Manual channel scan
MENU
1
Press the "MENU" button
and enter the pin code to access
the setup menu of the STB.(The default pin code is 888888)
2
Press the "LEFT" or "RIGHT" cursor button to highlight
Channels
Favorites
Settings
Scan
.
Scan
Scan Mode
Manual Scan <>
Channel Number
21
3
Press the "OK" Button to enter the sub-menu.
4
Highlight the "Scan Mode" and press the "LEFT" or "RIGHT" cursor
button to select "Manual scan".
5
Press the "DOWN" cursor button to highlight "Channel Number."
option and input the desired channel number.
6
Press the "UP" or "DOWN" cursor button to highlight the "Start Scan" and then
press the "OK" button to confirm.
7
Press the EXIT"button
Start Scan
EXIT
to quit.
NOTE
All the settings in the setup menu are fixed. To change anything the correct password will be
required.
When the search is finished, the first channel of the channel list and the information banner is
displayed. You can now watch digital terrestrial televison.
9
OPERATION
Changing Channels
There are four ways of channel selection - stepping through the channel list, selection by number,
from the on-screen channel list, and using the electronic programme guide(EPG).
1
Stepping through the channel list:
To move through the channel list, press the upward arrow or downward arrow key on the
remote control.
2
Selection by number:
Enter the channel number directly by pressing numeric buttons to select desired channel.
3
Selection by on-screen channels list:
You can also select the required channel directly from on-screen channel list. This is
displayed using the STB's main menu. See "Channel List" in this manual for operation detail.
4
Selection by EPG:
You can also select the required channel directly from electronic program guide (EPG).
This is displayed using the STB's main menu. See "Accessing the Electronic Program Guide
(EPG)" in this manual for operation detail.
Accessing the Electronic Program
Guide (EPG)
The EPG menu is used to look at what is being broadcast on a TV or Radio channel later in the day.
Accessing the EPG of all channels:
1
Press the "EPG" button to enter the EPG menu, and a preview
of your current channel will be displayed in the top left corner box.
Ease your way into the day with E4
Music.
Preview
BBC1
08:00-08:59 E4 Music:Uninterrupted
Service Name
E4+1
ProSieben
Sky News
Sky Spts News
SKY THREE
UKTV History
Channel
13/04/2006
08:30
09:00
09:30
10:00
E4 Musi...
Wake up with...
Freshly...
No Information
Sunrise
Sky News Today
Good M...
Good Morning Spor...
Morning...
Underco...
Last Min... The Sec... Italy, C...
The Ho...
Auschwltz,the Blue...
Around...
OK Select
Program Event
2
Press the "UP" or "Down" cursor button to view a different channel. Each
selected channel will be previewed in the top left corner box.
3
Press the "Right" cursor button to see what is going to be broadcast after
this programme. Each press of the button will increase by half an hour.
Or press the "Left" cursor button to move the EPG back half an hour.
4
Press the " OK" button to quit the EPG menu and watch the selected channel in full screen.
10
OPERATION
Select the USB mode
1
Insert a USB stick into the USB slot, the TV screen will display a file manager .
2
Select the icon
, then press the "OK" button to enter the USB menu as follows:.
USB flash disk
information
\USB
Upper Folder
Total 61MB
Free 46MB
2.JPG
0-..
Total:
Mode:
1-Recycled
Current playback file
8 Items
PLAY ALL
00:03:33/00:04:18
2-all rise.mp3
Play time
File Elapsed/File Time
3-500 miles.mp3
4-1.JPG
Highlighted file
Play status
Total file number in
current folder
Play mode
Preview window
5-2.JPG
6-3.JPG
7-4.JPG
+
Play
Function icons
3 Press the "UP" or "DOWN"cursor button to select a folder or file and then press the "OK" button to
start playback.
4
Press the "Left" or "Right" cursor button to select the different function icon, then press the "OK"
button to activate the function:
: Switch to the STB mode.
: Select the USB device or open folder. This icon will display only when highlighted a folder.
: Play the selected file. This icon will display only when highlighted a file.
+
: Add the selected file to play list. If the selected file is a audio file, it will be added to Audio
list automatically, and image will be added to Image list.
-
: Delete the selected file from Audio list or Image list.
: Select a playlist: Audio list/Image list /File list
: Select filter content :Audio/Image/All Types
: Select play mode:Play one/Play all/Shuffle play/Repeat one/
Repeat all/Repeat shuffle
: Slide show with background music:
1) Play the image without music
2) Play the image with background music from current folder
3) Play the image with background music from play lists
5
Press the "EXIT" button to quit the USB mode and switch to the STB mode.
6
Press the "USB" button to return back to the USB mode.
21
11
CHANNELS LIST
Channels List
Some channels broadcast material which you do not want younger members of the family to watch.
Any channel can be locked so that it cannot be selected for viewing without entering a PIN code.
Locking/Unlocking a channel:
1
Press the "MENU" button to enter the setup menu
of the STB.
Channels
2
Press the "LEFT" or "RIGHT" cursor button to highlight
.
3
Press the "OK" button to enter the sub-menu.
4
Press the "UP" or "DOWN" cursor button to preview channel.
5
Press the "0" button to open the PIN CODE box.
6
Enter the pin code and press the "OK" button to confirm
(default pin code is 888888).
7
Press the "EXIT" button two times to quit.
Favorites
1. E4+1
2. ProSieben
3. Sky News
4. Sky Spts News
5. Sky THREE
6. UKTV History
Delete a channel:
1
Press the "MENU" button to enter the setup menu
of the STB.
2
Press the "LEFT" or "RIGHT" cursor button to highlight
3
Press the "OK" Button to enter the sub-menu.
4
Press the "UP" or "DOWN" cursor button to preview channel.
5
Press the numeric button
6
Press the "OK" button to confirm.
7
Press the "EXIT" button two times to quit.
.
Channels
.
Move a channel:
1
Press the "MENU" button to enter the setup menu
of the STB.
2
Press the "LEFT" or "RIGHT" cursor button to highlight
.
Channels
3
Press the "OK" Button to enter the sub-menu.
4
Press the "UP" or "DOWN" cursor button to preview channel.
5
Press the numeric button
to move up to highlight channel.
6
Press the numeric button
to move down to highlight channel.
7
Press the "EXIT" button two times to quit.
12
Settings
TV
Channels
Preview
BBC1
0-Lock/ Unlock
1-Delete
2-Move up
3-Move down
Scan
SYSTEM SET-UP
System setup
Many aspects of your STB can be set to reflect your circumstances and preference.
Press the "MENU" button to enter the settigs menu of the STB.
1
Press the "LEFT" or" RIGHT" cursor button to highlight
and then
Settings
press the "OK" Button to enter the sub-menu.
3 Press the "UP" or "Down" cursor button to highlight the desired menu
and then press the "OK" button to enter its setting menu.
2
Channels
Favorites
Settings
Scan
Time Setting
Language Settings
A/V Setting
Sort Channels
Factory Setting
Highlight the desired item and then press the "LEFT" or "RIGHT" cursor
button to select desired setting. Press the "EXIT" button to quit.
4
NOTE
GMT is referred to the standard time of Greenwich.
Time Setting
Various time zone can be set, such as current local time, Auto power on/off time. The exact local
present time can be adjusted by using the GMT.
1
2
In the Settings menu, select "Time Setting" and then press the "OK"
button to enter its setting menu.
Select the desired item and press the "LEFT" or " RIGHT" cursor
button to select desired setting.
Channels
Favorites
Settings
Scan
GMT +1
Time Setting
Time Zone
Language Settings
Current Time
A/V Setting
Auto Power Off
14:34
Sort Channels
Time:
Factory Setting
Auto Power On
Enable
<>
00:00
Time:
3
<>
00:00
Enable
Press the "EXIT" button to quit.
Language Settings
This menu allows the user to select the desired language of the OSD,Audio and Subtitle.
1
2
In the Settings menu, select "Language Settings" and then press the
"OK" button to enter its setting menu.
Select the desired item and press the "LEFT" or "RIGHT" cursor
button to select desired language.
Channels
Favorites
Settings
Scan
Menu Language
Time Setting
Language Settings
A/V Setting
English
Audio Language
Sort Channels
English
<>
Factory Setting
3
Subtitle Language
Press the "EXIT" button to quit.
English
<>
A/V setting
In this menu, you can set TV shape, conversion, TV standard and video output.
1 In the Settings menu, select "A/V settings" and press the "OK" button to enter its setting menu.
2 Select the desired item and then press the "LEFT" or "RIGHT" cursor button
to select desired settings
3 Press the " EXIT" button three times to quit.
Channels
TV Shape/ Conversion:
Favorites
16:9
Conversion
Auto
Sort Channels
Conversion
Auto
FullFrame
Pan&Scan
LetterBox
Factory Setting
13
Scan
TV Shape
Language Settings
A/V Setting
TV shape Conversion TV shape
4:3
Auto
16:9
FullFrame
VerticalCut
PillarBox
Settings
Time Setting
<>
SYSTEM SET-UP
Sort Channel
You can sort the TV channels in Name Up,Name Down, Channel No or Encrypted order.
1
In the Settings menu, select "Sort Channel" and then press the
"OK" button to enter its setting menu.
2
Select the desired item and press the "OK" button to confirm.
Time Setting
Name Up
Language Settings
Name Down
3
Press the "EXIT" button to quit.
Sort Channels
Channels
Favorites
A/V Setting
Settings
Scan
Channel No
Encrypt
Factory Setting
Factory Settings
You can view the software version, change pin code, re-set the STB back to factory settings and clear
all channels in this menu.
1
In the Settings menu, select "factory Setting" and then press the
"OK" button to enter its setting menu.
2
Select desired item and press the "OK" button to enter the
sub-menu.
A) System Info: You can view the software version and the date of
last upgrade.
B) Change Pin Code: Change the Pin Code of the STB.
C) Restore Default: Restore to factory settings.
D) Clear Channels: Clear all channels .
Channels
14
Favorites
Time Setting
Language Settings
A/V Setting
Sort Channels
Factory Setting
Settings
Scan
System Info
Change Pin Code
Restore Default
Clear channels
FAVOURITE LIST
Favourite list
There are some channels that you tend to watch more often and some only occasionally. Although
some duplicate channels you may want to delete from channel list, others although not watched
frequently, you will not want to do away with altogether. The favourite mode allows the most-watched
channels to accessed more easily, leaving the less-watched channels accessible but out of the way.
Creating favourite group:
Channels
1
Press the "MENU" button to enter the setup menu of the STB.
Settings
Favorites
Scan
Favorites
No Items
2
Press the "LEFT" or "RIGHT" cursor button to highlight Favorites.
3
Press the "OK" button to enter the sub-menu (see pic-1).
4
Press the numeric button
add a favourite group.
5
Select the desired items and press the "OK" button to confirm .
1-Add 2-Delete
on the remote control(see pic-2)to
Pic-1
Channels
Press the “EXIT" button repeatedly to quit.
Settings
Favorites
Favorites
6
Scan
Create New
No Items
News
Sports
Movie
Music
Economy
Adding channels to a favourite group:
Other
1-Add 2-Delete
Pic-2
1
Press the "MENU" button to enter the setup menu of the STB.
2
Press the "LEFT" or "RIGHT" cursor button to highlight Favorites.
3
Press the "OK" button to enter the sub-menu.
4
Select a desired favourite group.
3. Finance
5
Press the "OK" button on the remote control(see pic-3).
1-Add 2-Delete
Channels
Settings
Favorites
Favorites
Scan
Favorite Channel
1. Movie
No Items
2. News
1-Add 2- Delete 3-Sort
6
Press the numeric button
on the remote control.
Select the desired channel and then press the "OK"button
(see pic-4)
7
Press the "EXIT" button repeatedly to quit.
4-Move up
5-Move down
Pic-3
Channels
Settings
Favorites
Scan
Favorite Channels
Add channel
1. CCB2
1. TVB1
2. CCB2
Accessing the favourite channels:
3. KKY5
1-Add 2- Delete 3-Sort
1
1-Add 2-Delete
4-Move up
5-Move down
Press the "FAVOURITE" button to enter the "FAVOURITE LIST".
Pic-4
2
Press the "UP" or "DOWN" cursor button to select the desired
favourite group.
3
Press the "OK" button to enter the favourite group.
4
Select the favourite channels and press the "OK" button .
NOTE
21
15
NOTE:
Press numeric button" 1-5" to Add,Delete,
Sort,Move favourite channels .
TROUBLE SHOOTING
In some region, the digital terrestrial signal may be weak. So you'd better use the antenna in which the
booster was built,for watching the weak signal channels.
Possible cause
What to do
Standby light not lit
Mains lead unplugged
Mains fuse blown
Check mains lead
Check fuse
No signal found
Aerial is disconnected
Aerial is damaged/misaligned
Out of digital signal area
Check aerial lead
Check aerial
Check with dealer
No picture or sound
Tuned to digital teletext channel
Reduce to another channel
Scrambled channel
message
Channel is scrambled
Select alternative channel
No response to remote
control
Receiver off
Handset not aimed correctly
Front panel obstructed
Hand set batteries exhausted
Plug in and turn on plug
Aim handset at front panel
Check for obstructions
Replace handset batteries
Problem
Forgotten channel lock
code
Re-install channels to cancel
channel lock
Forgotten menu lock
code
Contact Grundig warranty line
The remote control will
not operate your STB
(1) The batteries in your remote
control need replacing
(2) There is an obstruction
blocking the signal path
between the remote control
and the box.
(1) Replace the batteries
(2) Check that there is nothing in
the way of the path between
the remote control and the
receiver
After moving the STB to
another room you find you
are no longer able to
receive digital reception
The aerial feed former new point
may come through a distribution
system which may reduce the
digital signal now received by the
box.
Try a direct feed from the antenna
Picture no colour
The TV system of your TV not set to
PAL.
Set the TV system of your TV to PAL
16
SPECIFICATIONS
TUNER & CHANNEL
RF INPUT CONNECTOR x1
(IEC-TYPE, IEC169-2, FEMALE)
RF OUTPUT CONNECTOR x1
(IEC-TYPE, IEC169-2, MALE (LOOPTHROUGH))
FREQUENCY RANGE:
174MHz ~230MHz (VHF) & 470MHz ~862MHz (UHF)
SIGNAL LEVEL:
-15 ~ -70 dbm
DECODER
TRANSPORT STREAM
PROFILE LEVEL
MPEG-2 ISO/IEC 13818
MPEG-2 MAIN PROFILE @MAIN LEVEL
INPUT RATE
MAX. 15Mbit/s
VIDEO FORMATS
4:3/,16:9 SWITCHABLE
AUDIO FORMATS
MPEG Layer I & II, 32 / 44.1 / 48KHz
VIDEO OUTPUT
CVBS, Y Cb Cr, S-Video
CONNECTION
MAIN POWER CABLE
TUNER
Video
SPDIF
DATA PORT
FIXED TYPE
ANTENNA INPUTx1, RF OUTPUT x1
S-Video x1, Y Cb Cr x1, Composite Video x 1,Component x 1
COAXIAL x1
USB x1(For update the software and playback of
Mp3 and JPG file)
POWER SUPPLY
INPUT VOLTAGE
AC220~240V, 50/60Hz
POWER CONSUMPTION
MAX. 10W/STANDBY 5W
NOTE
Design and Specifications are subject to change without notice.
17
WARRANTY
Please keep your receipt as proof of purchase. This product is warranted
for any defect in materials or workmanship for one year after the original
date of purchase. This product is for normal domestic and office use only.
This warranty does not cover damage from misuse or neglect , accidental
damage, vermin infestation, excessive voltages such us lightning or power
surges or any alternation that affects the performance or reliability of the
product.
In the unlikely event that your product fails to work normally, please
contact Grundig Warranty on 1800 509 394 (Australia) or 0800 450 259
(New Zealand) and have your receipt of purchase on hand.
This warranty is subject to the following provisions:
It is only valid within boundaries of the country of purchase;
The product must be correctly assembled and operated in
accordance with the instructions contained in the manual;
This product must be used solely for domestic purposes;
The warranty does not cover accidental damage;
The warranty will be rendered invalid if the product is resold or has
been damaged by inexpert repair;
The manufacturer disclaims any liability for incidental or
consequential damaged.
This warranty is in addition to, and does not diminish,
your statutory or legal rights.
PO BOX 6287
Silverwater NSW 1811
www.grundig.net.au
Grundig Warranty: 1800 509 394 Australia
Grundig Warranty: 0800 450 259 New Zealand
18
PO BOX 6287
Silverwater NSW 1811
www.grundig.net.au
ver.2 27-Nov-2007