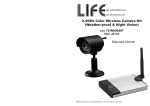
1
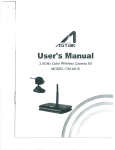
USER MANUAL
Please read this user manual carefully and thoroughly before any attemptto Install
and operate this product and retain it for your future reference.
VSPV922W | ENGLISH USER MANUAL
1
CATALOG
INTRODUCTION ……………………….…….………………………………….3
WARNING ……………..……………..…..……………………………………… 4
OVERVIEW………...………………………………………………………...…5-7
Main device………………………..……………..…………………………...…….5
Remote Controller…………………………………………………………………..6
Power charger………………………………………………………………………7
BASIC OPERATION ………………….…...…………………………….….. 8-13
Battery Installation……………………...…………………………………..………8
Connect with the camera …………………………………………... ……..……….9
Start recording………………………………………………………....…………..10
Connect with TV…………………..………………………………........…………11
Connect with computer………….………………………….…………...……..12-13
FUNCTION MODES……………………………………………………….14-20
Booting picture………………………………………….……...…………………14
Record Interface………………..………………………………………………….14
Record interface…………………………………...……………………….…….15
Multi-media folders…………………………………….………...…………16-20
Function setting…………………..…..…………….……………...……21-39
ACCESSORIES……………………………………...……………………….40-41
PARAMETERS…………………………………………………………………..42
VSPV922W | ENGLISH USER MANUAL
2
INTRODUCTION
Thank you for purchasing VSPV922W which has the unique, ultra-small and delicate
design. It can be used in many recording situations. VSPV922W rings more convenience,
safety and funs to your daily life.
Approval Information:
All our products meet the requirements of approval FCC or CE, and are granted the
FCC or CE certification. They are authorized to bear FCC or CE mark.
FCC:
This product has been tested and found to comply with the limits for a Class B digital
device, pursuant to Part 15 of the FCC rules. These limits are designed to provide
reasonable protection against harmful interference in a residential installation.
CE:
This product complies with standards including Low Voltage Device Directive
73/23/EEC; EMC Directive 89/336/EEC and R&TTE Directive1999/5/EC. It passed the
subject tests by the authority concerned and is authorized to bear CE mark.
OVERVIEW
Along with the improvement of people’s living standard and the development of
picture compression and memory technology, the digital video memory has been a part of
our daily life. VSPV922W a high-tech product, just meets a plenty of needs of people and
market. It possesses a series of advanced functions including digital photography, voice
memory, sound trigger recording, high speed USB data transferring and USB charging.
EU Environmental Protection
Waste electrical products should not be disposed of with
household waste. Please recycle where facilities exist.
Check with your Local Authority or retailer for recycling
advice.
VSPV922W | ENGLISH USER MANUAL
3
WARNING
To prevent fire or shock hazard, do not expose the unit to rain or moisture.
Attention
The electromagnetic fields at the specific frequencies may influence the picture of
the recorder. Be sure to read the following before using the recorder and the mini
camera.
The requirements of receiving wireless signal:
The frequency of wireless signal transmit by this product is 2.4GHz FM, maybe
interfere by other electronics, such as high-voltage, signal transmitting beacon,
wireless remote control and wireless alarm. Please keep away from them as possible.
And please try other channel if signal in monitor status is not well.
Trial recording
Before you record one-time events, you may want to make a trial recording to
make sure that the recorder and the camera are working correctly.
Notes on image data compatibility
Playback of moving images recorded with your recorder on other equipment and
playback of moving images recorded or edited with other equipment on your
recorded are not guaranteed.
Do not shake or strike the recorder
In addition to malfunctions and inability to record moving images, this may render
the SD card unusable of image data breakdown, damage or loss may occur.
LCD screen and mini camera
Be careful when placing the camera near a window or outdoors. Exposing the
LCD screen or the lens of camera to direct sunlight for long period may cause
malfunctions.
Back up recommendation
To avoid the potential risk of data loss always copy data to a disk.
Protect your hearing.
Listen by high volume earphone will damage your listening, we suggest you use a
suitable volume during listening.
VSPV922W | ENGLISH USER MANUAL
4
*Overview
Main Device
1.Function knob
2.Video Input
3.AV Output/Earphone jack
4.Power switch/Delete/Capture
5. LED light
6. Speaker
7. Channel switch
8.TFT LCD
9. Select /Back
10.Play/Record/Confirm
11.UP
12.USB jack
13.Micro-SD slot
14.Down
15.Volume
16.Microphone
VSPV922W | ENGLISH USER MANUAL
5
Back side:
1, Toggle switch: use to change between 6.0 and 6.5 audio system.
2. Remote control match button: use to match new remote control’s frequency, the match
button and start recording button on remote control should be pressed on the same time
during matching.
Remote control
Start recording
Stop recording
Notice:
1, When you use remote control to record, press the start recording button will power on the DVR and
start to record video, but LCD is still in turn off mode.
2, Press stop recording button will stop recording and power off DVR main set.
3, During remote control mode, the all buttons on DVR main set are unavailable to operate. After you
stop recording and power off DVR by remote control, the buttons on DVR will be available to operate.
4, The working range of remote control is 10 meters under unblock situation.
VSPV922W | ENGLISH USER MANUAL
6
BASIC OPERATION
Power Charger:
Please charge the battery before first using.
1. Connect charger’s USB pins into VSPV922W’s multifunctional USB port.
2. Connect the charger with standard AC power socket.
3. When the battery is full charged,(
icon on LCD will not flash any more),you
can pull out the charger from power socket.
LED lights:
1, During VSPV922W is in charging mode, the red LED light will be always turn on.
2, After VSPV922W full charged, red LED light will be turn off and blue light start turn
on.
Notice:
If you want to charge power when the DVR is recording, it only can works with wireless camera.
VSPV922W | ENGLISH USER MANUAL
7
Otherwise, the wire camera has no enough power, may cause bad recording effect.
Install the battery:
Pull down the cover according the picture shows below, open the battery back cover.
Shown as Fig below:
The 4 golden female pins of the battery should be full touched with the male pins in the
battery house.
Close the cover after install the battery well.
Battery using time information form:
Capability
1300mAh
Charging time
Approx :4
hours
Standby time
Approx :2
hours and 19
minutes
Playing time
Approx :4
hours
Recording time
Approx one
hour and 43
minutes
VSPV922W | ENGLISH USER MANUAL
8
Connect With the Camera:
Picture 1:Wireless camera receiving
1. Install the camera to the location you want to monitor, choose the suitable channel,
and then connect with the power source.
2. Switch the Function knob on main set to wireless receiving mode, press channel
change button to receive signal which sent from wireless camera.
3. In wireless mode, press menu button can choose manual operation or auto operation.
*Choose manual, press
to save, and press menu to back, use
to change
channel by hand.
* Choose Auto, press
to save, and press menu to back, the main set will change
channel per 5 seconds.
The meanings of wireless interface icon:
Wireless receiving situation,
CH1:current receiving channel, AUTO: channel
VSPV922W | ENGLISH USER MANUAL
9
auto change mode. Switch the channel automatically in every 5 seconds.
Note:
The frequency Channel
Min
of wireless
receiving
Typical
Max
Unit
value
CH1
2413.75
2414
2414.25
MHz
CH2
2431.75
2432
2432.25
MHz
CH3
2449.75
2450
2450.25
MHz
CH4
2467.75
2468
2468.25
MHz
Compatible with both 6.0 and 6.5 audio system.
Picture 2: Wire camera installation
1. Pull the camera’s output port into main set’s AV IN port.
2. Power on the main set, switch to wire camera recording mode, the LCD screen will
show the picture caught by camera.
VSPV922W | ENGLISH USER MANUAL
10
Start Recording
① Power on the main set, match the frequency of main set and camera in wireless
recording mode, or check the camera connection in wire recording mode.
② Switch the function knob to function setting, to set recording mode.
Press
button to start recording, top left corner on screen will show
recording icon.
③ Press
button to stop recording,
④ In preview mode, press
recording icon will disappear.
button can take photo.
Once-Operation recording mode: Continuous recording and storage the video per 30
minutes;
Motion recording mode:It will continuous recording if movement sensed, 30 minutes
longest for each part, if movement is not sensed, recording
will stop after 15 Secs.
Timing recording mode:Start recording according to the time you setted, 30 minutes of
each video file.
Audio recording mode: The audio file will not storage in partial.
Attention:
The mein unit has the vibrate notice while low power and no video signal.
1.While the camera did not connect with the main unit correctly, the main unit will
vibrate because of no signal, please check the connection carefully.
2.While the power is not enough, the main unit will continuous vibrate 3 times, at
VSPV922W | ENGLISH USER MANUAL
11
the same time stop recording.
Connect with TV:
1. Connect main set with TV by RCA AV OUT line. As follow:
2. Power on the main set and TV, switch function knob on main set to function setting,
choose video output, and press confirm button, choose PAL or NTSC TV system, then
TV will show what on main set screen.
3. Switch the function knob to multi-media, use
want to play, press
and
to select what you
to start playing.
VSPV922W | ENGLISH USER MANUAL
12
Connect with Computer:
① Connect the USB and MINI USB with computer and the main unit separately.
② After connect with computer, VSPV922W will display “ USB Connect”,
indicator always on.
recharge
Note:
Connect with computer at power on states, can not operate as it is External Hard Drive.
VSPV922W | ENGLISH USER MANUAL
13
Connect with computer at power off states, can do any operation as it is recharging.
③ Open “my computer” to check if there has the removable hard disk, called
“NO_NAME” .
Picture details:
④Open the video files in the folders.
⑤Check the video files in the folders, and play it by the default media player in your
computer.
Attention:
Connect the main unit with PC under power off state,it is power charge mode, red
indicator flash at the same time, files in the storage can not be read. Connect the main
VSPV922W | ENGLISH USER MANUAL
14
unit under power on state, the computer will read the files in the storage automatically
and power charging at the same time.
*Function Modes
Booting Picture:
Record Interface:
Recording Mode:
⑴ Recording symbol
⑵Current time
⑶Video files
⑷Record time
⑺Battery capacity
⑻Current time
⑼Picture quality of recording
⑽Record content
⑸Card icon( if memory card available)
⑾Circular record
VSPV922W | ENGLISH USER MANUAL
15
⑹Available memory
Multi-media folders:
Use
or
to select the folder and press
confirm and enter.
Video folder:
As picture above:”20091012” means the folder that built in 12th Oct of 2009. One folder
for every day.
Video files:
As picture above:”223118.AVI” means the video file that built in 22:31:18 ,30 minutes
VSPV922W | ENGLISH USER MANUAL
16
in a file of each part.
Video play:
Use
pause.
Use
and
and
select the video for playing and press
select forward/backward mode and press
start play or
to play or
pause.
VSPV922W | ENGLISH USER MANUAL
17
Notice:Here has 4 speed level of forward and backward.×2/×4/×8/×20
Audio folders:
Use
or
to select the folder and press
confirm and enter.
For the audio files that already exist,please use
content and press
confirm and playing.
and
to select the
Playing interface:
VSPV922W | ENGLISH USER MANUAL
18
Press
and
button to play other audio content.
Picture folders:
Press
Press
or
or
to select picture folder, press
to choose the picture, press
confirm and enter.
playing it.
Picture Display:
VSPV922W | ENGLISH USER MANUAL
19
Press
or
to browse other pictures.
Note:JPG format picture, 640×480 resolution.
Delete files:
Enter video folder,choose the file that you want to delete, short press “Power” button till
the delete menu appear.
Press
or
to choose “ALL/CURRENT”. Press
confirm or choose
“ Cancel” menu quit operation.
Use
or
to choose “YES” or “NO”. Press
confirm delete or cancel this
operation.
VSPV922W | ENGLISH USER MANUAL
20
ALL:Delete all data
CURRENT:Delete the file that selectd
CANCEL:Cancel the delete operation
Function setting
Switch function knob to function setting, use
Press
button confirm to enter.
Use
and
and
to set.
to recording mode.
There are three recording mode for you selection: one key record, motion detect, time
recording. User can set as his/ her personal need.
Press
to confirm exit.
VSPV922W | ENGLISH USER MANUAL
21
Resolution setting:
Use
and
Press
Use
buttons let the flashing arrow to resolution setting location.
confirm to enter.
and
to select resolution, and press
to save and exit menu.
VSPV922W | ENGLISH USER MANUAL
22
Recording quality setting:
Use
and
let the flashing arrow to quality setting location.
Press
to enter.
Press
and
select quality, and press
to save and exit.
Per minute video file storage usage under different resolution setting:
Storage memory information form:
Quality
High
Medium
Resolution
Low
720x576
≤45MB
≤36MB
≤20MB
720x480
≤43MB
≤33MB
≤18MB
Battery time
Approx. 1 hour
and 40 minutes
Approx.1 hour
and 30 minutes
VSPV922W | ENGLISH USER MANUAL
23
640x480
≤39MB
≤27MB
≤16MB
320x240
≤12.4MB
≤9.8MB
≤8.3MB
Approx.1hour
and 32 minutes
Approx.1 hour
and 50 minutes
Record content setting:
Use
and
move the flashing arrow to record content setting location.
Press
Use
to enter.
and
to select recording content.
After you choose video and audio recording function, sound source menu will be
activated.
VSPV922W | ENGLISH USER MANUAL
24
Internal MIC is MIC inside on main set itself, AV IN means audio signal provide by
camera microphone or external audio signal.
Press
to save file and exit.
Storage selection:
Use
and
Press
Use
to move the flashing arrow to storage location.
to enter.
and
buttons to choose TF card or internal memory, press
button to
save and exit.
VSPV922W | ENGLISH USER MANUAL
25
Support 32GB external TF card.
Circular record setting:
Use
and
to move flashing arrow to circular record.
.
Press
Use
button to enter.
and
buttons to turn on or off, press
to save and exit.
VSPV922W | ENGLISH USER MANUAL
26
Notice:
If you turn on circular record, when card storage is full, system will delete the earliest
video files, to make sure there is enough storage to save new content.
If user want save all contents, please do not turn on this function, and remember to
change card when card is full stored.
Vibrating alert setting:
Use
and
to move flashing arrow to vibrating alert.
Press
Use
to enter.
and
to select turn on or off vibration, and press
to save and
exit.
If you turn on vibrating alert, it will vibrate when main set has no video signal, or low
VSPV922W | ENGLISH USER MANUAL
27
power.
Notice:
After turn on vibrating alert, the main set will consume bigger.
Keypad tones setting:
Use
and
to move flashing arrow to keypad tones.
Press
Use
to enter.
and
to select to turn on and off keypad tones, and press
to save
and exit.
Keypad tones is buzz notice when main set has no video signal, low power or storage is
VSPV922W | ENGLISH USER MANUAL
28
full used.
Language setting:
Use
and
Press
to enter.
Use
and
to move flashing arrow to language.
to select language, press
to save and exit.
VSPV922W | ENGLISH USER MANUAL
29
This system has only Chinese and English menu right now.
We can OEM the language in your country if user can provide translation.
Time set:
Use
and
press
Use
to move flashing arrow to time set.
to enter.
and
to select.
Time stamp setting:
VSPV922W | ENGLISH USER MANUAL
30
Screen only shows date and time once time stamp is turn on.
Time adjust:
Use
and
Press
Use
to move flashing arrow to time adjust.
to enter.
button to select minute and second, use
and
to adjust.
Press Menu button to save and exit.
VSPV922W | ENGLISH USER MANUAL
31
Date adjust:
Use
and
Press
Use
to move flashing arrow to date adjust.
to enter.
button to year, month and day, use
and
to adjust.
Press Menu button to save and exit.
VSPV922W | ENGLISH USER MANUAL
32
Date format:
Use
and
.
Press
to move flashing arrow to date format.
to enter.
VSPV922W | ENGLISH USER MANUAL
33
Use
Press
and
to select display format of date.
to save settings.
Press Menu button to save and exit.
Brightness setting:
Use
and
Press
Use
to move flashing arrow to Brightness.
to enter.
and
to select intensity of brightness.
VSPV922W | ENGLISH USER MANUAL
34
Press
to save settings and exit.
Video output:
This function is available when connect with TV, make sure connection is correct before
setting.
Use
and
Press
Use
to move flashing arrow to video output.
to enter.
and
to select TV system, main set screen will turn off, and the content
show on TV.
If you want to quit TV display, please select LCD, and press
to confirm, the
content will show on main set screen.
VSPV922W | ENGLISH USER MANUAL
35
Auto power off:
Use
and
Press
Use
to move flashing arrow to power off.
to enter.
and
to select 1 minute, 5 minutes , 10 minutes, or never.
VSPV922W | ENGLISH USER MANUAL
36
LCD off:
Use
and
Press
Use
Press
to move flashing arrow to LCD off.
to enter.
and
to select LCD off time.
to confirm.
VSPV922W | ENGLISH USER MANUAL
37
Note:
Press any button can turn on LCD after LCD off.
Format:
Use
Press
Use
and
to move flashing arrow to format.
to enter.
and
to select format which object, and press
to confirm.
VSPV922W | ENGLISH USER MANUAL
38
Press MENU button to exit.
Notice:
Data can not recover after you format the storage, please be noticed beofre you do.
Program update:
Copy the update files to TF card root directory, and pull card into main set.
Use
and
to move flashing arrow to update.
Press
to update.
VSPV922W | ENGLISH USER MANUAL
39
Main set will auto shut after program update successfully, please power on the main set to
use. Select version can view the version of system software.
Default setting:
Recover the main set to factory setting.
Use
and
to move flashing arrow to default setting.
Press
Use
to enter.
and
to select recover factory setting or not, and press
to confirm.
Press MENU button to exit.
VSPV922W | ENGLISH USER MANUAL
40
*Accessories
Main unit
Wireless Camera
Battery
x1
x1
x1
Power charger
x1
AV input cable
x1
VSPV922W | ENGLISH USER MANUAL
41
AV output cable
x1
USB cable
x1
Disc
x1
Wireless remote controller
(Optional)
x1
Protective pack
Manual
x1
x1
VSPV922W | ENGLISH USER MANUAL
42
PARAMETERS
Wireless HDVR
VSPV922W
LCD
2.5inch TFT LCD 960×240
Video system
Video resolution
Frame rate
PAL/NTSC
D1
VGA
720×576@25 fps
D1
640×480@30fps
QVGA
Video format
AVI (MPEG-4)
Audio format
MP3
Built-in flash memory
Memory compatibility
Transmission Frequency
Modulation Mode
Receiving Sensitivity
720×480@30 fps
128MB~2G(optional)
Micro SD Card
256MB~16GB
ISM 2,400MHz~ 2,483MHz
≤-85dBm
High-speed USB 2.0
AV In Jack
3 rings with 2.5mm
AV Output Jack
3 rings with 3.5mm
Earphone jack
3 rings with 3.5mm
Operation Temperature
-0ºC-60ºC
Operation Humidity
15-85%RH
Battery
OS supported
Language
4CH*
FM
USB Jack
Power supply
320×240@30fps
DC 5V 1000mAh
Li-ion battery 1300mAh
2000/XP/Vista 32
Chinese/English
2.4G Wireless Camera
VSPV922W Camera
Imaging sensor type
CMOS
CMOS Total Pixels
628×582(PAL)/ 510×492(NTSC)
Horizontal Resolution
380 TV Lines
Minimum Illumination
5Lux/F1.2
Dimensions
Consumption Current
75×28×148 mm
700MA
VSPV922W | ENGLISH USER MANUAL
43
We will not inform you if there is any modification for user maual in future.
VSPV922W | ENGLISH USER MANUAL
44