1
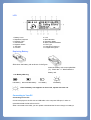
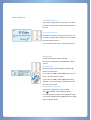
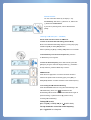
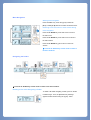
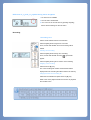
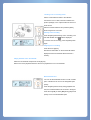
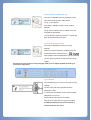
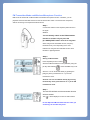
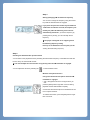
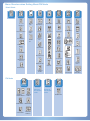
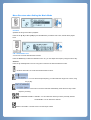
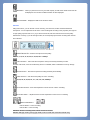
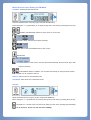
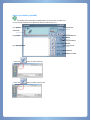
NMP-612T NMP-612TD User's Manual Thank you for purchasing NMP-612T/TD. Please read this guide carefully before using NMP-612T/TD. Contents of this manual are subject to change depending on the model type in the future. If applicable, you can download the revised version from our web site. The displayed memory capacity may differ with the actually available memory for system operation. Copyright Notice The copyright owner of this manual is Nextway Inc, and unauthorized reproduction or distribution of the manual, or any portion of it, may result in severe civil and criminal penalties. D Cube and Nextway are trademarks of Nextway Inc. FreeRip is a registered trademark of MG Shareware. WMA is a registered trademark of Microsoft Corporation. The copyright owner of MP3 Manager software for NMP-612T/TD is Nextway Inc, and unauthorized reproduction or distribution of this program or commercial usage without a prior written consent, may result in severe civil and criminal penalties What is NMP-612T/TD? 1. NMP-612T/TD is integrated with a FM transmitter. Therefore, you can playback MP3 or WMA file from NMP-612T/TD in the FM-tuner integrated audio, without connecting to the separated external device. 2. NMP-612T/TD is a portable digital audio player for saving and playing WMA (Windows Media Audio) files of Microsoft Corporation and MP3 music files. 3. NMP-612T/TD can save audio files directly transferred from voice recorder, CD player or other audio equipment without a Line-in jack, and play them with built-in MP3 encoding function. 4. With its built-in FM radio system, NMP-612T/TD can save a music received by FM as a MP3 file. Features ● Wireless MP3 function If you select the FM transmitter mode built in NMP-612T/TD, you can playback MP3 with high sensitivity by wireless connection using the device equipped with a FM radio (car audio, home audio, home theatre, regular FM radio and so on.) If you select the wireless microphone function on the menu at the same time, you can send your own voice with MP3. ● Lyric display The words of the playback music will be displayed in three lines. ● Up to 255 hour-long recording (512MB) NMP-612T/TD supports 4.8Kbps (TVF format), which provides the longest recording hours in the world.. ● Playing back MP3/WMA/TVF music files Saves and plays back the WMA file of Microsoft Corporation and the MP3 file. ● Receiving and recording the FM radio Receives FM radio signal and records it digitally as an MP3 file. ● Built-in backlight/Graphic LCD screen for multilingual setting Supplies Korean and multilingual ID3 TAGS with its multilingual graphic LCD screen. You can easily check the operation status with the LED backlight. ● High-quality voice recording with MP3 format Saves a digital voice recording file as a high quality MP3 file and plays it. ● Line-in digital recorder Directly converts and saves a sound signal from all analog audio equipments into a MP3 file without a PC. ● Setting up the variable bit-rate You can use the memory effectively by controlling the recording quality with the variable bit-rates of voice recording or Line-in recording, depending on the timing or the place. ● VAD (Voice Activity Detection) recording Controls the recording time and memory most effectively with its special function which starts recording only when sounds. ● Speed control function You can control playback speed faster or slower. ● Convenient firmware upgrade Firmware is automatically upgraded by Cube Audio Manager. Alternatively, you can download the upgrade file released on the Nextway web site (www.nextway.co.kr) and turn the power on and off to automatically upgrade the firmware. ● Providing software for creating MP3/WAV/OGG files Nextway provides FreeRIP application program that converts music files in the CD into MP3/WAV/OGG file in the PC. Package Components and Names of the Components NMP-612T/TD 1. Stereo Earphone 2. Software Installation CD 3. Neck Strap 4. Line-in Cable 5. Manual 6. USB Extension Cable 7. Carrying Case 8. AA Size Battery 1ea. 9. Antenna 1. Earphone Jack/FM Transmitter Antenna Jack 2. Music/Hold/FM Mode Selection Switch 3. Microphone 4. Forward/Rewind/Menu Button 5. LCD 6. Record Button 7. Recording LED/Transmitter On LED 8. Play/Pause Button, Power On/Off 9. Volume Control Button 10. Sector Repetition/Speed Control/Shortcut to FM Transmitter 11. Line-in Jack 12. Battery Cap 13. USB Cap 14. USB Slide Button LCD 1. Battery Level 3. Repetitive Playback 5. Playback Time 7. Sound Effect 9. Playback Status 11. Bit Rate 13. Volume 2. Lock 4. Music Number 6. Repetition Mode 8. Music Title/Words/Menu 10. File Type 12. Sampling Frequency 14. Playback Progress Replacing Battery Slide down the battery cab as shown in the figure. Insert the battery with correct polarities (+/-). Check the “+/-“ label inside the battery cab. Low Battery Warning Full Battery Decremented Battery Low Battery Flat Battery If the flat battery icon appears as shown left, replace with new one. Connecting to Your PC Connecting to Your PC Connect the player to the PC with an USB cable or the computer USB port, in order to upload/download the file to/from the PC. When connected to the USB, you can upload or download the file even though no battery is inserted into the player or the battery is completely flat, since the player uses the power provided by the PC USB. Windows ME/2000/XP or Mac OS 9.x automatically detects the players as a movable disk. However, you should install Cube Audio Manager first to use this player on Windows 98. As shown in the figure, connect to the PC USB port directly or using the USB extension cable. Then, connect the other side to the player. The above message “USB CONNECTED” will appear on NMP-612T/TD if connected successfully. ※ The red LED will flash during data transmission through the USB and will turn off when completed. Do not disconnect the USB while the red LED flashes. ※ Some PC vendors do not support direct USB connection. If not supported, use the USB extension cable. Caution 1 There is a gap between the cable entry and the player’s USB terminal as shown in the below figure when using the USB extension cable. If you apply excessive force to insert it completely, the player can be damaged. When inserting an USB jack, insert the USB terminal while pressing down the slide button. If you insert the terminal without pressing down the button, the player may be broken. Caution 2 Do not delete the system file in NMP-612T/TD - CONFIG.SYS and NED_LIC.SYS. Using Cube Audio Manager Insert the installation CD into the PC CD-ROM drive. The installation program will be automatically started and the initial installation screen will appear. ▷ Audio Manager: Software that uploads or downloads the files to/from the player and the PC. ▷ FreeRip: PC player application software that encodes the music in the CD into the digital music file and plays it back. ※ You cannot install Cube Audio Manager/FreeRip on the MAC OS. Double-click on the Cube Audio Manager icon on the desktop background to execute it. Menu Icon related with File Playback Plays back the file, pause or stop file playback. 1 File List in the Movable Disk Lists up the files in NMP-612T/TD Playlist editing window. Creates the Playlist inside the program.. If you drag and drop the Playlist 1 on the editing window, the Playlist will be crated. Upload: Uploads file(s). Download: Downloads file(s). New Folder: Creates a new folder. Delete: Deletes the file(s). Delete All: Deletes all files. Refresh: Refreshes the list. TVF2: Converts the TVF file into Wave file. Check: Checks whether new firmware is available or not. (Visit our web-site at www.nextway.co.kr) Lycirs ED: Executes the song text editing program. Configure: Configures the player. The PC to install software should comply with the following specifications. Pentium MMX or faster CPU/CD-ROM drive/more than 50MB HDD space/USB port/Windows 98/ME/2000/XP. Basic Operations Turning the power on Press the PLAY [▶] button for 2 seconds. The “NMP612T/TD” and its firmware version will be displayed on the LCD. Turning the power off Press the PLAY button for longer than 2 seconds. The “Good Bye” message will be displayed on the LCD and the power will be turned off. You can set the power off logo at the DISPLAY menu. Playing back Set the mode selection switch to "MUSIC". Press the PLAY [▶] button to playback MP3, WMA or TVF file. Selecting music Press the jog key towards FF [▶▶] or REW [◀◀] direction to select music. If you hold on FF [▶▶] or REW [◀◀] button, you can move to the desired music quickly. If you hold on FF [▶▶] or REW [◀◀] button during playback, you can move faster to the previous or next part of the current music Stopping/Pausing playback Press the PLAY [▶] button to stop or pause. The ( ) will flash and the player will pause. To resume playback, press the PLAY [▶] button again. If you press FF [▶▶] or REW [◀◀] button in the pause mode, the player will stop. Volume control You can control the volume by 30 steps (0 – 30). To volume up, slide to the (+) direction. Or, slide to the (-) direction to volume down. If you hold on pressing down, volume will decrease quickly. Listening to FM radio (87.5 ~ 108.0Mhz) Set the mode selection switch to ˈFMˉ first. To listen to the desired broadcasting (Search Mode) Move to the desired broadcasting frequency moving the jog key towards FF [ඖඖ] or REW [ඔඔ] direction. Hold on pressing FF [ඖඖ] or REW [ඔඔ] button to move faster. To automatically scan the entire frequencies, press the AļB/SPD key for a long time. To save the found frequency in the search mode, press the [Menu] key longer to select the target position (e.g., ROOM01 – 89.1M) and then, press the MENU key to save it. PRESET mode Press the PLAY [ඖ] button once in the FM main window to switch to the preset mode. Press the jog key to FF [ඖඖ] or REW [ඔඔ] direction to select and listen to the saved frequency. To recording the FM radio broadcasting Press the RECORD button for a long time while listening to the FM broadcasting. Then, the (G G G G G ) will flash and the broadcasting will be saved. Press the RECORD button again to pause recording, or press the PLAY [ඖ] button to stop recording FM broadcasting.. To Stop FM search press FF[ሪሪ] or REW[ረረ] or AᆎB/SPD shortly To stop automatic scan of the entire frequency, press AᆎB/SPD for a long time Menu Navigation Starting menu navigation Press the MENU key. Press the jog key towards FF [▶▶] or REW [◀◀] direction to select the desired menu. Returning to the main menu or main window during menu navigation Press the A↔B/SPD key at the sub-menu to return to the main menu. Press the A↔B/SPD key at the main menu to return to the main window. Press the A↔B/SPD key gain to return to the main window. ※ Press the A↔B/SPD key at each menu to return to the main windows. Navigating the folders ※ Press the A↔B/SPD key at each menu to return to the main windows. Deleting a File while Navigating a Folder To delete a file while navigating a folder, press on the file to delete longer. Then, the [ERASE FILE] meesage appears. Select NO/YES using the jog key. Press Difference of “>” and “>>” symbol during menu navigation ! : No sub-menu is available. YRLFH#TXDOLW\A >: The sub-menu will be listed. >>:You can move to the sub-menu by pressing the [Play] button without entering into the sub-menu. Recording ● Recording voice Set the mode selection switch to the "MUSIC". Press the [REC] button longer than 2 seconds. Then, the red LED will flash and voice recording will be started. Pausing voice recording Press the [REC] button during voice recording. Then, the red LED will flash and the ( ) symbol will appear. Press the [REC] button gain to resume voice recording. Stopping voice recording Press the PLAY [▶] key. The voice recording file number and information will be displayed and the recording file will be saved in the memory. Playing back the voice recording file Select the recorded file and press the PLAY [▶] key. Refer to the music playback method to see how to playback the recorded voice. ● Setting Line-in recording mode Set the mode selection switch to the "MUSIC". Connect the Line-in cable, which is included in the product package, to the output terminal of the Line-in audio device. Start the external audio first and press the [REC] button longer than 2 seconds. Pausing Line-in recording Press the [REC] button during Line-in recording. The red LED will flash and ( ) will be displayed. To resume Line-in recording, press the [REC] button again. Stopping Line-in recording Press the PLAY [▶] key. Number and information on the recorded file will be displayed and the recorded file will be saved in a memory. Playing back the Line-in recorded file Select the recorded file and press the PLAY [▶] key. Refer to the music playback method to see how to playback the Line-in recorded file. Bookmark function You can use the bookmark function to mark a certain point of the file and to move to the designated point quickly. Press the [REC] button shortly during playback and then, the bookmark will be set as shown in the figure. Press the FF [▶▶] or REW [◀◀] during playback to quickly move to the bookmarked point. Section Repeat playback [A↔B] Press the [A↔B/SPD] key during playback to set the point where sector repetition will be started. The [A→] icon will flash. Press the [A↔B/SPD] key again to stop repetition playback. The [A↔B] icon will flash and the selected sector will be repetitively played back. To clear repetitive playback, press the A<->B/SPD key again and playback will be resumed. Controlling playback speed Press the [A↔B/SPD] key shortly twice during playback. Whenever you press the button, playback speed will be switched between Normal (no icon) → → →. When playback speed is displayed that you want and you don’t press any button, the selected speed will be applied. This function is quite useful for foreign language study. You can adjust playback speed for your convenience and purpose. Lylics display Press the [Menu] key for 3 times for a long time during playback. The text of the music being played back will be displayed in 3 lines. To release the Lylics display function, press the REW [◀◀] button for one time. Only the MP3 format supports text display. WMA and TVF format does not support text display. For MP3 text display function to be activated, it should include the text with it. FM Transmitter Mode and Wireless Microphone Function NMP-612T/TD is built with a FM transmitter and wireless microphone function. Therefore, you can playback music file from NMP-612T/TD in the FM-tuner built-in audio or sound from the microphone, without connecting to the separated external device. Step 1 Connect the antenna to the earphone jack as shown in the figure. Shortcut You can directly switch to the FM transmitter function or release it if you press the [A↔B/SPD] FMTx button once for a long time. When using the FM transmitter function, frequency interference may occur depending on the area. Refrain from using the FM transmitter function when thunders or lightning flashes. Step 2 Setting a FM transmitter Press the [Menu] button to select ( ). Select the FM transmission function (ON/OFF )using the job key after selecting ( ). Press the MENU key to set. Shortcut: You can set On/Off directly by pressing the [Play] key at the [Transmission on >>] in the FM transmission menu. Shortcut: You can set ON/OFF directly by pressing the PLAY key at the [Transmission on >>] in the FM transmission menu. Step 3 The red LED will flash and the transmitter function will be activated. The ( ) will be displayed on the LCD main window. Do not adjust the FM transmitter function while you are driving. Car accident may occur. Step 4 Setting (Changing) FM transmission frequency You can set or change the frequency using the volume key while the FM transmitter is engaged. If you press the press the volume key toward ˈ+ˉ or ˈ-ˈ direction for about 2 seconds, the frequency not used by the public broadcasting service will be automatically searched. If you set the frequency by pressing the key shortly, you can manually set the frequency. The player is designed not to support general broadcasting frequency setting Don't try to set FM transmission frequency to the existing air broadcasting frequency. Step 5 Checking the FM transmitter operation status You can listen to the playback sound by matching the transmission frequency of the NMP-612T/TD with the one set by the external FM receiver.. You cannot adjust the sound volume using the key when the FM transmitter is engaged. You can adjust the volume by selecting the ( ) in the transmitter menu. Wireless microphone function Using internal/external microphone when the FM transmitter is engaged. ( ) will appear as shown in the figure when you press the [REC] button longer than 2 second during playback and the LED will flash frequently. Connect the external microphone to the NMP-612T/TD Line-in imputer terminal. To release the function, press the [REC] button longer than 2 seconds. Menu Structure when Setting Music/FM Mode Music Mode BROWSE> SOUND EFFECT> FM TRANSMITTER> REPEAT> OUTPUT OFF/ON >> REPEAT THIS! SHUFFLE/ SEQUENTIAL >> BASS BOOST > OUT FREQUENCY> REPEAT ONCE! SELECT > 3D SOUND > AUTO PRESET! REPEAT ALL! SCAN/PRESET MODE>> PLAY LISTS> PLAYLIST FILE > EQ>> ADVANCED> RECORD> BACKLIGHT > PLAY SPEED > VOICE QUALITY > LCD CONTRAST > SLEEP TIMER > DISPLAY> SCROLL SPEED > LOGO > VAD>> STANDBY TIME > AGC>> BATTERY > LINE QUALITY > DEL BOOKMARKS> CONFIG INITIALIZE MENU LANGUAGE > OUT VOLUME> QUICK FORMAT LOW LEVEL MEMORY FORMAT SEC MOVE SEL> TAG LANGUAGE > HEADPHONE >> ON / OFF CD SYNC >> FORMAT > CD SYNC LEVEL > MIN MOVE SEL> USER EQ> DISPLAY MODE> MEMORY> MIX BALANCE> PREVIEW SENSE> F/W VERSION> FM Mode FM RECEIVER> STEREO/ RECEIVE MONO MODE >> LEVEL> BAND AREA> AUTO PRESET BEND STEP> SCAN/AUTO PRESET>> DISPLAY> ADVANCED> Same as the MUSIC mode Same as the MUSIC mode RECORD> FM QUALITY> LINE-IN AUDIO/MIC>> Menu Structure when Setting the Music Mode BROWSE Specifies the range of the files to playback. Press the FF [ඖඖ] or REW [ඔඔ] key and the MENU key to select the file. Then, the file will be played back. FM TRANSMITTER You can turn on/off the FM transmitter function. Press the MENU key to select the desired function. Or, you can adjust the frequency using the volume key. Shortcut Press the [AļB/SPD] FMTx once for a long time to switch to the FM transmission function. OUTPUT OFF/ON: Turn on/off the FM transmission function. OUT FREQUENCY>: You can set the output frequency you want within the range of 87.5~95.0, using the jog key. AUTO PRESET! : Select this menu to scan the channels automatically. Press the PLAY key to start frequency scanning. SCAN/PRESET MODE>> PRESET: You can select the channel you have previously entered. SCAN MODE: You can search the channel. OUTPUT VOLUME>: Use this menu to set the output volume. HEADPHONE>>ON/OFF: Use this menu to set the headphone on/off. MIX BALANCE>: Use this menu to set the balance of the background music, using the jog key. REPEAT You can set the repetitive playback function. Press the MENU key to select the function you want. THIS! : Plays back one music only Once! : Plays back only once ALL! : Plays back all music. Select the desired function using the jog key and press the MENU key. Menus having the “>>” symbol allows you to directly change at the main menu by pressing the PLAY key. SHUFFLE/SEQUENTIAL>>: Plays back music randomly or sequentially. SELECT FOLDER>: Use this menu to select the folder you want. PLAYLIST FILE>>: Use this menu to select a Playlist file created by WinAmp (m3u) to play it back. DEL BOOKMARK>: Use this menu to delete the bookmark during playback. SEC MOVE : Move the jog key toward FF or REW during playing back. It will move forward or backward as much as the time you set and resume the playback. MIN MOVE : Move the jog key toward FF or REW during playing back. It will move forward or backward as much as the time you set and resume the playback. REVIEW SENSE : Select review sense mode. And, Move the jog key toward REW during playing back. It will sense the previous mute part while rewinding and resume playback from the mute point. G SOUND EFFECT You can enjoy various sound tones using this function. Select the desired function using the jog key and press the MENU key. Menus having the “>>” symbol allows you to directly change at the main menu by pressing the PLAY key. BASS NORMAL/BOOST: Use this menu to set bass sound on. RXGGGG 3D OFF/ON: You can enjoy dynamic sound. 5####ohyho EQ: You can enjoy various sound tones using this menu: Normal -> Jazz -> Rock -> Pop -> Classic -> User. Select the sound tone you want, using the jog key and press the MENU key. Or, you can directly change in the SOUND EFFECT menu by pressing the PLAY key. USER EQ: You can set the sound tones as your preference. There is five modes ; BASS, MID1, MID2, MID3, TREB. Press the play button to choose a mode and press (FF[ሪሪ] or REW[ረረ]) to adjust the sound tones as your taste. To save the adjusted sound tones on the mode, press the menu button Display Use this function to change the display setting of NMP-612T/TD. Select the desired function using the jog key and press the MENU key. Menus having the “>>” symbol allows you to directly change at the main menu by pressing the PLAY key. BACKLIGHT> : Sets the time duration the LCD light is on. LCD CONTRAST> : Sets the LCD contrast. LOGO DISPLAY> : Sets on/off logo display when the power is turned on/off. SCROLL SPEED> : Sets scrolling speed. MENU LANG.:You can select the menu language shown on LCD. TAG LANG.:You can select the ID3 tag language. In case of TAG OFF, only file name is shown. DISPLAY MODE: During playing back, you can set the display layout of LCD. Normal Current folder Next song Lyrics ADVANCED Using this function, you can set the detailed advanced functions of NMP-612T/TD. Select the desired function using the jog key and press the MENU key. Menus having the “>>” symbol allows you to directly change at the main menu by pressing the PLAY key. PLAY SPEED>:You can adjust the playback speed. SLEEP TIMER> : Sets the power off reservation time. OFF, 10, 20, 30, 40, 50, 60, 70, 80 or 90 minutes. STANDBY TIME> :Sets the time duration that the player is automatically turned off if no key operation is detected. 30, 60, 90, 120, 150 or 180 seconds. BATTERY> : Selects the battery type. CONFIG INITIALIZE LOW LEVEL MEMORY FORMAT FORMAT>: Initializes the NMP-612T/TD memory contents. QUICK FORMAT To Press the button of PLAY PAUSE or VOICE RECORDING PAUSE just causes the pause of playback or recording, not power off. MEMORY> : When you press the PLAY key, the total capacity as well as the remained amount will be displayed. The number of folders and files are also displayed. F/W VERSION> : Displays the NMP-612T firmware version. RECORD Using this function, you can bit rate of voice recording, Line-in bit rate, SYNC and internal/external microphone. You can adjust the bit rate of the voice recording file according to the purposes (for long-hour or high-quality purposes and so on.) If you set the low bit rate, file size reduces but the sound quality deteriorates. Contrary, if you set the high bit rate, the sound quality improves the recording time reduces due to file size. VOICE QUALITY>: Sets the microphone sound quality. 5, 8, 16, 24, 32, 40, 48, 56, 64, 80, 96 or 112Kbps VAD OFF/ON>> : Sets on/off the microphone VAD (Voice Activity Detection) function. In VAD mode, sound is recorded only when it is available, which contributes to memory savings. ACG OFF/ON>> : Sets the microphone recording sensitivity automatically. LINE QUALITY>: Sets the sound quality for Line-in recording. 32, 40, 48, 56, 64, 80, 96, 112, 128, 160, 192, 224Kbps CD SYNC OFF/ON> : Sets of/off separation of music in time of line-in recording. CD SYNC LEVEL> : Adjusts the level of music separation in time of Line-in recording. LINE-IN AUDIO/MIC>> LINE-IN AUDIO : Line-in recording LINE-IN MIC : Voice recording VAD OFF: General recording mode, which records all sectors VAD ON: Storage memory saving type mode, which records the sector that sounds only. Menu Structure when Setting the FM Mode FM RADIO: Provides the FM radio function. Select the desired function using the jog key and press the MENU key. Menus having the “>>” symbol allows you to directly change at the main menu by pressing the PLAY key. STEREO / MONO MODE: Select one of the stereo or mono mode. RECEIVE LEVEL: Sets the FM reception sensitivity. BAND AREA: Sets the bandwidth area for each country. BEND STEP AUTO PRESET! : Select this menu to scan the channels automatically. Press the PLAY key to start frequency scanning. SCAN/PRESET MODE>> PRESET: You can select the channel you have previously entered. SCAN MODE: You can search the channel. DISPLAY: Same as the one in the MUSIC mode. ADVANCED: Same as the one in the MUSIC mode. RECORD Select the desired function using the jog key and press the MENU key. Menus having the “>>” symbol allows you to directly change at the main menu by pressing the PLAY key. FM QUALITY>: Use this menu to set the sound quality you want, when recording FM broadcasting. 32, 40, 48, 56, 64, 80, 96, 112, 128, 160, 192 or 224Kbps Using Lyrics Editor (LyricsED) The window shown below will be populated when you click on the “LyricsED” icon. You can use this software for the MP3 music file that contains a lyric in it. Lyric Window MP3 Info Window Volume Bar Progress Bar MP3 Playback Buttons Timing Button Auto. Timing Set Button Open MP3 File Lyric Editing Window Open Lyric Text File Saves lyric text Save Edited Lyric to MP3 1. Press the button to select a MP3 file. 2. Press the button to select a lyric text file. 3 Press the PLAY button to play music back. Move the mouse cursor pointer at the beginning of the lyric when music is played back and press the button to display the time point in front of the lyric text. When you press the Press the button after music playback, only the edited text will be saved. button to save it as a MP3 music file containing the lyric. Automatic lyric time setting When you press the button and click on the target point on the lyric editing window, the time will be automatically displayed. Press the PLAY button to playback music and check the edited lyric on the lyric window Using FreeRip 1.Click on the [FreeRIP] icon and press the [Next] button as shown in the above fiture. 2. Select the installation directory and press the [Next] button. 3. Select the option as shown in the figure and Press the [Next] button. 4. Press the [Finish] button. Using FreeRip 1. Double-click on the “FreeRip” icon on the desktop window. 2. The option window will appear. Select Help and read information in it. 3. Select the file type you want and input the e-mail address. Then, click on the [OK] button. 4. When you insert the audio CD inside the CD-ROM, the music file will be listed. 5. Select a file(s) to convert and select “Rip to MP3” menu. 6. MP3 file(s) will be created. 7. Complete file conversion. 8. You can find the converted MP3 files in the directory you have specified. Usage Precautions Please read carefully the following instructions and safety pre-cautions to prevent damage on the property and the user. Do not expose the product in the high-temperature area (above 60 degree), under the direct sunlight, inside door-closed vehicle, in the dusty and high-humidity area like a bath room. Use the soft and dry cloth when cleaning the product. Do not apply any solvent, benzene or thinner. (These materials may deform or de-color the product surface.) Do not apply excessive power to the LCD unit. Never disassemble, repair or modify it. Please be kindly noted that Nextway will bear no obligation over file contents loss due to malfunction, repair or other reasons. Do not put the player close to the magnetic materials such as the cash card or commuter card because it may cause magnetic interference to the player, which will result in product breakdown.. Be careful not to insert any foreign object in the player. If you split water or fluid inside the player, take out the battery/adaptor and contact with Nextway's customer supply center. Remove the battery if you will not use the player for a long time. (Electron leakage may damage the product.) Safety Precautions 1. Do not adjust the FM transmitter function while you’re driving. Car accident may occur. 2. If you listen to the music with high sound volume, you hearing ability may be impaired. 3. Do not repair, disassemble or modify the player at your own discretion. 4. In case there is distortion of the product due to smoke or fire, remove the battery immediately. 5. Do not use in the places such as inside the plane or place where electronic devices are prohibited 6. Refrain from using headphone/earphone during biking, or driving. (It can be a major cause of accident if headphone/earphone is used during walking) 7. When you wear a neck strap, be careful about being caught in a door. Troubleshooting Check the following items first if any problem happens. 1. Playing does not work and the LCD screen is not turned on. - Check if the battery is correctly inserted. - Replace the battery with new one. - Charge the rechargeable battery. 2. Cannot hear any sound. - Check if the memory file is saved. - Check if the volume is set to 0 (zero). - Check if the earphone is connected correctly. 3. The button key does not work. - Check if the HOLD button is set. 4. Cannot download anything. - Check if the USB cable connected correctly. - Check if the USB extension cable is properly connected. Specifications Model name NMP-612T/TD Built-in Transmitter 87.5MHz ~ 95MHz Flash Memory Memory capacity is written on the product package box. Text Display LCD ID3 v1 tag, DI v2 tag Download/Upload Max. 6 Mbps data rate MP3 Decoding Supports ISO MPEG 1/2/2.5 layer 3 including variable bit rate. MPEG1 32KHz / 44.1KHz / 48K Hz Layer 3 32, 40, 48, 56, 64, 80, 96, 112, 128, 1 60, 192, 224, 256, 320 Kbps Mono/Stereo/Joint stereo mode MPEG2 16KHz / 22.05KHz / 24 KHz Layer 3 8, 16, 24, 32, 40, 48, 56, 64, 80, 96, 1 12, 128, 144, 160 Kbps Mono/Stereo mode Variable bit rate WMA Decoding Supports high bit rate version, middle bit rate version Bit rate MP3 Encoding 32Kbps ~ 192Kbps ISO MPEG 1/2/2.5 Layer 3 Support Including variable bit rate (up to 256Kbps) Sampling frequency 8Khz, 16Khz, 22.0 5Khz, 32Khz, 44.1Khz , 48KHz Bit rate 8Kbps ~ 22 4Kbps VBR support TVF Format Recording Earphone Output 12mW/12mW (left/right) – Max. volume S/N (Signal-to-noise Over 95dB (JIS A weight filter) ratio) Playback Time Longer than 22 hours (128Kbps, 2.5mW) FM: Longer than 40 hours When the FM transmitter is activated: Longer than 10 hours Voice Recording Time 256MB: Up to 115 hours (TVF 4.8kbps) 512MB: Up to 230 hours (TVF 4.8kbps) MIC AGC (Automatic Gain Control) Line-in Recording Longer than 8 hours (512Mb memory, 128Kbps encoding) Time PC Interface USB v1.1 Power 1 AA size battery Dimension 35.5 (width) X 84 (height) X18.5 (length) mm Weight 47g (excluding a battery) Warranty For Customer Services 1. This product is manufactured with the strict quality control and overhauling procedures. 2. Nextway provides with free after sales service for any malfunction caused by proper usage and occurred in the warranty period. 3. Free customer service is not guaranteed if the cases come under the pay services below. 4. This warranty is valid for the domestic use only. 5. Fill in the warranty form and keep it for future reference. 6. If trouble occurs, contact the distributor or the customer service team as described below. Please contact the customer support team if you have any enquiry on product usage. Nextway www.nextway.co.kr www.dcubemp3.com