1
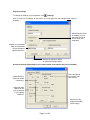
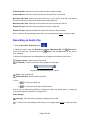
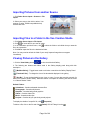
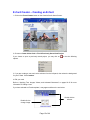
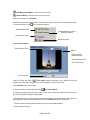
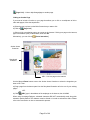
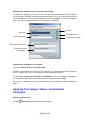
Click Continue when you are done.
5. Define your animated characters’ path.
Refer to pages 37-38 for more information on how to define the path of an animated character.
Click Continue when finished.
6. Select the background music. Click
selected audio files from the Gallery.
[Set Background Music] or click and drag the
7. Selecting background music. To listen to the music before selecting, place your cursor on any
one of
without clicking.
Click
[Mute] to turn background music on and off.
Note: When the Mute button
is selected it does NOT remove the background music, you will
just not be able to hear it during the creation process. To remove the music entirely, click
[Set
Background Music] and choose
.
After you select your music, click Continue.
8. Click
[Transition Effect]. Sample the effects by placing your cursor on each individual
effect without clicking.
9. Choose the opening effect (how you want the E-Card to open up). Click Continue after you
select your opening effect.
[Preview].
10. Preview the E-Card by clicking
Save the E-Card to the Creative Studio Projects Folder for future editing by clicking
Save the E-Card as a new template by clicking
[Save].
[Save As].
Export the E-card out of Creative Studio by selecting the Export button and the save location.
11. Type in the required information. In the Attach Card As pull-down menu, select A Video
(*.wmv) if the person you are sending the card to has Windows Media Player.
12. The default name given to the E-Card is *.wmv where (*) is the name of your E-card
background you picked in step 3. To rename the E-Card before sending, click on *.wmv in the
attachment text box, then click
[Rename]. If you send the file as *.wmv, the background
music will not play. To have the background music play, send the file as *.exe.
13. Click
[Send This Card] to send your E-Card.
If you are experiencing difficulties emailing your card, please refer to “Configuring Your Email
Program to Send Files” on pages 29-31.
Page 16 of 44