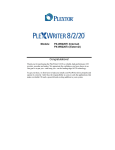
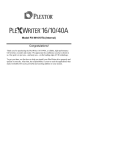
1
Model PX-W8432Ti (Internal)
Congratulations!
Thank you for purchasing the PlexWriter 8/4/32, a reliable, high-performance CD
rewriter, recorder and reader. We appreciate the confidence you have shown in us.
Our goal is to put you—and keep you—on the leading edge of CD technology.
To get you there, we first have to help you install your PlexWriter drive properly and
operate it correctly. After that, the responsibility is yours to seek the applications that
make rewritable CD such a powerful and exciting addition to your system.
FCC NOTICE
This equipment has been tested and found to comply with the limits for a Class B digital device, pursuant
to Part 15 of the FCC Rules. These limits are designed to provide reasonable protection against harmful
interference in a residential installation. This equipment generates, uses, and can radiate radio frequency
energy, and, if not installed and used in accordance with the instructions, may cause harmful interference
to radio communications. However, there is no guarantee interference will not occur in a particular
installation. If this equipment causes harmful interference to radio or television reception, which can be
determined by turning the equipment off and on, the user is encouraged to try to correct the interference
by one or more of the following measures:
•
•
•
•
Reorient or relocate the receiving antenna.
Increase the separation between the equipment and receiver.
Connect the equipment into an outlet on a circuit different from that to which the receiver is
connected.
Consult the dealer or an experienced radio/TV technician for help.
Any changes or modifications should be approved by the party responsible for compliance of FCC Rules;
otherwise, the user loses authority to operate the equipment.
CAUTION: Use of controls or adjustments or performance of procedures other than those
specified herein may result in hazardous radiation exposure.
The laser beam emitted from the optical pickup is invisible. Accordingly:
•
•
Do not open the optical pickup housing.
Obtain service only from Plextor-authorized personnel.
LASER INFORMATION
These products have been designed and manufactured according to IEC 825-1 on the Safety of Laser
products. This product comes under “Class 1 Laser Products.” A Laser Caution Marking is attached on the
top of the internal drive model: “Caution: Invisible laser radiation when open. Avoid direct exposure to
beam.”
CAUTION: To disconnect the CD drive from an electrical current, pull out the power plug.
VORSICHT: DIE TRENNUNG VOM NETZ ERFOLGT DURCH ZIEHEN DES NETZSECKES.
Zur Einhaltung der Funk-Entstörung von nicht selbständig betreibbaren
Hochfrequenzgeräten (periphere Anlagenkomponenten).
Dieses Gerät entspricht als Einzelgerät den Funk-Entstöranforderungen der
Postverfügung Nr. 243/1991.
Wird das Gerät innerhalb einer Anlage zusammen mit anderen Geräten
betrieben. So mub bei Inanspruchnahme der “Allgemeinen (Betriebs-)
genehmigung” nach der BMPT-AmtsblVfg Nr. 243/1991 die gesamte
Anlage folgenden Richtlinien entsprechen:
•
•
ÜG-Vfg.243
Grenzwertklases B der EN55022
Auflagen nach § 2 der BMPT-AmtsblVfg 243/1991
Dies ist bei der Zusammensetzung einer Anlage (z.B. Computersystem) aus nur einzein geprüften Geräten
nicht immer erfüllt.
Table of Contents
1. Getting Started............................................................................................. 1
About this Manual.......................................................................................... 1
Meet Your PlexWriter 8/4/32 ......................................................................... 1
What the PlexWriter 8/4/32 Does................................................................ 1
What You Can Do with the PlexWriter 8/4/32............................................. 2
Save Your Box!.......................................................................................... 3
What's in the Box ........................................................................................... 3
PlexWriter Drive Features and Controls.......................................................... 4
Front Panel................................................................................................. 4
Rear Panel.................................................................................................. 5
About Mastering Software.............................................................................. 5
Precautions .................................................................................................... 6
2. Installing Your PlexWriter .......................................................................... 7
QuickStart Installation—For Experienced PC Users Only ........................... 7
Open the Computer and Prepare for Installation .............................................. 7
Determine Your Existing IDE Configuration .................................................. 8
Set the Drive’s Jumpers.................................................................................. 9
Changing the Jumper on Your Internal PlexWriter Drive............................. 9
Select an IDE Configuration ........................................................................... 10
About Cable Select......................................................................................... 12
Install the PlexWriter Drive............................................................................ 12
Record the Serial Number........................................................................... 12
Mount the PlexWriter Drive in the Computer .............................................. 12
Using Soundboards and Audio Cables ............................................................ 17
Choosing and Connecting Audio Cables ..................................................... 17
Make Sure the Drive Is Recognized ................................................................ 17
Enable DMA.................................................................................................. 19
3. Installing and Using Software...................................................................... 21
Install Device Drivers..................................................................................... 21
Install Plextor Applications Software.............................................................. 22
PlextorManager 2000 ................................................................................. 22
CD Res-Q*................................................................................................. 22
Other Applications Software........................................................................... 23
4. Using Your PlexWriter ................................................................................ 25
What Media to Use......................................................................................... 25
Tray Loading and Operation ........................................................................... 25
Handling CD Media ................................................................................... 26
Cleaning Discs ........................................................................................... 26
Playing Audio CDs ........................................................................................ 27
Connections for Playing Audio CDs ........................................................... 27
Writing to CD-R and CD-RW Media.............................................................. 28
5. Maintenance and Troubleshooting .............................................................. 29
Upgrading Firmware ...................................................................................... 29
PlexWriter 8/4/32 Operation Manual
iii
Troubleshooting............................................................................................. 30
Troubleshooting: General ........................................................................... 30
Troubleshooting: Read ............................................................................... 32
Troubleshooting: Audio.............................................................................. 34
Troubleshooting: Writing Discs .................................................................. 35
Troubleshooting for Macintosh Users ......................................................... 39
6. Frequently Asked Questions about Recording ............................................ 41
Appendix A: PlexWriter Specifications........................................................... 43
Appendix B: Technical Support ...................................................................... 45
How to Contact Us......................................................................................... 45
Before You E-mail/Log On/FAX/Call ............................................................ 46
Returns .......................................................................................................... 46
Appendix C: Helpful Contacts......................................................................... 47
Contacts for CD-R and CD-RW Components ................................................. 47
Contacts for PC Vendors................................................................................ 48
Index................................................................................................................. 49
iv
PlexWriter 8/4/32 Operation Manual
1. Getting Started
This manual explains how to install and use your internal ATAPI PlexWriter 8/4/32
drive. For those of you with PCs, the installation process may seem a bit complicated
(Mac people have it easy). Fear not. We have successfully walked through the
installation process with millions of customers who previously had lived in mortal
terror of the innards of their computer.
About this Manual
Please read this manual carefully and keep it handy for easy reference. Use the
manual for installation, operation and troubleshooting. See your dealer or call
Plextor’s Technical Support Department should your drive require repair or service.
In this manual you should find all the information you need to successfully install,
operate and troubleshoot your drive. If you run into a problem that doesn't seem to be
covered, however, please contact us. (See “Appendix B: Technical Support” for the
different ways you can contact us). You will be connected to our friendly, helpful
band of tech support engineers who know their stuff. What might seem like an
uncooperative drive to you could very well be a 30-second fix to them. But we will
never know unless you contact us.
Meet Your PlexWriter 8/4/32
The PlexWriter 8/4/32 is a CD-ReWritable drive that provides professional quality
CD performance for writing, rewriting and reading.
What the PlexWriter 8/4/32 Does
The PlexWriter 8/4/32 writes to CD-R (recordable CD) media at up to 8X speed or
to CD-RW (rewritable CD) media at up to 4X speed. It reads all CD-ROM and
CD-R media at a maximum of 32X speed with an average access time of 170
milliseconds. Maximum read speed of CD-RW media is 20X.
Reliable writing is virtually guaranteed, thanks to unique circuitry that automatically
detects the type of media being recorded and adjusts the PlexWriter 8/4/32 to provide
the optimum laser power and length of burn. The PlexWriter 8/4/32 has an IDE
interface that supports the ATAPI-4 command set including special commands for
CD-R.
The PlexWriter 8/4/32 is fully MMC-compliant, supporting writing features such as
Disc-at-Once, Track-at-Once and Session-at-Once, as well as variable and fixed
packet writing. It also supports the UDF file system implemented through packet
writing.
PlexWriter 8/4/32 Operation Manual
1
Section 1. Getting Started
The PlexWriter 8/4/32 supports running OPC and is compatible with Windows Plug
& Play. Flash memory allows upgrading the PlexWriter 8/4/32 to the latest firmware
revision (available from the Plextor web site) without opening the drive. Plextor
backs up this remarkable drive with a one-year full warranty on parts and labor, and
unlimited toll-free tech support.
What You Can Do with the PlexWriter 8/4/32
Just look at some of the things you can do with your PlexWriter 8/4/32:
• Record data or audio onto writable or rewritable CD media.
• Play music CDs.
• Save photos and other images on rewritable or writable CDs.
• Create a “CD sneakernet” to share information with colleagues—just use
software such as Adaptec DirectCD to Drag & Drop files onto CD-R or
CD-RW media, then continue adding files and sharing the same CD disc.
• Archive images and video to CD.
• Master new software programs on CD.
• Periodically back up your computer's hard disk, including operating system,
hardware configuration, registry, program files and data. Plextor's CD Res-Q™*
software makes this easy! You can even make a bootable CD. Information on CD
Res-Q can also be found at http://www.plextor.com/cdresq.htm.
* CD Res-Q™ is available for purchase directly from Plextor.
To purchase CD Res-Q by phone, please call us at 408-980-1838 ext. 4 .
To purchase CD Res-Q by email, send your request to [email protected].
Type: CD RES-Q REQUEST in the subject line. You will also need to
include the serial number of your drive.
2
PlexWriter 8/4/32 Operation Manual
Section 1. Getting Started
What's in the Box
What you find in your Plextor box
depends on what the company that
sold you the box put in—or took
out—while the Plextor drive was in
their possession.
Plextor currently sells its PlexWriter
8/4/32 drive in this configuration:
• PlexWriter 8/4/32 CD-RW drive
• 40-pin IDE ribbon cable
• 4 mounting screws
• 1 piece of approved CD-RW
media
• 1 piece of approved CD-R media
• Plextor CD with bundled premastering and packet writing
software, including
PlextorManager 2000
• PlexWriter 8/4/32 operation
manual
• Warranty registration card
• PlextorManager 2000 manual
Save Your Box!
Be sure to save the box after you have
installed your PlexWriter drive. The
box and its packaging material were
designed and drop tested to ensure your
PlexWriter can endure rough treatment
and still arrive in working order.
Please save the tray insert that was used
to protect the delicate internal
components during shipping. Should
you need to ship the PlexWriter, it
should be placed on the tray inside the
drive.
We hope you will never have to ship
your drive back to us. If you do,
however, it's best to send it packaged in
the original box. Some of our customers
have not held on to their boxes and have
had to resort to less-than-secure
methods to get drives back to us.
If the security sticker on top of your
box is cut, there may be a good
reason: for example, a dealer may
have added other components or
software. Carefully check the
contents to ensure nothing has been
removed. If something is missing,
contact the party from whom you
purchased the box for an explanation.
We cannot assume liability for any
damage your drive sustains during
shipment. Therefore, please ship your
drive in the safest manner possible.
If your drive came pre-installed, some
or all of the items above may have
been installed and may not be
separately available.
If you did not receive a box (for
example, your drive came pre-installed
in a computer), we recommend you pay
a packaging store (such as Mail Boxes
Etc.) to ship your drive. If you don’t
have a packaging store in your area, ask
our Technical Support Department for
packaging pointers when you call to get
an RMA number before returning any
drive.
See Appendix C for locations to
purchase additional or replacement
accessories.
Before shipping your drive, refer to the
Plextor web site for pointers. The web
site is at:
http://www.plextor.com
PlexWriter 8/4/32 Operation Manual
3
Section 1. Getting Started
PlexWriter Drive Features and Controls
Before proceeding, become familiar with the controls and features of your
PlexWriter drive. Match the parts of your drive to the illustrations below.
Front Panel
Figure 1: Front Panel of the PlexWriter 8/4/32 Drive
• Tray front door: Attached to tray drawer.
• Headphone jack: Stereo mini-jack for headphones and powered speakers.
• Volume control: Controls volume of headphone jack.
• Disc indicator: Illuminated during power up or when disc is inserted and being
initialized. Blinks when reading or writing data from or to disc.
• Stop/Eject button: Push to eject or insert tray.
• Emergency eject hole: Insert emergency eject stick, paper clip, or other thin,
rigid object to eject tray if automatic eject button does not work. Turn OFF power
before using this feature.
4
PlexWriter 8/4/32 Operation Manual
Section 1. Getting Started
Rear Panel
Figure 2: Rear Panel of the PlexWriter 8/4/32 Internal Drive
• Audio output connector: Outputs stereo analog signal. Use to connect to
soundboard or audio amplifier. Use standard MPC-3 type, 4-pin connector.
• Jumpers: Use to select operation as an IDE master or slave, or for cable select.
In general, leave these jumpers at their factory settings.
• IDE interface connector: Connects to IDE interface using 40-pin IDE flat
ribbon cable.
• Power connector: Connects to your computer’s power supply to provide
DC +5V and +12V to the PlexWriter.
About Mastering Software
In order to create CD-R and CD-RW discs you will need to have mastering software
installed on your computer system. You can check our web site (www.plextor.com)
for an updated list of software that supports your drive. We provide mastering
software kits in retail packaging for your convenience.
PlexWriter 8/4/32 Operation Manual
5
Section 1. Getting Started
Precautions
Like the rest of your computer system, your PlexWriter requires reasonable care in
its installation and use.
• Keep the area around your drive clean from dust, smoke, and other contaminants.
• Do not allow moisture or liquids, including water or cleaning fluids, to touch the
drive. Thinner, benzene, or alcohol-based solvents can mar your drive’s surface.
• Do not drop or jolt the drive.
• Do not attempt to open the drive and service it yourself. Removing the cover may
expose you to harmful electrical voltages or the laser beam. For your safety,
entrust service to Plextor-authorized service personnel only.
• Keep your CD discs free of dirt or other contaminants, by storing them in jewel
cases. Use only industry-standard discs. Do not insert dirty, warped, poorly
balanced, or cracked discs into the drive.
• Do not clean discs using a circular motion. Instead, use a radial motion: start at
the center of the disc and proceed to the outer edge.
6
PlexWriter 8/4/32 Operation Manual
2. Installing Your PlexWriter
This chapter explains how to
physically install your PlexWriter in
your computer. The steps you'll need
to do are as follows:
1. Turn OFF your computer system.
2. Set the jumpers for your new
PlexWriter drive, if necessary.
3. Mount the PlexWriter drive into
an available drive bay inside the
computer system.
4. Make all necessary cabling
connections: IDE cable, power
cable, and audio cable.
5. Turn your computer system ON.
The following pages give more
details for this procedure.
Open the Computer
and Prepare for
Installation
To determine whether your
PlexWriter will be a master or a
slave, open your computer and
examine the IDE connections to the
motherboard.
To open the computer:
1. Before proceeding, make sure the
power to your computer and any
external peripherals is OFF and
your computer is UNPLUGGED
from its power source.
QuickStart Installation—For
Experienced PC Users Only
If you’ve installed computer peripherals
before, you’re in luck with the
PlexWriter drive. Use this QuickStart
installation to get up and running
quickly.
Typical Scenario 1: You have a PC
with an IDE interface installed, you
have Windows 95/98 or NT, and you
have nothing installed on the secondary
IDE port.
What to do: Leave the PlexWriter’s
jumper set to Master, attach it to the
secondary IDE port, and go. Windows
will recognize the drive automatically.
Typical Scenario 2: You have a PC
with an IDE interface installed, you
have Windows 95/98 or NT, the
primary IDE bus already has two
devices connected and you have a CDROM installed on the secondary IDE
port.
What to do: Change the CD-ROM to
Slave, leave the PlexWriter’s jumper set
to Master and attach the PlexWriter to
the secondary IDE port. Windows
recognizes the new drive automatically.
If neither of these situations applies to
you, or you’re not comfortable with
IDE installation, read the rest of this
chapter for more detailed installation
instructions.
PlexWriter 8/4/32 Operation Manual
7
Section 2. Installing Your PlexWriter
2. Remove your computer’s cover, following the directions provided by your
computer’s manufacturer. Typically, this involves loosening or removing several
screws on the back panel of your computer and sliding off the cover.
Figure 3: Removing a Typical Computer's Cover
Determine Your Existing IDE Configuration
With your computer open, determine the existing IDE configuration. You can do this
by looking at the 40-pin IDE ribbon cable (or cables—there may be two) and seeing
what is connected to them.
One end of the IDE cable is connected to a port on the computer’s motherboard; and
the other end is connected to one or two peripheral devices (such as a hard disk or
CD-ROM drive). If there are two devices, one is considered the master and the other
the slave. If there are two IDE ports, one is for the primary IDE bus and the other is
for the secondary bus.
A typical computer’s IDE configuration is usually one of the following:
• Hard disks connected as master and slave devices on primary IDE port; CDROM drive connected as master device on secondary IDE port.
• Hard disk connected as master device and CD-ROM drive connected as slave on
the primary IDE port; nothing connected to secondary IDE port.
• Hard disk connected as master device on primary IDE port; nothing connected to
secondary IDE port.
8
PlexWriter 8/4/32 Operation Manual
Section 2. Installing Your PlexWriter
Set the Drive’s Jumpers
You specify your drive's master or slave setting before installing it. You do this by
changing the position of a jumper on the jumper block at the rear of the drive.
Your drive ships from our factory with its jumper set to operate the PlexWriter as a
master. This will work in the most commonly found environments.
Changing the Jumper on Your Internal PlexWriter Drive
As shown in Figure 4, the PlexWriter drive arrives from the factory with its jumper
set to MASTER. (A function is ON if the jumper is installed and OFF if the jumper
is removed.)
Figure 4: Factory Settings for Jumpers at the Rear of the Drive
Changing to a Master, Slave, or Cable Select
The Master/Slave setting for the drive is determined by the jumper. To change the
drive from Master to Slave or to Cable Select, you must move the jumper.
For example, to change the PlexWriter drive to be a Slave, move the jumper to the
middle set of pins, leaving the other pins uncovered. To change the drive for Cable
Select, move the jumper to the left set of pins.
Changing Jumper Settings
To remove a jumper, pull it off with your fingers or a pair of needle-nose pliers.
To install a jumper, push it onto the jumper pins.
CAUTION: Ensure power to the drive is OFF before installing or removing jumpers.
PlexWriter 8/4/32 Operation Manual
9
Section 2. Installing Your PlexWriter
Figure 5: Install Jumpers Across Vertical Pairs of Pins
CAUTION: Install jumpers across each pin as shown (vertically). Do not connect one
pin switch to another by installing the jumpers lengthwise (horizontally). Doing so
could result in damage to the drive.
Select an IDE Configuration
Set the jumper according to the desired configuration, as shown in this table and the
illustrations.
Before PlexWriter Installation
A Hard disks connected as master and
slave devices on primary IDE port;
CD-ROM connected as master
device on secondary IDE port.
How to Install the PlexWriter
Connect the PlexWriter as master
device to the secondary IDE port.
Remove the CD-ROM drive, change
it to slave, and connect it to the
secondary IDE port.
B Hard disk connected as master
device and CD-ROM drive
connected as slave on the primary
IDE port; nothing connected to
secondary IDE port.
C Hard disk connected as master
device on primary IDE port; nothing
connected to secondary IDE port.
Connect the PlexWriter as master to
secondary IDE port.
Connect the PlexWriter as master to
secondary IDE port.
NOTE: For best performance, try to connect the PlexWriter to the IDE port that is not
connected to the hard disk drive or to a CD-ROM drive. In most cases, connect the
PlexWriter to the secondary IDE port as a master.
NOTE: For best results, set the PlexWriter to be the master, if possible. DMA setting
must be enabled on your system to achieve 8X writing speed.
10
PlexWriter 8/4/32 Operation Manual
Section 2. Installing Your PlexWriter
How to Install the PlexWriter
A
B
C
Figure 6: Typical IDE Configurations for Connecting the PlexWriter Drive
PlexWriter 8/4/32 Operation Manual
11
Section 2. Installing Your PlexWriter
About Cable Select
The Cable Select jumper position sets the PlexWriter drive to use the CSEL signal
from the IDE interface for configuration. This signal automatically selects the correct
Master/Slave setting for the PlexWriter. To use CSEL, you must have:
• A computer that supports CSEL.
• A special CSEL IDE cable.
Figure 7: Using the CSEL Signal to Configure the PlexWriter Drive
Install the PlexWriter Drive
Before proceeding to install the PlexWriter drive in your personal computer, doublecheck your jumper setting.
Record the Serial Number
Record the serial number and TLA code of your drive on the inside front cover of
this manual. If your drive came preinstalled, you can get this information using
PlextorManager 2000. See the PlextorManager 2000 user's manual for instructions.
Mount the PlexWriter Drive in the Computer
You can mount your internal PlexWriter drive in any available bay. You must
remove the small panel that covers the bay that you want to use.
CAUTION: Install your PlexWriter horizontally. Plextor does not guarantee the drive’s
performance in a vertical position.
If you don’t have an empty bay, remove the existing IDE CD-ROM drive and install
the PlexWriter.
You must make a minimum of two cable connections to your PlexWriter. The two
cable connections that you must make are:
• IDE cable
• Power cable
12
PlexWriter 8/4/32 Operation Manual
Section 2. Installing Your PlexWriter
A third cable connection will need to be made if you are using a soundboard in your
computer and plan to connect the PlexWriter’s audio output to the audio connector
on the soundboard.
Do You Need Another IDE Ribbon Cable?
The IDE cable is a standard 40-pin flat-ribbon cable, usually with three connectors.
One end connects to the IDE port on your computer’s motherboard, and the other
two connectors are free for attaching peripherals such as a hard disk or CD-ROM
drive.
You may need to install another IDE ribbon cable in your computer. You can use the
extra IDE cable supplied with your PlexWriter.
Figure 8: Internal IDE Ribbon Cable
CAUTION: Don’t try to string too many IDE cables together. The length of any IDE
cable cannot exceed 18 inches.
Do You Need a Power Cable?
In most computers, you will find free power connectors in the computer ready for
your use. When you open the computer, check the cable running from your power
supply to your hard disk and see if it has extra connectors on it. If so, you can plug
one of these into the power connector found on the rear panel of the PlexWriter.
If you do not find any additional connectors (either because they were not supplied
or they are all in use), you will have to buy a “splitter” or a “Y-connector.” These
can also be found at most retail and mail-order computer stores.
To mount the PlexWriter drive:
1. Make sure the power to your computer and any external peripherals are OFF and
your computer is UNPLUGGED from its power source.
2. If you haven't already removed your computer's cover, remove it now, following
the directions provided by your computer’s manufacturer. Typically, this
involves loosening or removing several screws on the back panel of your
computer and sliding off the cover. See Figure 3 for details.
PlexWriter 8/4/32 Operation Manual
13
Section 2. Installing Your PlexWriter
3. Remove the cover panel from the bay that will hold the PlexWriter drive. To
remove the cover panel, pop it out by pressing outward lightly. (In some older
computers, you may have to remove screws that hold the panel in place.)
Figure 9: Removing the Cover Panel from a Bay
4. Determine if you must install mounting rails on the sides of your drive. To do so,
insert the drive into the open bay. If the drive fits tightly with little or no
clearance on either side of the drive, you will not have to use mounting rails. The
drive can be mounted directly into your computer. Go to step 6.
NOTE: Plextor does not provide rails. If you need rails, you can obtain them from the
computer manufacturer or from a computer supply retail or mail-order store.
14
PlexWriter 8/4/32 Operation Manual
Section 2. Installing Your PlexWriter
5. If you must use mounting rails, fasten the rails to the lower pair of holes as
shown in Figure 10. (In some instances, you may need to fasten the rails to the
upper set of holes.) After fastening the rails, check their positioning by sliding the
drive into the bay before you mount the drive or connect any cables.
Figure 10: Installing Mounting Rails (if Needed)
6. Plug a free connector on the IDE cable into the IDE connector on the rear panel
of the drive before you insert the drive into your computer. Then thread the cable
through the front of the open bay and back toward the motherboard. The drive
should slide smoothly into the bay. If it does not, check for obstructions in the
bay and ensure the side rails are attached properly.
7. If not already connected, attach one end of the IDE ribbon cable to the connector
on the motherboard.
Figure 11: Connecting the IDE Ribbon Cable
PlexWriter 8/4/32 Operation Manual
15
Section 2. Installing Your PlexWriter
CAUTION: It is easy to accidentally plug your IDE ribbon cable upside down into both
your drive and the motherboard. Be sure you match the red stripe along one side of
the IDE cable to Pin 1 on the motherboard and Pin 1 on the drive. (Pin 1 on the drive
is closest to the power connector.) Each connector on the ribbon cable has a “key” in
the middle. This key should fit into a slot in the middle of each connector of the
motherboard, your PlexWriter, and any other internal IDE peripherals.
8. Double-check your work. You must ensure the side of the IDE cable with the red
stripe is matched to Pin 1 on the interface board and on the drive.
Figure 12: Power and IDE Connections for an Internal PlexWriter Drive
CAUTION: In the case of only one IDE device, you must make certain that one
end of the cable is always connected to the IDE connector on the motherboard.
The other end of the connector must be connected to a device. The end
connector of the cable should never be left unconnected.
9. Connect a power cable from the computer to the DC INPUT connector of the
PlexWriter drive. In most computers, you will find free power connectors that are
ready for your use.
Check the cable running from your power supply to your hard disk and see if it
has extra connectors on it. If so, you can plug one of these into the power
connector found on the rear panel of the PlexWriter.
10. Connect the audio cable if you want to use a soundboard in your system. This
cable runs from the four-pin audio output connector on the rear panel of your
PlexWriter drive to your soundboard. See “Using Soundboards and Audio
Cables” on page 17 for more information about audio cables.
16
PlexWriter 8/4/32 Operation Manual
Section 2. Installing Your PlexWriter
11. Mount the PlexWriter drive in the computer using the four screws were supplied
with your drive. Use only these screws.
CAUTION: Do not mount your drive in your computer using screws other than those
supplied by Plextor. You may damage the drive if you insert screws that are too long.
Using Soundboards and Audio Cables
Whichever category your soundboard falls into, you will find that the best source of
information about installing the soundboard in your computer is the board's manual.
Once you have successfully installed the soundboard in your computer, you can
continue below for a description of the different cable connections that need to be
made.
Choosing and Connecting Audio Cables
To make audio connections to your PlexWriter, you may have to purchase an audio
cable from a computer supply store.
Audio Connection
MPC audio source
Sound Blaster or
compatible soundboard
Cable
Required
MPC-compliant
audio cable
Sound Blastercompatible
audio cable
How to Connect It
Connect to MPC audio
source, and to audio output
connector at the rear of the
PlexWriter.
Connect to Sound Blastercompatible audio board and
to audio output connector at
the rear of the PlexWriter
We can help by recommending several vendors who offer audio cables; see page 47
of this manual.
Make Sure the Drive Is Recognized
After installation, make sure the PlexWriter drive and other IDE peripherals are
recognized by your computer. To check whether they are recognized:
On a PC with Windows 95 or 98:
1. Turn the computer ON. After the computer boots up, you should see the
Windows display.
2. Open Windows Explorer and ensure there is an icon for the PlexWriter, the hard
disk, and other CD-ROM drives, if present. The PlexWriter may be D: or E: or
another designator.
3. If the PlexWriter drive is not recognized in Windows, reboot the computer and
use your computer’s setup program to program the BIOS to recognize it.
PlexWriter 8/4/32 Operation Manual
17
Section 2. Installing Your PlexWriter
NOTE: Refer to the computer’s documentation for information on how to run the
motherboard BIOS setup program.
4. Use the setup program to set up IDE Master and Slave designations as needed for
your configuration, on the primary or secondary IDE bus. If the IDE interface is
disabled on your computer, you will need to enable it. If a master or slave device
is set to “disable” or “none” or a similar designation, change it as appropriate to
“enable” or “auto” (or something similar, depending on your setup program).
5. Save and exit your CMOS setup to restart your computer with the new settings.
6. In Windows, click the Start button, then Settings, then Control Panel, then
double-click on System icon, then click on Device Manager tab. Click + sign
next to the CD-ROM icon and look at the PX-W8432T drive underneath the CDROM icon.
7. If you do not see the PX-W8432T drive icon, or if it has a yellow diamond with
an explanation point (!), contact your PC or motherboard manufacturer to get the
appropriate IDE controller driver.
On a PC with Windows NT:
1. Turn the computer ON. After the computer boots up, you should see the
Windows display.
2. Open Windows Explorer and ensure there is an icon for the PlexWriter, the hard
disk, and other CD-ROM drives, if present. The PlexWriter may be D: or E: or
another designator.
3. If the PlexWriter drive is not recognized in Windows NT, reboot the computer
and use your computer’s setup program to program the BIOS to recognize it.
Reboot the computer when you are finished.
NOTE: Refer to the computer’s documentation for information on how to run the
setup program.
4. Use the setup program to set up IDE master and slave designations as needed for
your configuration on the primary or secondary bus. If a master or slave is set to
“disable” or “none” (or a similar designation, change it as appropriate to “enable”
or “auto” (or something similar, depending on your setup program).
5. Save and exit your CMOS setup to restart your computer with the new settings.
18
PlexWriter 8/4/32 Operation Manual
Section 2. Installing Your PlexWriter
Enable DMA
To achieve top speeds for reading and writing with your PlexWriter drive, direct
memory access (DMA) must be enabled for the drive. To ensure that DMA is
enabled:
1. In Windows 95 or 98, click the Start button, then Settings, then Control Panel,
then double-click on System icon, then click on Device Manager tab. You see a
list of devices in your system.
2. Double-click the CD-ROM icon and choose the PX-W8432T drive by clicking
on it once. Then, click on the Properties button and select the Settings tab. You
see the drive properties for the PlexWriter.
3. Ensure the DMA box is checked ON, as well as all other check boxes in this
window.
4. Click on OK button and then click on the Close button to exit System Properties
window.
5. When prompted if you want to restart you computer now, select yes for this
change to be enabled and saved.
PlexWriter 8/4/32 Operation Manual
19
Section 2. Installing Your PlexWriter
This page intentionally left blank.
20
PlexWriter 8/4/32 Operation Manual
3. Installing and Using Software
There's one more step before you can begin to use your PlexWriter drive: you need
to install special software on your computer. There are two software types:
• Device driver: Software program that allows your computer to interact with the
PlexWriter drive. Drivers are included in Windows 95/98 and NT that let you
operate your PlexWriter as a CD-ROM device (reader). The device driver is
installed automatically by the operating system as long as the IDE interface is
enabled in your system’s motherboard BIOS.
• Application software: Software programs for specific tasks, such as mastering
CDs, backing up your hard disk or files, capturing audio, duplicating CDs, and
more. Some of these applications are supplied with your PlexWriter if purchased
as a kit from Plextor, while others are available from other vendors.
If you have any problems at all, our technical support staff will help you.
Install Device Drivers
Your PlexWriter acts as a "CD-ROM Drive" for purposes of installation and setup.
In some cases, you will need to install additional software to make use of all of the
features of the PlexWriter.
• Using the PlexWriter on a PC:
q As CD-ROM: The computer’s operating system, whether it is Windows 95,
Windows 98, or Windows NT, supplies a generic CD-ROM device driver that
allows the PlexWriter to function as a standard CD-ROM drive. You don’t need
to install anything else.
q As a CD-R or CD-RW device: In order to write to CD-R or CD-RW media,
you will need additional software. If you purchased a kit from Plextor, software
is supplied.
• Using the PlexWriter on a Macintosh: Whether using the PlexWriter as a
standard CD-ROM or as a CD-R or CD-RW device, you will need additional
drivers or software besides those that are part of the Macintosh operating system.
You will need to purchase this software separately. The compatibility list is
available from Plextor’s web site at www.plextor.com.
Before installing any software, check that all the cable connections between your
PlexWriter and computer are correct, that the jumper is set properly, and the
PlexWriter is recognized by your system.
PlexWriter 8/4/32 Operation Manual
21
Section 3. Installing and Using Software
Install Plextor Applications Software
Windows 95, 98, and NT can immediately operate your PlexWriter drive as a
CD-ROM device (reader) and permit the drive to be recognized by the computer's
operating system. In order to take advantage of the PlexWriter’s ability to record on
CD-R or CD-RW media, however, you will also need packet writing and mastering
applications software on your PC. You can also check the compatibility list on the
Plextor web site at www.plextor.com, for software that supports the PlexWriter
under other operating systems. You will need to purchase this software separately.
If you purchased your PlexWriter as part of a Plextor kit, much of the software you
need is included for use on a PC. Plextor has developed several utilities to help you
get the most from your PlexWriter drive.
PlextorManager 2000
This unique suite of audio management and drive control applications puts you in the
CD "driver’s" seat. A variety of distinctive modules allow you to listen to, record and
even create your own playlists using a standard and digital audio file formats. Rip the
finest quality audio using digital audio extraction at high speed. Need to make a
duplicate CD? A simple mouse click and you’re done. Control every aspect of the
drive from spinup and spindown timeout to eject lock. PlextorManager 2000 also
gives you information on the drive's configuration and the media inserted into it.
See the Plextor Manager User’s Manual for details.
CD Res-Q*
For backup and disaster recovery, CD Res-Q lets you create an image of your hard
drive on secure, reliable CD-R media. By spanning CDs, you can back up your entire
HDD. Additional features include making a CD bootable, choice of compression,
HDD or image file integrity verification, and more.
NOTE: CD Res-Q backup works only with Plextor CD-R and CD-RW drives. You can
restore from any drive.
* CD Res-Q™ is available for purchase directly from Plextor.
To purchase CD Res-Q by phone, please call us at 408-980-1838 ext. 4 .
To purchase CD Res-Q by email, send your request to [email protected].
Type: CD RES-Q REQUEST in the subject line. You will also need to
include the serial number of your drive.
22
PlexWriter 8/4/32 Operation Manual
Section 3. Installing and Using Software
Other Applications Software
Other valuable applications software—which may already be included if you
purchased a kit from Plextor—lets you use your PlexWriter drive in exciting new
ways.
• Packet writing software: This type of application lets you use your PlexWriter
as an enormous floppy drive. You can just Drag & Drop files straight to a CD-R
or CD-RW disc.
• Mastering software: In conjunction with your PlexWriter drive, mastering
software lets you create specific format discs, such as audio, data, mixed mode,
etc…
PlexWriter 8/4/32 Operation Manual
23
Section 3. Installing and Using Software
This page intentionally left blank.
24
PlexWriter 8/4/32 Operation Manual
4. Using Your PlexWriter
This chapter explains how to use your PlexWriter drive and how to load, handle and
care for your CDs.
What Media to Use
Use the right media! Your PlexWriter drive's capabilities change depending on
which type of compact disc you use. It currently supports these types:
• CD-ROM: You can immediately play or read prerecorded discs, such as audio
CDs and data discs.
• CD-R: Recordable CD. You can record on these discs, but only once. You can
also read them.
• CD-RW: ReWritable CD. These discs support recording and re-recording (up to
1,000 times). You can also read them.
NOTE: Firmware upgrades for your PlexWriter drive are available as downloads from
the Plextor web site. Please check the web site at www.plextor.com.
Tray Loading and Operation
To load and unload the tray:
1. While the PlexWriter drive is powered up, push the Stop/Eject button on the front
panel. The tray drawer slides out in 3–4 seconds.
2. If this is the first time the drive is used, remove the tray insert.
3. Lay a blank CD in the depression in the tray, label side up. The CD should lie flat
in the tray.
Figure 13: Loading the Tray
4. Press the Stop/Eject button again and the tray will slide shut within seconds.
NOTE: Always use the Stop/Eject button to close the tray in a smooth and secure
manner. Closing the tray by pressing the front of the drawer by hand is not
recommended and risks damage or premature wearing of the mechanism.
PlexWriter 8/4/32 Operation Manual
25
Section 4. Using Your PlexWriter
Handling CD Media
Take care when handling blank CD-R and CD-RW media. Dust, scratches, and
fingerprints on the data side of the disc can cause write errors during recording.
When picking up or holding blank media you can either place your fingers along the
outer edge of the disc, or place one finger through the center hole and one finger on
the outer edge. Once you have finished creating a disc, label it by writing on the top
using permanent ink.
NOTE: We do not recommend placing self-sticking CD-R labels on the disc. The
weight of the label may unbalance the disc and cause write errors during recording or
read errors during reading.
Cleaning Discs
For proper read and write performance, your CD-R, CD-RW, and CD-ROM discs
must be clean. Trying to record on a dirty disc may result in a failed session and ruin
the disc.
To clean the disc, wipe the disc using a clean, soft cotton cloth to remove surface dirt
such as fingerprints. Use a straight-line motion, wiping from the center out. Do not
wipe the disc in a circular motion.
Figure 14: Wipe the Disc from the Center Outward
HINT: Keep your frequently used discs in jewel cases at all times to prevent them
from becoming dirty or damaged.
26
PlexWriter 8/4/32 Operation Manual
Section 4. Using Your PlexWriter
Playing Audio CDs
Connections for Playing Audio CDs
There are basically two types of audio:
q CD-Audio: This comes from audio discs (like the ones used by your home
stereo) that are translated directly by your PlexWriter into sound. You do not
need a soundboard to hear this audio. Simply plug in a set of headphones or
powered speakers into the headphone jack on the front of your drive.
q Soundboard audio: This comes from data files, such as a WAV or MP3, that
are transferred from the CD via the IDE host adapter to your computer. The
soundboard translates the data into sound. If you do not have a soundboard, you
will not be able to hear this form of audio from your PlexWriter.
In order to listen to an audio CD, connect an audio cable to the analog audio
connector on the rear of the drive and connect the other end to your soundboard.
Please refer to “Using Soundboards and Audio Cables” on page 17 of this manual for
more detail.
You can also listen to an audio CD by plugging in a pair of stereo headphones or
self-powered speakers into the headphone jack on the drive’s front panel, as shown
in Figure 15. In order to control audio playback, you will need to use audio control
software such as Windows Media Player or CD Player.
Figure 15: Connections for Playing Audio Using the Headphone Jack
NOTE: The volume control on the front panel of your drive adjusts only the sound
level of the headphone jack. It has no impact on the volume level of the rear panel
audio outputs. PlextorManager software can control volume level of the signal from
the rear panel audio outputs.
PlexWriter 8/4/32 Operation Manual
27
Section 4. Using Your PlexWriter
Playing a CD Using PlextorManager
For PC users, unique and powerful audio software - PlextorManager 2000 - is
provided. For installation and operating instructions, refer to the separate
PlextorManager 2000 User's Manual and README files.
Playing a CD Using Other Utilities
Other alternatives for playing CDs include audio utilities designed into your
operating system (Media Player or CD Player in Windows, for instance) or various
other utilities that can be purchased commercially.
To listen to music through the computer’s soundboard, volume can be controlled
through the volume control on your task bar (via a soundboard). You can also mute
the sound on your soundboard and listen to music through headphones or selfpowered speakers. When using headphones or self-powered speakers, volume is
controlled by the volume knob on the front panel of the drive.
Playing a CD On a Macintosh
Mac users can run a program such as CDT Remote (which is typically included with
FWB’s CD-ROM device driver).
Writing to CD-R and CD-RW Media
In conjunction with your PlexWriter drive, mastering and packet writing software
such as EasyCD Creator and DirectCD allow you to write audio, video, data, or other
information to writable (CD-R) or rewritable (CD-RW) media.
IMPORTANT: Only newer CD-ROM drives can read CD-RW discs. Drives
manufactured before 1997 cannot read them. Plextor CD-ROM drives starting with
the 12/20PleX or newer can read CD-RW discs.
28
PlexWriter 8/4/32 Operation Manual
5. Maintenance and Troubleshooting
This chapter explains maintenance and troubleshooting procedures for your
PlexWriter drive.
With proper maintenance, you can prevent problems. If problems arise, you can
often solve many simple problems on your own, rather than wait for assistance from
a Plextor representative.
TIP: Read all of this section that pertain to you (PC or Macintosh). Many of the
problems discussed happen only rarely, and others may seem as if they do not
pertain to you. However, if you are familiar with the variety of problems that can
occur, you will be better prepared to deal with them if they do occur.
Upgrading Firmware
Plextor creates firmware revisions to meet the peculiar needs of large computer
manufacturers. It is rare that these will impact the performance or operation of your
PlexWriter drive. However, we advise that our customers always update drives with
latest available firmware. Before troubleshooting a possible problem with your drive
please make sure to visit our web site at www.plextor.com to check if you have the
latest firmware.
To obtain new firmware for your PlexWriter drive:
1. Go to the Plextor web site at www.plextor.com.
2. Look for firmware upgrades in either the Technical Support area or on the
Downloads page. There is a description of the latest firmware revision and its
intended use.
3. Download the firmware to your computer.
To upgrade firmware:
1. Run the executable file that you downloaded from Plextor’s web site.
2. Accept all defaults by continuing to click on the “Next” button until you see the
message:
Firmware update has completed.
3. Reboot your system.
4. Verify DMA is enabled before using the PlexWriter
Note: If firmware upgrade does not complete successfully, you may need to disable
DMA and this procedure again.
To enable/disable DMA:
1. Click the Start button, then Settings, then Control Panel, then double-click on
System icon, then select the Device Manager tab. You see a list of devices in
your system.
PlexWriter 8/4/32 Operation Manual
29
Section 5. Maintenance and Troubleshooting
2. Double-click the CD-ROM icon and choose the PX-W8432T by clicking on it
once. Then, click on the Properties button and select the Settings tab. You now
see the drive properties for the PlexWriter.
3. Enable DMA by click the DMA checkbox ON, then click OK.
Disable DMA by click the DMA checkbox OFF, then click OK.
4. Close the System Properties window by clicking on the Close button.
5. When prompted, Reboot your system.
Note: DMA must be enabled for normal operation of the PlexWriter.
Troubleshooting
If you have problems during or right after installation of your PlexWriter drive, use
these tips to help find the problem. You can also use these charts to help find
problems that develop in existing installations.
Start here if you're a PC user. Mac users should start with page 39 and come back
here if they don't find the answer.
Troubleshooting: General
Symptoms
PlexWriter drive not recognized by computer.
Possible Cause #1
• IDE cable is not connected properly.
Solution #1
• Ensure IDE cable is connected.
• Verify that connectors on motherboard and drive do not have bent pins.
Possible Cause #2
• Drive or IDE bus is not enabled in the computer’s BIOS.
Solution #2
• Ensure the IDE port is enabled and set properly in motherboard’s BIOS.
See “Make Sure the Drive Is Recognized” on page 17 for more details.
Possible Cause #3
• Jumper conflict.
Solution #3
• Check jumpers for the PlexWriter drive and the other peripheral devices (hard
disk or CD-ROM drive) on the same IDE cable. Ensure the jumper for one device
is set to master and the other to slave. Two devices on one cable cannot be set to
the same setting.
30
PlexWriter 8/4/32 Operation Manual
Section 5. Maintenance and Troubleshooting
Possible Cause #4
• Wrong cable with jumper set to Cable Select.
Solution #4
• Make sure that a CSEL-compatible IDE cable is used if you want to use the
PlexWriter with jumper set to Cable Select.
Possible Cause #5
• Power connector is not attached to PlexWriter or does not work.
Solution #5
• Ensure the computer’s power cable is securely attached to the PlexWriter’s
power connector.
• When the computer’s power is ON, confirm that the PlexWriter’s indicator LED
is illuminated briefly, then is extinguished.
• Connect a different power cable to PlexWriter.
Symptoms
PlexWriter does not respond (lights or eject button).
Possible Cause #1
• No power.
Solution #1
• Ensure the power cable is connected securely to the PlexWriter’s power
connector.
• Try a different power cable.
Possible Cause #2
• IDE cable isn’t connected properly.
Solution #2
• Ensure that the IDE cable is securely inserted, and is not damaged.
• Check the connector pins to ensure they are not bent.
Symptoms
Cannot eject tray.
Possible Cause #1
• Tray is locked by PlextorManager software.
Solution #1
• Refer to PlextorManager manual how to unlock the eject feature.
Possible Cause #2
• CD was not properly set into tray and is stuck.
Solution #2
• At the PlexWriter’s front panel, insert a thin object such as a paper clip into the
emergency eject hole and eject the tray.
PlexWriter 8/4/32 Operation Manual
31
Section 5. Maintenance and Troubleshooting
Troubleshooting: Read
Symptoms
PlexWriter drive has read errors, may not respond to a DIR command or cannot run a
program.
Possible Cause #1
• Defective CD-ROM, CD-R, or CD-RW disc.
• A fingerprint, contaminants, or scratches on the disc’s surface may prevent the
drive from reading or writing data.
Solution #1
• Clean the disc as detailed on page 26.
• Try a different disc.
Possible Cause #2
• Disc is badly manufactured.
Solution #2
• Try a different disc.
Possible Cause #3
• Bad connection between the PlexWriter drive and the motherboard.
Solution #3
• Inspect the IDE cable and drive for recessed, broken, or bent pins.
• Inspect the IDE ribbon cable for any signs of distress, such as kinking.
Possible Cause #4
• CD-Audio disc in the drive. Audio CDs do not have computer data, so typing
computer commands in DOS while an audio disc is in your drive gives an error
message.
Solution #4
• Use a data CD in the PlexWriter drive.
Possible Cause #5
• Disc is inserted upside down.
Solution #5
• Eject the disc and load it with the label or text side up.
Possible Cause #6
• Blank CD-R or CD-RW disc is inside the drive.
Solution #6
• Remove the disc from the drive and test it by using another disc
32
PlexWriter 8/4/32 Operation Manual
Section 5. Maintenance and Troubleshooting
Symptoms
Cannot use other CD-ROM drives to initialize or discs written by PlexWriter.
Possible Cause #1
• Trying to read a CD-RW disc in a CD-ROM drive that does not support it.
Solution #1
• Use the PlexWriter to read CD-RW discs or use a different CD-ROM drive. Only
CD-ROM drives manufactured after 1997 can read CD-RW discs.
Possible Cause #2
• UDF reader is not installed on the system to read CD-RW or packet written discs
from a CD-ROM drive.
Solution #2
• Refer to your packet writing software manual for how to obtain a UDF reader
and install it on the computer where you need to access these discs.
Possible Cause #3
• Session was left open on a CD-R disc and does not have a Table of Contents.
Solution #3
• Place this disc back into PlexWriter and use the same software originally used to
write to it. Then close the session/disc.
Symptoms
Excessive noise.
Excessive vibration.
Slow read performance.
Possible Cause
• CD is poorly balanced. Poorly manufactured discs or discs with poorly
distributed ink on labeling cause significant vibration at high speeds because they
are out of balance. Read errors may also occur.
• If the disc label (especially adhesive labels) adds more weight to one area of the
disc than another it can also cause the disc to be out of balance.
Solution
• Remove any adhesive label.
• Clean the disc as detailed on page 26.
• In Windows 95, 98 and NT use PlextorManager to lower the drive speed.
• If there is no foreign substance on the disc, contact the disc manufacturer for a
replacement.
PlexWriter 8/4/32 Operation Manual
33
Section 5. Maintenance and Troubleshooting
Symptoms
Can read only the last session of a multisession CD-R or CD-RW disc.
Possible Cause
• “Import previous session” or a similar feature was not enabled when the
multisession disc was created.
Solution
• Use CD-R or CD-RW mastering software to import session(s). Such features
may vary in name depending on the software being used. Please refer to the
appropriate manual regarding this feature.
Troubleshooting: Audio
Symptoms
When playing an audio CD, you do not hear sound even though everything appears
to be functioning normally.
Possible Causes
• Soundboard volume too low.
• Mixer settings for soundboard set too low.
• Need soundboard.
• Need audio cable connection.
• Soundboard not properly configured.
Solution
• Each soundboard has a different setting for each input source, including one for
CD-Audio. Run your soundboard’s mixer program and verify that the volume is
turned up or not muted. You can do this by double-clicking on the speaker icon
on your computer’s task bar.
• Check your system configuration to see if the soundboard settings (such as IRQ,
memory, etc.) are conflicting with other devices on the system.
• Check if all the necessary drivers and multimedia devices required by your
soundboard are installed.
• Make sure the audio cable is properly connected between PlexWriter and
soundboard.
Symptoms
Low sound level from PlexWriter drive.
Possible Cause #1
• Improper audio cable connection between PlexWriter drive and soundboard.
Solution #1
• Check the cable connection from PlexWriter to soundboard.
34
PlexWriter 8/4/32 Operation Manual
Section 5. Maintenance and Troubleshooting
Possible Cause #2
• Low levels from audio mixer.
Solution #2
• Check the master, CD and line levels of all audio mixers.
Troubleshooting: Writing Discs
Symptoms
Cannot write to CD-R or CD-RW disc.
Possible Cause #1
• You are using authoring software other than that bundled with your PlexWriter.
Solution #1
• Use the authoring software provided with the PlexWriter.
• To use other types of authoring software, contact the supplier and ensure the
software support the PX-W8432T CD-RW drive. Supported software lists can
also be found on the Plextor web site at www.plextor.com.
Possible Cause #2
• CD-R or CD-RW media is not supported.
Solution #2
• Use CD-R or CD-RW media recommended by Plextor. Supported media lists can
also be found on the Plextor web site at www.plextor.com.
Possible Cause #3
• Disc inserted upside down.
Solution #3
• Eject the disc from tray and load it with the label side up.
Possible Cause #4
• Lack of hard disk capacity.
This varies with different software packages. Contact the software vendor or
check their documentation for recommendations.
Solution #4
• Delete files from your hard disk to free up sufficient space; or use another hard
disk.
Symptoms
CD-R or CD-RW software cannot detect PlexWriter
Possible Cause #1
• Power connector is not attached to PlexWriter.
Solution #1
• Ensure the computer’s power cable is securely attached to the PlexWriter’s
power connector.
PlexWriter 8/4/32 Operation Manual
35
Section 5. Maintenance and Troubleshooting
• When the computer’s power is turned ON, confirm that the PlexWriter’s
indicator LED is illuminated briefly, then is extinguished.
• Try connecting another power cable to the PlexWriter.
Possible Cause #2
• IDE cable isn’t connected properly.
Solution #2
• Ensure that the IDE cable is securely inserted, and is not damaged. Check the
connector pins to ensure they are not bent.
Possible Cause #3
• Drive or IDE bus is not enabled in the computer’s BIOS.
Solution #3
• Ensure the IDE port is enabled and set properly in motherboard’s BIOS. See
“Make Sure the Drive Is Recognized” on page 17 for more details.
Possible Cause #4
• Jumper conflict.
Solution #4
• Check jumpers for the PlexWriter drive and the other peripheral devices (hard
disk or CD-ROM drive) on the same IDE cable. Ensure the jumper for one device
is set to Master and the other to Slave. Two devices on one cable cannot be set to
the same setting.
Possible Cause #5
• Wrong cable with jumper set to Cable Select.
Solution #5
• Make sure that a CSEL-compatible IDE cable is used if you want to use the
PlexWriter with jumper set to Cable Select.
Symptoms
Writing error occurs.
Buffer underrun.
Does not record at 8X.
Possible Cause #1
• DMA is not enabled on your computer.
Solution #1
• In Windows 95 and 98, click on Start button, then select Settings/Control Panel,
then double-click on System icon, then click on Device Manager tab, then
double-click on CD-ROM icon. Select PlexWriter and click on Properties. Then
click on the Settings tab and enable DMA. Reboot your system.
• Make sure DMA is enabled on your motherboard.
36
PlexWriter 8/4/32 Operation Manual
Section 5. Maintenance and Troubleshooting
Possible Causes #2
• Network is being used.
• Mouse was moved or Windows screensaver activated while writing.
• Other applications are running.
• Power save mode is active.
Solution #2
• If problems occur when writing, reduce the load on CPU resources. Some ways
to do this are:
q Log off from the network.
q Don’t use the mouse.
q Disable the screensaver or power save mode.
q Exit all other applications.
Possible Cause #3
• Shortage of PC memory. If there is insufficient main memory in the PC, data
may be swapped to the hard disk, and this can cause a buffer underrun.
Solution #3
• Increase the PC’s main memory capacity.
Possible Cause #4
• PlexWriter and other IDE CD-ROM drive are connected on the same cable.
Solution #4
• When writing from another IDE device to the PlexWriter on the same bus using
on-the-fly writing, the IDE bus is very busy and it may cause writing errors. This
depends on your system speed and configuration. Use the image writing method
for best results (safe mode) or record at lower speed.
• Put the IDE CD-ROM drive on the primary bus and PlexWriter as the only
device on the secondary bus (Master).
Possible Cause #5
• PlexWriter and hard disk are connected on the same cable.
Solution #5
• Remove the PlexWriter from the cable and re-connect it to a secondary IDE port.
Possible Cause #6
• Automatic thermal recalibration triggered.
Some high-speed hard disks are equipped with an automatic thermal
re-calibration function.)
Solution #6
• Use another hard disk in this case.
PlexWriter 8/4/32 Operation Manual
37
Section 5. Maintenance and Troubleshooting
Possible Cause #7
• Defective CD-R or CD-RW media. CD-R or CD-RW media may be dirty,
scratched, or damaged.
Solution #7
• ReWrite using another CD-R or CD-RW disc.
Symptom
Cannot add information to CD-R or CD-RW disc.
Possible Cause #1
• The CD-R or CD-RW disc was originally written using other software. If the
software is different, incompatibility errors may occur.
Solution #1
• Always use the same authoring software to add content to a disc.
Possible Cause #2
• Not enough disc capacity.
Capacity of a standard 74-minute CD is limited to 650 MB.
Solution #2
• Use different CD-R or CD-RW media if the capacity is insufficient.
Possible Cause #3
• The disc is written with on a CD-R or CD-RW drive from another vendor.
Solution #3
• Use a different CD-R or CD-RW disc.
• Try to use same drive to add more data to CD-R or CD-RW disc.
Symptoms
Cannot write at 8X speed.
Possible Cause #1
• Using poor quality media.
Solution #1
• Use the CD-R/RW media recommended by Plextor. Supported media lists can
also be found on the Plextor web site at www.plextor.com.
Possible Cause #2
• Buffer underrun occurring.
Solution #2
• Reduce the load on CPU resources. Some ways to do this are:
q Log off from the network.
q Don’t use the mouse.
q Disable the screen saver or power save mode.
q Quit all other applications except the authoring software.
38
PlexWriter 8/4/32 Operation Manual
Section 5. Maintenance and Troubleshooting
Possible Cause #3
• Using CD-RW media. This drive does not support 8X speed with CD-RW media.
Solution #3
• Use CD-R media.
Possible Cause #4
• Defective CD-R media.
Solution #4
• CD-R media may be dirty, scratched or damaged. Rewrite using another CD-R
disc.
Possible Cause #5
• Using authoring software other than that bundled with the PlexWriter.
Solution #5
• To use other types of authoring software, contact the supplier and ensure the
software support the PX-W8432T CD-RW drive. Supported software lists can
also be found on the Plextor web site at www.plextor.com.
Possible Cause #6
• CD-ROM drive used cannot read data fast enough to record at 8X.
Solution #6
• Record to HDD first, then to PlexWriter.
Troubleshooting for Macintosh Users
Symptoms
Drive will not operate as CD-ROM, CD-R or CD-RW device.
Possible Cause
• Whether using the PlexWriter as a standard CD-ROM, CD-R or CD-RW device,
you will need additional software and device drivers that are not part of the
Macintosh operating system.
Solution
• You will need to purchase additional software. Supported software lists can also
be found on the Plextor web site at www.plextor.com.
.
Symptoms
Drive not responding.
Possible Cause
• Bad connection between PlexWriter drive and IDE interface.
Solution
• Check the IDE cable to ensure it is seated properly and has no bent pins.
PlexWriter 8/4/32 Operation Manual
39
Section 5. Maintenance and Troubleshooting
This page intentionally left blank.
40
PlexWriter 8/4/32 Operation Manual
6. Frequently Asked Questions about Recording
What media should I use for my PlexWriter?
Supported media lists can also be found on the Plextor web site at www.plextor.com.
When can I use CD-RW media?
CD-RW media can only be used for writing in ReWritable drives. It is readable only
in ReWritable drives or newer MultiRead CD-ROMs with UDF readers installed.
UDF readers are available from software companies that develop packet writing
software. With CD-RW media you can:
q Use as if it were a large capacity floppy disc.
q Transport files to and from work.
q Copy your important data periodically.
q Store large projects as you develop them.
When should I use CD-R media?
CD-R media can be read in most CD-ROM, CD-Recordable or CD-ReWritable
drives. Use CD-R media to:
q Permanently archive important data.
q Copy your music to CD for personal use.
q Create specific format discs.
q Create disc for distribution to others.
q Share non-editable presentations
Why doesn’t CD-Copier work?
Some possible reasons are:
q Some CD-ROM drives are not fast enough for direct copying to the PlexWriter.
They cannot stream data fast enough to record at 8X or are not capable of digital
audio extraction at high speed.
q The CD-R disc being used is poor quality, scratched, badly manufactured, or has
oily fingerprints.
q Some CDs have copy prevention or other feature that does not allow direct CDto-CD duplication.
q Software may not support that disc format.
Why am I getting buffer underrun errors?
Recording CDs requires a source device to provide an uninterrupted stream of data.
A buffer underrun occurs when the data stream is interrupted. This can occur if:
q Another application interrupts the writing process.
q The write speed is set higher than the source drive can supply data.
q Lack of computer memory.
q Poor quality discs, scratched discs, discs with fingerprints, or badly
manufactured discs.
PlexWriter 8/4/32 Operation Manual
41
Section 6. Frequently Asked Questions about Recording
This page intentionally left blank.
42
PlexWriter 8/4/32 Operation Manual
Appendix A: PlexWriter Specifications
Disc Specifications
Useable Formats: Read
CD-DA; CD-ROM (Mode 1); CD-ROM XA (Mode 2: form
1 or form 2); CD-ROM (Mixed Mode); Photo CD;
VideoCD; CD-I (MPEG movies); CD-Extra; CD-G; CD
Text
Useable Formats: Write
ISO 9660-HFS; Rockridge; Photo CD, VideoCD; CD-I;
CD-Extra (CD-Plus); Enhanced CD; CD-R; CD+G; CD
Text; CD-Midi
Disc Diameter
12 cm diameter (Recording time 74 min.)
Writing Modes
Track-at-Once, Disc-at-Once, Session-at-Once,
multisession, fixed and variable packet writing
Recommended Media
§ CD-R: 8X, 4X, 2X
Taiyo Yuden, TDK, Ricoh, Mitsui Chemical, Kodak, Fuji
Photo Film, Sony, Imation, Philips, Maxell, Mitsubishi
Chemical
§ CD-R: 1X
Taiyo Yuden, TDK, Ricoh, Mitsui Chemical, Fuji Photo
Film, Sony, Imation, Philips, Maxell, Mitsubishi Chemical
§ CD-RW: 4X, 2X
Mitsubishi Chemical, Ricoh, TDK
(All are rewritable up to 1,000 times.)
Performance Specifications
Data Transfer Rate
CLV Write/CAV Read
Sustained Read/Write
32X (read only): 4.8MB/sec – Outer track
14X (read only): 2.1MB/sec – Inner track
8X (read/write): 1.2 MB/sec
4X (read/write/rewrite): 600KB/sec
2X (read/write/rewrite): 300KB/sec
1X (read/write): 150 KB/sec
Burst Read/Write
16.7MB/sec (PIO Mode 4, DMA Mode 2)
Average Random
Access
170ms
Spindle Motor
Brushless
Error Rate
Mode 1: 1 Block/10 Bits
Mode 2: 1 Block/109 Bits
12
PlexWriter 8/4/32 Operation Manual
43
Appendix A: PlexWriter Specifications
Front Panel
Eject
Eject Button; Manual Emergency Eject; Software Eject
Lights
Power On/Disc Access
Disc Loading
Auto
Headphone Jack
Stereo mini-jack, 0.8V at 32 ohms
Volume Control
Wheel knob
CD-Audio Controls
Stop/Eject
Rear Panel
Power Supply
DC +5V: 500mA
DC +12V: 600mA
Interface Connector
IDE bus, 40-pin flat ribbon type. Interface complies with
ANSI X3T13/1153D (ATA/ATAPI-4). Supports 59
commands, including special commands for CD-R.
Audio Output
Stereo analog output, Molex connector (L*G*G*R),
MPC3 standard
Jumper Switches
Master, Slave, Cable Select
Environmental Conditions
Operating Temperature
0 to 45 degrees Celsius
Performance Guarantee
Temperature
Operating Humidity
5 to 40 degrees Celsius
Storage Temperature
–40 to 60 degrees Celsius
Storage Humidity
20% to 95% (non-condensing)
20% to 80% (non-condensing)
Dimensions and Weight
Dimensions (W/H/D)
(excluding front panel)
5.78" x 1.64" x 7.95"
146mm x 41.3mm x 202mm
Weight
2.5 lbs. (1.2 kg)
Reliability
MTBF
Tray Loading
44
60,000 POH
200,000 Load Cycles
PlexWriter 8/4/32 Operation Manual
Appendix B: Technical Support
Store Plextor’s email, web site, phone, and fax numbers in a convenient location.
Keep your drive’s serial number and a copy of your sales receipt handy as well.
If you experience a problem while installing or operating your PlexWriter drive,
please refer first to the relevant sections of this manual regarding setup and
installation (Chapters 1–3). If you do not uncover the solution there, please refer next
to the maintenance and troubleshooting chapter that begins on page 29. It contains
solutions to the most common types of problems fielded by our technical support
staff. You may also wish to refer to the Frequently Asked Questions (FAQ) section
of our web site to assist you in troubleshooting the problem on your own.
NOTE: We encourage you to go the Plextor web site (www.plextor.com) before
attempting to contact Technical Support. The answers to the most common questions
callers ask can be found quickly in the FAQ area. A link to the FAQ area can be found
on our home page.
If you have not been successful in your quest, our Technical Support Department
will help you solve problems that relate specifically to your PlexWriter drive. In
many cases, a problem that appears to be caused by your PlexWriter actually
originates in another part of your computer. In such instances, our technical support
staff will try to help you identify the part at fault and will refer you to the
manufacturer of that part for further assistance.
How to Contact Us
There are several ways for you to contact Plextor’s Technical Support Department:
• Visit our web site (www.plextor.com) for answers to Frequently Asked
Questions.
• Send us email at [email protected], or send a fax to the attention of the
Technical Support Department at 408-986-1010. Include your telephone number
and the hours during which you can be reached. Be as detailed as possible in
describing your problem. Please include system configuration, hardware and
software, as well as versions of drivers used.
• Call 800-886-3935 and select the technical support extension.
PlexWriter 8/4/32 Operation Manual
45
Appendix B: Technical Support
Before You E-mail/Log On/FAX/Call
Please gather as much of the following information as possible before contacting us.
• The serial number and TLA number of your PlexWriter. Your serial number can
be found both on the warranty card that accompanied the drive and on a label on
the drive itself. The TLA number appears both on the drive label and on a sticker
at the rear of internal drives.
• The version of Plextor Manager you are using, if applicable.
• The latest version of firmware you loaded onto the drive, if applicable.
• The version of the Windows, Mac, or UNIX operating system you are using.
• The brand name and model number of your computer (e.g., Dell 466/NP, Micron
P66PCI Powerstation, ALR Evolution V, Apple Macintosh, Performa 575, etc.).
• The type of VGA, Super VGA, or other graphics board you use.
• Brand name and model number of any other peripherals you have installed or
connected to your computer (e.g., CD-ROM, scanner, fax board, network board).
Returns
You must receive an RMA (Returned Materials Authorization) number from our
Technical Support Department before any Plextor drive can be returned for repair or
replacement. Any drive sent to Plextor without an RMA number will not be
accepted. Drives must be sent postage prepaid. We recommend that you insure your
shipment, as Plextor cannot be held responsible for any damage that may occur
during shipment.
46
PlexWriter 8/4/32 Operation Manual
Appendix C: Helpful Contacts
Use the contacts below for CD-R and CD-RW software and components, and for PC
vendors.
Contacts for CD-R and CD-RW Components
Company
Phone
Fax
Product
Adaptec
408-945-8600
408-262-2533
CD-R software
AMC
800-390-9328
425-861-8391
CeQuadrat
800-330-6734
650-843-3799
Devices,
cables, acc.
CD-R software
Creative
Labs
405-742-6600
405-742-6633
Soundboards
Creative
Digital
Research
Diamond
408-255-0999
408-255-1011
800-468-5846
408-325-7408
Windows,
UNIX CD-R
software
Soundboards
FWB
650-482-4800
650-482-4858
Pacific
Inter
Connects
Plextor
408-654-0234
408-982-9329
408-980-1838
408-986-1010
Testa CD
Labs
520-531-1880
Mac device
drivers
Audio cables
Recommend
boards, audio
cables, all
other technical
support needs
CD-Tach
performance
benchmarks
Web
Address
www.adaptec.
com
cust.svc@
amcdirect.com
www.
cequadrat.com
www.
creativelabs.
com
www.cdr.com
www.
diamondmm.
com
www.fwb.com
www.piccable.
com
support@
plextor.com
BBS: 408-9861569
http://tcdlabs.
simplenet.com
PlexWriter 8/4/32 Operation Manual
47
Appendix C: Helpful Contacts
Contacts for PC Vendors
Company
IBM
Dell
Gateway
Compaq
Hewlett Packard
Intel
ASUSTeK Computer
GIGA-BYTE
ABIT
Aopen
EPOX
SOYO Computers
Tekram
FIC
Micro-Star International
I Will
ELITEGROUP COMPUTER
SYSTEMS
Free Computer Technology
48
PlexWriter 8/4/32 Operation Manual
Web Address
http://ibm.com
http://dell.com
http://www.gw2k.com
http://compaq.com
http://www.hp.com/
http://intel.com
http://www.asus.com.tw/
http://www.giga-byte.com/
http://www.abit-usa.com/
http://www.aopen-usa.com/
http://www.epox.com/
http://www.soyousa.com/
http://www.tekram.com/
http://www.fic.com.tw/
http://www.msi.com.tw/
http://www.iwill.com.tw/
http://www.ecs.com.tw/
http://www.freetech.com/
Index
A
applications software · 22
audio cable · 17
audio CD
playing · 27
audio output connector · 5
audio, troubleshooting · 34
B
bay cover panel · 14
box
contents of · 3
shipping · 3
C
cable
audio · 17
IDE · 13
power for drive · 13
cable connections · 16
cable select · 12
CD
playing on Macintosh · 28
reading · 1
writing · 1
CD Res-Q · 22
CD-Audio · 27
error messages · 32
playing · 27
CD-R media · 25
CD-R/RW
writing to · 28
CD-ROM media · 25
CD-RW
reading from · 28
CD-RW media · 25
cleaning disc · 26
configuration
CSEL · 12
connection
soundboard and · 17
connector
audio output · 5
contacts · 47
controls
front-panel · 4, 44
rear panel · 44
cover panel, bay · 14
CSEL signal · 12
D
device driver · 21
dimensions · 44
disc
cleaning · 26
specifications · 43
troubleshooting · 32
DISC indicator · 4
DMA
disabling · 30
enabling · 19
drive
installing · 12
recognizing in Windows 95/98 · 17
recognizing in Windows NT · 18
E
emergency eject hole · 4
enabling DMA · 19
environmental conditions · 44
F
firmware
revision · 2
front-panel controls · 4, 44
H
headphone jack · 4
I
IDE cable · 13
PlexWriter 8/4/32 Operation Manual
49
Index
IDE configuration
determining · 8
examples · 11
selecting · 10
IDE interface connector · 5
IDE ribbon cable
connecting · 15
installation · 7, 12
QuickStart · 7
J
jumpers · 5
setting · 9
M
R
rails · 14, 15
reading a CD · 1
rear panel controls · 44
recognizing the drive in Windows 95/98 · 17
recognizing the drive in Windows NT · 18
recording
frequently asked questions · 41
reliability · 44
returns · 46
RMA number · 3, 46
S
opening the computer · 7
secondary IDE port · 8
security sticker · 3
selecting an IDE configuration · 10
serial number · 12
shipping your drive · 3
slave · 8
software
application · 21
device drivers · 21
installing · 21
mastering · 5
soundboard
connection and · 17
specifications · 43
speed
reading · 1
writing · 1
support · 45
P
T
packet-writing software · 23
performance
specifications · 43
playing a CD · 27
Plextor Manager
audio utilities · 28
Plextor Manager 2000 · 22
power cable · 13
power connector · 5
precautions · 6, 9
primary IDE port · 8
technical support · 45
TLA code · 12
tray
front door · 4
loading and unloading · 25
troubleshooting
audio problems · 34
disc problems · 32
general problems · 30
Macintosh installation · 39
writing discs · 35
Q
U
QuickStart installation · 7
upgrading · 2
Macintosh
playing CD on · 28
troubleshooting · 39
maintenance · 29
master · 8
mastering software · 5, 23
media · 25
care and handling · 26
mounting rails · 14, 15
O
50
PlexWriter 8/4/32 Operation Manual
Index
V
volume control · 4, 27
writing
frequently asked questions · 41
writing a CD · 1
writing discs
troubleshooting · 35
writing to CD-R and CD-RW · 28
W
weight · 44
PlexWriter 8/4/32 Operation Manual
51
Notes
PlexWriter 8/4/32 Operation Manual
52