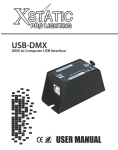
1
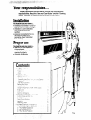
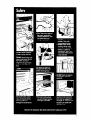
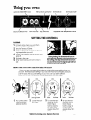
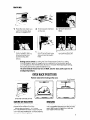
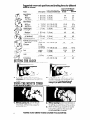
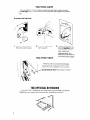
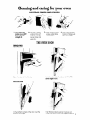
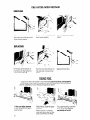
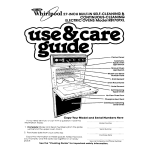
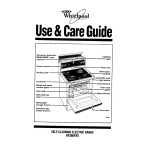
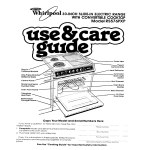
01 304NCH BUILT-IN ELECTRIC OVEN
Model RB2OOOXK
mIii!l
-5L
Control
Panel
Manual
Oven Li ht
Swl Bch
Automatic
Oven Light
Switch
eland
Number
Serial
Plate
Broil Element
Oven Rack Guide
Bake Element
Removable
Oven Door
Silicone
Lr k,~~ckse
or Installaton
Heat Seal
date trom voclr sales jiirr;
P,.‘? ?jC
‘,,;:jpy !hls Inform&ion
In these spaces
your warranty and the sales slip together
place
See the “Cooking
Keep this ooc-,
in a handy
Guide”for
Service
important
safety
Compc~n,~
information
.zn3
phone
Number
Your responsfb5Wes..
l
Proper installation
and safe use of the oven are your personal
responsibilities.
Read this’llse
and Care Guide”and
the “Cooking
Guide”carefully
for important
use and safety information.
Instalfath
You must be sure your oven is...
a Installed and teveled in a wall or
cabinet that wilt hold the weight;
l tnstalled in a well-ventilated
area protected from the
weather;
l properly
connected to the correct electric supply and
grounding. (See “Installation
Instructions.“)
i
~\
1”
Proper use
You must be sure your oven is...
a used only for jobs expected
of home ovens;
9 used only by peopfe who can
operate it properly;
l properly
maintained.
/ i,
Contents
”
Resetting the Over ‘+~:_e’ :-?::e Contra
BroilIric~
.&en Ru:k PosItIon,
Setting the Clock
Minute timer
Sslng the Automat(c
~4tAty8VJltR Clock
Oven Llqqt
?ver V/ei?t
ilptlonci
Rotlsserle
Cleaqlng
2nd Caring t .r ::I,, C t.er
Control P=lnel and Kr ‘ICC
i)ven Door
%ter Oven Wlndovw
I:sing Foi
Cleaning
Chart
If You Need Service or iissistance
1 Before Calling for Assistance
2 If You Need Assistance
3 If You Need Service
4 If You Have a Prob!em
~.:
:,
c;
t:
b
/’
4
0
li‘
1II
1”
12
12
12
12
12
‘Tmk
3
Using your oven
Automatic
Clock
MEALTIMER
and Minute
Timer
Manual
Clock
Start Time Knob
Oven
6.
Oven Signal
Oven Selector
Adjustable
Stop Time Knob
SETTING
5.
Light Switch
Oven Temperature
Light
Control
THE CONTROLS
goes off
Put food in the oven.
When done baking, turn both knobs to
OFF.
During baking, the elements will turn on
and off to help hold the oven temperature
at
the setting. (The top element will never turn
red, but will be hot.) The Signal light will turn
on and off with the elements.
RESETTING THE OVEN TEMPERATURE CONTROL
Does your new oven seem to be hotter or colder at the same settings than your
old oven. The temperature
setting in your old oven may have changed
gradually
over the years. The accurate
setting of your new oven can seem different.
If you think the oven temperature
needs adjusting, follow these steps:
Locking
1.
4
Pull out the center
of the Oven Temperature Control.
2.
Screw
Loosen the locking screw.
Tighten
the locking
OFF
OFF
OFF
Tooth
Notches
3. To lower the temperature. move
black ring so
tooth is closer to
LO. Each notch
equals about 10 F
(5 Cl.
screw.
Replace
the knob.
Tooth
Notches
4. To raise the temperature, move
black ring so
tooth is closer to
HI. Each notch
equals about 10 F
(5 CL
‘Tmk
1.
Place the rack where you
want it for broiling. (See
below for suggestions
]
2.
Put broiler pan and food
on the rack.
3.
Set Oven Selector
BROIL.
4.
Set Oven Temperature
Control to BROIL. (Set on a
lower temperature
for
slower broiling. See
below.)
5.
During broiling the oven
door must be partly open
A built-in stop will hold it
there
6.
When broriing is done,
turn both knobs to OFF.
to
Broiling can be slowed by setting the Oven Temperature
Control to a setting
lower than BROIL. When it’s on BROIL, the broil element is on all the time. When it’s
on a temperature,
the element turns off and on. The lower the temperature
setting,
the shorter are the times when the element is on.
The Oven Selector
Knob
broiling temperatures.
must be on BROIL and
the door
partly
open
for all
OVEN RACK POSITIONS
Position
Lift rack at front and
racks
before
turning
on the oven.
Broil Element
pull out.
BAKING OR ROASTING
BROILING
Food for baking or roasting should be
placed in the center of the oven.
Always leave at least I? 2 to 2 inches
(4-5 cm) between the sides of a pan and the
oven wall and another pan. For more information, see the “Cooking
Guide.”
Adjust the top rack so the food to be broiled
is at a suggested
distance from the broil element. (See page 6.) ALWAYS broil with the
door open to the broil-stop.
5
Suggested
oven-rack
kinds of meats.
Food
Beef Steaks
Rare
Medium
Well done
Beef Steaks
Rare
Medium
~~~Well Done
Hamburgers
Lamb Chops
Medium
Ham slice, precooked
or tendered
Canadian
Bacon
Pork Rib or Loin Chop
Well done
Chicken
Fish
Liver
and broiling
times for different
Approximate
Mlnutes Selector set to BROIL
2nd side
1st side
Description
Inches (cm) from top
of food to Broil Element
1 (2.5 cm)
I (2.5cm)
1 (2.5 cm)
3 (8 cm)
3 (8cm)
3 (8 cm)
7-9
9-11
11-13
3-5
4-7
5-7
II2 (4cm)
1 2 (4 cm)
1. i (4 cm)
I2 (1 cm)
4
4
4
3
13-15
17-19
19-21
6-8
6-8
8-10
14-16
4-5
1 (2.5 cm]
’ 2 -1
(l-2.5 cm)
I2 (I cm)
34 -1
(2-2.5 cm)
2-3 lb.
(l-l.5 kg)
cut in half
whole
fillets
1 -ja
(1-2 cm)
3 (8 c*
6-8
4-5
3 (8cm)
3 (8W
6-8
6
4-5
4
Frankfurters
SETTING-THE
positions
-5 (IO-13 cm]
-5’ (IO-13 cm)
-5’ (IO-13 cm)
(8cm)
_
4 -5 (IO-13 cm)
15
10
7 -9 (18-23 cm)
3 (8cm)
3 (8cm)
25-30
11-16
7-8
1 O-l 2
9-14
5-7
3 (8 cm)
4 -5 (IO-13 cm)
3
6-7
3
4-5
CLOCK
Push In and turn the Minute Timer Knob to set the Clock
1.
Push in Minute Timer Knob and turn
clockwise
until clock shows the right time
of day.
USING THE MINUTE
2.
TIMER
let the Minute Timer Knob pop out. Turn
counterclockwrse
until the Mfnute Timer
dral shows OFF The clock setting will
change if you push in when turning.
DO NOT PUSH IN THE KNOB when settrng the Minute Timer
1.
Without pushing it in, turn the Minute
Timer Knob until the hand passes the
settfng you want
2.
Without pushing in, turn the knob back so
the setting you want shows in the window.
3.
When the time is up, a buzzer will sound.
To stop the buzzer, turn the dial to OFF
without pushing in the knob.
PUSHING IN AND TURNING THE KNOB CHANGES THE CLOCK SETTING.
USING THE AUTOMATIC
MEALIIMER’i:
The Automatic
MEALTIMER Clock is designed
you set...even when you are not around.
To start and stop baking
CLOCK
to turn the oven on and off at times
automatically:
1. Put the racks where you
want them and place the
food in the oven.
2.
Make sure the clock is set
to the right time of day.
3.
Push in and turn the Start
Time Knob clockwise
to the time you want baking to start.
4.
Push in and turn the Stop
Time Knob clockwise
to the time you want the
oven to shut off
5.
Set the Oven Selector
TIMED.
6.
Set the Oven Temperature
Control on the baking
temperature
you want.
7.
After baking is done, turn
both knobs to OFF
8.
To stop the oven before
the preset time, turn both
knobs to OFF
To stop baking
on
automatically:
1.
Put the racks where you want them and
place the food In the oven
2. Make sure the clock 1sset to the right time
of day.
3. Push in and turn the Slop Time Knob clockwise to the time you want the oven to shut
Off
4.
5.
Set the Oven Selector on TIMED.
Set the Oven Temperature
Control on the
baking temperature
you want.
6. After baking is done, turn both knobs to
OFF.
7. To stop the oven before the preset time,
turn both knobs to OFF.
SPECIAL CAUTION:
Use foods that will not go bad or spoil
while waiting for cooking
to start. Avoid
using dishes with milk or eggs, cream
soups, cooked
meats or fish, or any item
with baking powder or yeast.
Smoked or frozen meats may be used;
so can vegetables,
fruits and casseroletype foods. Vegetables
can be cooked
in
‘Tmk
a covered
baking dish with about a halfcup (118 ml) of water for 1 to 1% hours.
Any food that has to wait for cooking
to
start should be very cold or frozen before
it is put in the oven. MOST UNFROZEN
FOODS SHOULD NEVER STAND MORE THAN
TWO HOURS BEFORE COOKING STARTS.
7
THE OVEN LIGHT
The oven light M/III come on when you open the oven door or when you push
the Oven light Switch Close the oven door or push the switch again to shut off the
light
To replace
1.
the light bulb:
Turn off the electric
at the marn power
po’“ver
supoly
2.
Remove the light bulb
from rts socket.
3.
THE OVEN VENT
Replace the bulb with a
40-watt appliance
bulb
available
from most grocery, variety and
hardware
stores. Turn
electrical
power back on
at the main power supply.
When the oven is on, hot air and moisture
escape through a vent on top of the control
panel. The vent is needed for air circulation.
Do not block
THE OPTIONAL
the vent. Poor baking
can result
ROTISSERIE
If you would like a rotisserie for your lower oven, you can order a kit (Part No
261880) from your dealer The kit includes easy installation
instructions.
Cleaning and carhg for your oven
CONTROL PANEL AND KNOBS
1.
First make sure
knobs are on OFF
then pull knob
straight off.
2. Use warm soapy
water and a soft
cloth to wipe the
panel. Rinse and
wipe dry.
3. Wash knobs in warm
soapy water. Rinse
well and dry.
4. Push knobs straight
back on. Make sure
they are on OFF.
THE OVEN DOOR
REMOVING
Hold the door at both sides and Iift it at the
same angle it is in.
Open the door to the first stop
REPLACING
Fit the bottom corners
ends of the hinges.
II
of the door over the
Push the door down evenly. The door will
close only when it is on the hinges correctly.
9
THE OUTER OVEN WINDOW
REMOVING
With the door closed, remove
the screws from the top of the
outer window frame.
Tip the window and frame out
from the top slightly.
Lift up on both sides of the
frame.
Push the top of the frame into
the opening
while pushing
down.
Replace
REPLACING
Fit the tabs at the bottom of
the frame into the bottom of
the window opening.
the screws.
USING FOIL
Using foil on the oven bottom is recommended
only if the foil is used properly.
Cut foil from a roll of heavy-duty
IS-inch (45 cm) aluminum foil, or buy a foil kit
[Part No. 241430) from your Whirlpool Appliance
dealer.
Lift the cool bake element
slightly to lift the feet off the
oven bottom.
10
Slide the foil under the bake
element.
Make sure foil is centered,
long enough to start up both
sides, and without wrinkles.
For proper baking, lower the
bake element so all feet
rest solidly on the foil.
CLEANING
PART
Outside
oven
of
CHART
WHAT TO USE
HOW TO CLEAN
Soft cloth,
water
l
warm soapy
knobs
Warm, sudsy water
bristle brush
and
when oven is cool.
Do not allow food containing
acids
(such as vinegar, tomato, lemon juice
milk) to remain on surface. Acids will
remove the glossy finish.
l
Nylon or plastic
scouring pad for
stubborn spots
Control
Wipe off regularly
l
Do not use abrasive
l
Wash, rinse and dry well.
l
Do not soak.
or harsh clear-sers.
Aluminum
broiler pan
and grid
Warm, soapy water or
soapy steel wool pads
l
Wash with other cooking
Control
Warm, soapy
water
l
Wash, rinse and dry with soft cloth.
Commercial
cleaner
glass
l
Follow directions
panel
Oven racks
Warm, soapy water or
soapy steel wool pads
l
Oven door
glass
Warm, soapy water or
plastic scrubbing
pad
l
Commercial
cleaner
Standard
oven
glass
Warm, soapy water or
soapy steel wool pads
Commercial
cleaners
oven
l
or
utensils.
with cleaner.
Wash, rinse and dry. Use steel wool
for stubborn areas.
pads
Make certain oven is cool. Wash, rinse
and dry well with soft cloth.
Follow directions
cleaner.
provided
with the glass
l
Remove door for easier access.
0 Place newspaper
on floor to protect
floor surface.
l
Follow directions
provided
with the oven
cleaner.
l
Rinse well with clear water.
l
Use in well ventilated
room.
l
Do not allow commercial
oven cleaner
to contact the heating elements, oven
seal, or exterior surfaces of the oven.
If you need service or assistance, we
suggest you follow these four steps:
1. Before
calling for assistance.. .
3
l
If you need service”‘. . .
Performance
problems
often result from
little things you can find and fix yourself without tools of any kind.
If nothing operates:
. Is the oven correctly
wired into a live circuit
with the proper voltage?
(See Installation
Instructions.)
l Have
you checked
the main fuse or circuitbreaker box?
It the oven will not operate:
. Is the Oven Selector turned to a setting [BAKE
or BROIL, but not TIMED)?
. Is the Oven Temperature
Control turned to a
temperature
setting?
It cooking
l
Is the oven
results aren’t
Whirlpool
has a
nationwide
network of franchised
-
1
warranty
States. To
area, call
telephone
telephone
TECH-CARE service
and provide
afterservice,
anywhere
in the United
locate
TECH-CARE service
in your
our COOL-LINE service assistance
number (see Step 2) or look in your
directory
Yellow Pages under:
what you expect:
level?
. Are you using pans recommended
in the
Cooking Guide?
. If baking, have you allowed
I1 I to 2 Inches
(4-5 cm) on all sides of the pans for air
circulation?
. Have you preheated
the oven as the recipe
calls for?
l Does the oven temperature
seem too low or
too high? See page 4 “Resetting the oven
temperature
control.”
l Are the pans thesize
called for in the recipe?
l Are
you following
a tested recipe
from a
reliable source?
See the Cooking Guide for more information
on cooking problems
and how to solve them
2 . If you need assistance ‘:’. . .
Call the Whirlpool
COOL-LINE’
service assistance telephone
number. Dial free from:
Continental
U.S. . . . . . . . . (800) 253- 130 1
Michigan
. . . . . . . . . . . . . . . . (800) 632-2243
Alaska & Hawaii . . . . . . . . (800) 253- 1121
and talk with one of our trained Consultants.
The Consultant
can rnstruct you in how to obtarn satisfactory
operation
from your appliance or, if service is necessary,
recommend
a
qualified
service company
in your area.
WASHlNG MACHINES. DRYERS
LLIRONERS-SERVICING
II,
\.A,<\ ,, i / iit,,‘\
\,A.
;t3. ci 8.:’
d.,” <“A
‘2’ Mn:,P
4 . If you have a problem”‘.
..
Call our COOL-LINE service assistance
telephone number (see Step 2) and talk with one
of our Consultants, or if you prefer, write to:
Mr. Guy Turner, Vice President
Whirlpool Corporation
Administrative
Center
2000 US-33 North
Benton Harbor, Ml 49022
If you must call or write, please provide: model
number, serial number, date of purchase,
and
a complete
description
of the problem.
This
information
is needed
in order to better respond to your request for assistance.
0
FSP
P
FSP IS o eglsiered
tradema*
it Wh,rlpcol
CorWrailO~
for quaI+,
POflS Look IOr ttilS synbo’
of quolltv
whenever
YOL need o replacement
purl for your WhIrlpool
appliance
FSP
replacement
ports WIII fit right and work right
because
they ore mode
lo the same exacting
speahcotlons
used lo build every revi
WhlrlpcG
appl~once
Benton Harbor, Michigan. Automatic Washers. Clolhes Dryers.
Freezers, Relrigeralor-Freezers.
Ice Makers, Dishwashers.
BullI-in Owens and Surlace Units, Ranges. Microwave Ovens,
Compactors, Room Air Conditioners, Dehumidiliers,
Central
beating and Air Conditioning Systems.
Part No 311413 Rev. A
Printed
In U S A.