1
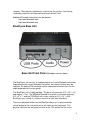
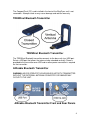
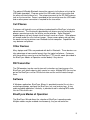
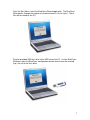
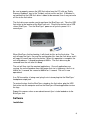
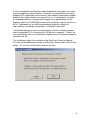
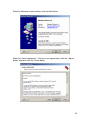
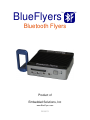
TM
BlueFlyers
Bluetooth Flyers
Product of
Embedded Solutions, Inc
www.BlueFlyers.com
R91007G
TM
TABLE OF CONTENTS
Warnings............................................................................................................... ii
Manufacturer Certifications ................................................................................... ii
BlueFlyers Base Unit......................................................................................... ii
AIRcable Bluetooth Transmitter........................................................................ iii
TRENDnet Bluetooth Transmitter..................................................................... iii
FM Transmitter ................................................................................................. iv
BlueFlyers Overview .............................................................................................1
BlueFlyers Concept ...........................................................................................1
About Bluetooth.................................................................................................1
BlueFlyers Base Unit.........................................................................................2
TRENDnet Bluetooth Transmitter......................................................................4
AIRcable Bluetooth Transmitter.........................................................................4
Cell Phones .......................................................................................................5
Other Devices....................................................................................................5
FM Transmitter ..................................................................................................5
Software ............................................................................................................5
BlueFlyers Modes of Operation .........................................................................5
Using BlueFlyers...................................................................................................6
Operation Overview...........................................................................................6
Software ............................................................................................................8
Installation......................................................................................................8
Creating A Flyer File Set..............................................................................16
Modifying An Existing Flyer File Set ............................................................27
Remove A Flyer File Set ..............................................................................29
Configuration ...............................................................................................30
Logs.............................................................................................................45
Audio Recordings ........................................................................................51
Hardware.........................................................................................................51
Setup ...........................................................................................................51
Configuration ...............................................................................................52
Time.............................................................................................................53
Audio Tones.................................................................................................54
HTTP Server ...................................................................................................54
Successful Campaign Tips .................................................................................61
Troubleshooting ..................................................................................................62
Warranty .............................................................................................................65
Export .................................................................................................................65
Trademark ..........................................................................................................65
i
WARNINGS
•
•
•
•
•
•
•
Read the eBox 2300, AIRcable Host XR, TRENDnet TBW-104UB, and
C.Crane FM transmitter manuals for complete safety instructions.
Operating the AIRcable Bluetooth transmitter without the external antenna
connected may result in damage to the unit.
The BlueFlyers unit is not intended for use outdoors. Exposing the unit to
rain or moisture may result in electrical shock or fire hazards or damage to
the equipment.
Never install the BlueFlyers unit in wet locations.
Opening the BlueFlyers unit, Bluetooth transmitter, or FM transmitter
housings may result in electrical shock.
Never touch un-insulated terminals or wires.
USB connectors are not supplied with Limited Power Sources.
MANUFACTURER CERTIFICATIONS
BlueFlyers Base Unit
FCC Class A Note
This equipment has been tested and found to comply with the limits for a Class A
digital device, pursuant to Part 15 of the FCC Rules. These limits are designed to
provide reasonable protection against harmful interference when the equipment
is operated in a commercial environment. This equipment generates, uses and
can radiate radio frequency energy and, if not installed and used in accordance
with the instruction manual, may cause harmful interference in which case the
user will be required to correct the interference at his own expense. Testing was
done with shielded cables. Therefore, in order to comply with the FCC
regulations, you must use shielded cables with your installation.
Warning
This product complies with EN55022 class A. In a domestic environment this
product may cause radio interference in which case the user may be required to
take adequate measures.
Changes or modifications to this unit not expressly approved by the party
responsible for compliance could void the user’s authority to operate the
equipment.
This device complies with Part 15 of the FCC rules. Operation is subject to the
following two conditions: (1) this device may not cause harmful interference, and
ii
(2) this device must accept any interference received, including interference that
may cause undesired operation.
This digital apparatus does not exceed the Class A limits for radio noise
emissions from digital apparatus as set out in the interference - causing
equipment standard entitled “Digital Apparatus”, ICES-003 of the Department of
Communications.
Manufacturer’s Declaration Of Conformity
This equipment has been tested and found to comply with the requirements of
European Community Council Directives 89/336/EEC and 73/23/EEC relating to
electromagnetic compatibility and product safety respectively.
Attention
This product has been designed and certified to comply with certain regulatory
requirements pertaining to Information Technology Equipment. This product has
not been designed for use as a medical device. Without limitation of the
foregoing, this product is not intended and has not been certified for use in a
hospital or clinical environment to diagnose, treat, or monitor patients under
medical supervision, and is not intended and has not been certified to make
physical or electrical contact with patients, nor to transfer energy to or from
patients and/or to detect such energy transfer to or from patients.
AIRcable Bluetooth Transmitter
Certifications
•
•
•
•
Bluetooth Certified (BQB)
Bluetooth 2.0 compatible with 802.11b tolerance (AFH)
FCC authorization 15C
CE certification
TRENDnet Bluetooth Transmitter
Certifications
•
•
•
•
Compliant with Bluetooth v2.0 Specification with EDR (Enhanced Data
Rate) support
Backward compatible with Bluetooth v1.1 and v1.2 devices
Compliant with Class I Bluetooth Operations
CE, FCC
iii
FM Transmitter
This device complies with part 15 of the FCC rules. Operation is subject to the
following two conditions.
1. This device may not cause harmful interference, and
2. This device must accept any interference received, including interference
that may cause undesired operation.
iv
BLUEFLYERS OVERVIEW
BlueFlyers Concept
The BlueFlyers unit electronically transmits information directly to Bluetooth
enabled cell phones, laptops, PDAs, Blackberries, or other portable devices. The
Bluetooth advertisement can contain images, audio, video, business cards, Java
applications, and more. Bluetooth marketing is proximity-based, and the choice
of Bluetooth transmitters will determine the distance covered by the marketing
effort.
The BlueFlyers unit can also transmit an FM broadcast audio message. The FM
broadcast can be used to transmit instructions on how to access BlueFlyers from
a cell phone, details about a daily special, or music. Multiple MP3 files can be put
on the BlueFlyers unit for FM transmission and the unit will rotate through them.
About Bluetooth
Bluetooth uses a wireless connection protocol that allows devices to exchange
data. This protocol is commonly built into modern cell phones and PDAs, and
many laptops. If not present, Bluetooth capability can easily be added to many of
these devices using a small external Bluetooth transmitter.
Bluetooth is in common use today in wireless headsets, allowing hands-free use
of cell phones. In addition to the voice connections, this protocol also allows the
exchange of data files. These files can be images, audio MP3s, videos, text,
Word documents, vCards (virtual business cards), or other formats.
BlueFlyers can transmit multiple file formats, including information in formats
which give the prospect immediate access to vital information and long term
access to detailed information.
Depending on the device and the format of the data transferred, the information
may be usable immediately or may need to be transferred to a PC before use.
For example, images may be viewable on cell phones and PDAs. Audio MP3s
may be playable on newer cell phones and PDAs. A Word document would not
be usable on a cell phone and would need to be transferred to a PC. Some
cellular service providers purposely cripple the cell phone manufacturer's built-in
Bluetooth functionality and limit file types that may be transferred over Bluetooth.
Using a variety of file formats helps ensure the flyer is received.
Bluetooth transfers are not "high-speed". Devices that use early versions of the
protocol are limited to a maximum of 721 kbps, while newer devices may support
up to 3 Mbps. Transferring a 1MB file to an older device could take more than 10
1
seconds. Some devices implement a size limit for file transfers; transferring
reasonably sized files will help avoid reaching a device's limit.
Additional Bluetooth Information can be found at:
http://www.bluetooth.com/
http://www.bluetooth.org/
BlueFlyers Base Unit
Base Unit Front Panel (BlueAgent version shown)
The BlueFlyers unit consists of a compact base unit, and a Bluetooth transmitter.
Depending on the chosen Bluetooth transmitter, an external antenna may be
required. An optional FM transmitter can be connected to the base unit via the
audio output port on the front panel.
The BlueFlyers unit is highly portable. The base unit measures 4.5" x 4.5" x 1.4"
and weighs 1.1 lbs. The AIRcable Bluetooth transmitter’s enclosure measures
3.5” x 3” x 1”, and the TRENDnet unit is even smaller at 2.8” x 1.4” x 0.44”.
BlueFlyers runs silently; it is fanless and uses a solid state hard drive.
There are two power buttons on the BlueFlyers base unit, a physical rocker
switch located on the rear panel and a soft switch on the front panel. The
physical switch on the rear panel must be in the ‘ON’ position for the unit to
2
operate. The soft switch on the front panel can be used to turn the unit on and
off. The unit has an AC to DC power transformer built into its power cable. The
AC end of the power cable plugs into a standard 120V AC outlet. The DC end of
cable connects to the power jack on the rear panel of the base unit.
Neither of the Bluetooth transmitters requires a separate power connection.
Base Unit Rear Panel
There are two USB ports on the front of the unit and one on the rear of the unit.
Any available USB port can be used for the AIRcable Bluetooth transmitter’s
USB cable. For the TRENDnet Bluetooth transmitter, a USB port should be
chosen so that the transmitter‘s built in antenna can be extended vertically.
The BlueFlyers unit is shipped with a demonstration advertisement installed, but
must be configured to transmit the desired advertisement flyer. Files are
transferred to BlueFlyers via the provided USB flash drive. The USB flash drive
can be plugged into any available USB port on the base unit.
Example Flash Drive
3
The CompactFlash (CF) card installed in the front of the BlueFlyers unit is not
removable. Attempts to do so may cause damage and void the warranty.
TRENDnet Bluetooth Transmitter
TRENDnet Bluetooth Transmitter
The TRENDnet Bluetooth transmitter connects to the base unit via a USB port.
Select a USB port that allows the antenna to be extended vertically. Power is
provided to the transmitter over USB and no other power connection is required
for the transmitter.
AIRcable Bluetooth Transmitter
WARNING: NEVER OPERATE THE AIRCABLE BLUETOOTH TRANSMITTER
WITHOUT THE EXTERNAL ANTENNA CONNECTED OR DAMAGE MAY
OCCUR TO THE UNIT.
AIRcable Bluetooth Transmitter Front and Rear Panels
4
The optional AIRcable Bluetooth transmitter connects to the base unit using the
USB cable (provided). Plug one end of the USB cable into the transmitter and
the other end into the base unit. The antenna connects to the RP-SMA antenna
jack on the transmitter. Power is provided to the transmitter over the USB cable
and no other power connection is required for the transmitter.
Cell Phones
Customers will typically use a cell phone to download the BlueFlyers’ electronic
advertisement. The functionality provided by cell phones may be limited by the
phones manufacturer or by the cellular service provider. Some Bluetooth
enabled phones will only accept virtual business cards or vCards. Other phones
will accept audio files also, but not images. Some camera phones do not allow
the owner to transfer pictures over Bluetooth to their computer. Capabilities will
vary between cell phones.
Other Devices
Many laptops and PDAs are produced with built-in Bluetooth. These devices can
take advantage of more media formats than the typical cell phone. Customers
with these devices can also use the BlueFlyers’ FTP transfer mode (described in
the BlueFlyers Modes of Operation section below) if they desire.
FM Transmitter
The FM broadcast can be used to transmit instructions on how to access the
BlueFlyers unit, details about a daily special, or music. Multiple MP3 files can be
put on the BlueFlyers unit for FM transmission and the unit will rotate through
them.
Software
A Windows application, BlueFlyers Wizard, is provided to create file sets for a
marketing campaign, configure the BlueFlyers unit, and analyze logs. A free
audio recording application, Audacity, is provided to aid in creating MP3 audio
files for FM transmission.
BlueFlyers Modes of Operation
The BlueFlyers Wizard allows the selection of BlueFlyers’ operating mode.
Multiple modes may be enabled simultaneously; they are not exclusive.
5
Mode
Description
Passive
Passive mode is always enabled. In this mode, flyers are sent
when customers initiate the Bluetooth contact. This mode waits
for parties to show interest before sending the advertisement.
Active
Active mode is optional. In this mode, a request to send a flyer
is made to all Bluetooth devices that are found within the
BlueFlyers’ transmit range. For each device found, only one
request to send is made for a particular flyer’s file set.
Regardless of whether the recipient accepts or declines the flyer,
they will not be asked again. Customers can still receive the
advertisement using passive mode operation by initiating the
request.
FTP
FTP mode is always enabled. This mode can be used by
laptops. It is a passive mode that allows customers’ devices to
pull flyers from BlueFlyers rather than the BlueFlyers unit
pushing ads to the devices. This is a one way connection that
does not allow customers to push information to BlueFlyers, nor
does it allow access to any other files on the BlueFlyers unit.
FM
Broadcast
FM broadcast is an optional mode and requires the external FM
transmitter. A BlueFlyers instructional audio file is provided with
the sample flyer. This file may be used to provide instructions to
customers. The optional FM transmitter provides digital
frequency selection from 88.3 to 107.7 MHz.
USING BLUEFLYERS
Operation Overview
This section provides a summary of the operation of BlueFlyers and the
BlueFlyers Wizard application. Detailed information is provided in the sections
following this one.
Install the BlueFlyers Wizard application on a computer running the Windows
operating system. This will create a BlueFlyers Wizard icon on the PC’s Start
Menu.
6
From the Start Menu, select the BlueFlyers Wizard application. The BlueFlyers
Wizard walks through the creation of an advertisement’s file set (flyer). These
files will be stored on the PC.
Plug the provided USB flash drive into a USB slot on the PC. Use the BlueFlyers
Wizard to select the BlueFlyers configuration desired and to save the selected
flyer’s file set to the flash drive.
7
Be sure to properly remove the USB flash drive from the PC (click on “Safely
Remove Hardware” icon in the Taskbar) so that no files are lost. If Windows is
not notified that the USB flash drive is about to be removed, then it may not write
all files to the flash drive.
The flash drive can now be used to configure the BlueFlyers unit. Take the USB
flash drive to the location of the BlueFlyers unit. Plug the flash drive into a USB
slot on BlueFlyers. Turn the BlueFlyers’ power on or cycle its power if it is
currently on.
When BlueFlyers finishes booting, it will check for files on the flash drive. The
unit will copy the flyer’s files and the configuration files from the flash drive, and it
will copy its current logs to the flash drive. When this operation is complete, the
unit will produce a 1 second long beep at 800Hz. The flash drive may be
removed from the unit after this beep.
The unit will then start the required applications. Once all applications are
running, the unit will produce two short beeps that rise in frequency: the first at
440Hz for ¼ second, the second at 660Hz for ¼ second. The unit is now
operational.
If an FM transmitter is being used, plug its mini-stereo plug into the BlueFlyers’
headphone output jack.
To review the logs that the BlueFlyers stored on the flash drive, plug the USB
flash drive into the computer and use the BlueFlyers Wizard application to view
the logs.
Repeat this process when a new advertisement flyer is to be loaded on to the
BlueFlyers unit.
Software
Installation
8
A CD is provided with the BlueFlyers Wizard application along with a free audio
recording application called Audacity. Audacity is not covered by the warranty.
Support for this application can be found at: http://audacity.sourceforge.net/help/
Audacity may not be suitable for any particular use. It is provided as an option
for recording audio files; however other programs may provide better results.
Audacity requires the LAME MP3 encoder to be installed in order to save files as
MP3s. Download links for LAME are provided on Audacity’s website at
http://audacity.sourceforge.net/help/faq?s=install&item=lame-mp3.
The Windows operating system will automatically start the installation program
when the provided CD is inserted into the CD drive of a computer. If it does not
start automatically, then use the Windows Explorer to run the setup.exe program
located on the CD.
The installation enables the installation of the BlueFlyers Wizard or Audacity.
First click on the radio button to select the BlueFlyers Wizard and click the Install
button. This will start the BlueFlyers Wizard’s installer.
9
Read the Welcome screen and then click the Next button.
Read the License Agreement. If the terms are agreed upon, click the ‘I Agree’
button, otherwise click the Cancel button.
10
On the Installation Options screen, select a directory for the installation of the
BlueFlyers Wizard software or leave the default installation directory if desired.
Click the Install button.
When the process has finished, click the Finish button.
11
The BlueFlyers Wizard is now installed and a BlueFlyers Wizard folder should
appear on the Windows Start menu.
On the main installation screen, select to install Audacity if desired. Click on the
radio button to select the Audacity and click the Install button. This will start
Audacity’s installer.
Read the Welcome screen and then click the Next button.
12
Read the License Agreement. If the terms are agreed upon, click the radio
button next to ‘I accept the agreement’ and click the Next button, otherwise click
the Cancel button.
Read the Information screen and click the Next button.
13
On the Select Destination Location screen, select a directory for the installation
of the Audacity software or leave the default installation directory if desired. Click
the Next button.
14
On the Select Additional Tasks screen, select the options to be installed by
Audacity.
On the Ready to Install screen, review the installation options and click the Install
button.
15
When the process has finished, uncheck the Launch Audacity check box if it is
not desired for to start the application immediately. Click the Finish button.
Audacity is now installed and there should be an Audacity program icon on the
Windows Start menu. This will not be located in a folder, but may be moved to
one if desired.
Use the Help menu on Audacity to learn how to use the software.
The software installation is now complete; click the Exit button on the main
installation screen. Start either application using the application icons located in
the Start Menu.
Creating A Flyer File Set
The BlueFlyers Wizard allows the creation and storage of flyer information for
multiple marketing efforts. The file set for a flyer will include files to transfer to
customers (such as pictures and text files), and audio files to play over the FM
transmitter.
16
To create a file set for a flyer, start the BlueFlyers Wizard and click Next on the
Welcome screen.
Click the radio button next to “Create Or Modify A Flyer’s File Set”, then click the
Next button.
17
Click the radio button next to “Create A New Flyer File Set”, then click the Next
button.
The next screen will request the description of the flyer. This is used to catalog
the flyer and allow future identification of it. A title must be entered before the
Next button will be enabled.
18
The Unit Name field is the name customers will see over Bluetooth and it will
appear on some cellular phones when a connection request is made. This field
is limited to 247 characters. If left blank, the name “BlueFlyers (PIN: 00)” will be
used.
After clicking the Next button, an information screen will appear with a notification
that files are to be selected to create a flyer that will be sent over Bluetooth to
customers. Read this information and click the Next button.
19
Click the Add File button to select the files to be included in this flyer.
After clicking the Add File button, a file browser window is shown to select the
files which will be included in this flyer’s file set. The first time the Add File button
is clicked after starting the BlueFlyers Wizard, an informational screen that
explains how the file browser’s filter works is shown. Read the information and
click the OK button.
20
Use the file browser to locate the files to include in the flyer. More than one file
can be selected in the file browser at a time.
The “Files of Type” filter can be used to view only certain files, such as audio files
or images, or select All files to remove the filter.
Select one or more files by clicking on the file names in the browser. To select
multiple files, hold down the Control (CTRL) key while clicking on the desired
21
files. After files are selected, click the Open button on the file browser to add the
files to the file set. Files can be added individually; it is not necessary to select
all files at once.
The files added will be displayed by the BlueFlyers Wizard. The file size is also
shown. Keep in mind that the larger a file, the longer it will take to transfer over
Bluetooth.
22
To remove a file from the file set, click on the file name so that it is selected, and
the click the Remove button.
Any of the files in the flyer’s file set can be opened by double clicking on the file
name. Windows’ default application for handling the selected type of file will be
used to display the file’s contents. For example, if Microsoft Paint is the default
program for BMP files, then double clicking on a BMP file will use Paint to open
and display the image.
The Next button will not be enabled until at least one file has been added to the
flyer’s file set. Click the Next button when finished adding files.
23
An information screen is shown with a notification that audio files are to be
selected to be broadcast over the FM transmitter. Use of broadcast files is
optional. Read this information and click the Next button.
24
Select the MP3 audio files to include in this flyer’s FM broadcast. It is optional to
include any broadcast files. Leave the list empty and click the Next button if no
broadcast is desired.
To include broadcast files, click the Add File button. A file browser window is
shown to select the MP3 audio files which will be included in this flyer’s FM
broadcast.
25
More than one file for broadcast may be included. The BlueFlyers unit will
repeatedly cycle through playing each file. The size of these files will not affect
customers, but the BlueFlyers does have a limited amount of memory and files
that are too large may affect the performance of the BlueFlyers unit. Files under
5MB are recommended.
Click the Next button after the broadcast files for this flyer are selected.
26
Creation of the flyer’s file set is now complete. Click the Save button to store the
file set. All files that have been selected for the electronic flyer and the FM
broadcast will be copied to the BlueFlyers Wizard’s local directory.
Modifying An Existing Flyer File Set
The BlueFlyer Wizard allows the modification of an existing flyer file set. On the
first Flyer File Set screen, click the “Open An Existing Flyer File Set” radio button
and then click the Next button.
27
A list of all flyers that exist on the computer is shown. The flyer title shown is
based on the title provided when the flyer’s file set was created. The Open
button will be disabled until a flyer is selected.
Click on the flyer title and click the Open button.
28
Files can be added or removed as desired. The Save screen will be shown if
changes were made to the flyer’s file set.
Remove A Flyer File Set
The BlueFlyers Wizard allows the removal of a flyer file set. On the first Flyer
File Set screen, click the “Remove A Flyer File Set” radio button and then click
the Next button.
29
A list of all flyers that exist on the computer is shown. The flyer title shown is
based on the title provided when the flyer’s file set was created. Select the flyer
that is to be removed by clicking on its title and then click the Remove button.
A confirmation screen will be shown to verify that the flyer is to be removed.
Removed properties cannot be restored. Click the Yes button to confirm
removal, otherwise click the No button.
When finished removing flyers, click the Back button.
Configuration
Use the BlueFlyers Wizard to configure the BlueFlyers unit. This is done by
selecting the desired flyer and BlueFlyers mode which then is stored from the PC
to the USB flash drive. When the flash drive with the stored files is plugged into
a BlueFlyers unit and the unit is turned on or its power is cycled, then the
30
BlueFlyers configures itself with the files located on the flash drive. The flash
drive can be removed after configuration is complete.
To setup a USB flash drive to configure the BlueFlyers unit, start the BlueFlyers
Wizard and click Next on the Welcome screen.
Click the radio button next to “Set Up USB Flash Drive”, then click the Next
button.
31
A list of all flyers that exist on the computer is shown. The flyer title shown is
based on the title provided when the flyer’s file set was created. The Next button
will be disabled until a flyer is selected. Click on the flyer title that the BlueFlyers
unit is to send and click the Next button.
Active mode can be enabled if desired. In Active mode, a request to send a flyer
is made to all Bluetooth devices that are found within the BlueFlyers’ transmit
range. For each device found, only one request to send is made for a particular
flyer’s file set. Regardless of whether the recipient accepts or declines the flyer,
they will not be asked again. Customers can still receive the flyer using passive
mode operation by initiating the request.
32
To enable Active mode, click the radio button next to “Enable Active mode”, then
click the Next button. To disable Active mode, click the radio button next to
“Disable Active mode”, then click the Next button.
The BlueFlyers unit stores log files on its permanently installed CompactFlash
card. These logs store information about the download of the flyers from the unit
and the unit’s operational status. As the log files grow, they will consume the
free space on the card. Logs may be cleared periodically to reclaim used space.
Also, as the logs grow, they may become more difficult to review and clearing
them may ease review. Clearing logs is not necessary on a regular basis.
When a file set is copied from the USB flash drive to the BlueFlyers unit, the
unit’s logs are copied back to the flash drive. The size of the logs can be used to
determine if and when to clear the logs.
Clearing the logs will remove the BlueFlyers’ information about Bluetooth devices
which have received specific flyers. If operating in Active mode, clearing the logs
may cause the BlueFlyers unit to request to send a duplicate flyer to a Bluetooth
device that is found within its range.
33
Click the radio button next to “Clear Logs” and then click the Next button to
configure the BlueFlyers unit to clear its logs. Click the radio button next to “Do
Not Clear Logs” and then click the Next button if the unit’s logs do not need to be
cleared.
34
The BlueFlyers’ time zone can be configured to reflect the local time. Click the
check button next to “Set BlueFlyers’ Time Zone” and then use the drop down
box to select the appropriate time zone from the list.
A unit’s time zone only needs to be set once. Click the Next button.
35
There are several advanced networking modes supported by the BlueFlyers unit.
Use of these modes is optional. Remote FTP and HTTP access to the unit can
be enabled to allow updating flyers and access to logs over a network
connection. This mode requires an Ethernet connection to a network or the
Internet. If advanced networking is not needed, click the radio button next to
“Disable Remote Access” and click the Next button.
If remote access is not enabled, then the next screen shown will be the power
level screen. The FTP ports, HTTP port, DHCP/static IP address, and unit
networking screens will be skipped.
Remote access mode allows FTP and HTTP access into the unit over a network.
This FTP mode should not to be confused with Bluetooth FTP mode.
Bluetooth FTP mode allows a Bluetooth device to connect over Bluetooth and
copy the flyer from the unit. Bluetooth FTP only provides access to the directory
containing the flyer and does not allow anything to be copied onto the unit.
Remote access FTP mode requires a user name and password to connect to the
unit by FTP and the connection is made over Ethernet. This mode provides read
and write access to the BlueFlyers’ configuration directories. The directory
structure mirrors the structure built on the USB flash drive, plus there are two
extra directories. The layout is as follows:
36
Directory
logs
private
public
radio
remote_logs
update
Use
Contains logs with information about flyer distribution and
process performance
Contains the unit’s configuration file
Contains the files to be sent to customers over Bluetooth –
any files placed in this directory will be sent to consumers
Contains the MP3 files to be played for broadcast using the
optional FM transmitter
Exists only when in network mode and will contain a
temporary copies of the flyer distribution logs from other units
– not found on the USB flash drive
Read-only access, contains information about the software
updates installed on the unit – not found on the USB flash
drive
Remote access HTTP mode requires the same user name and password as
remote access FTP mode. HTTP mode provides a graphical interface to
uploading and downloading files from the public and radio directories, viewing log
files, and configuring the unit.
To enable FTP and HTTP access, click the radio button next to “Enable Remote
Access”. A new remote access password can be selected at this point if desired.
A new password only needs to be configured once and it will be stored on the
unit. The username for FTP and HTTP access is “remote_access”, and the
default password is “blueflyers”. This account only has FTP and HTTP access to
the unit. Click the Next button when finished.
37
If remote access is enabled, then the unit’s FTP ports can be configured. The
default FTP port is 21, and the default passive mode port range is 50000 to
50100. These can be changed for security or networking purposes. If a
BlueFlyers unit is behind a firewall, then the firewall must be configured to pass
the FTP and passive mode ports to the BlueFlyers unit. If multiple units are
behind a firewall, then each unit will need a unique FTP port and a unique
passive port range so that firewall can be configured to forward ports correctly.
The following diagram shows an example network setup. A PC with an Internet
connection is used to remotely access multiple BlueFlyers units which are
located behind a firewall. The units are configured for static IP addresses and
unique FTP and passive mode ports. The firewall’s port forwarding is configured
to pass the correct ports to known static IP addresses. The PC uses the public
Internet address of the firewall, in this example 209.114.198.3. This public
Internet IP address is assigned by the Internet Service Provider (ISP) and may
be static or dynamic depending on the service. The unique FTP port number
11021 is used to specify which unit is to be accessed. The firewall then
connects the PC to the correct BlueFlyers unit based on this port number.
38
The FTP port configuration screen will show default settings of FTP port 21, and
a passive port range of 50000 to 50100. These values can be modified if unique
ports are desired. Allowed port numbers are 1 through 65534. Many ports have
standard uses such as port 80 for HTTP and port 443 for secure HTTP (HTTPS);
be careful when choosing alternate ports. Ports in the range of 49152 to 65534
are reserved for dynamic use and are fairly safe to use. Click the next button
when finished selecting FTP ports.
39
Similarly, the units HTTP port can be configured. The default HTTP port is set to
80. If the unit resides behind a firewall, the firewall will need to be configured as
described above to pass the configured HTTP port activity to the BlueFlyers
unit’s local network IP address. Click the next button when finished selecting the
HTTP port.
40
If remote access is enabled, then the unit can be configured to have a static IP
address or to use DHCP. Using DHCP, the unit will automatically try to acquire
an IP address from a DHCP server on the network. If remote access is enabled,
the unit will write its IP address into its log file. This can be useful if DHCP is
enabled. Be sure the Ethernet cable is connected to the unit when it is powered
up.
To use a static IP address, click the radio button next to “Static IP Address”. A
valid IP address and network mask must be specified. If the address specified is
not valid, the unit will not be accessible from the network. The unit will first
DHCP, and then set its IP address to the specified static address. It is important
that DHCP is possible even when using a static address as the default gateway
is determined by the DHCP process. Click the Next button when finished.
If remote access is enabled, then the unit can be setup to participate in a
networked configuration of units. This allows several units to be used to cover a
larger area and share flyer download information to prevent sending the same
flyer repeatedly to the same Bluetooth device. Networking the units together is
mainly for use with Active mode, there is little benefit from it when running in
Passive mode only.
One unit in the network will be assigned the role of Master. All other units will
use the Master unit’s FTP access to copy their access logs to a temporary
directory, and to retrieve the access logs copied from all other units (including the
Master unit’s logs). The Master unit operates the same as all other units, except
it does not need to copy access logs as they are pushed and pulled from the
Master unit. Any unit can be chosen as the Master unit.
41
When a unit first powers up and after every flyer transmission, it will copy its
access log to the Master unit. Before every transmission of a flyer, the unit will
check the sizes and times of all access logs on the Master to determine if any
logs have been updated since they were last retrieved. This operation requires
all units to have the same time zone for correct time comparisons (accuracy of
the clock’s time is not important).
There is a short time at power up when a duplicate flyer could be pushed to a
consumer. Here's a scenario where that could happen:
A system has 3 BlueFlyers units with Active mode enabled. Unit 1 is the
Master unit. Unit 2 has pushed a flyer to a consumer. At some point, all
units are turned off and then back on. Unit 3 boots quickest and the
consumer is in range of unit 3. Unit 2 has not booted so its shared logs
are not on the master yet and unit 3 decides it’s okay to send the flyer to
the consumer, not knowing that unit 2 has previously sent the flyer. Once
unit 2 boots and copies its access log to the Master unit, all units will no
longer push the flyer to that consumer.
To enable networking mode, click the radio button next to “Enable Unit
Networking”. Specify the IP address assigned to the Master unit and the
password from the remote_access FTP account on the Master unit. If using
DHCP on the Master unit, its IP address must be determined. This can be found
in the Master unit’s log file. If the Master has been configured with a unique FTP
port number (the passive port numbers are not required here), then the Master
unit’s FTP port number must be specified here. Click the Next button when
finished.
42
The power level of either the TRENDnet or AIRcable Bluetooth transmitters can
be adjusted. A power level of 100 is full power for the device. This can be
reduced by dragging the power level slider. Default power level is 100%. Select
the desired power level and click the Next button.
43
After the configuration options have been selected, the USB flash drive which will
be used to configure the BlueFlyers unit needs to be selected. Be sure the USB
flash drive is plugged into an available USB port on the PC. If a USB device is
found that contains the proper directory structure that is used by BlueFlyers, then
it will be shown as selected. A different device can still be chosen. To choose a
device, click on the drive that corresponds to the USB flash drive which will be
used to configure the BlueFlyers unit. The Save button will be disabled until a
device is selected. The files currently stored on the selected USB flash
drive’s /private, /public, and /radio directories will be overwritten with the
new configuration information.
44
Once a device is selected, the Save button is enabled. Click the Save button to
store the flyer’s file set and BlueFlyers configuration information. This flash drive
will be used to configure the BlueFlyers unit.
The USB flash drive can now be used to configure the BlueFlyers unit.
Logs
Log files are copied from the BlueFlyers unit to the USB flash drive every time
the unit is configured using the flash drive. Any existing log files that were
previously copied to the USB flash drive will be over written. These log files
contain information about flyers that were downloaded using Active or Passive
mode transfers. They will not contain information about FTP mode transfers to
customers. The logs also contain information about the systems operational
status. The logs may be useful if a problem is encountered with the unit.
45
The BlueFlyers Wizard allows easy viewing of the information stored in the log
files. To view the logs that were copied to the USB flash drive by the unit, plug
the flash drive into the PC and start the BlueFlyers Wizard. Click the radio button
next to “Review Flyer Logs”, then click the Next button.
46
Be sure the USB flash drive is plugged into an available USB port on the PC. If a
USB device is found that contains the proper directory structure that is used by
BlueFlyers, then it will be shown as selected. A different device can still be
chosen. To choose a device, click on the drive that corresponds to the USB flash
drive that was used to configure the BlueFlyers unit and contains its logs. The
Open button will be disabled until a device is selected.
Once a device is selected, the Open button is enabled. Click the Open button.
47
The first log shown is the flyer download attempts. These are the Active and
Passive downloads; FTP downloads are not included. Three columns of
information are displayed. The first column contains the date of the flyer
download. The second column contains the Bluetooth device’s unique ID. This
information is not traceable to a particular person; it is only used to uniquely
identify the device.
48
Use the scroll bar at the bottom of the screen to view the third column. This
column lists the title of the flyer that was downloaded. This title is the one
provided when the flyer’s file set was created. If the BlueFlyers unit has been
used for multiple flyers without clearing the logs, then downloads from multiple
flyers may be present in the log.
49
The BlueFlyers Wizard assigns a unique ID (a time stamp) to each flyer when the
flyer’s file set is created. This ID is stored on the computer and is stored in the
log file by the BlueFlyers unit. When viewing logs, it is used as a reference to
determine the flyer’s title. If the flyer no longer exists on the computer, then the
title cannot be determined. The title will be listed as “Unknown flyer (UniqueID)”,
where the UniqueID is the ID number assigned to the flyer.
Click the Next button when finished reviewing the flyer download attempt log.
50
A system log is also stored and provided. This log contains information from the
BlueFlyers’ applications. The applications will write information to this log when
they start, including version information. They will also write information if an
error is encountered or a special function, such as a software update, is
performed. Click the Next button when done reviewing this log.
Audio Recordings
Use the Help menu on Audacity to learn how to use the provided audio software.
Hardware
Setup
The BlueFlyers consists of a base unit, a power cord, a Bluetooth transmitter,
and an optional FM transmitter.
For the TRENDnet Bluetooth transmitter, plug the transmitter into an available
USB port on the base unit. Select a USB port that allows the antenna to be
extended vertically.
For the optional AIRcable high power Bluetooth transmitter, connect the provided
USB cable to any available USB port on the base unit. This cable has different
51
connectors on each end. Be sure to use the end of the cable that mates with the
USB ports on the base unit. Connect the other end of the USB cable to the
AIRcable Bluetooth transmitter.
Connect the provided antenna to the RP-SMA jack on the AIRcable Bluetooth
transmitter. Be sure to screw the antenna onto the RP-SMA connector snuggly
by hand. Do not over-tighten.
To avoid damaging the transmitter, never operate the unit without the antenna
connected.
If using an optional FM transmitter, connect the mini-stereo plug from the FM
transmitter to the audio output jack on the front of the base unit. Plug the
transmitter’s power converter into a standard 120V power outlet. The transmitter
can be turned on and off using the power switch located on the top of the
transmitter, and the desired transmit frequency set using the tuning buttons on
the top of the transmitter.
Connect the DC power cord to the power jack on the back panel of the base unit.
This power cord has a latching mechanism and the barrel on the end of the cable
must be pulled back to release the latch. Plug the base unit’s power converter
into a standard 120V power outlet.
Put the power switch on the rear panel of the base unit in the ON position. The
power switch on the front of the unit can now be used to turn the unit on and off
as necessary.
The base unit will take approximately 1 minute to boot. A series of two tones
with a rising frequency will be played to indicate the unit is ready to send flyers.
Configuration
Begin by using the provided Windows application to create flyer file sets, audio
recordings, and for selecting the BlueFlyers’ operating mode. Follow the
application’s instructions for storing files and configuration information on the
USB flash drive. Use of the application is described in the software section of
this manual.
Once the proper files are stored on the USB flash drive, the flash drive is ready to
be used to configure the BlueFlyers unit. Plug the USB flash drive into any
available USB port on the base unit, and turn on the unit’s power. After booting,
the files will be copied to the unit. A single long beep (1 second) will be played to
indicate the files have been copied. This will occur before the two tone series
that indicates the unit is ready to send flyers.
52
The USB flash drive can be removed any time after the single long beep has
been played.
Time
The BlueFlyers’ time can be synchronized with an NTP server. To accomplish
this, connect the BlueFlyers unit to a network that has a DHCP server and an
Internet connection, and then boot the unit. The BlueFlyers unit will DHCP when
it boots. After booting, it will attempt to synchronize time over the network with a
public NTP server. When successful, the unit will play five short tones that
increase in frequency. Firewalls or lack of DHCP or DNS servers may prevent
the unit from being able to synchronize time.
The unit’s time zone can be configured using the BlueFlyers Wizard application.
Please refer to the software section for instructions on selecting a time zone.
A network connection is only required if time synchronization is necessary. It is
not needed for normal operation.
53
Audio Tones
Description
Two short beeps that rise in
frequency
Two short beeps that
decline in frequency
A long single beep
Three short beeps followed
by a higher pitch beep
Two short beeps
Continuous beeps
alternating between two
frequencies
Short low frequency beep
repeating every 3 seconds
Five short beeps that rise in
frequency
Frequency
440 Hz for ¼ second
followed by 660 Hz for
¼ second
660 Hz for ¼ second
followed by 440 Hz for
¼ second
800 Hz for 1 second
3 beeps at 440 Hz for ¼
second followed by 1
beep at 660 Hz for ½
second
Two beeps at 440 Hz for
¼ second each
Alternating 800 Hz for ¼
second and 1000 Hz for
¼ second
220 Hz for ¼ second
500 HZ for 1/10 second,
700 HZ for 1/10 second,
900 HZ for 1/10 second,
1100 HZ for 1/10
second, 1300 HZ for
1/10 second
Meaning
The unit is up and
operational.
The unit is rebooting
itself to try to correct a
problem.
The unit has copied files
from the USB flash
drive.
The update on the USB
flash drive is about to be
installed.
Update has finished.
The update could not be
performed due to
problems with the file.
Either files to transmit
for the flyer or the
Bluetooth adapter is
missing. BlueFlyers unit
cannot start until
reconfigured.
Time has been
synchronized with an
NTP server
HTTP Server
Each BlueFlyers unit has a built in HTTP server that can be used to remotely
configure the unit. The web pages provided by the unit are shown below.
54
Upload or remove files from the unit’s public directory. All files located in this
directory will be transferred over Bluetooth. Removed files cannot be restored.
55
Upload or remove MP3 files from the unit’s radio directory. The files located in
this directory will be rotated through and played over the audio output port for FM
transmission. Removed files cannot be restored.
56
The flyer transmission log file can be reviewed, downloaded, and cleared.
Cleared logs cannot be restored.
57
The application log file can be reviewed, downloaded, and cleared. Cleared logs
cannot be restored.
58
The BlueFlyers unit can be configured. Please review the BlueFlyers Wizard
section of this document for the meaning of fields. Warning: remote access can
59
be disabled by changing the unit’s configuration. After making changes, use the
Save button to store the new configuration. The Flyer ID must be updated when
new flyer files are uploaded to the public directory. If the Flyer ID is not updated,
then the new flyer will not be pushed to Bluetooth devices which have already
received the flyer files associated with the current ID. The unit must be rebooted
before the changes will take effect.
60
SUCCESSFUL CAMPAIGN TIPS
1. Provide clear usage instructions to consumers. Educating consumers is
key to successful downloads. Instructions could be in writing on a display or
played as audio from the BlueFlyers unit.
2. Instruct consumers to make sure their phone has Discoverable or “Find
Me” mode enabled. Without Discoverable mode enabled, some phones will
disallow access even when the phone initiates contact and BlueFlyers is in
passive mode.
3. Limit files to a reasonable size. Bluetooth downloads may take some time
and consumers may cancel the process before it completes if the download
takes too much time.
4. Ensure the BlueFlyers’ Bluetooth signal is strong in the location where
consumers are to receive the advertisement. Objects located between the
BlueFlyers unit and the consumer will attenuate the signal strength.
61
TROUBLESHOOTING
1. What FM frequency is available for transmitting in my area?
Try using the radio locator web site to find a vacant frequency. This web
site’s address is: http://www.radio-locator.com/cgi-bin/vacant
2. Why does the FM broadcast have a periodic ticking noise in it?
There may be interference from the BlueFlyers’ periodic Bluetooth scans.
Move the FM transmitter unit further away from the BlueFlyers’ Bluetooth
transmitter.
3. Why does the FM transmission sound quiet?
Be sure the input level control on the transmitter is turned up.
4. Why does the FM transmitter turn itself off?
The transmitter has an Auto-OFF feature. This is enabled by holding the
power button down for an extended period of time. Turning the unit off and
back on clears the auto shut-off.
5. Why does the Bluetooth signal from the unit seem weak?
Make sure that the base unit has a line-of-sight path to the location where
flyers will be received. Solid walls and objects will attenuate the Bluetooth
signal strength. Using the high powered transmitter, and possibly a stronger
antenna on the Bluetooth transmitter will increase the unit’s range.
6. Why can’t I receive a flyer or a specific type of file on my Bluetooth device?
Make sure Bluetooth is powered on. Some devices may automatically power
Bluetooth off.
On some cell phones, such as a Motorola, the phone must be put into
discoverable mode (“Find Me”) before the phone allows Bluetooth
connections.
Some cell phones will not accept certain file types or do not support all fields
in a virtual business card (vCard). This may result in a partial file set being
received on the phone.
62
Some cellular service providers limit the types of files that the phone will
transfer, even if the phone has greater capabilities built into it. Contact the
service provider if you feel that a phone’s functionality is being limited.
7. Why can’t I view an image on my phone even though I can view images from
larger files?
Some phones don’t only care about the size of the file in bytes, but they also
care about the size of the image in pixels. A large 1500 x 1500 pixel image
might compress down to 80 kB using a high compression algorithm, whereas
a small 700 x 700 pixel image might only compress to 100 kB using a low
compression algorithm.
Even though both files have a low number of kilobytes and may be accepted
by a phone, some phones might not display the large 1500 x 1500 image.
8. After downloading the flyer in Passive mode, I cannot immediately download
it again, but if I wait a while, I can download it again later. Why?
In Passive mode, the unit will download the flyer to the same device as many
times as requested, though it does have a 90 second timeout. After a device
has downloaded the flyer, it will not send it to that device again for 90
seconds. This is to prevent unintentional duplicate requests by consumers.
9. Why can’t the Compact Flash card be removed from the front of the unit?
The Compact Flash card is not removable.
10. How is an audio recording made?
Audacity, a free recording application, is distributed on the BlueFlyers’
installation CD. This tool or other applications may be used to create
recordings. The BlueFlyers Wizard does not record audio itself.
11. How is a quality sounding recording made?
Be sure to use a quality microphone and a pop screen to get clean, crisp
audio free of wind noise, and smile when speaking to have a bright sounding
voice.
12. Where do I get the LAME MP3 encoder needed by Audacity?
Download links are provided on Audacity’s website:
http://audacity.sourceforge.net/help/faq?s=install&item=lame-mp3
63
13. Why does the BlueFlyers unit reboot itself?
Be sure the Bluetooth transmitter is properly connected to the base unit. If
the software cannot find the transmitter, it will reboot to try to correct the
problem.
The BlueFlyers’ logs can be reviewed for information about the unit’s specific
problem.
14. Why doesn’t the unit connect to the network after I plug in the Ethernet
cable?
The Ethernet cable needs to be connected to unit when it is powered on.
Ethernet is only configured when the unit is booting.
15. What is your logo?
Bluetooth was named after a late tenth century king, Harald Bluetooth King of
Denmark and Norway. The Bluetooth logo merges the runes analogous to
the letters H and B. Following their lead, the BlueFlyers logo adds the rune
for the letter F after the Bluetooth logo.
64
WARRANTY
A limited 1 year warranty is provided with the BlueFlyers. Attempts to remove
the CompactFlash card from the front of the unit will void the warranty. Opening
the BlueFlyers unit will void the warranty. Removing or tampering with the
warranty seal on the bottom of the unit will void the warranty. Damage from
moisture, excessive heat, operating the unit without an antenna connected, or
other neglect or mishandling of the unit is not covered by the warranty. Units
covered under warranty may be repaired or replaced at Embedded Solutions, Inc
sole discretion.
Modifying BIOS settings or operational software is prohibited.
TRENDnet TBW-104UB has a 2 year manufacturer warranty.
AIRcable Host XR has a 1 year manufacturer warranty.
C.Crane FM transmitter has a 1 year manufacturer warranty.
EXPORT
This product is subject to the U.S. Export Administration Regulations and other
U.S. laws, and may not be exported or re-exported to certain countries (currently
Cuba, Iran, Libya, North Korea, Sudan and Syria) or to persons or entities
prohibited from receiving U.S. exports (including those (a) on the Bureau of
Industry and Security Denied Parties List or Entity List, (b) on the Office of
Foreign Assets Control list of Specially Designated Nationals and Blocked
Persons, and (c) involved with missile technology or nuclear, chemical or
biological weapons).
TRADEMARK
The name BlueFlyers and the BF symbol are trademarks of Embedded
Solutions, Inc.
65