1
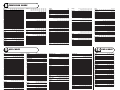
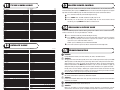
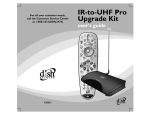
version 1.0
TV
09192001
Make sure to set your TV to channel 2, 3, or 4
as directed by your satellite receiver manual.
This manual makes reference to “mode
keys.” These are the TV, SAT, DVD, and VCR
keys at the top of the remote control.
SAT
3 INSTALL
BATTERIES
Before you can set up or operate the remote control, you must
install two Alkaline AA batteries.
b
Remove the battery compartment cover on the back of your
remote control.
c
Check battery polarity carefully, and install the batteries as
shown in the illustration to the right.
d
Replace the battery compartment cover.
POWER
After you have programmed the remote, you’ll
use the mode keys to select which device
you want the remote control to operate.
VCR
DVD
MUTE
VOL
CANCEL
INFO
THEME
2
BROWSE
SELECT
MENU
GUIDE
RECEIVER BASE
INSTALLATION
CHAN
Option 1
RECALL
PAGE
▲
▼
VIEW
1
RECORD
2
3
4
5
6
7
8
9
SYS INFO
TV/VIDEO
0
ENTER
Place the receiver base station in the
room where your equipment is located.
Choose a location near an electrical
outlet on an opposing wall to where the
equipment is installed. Point the front of
the base station towards the equipment.
Try to use your remote from your chosen
location to confirm that it is within the
operating view of your equipment.
Plug the AC power adapter into the wall
outlet. Attach the small plug from the
transformer into the jack on the base station.
The power light should flash and go out. The
light will only go on when it is receiving a
command from the Around the House
Remote. The base station is ready to use.
Option 2
This device complies with Part 15 of the FCC Rules. Operation is
subject to the following two conditions: (1) this device may not
cause harmful interference, and (2) this device must accept any
interference received, including interference that may cause
undesired operation.
This equipment has been tested and found to comply with the
limits for a Class B digital device, pursuant to Part 15 of the FCC
Rules. These limits are designed to provide reasonable protection
against harmful interference in a residential installation. This
equipment generates, uses and can radiate radio frequency
energy and, if not installed and used in accordance with the
instructions, may cause harmful interference to radio
communications. However, there is no guarantee that interference
will not occur in a particular installation. If this equipment does
cause harmful interference to radio or television reception, which
can be determined by turning the equipment off and on, the user is
encouraged to try to correct the interference by one or more of the
following measures:
• Reorient or relocate the receiving antenna.
• Increase the separation between the equipment and receiver.
• Connect the equipment into an outlet on a circuit different from
that to which the receiver is connected.
• Consult the dealer or an experienced radio/TV technician for help.
Using Your Control Cables
With the proper connection, you can hide
the receiver base station behind your
entertainment system and still control all
your equipment. First, plug the control cable
into the back of the base station receiver.
The emitter end of the control cable must
then be placed in front of each piece of
equipment you want to communicate with
the remote control sensor. The remote
control sensor is commonly identifiable by a
small plastic window.
You may have to try different locations for
optimum performance. You can permanently
attach the emitters using the peel-and-stick
backing. This attachment should not
interfere with normal operation.
4 KNOW YOUR REMOTE
The diagram below shows the functions of special keys for your satellite receiver. Refer to your
satellite receiver manual for descriptions of specific functions. NOTE: keys are marked for Dish
Network® functions. For other satellite receivers, keys may have different functions.
MODE KEYS allow you to
select which device your remote
will operate. They are also used
to setup the remote control
TV
SIGNAL LED lights up when the
remote is transmitting signal, and
during certain setup procedures
SAT
POWER
DVD
POWER used in conjunction with
the device Keys, the Power key
lets you turn devices on and off
VCR
CANCEL cancels the
current procedure
VOL turns the
volume up and down
VOL
FOUR-WAY CURSOR KEYS
allow you to navigate through
the on-screen menus
CANCEL
INFO
INFO displays channel and
program information
BROWSE
THEME
SELECT
SELECT chooses the
highlighted item in the menu
GUIDE displays the
program guide
PAGE moves the menu
forward and backward
one page
GUIDE
MENU
CHAN changes the
channel up and down
MENU brings up the
main on-screen menu
RECALL
PAGE
▲
CHAN
▼
VIEW
RECORD
RECALL tunes to the last
channel that was viewed
VIEW exits out of
on-screen menus
NUMBER KEYS allow
direct access to specific
channels and menu options
1
2
3
4
5
6
7
8
TV/VIDEO
SYS INFO displays information
about the satellite receiver
9
VCR KEYS perform standard
VCR functions (see illustration below)
SYS INFO
0
TV/VIDEO switches inputs
on the Satellite Receiver and
TV when in SAT or TV mode;
and acts as the TV/VCR button
when in VCR mode
RECORD does not operate VCR
record. Use the VCR Record
button (see illustration below)
ENTER
VCR/DVD KEYS
USER’S GUIDE
for NG-ATH33, NG-ATH18, and NG-IR
YOU
1 BEFORE
BEGIN
PAUSE
PLAY
STOP
FAST FORWARD
REWIND
RECORD
To initiate recording on the VCR,
press RECORD twice.
UP YOUR REMOTE TO OPERATE A DEVICE
5 SETTING
USING THE TV, SAT. OR VCR MODE KEYS
To set up the remote to operate your TV, VCR, Satellite receiver, and DVD player, look for the
manufacturers’ three-digit codes for the device type in the codes sections (sections 8-12), then
perform the following steps.
TELEVISION codes will be set up using the TV mode key.
SATELLITE codes will be set up using the SAT mode key.
VCR, TV/VCR COMBO, and DVD codes will be set up using the VCR mode key.
UP YOUR REMOTE TO OPERATE
6 SETTING
A DEVICE USING THE DVD MODE KEY
Any type of device may be set up to operate in DVD mode. Refer to the code list sections to find the
codes listed for the brands of your devices.
b On the remote control, press and hold the DVD mode key until the LED begins flashing.
c Press and release the appropriate mode key ( TV, SAT, or VCR), corresponding to the type of
device you want to operate in DVD mode. The LED will stop flashing and remain on.
d
Select a code from the appropriate code list for the brand of device you wish the remote
to operate, then enter the code using the numeric keys on the remote. This code should be
one selected from the following sections:
• TELEVISION if you pressed the TV mode key in step 2 above
• SATELLITE if you pressed the SAT mode key in step 2 above
• VCR, TV/VCR COMBO, or DVD if you pressed the VCR mode key in Step 2 above.
After you press the last digit, the LED should flash rapidly and turn off. If the LED does not
flash rapidly before turning off, repeat the procedure, starting at step 1 above, using a
valid code from the appropriate code list.
e
Point the remote at the device and press POWER. If the device turns on/off, then the
remote has been set up with a code that can control the device. However, test other
primary functions to see if you have entered the best code for operating the device. If
necessary, try another code listed for your brand of device, starting at step 1 above. For
reference, write the codes below
DVD code ____ ____ ____ circle one (TV, SAT, VCR, TV/VCR COMBO, DVD)
NOTE: SETTING UP THE REMOTE TO OPERATE A DEVICE USING THE DVD MODE KEY IS
EXPLAINED SEPARATELY IN THE NEXT SECTION.
b
On the remote control, press and hold the mode key (TV, SAT, or VCR) until the LED
begins flashing.
c
Select a code from the appropriate code list for the brand of device you wish the remote
to operate, then enter the code using the numeric keys on the remote.
After you press the first digit, the LED should light and stay on. After you press the last
digit, the LED should flash rapidly and turn off. If the LED does not flash rapidly before
turning off, repeat the procedure, starting at step 1 above, using a valid code from the
appropriate code list.
d
e
Point the remote at the device and press POWER. If the device turns on/off, then the remote
has been set up with a code that can control the device. However, test other primary functions to see if you have entered the "best" code for operating the device. If necessary, try
another code listed for your brand of device, starting at step 1 above.
If none of the codes listed for your device works, the CodeScan™ procedure will allow
you to cycle through all the available codes in the remote until you find the right one:
For reference, write the codes below
b
TV code ____ ____ ___
c
d
Satellite Code ____ ____ ____
VCR code ____ ____ ____ circle one (VCR, TV/VCR COMBO, DVD)
If none of the codes listed for your device works, the CodeScan™ procedure will allow
you to cycle through all the available codes in the remote until you find the right one:
b
Manually turn on power to the device for which you want to set up the remote
to operate (TV, SAT, VCR, TV/VCR COMBO, DVD).
c
On the remote control, press and hold the appropriate mode key (TV, SAT, VCR) until the
LED begins flashing.
d
Press and release POWER. The LED will stop flashing and remain on.
e
Point the remote control at the device, Press and release the UP ARROW key repeatedly
and slowly. Each time you press the key, the remote sends the power-off command using
a different device code. When the device turns off, that means that the remote has a code
that can control the device. If you accidentally press the UP ARROW key after the device
has turned off, press the DOWN ARROW key to return to the previous device code.
e
f
g
h
Manually turn on power to the device for which you want to set up the remote
to operate (TV, SAT, VCR, TV/VCR COMBO, DVD).
On the remote control, press and hold the DVD mode key until the LED begins flashing.
Press and release the appropriate mode key (TV, SAT, or VCR), corresponding to the type of
device you want to operate in DVD mode. The LED will stop flashing and remain on.
Press and release POWER. The LED will remain on.
Point the remote control at the device, Press and release the UP ARROW key repeatedly
and slowly. Each time you press the key, the remote sends the power-off command using
a different device code. When the device turns off, that means that the remote has a code
that can control the device. If you accidentally press the UP ARROW key after the device
has turned off, press the DOWN ARROW key to return to the previous device code.
Test whether other primary key functions operate (including POWER to turn the device ON
again). If a primary key function does not work, continue to press the UP ARROW key to
find another code that turns the device OFF. Then test the primary key functions again.
When you are satisfied that all primary functions are working, press SELECT to lock in the code.
The LED should flash rapidly and turn off.
7 PROGRAMMING VOLUME CONTROL
f
Test whether other primary key functions operate (including POWER to turn the device ON
again). If a primary key function does not work, continue to press the UP ARROW key to
find another code that turns the device OFF. Then test the primary key functions again.
You can set up the remote control so that it controls volume through either the satellite receiver or
the television (this procedure does not affect the device codes you set previously).
g
When you are satisfied that all primary functions are working, press SELECT to lock in the code.
The LED should flash rapidly and turn off.
Press the mode key of the device that you want to control volume (TV or SAT). The LED should
flash rapidly and turn off. Volume is now controlled through the specified device.
b
c
Press and hold the SAT until the LED begins flashing.
8 TELEVISION CODES
AOC
005 • 006 • 019 • 020 • 120
Admiral
003 • 018 • 034 • 041
Aiko
Aiwa
Akai
000 • 032
Alaron
Amark
Amstrad
Anam
005 • 009 • 021
Anam National
Archer
Audiovox
024
Bell & Howell
Broksonic
005 • 144
CXC
Candle
006 • 022 • 023
Capehart
Carver
Centurion
Citizen
006 • 016 • 018 • 022
026 • 144 • 163
Concerto
Contec
041
Corando
Coronado
Craig
Crown
Curtis Mathes 006 • 016 • 018 • 026
131 • 163 • 172 • 192
Daewoo
005 • 024 • 026
130 • 170 • 172
Daytron
026
Denon
Dimensia
Dumont
Electrohome
• 140 • 163 • 173
• 090 • 125 • 129
024
090
• 070 • 149 • 172
034
120 • 224 • 225
033
• 041 • 120 • 121
211
120
• 041 • 120 • 170
018 • 090
• 172 • 173 • 174
041
• 025 • 163 • 213
019
151
192 • 194
• 023 • 024 • 025
• 202 • 213 • 224
005 • 023 • 213
• 091 • 185 • 227
224
225
021 • 041
026 • 041
• 059 • 090 • 125
• 194 • 202 • 224
• 029 • 030 • 032
• 214 • 215 • 224
• 192 • 194 • 224
169
125
001
026 • 149 • 224
Emerson
017 • 023 • 026 • 028 • 033 •
037 • 038 • 039 • 041 • 090 •
144 • 171 • 172 • 176 • 187 •
222 •
Envision
Fisher
Fujitsu
Funai
Futuretech
General Electric
Goldstar
Gradiente
Hallmark
Harman Kardon
Hinari
Hitachi
Infinity
JBL
JC Penney
JVC
Jensen
KEC
KMC
KTV
Kawasho
Kenwood
Kloss
LXI
034
122
203
224
•
•
•
•
035
141
204
225
•
•
•
•
042 • 090 •
034 •
034 • 041 • 132 •
003 • 008
125 • 130
172
005 • 023 • 026
172 • 173
•
•
•
•
•
009
134
195
045
194
•
•
•
•
•
023
143
206
046
213
•
•
•
•
•
043
165
207
088
224
•
•
•
•
•
023 •
018 • 023 • 026 • 048
051 • 052 • 053 • 054
169 • 172 • 185 • 213
010
010
003 • 005 • 006 • 014 • 016
044 • 096 • 125 • 131 • 134
165 • 172 • 194 • 202 • 206
057 • 058 • 059
•
•
•
•
•
•
•
•
•
034
049
055
224
066
066
026
149
207
060
•
•
•
•
•
•
•
•
•
•
224 •
026 • 039 • 041 • 172 • 224 •
022 • 062 •
003 • 010 • 066 • 090 • 117 • 125 •
131 • 134 • 151 • 172 • 173 •
036
143
205
227
163
099
187
187
041
044
170
211
168
225
060
172
062
187
050
126
225
151
151
043
163
224
186
056
041
225
225
061
006
110
129
194
Lloytron
Lodgenet
Logik
Luxman
MGA
023
071
192
202
131
025
068
167
224
•
•
•
•
•
•
•
•
•
010 • 066 • 068
149 • 151 • 163
032
018 • 032 • 072 • 090 • 149
001 • 003
023 • 034 • 070 • 071 • 072
149 • 172 • 173 • 187 • 192
•
•
•
•
•
•
•
002
006 • 007
172 • 173
011 • 151
•
•
•
•
•
004 • 005 • 006 •
149 • 163 •
MTC
005 • 006 • 016 •
Magnasonic
024 •
Magnavox 000 • 006 • 008 • 010 •
028 • 034 • 064 • 065 •
132 • 144 • 151 • 154 •
173 • 175 •
Majestic
Marantz
006 •
Matsui
Memorex
Midland
Mitsubishi 004 • 005 •
123 • 129 •
Multitech
NAD
NEC
005 •
163 •
National
Nikkai
Novabeam
Onwa
Optimus
Optonica
Orion
Osume
Panasonic
Philco
008 • 009
151
005 • 006 • 025 • 064
149 • 151 • 163
•
•
•
•
023
172
023
034
017
066
163
192
117
023
191
190
•
•
•
•
•
•
•
•
•
•
•
•
034
187
163
129
020
067
164
194
131
028
192
195
•
•
•
•
•
•
•
•
•
•
•
•
166
090
194
196
113
012 • 090 •
•
•
•
•
010
165
065
169
•
•
•
•
011
195
067
172
•
•
•
•
012
196
068
224
•
•
•
•
224
018
018
213
072
194
213
151
027
110
172
225
018
088
172
109
172
165
122
194
041
172
144
213
211
118
062
041
166
129
204
091
066
211
110
225
Philips
005 • 010
146
002 • 008
005
Pioneer
Portland
Proscan
Proton
Pulsar
Quasar
RCA
Radio Shack
Realistic
•
•
•
•
027
163
051
026
•
•
•
•
066
164
076
172
•
•
•
•
068
220
131
224
125
006 • 013 • 019 • 023 • 026 • 172
•
•
•
•
•
•
008 • 009 •
003 • 005 • 008 •
080 • 082 • 084 •
130 •
003 • 026 •
141 • 172 •
035 •
012
014
085
134
041
173
041
194
•
•
•
•
•
•
•
•
165
048
086
149
072
194
090
222
•
•
•
•
•
•
•
•
•
•
•
•
•
•
•
•
Runco
SAA
SSS
Saba
Saisho
Sampo
Samsung
Sharp
Signature
Sony
Soundesign
Spectricon
Starlite
025
151
048
024
195
078
087
172
090
224
141
224
005 •
Sanyo
Scott
Sears
•
•
•
•
042 •
003 • 023
101 • 102
151
026
•
•
•
•
005
088
194
089
026
173
034
104
172
091
•
•
•
•
•
•
•
•
•
•
006
006
112
202
090
034
187
042
117
187
129
•
•
•
•
•
•
•
•
•
•
•
019
016
163
213
091
037
192
090
125
194
141
•
•
•
•
•
•
•
•
•
•
•
032
163
023
172
224
092
041
194
096
131
202
200
•
•
•
•
•
•
•
•
•
•
•
•
033
192
026
173
225
109
093
204
098
132
224
224
•
•
•
•
•
•
•
•
•
•
•
•
000 • 109 • 119 •
023 • 025 • 034 • 041 •
088
225
166
225
172
224
001
211
079
125
210
112
229
172
229
001
145
041
051
109
194
032
192
229
194
172
224
099
134
225
225
018
122
172
120
041
9 VCR CODES
ASA
Aiwa
Akai
065 • 134
056 • 088 • 166 • 202
008 • 013 • 014 • 015 • 016 • 018 • 019
020 • 060 • 068 • 086 • 198 • 210
Alba
046
Amstrad
088
Audio Dynamics
030 • 086 • 093 • 210
Audiovox
166
Broksonic
005 • 008 • 059 • 148 • 198
Bush
089
Candle
042 • 056 • 080 • 092 • 093 • 149
Canon
042 • 054 • 184
Capehart
046
Citizen
056 • 091 • 092 • 093 • 166
Craig
044 • 082 • 091 • 166
Curtis Mathes
051 • 054 • 088 • 092 • 105 • 149 • 184
DBX
030 • 086 • 093 • 210
Daewoo
034 • 046 • 093 • 150 • 204 • 206
Daytron
046 • 206
Dimensia
105
Dual
210
Dumont
049
Dynatech
088 • 161
Electrohome
068 • 166
Emerson
005 • 006 • 008 • 009 • 010 • 011 • 012 • 056
059 • 068 • 088 • 090 • 132 • 148 • 166 • 190
192 • 193 • 198 • 204 • 211 • 212 • 213
Ferguson
210
Finlandia
049
Finlux
049 • 065 • 088 • 134
Fisher
048 • 049 • 081 • 082 • 084
Funai
088
General Electric
025 • 033 • 050 • 051 • 052 • 054
091 • 105 • 133 • 149 • 184 • 194
Go Video
057 • 058 • 164 • 165 • 186
Supra
Sylvania
022
006 • 010 • 025 • 064 • 065 • 066 • 068
112 • 151 • 163 • 172 • 173 • 192 • 194
Symphonic
132
TMK
023 • 172
Tandy
112 • 113
Tatung
009
Technics
008 • 012
Techwood
023 • 165
Teknika
004 • 005 • 016 • 018 • 022 • 023
025 • 026 • 034 • 041 • 072 • 114
151 • 187 • 202 • 213 • 224
Telerent
018
Teletech
Thomson
Toshiba
016 • 017 • 090 • 096
118 • 131 • 180 • 201
Totevision
026
Universal
043 • 044 • 206
Vector Research
Victor
057
Video Concepts
Vidtech
005 • 023 • 172
Viking
Wards
005 • 006 • 018 • 023 • 034 • 043 • 044
065 • 067 • 068 • 119 • 125 • 141 • 151
172 • 173 • 187 • 192 • 194 • 206 • 207
Westinghouse 041 • 090 • 130 • 170 • 171 • 176
Yamaha
005
Yorx
192
Zenith
001 • 018 • 024
Zonda
•
•
•
•
•
•
•
•
•
•
•
•
•
•
•
•
•
•
•
•
•
•
•
•
•
•
023
110
229
179
213
129
211
165
213
024
149
225
224
032
051
117
202
224
207
006
060
070
173
022
064
163
224
204
006
194
178
120
10 DVD CODES
Goldstar
Goodmans
Graetz
Granada
Grundig
Harman Kardon
Hinari
Hitachi
ITT
Instant Replay
JC Penney
JCL
JVC
Jensen
Kenwood
LXI
Lloyd
Logik
Luxor
MEI
MGA
MTC
Magnavox
Marantz
Marta
Memorex
Minolta
Mitsubishi
030 • 033 • 056 • 092 • 102 • 166
085 • 089 • 161
210
049 • 081
065 • 134
030 • 069
089
037 • 038 • 040 • 041 • 086
088 • 094 • 095 • 121 • 210
018 • 210
184
030 • 050 • 052 • 054 • 080 • 081 • 091
092 • 093 • 094 • 114 • 149 • 166 • 184
184
030 • 061 • 062 • 063 • 064 • 081
086 • 092 • 093 • 122 • 123 • 210
060 • 086 • 210
062 • 081 • 086 • 088 • 092 • 093 • 210
088 • 166
088
089
018
054 • 184
067 • 068 • 183 • 211
080 • 088 • 091
027 • 034 • 050 • 054 • 065 • 076 • 085
088 • 111 • 130 • 134 • 136 • 137 • 138
139 • 141 • 143 • 158 • 159 • 184
030 • 054 • 065 • 081 • 085 • 092
093 • 102 • 134 • 159 • 161 • 184
166
033 • 049 • 054 • 066 • 081 • 082
085 • 088 • 114 • 161 • 166 • 184
094
062 • 067 • 068 • 069 • 070 • 071
Mitsubishi (cont.)
Multitech
NAD
NEC
124 • 125 • 140 • 183 • 211
088 • 089 • 091
073 • 153
030 • 031 • 032 • 062 • 081 • 086 • 092
093 • 102 • 127 • 128 • 160 • 210
National
184
Nordmende
210
Optimus
114 • 166
Optonica
085 • 130 • 161
Orion
005 • 006
Panasonic
023 • 024 • 026 • 054 • 078 • 098
114 • 129 • 139 • 149 • 184
Pentax
037 • 092 • 094
Philco
054 • 088 • 111 • 184
Philips 054 • 065 • 085 • 088 • 134 • 154 • 155 • 161 • 184
Pioneer
062 • 073 • 074 • 075 • 076 • 093
Portland
046 • 093 • 206
Proscan
105
Pulsar
033
Quartz
081
Quasar
054 • 078 • 114 • 129 • 149 • 184
RCA
025 • 026 • 027 • 028 • 037 • 051 • 088
091 • 094 • 105 • 147 • 184 • 194
Radio Shack
068 • 081 • 082 • 084 • 085 • 088
091 • 114 • 130 • 161 • 166 • 184
Realistic
049 • 054 • 080 • 081 • 082 • 084 • 085
088 • 091 • 130 • 149 • 161 • 166 • 184
Ricoh
000
SBR
065 • 134
Saba
210
Saisho
006 • 009 • 212
Salora
067 • 081 • 183
Samsung
015 • 034 • 079 • 080 • 091 • 165 • 186 • 204
Sansui
032 • 062 • 086 • 093 • 210
Sanyo
044 • 048 • 049 • 081 • 082 • 083 • 084
Schaub Lorenz
Schneider
Scott
210
089
008 • 009 • 034 • 059 • 090
183 • 198 • 204 • 212 • 213
Sears
048 • 049 • 081 • 082 • 084 • 094 • 166
Sentra
046
Sharp
068 • 085 • 130 • 161
Signature
088
Sony
000 • 001 • 002 • 003 • 004 • 007 • 180
Soundesign
088
Sylvania
050 • 054 • 067 • 088 • 111 • 159 • 183 • 184
Symphonic
088
TMK
006 • 190
Tandy
068 • 081 • 082 • 084 • 085 • 088 • 161
Tashiko
088
Tatung
086 • 210
Teac
086 • 088 • 210
Technics
114
Teknika
054 • 087 • 088 • 166 • 184
Telefunken
210
Thomson
210
Thorn
210
Toshiba 034 • 035 • 067 • 084 • 086 • 090 • 183 • 204 • 210
Totevision
080 • 091 • 166
Unitech
080 • 091
Vector Research
030 • 092 • 093 • 183
Victor
062
Video Concepts
030 • 068 • 088 • 092 • 093
Videosonic
091
Wards
027 • 054 • 068 • 080 • 082 • 085 • 088
089 • 090 • 091 • 130 • 161 • 184
Yamaha
030 • 081 • 086 • 088 • 092 • 093 • 210
Zenith
000 • 033 • 062 • 088
Denon
Fisher
Funai
General Electric
Goldstar
Hitachi
JVC
Kenwood
Magnavox
Mitsubishi
NAD
Onkyo
Panasonic
Philips
Pioneer
Proscan
Quasar
RCA
Radio Shack
Runco
Samsung
Sharp
Sony
Technics
Toshiba
Yamaha
Zenith
110 • 112 • 113 • 185
177
115
200 • 205
196
116
117
119 • 216
120 • 170 • 171 • 172 • 173
120 • 171 • 174 • 175
120
171
176 • 177 • 182 • 185 • 188
170 • 171 • 172
120 • 189 • 191
200 • 205
177
195 • 199 • 200 • 205
115
207
171 • 208 • 209
216
101 • 103 • 108
176 • 177 • 182
171 • 189 • 216
169 • 185 • 214 • 217
171 • 196
11 TV/VCR COMBO CODES
Aiwa
Audio Dynamics
Broksonic
Curtis Mathes
DBX
Daewoo
Electrohome
Emerson
Funai
General Electric
Goldstar
Harman Kardon
Hitachi
JC Penney
JVC
Kenwood
LXI
MGA
Magnavox
Marantz
Marta
Memorex
Mitsubishi
Optimus
Orion
Panasonic
Philco
Philips
Pioneer
12
219 •
231 •
247 • 250 •
219 • 223 • 226 • 251 •
231 • 233 • 241 •
223 • 230 • 238 •
231 • 241 •
223 • 231 • 238 • 241 •
234 • 235 •
235 •
223 • 251 •
231 • 236 • 237 • 241 •
237 •
223 • 242 • 244 • 245 • 248 •
239 •
219
231 • 241
236 • 237
223 • 236 • 237
Proscan
Pulsar
Quasar
RCA
Radio Shack
Realistic
Runco
Samsung
Sansui
Sanyo
Scott
Sears
Signature
Sony
Soundesign
Sylvania
Symphonic
Tandy
Teac
Technics
Teknika
Toshiba
Totevision
Vector Research
Victor
Video Concepts
Wards
Yamaha
Zenith
231 • 241
231 • 233 • 241
230
223
•
•
•
•
221 • 244 • 245 • 246 •
219 •
244 •
237 • 240 •
223 •
240 •
238 •
238 •
219 • 223 • 235 • 248 • 249 •
233
248
242
251
242
251
243
247
235
245
247
223
251
232
251
251
251
251
251
242
251
247
223
238
235
251
251
251
251
214 • 215 • 216 •
• 093 • 094 • 095 • 096 • 097 •
115 • 144 •
149 • 187 • 188 • 189 • 191 •
• 150 • 204 • 205 • 206 • 207 •
• 122 • 134 • 151 • 152 • 153 •
171 • 172 • 183 • 196 • 197 •
124 •
124 • 132 • 093 • 094 • 095 • 096 • 097 •
178 •
137 •
134 •
117 •
You can program your remote to turn all of your remote-controlled devices (TV, SAT, DVD, VCR) on and
off simultaneously when you press POWER. All devices must be in direct line of sight to ensure proper
operation. Perform the following steps to enable or disable master power control for all devices:
b
c
d
121
125
139
235
146
183
148
147
217
216
145
142
174
098
119
100
213
194
208
119
186
154
202
132
226
113
098
212
124
241
119
186
243
204
174
126
Memorex
Next Level
Norsat
Optimus
Orb
Panasonic
Pansat
Philips
Pico
Primestar
Prosat
Proscan
Quick Draw
RCA
Radio Shack
Ramsey
Realistic
Rural Cable
STS
Samsung
Sierra
Sony
Star Choice
Star Sight
Star Trak
Strong
Super Guide
TCE
TeeCom
Toshiba
Uniden
Video Cipher II
Viewstar
Zenith
117 •
110 •
110 •
183 •
136 • 218 • 219 •
133 • 134 •
117 • 126 • 180 • 181 • 182 •
224 • 226 • 227 • 228 •
149 •
117 • 137
122
142
117
223
123 • 178
246
126 • 176
139
049 • 115
138
116 • 141
144
116 • 141
196 • 197
139
230
196
212 • 213
108
216
112
122
109
222 • 223
136
253
110
248 • 251
174 • 187
183 • 184
230 • 232
186
185
174 • 186
Press and hold a mode key until the LED begins flashing.
Press POWER twice. The LED should flash rapidly and turn off.
Manually turn on all devices (TV, SAT, DVD, VCR). Test the master Power Control
function by pressing POWER. All the devices should turn off.
14 RECALLING A DEVICE CODE
Perform the following steps to read the code currently set for a device. This is useful for retrieving
a device code that was set using the CodeScan™ method.
b
c
d
SATELLITE CODES
4DTV
Alphastar
Amway
Birdview
CI Satellite
Cable Innovations
Century
Channel Master
Chaparral
Cheyenne
Citoh
Conifer
Curtis Mathes
DIRECTV
124 • 132
DISH Network
DISHPlayer
DX Antenna
Drake
Echostar
113 • 119 • 137
Express VU
Fujitsu
General Instrument
121
Hitachi
Homecable
Houston Tracker
Hughes Network
IQ
Insight
Intersat
JVC
Janeil
Kenwood
Legend
Macom
Magnavox
•
•
•
•
251
238
226
241
238
252
240
253
251
248
254
238
251
242
238
251
254
240
251
238
223
251
240
242
226
242
251
251
235
13 MASTER POWER CONTROL
Press and hold a mode key until the LED begins flashing.
Press SELECT. The LED will flash each of the three digits in the code. A pause separates
each digit. For example, three flashes represent the number 3, and a rapid flicker
represents 0, so a code of 103 will be shown as:
FLASH <pause> FLICKER <pause> FLASH FLASH FLASH
Count and record the sequence of flashes to determine the three-digit code.
15 TROUBLESHOOTING
y Problem
I programmed the remote, but it won’t work my TV, VCR, or Satellite Receiver.
x Solution
You may have entered the wrong code (or the correct code might not be listed). Try the Code
Scan™ procedure. It will allow you to cycle through all the codes until you find one that works.
Weak batteries may cause the remote to only operate one device or operate intermittently.
Replace weak batteries with NEW alkaline batteries. If you are sure the batteries are good, try
rolling them with your finger (while they are in the remote control) to ensure a good connection.
Finally, make sure that nothing is blocking the signal from the remote control from reaching
your TV, VCR, or Satellite Receiver; and make sure that you are pointing the remote control at
the correct device when you are pressing a key on the remote.
Problem
My remote control doesn’t operate my combination TV/VCR.
y
x Solution
If none of the TV/VCR combo codes work, you may need to set up separate TV and VCR codes
to operate your TV/VCR.
Problem
I don’t get any picture and/or sound from my TV.
y
x Solution
Make sure all cables are connected properly and that all devices are powered on. Consult
related owners manuals for specific installation and operation instructions for each device.
CodeScan ™ is a trademarks of US Electronics, Inc.
All other trademarks are the property of their respective owners.
Next Generation Home Products manual • version 1.0 • page 2